Using instructions
Solarlamp „Disk“
1. Introduction
Dear customer, thank you for purchasing this product.
You have acquired a product that has been built according to the current
state of the art.
The product meets the requirements of the applicable
European and national guidelines. The conformity with
these requirements has been proven, and the corresponding
declarations and documents are deposited with the manu-
facturer.
In order to ensure the product continues to meet these requirements, and
to ensure safe operation, you as the user must observe these operating
instructions.
2. Safety instructions
The guarantee and the warranty expire in the event
of damage to the product caused by failure to
observe these operating instructions. We are not
liable for any consequential damage!
The same applies to property damage or personal
injury caused by improper handling or failure to
observe the safety instructions.
- Unauthorised modifications or other changes to the product are not per-
mitted. The guarantee and the CE approval expire in this event.
- Make sure that the light does not get into the hands of children. It is not
a toy!
- Keep plastic film or other packaging material away from children, there is
a risk of suffocation.
- This product is only suitable for private use!
3. Intended use
A highly efficient monocrystalline solar module with an output of 1.4 Wp
is built into the top of the solar light. This module charges the Li-Ion bat-
tery inside the light when exposed to sunlight. At night, the light activates
independently and 2 operating modes can be selected. The 43 LEDs are
arranged in a ring around the light behind a frosted glass. This enables
bright and homogeneous illumination of the surroundings. The height of
the light can be changed via a screw thread, and the light head can be
rotated or tilted as desired. This allows the light to be placed in the ideal
position in almost any environment. Depending on the surface, it can be
mounted using screws or ground spikes. It is designed with IP 65 protec-
tion and can be used outdoors all year round.
Note: Solar lights must always be placed in the sunlight without
shading. Operation on the north side or in the shade of trees or bush-
es is not recommended!
4. Installation
1. Carefully remove the parts from the packaging.
2. The light can be mounted via a ground spike or the enclosed screws
and inserts.
3. The light has 2 different operating modes:
1. 5 hr continuous light function The light switches on automatically
and shines with its full intensity of approx. 260 lm at night. The intensity
may decrease after some time if the battery is not fully charged. The
light switches off after 5 hours at the latest.
2. Permanent light: At night, the light switches on automatically and
shines with its full intensity until the battery is discharged or dawn
arrives. The intensity decreases over time when the battery is dis-
charged.
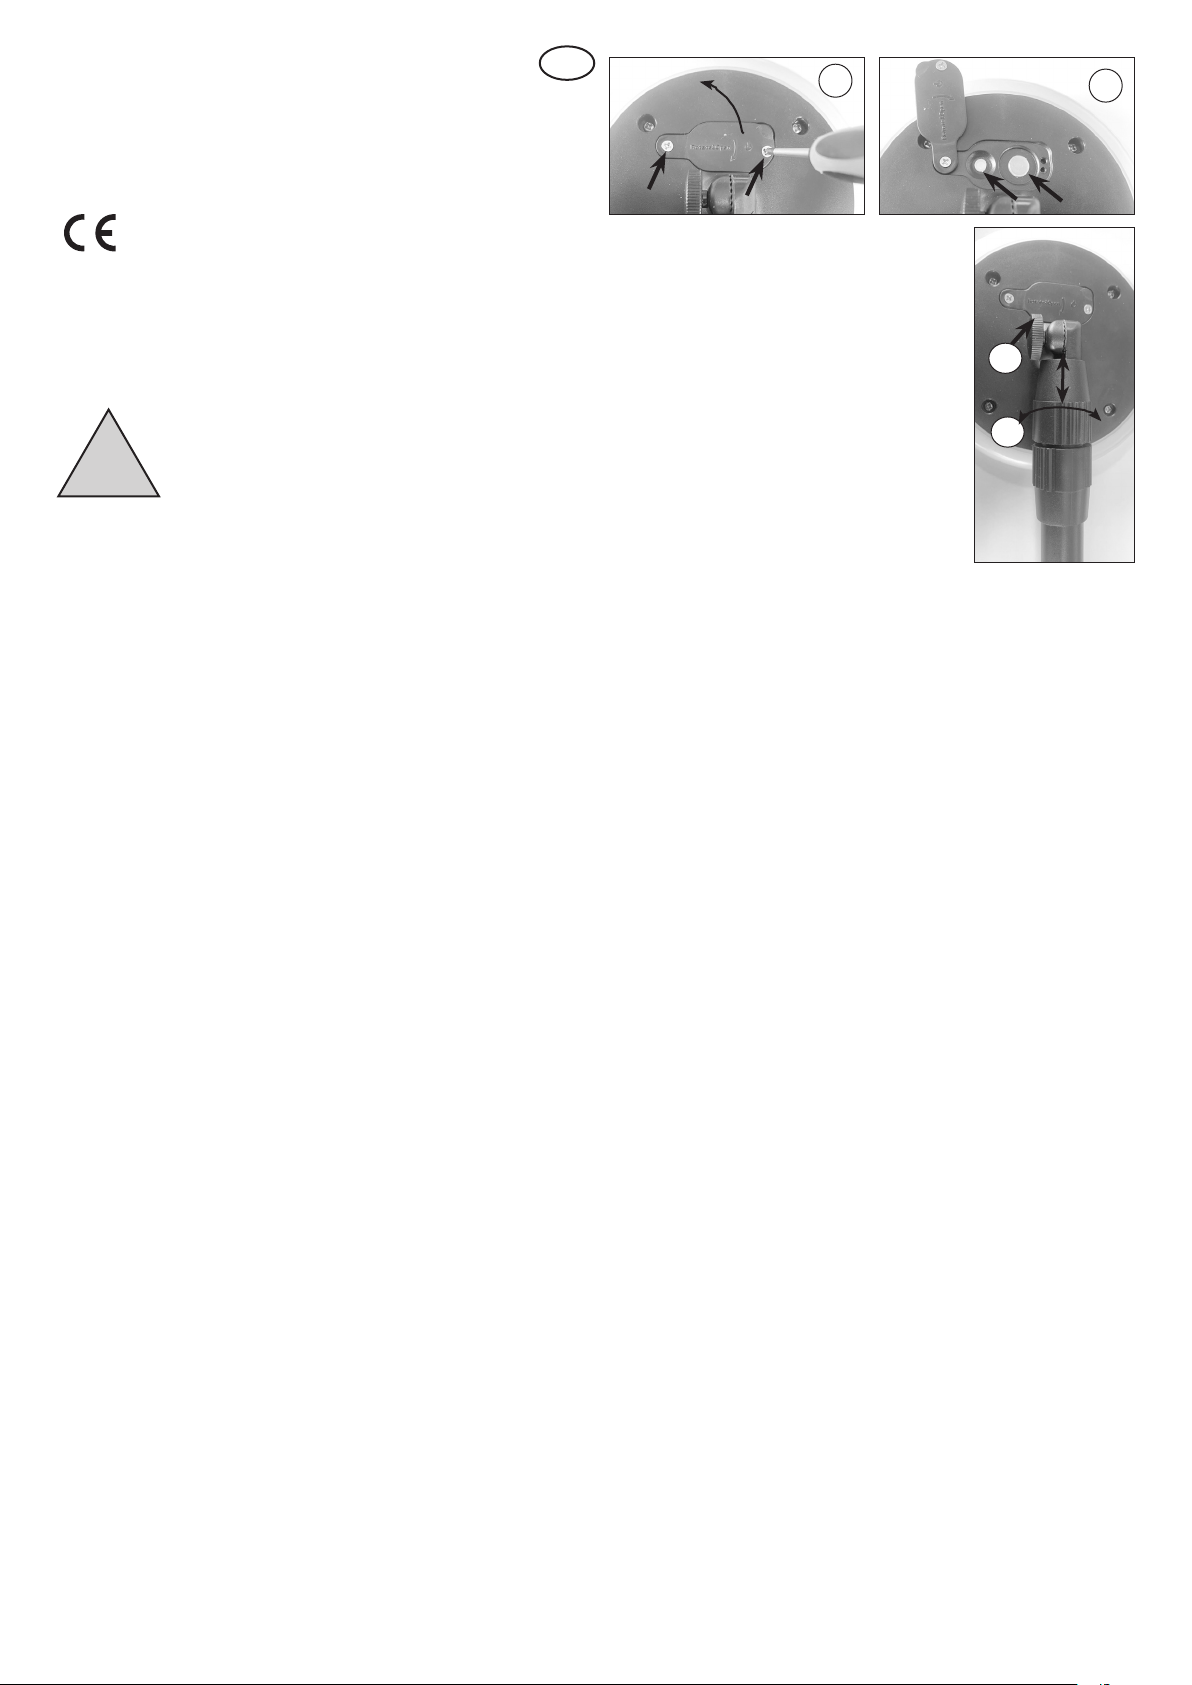
4. The switch for switching the light on/off and selecting the operating
mode is located under a cover on the back of the light. To reach
this, loosen the right-hand screw with a suitable screwdriver and also
loosen the left-hand screw by a few turns (Fig. 1). Then fold the cover
upwards (picture 2).
5. The right switch is the on/off switch; the left switch can be used to set
the operating mode (Fig. 2). First press the right-hand switch in firmly.
The light will come on briefly. The light is set in mode 1. By pressing
the left operating mode switch, you can switch to operating mode 2.
This is confirmed by a double flash of the light. Pressing the button
again switches the light back to operating mode 1. This is confirmed
by a short flash of the light. Then close the cover again.
6. Now mount the light on soft ground with the help of the ground spike.
The light can be mounted on concrete or pavement with the enclosed
screws and inserts. Drill the holes with a diameter of 6 mm.
7. The height of the light can be adjusted between
42 and approx. 70 cm. To adjust the height,
loosen the screw connection on the rod of the
light (point 3) and pull out the upper part. Then
screw the screw connection back together
tightly.
8. The light head can be conveniently adjusted in
all directions. To adjust the tilt, please loosen
the knurled wheel screw (point 4) below the
solar light. After adjusting, tighten the screw
again.
Note: The duration of the light depends heavily
on the intensity and duration of sunlight during
the day. In the winter months, you can generally
expect less lighting time.
Note: When switched off, the built-in battery is charged when the solar
module is exposed to sunlight.
5. Changing the battery
A new battery is generally needed after approx. 4 years of operation. For
design reasons, the battery can only be replaced by our service personnel.
Please contact us by email about this. You can find our contact details on
the internet at www.solarversand.de.
6. Malfunctions
Light does not turn on
- Battery weak or defective? Wait for a sunny day or have the battery
changed as described in point 5.
- Is the light switched on? Activate the light as described under point 4
- Extraneous light? Is extraneous light shining on the solar module,
simulating daylight? Place the light in a darker place!
7. Technical specifications
Solar module: 1.4 Wp/ 5 V monocrystalline
Battery pack: 1x Li-Ion 3.7 V/ 1000 mAh/ 3.7 Wh
Time to full charge: 4-5 hrs. in full sunlight
Burn time: approx. 3 nights (with full battery)
Light colour: 3000 K (warm white)
Light intensity: Max. 260 lm
Light source: 43 SMD LEDs
Protection class: IP 65
Protection class: III
Operating temperature range: -15°C to +50°C
8. Warning:
- Batteries do not belong in the hands of children. Never leave batteries
lying around openly, there is a risk of them being swallowed by children
or pets.
- Batteries must never be short-circuited, dismantled or thrown into fire.
There is a risk of explosion!
- Leaking or damaged batteries can cause burns if they come into contact
with the skin, so use suitable protective gloves in this case.
- When changing the batteries, only batteries of the same construction
may be used. Under no circumstances should old batteries be used as
they cannot be recharged.
- Make sure the polarity is correct when inserting or connecting the batter-
ies.
- If the device is not used for a longer period of time (e.g. storage), remove
the inserted batteries to avoid damage from leaking batteries.
!
GB 1. 2.
3.
4.


