Instruction manual
Solar Flood Light Pro RGB
1. Introduction
Dear customer, we thank you for purchasing the Solar Globelight.
With this Solar Light you have purchased a product that complies with the
latest and most up-to-date technology.
This product complies with the European and National
Standards. The relevant certificates of conformity are
deposited with the manufacturer.
To preserve this standard and in order to maintain safety you must adhere
to the use instructions!
2. Security Instructions
In the event of any problems arising or damage occur-
ring from not following these instructions, the warranty
is deemed cancelled. The manufacturer will not be held
responsible for any claims or damages arising from the
misuse of this product.
- For safety reasons and in order to maintain standards (CE) you are pro-
hibited from altering or changing any component in the product.
- Please follow the instructions very carefully.
- For commercial applications due care and attention must be paid to the
Health and Safety Standards in your jurisdiction.
3. Function and intended use
The solar radiator is designed for year-round outdoor operation. It is made
of high-quality materials and thus guarantees a long function over many
years.
The solar module must be set up shadow-free to the sun. It can be moun-
ted with a ground spike or via a mounting bracket with screws. A south,
east or west side is recommended. Shady north sides are not suitable for
solar lights.
The built-in batteries are charged by the solar module installed in the upper
part. The solar module consists of high-quality crystalline solar cells and is
laminated absolutely weatherproof behind glass.
The radiator is connected to the solar module via a cable with plug connec-
tion. It can be mounted on the wall by means of a ground spike in the floor
or mounting bracket with screws. 24 RGB light emitting diodes (LEDs) are
used as the light source. These LEDs guarantee high luminous intensity
with low power consumption and a service life of over 30,000 hours. The
spotlight must not be submerged in water!
The product can be used outdoors throughout the year. The solar module
must be kept free of snow.
Note: During longer periods without sunlight, the battery is insufficient-
ly charged by the sunlight and the lamp does not work in the evening.
However, this does not mean that the solar light is defective. Wait for
the next sunny days and the lamp will work again accordingly.
The battery should be changed every 3-4 years on average!
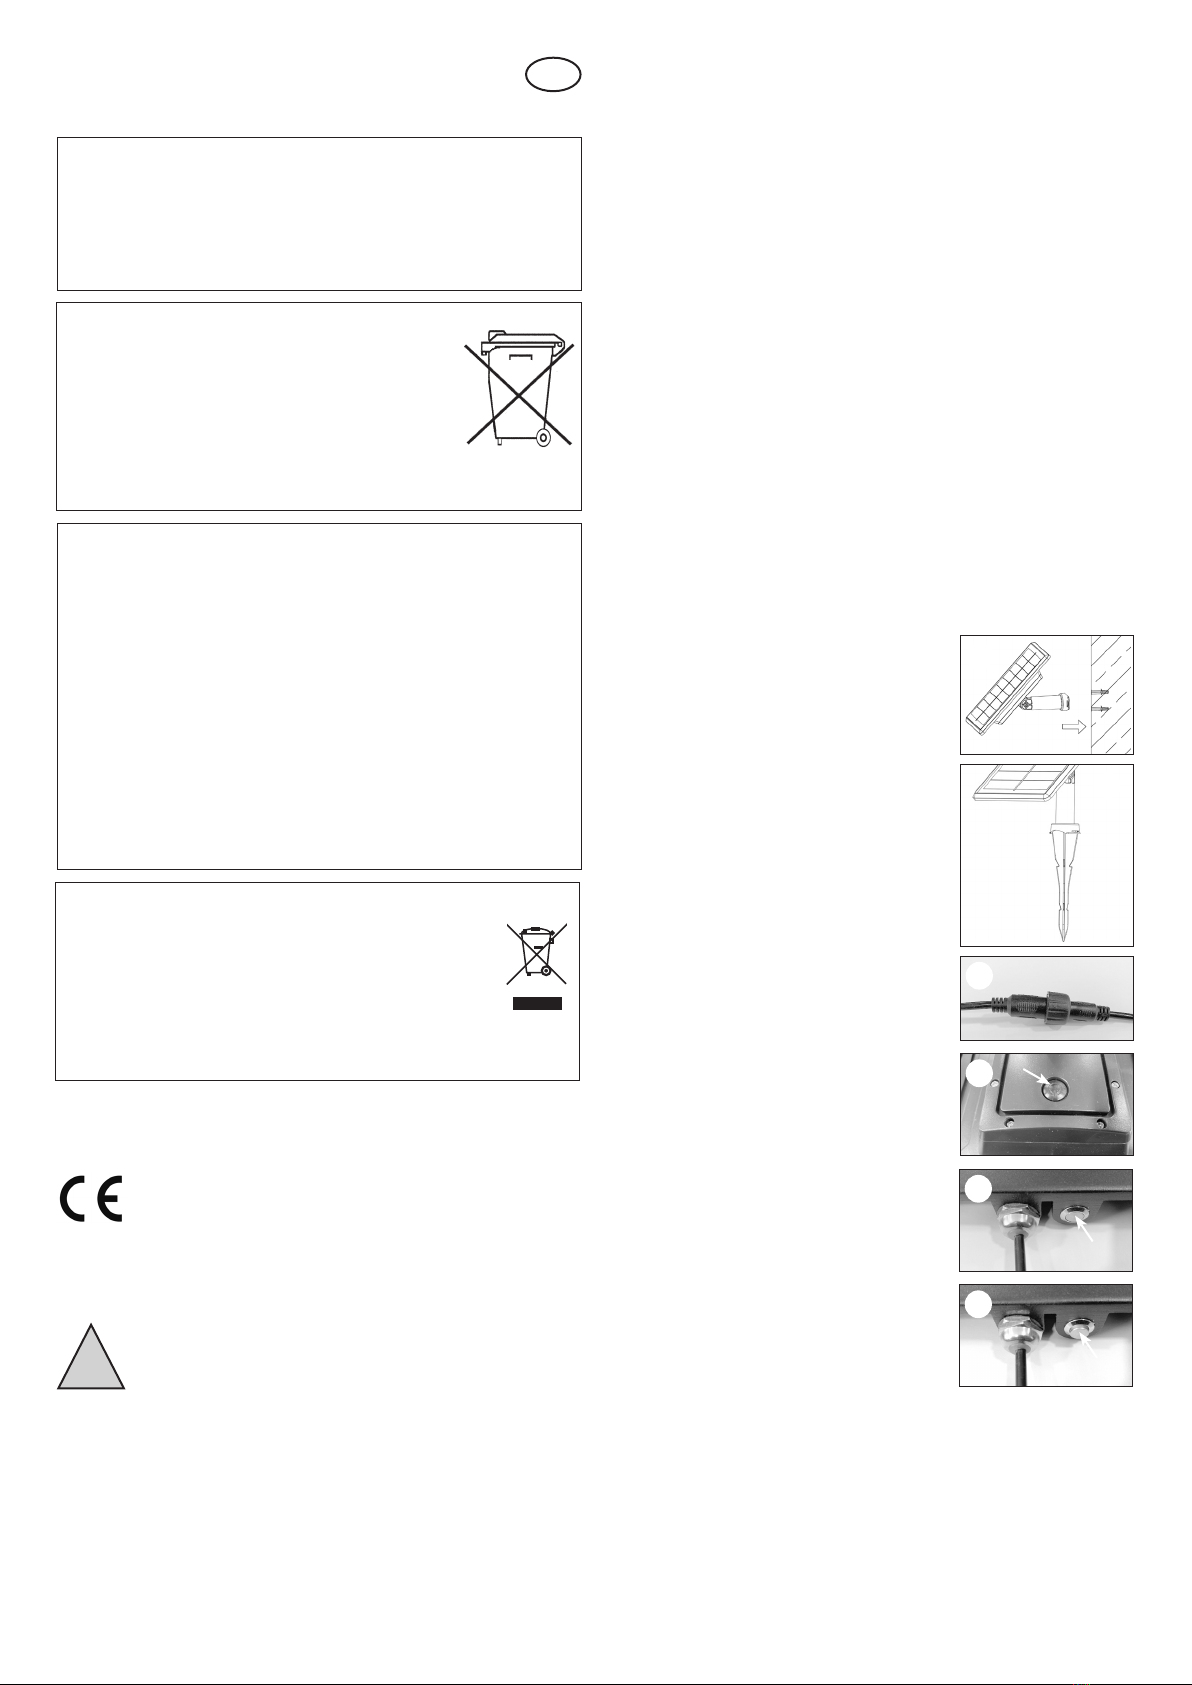
4. Commissioning
1. Carefully remove the parts from the packa-
ging.
2. Determine the mounting location of the solar
module and spotlight within reach of the
cable. The spotlight and the solar module can
either be screwed to the wall using screws
(picture 1) or plugged into the ground using a
ground spike (picture 2).
3. After installation, connect the cable of the
solar module and the radiator to each other.
Then secure the plug connection additionally
with the union nut (picture 3)!
4. Pressthe„ON/OFF“switchonthebackofthe
solar module (Fig. 4) firmly.
5. The light colours can be set either as alter-
nating light or continuous light. The switch
on the underside of the spotlight is used
for adjustment. If the switch is pressed in
(picture 5), the alternating light is activated.
To determine the desired light colour, simply
press the switch again, then the correspon-
ding light colour is fixed (picture 6).
Note: In OFF-position the battery is also
charged during sunshine!
Note: The duration of the light depends
strongly on the intensity and duration of
sunlight during the day. In the winter months
you should generally reckon with less light
duration. If the lamp does not yet light up on
the first evening, please wait for a sunny day.
Note: The cover of the spotlight and the solar
module is made of glass. There is a risk of
injury in the event of breakage!
GB
!
Battery take-back
- Batteries must not be discarded into domestic waste.
- The consumer is legally required to return batteries
after use, e.g. to public collecting centers or to battery
distributors.
- Contaminant-containing batteries are labeled with the
sign“crossed-outtrashcan“andoneofthechemical
symbols. Used batteries should be disposed environ-
mentally friendly and should not be discarded into
domestic waste. Your dealer is legally required to take
back old batteries.
Li-Ion
Customer support:
If you have problems or questions regarding this product, simply contact us!
esotec GmbH, Industriegebiet Weberschlag 9, D-92729 Weiherhammer
By phone: +49 9605-92206-0
Product: Manufacturer Item No.: 102703
Rechargeable battery notes
-Rechargeablebatteriesshouldnotbeplayedwithbychildren.Never
leave rechargeable batteries lying around; they could be swallowed
by children or pets.
- Rechargeable batteries must never be short-circuited, disassembled
or thrown into fire. This leads to a danger of explosion!
- Leaking or damaged rechargeable batteries can cause chemical
burns when they come into contact with skin. For this reason, please
make use of suitable protective gloves.
- Rechargeable batteries should only be replaced by structurally iden-
tical rechargeable batteries from the same manufacturer. Normal
batteries must not be used since these are not rechargeable.
- Make sure the rechargeable batteries are inserted with the correct
polarity.
- For long periods of time of non-use (for example, storage), remove
the inserted rechargeable batteries to avoid damages via the leaking
rechargeable batteries.
Disposal:
Dear customer,
please cooperate in avoiding waste. When you intend to dis-
pose of the product in future, please consider that it contains
valuable raw materials suited for recycling.
Therefore, do not dispose it of with domestic waste but bring
it to a collection point for the recycling of waste electrical and
electronic equipment.
Thank you very much for your cooperation! 4.
3.
2.
1.
5.
6.


