esotec Trio Manual

Bedienungsanleitung
Solarspot Trio
Diese Bedienungsanleitung gehört ausschließlich zu diesem Produkt. Sie
enthält wichtige Hinweise zur Inbetriebnahme und Handhabung. Achten Sie
hierauf, auch wenn Sie dieses Produkt an Dritte weitergeben.
Archivieren Sie deshalb diese Bedienungsanleitung zum Nachlesen.
1. Einführung
Sehr geehrter unde, wir bedanken uns für den auf dieses Produktes.
Sie haben ein Produkt erworben, welches nach dem heutigen Stand der Technik
gebaut wurde.
Es erfüllt die Anforderungen der geltenden europäischen und nationalen
Richtlinien. Die Konformität wurde nachgewiesen, die entsprechenden
Erklärungen und nterlagen sind beim Hersteller hinterlegt.
Um diesen Zustand zu erhalten und einen gefahrlosen Betrieb sicherzustellen, müs-
sen Sie als Anwender diese Bedienungsanleitung beachten!
2. Sicherheitshinweise
Bei Schäden, die durch Nichtbeachten dieser
Bedienungsanleitung verursacht werden, erlischt der
Garantieanspruch!
Für Folgeschäden übernehmen wir keine Haftung!
Bei Sach- oder Personenschäden, die durch unsachge-
mäße Handhabung oder nichtbeachten
der Sicherheitshinweise verursacht werden, übernehmen
wir keine Haftung. In solchen Fällen erlischt jeder
Garantieanspruch.
Aus Sicherheits- und Zulassungsgründen (CE) ist das eigenmächtige Umbauen
und/oder Verändern des Produktes nicht gestattet. Achten Sie auf eine sachgemäße
Inbetriebnahme. Beachten Sie hierbei diese Bedienungsanleitung.
3. Bestimmungsgemäße Verwendung
Der Solarstrahler schaltet sich automatisch bei Dunkelheit ein und bei Morgenlicht
wieder aus. Die maximale Brenndauer der Beleuchtung beträgt bei vollem Akku und
ohne Nachladung ca. 8 Stunden. Das im Oberteil des Gehäuses eingebaute
Solarmodul lädt die eingebauten Akkus auf. Über einen Schalter ist die Beleuchtung
ein- und ausschaltbar. Die drei Strahler sind für den Einsatz im Aussenbereich
geeignet. Die Strahler dürfen nicht im Wasser versenkt werden. Die Strahler
können über einen Erdspieß in die Erde gesteckt oder über eine Halterung an die
Wand geschraubt werden. Das Solarmodul kann an einen Mast montiert in die Erde
gesteckt oder an die Wand geschraubt werden. Das Produkt ist für den Einsatz im
privaten Bereich konzipiert.
Hinweis: Bitte achten Sie darauf, dass das Solarmodul möglichst nach Süden aus-
gerichtet ist und Schatten vermieden werden. Bei einer Ausrichtung auf eine
Nordseiten ist das Produkt nicht einsetzbar. Im Winter muß das Solarmodul immer
schneefrei sein.
4. Inbetriebnahme
1. Nehmen Sie die Teile vorsichtig aus der Verpackung heraus und packen Sie das
Zubehör aus.
2. Die drei LED-Strahler können
über einen Erdspieß in die Erde
gesteckt oder über eine
Montageplatte an die Wand oder
Boden geschraubt werden. Über
das ugelgelenk kann der
Strahler optimal eingestellt wer-
den.
3. Suchen Sie nun einen geeigneten Ort für die Montage des Solarmoduls in
Reichweite der Strahler. Bitte beachten Sie, dass dies ein nach Süden gerichte-
ter Ort sein muß und kein Schatten auf das Solarmodul fällt. Das Solarmodul kann
über eine Halteplatte am Boden oder Wand, über einen Erspieß in die Erde
gesteckt oder Masthalterung an einen Masten montiert werden. Über das
ugelgelenk kann das Solarmodul optimal Richtung Sonne ausgerichtet werden.
4. Verbinden Sie nun die 3 Stecker der Strahler
mit den Buchsen am Solarmodul. Hinweis:
Dies sind feuchtigkeitsgeschützte Stecker.
Stecken Sie die Stecker ganz zusammen.
5. Schalten Sie nun den Schalter an der
Rückseite des Solarmoduls in die Stellung
“ON”. Die Solar Strahler sind nun aktiviert.
Hinweis: In den Wintermonaten ist generell mit weniger Leuchtdauer zu rechnen.
Sollte die Leuchte am ersten Abend noch nicht leuchten, warten Sie bitte einen
Sonnentag ab.
5. Wechseln der Akkus
Nach ein bis zwei Jahren wird die apazität der
Akkus nachlassen und müssen getauscht werden.
Die Akkus sind im Handel oder beim Hersteller
erhältlich.
1. Schrauben Sie die 4 Schrauben an der
Rückseite des Solarmoduls heraus und nehmen
Sie die Abdeckung ab.
2. Entnehmen Sie den Akku aus der Halterung
3. Setzen Sie den neuen Akku wieder pol-
ungsrichtig ein und schließen Sie das Gehäuse wieder in umgekehrter
Reihenfolge.
Hinweis: Verbrauchte Akkus müssen umweltgerecht entsorgt werden und gehö-
ren nicht in den Hausmüll. Ihr Händler ist gesetzlich verpflichtet die alten Akkus
zurückzunehmen.
6. Funktionsstörungen
Lampe schaltet bei Dunkelheit nicht ein
- Leuchte eingeschaltet? Stecker der Strahler fest eingesteckt?
-Eine Fremdlichtquelle (z.B. Straßenlaterne) simuliert Tageslicht am Solarmodul
und verhindert das Einschalten der Leuchte. Platzieren Sie die Leuchte an einem
dunkleren Ort.
Lampe schaltet bei Dunkelheit nicht oder nur kurz ein.
-Akku beim Auswechseln verpolt?
- Akku schwach oder defekt? Austauschen des Akkus.
- abel der Strahler an der Rückseite des Moduls fest eingesteckt?
7. Technische Daten
Betriebsspannung: 3,6 V
Leistung Slarmodul: 1 W
Schutzart: IP 44
Akkus: 3 Stk. NiMh 1,2 V/900 mAh (Mignon AA)
Leuchtmittel: 9 weiße Leuchtdioden (LED)
Leuchtzeit: Max. 8 Std. bei vollem Akkusatz
Akku Hinweise
- Akkus gehören nicht in inderhände. Lassen Sie nie Akkus offen herumliegen,
es besteht die Gefahr, das sie von indern oder Haustieren verschluckt werden.
- Akkus dürfen niemals kurzgeschlossen, zerlegt oder ins Feuer geworfen werden.
Es besteht Explosionsgefahr!
- Auslaufende oder beschädigte Akkus können bei Berührung mit der Haut
Verätzungen verursachen, benutzen Sie deshalb in diesem Fall geeignete
Schutzhandschuhe.
- Es dürfen beim Wechseln der Akkus nur die baugleichen Akkus des Herstellers
verwendet werden. Es dürfen auf keinen Fall Batterien eingesetzt werden, da
diese nicht aufladbar sind.
- Achten Sie beim Einlegen der Akkus auf richtige Polung.
- Bei längerem Nichtgebrauch (z.B. Lagerung) entnehmen Sie die eingelegten
Akkus, um Schäden durch auslaufende Akkus zu vermeiden.
Hersteller/Importeur/ Kundenbetreuung/ Ersatzteile:
esotec GmbH, Weberschlag 9, D-92729 Weiherhammer
Tel.-Nr: 09605-92206-28, Fax.-Nr: 09605-92206-10
Hersteller Art.-Nr: 102140
Entsorgung:
Werter Kunde,
bitte helfen Sie mit Abfall zu vermeiden. Sollten Sie sich einmal von diesem Artikel
trennen wollen, so bedenken Sie bitte, dass viele seiner omponenten aus wertvol-
len Rohstoffen bestehen und wiederverwertet werden können.
Entsorgen Sie ihn daher nicht in der Mülltonne, sondern führen Sie ihn bitte Ihrer
Sammelstelle für Elektrogeräte zu.
Vielen Dank für Ihre Mithilfe!
Copyright, Änderungen vorbehalten!
!
Batterie-Rücknahme
-Batterien dürfen nicht mit dem Hausmüll entsorgt
werden.
- Der Verbraucher ist gesetzlich verpflichtet, Batterien nach
Gebrauch zurückzugeben, z.B. bei den öffentlichen
Sammelstellen oder dort, wo derartige Batterien verkauft wer-
den.
- Schadstoffhaltige Batterien sind mit dem Zeichen „durchgestri-
chene Mülltonne“ und einem der chemischen Symbole verse-
hen.
D
Mastmontage
Steck-
montage
Mast
Flügelmutter Schraub-
montage
NiMh
Steck-
montage
4
5

Using Instructions
These instructions relate ONL to this product and contain important
information for using the product for the first time. Please keep these
instructions for later reference and should always accompany the
product in the event of transference to a new user.
1. Introduction
Dear Costumer,
Thank you for purchasing the solar light. With this solar light you purchased a
product manufactured according to the current state of technology.
This product fulfils all requirements of the valid European and national
regulations. The conformity was proved. The relevant declarations and
documentation are deposited with the manufacturer.
To maintain this state and guarantee a safe operation, you as the user will have
to follow this operating manual!
2. Safety Instructions
-In case of damages caused by not
following this operating manual, the
warranty rights will expire! We exclude
liability for any consequential damages!
-We exclude liability for property or
personal damages caused by inappropriate
handling or not following the safety instructions.
-In these cases any guarantee rights will expire.
Due to safety and admission reasons (CE) it is not allowed to arbitrarily recon-
struct and/or change the solar light.
Therefore, please keep to the operating manual.
The accident prevention rules of the association of the industrial trade coopera-
tive association for electric plants and working material are to be considered in
industrial environments.
3. Usage in Accordance with Requirements
The solar spotlight is automatically switched on at darkness and switched out
in the morning light. The maximum illumination duration with a full accumula-
tor and without recharging is approximately 8 hours. The solar module instal-
led in the upper part of the housing charges the integrated accumulator.
The illumination may be switched on and off via a switch. The three solar
spotlights are suitable for outdoor usage. The spotlights must not be sunk into
water. With the earth pole, it is possible to insert the spotlights into the ground
or, by means of a mounting bracket, screw them to a wall. The solar module
may be installed on a pole, inserted into the ground or screwed to the wall.
The product is designed for the application in a private environment.
Note: Please make sure that the solar module is preferably directed to the
South and that shadows are avoided. When directing the module to the North
it is not possible to use the product. The solar module shall always be free of
snow in the winter.
4. Initiation
1. Please carefully take all parts out of the package and unwrap the accesso-
ries.
2. Via an earth pole, it is possible
to insert the three ED spot-
lights into the ground or, by
means of an assembly plate,
screwed to a wall or floor. The
spotlight may be adjusted via
the ball-and-socket joint.
3. Now choose an appropriate
site for the assembly of the
solar module within the reach of the spotlight. Please note that the site
shall be directed to the south and that no shadow falls on the solar modu-
le. By means of an assembly plate, the spotlight may be screwed to a wall
or floor, or, via an earth pole, inserted into the ground. The spotlight may
also be installed on a post. This is done by means of a pole bracket. Via
the ball-and-socket joint, it is possible to direct the spotlight to the sun.
4. Now, connect the 3 plugs of the spotlight
with the sockets on the backside from the
solar module.
Note: Those are humidity-protected plugs.
Put the plugs together completely.
5. Now set the switch on the back side of the
solar module to the position “ON”. The
solar spotlights are now activated.
Note: During the winter months the duration
of illumination will generally be shorter. If the lamp should not shine on the first
evening, please wait for a sunny day.
5. Exchange of Accumulators
After one to two years, the capacity of the accumu-
lator pack will decrease. It is then required to
exchange the accumulators. The accumulators are
available in the shops or from the manufacturer.
1. Unscrew the 4 screws on the back side of the
solar module and take off the cover.
2. Take the accumulator from the mounting bracket
3. Insert the new accumulator with correct polarity
and close the housing in reverse order.
Note: Use batteries or accumulators must be disposed of in a non-polluting way
and do not belong into the domestic waste. Your dealer is legally obliged to take
back the old accumulators.
6. Malfunctions
- Lamp is not automatically switched on at darkness
-An outside light source (e.g. streetlight) simulates daylight and prevents the
lamp from switching on. Place the lamp at a darker location.
- Lamp is not switched on at darkness or only for a short period of time.
- Is the lamp connected?
-Accumulator weak or defective. Exchange of the accumulators.
7. Specifications
-Operating voltage: 3,6 V
-Power Solarmodule: 1 Wp
- Battery: 3 pcs. NiMh 1.2 V/900 mAh AA-size
- Illuminating units: 9 white EDs
- Illumination time: max. 8 h with a full battery
Rechargeable battery notes
- Rechargeable batteries should not be played with by children. Never leave
rechargeable batteries lying around; they could be swallowed by children or pets.
- Rechargeable batteries must never be short-circuited, disassembled or thrown
into fire. This leads to a danger of explosion!
- eaking or damaged rechargeable batteries can cause chemical burns when
they come into contact with skin. For this reason, please make use of suitable
protective gloves.
- Rechargeable batteries should only be replaced by structurally identical rechar-
geable batteries from the same manufacturer. Normal batteries must not be used
since these are not rechargeable.
- Make sure the rechargeable batteries are inserted with the correct polarity.
- For long periods of time of non-use (for example, storage), remove the inserted
rechargeable batteries to avoid damages via the leaking rechargeable batteries.
Manufacturer/Importer/Spare parts:
esotec GmbH, Weberschlag 9, D-92729 Weiherhammer
Tel.-Nr: 09605-92206-28, Fax.-Nr: 09605-92206-10,
e-mail:[email protected] Internet:www.esotec.de
Product item-Nr: 102140
Disposal:
Dear customer,
please cooperate in avoiding waste. When you intend to dispose of the product in
future, please consider that it contains valuable raw materials suited for recycling.
Therefore, do not dispose it of with domestic waste but bring it to a collection point
for the recycling of waste electrical and electronic equipment.
Thank you very much for your cooperation!
Copyright, esotec GmbH
!
Battery take-back
- Batteries must not be discarded into domestic waste.
- The consumer is legally required to return batteries after
use, e.g. to public collecting centers or to battery distribu-
tors.
- Contaminant-containing batteries are labeled with the sign
“crossed-out trashcan“ and one of the chemical symbols.
Used batteries should be disposed environmentally friend-
ly and should not be discarded into domestic waste. Your
dealer is legally required to take back old batteries.
post-mounting
earth
pole
pole
Srew
NiMh
GB
earth
pole
screw-
mounting
4
5

Instructions
Ce mo e ʻemploi sʻapplique exclusivement à la lampe solaire.
Il contient es informations importantes concernant la mise en service et
la manipulation e la lampe. Ces informations oivent être observées
même lorsque vous onnez ce pro uit à es tiers. Par conséquent, archi-
vez ce mode dʻemploi afin de pouvoir le relire ultérieurement.
1. Intro uction
Cher client, Nous vous remercions dʻavoir opté pour cette lampe solaire.
a lampe solaire que vous venez dʻacheter est un produit qui a été conçu et
fabriqué suivant les dernières connaissances techniques.
Ce produit répond aux exigences des directives européennes et nationales en
vigueur. Sa conformité a été attestée et les explications et documents corre-
spondants sont déposés chez le fabricant.
Afin de préserver lʻétat de la lampe et de garantir un fonctionnement sans dan-
gers, vous devez, en tant quʻutilisateur, observer ce mode dʻemploi !
2. Consignes e sécurité
- En cas e ommages occasionnés suite à la
non-observation e ce mo e ʻemploi, le roit
àla garantie est mannulé !
- Nous éclinons toute responsabilité en cas
e ommages consécutifs !
-En cas e ommages matériels ou corporels
occasionnés suite à une manipulation non
conforme ou à la non- observation es
consignes e sécurité, nous éclinons toute responsabilité.
-Dans ces cas, tout roit à la garantie est annulé.
Pour des raisons de sécurité et dʻhomologation (CE), la transformation et/ou la
modification de la lampe solaire de sa propre initiative nʻest pas autorisée.
Veillez à ce que la lampe solaire soit mise en service de façon conforme. A cet
effet, observez ce mode dʻemploi. Dans les établissements industriels, les pres-
criptions relatives à la prévention contre les accidents, établies par lʻassociation
de la corporation professionnelle pour les installations et les moyens
dʻexploitation électriques, doivent être respectées.
3. Utilisation conforme à lʻusage éfini
e radiateur solaire se met automatiquement en marche dans lʼobscurité et à
lʼarrêt à lʼaube. a durée dʼéclairage maximale est dʼenviron 8 heures sans
recharge et lorsque lʼaccu est entièrement chargé. e module solaire intégré
dans la partie supérieure du boîtier recharge les accus intégrés. Un interrup-
teur permet de mettre en marche et dʼarrêter lʼéclairage. es trois radiateurs
sont appropriés pour une utilisation à lʼextérieur. es radiateurs ne doivent pas
être immergés dans lʼeau. es radiateurs peuvent être branchés à la terre par
une perche de mise à la terre ou vissés au mur à lʼaide dʼun support. e mod-
ule solaire installé sur un poteau, peut être branché à la terre ou vissé sur le
mur. e produit est conçu pour un usage privé.
Remarque : veillez à ce que le module solaire soit orienté le plus possible
vers le sud et à éviter toute ombre. Dans le cas dʼune orientation côté nord, le
produit nʼest pas utilisable. En hiver, le module solaire doit toujours être
exempt de neige.
4. Mise en service
1. Enlevez avec précaution les éléments de lʻemballage et déballez les
accessoires.
2. es trois radiateurs à DE peu-
vent être branchés à la terre
par une perche de mise à la
terre ou vissés sur le mur ou
au sol par une plaque de mon-
tage. e radiateur peut être
parfaitement réglé à lʼaide de la
rotule.
3. A présent, choisissez un lieu
approprié pour le montage du module solaire dans le rayon dʼaction des
radiateurs. Veillez à ce que lʼendroit soit orienté vers le sud et à éviter
toute ombre sur le module solaire. e module solaire peut être fixé au sol
ou sur un mur au moyen dʼune plaque de retenue, branché à la terre au
moyen dʼune perche de mise à la terre ou bien installé sur un poteau au
moyen dʼun support de poteau. A lʼaide de la rotule, le module solaire peut
être parfaitement orienté en direction du soleil.
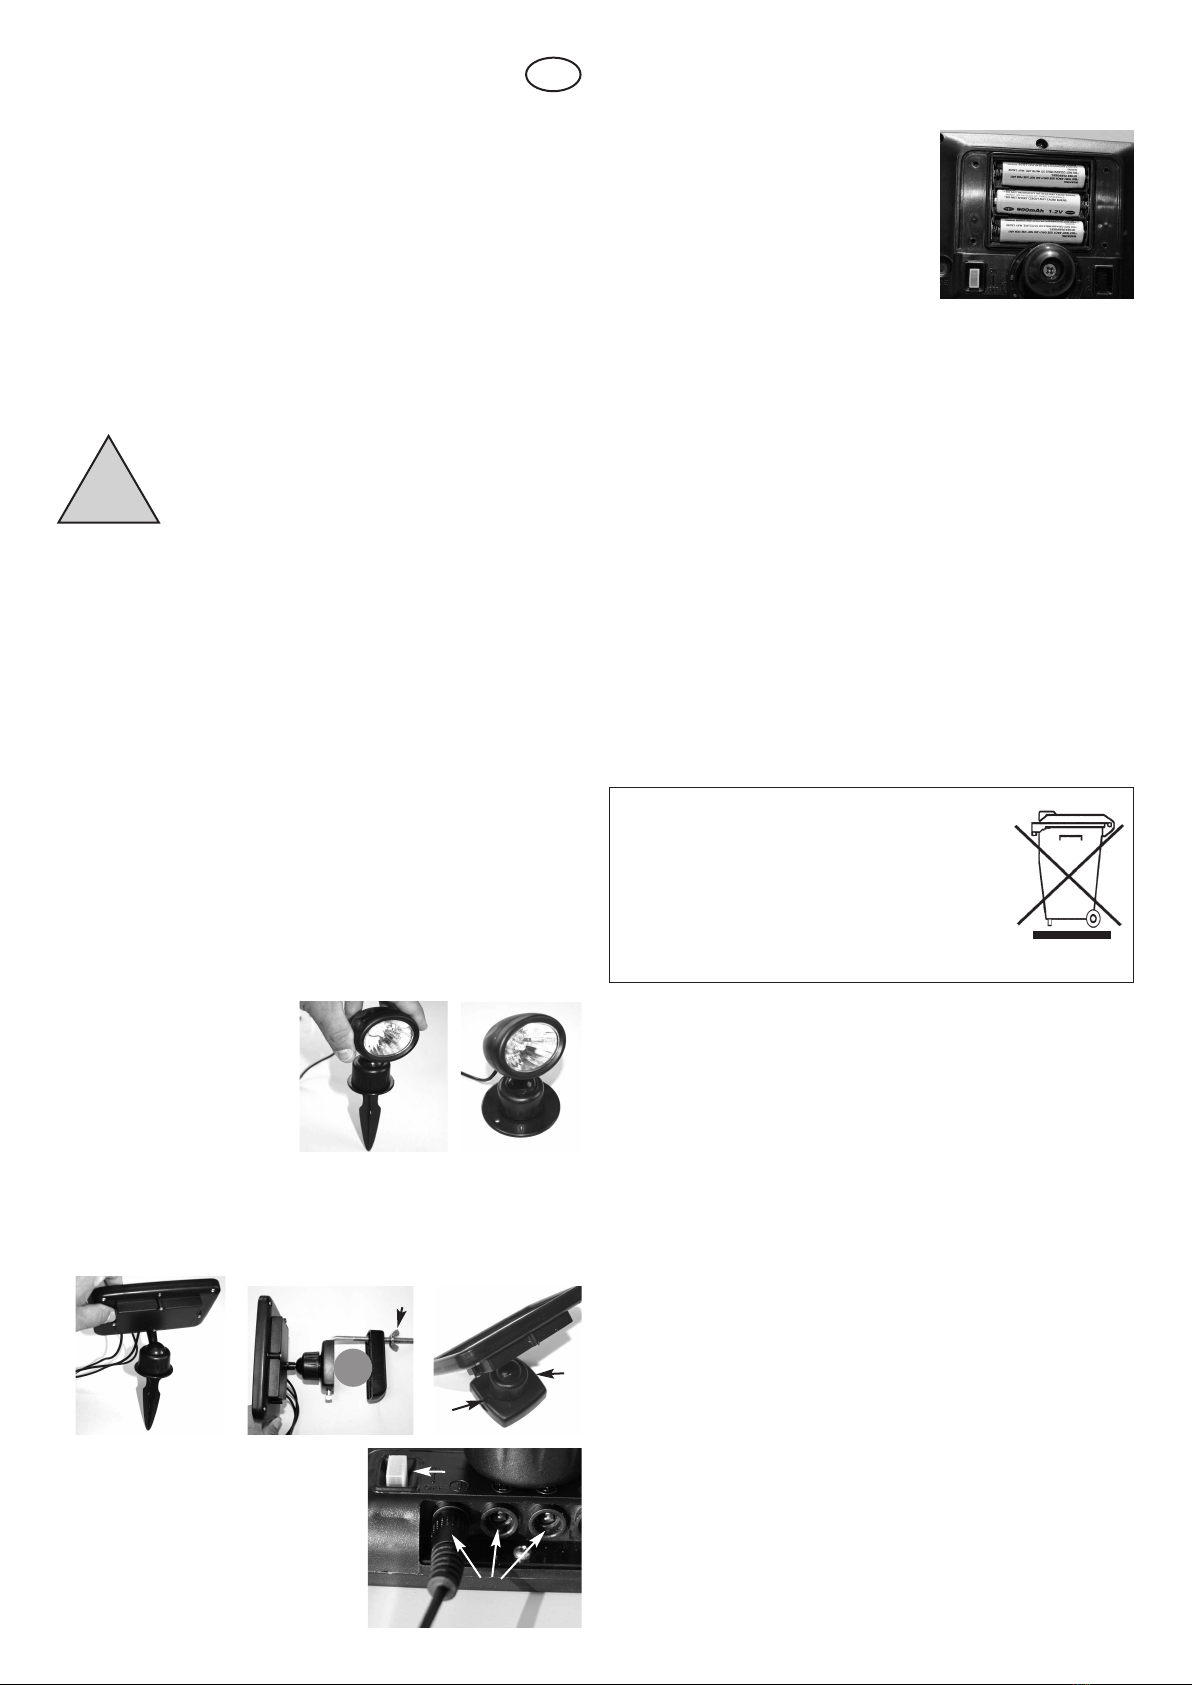
4. Ensuite, reliez les 3 fiches des radiateurs
aux prises des module solaire.
Remarque : il sʼagit de fiches protégées
contre lʼhumidité. Branchez les fiches
ensemble.
5. Ensuite, réglez lʼinterrupteur situé à lʼar-
rière du module solaire sur la position
«ON». A présent, les radiateurs solaires
sont activés.
Remarque : pendant les mois dʻhiver, il faut généralement sʻattendre à avoir une
durée dʻéclairage réduite. Si la lampe nʻéclaire pas encore le premier soir, veuillez
attendre une journée ensoleillée.
5. Remplacement es accus
Après une ou deux années, la capacité des accus
diminue ; ces derniers doivent être remplacés. es
accus sont disponibles dans le commerce ou chez
le fabricant.
1. Dévissez les 4 vis situées à lʼarrière du module
solaire et enlevez le capot.
2. Enlevez lʼaccu du support.
3. Insérez lʼaccu neuf en respectant la polarité
et refermez le boîtier dans lʼordre inverse.
Remarque : les accus usagés doivent être éliminés conformément aux prescrip-
tions relatives à la protection de lʼenvironnement et nʼentrent pas dans la catégorie
des ordures ménagères. Votre revendeur est légalement tenu de reprendre les
accus usagés.
6. Dysfonctionnements
- La lampe ne sʻallume pas ans lʻobscurité.
-Une source lumineuse externe (par exemple, réverbère) simule la lumière du jour
et empêche la mise en marche de la lampe. Placez la lampe dans un endroit
sombre.
-La lampe ne sʻallume pas ou ne sʻallume que brièvement ans lʻobscurité.
-ampe allumée ?
-Accus faibles ou défectueux. Remplacement des accus.
7. Données techniques
Tension de service : 3,6 V
ot de batteries : 3 x NiMh 1,2 V/900 mAh
Moyens lumineux : 9 Diodes lumineuses blanches ( EDs)
Durée de luminosité: Max. 8 heures lorsque les batteries sont
entièrement chargées
Informations relatives aux accus
- es accus doivent être tenus hors de la portée des enfants. Ne laissez jamais des
accus accessibles ; des enfants ou des animaux domestiques risqueraient de les ava-
ler.
- es accus ne doivent jamais être court-circuités, désassemblés ou jetés dans un feu. Il
y a un risque dʼexplosion !
- Des accus qui sʼécoulent ou qui sont endommagés risquent, lors dʼun contact avec la
peau, de provoquer des irritations ; dans ce cas, veuillez utiliser des gants de protecti-
on appropriés.
- es accus doivent être remplacés exclusivement par des accus identiques, provenant
du même fabricant. Des piles ne peuvent être, en aucun cas, utilisées car elles ne sont
pas rechargeables.
- ors de lʼinsertion des accus, veillez à respecter la polarité.
- En cas de non-utilisation prolongée de la lampe (par exemple, entreposage), enlevez
les accus afin dʼéviter un endommagement lié à un écoulement dʼaccus.
Manufacturer/ Importer/ Spare parts:
esotec GmbH, Weberschlag 9, D-92729 Weiherhammer
Tel.-Nr: 09605-92206-28, Fax.-Nr: 09605-92206-10
e-mail:[email protected]
Internet:www.esotec.de
Pro uct Art.-Nr: 102140
Elimination:
Cher client,
Veuillez nous aider à réduire les déchets. Si vous voulez un jour vous débarrasser
de cet article, nʼoubliez pas quʼun grand nombre de ses composants sont constitués
de matières premières de valeur qui peuvent être recyclées.
Ne le jetez donc pas à la poubelle mais amenez le au centre de collecte pour les
appareils ménagers.
Merci beaucoup pour votre aide !
Copyright, Änderungen vorbehalten
!
Reprise es batteries
- es batteries ne doivent pas être éliminées avec les déchets
ménagers.
- e consommateur est tenu juridiquement à restituer les batte-
ries après utilisation, notamment auprès des collectes publi-
ques ou là où sont vendues des batteries de ce type.
- es batteries contenant des substances nocives comportent
la marque « Conteneur de déchets rayé » et lʼun des symbo-
les chimiques.
poteau
NiMh
F
plaque de
montage
4
5
Table of contents
Languages:
Other esotec Lantern manuals

esotec
esotec Float 15 User manual

esotec
esotec Float 15 User manual

esotec
esotec Smart Cube User manual

esotec
esotec Modena Manual

esotec
esotec Salerno pro Duo Color User manual

esotec
esotec 574294 Manual

esotec
esotec Duo Power 2000 User manual

esotec
esotec Lumina User manual

esotec
esotec pro Line Series Manual

esotec
esotec Trendy Manual

esotec
esotec Sunnylight Parts list manual

esotec
esotec Pro RGB User manual

esotec
esotec Power Globe 20 User manual

esotec
esotec Disk Manual

esotec
esotec Super Spot pro Duo Color User manual

esotec
esotec Asinara Manual

esotec
esotec Stone 40 Manual

esotec
esotec pro Line Series Manual

esotec
esotec 102168 Manual

esotec
esotec Float 25 User manual