EUFAB 13490 User manual

1
Art.-Nr.: 13490
COB Akku Werkstattleuchte mit Ladestation
Bedienungsanleitung
Article number 13490
COB Battery powered workshop lamp with charging station
Operating instructions
Réf. 13490
Lampe d‘atelier COB sur batterie avec station de recharge
Manuel de l‘opérateur
Art.nr. 13490
COB accu werkplaatslamp met laadstation
Gebruiksaanwijzing
Cod. art. 13490
Lampada da ocina a batteria COB con stazione di carica
Istruzioni per l‘uso

2
1. BESTIMMUNGSGEMÄSSER GEBRAUCH
2. LIEFERUMFANG
3. SPEZIFIKATIONEN
Die COB-Akku Werkstattleuchte dient als mobile Lichtquelle in der Werkstatt, bei Autopannen, in der Freizeit oder beim Camping. Die COB-Akku Werkstattleuchte
kann in der Ladestation mit dem Netzgerät oder mit dem 12V Kfz-Adapter direkt an einer Kfz-Steckdose aufgeladen werden.
Dieses Gerät ist nicht dafür bestimmt, durch Kinder und Personen mit eingeschränkten geistigen Fähigkeiten oder ohne erforderliches Fachwissen benutzt zu werden.
Kinder sind von dem Gerät fernzuhalten.
Das Gerät ist nicht für den gewerblichen Einsatz bestimmt.
Zum bestimmungsgemäßem Gebrauch gehört auch die Beachtung aller Informationen in dieser Anleitung, insbesondere die Beachtung der Sicherheitshinweise.
Jede andereVerwendung gilt als nicht bestimmungsgemäß und kann zu Sach- oder Personenschäden führen. Die EAL GmbH übernimmt keine Haftung für Schäden,
die durch nicht bestimmungsgemäßen Gebrauch entstehen.
1 x COB-AkkuWerkstattleuchte
1 x 12V Kfz-Adapter
1 x USB-Ladekabel
1 x 230V Ladegerät
Dimensionen (L x B x H) [cm]: 26,5 x 6,7 x 3,8
Gewicht: 425 g
Befestigung: Haken und Magnet
Eingang: 100 – 240V AC, 50 – 60 Hz, 10W
Ausgang: 5V DC, 1000 mA
USBTyp A / USB Micro-B, Länge ca. 1,00 m
Leuchtdauer: ca. 2,5 - 3 h / 4,5 - 5 h
Ladedauer: ca. 4 h
Lichtstrom: 250-280 lm
Akkutyp: Li-Ion
Akkuspannung: 3,7V
Akkukapazität: 1800 mAh, 6,67Wh
COB-Akku Werkstattleuchte:
Ladegerät: Ladekabel:
1 x Ladestation
1 x Gebrauchsanleitung
4. SICHERHEITSHINWEISE
• DasWarndreieck kennzeichnet alle für die Sicherheit wichtigen Anweisungen. Befolgen Sie diese immer, anderenfalls könnten Sie sich verletzen
oder das Gerät könnte beschädigt werden.
• Kinder dürfen nicht mit dem Gerät spielen.
• Reinigung und Benutzerwartung dürfen nicht von Kindern ohne Beaufsichtigung durchgeführt werden.
• Lassen Sie das Verpackungsmaterial nicht achtlos liegen. Dieses kann für Kinder zu einem gefährlichen Spielzeug werden!
• Benutzen Sie dieses Produkt nur für die dafür vorgeseheneVerwendung!
• Manipulieren oder zerlegen Sie das Gerät nicht!
• Verwenden Sie zu Ihrer eigenen Sicherheit ausschließlich Zubehör oder Ersatzteile, die in der Anleitung angegeben sind, oder derenVerwendung
durch den Hersteller empfohlen wird!
• Setzen Sie die Miniarbeitsleuchte keinen hohenTemperaturen, extremer Nässe oder starkenVibrationen aus.
• Blicken Sie niemals direkt in die Lichtquelle, und richten Sie niemals den Lichtstrahl auf Personen oderTiere. Das LED-Licht kann zu Augenverlet-
zungen führen.
• Betrachten Sie die Lichtquelle niemals mit optischen Instrumenten. Das LED-Licht kann zu Augenverletzungen führen.
WARNUNG!
Lesen Sie die Bedienungsanleitung vor Inbetriebnahme sorgfältig durch und beachten Sie alle Sicherheitshinweise!
Nichtbeachtung kann zu Personenschäden, Schäden am Gerät oder Ihrem Eigentum führen!
Bewahren Sie die Originalverpackung, den Kaufbeleg sowie diese Anleitung zum späteren Nachschlagen auf!
Bei der Weitergabe des Produkts geben Sie auch diese Anleitung weiter.
Prüfen Sie vor Inbetriebnahme den Inhalt der Verpackung auf Unversehrtheit und Vollständigkeit!
COB Akku Werkstattleuchte mit Ladestation
INHALT
1. BESTIMMUNGSGEMÄSSER GEBRAUCH ______________________________________________________________________ 2
2. LIEFERUMFANG ____________________________________________________________________________________ 2
3. SPEZIFIKATIONEN ___________________________________________________________________________________ 2
4. SICHERHEITSHINWEISE _______________________________________________________________________________ 2
5. SYMBOLERKLÄRUNG _________________________________________________________________________________ 3
6. BEDIENUNGSANLEITUNG ______________________________________________________________________________ 3
6.1 ÜBERSICHT _______________________________________________________________________________________ 3
6.2 AUFLADEN DES AKKUS ________________________________________________________________________________ 3
6.3 FUNKTIONEN ______________________________________________________________________________________ 3
6.4 BEFESTIGUNG _____________________________________________________________________________________ 4
7. WARTUNG UND PFLEGE _______________________________________________________________________________ 4
7.1 WARTUNG _______________________________________________________________________________________ 4
7.2 PFLEGE _________________________________________________________________________________________ 4
8. HINWEISE ZUM UMWELTSCHUTZ__________________________________________________________________________ 4
9. KONTAKTINFORMATIONEN _____________________________________________________________________________ 4

3
5. SYMBOLERKLÄRUNG
6. BEDIENUNGSANLEITUNG
6.1 ÜBERSICHT
Akkuwerkstattleuchte:
Ladestation: Kfz-Adapter:
Ladegerät: Ladekabel:
Entspricht den EG-Richtlinien
Schutzisolierung Klasse 2
1 LED-Taschenlampe
2 COB-Leuchtfeld
3 Schalter
4 ausklappbarer Haltebügel
5 Befestigungshaken
6 Befestigungsmagnet Rückseite
7 USB-Ladebuchse
8 Ladekontrollleuchte
9 Ladekontakte
10 Befestigungsmagnet Haltebügel
11 Ladekontakte
12 USB-Ladebuchse
13 USB-Anschluss
14 Kontrollleuchte
15 USB-Anschluss 16 USB Typ A - Stecker
17 USB-Micro B - Stecker
Bild 1: Übersicht
Bild 2: Direktanschluss Bild 3: Verwenden der Ladestation
Gekennzeichnetes Elektroprodukt darf
nicht in den Hausmüll geworfen werden
Entspricht dem Produktsicherheitsgesetz
Nur in trockenen Räumen verwenden
Gebrauchsanleitung lesen
6.2 AUFLADEN DES AKKUS
6.3 FUNKTIONEN
ZumAuaden des Akkus könnenSie dieWerkstattleuchtedirektanschließen, Bild 2,oderdieLadestationverwenden,Bild 3. Beibeiden Möglichkeitenkannentweder
das Ladegerät oder der Kfz-Adapter eingesetzt werden.
Durch das mehrmalige Drücken des Schalters (Position 3 in der Übersicht) können Sie folgende Funktionen der Akkuwerkstattleuchte schalten:
• COB-Leuchtfeld (Position 2 in der Übersicht) gedimmt ein
• COB-Leuchtfeld,
• COB-Leuchtfeld aus/LED-Taschenlampe (Position 1 in der Übersicht) ein
• aus
Während des Ladevorgangs leuchtet die Kontrollleuchte rot. Ist der Akku voll aufgeladen, leuchtet die Kontrollleuchte grün. Zum Beenden des Ladevorgangs ziehen
Sie zuerst das Ladegerät/Kfz-Adapter aus der Steckdose, danach trennen Sie dieWerkstattleuchte von der Ladestation/vom Ladekabel.

4
Sie können den Haltebügel (Position 4 in der Übersicht) ausklappen
um eine optimale Ausleuchtung zu erreichen.
Bild 4: Haltebügel ausklappen
6.4 BEFESTIGUNG
7. WARTUNG UND PFLEGE
7.1 WARTUNG
7.2 PFLEGE
8. HINWEISE ZUM UMWELTSCHUTZ
9. KONTAKTINFORMATIONEN
Um im Licht freihändig zu arbeiten, können Sie die Akku-Werkstattleuchte
Die Leuchte, die Ladestation und der Kfz-Adapter sind bei bestimmungsgemäßem Gebrauch wartungsfrei.
Reinigen Sie die Leuchte, die Ladestation und den Kfz-Adapter nur mit einem trockenen, weichen Tuch. Verwenden Sie keine scharfen oder lösungsmittelhaltigen
Reiniger. Lassen Sie niemals Flüssigkeiten in das Innere der Geräte dringen.
Entsorgen Sie Elektrogeräte nicht mit dem Hausmüll! Elektro- und Elektronik-Altgeräte müssen getrennt gesammelt und einer umweltgerech-
ten Wiederverwertung zugeführt werden. Über Entsorgungsmöglichkeiten für Elektro- und Elektronik-Altgeräte informieren Sie sich bei Ihrer
Gemeinde- oder Stadtverwaltung.
1. am ausklappbaren Befestigungshaken (Position 5 in der Übersicht) aufhängen, oder
2. mit den Magnethaltern (Positionen 6 und 10 in der Übersicht) auf einem glatten, magnetischen Untergrund xieren. Achten Sie darauf, dass die Oberäche, z. B.
Autolack, nicht beschädigt wird.
EAL GmbH
Otto-Hausmann-Ring 107
42115Wuppertal, Deutschland
+49 (0)202 42 92 83 0
+49 (0) 202 42 92 83 – 160
info@eal-vertrieb.com
www.eal-vertrieb.com

5
1. PROPER USE OF THE PRODUCT
2. SCOPE OF DELIVERY
3. SPECIFICATIONS
The COB cordless workshop lamp is designed to be used as a mobile source of light in the workshop, in the event of vehicle breakdowns, as well as for leisure or camping
activities.TheCOBcordlessworkshoplamp can bechargedusingthe chargingstationand powersupplyorwith the12Vvehicleadapterconnected directlyto avehiclesocket.
This device is not designed to be used by children or persons with limited mental abilities or without experience and/or lack of required specialist knowledge. Keep
children away from the device.
The device is not designated for commercial use.
Utilisation according to the intended purpose also includes the observation of all information in these operating instructions, particularly the observation of safety
instructions. Any other utilisation is considered to be counter to the intended purpose and may result in material damage or personal injuries. EAL GmbH assumes no
liability for damage resulting from improper use.
1 x COB Battery powered workshop lamp
1 x 12V vehicle adapter
1 x USB charging cable
1 x 230V Charger
Dimensions (L xW x H) [cm]: 26.5 x 6.7 x 3.8
Weight: 425 g
Fixture: Hook and magnet
Input: 100 – 240V AC, 50 – 60 Hz, 10W
Output: 5V DC, 1000 mA
USB type A / USB Micro-B, length approx. 1.00 m
Lighting duration: Approx. 2.5 - 3 hours / 4.5 - 5 hours
Charging time: Approx. 4 hours
Luminous ux: 250-280 lumen
Battery type: Lithium ion
Battery voltage: 3.7V
Battery capacity: 1800 mAh, 6.67Wh
COB Battery powered workshop lamp:
Charger: Charging cable:
1 x Charging station
1 x Operating instructions
4. SAFETY PRECAUTIONS
• The warning triangle indicates all of the instructions that are important for safety. Always follow these, otherwise you could injure yourself or
damage the device.
• Children may not play with the device.
• Cleaning and user maintenance may not be carried out by children without supervision.
• Do not treat packaging material carelessly. It may become a dangerous plaything for a child!
• Only use this product for its designated purpose!
• Do not manipulate or disassemble the device!
• For your own safety, only use the accessories and spare parts that are stated in these instructions or that are recommended by the manufacturer!
• Do not expose the mini working light to high temperatures, extreme damp or severe vibrations.
• Never look directly into the light source and never direct the beam of light onto people or animals.The LED light may result in injuries to the eyes.
• Never look at the light source using optical instruments.The LED light may result in injuries to the eyes.
WARNING!
Read the operating instructions through carefully prior to initial use and observe all of the safety notes!
Not observing such may lead to personal injury, damage to the device or to your property!
Store the original packaging, the receipt and these instructions so that they may be consulted at a later date! When passing on the
product, also include these operating instructions.
Check the contents of package for integrity and completeness prior to use!
COB Battery powered workshop lamp with charging station
CONTENTS
1. PROPER USE OFTHE PRODUCT ___________________________________________________________________________ 5
2. SCOPE OF DELIVERY__________________________________________________________________________________ 5
3. SPECIFICATIONS ____________________________________________________________________________________ 5
4. SAFETY PRECAUTIONS ________________________________________________________________________________ 5
5. EXPLANATION OF SYMBOLS_____________________________________________________________________________ 6
6. INSTRUCTIONS FOR USE _______________________________________________________________________________ 6
6.1 OVERVIEW _______________________________________________________________________________________ 6
6.2 CHARGING THE BATTERY ______________________________________________________________________________ 6
6.3 FUNCTIONS_______________________________________________________________________________________ 6
6.4 FIXING __________________________________________________________________________________________ 7
7. MAINTENANCE AND CARE ______________________________________________________________________________ 7
7.1 MAINTENANCE_____________________________________________________________________________________ 7
7.2 CARE ___________________________________________________________________________________________ 7
8. NOTES REGARDING ENVIRONMENTAL PROTECTION ______________________________________________________________ 7
9. CONTACT INFORMATION _______________________________________________________________________________ 7

6
5. EXPLANATION OF SYMBOLS
6. INSTRUCTIONS FOR USE
6.1 OVERVIEW
COB Battery powered workshop lamp:
Charging station: Vehicle adapter:
Charger: Charging cable:
Complies with EC directives
Protective insulation, Class 2
1 LED torch function
2 COB light eld
3 Switch
4 Fold-out bracket holder
5 Fixture hook
6 Fixture magnet (rear)
7 USB charging socket
8 Charging control lamp
9 Charging contacts
10 Fixture magnet on bracket holder
11 Charging contacts
12 USB charging socket
13 USB connection
14 Control lamp
15 USB connection 16 USB type A - plug
17 Micro-USB B connector
Figure 1: Overview
Figure 2: Connecting directly Figure 3: Using the charging station
Labelled electrical products may not be
disposed of in the household waste
Complies with the German product
safety act
Only use in dry rooms
Read the operating instructions
6.2 CHARGING THE BATTERY
6.3 FUNCTIONS
You can connect the workshop lamp directly to charge the battery, Figure 2, or you may use the charging station, Figure 3.With both options, you can use either the
charger or the vehicle adapter.
Pressing the switch multiple times (Position 3 in the overview) enables you to activate the following functions of the cordless workshop lamp:
• COB light eld on (Position 2 in the overview), dimmed function on
• COB light eld,
• COB light eld dimmed function o/LED torch function on (Position 1 in the overview)
• O
The indicator lamp will light red during the charging process.When the battery pack is charged, the control lamp will light up in green.To end the charging process,
rst disconnect the charger/vehicle adapter at the socket, then disconnect the workshop lamp from the charging station/cable.

7
You can unfold the bracket holder (Position 4 in the overview) to
achieve optimum illumination.
Figure 4: Unfolding the bracket holder
6.4 FIXING
7. MAINTENANCE AND CARE
7.1 MAINTENANCE
7.2 CARE
8. NOTES REGARDING ENVIRONMENTAL PROTECTION
9. CONTACT INFORMATION
In order to be able to use the light and still have your hands free, you can hang the cordless workshop lamp
The lamp, the charging station and the vehicle adapter are maintenance free when used according to their intended purposes.
Clean the lamp, the charging station and the vehicle adapter with a dry, soft cloth only. Do not use any aggressive cleaning agents or solvent-based cleaners.
Never allow liquids to ingress into the devices.
Do not dispose of electrical devices with the household waste! Electrical and electronic scrap must be collected separately and disposed of in an
environmentally responsible manner for recycling. Please contact your community or city administration regarding disposal options for electrical
and electronic scrap.
1. using the fold-out hook (Position 5 in the overview), or
2. secure it to a smooth, magnetic surface using the magnetic holders (Positions 6 and 10 in the overview). Pay attention to ensure that the surface, for example,
the paint job of the car, is not damaged.
EAL GmbH
Otto-Hausmann-Ring 107
42115Wuppertal, Germany
+49 (0)202 42 92 83 0
+49 (0) 202 42 92 83 – 160
info@eal-vertrieb.com
www.eal-vertrieb.com

8
1. UTILISATION CONFORME
2. MATÉRIEL FOURNI
3. SPÉCIFICATIONS
La lampe d‘atelier COB sur batterie sert de source lumineuse mobile dans l‘atelier, en cas de pannes automobiles, pour les loisirs ou le camping. La lampe d‘atelier COB
sur batterie peut être chargée dans la station de recharge avec le bloc d‘alimentation ou avec l‘adaptateur pour voiture 12V directement sur une prise de véhicule.
Cet appareil n‘est pas destiné à être utilisé par des enfants ou des personnes aux capacités mentales limitées ou ne disposant pas de l‘expérience ou des connaissances
nécessaires. Les enfants doivent rester à distance de cet appareil.
L‘appareil n‘est pas destiné à une utilisation industrielle ou commerciale.
L‘utilisation conforme aux prescriptions implique également le respect de toutes les informations contenues dans cette notice d‘utilisation, en particulier le respect
des consignes de sécurité.Toute autre utilisation est considérée comme non conforme et peut entraîner des dommages matériels ou corporels. La société EAL GmbH
décline toute responsabilité en cas de dommages découlant d’une utilisation non conforme à l’emploi prévu.
1 x lampe de travail COB sur batterie
1 x adaptateur pour voiture 12V
1 x câble de chargement USB
1 x chargeur 230V
Dimensions (L x l x h) [cm] : 26,5 x 6,7 x 3,8
Poids : 425 g
Fixation : Crochet et aimant
Entrée : 100 – 240 V AC, 50 – 60 Hz, 10W
Sortie : 5V DC, 1000 mA
USB type A / USB Micro-B, longueur env. 1,00 m
Durée d‘éclairage : env. 2,5 - 3 h / 4,5 - 5 h
Temps de charge : env. 4 h
Flux lumineux : 250-280 lm
Type de batterie : Li-Ion
Tension de la batterie : 3,7V
Capacité de la batterie : 1800 mAh, 6,67Wh
Lampe d‘atelier COB sur batterie :
Chargeur : Câble de chargement :
1 x station de recharge
1 x mode d’emploi
4. CONSIGNES DE SÉCURITÉ
• Le triangle d’avertissement indique toutes les instructions relatives à la sécurité. Respectez-les à tout moment car vous risqueriez sinon de vous
blesser ou l‘appareil risquerait d‘être endommagé.
• Les enfants ne doivent pas jouer avec l‘appareil.
• Les tâches de nettoyage et d‘entretien à eectuer chez soi ne doivent pas être exécutées par des enfants qui ne sont pas sous surveillance.
• Ne laissez pas traîner le matériel d‘emballage. Il pourrait devenir un jouet dangereux pour les enfants !
• N‘utilisez cet appareil qu‘aux ns pour lesquelles il a été prévu !
• Ne pas manipuler ni démonter l‘appareil !
• Pour votre propre sécurité, utilisez exclusivement les accessoires ou pièces de rechange qui sont indiqué(e)s dans la notice d‘utilisation ou dont
l‘utilisation est conseillée par le fabricant !
• N‘exposez pas la mini lampe de travail à des températures élevées, à une humidité extrême ou à de fortes vibrations.
• Ne dirigez jamais le regard directement vers la source lumineuse et ne dirigez jamais le faisceau lumineux vers des personnes ou des animaux. La
lumière LED risque d‘entraîner des lésions des yeux.
• N‘examinez jamais la source lumineuse sans emploi d‘instruments optiques. La lumière LED risque d‘entraîner des lésions des yeux.
VERTISSEMENT!
Lisez attentivement la notice d‘utilisation avant la mise en service et respectez toutes les consignes de sécurité !
Tout non-respect de ces consignes peut entraîner des dommages corporels, endommager l‘appareil ou vos biens !
Conservez l‘emballage d‘origine, le justicatif d‘achat et la présente notice pour vous y référer ultérieurement ! Si vous revendez
ou remettez l‘appareil à des tiers, veuillez également leur remettre cette notice d‘utilisation.
Avant la mise en service, veuillez contrôler le contenu de l‘emballage quant à l‘absence de dommages et vérier si toutes les pièces
sont présentes !
Lampe d‘atelier COB sur batterie avec station de recharge
SOMMAIRE
1. UTILISATION CONFORME_______________________________________________________________________________ 8
2. MATÉRIEL FOURNI___________________________________________________________________________________ 8
3. SPÉCIFICATIONS ____________________________________________________________________________________ 8
4. CONSIGNES DE SÉCURITÉ ______________________________________________________________________________ 8
5. EXPLICATION DES SYMBOLES ____________________________________________________________________________ 9
6. NOTICE D‘UTILISATION ________________________________________________________________________________ 9
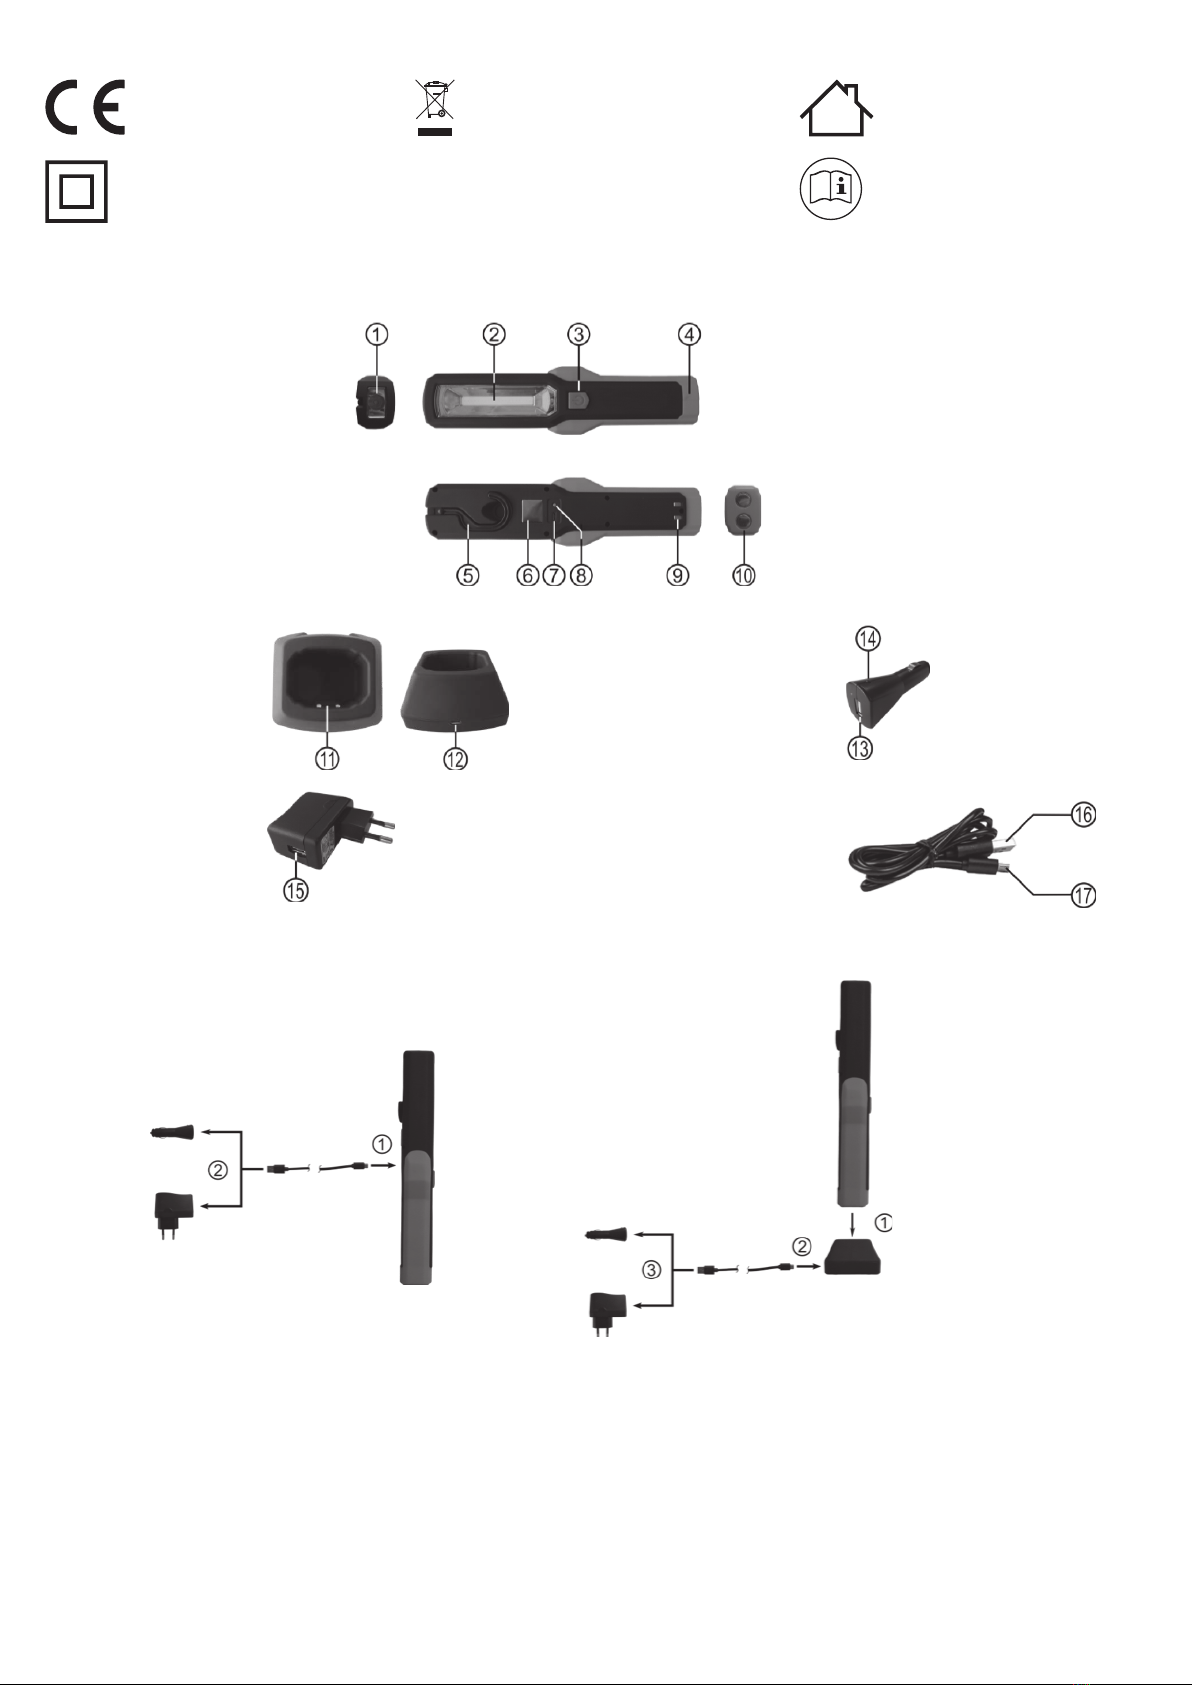
6.1 VUE D‘ENSEMBLE ___________________________________________________________________________________ 9
6.2 CHARGEMENT DE L’ACCU_______________________________________________________________________________ 9
6.3 FONCTIONS _______________________________________________________________________________________ 9
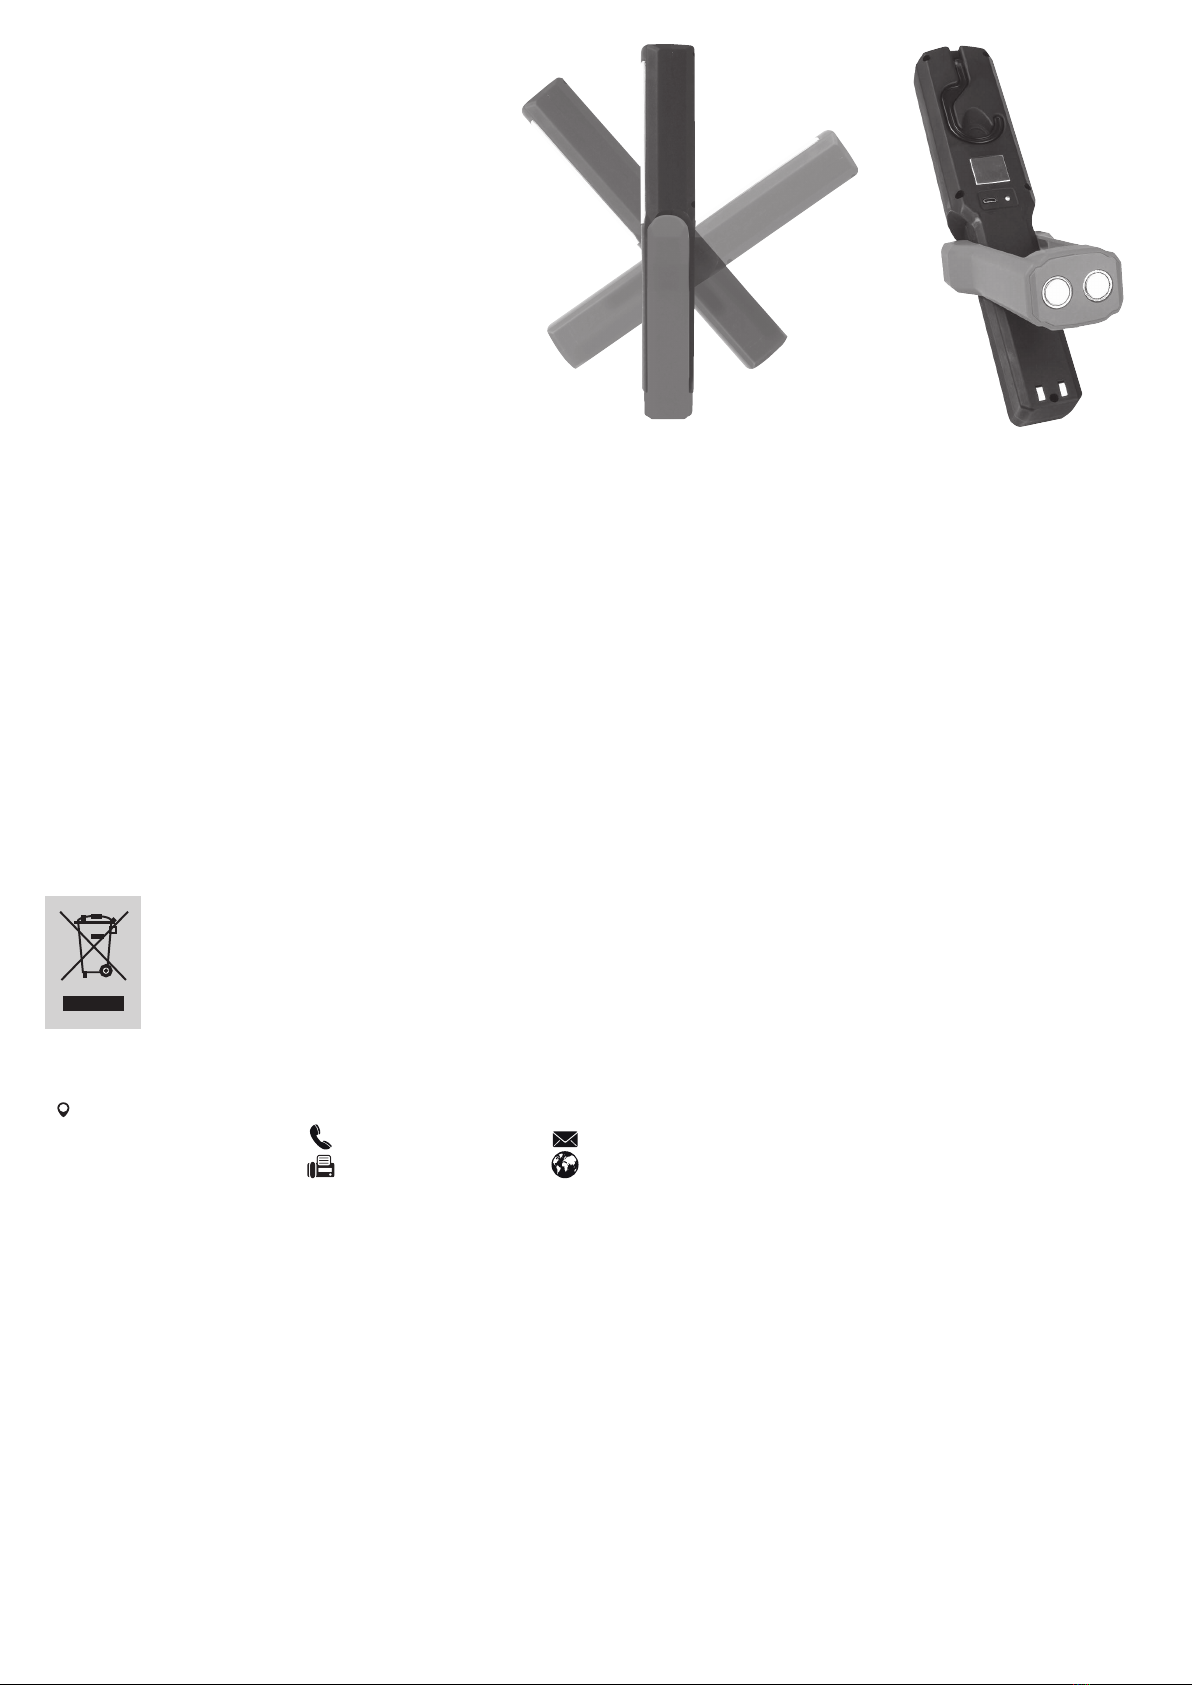
6.4 FIXATION ________________________________________________________________________________________ 10
7. MAINTENANCE ET ENTRETIEN____________________________________________________________________________ 10
7.1 MAINTENANCE_____________________________________________________________________________________ 10
7.2 ENTRETIEN _______________________________________________________________________________________ 10
8. REMARQUES RELATIVES À LA PROTECTION DE L‘ENVIRONNEMENT _____________________________________________________ 10
9. COORDONNÉES_____________________________________________________________________________________ 10

9
5. EXPLICATION DES SYMBOLES
6. NOTICE D‘UTILISATION
6.1 VUE D‘ENSEMBLE
Lampe d‘atelier sur batterie :
Station de recharge : Adaptateur pour voiture :
Chargeur : Câble de chargement :
Correspond aux directives de la CE
Isolation catégorie 2
1 Lampe de poche LED
2 Champ lumineux COB
3 Interrupteur
4 Étrier de maintien pliable
5 Crochet de xation
6 Aimant de xation à l’arrière
7 Port USB
8 Voyant lumineux de contrôle de charge
9 Contacts de charge
10 Aimant de xation étrier de maintien
11 Contacts de charge
12 Port USB
13 Port USB
14 Lampe de contrôle
15 Port USB 16 USB type A – Connecteur
17 Prise USB-Micro B
Figure 1 : Vue d’ensemble
Figure 2 : Raccordement direct Figure 3 : Utiliser la station de recharge
L‘appareil électrique marqué ne peut pas
être jeté aux ordures ménagères
Conforme à la loi relative à la sécurité des
produits
Utiliser uniquement dans des lieux secs
Lire le mode d‘emploi
6.2 CHARGEMENT DE L’ACCU
6.3 FONCTIONS
Pour charger la batterie, vous pouvez raccorder directement la lampe d‘atelier gure 2, ou utiliser la station de recharge, gure 3. Dans les deux cas, il est possible
d‘utiliser le chargeur ou l’adaptateur pour voiture.
En appuyant plusieurs fois sur l‘interrupteur (position 3 dans la vue d’ensemble), vous pouvez commuter les fonctions suivantes de la lampe d’atelier sur batterie :
• Champ lumineux COB (position 2 dans la vue d’ensemble) atténué allumé
• Champ lumineux COB,
• Champ lumineux COB éteint/Lampe de poche LED (position 1 dans la vue d’ensemble) allumée
• Éteint
La lampe de contrôle s‘illumine en rouge pendant le chargement. Lorsque la batterie est entièrement rechargée, le voyant de contrôle de charge s‘allume en vert. Pour
terminer le processus de recharge, débranchez d‘abord le chargeur/l‘adaptateur pour voiture de la prise, puis débranchez la lampe d‘atelier de la station de recharge/
du câble de chargement.

10
Vous pouvez rabattre l’étrier de maintien (position 4 sur la vue
d‘ensemble) pour obtenir un éclairage optimal.
Figure 4 : Rabattre l‘étrier de maintien
6.4 FIXATION
7. MAINTENANCE ET ENTRETIEN
7.1 MAINTENANCE
7.2 ENTRETIEN
8. REMARQUES RELATIVES À LA PROTECTION DE L‘ENVIRONNEMENT
9. COORDONNÉES
An de pouvoir travailler les mains libres dans le faisceau lumineux de la lampe d‘atelier sur batterie, vous pouvez la xer
La lampe, la station de recharge et l’adaptateur pour voiture ne nécessitent pas d’entretien s’ils sont utilisés de façon conforme.
Nettoyez la lampe, la station de recharge et l’adaptateur pour voiture uniquement avec un chion doux et sec. N‘utilisez pas de nettoyants agressifs ou contenant des
solvants. Ne laissez jamais pénétrer du liquide à l’intérieur de l’appareil.
Ne jetez pas les appareils électriques dans les ordures ménagères ! Les appareils électriques et électroniques usagés doivent être collectés séparé-
ment et remis aux services de recyclage. Renseignez-vous quant aux possibilités d‘élimination d‘appareils électriques et électroniques usagés auprès
de votre administration communale, municipale ou cantonale.
1. sur le crochet de xation pliable (position 5 dans la vue d‘ensemble), ou
2. avec l‘aimant (position 6 et 10 dans la vue d‘ensemble) sur un support lisse magnétique. Veillez à ce que la surface, p. ex. peinture de l‘automobile, ne soit pas
endommagée.
EAL GmbH
Otto-Hausmann-Ring 107
42115Wuppertal, Allemagne
+49 (0)202 42 92 83 0
+49 (0) 202 42 92 83 – 160
info@eal-vertrieb.com
www.eal-vertrieb.com

11
1. REGLEMENTAIR GEBRUIK
2. LEVERINGSOMVANG
3. SPECIFICATIES
De accuwerklamp dient als mobiele lichtbron in de werkplaats, bij autopech, voor vrijetijdstoepassingen of op de camping. De COB-accuwerklamp kan in het laadstation
met de netadapter of rechtstreeks met de 12V-autoadapter in een autostopcontact worden opgeladen.
Dit product mag niet worden gebruikt door kinderen, mensen met een verstandelijke beperking of mensen die niet over de vereiste ervaring/kennis beschikken. Houd
kinderen uit de buurt van het apparaat.
Het apparaat is niet bedoeld voor bedrijfsmatig gebruik.
Tot het reglementair gebruik behoort ook het in acht nemen van alle informatie in deze gebruiksaanwijzing, in het bijzonder van de veiligheidsvoorschriften. Elk
ander gebruik geldt als niet-reglementair en kan materiële schade of persoonlijk letsel veroorzaken. EAL GmbH is niet aansprakelijk voor schade als gevolg van
niet-reglementair gebruik.
1 x COB-accu werklamp
1 x 12V-autoadapter
1 x USB-laadkabel
1 x 230V-oplader
Afmetingen (l x b x h) [cm]: 26,5 x 6,7 x 3,8
Gewicht: 425 g
Bevestiging: haak en magneet
Ingang: 100 – 240V AC, 50 – 60 Hz, 10W
Uitgang: 5V DC, 1000 mA
USB type A/USB micro B, lengte ca. 1,00 m
Verlichtingsduur: ca. 2,5 - 3 h / 4,5 - 5 h
Oplaadtijd: ca. 4 h
Lichtstroom: 250-280 lm
Accutype: Li-ion
Accuspanning: 3,7V
Accucapaciteit: 1800 mAh, 6,67Wh
COB-accuwerklamp:
Oplader: Laadkabel:
1 x laadstation
1 x gebruiksaanwijzing
4. VEILIGHEIDSINSTRUCTIES
• Deze waarschuwingsdriehoek markeert alle belangrijke veiligheidsaanwijzingen. Neem deze te allen tijde in acht, anders kunnen lichamelijk
letsel of schade aan het apparaat het gevolg zijn.
• Kinderen mogen niet met het product spelen.
• Reiniging en onderhoud mogen niet zonder toezicht door kinderen worden uitgevoerd.
• Laat het verpakkingsmateriaal niet achteloos rondslingeren. Dit kan voor kinderen gevaarlijk speelgoed worden!
• Gebruik dit product uitsluitend voor het beoogde doel!
• Verander of demonteer het apparaat niet!
• Gebruik voor uw eigen veiligheid uitsluitend toebehoren of reserveonderdelen die in de gebruiksaanwijzing staan vermeld of waarvan het
gebruik door de fabrikant wordt aanbevolen!
• Stel de werklamp niet bloot aan hoge temperaturen, extreme vochtigheid of sterke trillingen.
• Kijk nooit direct in de lichtbron en richt de lichtbundel nooit op personen of dieren. Het led-licht kan oogletsel veroorzaken.
• Gebruik de lichtbron nooit in combinatie met optische instrumenten. Het led-licht kan oogletsel veroorzaken.
WAARSCHUWING!
Lees voorafgaand aan de ingebruikname de gebruiksaanwijzing aandachtig door en neem alle veiligheidsvoorschriften in acht!
Het niet-naleven hiervan kan letsel, schade aan het product of aan uw eigendom veroorzaken!
Bewaar de oorspronkelijke verpakking, het aankoopbewijs en de gebruiksaanwijzing om deze later te kunnen raadplegen!
Geef bij het doorgeven van het product ook deze gebruiksaanwijzing door.
Controleer voor de ingebruikname eerst de inhoud van de verpakking op beschadigingen en volledigheid!
COB accu werkplaatslamp met laadstation
INHOUD
1. REGLEMENTAIR GEBRUIK ______________________________________________________________________________ 11
2. LEVERINGSOMVANG _________________________________________________________________________________ 11
3. SPECIFICATIES _____________________________________________________________________________________ 11
4. VEILIGHEIDSINSTRUCTIES ______________________________________________________________________________ 11
5. UITLEG BIJ DE SYMBOLEN ______________________________________________________________________________ 12
6. GEBRUIKSAANWIJZING _______________________________________________________________________________ 12
6.1 OVERZICHT _______________________________________________________________________________________ 12
6.2 DE ACCU OPLADEN __________________________________________________________________________________ 12
6.3 FUNCTIES ________________________________________________________________________________________ 12
6.4 BEVESTIGING______________________________________________________________________________________ 13
7. ONDERHOUD ENVERZORGING ___________________________________________________________________________ 13
7.1 ONDERHOUD ______________________________________________________________________________________ 13
7.2 VERZORGING ______________________________________________________________________________________ 13
8. INFORMATIE M.B.T. HET MILIEU __________________________________________________________________________ 13
9. CONTACTINFORMATIE ________________________________________________________________________________ 13

12
5. UITLEG BIJ DE SYMBOLEN
6. GEBRUIKSAANWIJZING
6.1 OVERZICHT
Accuwerklamp:
Laadstation: Auto-adapter:
Oplader: Laadkabel:
Voldoet aan de EG-richtlijnen
Beschermende isolatie klasse 2
1 LED-zaklamp
2 COB-lichtveld
3 Schakelaar
4 Uitklapbare bevestigingsbeugel
5 Bevestigingshaak
6 Bevestigingsmagneet achterkant
7 USB-laadbus
8 Laadindicator
9 Oplaadcontacten
10 Bevestigingsmagneet houderbeugel
11 Oplaadcontacten
12 USB-laadbus
13 USB-aansluiting
14 Controlelampje
15 USB-aansluiting 16 USB type A-stekker
17 USB-micro B-stekker
Afb. 1: Overzicht
Afb. 2: Rechtstreekse aansluiting Afb. 3: Het laadstation gebruiken
Een elektrisch product met dit symbool
mag niet bij het huisvuil worden gegooid
Voldoet aan de wetgeving voor
productveiligheid
Alleen voor gebruik in droge ruimtes
Gebruiksaanwijzing lezen
6.2 DE ACCU OPLADEN
6.3 FUNCTIES
Om de accu op te laden, kunt u de werklamp rechtstreeks aansluiten, afb. 2, of het laadstation gebruiken, afb. 3. Bij beide mogelijkheden kunnen zowel de oplader
als de autoadapter worden gebruikt.
Door herhaaldelijk op de schakelaar te drukken (positie 3 in het overzicht), kunt u door de volgende functies van de accuwerklamp schakelen:
• COB-lichtveld (positie 2 in het overzicht) gedimd aan
• COB-lichtveld aan,
• COB-lichtveld uit/LED-zaklamp (positie 1 in het overzicht) aan
• Uit
Tijdens het laadproces brandt het controlelampje rood.Wanneer de accu volledig is opgeladen, brandt het controlelampje groen. Om het opladen te stoppen, trekt u
eerst de lader/autoadapter uit het stopcontact en vervolgens koppelt u de werklamp los van het oplaadstation/de laadkabel.

13
Voor een optimale verlichting kunt u de bevestigingsbeugel
(positie 4 in het overzicht) uitklappen.
Figure 4: Unfolding the bracket holder
6.4 BEVESTIGING
7. ONDERHOUD EN VERZORGING
7.1 ONDERHOUD
7.2 VERZORGING
8. INFORMATIE M.B.T. HET MILIEU
9. CONTACTINFORMATIE
Om met de handen vrij in het licht van de lamp te werken, kunt u de accuwerklamp
De lamp, het laadstation en de autoadapter zijn onderhoudsvrij bij correct gebruik.
Reinig de lamp, het laadstation en de autoadapter uitsluitend met een droge, zachte doek. Gebruik geen agressieve reinigings- of oplosmiddelen. Laat nooit vloeis-
toen in het apparaat binnendringen.
Gooi elektrische apparaten niet weg bij het huisvuil! Elektrische en elektronische apparaten moeten gescheiden worden ingezameld en op milieuv-
riendelijke wijze worden gerecycled. Meer informatie over het afvoeren van elektrische en elektronische apparaten kunt u opvragen bij de gemeente
of het stadsbestuur.
1. met de uitklapbare bevestigingshaak (positie 5 in het overzicht) ophangen, of
2. met de magneethouders (posities 6 en 10 in het overzicht) op een glad, magnetisch oppervlak bevestigen. Zorg ervoor dat hierbij het oppervlak, bijvoorbeeld de
autolak, niet wordt beschadigd.
EAL GmbH
Otto-Hausmann-Ring 107
42115Wuppertal, Duitsland
+49 (0)202 42 92 83 0
+49 (0) 202 42 92 83 – 160
info@eal-vertrieb.com
www.eal-vertrieb.com

14
1. USO CONFORME
2. VOLUME DI CONSEGNA
3. SPECIFICHE
La lampada da ocina a batteria COB è una fonte luminosa mobile da usare in ocina, in caso di panne, nel tempo libero o in campeggio. La lampada da ocina a
batteria COB si può ricaricare nella stazione di ricarica con l’alimentatore oppure tramite l’adattatore per auto 12V direttamente a una presa auto.
Questo dispositivo non è destinato all‘uso da parte di bambini e persone con capacità mentali limitate o che non siano in possesso delle necessarie conoscenze.Tenere
il dispositivo lontano dalla portata dei bambini.
Questo dispositivo non è destinato all‘impiego industriale.
L‘uso conforme include anche il rispetto di tutte le informazioni fornite in queste istruzioni, soprattutto delle avvertenze di sicurezza. Ogni altro utilizzo viene consi-
derato improprio e può causare danni a persone o cose. EAL GmbH non risponde dei danni derivanti da un uso improprio.
1 x lampada da ocina a batteria COB
1 x adattatore auto 12V
1 x cavo di ricarica USB
1 x caricabatteria 230V
Dimensioni (Lun x Lar x Alt) [cm]: 26,5 x 6,7 x 3,8
Peso: 425 g
Fissaggio: gancio e magnete
Ingresso: 100 – 240V AC, 50 – 60 Hz, 10W
Uscita: 5V DC, 1000 mA
USB tipo A / USB Micro B, lunghezza ca. 1,00 m
Autonomia: ca. 2,5 - 3 h / 4,5 - 5 h
Durata ricarica: ca. 4 h
Flusso luminoso: 250-280 lm
Tipo di batteria: Li-Ion
Tensione batteria: 3,7V
Capacità della batteria: 1800 mAh, 6,67 Wh
Lampada da ocina a batteria COB:
Caricabatteria: Cavo di ricarica:
1 x stazione di ricarica
1 x manuale d’uso
4. AVVERTENZE DI SICUREZZA
• Il triangolo di segnalazione identica tutte le istruzioni importanti per la sicurezza. Rispettare sempre queste istruzioni, per evitare il pericolo di
lesioni personali o danni al dispositivo.
• I bambini non devono giocare con l‘apparecchio.
• Non adare pulizia e manutenzione ai bambini se non sorvegliati.
• Non lasciare il materiale d‘imballaggio in giro con noncuranza. Potrebbe infatti diventare un pericoloso giocattolo per i bambini!
• Utilizzare questo prodotto solo per lo scopo previsto!
• Non manomettere né smontare il prodotto!
• Per la propria sicurezza, utilizzare solo gli accessori e i pezzi di ricambio indicati nelle istruzioni o consigliati dal produttore!
• Non esporre la mini lampada da lavoro a temperature elevate, umidità estrema o forti vibrazioni.
• Non guardare mai direttamente la fonte luminosa e non puntare mai il raggio luminoso sulle persone o sugli animali. La luce a LED può causare
lesioni agli occhi.
• Non guardare mai la fonte luminosa mediante strumenti ottici. La luce a LED può causare lesioni agli occhi.
AVVERTENZA!
Leggere attentamente le istruzioni per l‘uso prima della messa in funzione e osservare tutte le avvertenze di sicurezza!
La mancata osservanza di queste istruzioni può provocare lesioni personali, danni al prodotto o alla vostra proprietà!
Conservare l‘imballo originale, la ricevuta di acquisto e il presente manuale per poterlo eventualmente consultare in seguito!
Quando si consegna il prodotto a terzi, consegnare anche il presente manuale.
Prima della messa in funzione vericare l‘integrità e la completezza del contenuto della confezione!
Lampada da ocina a batteria COB con stazione di carica
INDICE
1. BESTIMMUNGSGEMÄSSER GEBRAUCH ______________________________________________________________________ 2
2. LIEFERUMFANG ____________________________________________________________________________________ 2
3. SPEZIFIKATIONEN ___________________________________________________________________________________ 2
4. SICHERHEITSHINWEISE _______________________________________________________________________________ 2
5. SYMBOLERKLÄRUNG _________________________________________________________________________________ 3
6. BEDIENUNGSANLEITUNG ______________________________________________________________________________ 3
6.1 ÜBERSICHT _______________________________________________________________________________________ 3
6.2 AUFLADEN DES AKKUS ________________________________________________________________________________ 3
6.3 FUNKTIONEN ______________________________________________________________________________________ 3
6.4 BEFESTIGUNG _____________________________________________________________________________________ 4
7. WARTUNG UND PFLEGE _______________________________________________________________________________ 4
7.1 WARTUNG _______________________________________________________________________________________ 4
7.2 PFLEGE _________________________________________________________________________________________ 4
8. HINWEISE ZUM UMWELTSCHUTZ__________________________________________________________________________ 4
9. KONTAKTINFORMATIONEN _____________________________________________________________________________ 4

15
5. SPIEGAZIONE DEI SIMBOLI
6. ISTRUZIONI PER L‘USO
6.1 SCHEMA
Lampada da ocina a batteria:
Stazione di ricarica: Adattatore auto:
Caricabatteria: Cavo di ricarica:
Conforme alle direttive CE
Isolamento classe 2
1 Torcia tascabile a LED
2 Campo luminoso COB
3 Interruttore
4 Staa di sostegno ribaltabile
5 Gancio di ssaggio
6 Magnete sul retro
7 Presa di ricarica USB
8 Spia di controllo ricarica
9 Contatti di ricarica
10 Magnete staa di sostegno
11 Contatti di ricarica
12 Presa di ricarica USB
13 Porta USB
14 Spia di controllo
15 Porta USB 16 Connettore USB tipo A
17 Connettore USB Micro B
Figura 1: Schema
Figura 2: Collegamento diretto Figura 3: Utilizzo della stazione di ricarica
I dispositivi elettrici contrassegnati con
questo simbolo non vanno gettati nei riuti
domestici
Conforme alla legge sulla sicurezza dei
prodotti
Utilizzare soltanto in luoghi asciutti
Leggere le istruzioni d‘uso
6.2 RICARICA DELLA BATTERIA
6.3 FUNZIONI
Per ricaricare la batteria è possibile collegare la lampada da ocina direttamente, gura 2, oppure utilizzare la stazione di ricarica, gura 3. Per entrambe le possibilità
si può utilizzare il caricabatteria o l’adattatore per auto.
Premendo ripetutamente l‘interruttore (pos. 3 dello schema) è possibile attivare le seguenti funzioni della lampada da ocina a batteria:
• campo luminoso COB (pos. 2 dello schema) dimmerato on
• campo luminoso COB
• campo luminoso COB o / torcia tascabile LED (pos. 1 dello schema) on
• o
Durante la ricarica, la spia di controllo è accesa di colore rosso. Una volta che la batteria è completamente ricaricata, la spia di controllo si accende a luce verde.
Per terminare il processo di ricarica, scollegare prima il caricabatteria / l’adattatore per auto dalla presa, quindi separare la lampada da ocina dalla stazione di
ricarica / dal cavo di ricarica.

16
Per ottenere un’illuminazione ottimale è possibile ribaltare la staa di
sostegno (pos. 4 dello schema).
Figura 4: Ribaltamento della staa di sostegno
6.4 FISSAGGIO
7. MANUTENZIONE E PULIZIA
7.1 MANUTENZIONE
7.2 PULIZIA
8. AVVERTENZE SULLA TUTELA AMBIENTALE
9. COME CONTATTARCI
Per poter lavorare a mani libere nel campo di luce, la lampada da ocina a batteria si può
La lampada, la stazione di ricarica e l’adattatore per auto, se utilizzati in maniera appropriata, non richiedono manutenzione.
Pulire la lampada, la stazione di ricarica e l’adattatore per auto soltanto con un panno morbido e asciutto. Non utilizzare detergenti aggressivi o solventi. Evitare
sempre che i liquidi penetrino all‘interno dei dispositivi.
Non smaltire gli apparecchi elettrici insieme ai riuti domestici! I dispositivi elettrici ed elettronici devono essere separati e destinati al riciclaggio.
Per le possibilità di smaltimento delle apparecchiature elettriche ed elettroniche, informarsi presso il proprio comune.
1. agganciare al gancio di ssaggio ribaltabile (pos. 5 dello schema), oppure
2. ssare con i magneti (poss. 6 e 10 dello schema) su una supercie magnetica liscia. Accertarsi che la supercie, ad es. la vernice dell‘auto, non venga danneggiata.
EAL GmbH
Otto-Hausmann-Ring 107
42115Wuppertal, Germania
+49 (0)202 42 92 83 0
+49 (0) 202 42 92 83 – 160
info@eal-vertrieb.com
www.eal-vertrieb.com
© EAL GmbH, 13490 03. 2019
Other manuals for 13490
1
Table of contents
Languages:
Other EUFAB Work Light manuals
Popular Work Light manuals by other brands

Schumacher Electric
Schumacher Electric SL176R owner's manual

Haneco
Haneco SKYLUX GEN II installation guide

CSL
CSL 304331 user manual

ECCO SAFETY GROUP
ECCO SAFETY GROUP CODE 3 CW2461 Installation and operation instruction

StarTech.com
StarTech.com 849915 Operation manual

Imagilights
Imagilights TRON RECTANGULAR user manual