Excel G3 Eco User manual

EXCEL
EXCEL
EXCEL
EXCEL
EXCEL
EXCEL
EXCEL
EXCEL
EXCEL
EXCEL
User Manual
Excel G3 Eco

~ 1 ~
Overall user manual
© 2012 VAN OS MEDICAL UK LTD.
YOU AND / OR YOUR ATTENDANT MUST READ AND FULLY UNDERSTAND THIS MANUAL BEFORE USE
General information
At this moment we introduce you to a quality product from Van Os Medical UK Ltd and we want to thank you for
the confidence in our Excel products. The Excel G3 ‘Eco’ wheelchair is a quality product. It is adjustable in many
different ways and it can also be easily upgraded.
The policy of Van Os Medical UK Ltd is to continually improve the quality and reliability of our products. We reserve
the right, therefore, without prior notification, to alter this guide.
It is important that your guide for the use of the wheelchair is read carefully. The manual contains important
information about the safe use and maintenance of your wheelchair. We recommend that you keep this guide, it's
also your proof of warranty and you will find it useful for referring to at a later date.
The safety instructions in this guide are general guidelines that must be seen as broad guidelines. It is possible that
you develop your own ways for many common actions. However, we advise you to consult a professional for
assistance in developing safe and effective techniques with regards to your daily activities and your physical
capabilities.
Your new wheelchair requires frequent maintenance, much of which you can do yourself. We want you to take your
wheelchair once a year to be inspected by a professional. You will find a maintenance schedule later in this
manual.
You will also find that this manual includes a detailed description of all the available settings of your wheelchair.
Many of these options require, as well as repairs to your wheelchair, the knowledge of a professional. We therefore
advise you to consult a professional if your wheelchair requires repairs or a modification.
Caution!
In this guide you will find informative comments and warnings. These are clearly identified by the below symbols
and the appearance of the text:
Tip Information
Warning To avoid personal injury, warnings must be followed
Fill out the information on your authorised dealer below:
Company: …………………………………………………………………
Address: …………………………………………………………………
…………………………………………………………………
Telephone number: …………………………………………………………………
Fax number: …………………………………………………………………
Email adress: …………………………………………………………………
Website: …………………………………………………………………

~ 2 ~
Overall user manual
© 2012 VAN OS MEDICAL UK LTD.
Contents
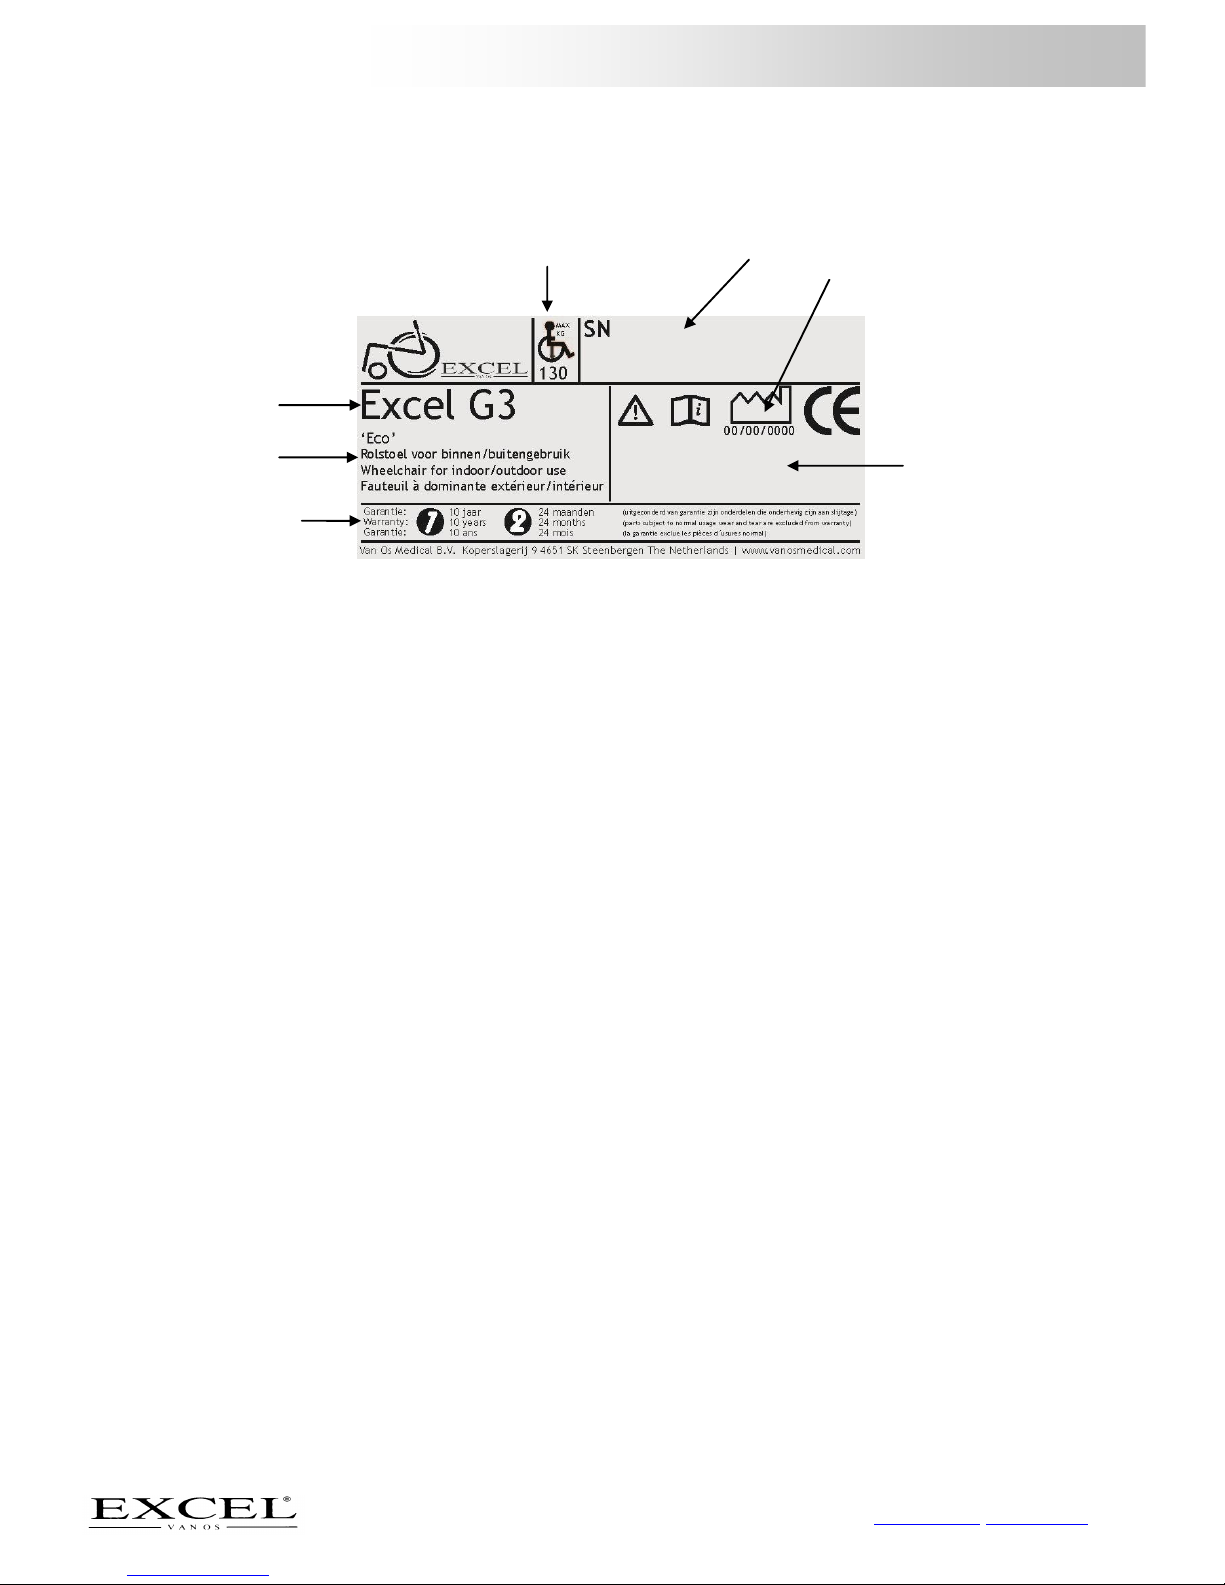
1. IDENTIFICATION.................................................................................................................................................................. 3
2. GENERAL EXPLANATION CONCERNING YOUR WHEELCHAIR ............................................................................................... 4
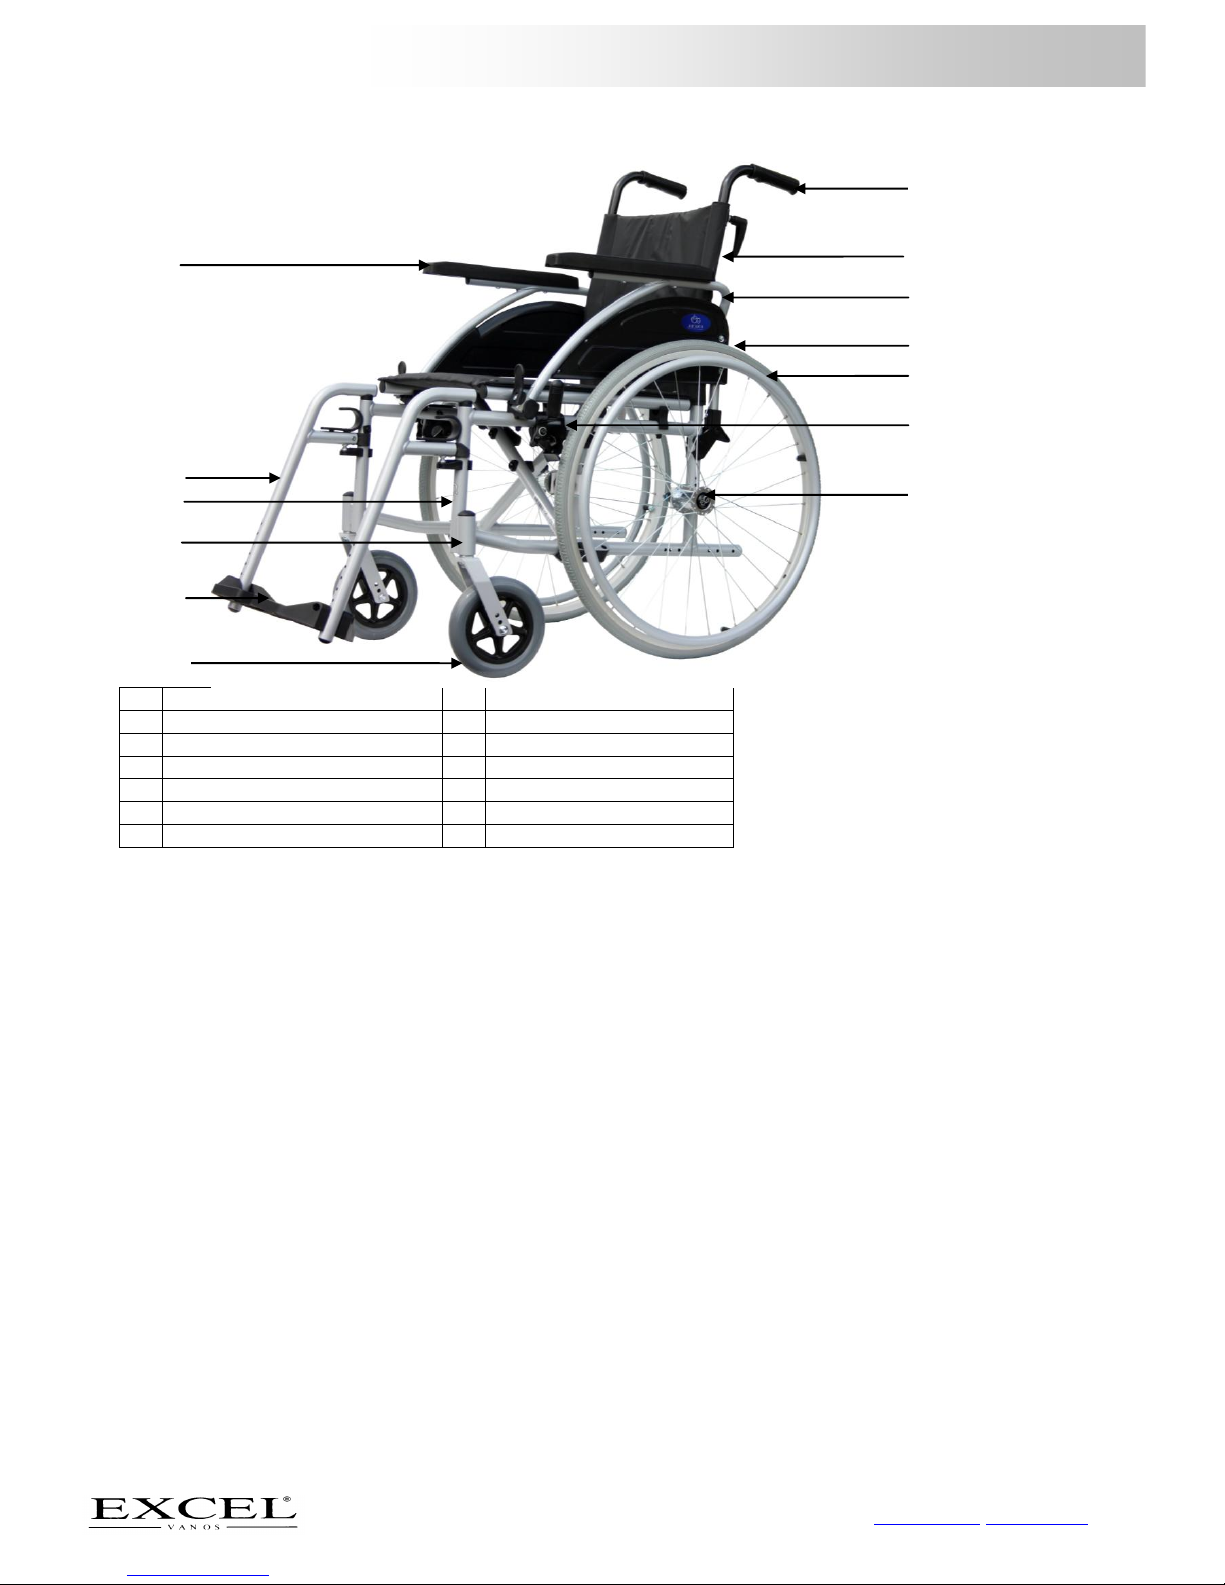
2.1 COMPONENTS OF THE WHEELCHAIR ................................................................................................................................................... 4
2.2 GENERAL EXPLANATION OF THE FUNCTION AND POSSIBILITIES OF YOUR WHEELCHAIR ................................................................................... 4
3. SAFETY REGULATIONS ........................................................................................................................................................ 4
3.1 GENERAL SAFETY REGULATIONS......................................................................................................................................................... 4
3.2 WARNINGS FOR SAFE USE ................................................................................................................................................................ 5
4. INSTRUCTIONS FOR USE...................................................................................................................................................... 5
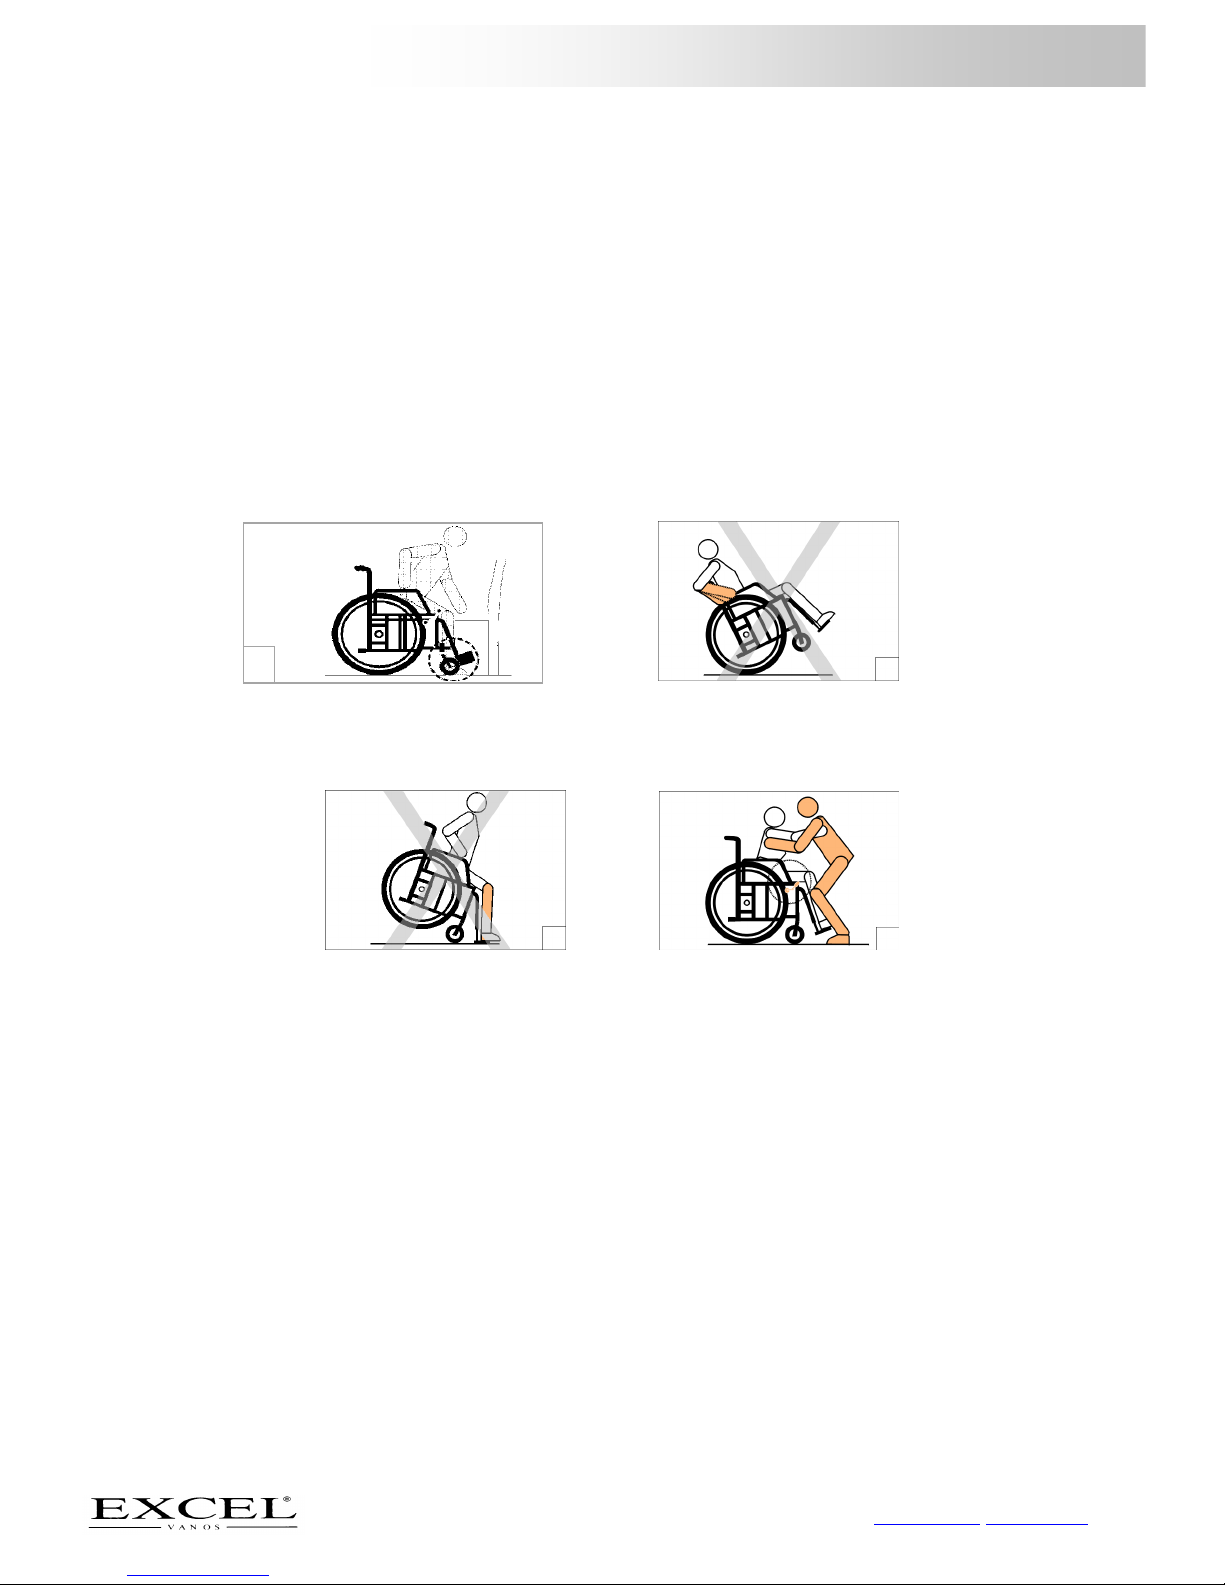
4.1 SAFETY TIPS .................................................................................................................................................................................. 5
4.2 NEGOTIATING PAVEMENTS AND UNEQUAL SURFACES............................................................................................................................. 7
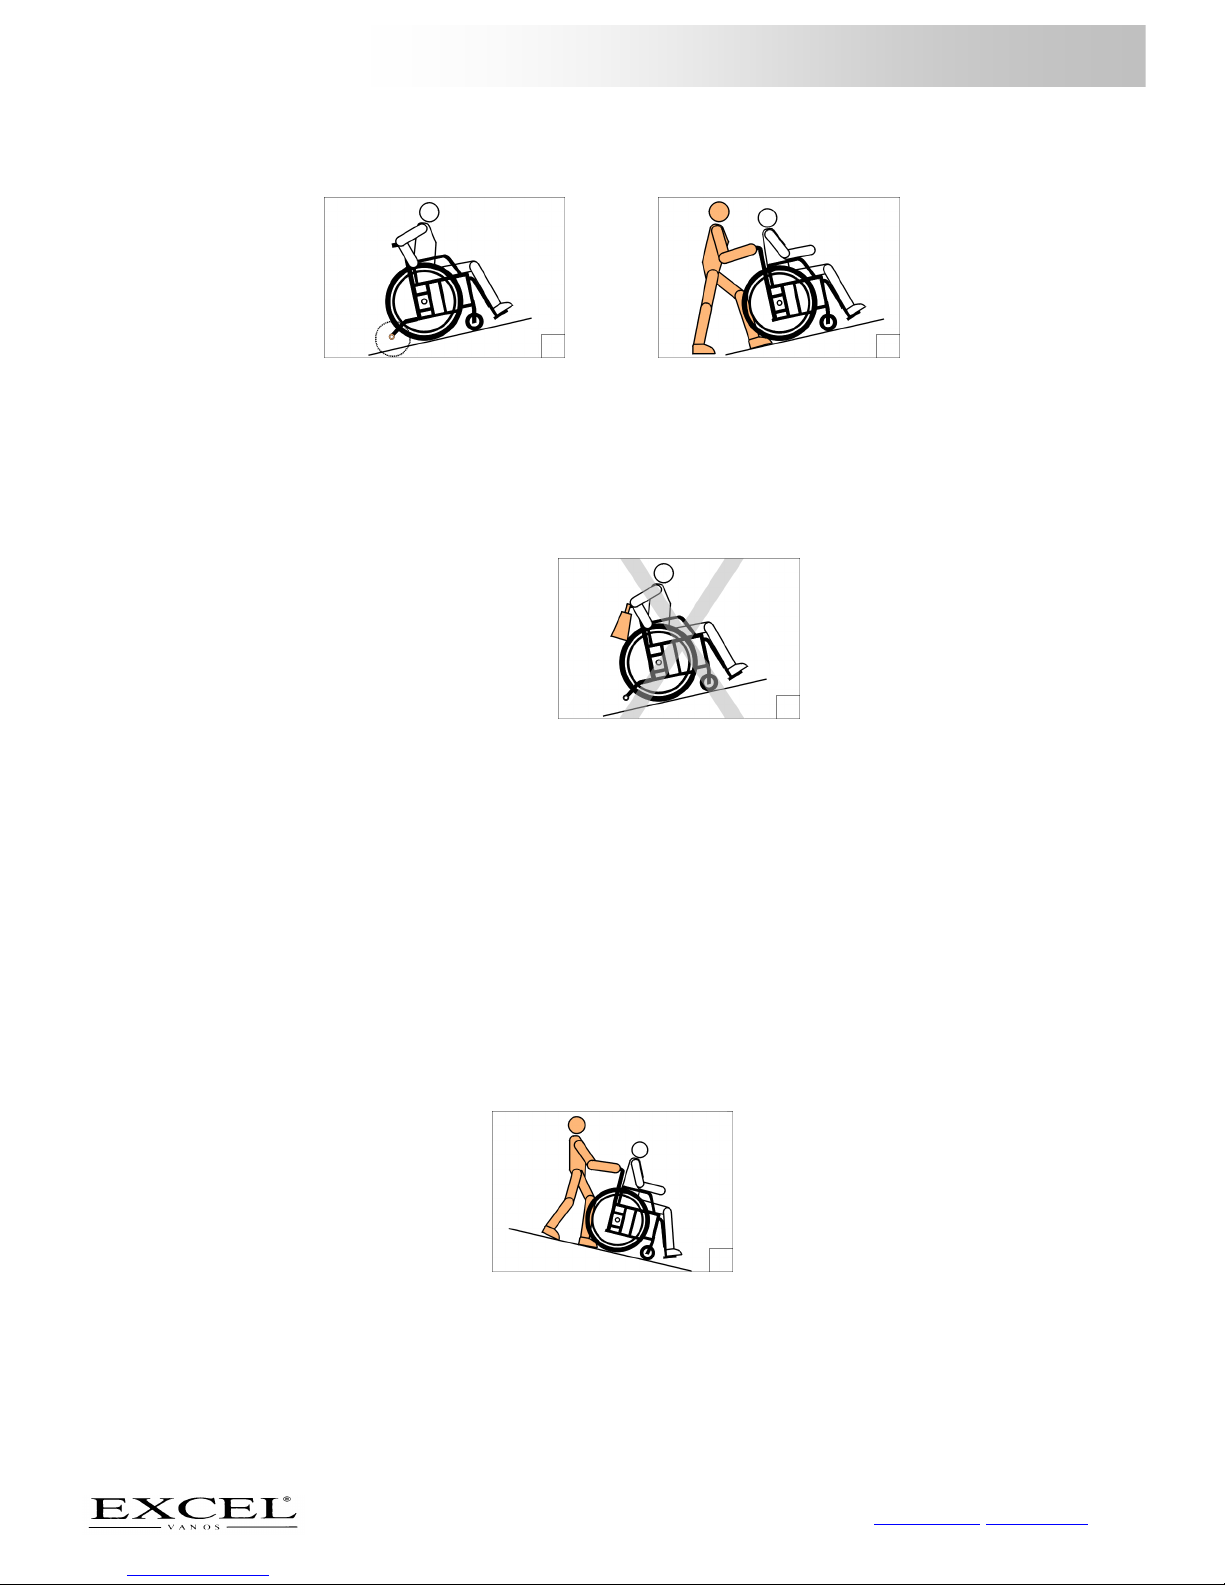
4.3 GOING UP AND DOWN RAMPS .......................................................................................................................................................... 7
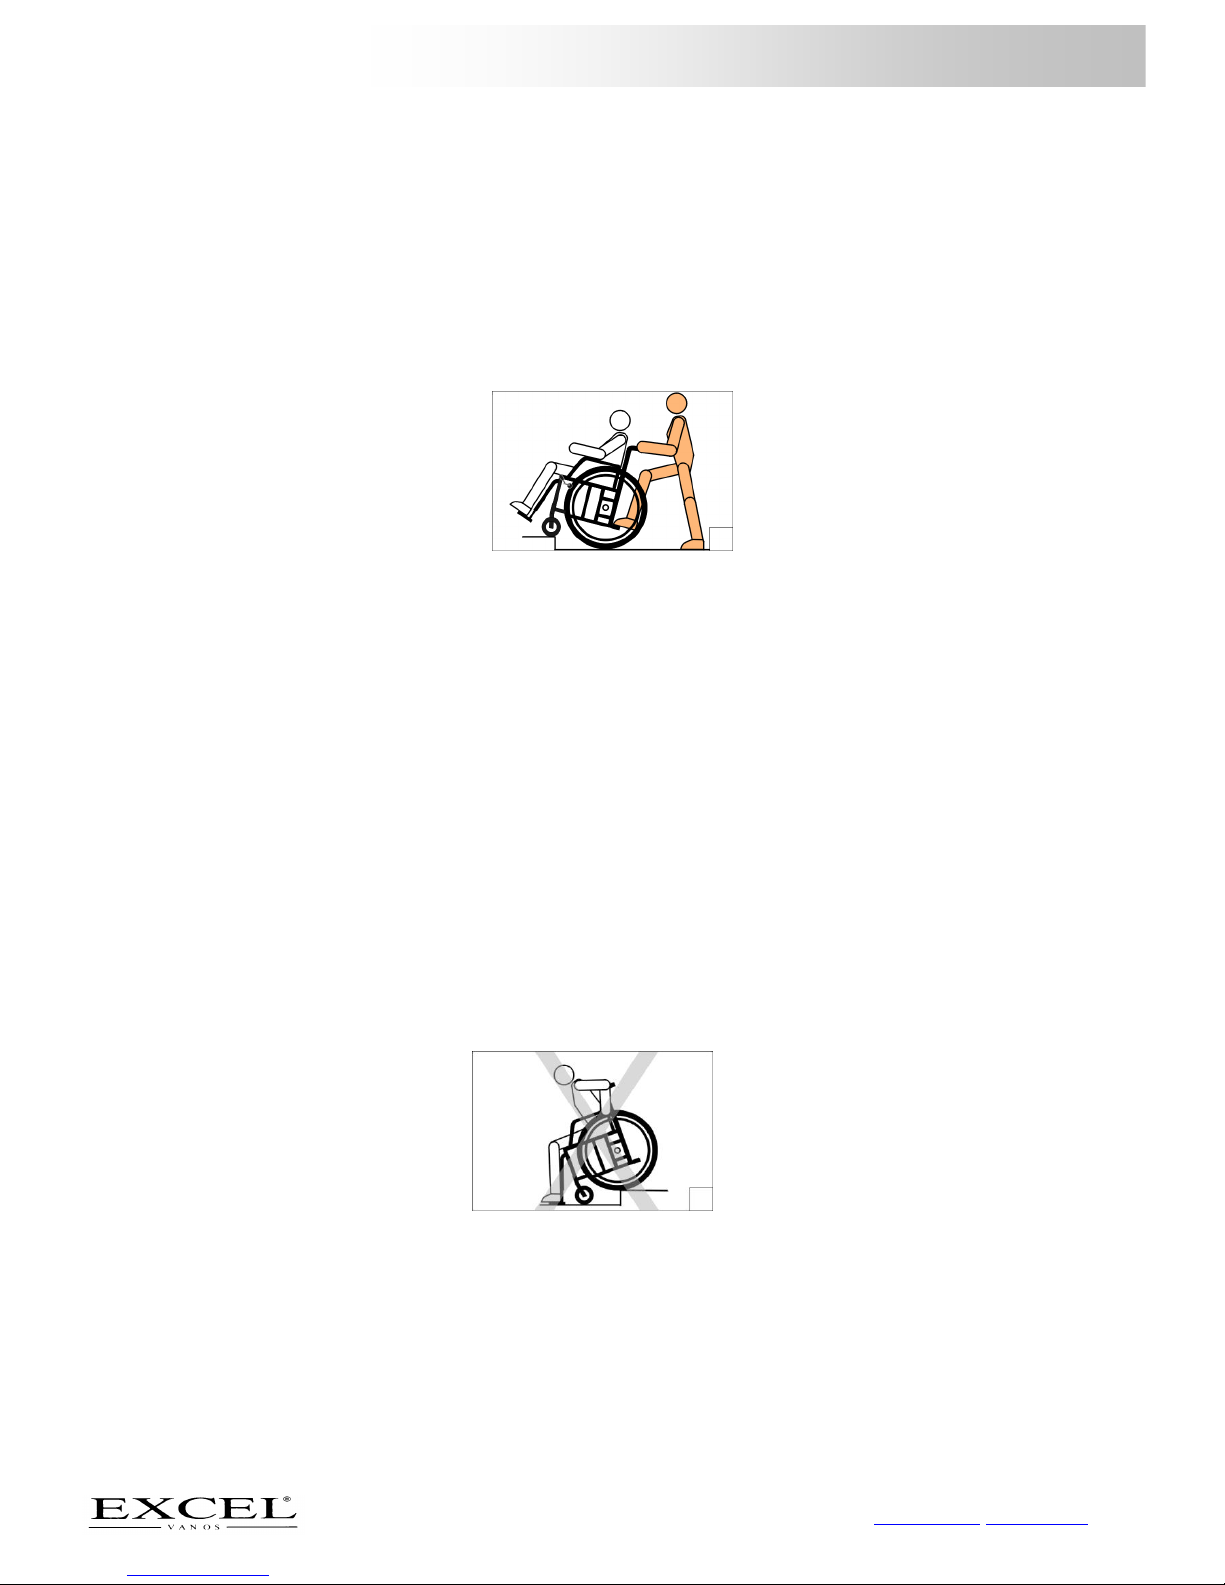
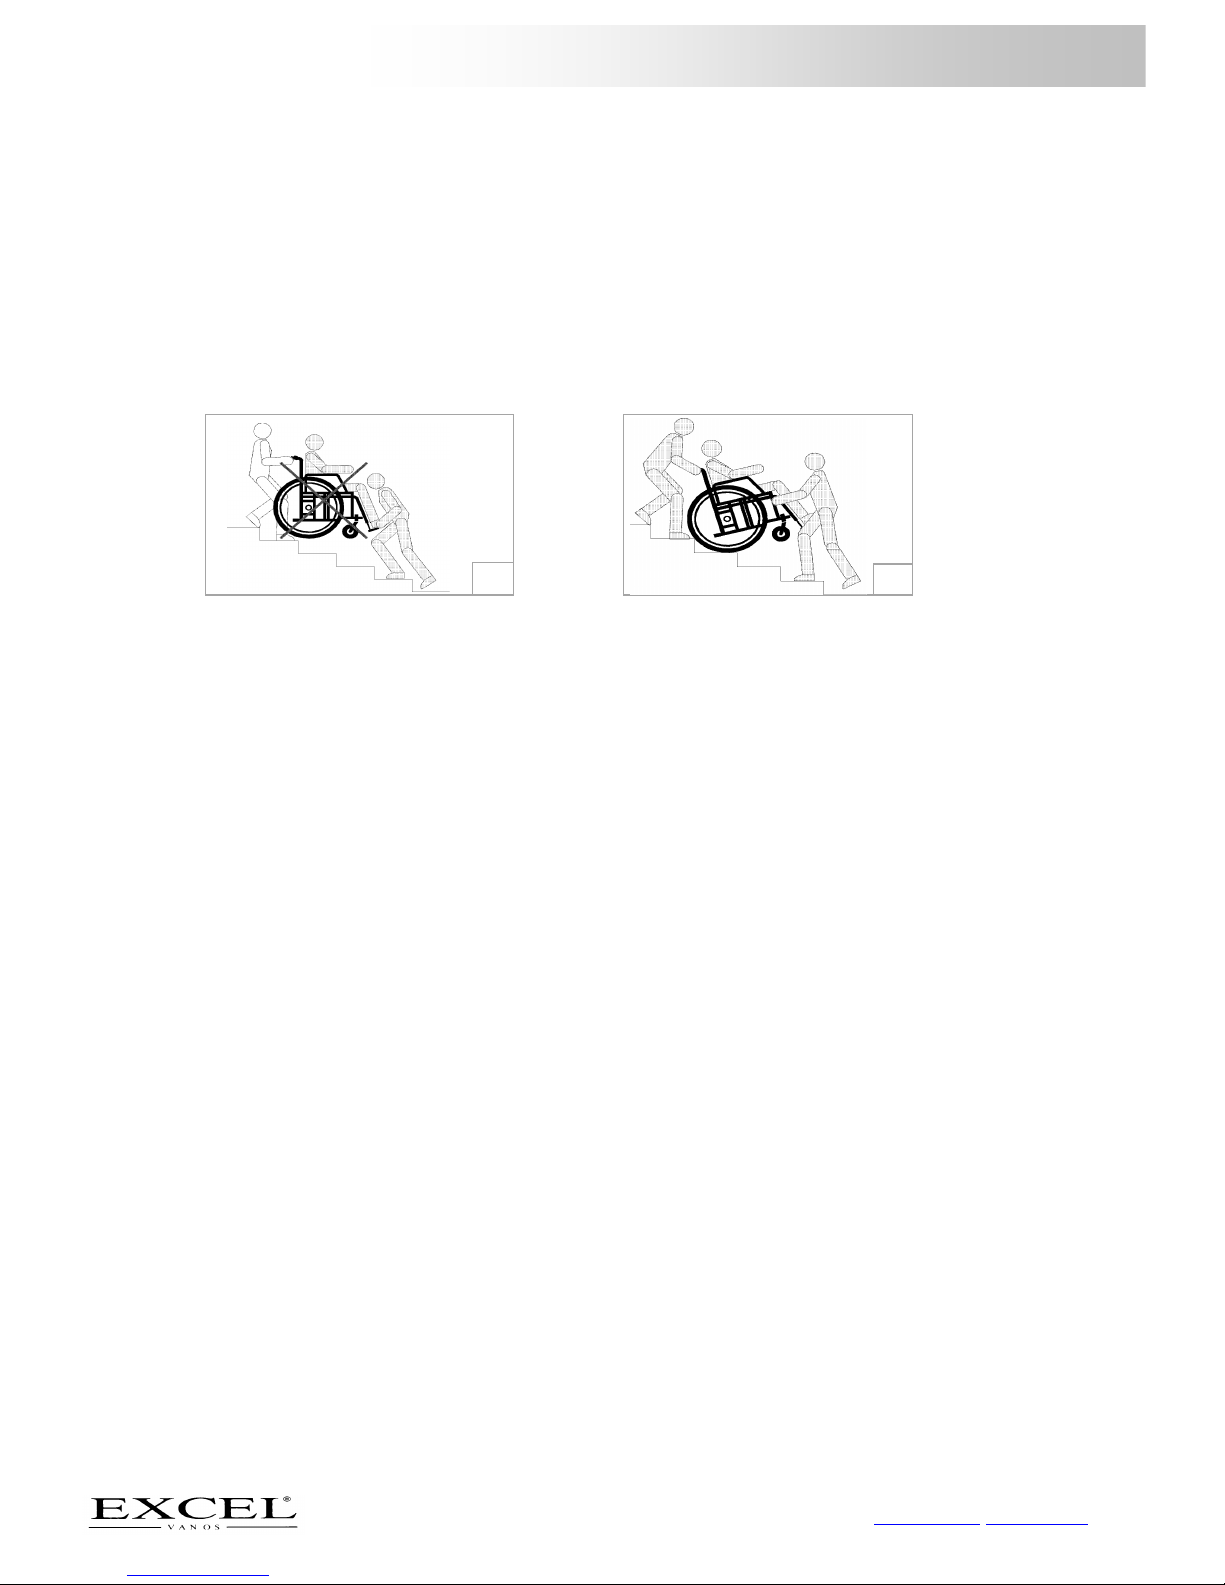
4.4 GOING UP AND DOWN STAIRS ........................................................................................................................................................... 9
5. INSTRUCTIONS FOR USE AND MOUNTING OPTIONS......................................................................................................... 10
5.1 TOOLS AND TECHNICAL INFORMATION.............................................................................................................................................. 10
5.2 OPENING AND CLOSING THE WHEELCHAIR ......................................................................................................................................... 11
5.3 USE OF THE FOOTPLATE AND FOOTREST ............................................................................................................................................ 11
5.4 USING THE ELEVATING LEG RESTS (OPTIONAL) .................................................................................................................................... 13
5.5 USING THE CALF PLATE (OPTIONAL).................................................................................................................................................. 14
5.6 USING THE WHEELCHAIR BRAKE....................................................................................................................................................... 15
5.7 USING THE ARMREST..................................................................................................................................................................... 15
5.8 USING THE PUSH HANDLES ............................................................................................................................................................. 16
5.9 USING THE REAR WHEELS (TYRE TABLE)AND ANTI-TIP WHEELS............................................................................................................... 16
5.10 USING ACCESSORIES AND OTHER OPTIONS ON YOUR WHEELCHAIR ........................................................................................................ 17
6. TRANSPORT AND TRANSIT IN CAR .................................................................................................................................... 20
6.1 DE-ASSEMBLY.............................................................................................................................................................................. 20
6.2 ASSEMBLY .................................................................................................................................................................................. 20
7. MAINTENANCE ................................................................................................................................................................. 20
7.1 TYRES ........................................................................................................................................................................................ 20
7.2 BRAKES ...................................................................................................................................................................................... 21
7.3 CROSS BRACE .............................................................................................................................................................................. 21
7.4 REAR WHEEL ............................................................................................................................................................................... 21
7.5 FRONT CASTOR AND FRONT CASTOR FORK ......................................................................................................................................... 21
7.6 UPHOLSTERY ............................................................................................................................................................................... 21
7.7 CLEANING................................................................................................................................................................................... 21
8. PROBLEM ANALYSIS AND SOLUTIONS............................................................................................................................... 22
9. WARRANTY....................................................................................................................................................................... 22
9.1 WARRANTY APPLICATION............................................................................................................................................................... 22
9.2 WARRANTY DEFINITION................................................................................................................................................................. 23
10. SERVICE AND MAINTENANCE........................................................................................................................................ 24
10.1 GENERAL MAINTENANCE INSTRUCTIONS.......................................................................................................................................... 24
10.2 SERVICE CHECKLIST ..................................................................................................................................................................... 25

~ 3 ~
Overall user manual
© 2012 VAN OS MEDICAL UK LTD.
6
7
1. IDENTIFICATION
Your wheelchair is equipped with a unique serial number. You can find this number on the cross frame of your
wheelchair. Below is an example of the frame label on which you can find the identification number. Furthermore
you will find the explanation of the various data stored on the frame label listed below.
1. Production date The date on which your wheelchair was manufactured.
2. Serial number Every wheelchair has its own unique serial number. You must have this number
when making technical requests or if warranty parts are required.
3. Maximum user weight The largest occupant weight allowed for protection of both the wheelchair and the
user.
4. Type number This number indicates which model of wheelchair you have, again this is always
required when making technical calls.
5. Model name The model name of your wheelchair starts with the brand name Excel. The brand
name Excel is followed by an additional model description that forms the model
name of your wheelchair.
6. Usage application The intended use of your wheelchair.
7. Warranty Here is the guarantee period of your wheelchair reflected. Chapter 9 describes your
warranty terms and conditions in more detail.
1
2
3
4
5

~ 4 ~
Overall user manual
© 2012 VAN OS MEDICAL UK LTD.
2. GENERAL EXPLANATION CONCERNING YOUR WHEELCHAIR
2.1 Components of the wheelchair
1
Push handle
8
Front wheel
2
Backrest upholstery
9
Foot plate
3
Armrest
10
Bearing head
4
Rear wheel
11
Frame
5
Hand rim
12
Foot rest
6
Brake
13
Arm pad
7
Quick-release axle
Your wheelchair is equipped with a number of elements and parts. You should know these before continue reading
this manual. Your wheelchair can be equipped with options and accessories not pictured. You will see this yourself
whilst reading this manual. Designs and specifications may change without prior notice.
2.2 General explanation of the function and possibilities of your wheelchair
Your wheelchair is foldable, which is designed to be easy to transport in a car. This wheelchair is known for its
cross frame. The cross frame has the same colour as the side frame. We distinguish our manual wheelchairs into
two categories: self propel wheelchairs and transit version wheelchairs. You can see if you have a self propel
wheelchair of a transit version wheelchair by checking the rear wheels (self propel: 24” rear wheels, transit
version: 12½” wheels). The G3 Eco is only available as a self propel wheelchair. The rear wheels are provided with
a steel wheel hub. Your wheelchair is a product falling into the medical equipment and is not a standard consumer
product. You must follow this manual completely to ensure good, optimal and safe use of your wheelchair.
3. SAFETY REGULATIONS
Van Os Medical UK Ltd specifically disclaims responsibility for anybody injury or property damage which may occur
during any use which does not comply with laws or ordinances. If used correctly, the Excel wheelchair is an utmost
safe and stable product, if the instructions for use as described in this manual are followed. However, it is possible
when the Excel wheelchair is not used correctly, dangerous situations may occur.
3.1 General safety regulations
Protect your Excel wheelchair by checking it regularly. When a part of your Excel wheelchair is not functioning
properly, a dangerous situation could occur. You must keep your wheelchair in a good condition to ensure safety
in use. Periodical inspection, correct adjustment of your wheelchair and timely replacement of damaged and worn
parts will result in use for years without any problems. A qualified Van Os Medical UK Ltd dealer, who will use only
Van Os Medical UK Ltd replacement parts, will take care of your wheelchair to ensure a long lifetime.
11
12
10
9
8
7
6
5
4
3
2
1
13

~ 5 ~
Overall user manual
© 2012 VAN OS MEDICAL UK LTD.
Warning:
You must keep your wheelchair in a good state to be guaranteed of safe use.
3.2 Warnings for safe use
Warnings:
-Do not use your wheelchair on streets or roads, only on the pavements;
-Do not use your wheelchair in sand, rough area, wet and glade surfaces or surfaces with little grip;
-You are able to transport your wheelchair in all types of vehicles, including vehicles that are developed
to transport wheelchairs, however this is taken at your own risk. We accept absolutely no liability for
this. We recommend you to contact a recognised manufacturer of taxi fixations if you want to transport
your wheelchair using the appropriate system for your wheelchair and the situation.
-Do not try to ascend ramps without installed anti tippers, never ascend a hill without anti tippers;
-Do not lean over the backrest of the wheelchair. This can result in rolling over the wheelchair;
-Do not drive into curbs;
-Before leaning or reaching forward, sit back into the chair and face the castors forward, figure 1;
-A wheelie is extremely dangerous to the user and will cause serious damage to the wheelchair, figure 2;
-Do not stand on the footrest this will cause the chair to tip and injure the user (figure 3);
-Attach the brakes when you use the wheelchair in a lift or on a wheelchair lift and when you want to get
off, figure 4;
-For suitable protection of potential obstruction the lowest point of the footrests serves minimum 7 cm
free of the ground;
-Place the wheelchair on a stable, flat surface and attach the brakes before you get off;
-The standard weight capacity has been indicated on your frame label;
-Unauthorized modification and or use of no Van Os Medical parts will void the warranty of this chair and
may lead to injury to the user and damage to the chair.
4. INSTRUCTIONS FOR USE
You will have to learn the characteristics of your wheelchair. It is most important to learn the safest methods to
develop the daily activities in accordance to your life style. Consult your medical advisor or therapist for assistance
by developing safe and effective techniques for your daily activities and your physical possibilities.
4.1 Safety Tips
Daily operations such as getting off the wheelchair, reaching and bending in the wheelchair will cause a change in
the weight distribution and the centre of gravity of you and your wheelchair. You will need to perform these
movements and techniques as shown below.
Transferring
Transferring in a wheelchair is a difficult manoeuvre. Consult your physical therapist for assistance in developing
your individual technique. The possibilities you have for making a transfer are depending on your physical
characteristics. We advise you to discuss this first with your physical therapist.
4
2
3
1

~ 6 ~
Overall user manual
© 2012 VAN OS MEDICAL UK LTD.
However if you have sufficient body strength and you want to transfer to and from the wheelchair can you best do
this in the following manner:
To get out of the wheelchair
First of all you must make sure that your wheelchair stands as closely as possible to the place of where you want to
sit. Put the castors forward and attach the brakes. Flip up the footplates and swing away the foot or leg rests and
place your feet on the ground. You are now in position to carry out the operation. Shift your weight to the front of
the chair, you can use the armrests as a support and move yourself to the place where you want to sit. If necessary
you can use a transfer board.
To get in
To get in your wheelchair you need to do the same things as when you want to get out of the wheelchair, only in
reversed order.
Reaching / bending forward
Make sure that you are as close as possible to the object;
1. Place yourself as close as possible against the backrest;
2. Make sure the front wheels are turned forward. If not, go forwards and then backwards to turn the wheels fully
to the front, figure 5;
3. Engage the wheel brakes;
4. You can now move towards the target with caution to keep the wheelchair from tilting.
Reaching / bending sideward
1. Manoeuvre the chair as closely as possible to the object you want to reach. You can use your rear wheels;
2. Make sure the front wheels are fully turned to the front. If not, go forwards and then backwards to turn the
wheels fully to the front;
3. You can now pick up the object. While you pick up the object you need to make sure you keep it as close as
possible to the wheelchair (picture 6 and picture 7) to avoid tilting.
Reaching / bending backward
1. Manoeuvre the chair as closely as possible to the object. You can use the rear wheels. For example they will
indicate how close you can come to object;
2. Do not engage the wheel locks. If your weight moves while reaching, it is better to drive in that direction than
tipping the wheelchair, figure 8;
3. Do not reach further than your arm can reach. If you are in doubt, you reposition the chair.
6
7
8
5

~ 7 ~
Overall user manual
© 2012 VAN OS MEDICAL UK LTD.
4.2 Negotiating pavements and unequal surfaces
Going up the pavement
If you ascend a pavement, you must do this together with an attendant. The attendant can help you in two
different ways, however we advise you to do it the first way.
-You and the attendant reach the pavement facing forwards. The attendant must pull the push handles towards
him and place his foot on the stepper on the rear side of the wheelchair. This creates a leverage effect that
tips the wheelchair, figure 9.
-The attendant is already standing on the pavement and makes sure that the wheelchair stands with the rear
wheels as closely to the pavement as possible. The user of the wheelchair needs to lean backwards. This way
the wheelchair will tip backwards and the attendant can pull the chair on the pavement. The attendant needs
to make sure that the front wheels are on the pavement before he lets the wheelchair down.
Warning:
Do not drive into curbs!
If you want to go up a pavement alone, you should move your weight as far forward as possible by bending forward.
Then you must provide a so-called 'Wheelie', to get the front wheels on to the pavement (see figure 2, under the
heading “Warnings for safe use”). You can only perform this action if you have practiced it with a trained expert.
Going down the pavement
If you want to go down the pavement, you must do this with an attendant. The attendant should move the
wheelchair forwards to the curb. Then the user should lean back so the attendant can tilt the wheelchair to find a
balance point. When the wheelchair is balanced the attendant can move the wheelchair slowly off the curb. When
the wheelchair is off the pavement, the attendant can let the front wheels back onto the ground.
If you want to independently go off the pavement, you should do this backwards not forwards (figure 10 shows what
not to do). You can do this only if you've practiced with a trained expert.
4.3 Going up and down ramps
Most people can climb short slopes by themselves. This of course depends on your body strength, stamina and the
gradation of the slope. Inspect the slope always for risks, such as holes or slippery and uneven surfaces before you
drive off. If you cannot see the slope, ask someone to inspect it for you.
Warning:
A slope of more than 5 degrees can be dangerous to descend or climb. Remember that the friction of
your hands to grab the hand rim is the only way to brake while driving.
10
9

~ 8 ~
Overall user manual
© 2012 VAN OS MEDICAL UK LTD.
Most people develop their own methods to drive up slopes through practice. Sit with your upper body slightly
forwards as you climb the slope. Should it be necessary to stop on the slope, you must try to avoid unexpected
movements which may cause tilting when climbing further (figure 11). If you want to climb a relatively steep slope,
you must do this with the assistance of a supervisor, figure 12.
Tip
-We recommend you to use anti-tip wheels. They prevent you from tipping the wheelchair over backwards
(figure 12). Depending on the model of your Excel wheelchair sometimes these are a standard item and
sometimes they are an optional extra;
-Do not carry any weight on the back of the wheelchair whilst ascending (figure 13). This changes the balance
and increases the chances of tipping backwards.
Make sure the footrest is at least 7 cm from the ground when you are descending a slope. This is in order to ensure
your safety at the end of the slope. Always look forward when you descend and do not lean forward as this can
cause overturning. Lean slightly backwards in order to increase stability.
Make sure you have your wheelchair under control at all times. Do not hurry down the slope, but move slowly and
safely. The speed of descent is controlled by the amount of grip strength that you exercise on the hand rims. In an
effort to prevent friction burns to your hands, it is recommended that you use gloves. To reduce the risk that you
burn your hands or lose control over the wheelchair, you need to slowly descend a slope.
Do not use the wheel brakes during the descent. The wheel brakes are designed for static braking of the rear
wheels whilst stationary.
Avoid changing direction as you descend. Despite that your Excel wheelchair is designed for balance and control, a
change of direction on the slope can change the balance which will cause instability.
If you are using an attendant they should be aware that even with a slight slope already considerable traction
should be exercised (figure 14).
Warning:
Using the wheel brakes to slow down the wheelchair whilst driving can cause a sudden stoppage. The
result of this can be that the chair rotates to one side and tilts, or abruptly stops so that the seat tilts
forward.
Tip
If your wheelchair is used in an environment where there are many slopes, it is advisable to fit a drum
braking system for the attendant to use.
11
12
13
14

~ 9 ~
Overall user manual
© 2012 VAN OS MEDICAL UK LTD.
4.4 Going up and down stairs
Stairs are one of the largest obstacles for wheelchair users. However, with a little help from others it is possible to
climb up and down the stairs when a wheelchair elevator is not available. Only you and your attendant must be
aware of the rather heavy weight to be replaced.
Going up the stairs
You need to go up the stairs backwards. We advise if you want to climb the stairs with a wheelchair you will do this
with the help of a minimum of two attendants. One attendant on the front of the wheelchair, and one attendant on
the back. The attendant at the back grabs the push handles and let the wheelchair tip backwards until it is in
balance. When the wheels are in balance the attendant at the front needs to grab the side frames. You are now in
position to climb the stairs. The attendant on the front pushes the side frames up until they are above the first step
and the attendant on the back makes the first step on the stairs. Repeat this technique until the last step of the
stair, see figure 16. You can let the front castors down when the attendant on the front has taken the last step.
7
Going down stairs
To go down the stairs you need to do the same things as when you were going up the stairs, only in reversed order
and you need to go down the stairs forwards.
Warning:
Never lift a wheelchair by the push handles, armrests or footrests (figure 15). Always hold a part of the
main frame.
15
16

~ 10 ~
Overall user manual
© 2012 VAN OS MEDICAL UK LTD.
MAKING ADJUSTMENTS TO YOUR WHEELCHAIR CAN CAUSE BIG RISKS FOR YOUR SAFETY AND THE FUNCTION OF
YOUR WHEELCHAIR. ADJUSTMENTS MADE BY YOURSELF ARE STRONGLY ADVISED AGAINST AND CARRIED OUT AT
YOUR OWN RISK. ALWAYS SEEK ADVICE FROM AN APPROVED DEALER BEFORE MAKING ADJUSTMENTS.
5. INSTRUCTIONS FOR USE AND MOUNTING OPTIONS
In this chapter we will explore all the possibilities that you have with your wheelchair. All setting and user
instructions, such as the removal of the footrest, will be discussed.
Your wheelchair is an Excel G3 ‘Eco’
This wheelchair is available as self propel wheelchair. You can check paragraph 2.2 for more information.
Warning:
We advise you, if you want to make changes where tools are needed, to consult with your dealer.
5.1 Tools and technical information
For the maintenance of your wheelchair you will, in some cases, need tools. For your wheelchair you will need the
following tools:
Phillips screwdriver PH2
Allen keys 4, 5 and 6 mm
Cross-ring or keys 8, 10, 13 and 26 mm
Spanners 19 and 22 mm
Socket wrench 19 mm
Excel G3 ‘Eco’
Seat width 40, 45, 50, 55* and 60* cm
Seat depth 43 and 46 cm
Seat height 47½** and 50 cm
Backrest height 37½ cm
Total width seat width + 20 cm
Total length 107 cm (including footrests, 81 cm without footrest)
Total height 90 cm
Armrest height 23½ cm
Weight (complete) 19.9 kg
Transport weight 11.9 kg
Maximum user weight 130 kg (150 kg for seat width 50, 55 and 60 cm)
*Seat width 55 and 60 cm are only available in combination with seat depth 46 cm.
**Only on a self propel wheelchair

~ 11 ~
Overall user manual
© 2012 VAN OS MEDICAL UK LTD.
5.2 Opening and closing the wheelchair
Opening the wheelchair
-Stand next to the wheelchair;
-Grab the seat tubes and move them apart;
-Push the seat tubes downwards until the wheelchair unfolds itself, picture 1;
-Go to the front of the wheelchair and push the seat tubes on to the cross frame;
-Check if the seat tubes are directly on to the cross frame and if the seat upholstery is flat;
-Replace the foot or leg rests and the seat cushion back on the wheelchair and fold down the footplate;
-You can now use the wheelchair.
Folding the wheelchair
-Flip up the footplates and remove the foot or leg rests;
-Remove the seat cushion from the wheelchair;
-Go to the side of the wheelchair;
-Place one hand at the front side in the middle of the seat upholstery and one hand at the backside in the
middle of the seat upholstery, picture 2;
-Pull the seat upholstery upwards;
-Tilt the wheelchair and push the sides towards each other to fold the wheelchair completely.
5.3 Use of the footplate and footrest
Adjusting the heel straps:
-You can adjust the heel straps, which you will find on the footplate, with the Velcro;
-Check if the Velcro of the heel straps is tightened properly.
Folding the footplate away
-Go to the front of the wheelchair and get a hold of the front of the foot plate, picture 3;
-Fold the footplate in the direction of the footrest, picture 4. Make sure the heel strap does not get stuck
between the footplate and footrest.
Picture 1
Picture 2
Picture 3
Picture 4

~ 12 ~
Overall user manual
© 2012 VAN OS MEDICAL UK LTD.
Swinging the footrests towards and away from the wheelchair
-Go to the front of the wheelchair;
-Pull the black control lever up, picture 5;
-You can now swing the footrest inwards or outwards, picture 6.
Removing the footrests from the wheelchair
-Go to the front of the wheelchair;
-Pull the black control lever up, picture 5. You can now swing the footrest inwards and outwards, picture 6;
-Swing the footrests 90˚ to the outside of your wheelchair and pull the complete footrest straight up from the
tube.
Placing the footrest back on your wheelchair
-Go to the front of the wheelchair;
-Place the footrest with an angle of 90°back on the tube;
-Swing the footrest 90° to the front until you hear a click. This click confirms that the footrest is in position.
Setting the height of the footplate
You have the possibility to adjust the height of the footplate.
You can do this by using the included Allen wrench.
-Loosen the screw, picture 7;
-Place the footplate at the desired height;
-Tighten the screw.
Picture 5
Picture 6
Picture 7

~ 13 ~
Overall user manual
© 2012 VAN OS MEDICAL UK LTD.
5.4 Using the elevating leg rests (optional)
You have the possibility to place an elevating leg rest on your wheelchair instead of a standard leg rest. In this
section you can read how to use an elevating leg rest.
Swinging the elevating leg rest away
-Go to the front of the wheelchair;
-Pull the black button upwards, picture 8;
-You can now swing your elevating leg rest inwards and outwards.
Removing the elevating leg rest from the wheelchair
-Go to the front of the wheelchair;
-Pull the black button upwards, picture 8;
-You can now swing your elevating leg rest inwards and outwards;
-Swing the elevating leg rest 90˚ to the outside of the wheelchair and pull it straight up from the receiving
tube.
Replacing the elevating leg rest back on the wheelchair
-Go to the front of the wheelchair;
-Attach your elevating leg rest back to the frame at an angle of 90°, picture 9;
-Turn the leg rest so that it is parallel with your frame;
-You should hear a click. This click confirms that the leg rest is in position.
Setting height of the elevating leg rest
-Turn the bolt of the elevating leg rest loose, picture 10;
-Select the desired height and retighten the bolt;
-Make sure the comfort leg support is in the desired position.
Setting the angle of the elevating leg rest
-Move the control lever with the black button towards the wheelchair. The gas spring in the comfort leg rest
moves up automatically, picture 11;
-If you want the comfort leg rest to move downwards, you control the lever towards the wheelchair to maintain
and support the leg while gently pushing down.
Picture 8
Picture 9
Picture 10
Picture 11

~ 14 ~
Overall user manual
© 2012 VAN OS MEDICAL UK LTD.
5.5 Using the calf plate (optional)
You have the possibility to place an elevating leg rest on your wheelchair instead of a standard leg rest. The
elevating leg rest is equipped with a calf plate. In this section you can read how to use a calf plate.
Swing away the calf plate
-Go to the front of the wheelchair;
-Get a hold of the middle of the calf plate, picture 12;
-Swing the calf plate away by moving it upwards and sideward’s, picture 13.
Setting the angle of the calf plate
Hold the calf plate at the top and bottom and by moving it up and down find the correct angle, picture 14;
Setting the height of the calf plate
In order to set the height of the calf plate, you have to use the number 4 supplied wrench.
-Use the wrench to loosen the two screws, picture 15;
-Move the calf plate to the desired height by pushing it upwards or downwards, picture 16
Picture 15
Picture 13
Picture 12
Picture 14
Picture 16

~ 15 ~
Overall user manual
© 2012 VAN OS MEDICAL UK LTD.
5.6 Using the wheelchair brake
Putting the wheelchair brake on
If you are in the wheelchair
-Take the black handle of the brake, picture 17;
-Push the forward until you hear a click, this confirms that the wheelchair has been put on the brake, picture
18.
If you are next to the wheelchair
-Go to the side of the wheelchair and face towards the front of the wheelchair;
-Take the black handle of the brake, picture 17;
-Push the lever forward until you hear a click, this confirms that the wheelchair has been put on the brake,
picture 18.
5.7 Using the armrest
Flipping the armrest backwards
-Where the front of the armrest meets the frame you will find a black lever. Pull the black lever to the armrest
tube, see picture 19;
-You can now swing the armrest backwards;
-To put the armrest back in place you must reverse the previous steps. Please make sure you hear the click that
confirms that the armrest is back in place.
Picture 17
Picture 18
Picture 19

~ 16 ~
Overall user manual
© 2012 VAN OS MEDICAL UK LTD.
5.8 Using the push handles
Adjust the height of the push handles
-Turn the black lever, until you can move the push handles, picture 20;
-Move the push handles to the desired height;
-Tighten the black lever back;
-Make sure the handles are fastened securely.
5.9 Using the arm pads
With the G3 ‘Eco’, it is possible to push the arm pads back. With this option you can decide for yourself whether
you wish to have long or short arm pads. Just do the following:
- Screw the two designated screws loose (picture 21 and 22);
- Remove the arm pads from the arm rests;
- Replace the arm pads;
- Screw the screws back in the arm rests.
Picture 21 Picture 22
5.9 Using the rear wheels (tyre cable) and anti-tip wheels
Removal of the rear wheel
You can remove the rear wheels using the quick release system in the following way:
-Stand next to the wheelchair;
-Tilt your wheelchair slightly so the wheel you wish to remove is off the ground;
-Press the black button in the centre of the wheel (picture 23) and remove the axle and wheel from the frame.
Make sure the black button is completely pressed in otherwise the ball bearing safety system that stops the
wheel from being removed at the opposite side of the axle will do exactly that;
To put the rear wheel back in place you must reverse the above steps. In order to ensure your safety please make
sure the axle is fully in place and the ball bearing system is engaged so the wheel does not come loose during use.
Picture 20

~ 17 ~
Overall user manual
© 2012 VAN OS MEDICAL UK LTD.
Tyre table
Type Designation
Type
wheelchair
Tyre size
front
Maximum pressure
front tyres
Tyre size
rear
Maximum pressure rear
tyres
EXCEL G3 ‘Eco’
Self propel
7”X 1¼"
8" X 1 ¼"
2,5 bar / 36 psi
2,5 bar / 36 psi
24" x 1 3/8"
4,5 bar / 65 psi
Using the anti-tip wheels
-Go to the back of the wheelchair;
-At the bottom of the rear side of the side frame you can find the anti-tip wheels, picture 24;
-By pulling the silver round you can adjust the height of the anti-tip wheels;
-When you pull the silver round towards you, the anti-tip wheel will automatically slide downwards. Adjust the
anti-tip wheel to the desired height and let go of the silver round;
-The anti-tip wheels are adjusted in the best manner if you, if you are at the side of the wheelchair, can see
the anti-tip wheel stick out of the outside the rear wheel;
-Check if the anti-tip wheels are fastened correctly and aren´t moving anymore;
-When you do not want to use the anti-tip wheels you can adjust the anti-tip wheels in to the highest position.
Retract the silver round with one hand, while pushing up the anti-tip wheel, by sliding it up the holder.
5.10 Using accessories and other options on your wheelchair
The seat cushion (option)
Your wheelchair can be equipped with a 5 cm thick, nylon seat cushion. This seat cushion is equipped with an anti-
slip layer, see picture 25. You need to place the seat cushion with the anti-slip side down on your wheelchair.
When you are going to sit in the wheelchair the seat cushion will not move.
Picture 23
Picture 24
Picture 25

~ 18 ~
Overall user manual
© 2012 VAN OS MEDICAL UK LTD.
Seat Belt (optional item)
Your wheelchair is equipped with a seat belt which you can use the following way:
-When in the wheelchair, you can fasten the belt by clicking the two loose ends together, picture 26;
-If the belt is too loose or too tight you can make it more secure or looser, picture 27;
-To release the seat belt, you press the red button with 'press' printed on.
Taxi Fixation Points
On your wheelchair, you will find taxi fixation indication points, picture 26. You should be familiar with these items
before transporting your wheelchair in a car or on a taxi bus. We advise you to make contact with the carrier, your
supplier and/or an approved manufacturer of taxi fixation systems for advice on an adequate system if you want to
transport your wheelchair
Picture 26
Picture 26
Picture 27

~ 19 ~
Overall user manual
© 2012 VAN OS MEDICAL UK LTD.
Tel. +44(0)1904 720170, Fax +44(0)1904 720398, E-mail: sales@vanosmedical.com, www.vanosmedical.com
Product identification
Product: Manually propelled wheelchairs
Brand: Excel
Model/type: G3
Version: Eco
Manufacturer: Name Van Os Medical B.V.
Address Koperslagerij 9
4651 SK Steenbergen
Country The Netherlands
EU Representative: Name W. van Os
Address Koperslagerij 9
4651 SK Steenbergen
Country The Netherlands
Function Director
Technical constructed file
Prepared by: Name J.M.J. Brouwer BBA
Function: Research and Development
Issue date: 01-02-2008
TCF date: 01-02-2008
Recertification date: 09-06-2008
Certificate/report no.: 08-021 / 06-233-KA
Crash test report no. according to ISO 7176/19: S8918
Means of conformity
The product is in conformity with Directive 93/42/EEC based on the use of a Technical
construction file in accordance with Article 9 (Class I products) of the Directive
Signature of EU representative:
Place : Steenbergen
Date : 09-06-2008
Number: VOS.TCF.G3.0229
CERAH
FRANCE
Table of contents
Other Excel Wheelchair manuals