10. Do not operate any appliance if it has a damaged cord or plug,
or if it is malfunctioning or if it is dropped or damaged in any
manner. if the power cord of this appliance is damaged
it should be retuned to the manufacturer or authorized service
agent for replacement, there may be a small charge for this
service.
11. Make sure the appliance is securely installed before operating it.
12. Save these instructions.
Instructions:
Clamp Installation (hanger portion not required):
Note: This clamp must not be used to mount this lamp onto any
glass item, terrarium, shelf, or aquarium.
1. Screw light bulb into the Exo Terra Glow Light Clamp Lamp
(follow maximum wattage guidelines). TIP: apply a thin layer of
petroleum jelly to the threads on the base of the light bulb before
screwing it in. This will make it easier to unscrew the bulb when
it is time to replace it.
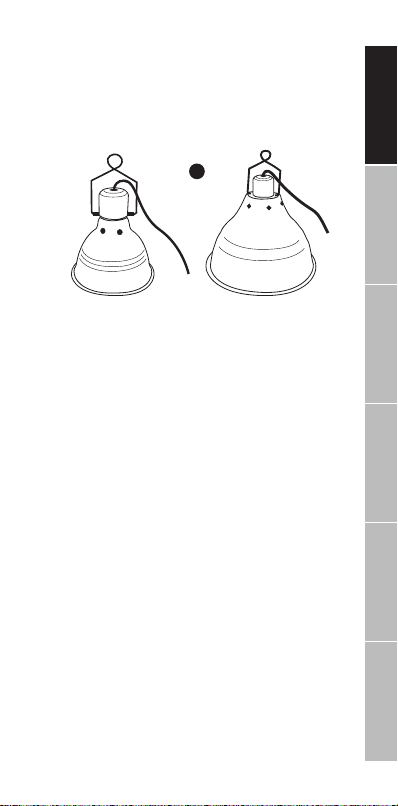
2. Attach the clamp bracket to
the lamp socket, wide part
of the bracket goes around
the socket (adjust the screw
to widen the bracket as
necessary) (A).
3. Insert the narrow, rounded
end of the clamp between
narrow part of the bracket
and tighten the screw until
the clamp is firmly
secured (B).
4. Attach the lamp to the top rim portion of your terrarium (not to
the glass part of the terrarium). Note: squeeze the clamp to open
it, release the clamp to close it. Test that the Glow Light is firmly
secured to the terrarium by gently taping the lamp with your
fingers. Ensure that the lamp is positioned over the top metal
screen portion of your terrarium and NOT over any glass, plastic
parts, or other flammable material.. Failure to do so could result
in a possible fire hazard.
5. Keep unit out of reach of children. Keep unit away from curtains
or other flammable objects.
Hanging Installation (clamp portion not required):
1. Screw light bulb into the Exo Terra Glow Light Clamp Lamp
(follow maximum wattage guidelines). TIP: apply a thin layer of
petroleum jelly to the threads on the base of the light bulb before
screwing it in. This will make it easier to unscrew the bulb when
it is time to replace it.
2. Insert Hanger into the mounting brackets located on either side
of the lamp socket (C).
3. Suspend Exo Terra Glow Light Clamp Lamp from ceiling or
other elevated platform using a chain or other recommended
suspension method. Ensure that the lamp is positioned over
the top metal screen portion of your terrarium and NOT over any
glass, plastic parts, or other flammable material.. Failure to do so
could result in a possible fire hazard.
4. Keep unit out of reach of children. Keep unit away from curtains
or other flammable objects.
Distributed by:
Canada: Rolf C. Hagen Inc., Montreal, QC H9X 0A2
U.S.A.: Rolf C. Hagen (U.S.A.) Corp., Mansfield MA. 02048
U.K.: Rolf C. Hagen (U.K.) Ltd. Castleford, W. Yorkshire WF10 5QH
Service
If you have any problem or question about the operation of this
product, please let us try to help you before you return the product
to your dealer. Most problems can be handled promptly with a
phone call. When you call (e-mail or write), please have all relevant
information such as model number and/or part numbers available,
as well as the nature of the problem. Call our Customer Service
Department:
Canada Only:
Toll Free Number 1-800-555HAGEN (1-800-554-2436)
Between 9:00 am and 4:30 pm (Eastern Time)
U.S.A. Only:
Toll Free Number 1-800-724-2436
Between 9:00 am and 4:00 pm (Eastern Time)
U.K. Only:
Helpline Number 01977 556622
Between 9:00 am and 5:00 pm
ENGLISHFRANÇAISDEUTSCHESPAGÑOLITALIANONEDERLANDS
Small Medium / Large
A
C