manuals.online logo
Brands
  1. Home
  2. •
  3. Brands
  4. •
  5. Fabtech
  6. •
  7. Automobile Accessories
  8. •
  9. Fabtech FTS22111 User manual

Fabtech FTS22111 User manual

2005 - 2007 FORD SUPER DUTY 4WD
REAR BOX KIT FOR 10” REAR LIFT
FTS22111
PARTS LIST:
FTS2211
1 Rear 10" 05 S.D. FT30335 Hdwr Sub-Assembly Kit
Qty Part # Description Qty Part # Description
2 FTS281 Rear Leaf Pack 1 31000005252 5/16" Split Washer
2 FTBK2 2" Lift Block 1 31182001081 5/16"-18 x 2" Bolt Gr. 8
4 FT744U U-Bolts 2 43000005081 7/16" SAE Flat Washer
1 FT20073 Angle Carrier Drop 2 43000005252 7/16" Split Washer
1 FTS419 Carrier Bearing Spacer Kit 2 43141501081 7/16"-14 x 1 1/2" Bolt
1 FT30335 Hdwr. Sub-Assembly Kit 1 FT30166 E-Brake Cable Sleeve
1 FT58H U-Bolt Hardware
1 FTLOCK Loc-Tite
2 FT22111i Instruction Sheet
Tool List: (Not Included)
Floor Jack
Jack Stands
Assorted Metric and S.A.E Sockets & Allen Wrenches
READ ALL INSTRUCTIONS THOROUGHLY FROM START TO FINISH BEFORE BEGINNING INSTALLATION!
THE FACTORY READ LOAD CARRYING CAPACITY WILL BE REDUCED WITH USE OF THIS REAR SPRING KIT
INSTRUCTIONS:
1. Disconnect the negative terminal on the battery. Jack up
the rear end of the vehicle and support the frame rails with
jack stands. Supporting the rear differential remove and
discard the rear shocks. NEVER WORK UNDER AN
UNSUPPORTED VEHICLE!
2. Remove the u-bolts from truck and discard. Lower the axle
down slowly. Use care not to over extend the brake hose.
3. Locate the E-Brake cable mount on the driver side spring
perch. Remove the bolt attaching the e-brake cable to the
mount and discard the hardware.
4. Remove the complete leaf spring packs from the truck and
discard. Save the factory hardware. If your truck is
equipped with a factory over load leaf on top of the
factory leaf spring pack you will NOT be able to reuse it
with this replacement leaf pack.
7. Install Fabtech shock part number FTS7266 (not included)
with the factory hardware and torque bolts to 65lbs.
5. Locate the new FTS281 rear leaf springs and install into the
factory position using factory hardware. You will use the
supplied u-bolts and the factory shackle and hanger
hardware. Position the new supplied 2” block on the axle
with the factory block on top of it. Torque u-bolts to 180 ft.
lbs and leave the shackle and hanger bolts loose at this
time. SEE PHOTO BELOW
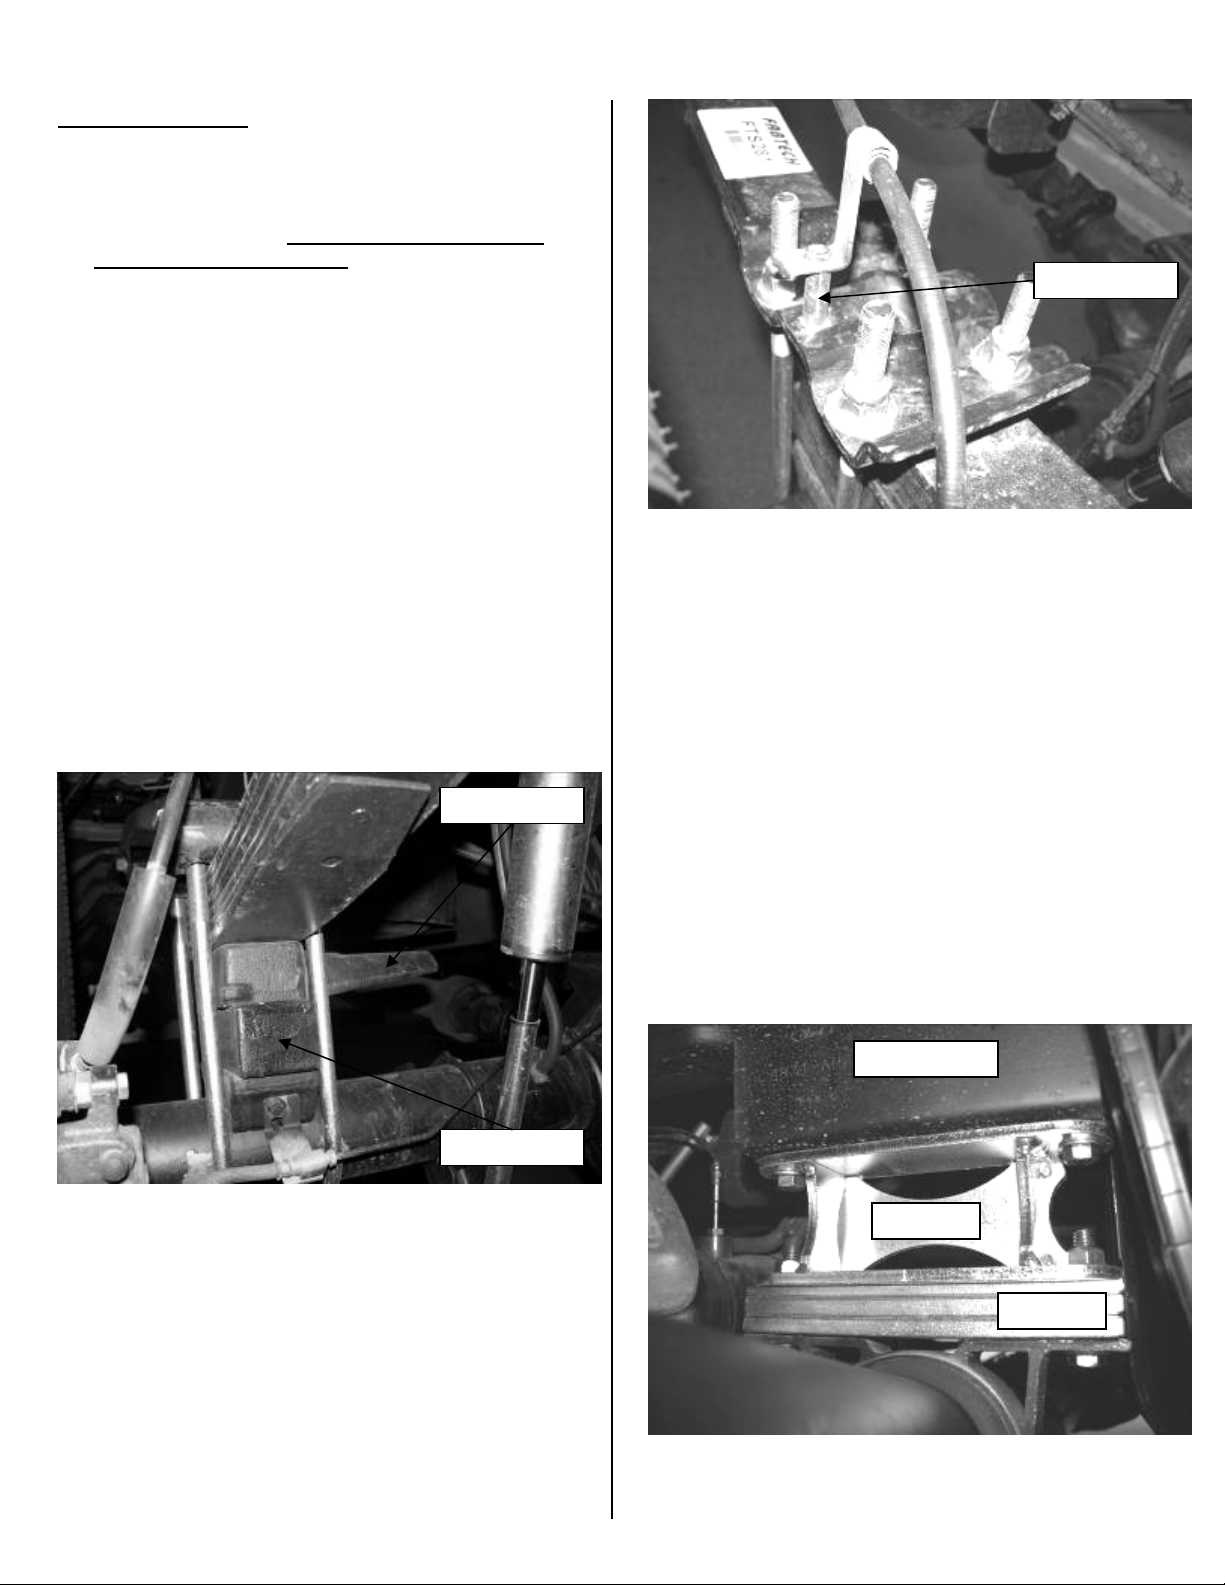
8. Locate FT20073 Angle Carrier Drop Spacer, supplied
7/16” hardware, and FTS419. Remove the two bolts
securing the drive shaft carrier bearing to the frame cross
member. SUPPORT THE DRIVE SHAFT WITH A
JACK OR A STRAP, DO NOT LET IT HANG
WITHOUT SUPPORT Attach the FT20073 to the
crossmember (with wide angle of bracket to rear) using the
7/16” bolt, split, and flat washers. Use the supplied thread-
locking compound and torque to 50 lbs. Place 1 ½” of
shims from the FTS419 kit in between the carrier bearing
and the FT20073 drop spacer. Place a lock washer,
followed by a flat washer on each bolt and insert them
through the carrier bearing and shims, into the drop bracket
with the Nylock nut. Use the supplied thread-locking
compound and torque to 50 lbs. NOTE: This is a starting
point for the shims from the FTS419 kit, Adjustment can be
made as needed to reduce driveline vibration. SEE
PHOTO BELOW
6. Locate FT30166 and attach the e-brake cable to it using the
supplied 5/16” bolt, nut, and washer. Using the original
hardware attach the new bracket to the spring perch. SEE
PHOTO IN NEXT COLUMN.
View from front looking toward the rear
9. Install tires and wheels and torque lug nuts to wheel
manufacturer’s specifications.
Factory Block
Frame section
FT30166 Sleeve
New 2” block
FT20073
FTS419
10. Recheck all bolts for proper torque. Recheck brake hoses
and lines for proper clearances.
11. Check front-end alignment and set to factory specifications.
Readjust headlights.
12. Reinstall the rear tires and torque the lugs to factory
specifications. The factory torque specifications can be
found in your owner’s manual.
13. Remove the jack stands and set the truck back onto the
ground. Check the torque on all fasteners.
14. Torque the front leaf spring bolts to 222 ft. lbs. and the rear
leaf spring bolts to 185 ft. lbs.
15. Check the front-end alignment and set to the factory
specifications. Re-adjust headlights.

Other Fabtech Automobile Accessories manuals

Fabtech FTS22036 User manual

Fabtech

Fabtech FTS22036 User manual

Fabtech FTS22101 User manual

Fabtech

Fabtech FTS22101 User manual

Fabtech FTS7006 User manual

Fabtech

Fabtech FTS7006 User manual

Fabtech Dirt Logic shocks User manual

Fabtech

Fabtech Dirt Logic shocks User manual

Fabtech FTS22108 User manual

Fabtech

Fabtech FTS22108 User manual

Fabtech FTS22044 User manual

Fabtech

Fabtech FTS22044 User manual

Fabtech FTS22114 User manual

Fabtech

Fabtech FTS22114 User manual

Fabtech FTS22068 User manual

Fabtech

Fabtech FTS22068 User manual

Fabtech FTS24092 User manual

Fabtech

Fabtech FTS24092 User manual

Fabtech FTS22091 User manual

Fabtech

Fabtech FTS22091 User manual

Fabtech FTS8000 User manual

Fabtech

Fabtech FTS8000 User manual

Fabtech FTS22105 User manual

Fabtech

Fabtech FTS22105 User manual

Fabtech FTS22104 User manual

Fabtech

Fabtech FTS22104 User manual

Fabtech FTS22107 User manual

Fabtech

Fabtech FTS22107 User manual

Fabtech FTS51009 User manual

Fabtech

Fabtech FTS51009 User manual

Fabtech FTS24048BK User manual

Fabtech

Fabtech FTS24048BK User manual

Fabtech FTS8002 User manual

Fabtech

Fabtech FTS8002 User manual

Fabtech FTR10079 User manual

Fabtech

Fabtech FTR10079 User manual

Fabtech FTS24129 User manual

Fabtech

Fabtech FTS24129 User manual

Fabtech FTS24094 User manual

Fabtech

Fabtech FTS24094 User manual

Fabtech FTS8023 User manual

Fabtech

Fabtech FTS8023 User manual

Fabtech FTS71002 User manual

Fabtech

Fabtech FTS71002 User manual

Popular Automobile Accessories manuals by other brands

Sentaz Tactile Car Seat quick guide

Sentaz

Sentaz Tactile Car Seat quick guide

Bruno Curb-Sider VSL-6000 Operator's manual

Bruno

Bruno Curb-Sider VSL-6000 Operator's manual

bosal 044211 Fitting instructions

bosal

bosal 044211 Fitting instructions

Crux RVCCH-75 installation guide

Crux

Crux RVCCH-75 installation guide

WIX WP6830 Installation instruction

WIX

WIX WP6830 Installation instruction

Rhino-Rack RCP58-BK manual

Rhino-Rack

Rhino-Rack RCP58-BK manual

Ecco ED5101 Installation and operating instructions

Ecco

Ecco ED5101 Installation and operating instructions

SUPERTOOTH VOICE owner's manual

SUPERTOOTH

SUPERTOOTH VOICE owner's manual

Young Electric Sole manual

Young Electric

Young Electric Sole manual

aFe Power 54-12208 manual

aFe Power

aFe Power 54-12208 manual

Link LK-TOY11CL installation manual

Link

Link LK-TOY11CL installation manual

Pyle BlueTech PBT70R user manual

Pyle

Pyle BlueTech PBT70R user manual

Sargent Caravan Reversing Camera Kit user manual

Sargent

Sargent Caravan Reversing Camera Kit user manual

PMM 12014 Installation instruction

PMM

PMM 12014 Installation instruction

Kuda 270035 Installation instruction

Kuda

Kuda 270035 Installation instruction

Car Shades LRO-FREE-5-B installation manual

Car Shades

Car Shades LRO-FREE-5-B installation manual

Vivanco UNIVERSAL CHARGER 3IN 1 POWER SET operating instructions

Vivanco

Vivanco UNIVERSAL CHARGER 3IN 1 POWER SET operating instructions

EGR EGR-3PVE-COLOUR installation instructions

EGR

EGR EGR-3PVE-COLOUR installation instructions

manuals.online logo
manuals.online logoBrands
  • About & Mission
  • Contact us
  • Privacy Policy
  • Terms and Conditions

Copyright 2025 Manuals.Online. All Rights Reserved.