Fagor Xperta CAT-44 NG User manual

Fully Automatic Espresso-Maker
Machines à Café Automatiques
Máquina automática para Café Expresso
Máquina de café Espresso- totalmente automática
Operating instructions
Manuel d’utilisation
Instrucciones de uso
Instruções de serviço
CAT 44 NG

1
D
B
M
H
L
F
A
E
C
O
I
J
G
K
N
O.1 PO.2

2
3
U
Q
SV
R
T
j
b
c
d
fi
k
g
h
a
e

54
876
11019
413121
ab

716151
029181
322212
625242

DESCALING
D7
928272
231303
534333
837363

1.
2.
2.
1.
140493
443424
746454
7
48

Dear customer
Please read these operating instruc-
tions through carefully. Please make
sure you read the safety instructions
on the first pages of these operating
instructions! Keep the operating
instructions for future reference. Pass
them on to any future owners.
Contents
1 Figure captions 9
1.1 Machine Parts (Fig 1) 9
1.2 Top View (Fig. 2) 9
1.3 Control Panel (Fig. 3) 9
2 Coffee and espresso 10
3 Safety Information 10
4 Overview of the menu points 12
5 Before using for the first time 12
5.1 Setting Up and Connecting the
Coffee Machine 12
5.2 Filling with Water 12
5.3 Switching on for the first time 13
5.4 Switching on the machine 13
5.5 Switching the coffee machine off 14
5.6 Setting the water hardness 14
6 Making Coffee with Beans 15
6.1 Filling the Coffee Bean Container 15
6.2 Select Cup Size 15
6.3 Selecting the coffee quantity 15
6.4 Setting the number of cups and
dispensing coffee 16
7 Making Ready-ground Coffee 16
7.1 Filling the ground coffee filler 17
7.2 Selecting cup size 17
8 Frothing Milk 17
9 Preparing Hot Water 18
10 Programming the cup measure
and the coffee quantity 19
10.1 Changing and saving the cup
measure and the coffee quantity 19
10.2 Changing and saving the coffee
20quantity
11 Setting the Grinding Texture 20
12 Menu settings 20
12.1 Setting language 20
12.2 Setting the Coffee Temperature 21
12.3 Setting the Switch-off Time 21
12.4 Interrogate the number of dispensed
coffees and the cup measures 22
12.5 Resetting the machine to the
factory setting (Reset) 22
12.6 Reset display language 22
13 Cleaning and Care 23
13.1 Regular Cleaning 23
13.2 Cleaning the height adjustment 23
13.3 Emptying the Container 23
13.4 Cleaning the Grinder 23
13.5 Cleaning the Coffee-making Unit 24
13.6 Running the Cleaning Program 25
13.7 Running the Descaling Program 26
13.8 Cleaning the steam valve 28
14 What do I do, if ... 28
15 EU Directives 30
16 Technical Data 30
30Disposal71
GB
GB

1 Figure captions
1.1 Machine Parts (Fig 1)
ATop view (see Fig. 2)
BBean container with lid
CService cover
DSelection dial for steam and hot water
EHeight-adjustable dispenser with
outlets
FSwivel nozzle for steam and hotwater
with removable frothing aid
GContainer (removable)
HDrip grille
IDrip tray float
JDrip tray
KDisplay
LType plate (at top behind service cover)
MControl panel (see Fig. 3)
NWater tank with fill level indicator
(removable)
OTest strip for water hardness
O.1 Descaling agent
O.2 Cleaning agent
PMeasuring spoon with cleaning brush
1.2 Top View (Fig. 2)
QCup rack
ROpening for ground coffee
with lid (ground coffee filler)
SBean container position setting
TService cover release button
URelease catch for removing grinding
ring
VLever for setting grinding texture
1.3 Control Panel (Fig. 3)
aKey „Steam Pre-selector“
(with indicator)
bKey „1 or 2 cups of coffee“
(with indicator)
cKey „Coffee Quantity“ *
(with indicators)
* With menu selected (key f) this key
serves for „paging“ in the menu
dKey „Cup Measure“ **
(with indicators)
** With menu selected (key f) this key
serves for „paging“ in the menu
eKey „Rinse“ (with indicator)
fKey „Menu“ (with indicator)
gKey „OK“ (with indicator)
h„On/Off“ key (with indicator)
i„Coffee machine heating“ indicator
j„Waste container“ indicator
k„Fill water tank“ indicator
GB

2 Coffee and espresso
Your fully automated coffee machine
guarantees you
• Absolute ease of operationboth in
making coffee and in maintenance and
care.
The excellent, individual taste is
achieved by
• The pre-brewing system: before the
coffee is brewed, it is first moistened to
extract its full aroma
• The individually controllable amount of
water per cup, from a short espresso to
a „long“ milky coffee
• The individually controllable tempera-
ture, at which the coffee is made
• The choice between a normal or a
strong cup of coffee
• The grinding texture – adjustable to
the roast of the coffee beans, and
• Last, but not least, the guaranteed
crema, that small crown of froth that
makes espresso-coffee so unmatcha-
ble for connoisseurs
Did you know? The time the water is
in contact with the ground coffee is
considerably less for espresso coffee
than conventional filter coffee. As a
result, less bitterness is released from
the ground coffee– making espresso-
coffee that much milder!
3 Safety Information
This appliance corresponds to accepted
technological standards with regards
to safety and to the German Appliance
Safety Law. As the manufacturer, we
nevertheless wish to familiarise you
with the following safety information.
General safety
• The coffee machine must be connected
only to a mains power supply of which
the voltage, type of supply and fre-
quency conform with the details
shown on the type plate (this can be
found on the upper part, behind the
service cover)!
• Never allow the mains lead to come
into contact with hot parts of the
appliance.
• Never use the mains lead to pull the
plug out of the mains socket!
• Do not use the coffee machine, if:
– the mains lead is damaged, or
– the case shows visible signs of
damage.
• Ensure that the coffee machine is
switched off before plugging into the
mains socket.
• This appliance is not intended for use
by persons (including children) with
reduced physical, sensory or mental
capabilities or lack of experience and
knowledge unless they have been given
initial supervision or instruction con-
cerning use of the appliance by a per-
son responsible for their safety.
Child safety
• Do not leave the coffee machine run-
ning unattended, and take special
care when children are about!
Safety in operation
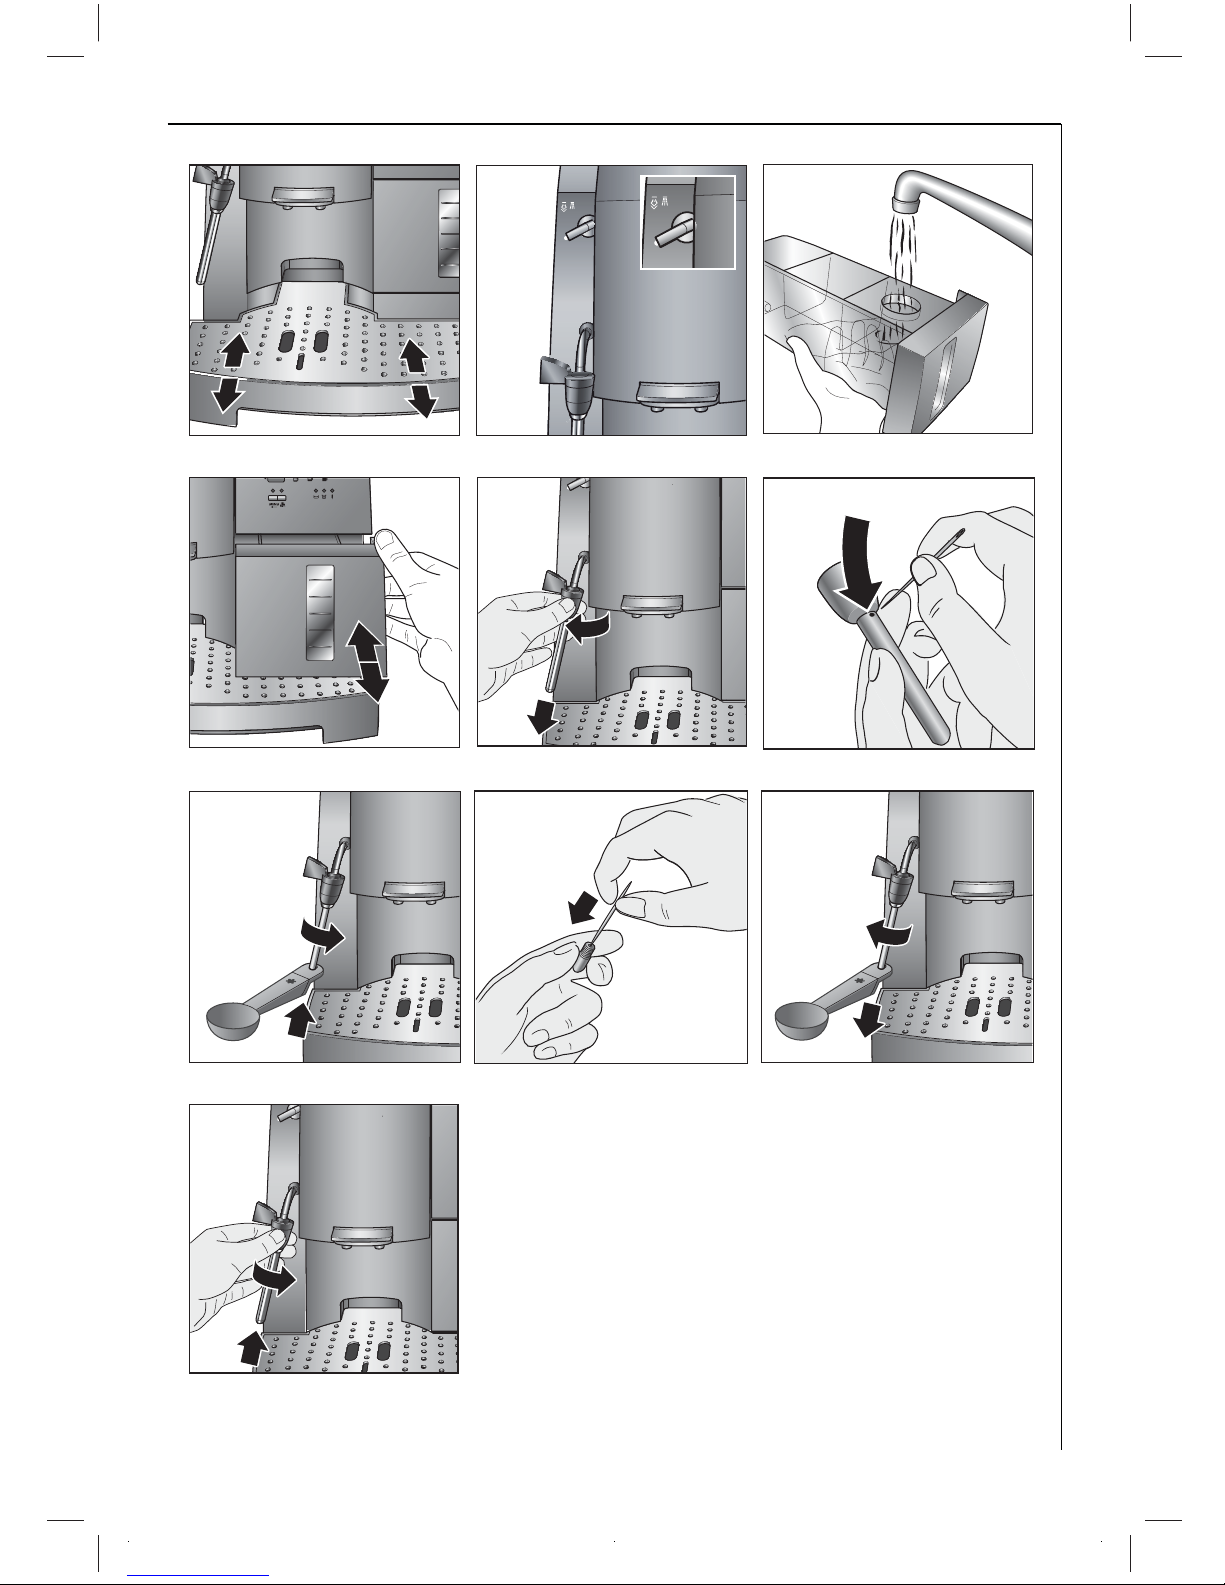
• Caution! The coffee dispenser, swivel
nozzle and cup rack become hot in
operation. Keep childeren at a safe
distance!
• Caution! Danger of scalding when the
steam nozzle is activated! Hot water
or steam output can cause scalding.
GB

Activate the steam nozzle only when
you are holding a container under the
nozzle.
• Do not use steam to heat inflammable
liquids!
• Only use the coffee machine with
water in the system! Fill the water tank
with cold water. Do not use hot water,
milk or other liquids. Do not exceed the
maximum fill level of 1.5 litres.
• Do not put frozen or caramelised cof-
fee beans in the bean container. Use
only roast coffee beans! Remove any
foreign bodies from the coffee beans.
Failure to do this invalidates the guar-
antee.
• Spoon only ground coffee into the
ground coffee filler.
• Do not leave the coffee machine
switched on unnecessarily.
• Do not expose the coffee machine to
the weather.
• When using an extension lead, use only
a commercially available cable with a
conductor cross-section of at least
1.5 mm2.
• To avoid injury, persons with motor
system disorders should never use the
machine without an accompanying
person.
• Operate the machine only when the
drip tray, container and the drip grille
are installed!
Safety in cleaning and care
• Follow the cleaning and descaling
instructions.
• Switch off the coffee machine and
unplug from the mains socket before
carrying out any maintenance or
cleaning!
• Do not immerse the coffee machine
in water.
• Only clean the steam nozzle when the
machine is switched off, cold and not
under pressure!
• Do not clean coffee machine parts in
the dishwasher.
• Never put water in the grinder. This
would damage the grinder.
Never open or repair the coffee
machine. Faulty repairs can result in
considerable hazard to the user.
Repairs to electrical appliances must be
carried out only by qualified service
engineers.
If a repair becomes necessary – includ-
ing replacement of the mains lead,
please contact
• the dealer where you bought the
coffee machine, or
• to Fagor’s Customer Care Service.
If the machine is misused or incor-
rectly operated the manufacturer
accepts no liability for damages and
the guarantee is invalidated – like-
wise if the cleaning and descaling
program is not carried out immedi-
ately after the display indication
«CARRY OUT CLEANING
PROCESS» respectively «CARRY
OUT DESCALING» and accord-
ing to the details in these operating
instructions.
GB

4 Overview of the menu
points
Below is an overview of the menu
points in which you can change and
save the machine parameters which are
preset at the factory and also start
programs and call up information. You
will find detailed information on this in
the further chapters of these operating
instructions.
•Menu«LANGUAGE»
Display language; Several languages
are available for selection.
Factory setting: «ENGLISH».
•Menu«TEMPERATURE»
Programmable coffee temperature
between 1 (moderately warm) to 5
(extra hot).
Factory setting: 3 (normal).
•Menu«SHUT OFF TIME»
Programmable switch-off time
between 1 to 5 hours.
Factory setting: 1h (1 hours).
•Menu«WATERHARDNESS»
Programmable hardness level between
1 (soft) and 4 (very hard).
Factory setting: 4.
• Menu «CLEAN»
Start the cleaning program.
• Menu «DESCALE»
Start the descaling program.
• Menu «RESET»
Reset the changed parameter settings
to the factory settings.
• Menu «INFO»
Retrieve the number of cups of coffee
dispensed and the cup measure for
each cup size.
5 Before using for the first
time
5.1 Setting Up and Connecting the
Coffee Machine
Place machine on a suitable horizontal,
stable, unheated and water-resistant
surface. Ensure there is good air circu-
lation.
Important! If the coffee machine is
brought into a warm room from a cold
environment, wait about two hours
before switching on!
We advise you to place the coffee
machine on a suitable mat to prevent
damage being caused by spray and
splashes.
Hold the bean container with the
marking at the „Unlock container“
position and set it in place (Fig. 4).
The bottom opening of the bean con-
tainer must be closed (Fig. 4,a), if it is
not closed (Fig. 4,b), insert the tip of a
ballpoint pen in the small oval hole
(arrow) of the black ring with the
marking „TOP“ and turn opening clock-
wise as far as the stop.
Now turn the bean container anti-
clockwise to the position „Coffee
beans“ (Fig. 10) or further on to
the position „Powder“ (Fig. 14).
Push the drip tray in, until it engages
on the right under the water tank
(Fig. 5).
Plug the coffee machine into an
earthed mains socket. Do not use a
socket that is not earthed!
If you do not need the full length of
the mains lead, open the cable com-
partment on the back of the coffee
machine, and stow away the unused
lead (Fig. 6).
5.2 Filling with Water
Each time before switching on the cof-
fee machine, check that there is water
in the water tank and refill if necessary.
The coffee machine requires water for
the automatic rinsing processes each
time the machine is switched on or off.
GB

Remove the water tank from the cof-
fee machine (Fig. 7).
Fill the water tank with fresh cold
water (Fig. 8).
Pour only fresh cold water in the water
tank. Never put in other liquids, e.g.
mineral water or milk.
Replace the water tank (Fig. 7). Press
the tank firmly in, to ensure that the
water tank valve opens.
If for instance, water has to be refilled
during coffee dispensing, the „Fill
water tank“ indicator (Fig. 3, k)
flashes, the display indicates «REFILL
WATER». Coffee preparation is inter-
rupted. Fill the water tank!
To always be sure of a rich coffee, with
a full aroma, you should:
• change the water in the water tank
daily,
• wash the water tank at least once per
week in normal washing-up water (not
in the dishwasher). Then rinse with
fresh water.
5.3 Switching on for the first time
When you place the machine in use for
the first time, the automatic switching
on process only continues if you have
selected the desired language.
Switch on the machine with the „On/
Off“ key (Fig. 3, h) (Fig. 9). The red
indicator light comes on
The machine is set at the factory to the
display language «ENGLISH».
To select a different language, proceed
with „Setting language“ page 45.
If you wish to select «ENGLISH»,
press the „OK“ key (Fig. 3, g). English is
now programmed.
After programming the display returns
automatically in the main menu to the
menu point «LANGUAGE».
To start the switching on process, press
the „Menu“ key (Fig. 3, f) or wait
ca. 30 sec. For the machine to auto-
matically start with the switching on
process.
The display briefly indicates «Xperta».
The machine now heats up (display
indication «UNIT HEATS») and sub-
sequently performs a rinsing cycle (dis-
play indication «UNIT RINSES»). On
completion of the rinsing cycle, the
machine is ready for use. The display
indication now appears according to
the basic setting.
5.4 Switching on the machine
Each time before switching on, make
sure there is water in the water tank
and replenish if necessary. The machine
requires water for the automatic rins-
ing cycles with each switching on and
switching off process.
Switch the machine on with the „On/
Off“ key (Fig. 3, h) (Fig. 9). The red
indicator light comes on, the display
indicates briefly «Xperta».
Immediately after being switched on
the machine runs through a set-up
cycle. The noises occurring are per-
fectly normal.
During the heating-up phase (ca.
60 seconds) the „Coffee machine heat-
ing“ indicator (Fig. 3, i) flashes (dis-
play indication «UNIT HEATS»).
After the operating temperature has
been reached, the coffee machine car-
ries out an automatic rinsing cycle.
(display indication «UNIT RINSES»).
The water flows into the drip tray. The
„Unit heats“ indicator (Fig. 3, i) lights
continuously.
The coffee machine is now ready to
use. The indication shown in the dis-
play depends on the last selected cof-
fee mode.
GB
13

5.5 Switching the coffee machine
off
Switch the machine off with the „On/
Off“ key (Fig. 3, h) .
The machine carries out a rinsing cycle
(display indication «UNIT RINSES»)
and then requests you to empty the
container (display indication ca. 1 min.
alternately «UNIT SWITCHES
OFF» and «WASTE CONTAINER»).
The machine is switched off automati-
cally after 60 seconds.
Emergency cut-out
You can place the machine out of
action immediately at any time.
Press the „On/Off“ key (Fig. 3, h) briefly
twice in succession . All functions
are immediately switched off and the
machine is placed out of action.
5.6 Setting the water hardness
After first placing the machine in use
or when using a different water quality
you should set the machine to the
water hardness level corresponding to
the local water hardness. You can use
the included test card to determine the
water hardness, or contact your local
water supply company.
Determining water hardness
Dip the test strip in cold water for
around 1second. Shake off the excess
water, and gauge the hardness by
means of the pink bands.
pink bands or one pink band:
Hardness 1, soft
up to 1.24 mmol/l, or
up to 7° German hardness, or
up to 12.6° French hardness
Two pink bands:
Hardness 2, medium hard
up to 2.5 mmol/l, or
up to 14° German hardness, or
up to 25.2° French hardness
Three pink bands:
Hardness 3, hard
up to 3.7 mmol/l, or
up to 21° German hardness, or
up to 37.8° French hardness
Four pink bands:
Hardness 4, very hard
over 3.7 mmol/l or
over 21° German hardness, or
over 37.8° French hardness
Setting and saving the water
hardness level
You can set 4 hardness levels. The cof-
fee machine is factory-set to hardness
level 4.
With the machine switched on, press
the „Menu“ key (Fig. 3, f) . The
menu point «LANGUAGE» appears.
Press the paging keys or (Fig. 3, c
or d) until the menu point
«WATERHARDNESS» appears.
Confirm the menu point with the „OK“
key (Fig. 3, g). The display indicates the
current setting e.g. «HARDNESS
LEVEL 3».
Then press the paging keys or (Fig.
3, c oder d) until the determined hard-
ness level is displayed.
Confirm the selection with the „OK“
key (Fig. 3, g).
After the programming the display
returns automatically into the main
menu to the meun point
«WATERHARDNESS».
To return to the coffee mode, then
press the „Menu“ key (Fig. 3, f) or
wait ca. 30 sec. For the machine to
automatically return to the coffee
mode.
You can execute other menu settings,
see „Menu settings“.
GB

6 Making Coffee with Beans
The following process for making cof-
fee with beans runs completely auto-
matically: Grinding, portioning,
pressing, pre-brewing, brewing, ejec-
tion of the coffee grounds.
The facility to select the grinding tex-
ture and the coffee quantity allows
you to individually set up the coffee
machine to your own personal taste.
Ensure that you use only pure coffee
beans with no caramelised or aroma-
tised additives. Do not use frozen
beans.
6.1 Filling the Coffee Bean
Container
Turn the bean container to the „Coffee
Beans“ position
(Fig. 10)
. The mech-
anism sets to the required function
Set the grinding texture
(Fig.11)
.
Using the grinding texture adjustment
(Fig. 2, V) you can set the grinding tex-
ture of the grinder.
Note! Before putting beans into the
coffee machine for the first time, you
can set the grinding texture once with
the grinder stationary. Once the
grinder has been filled with beans, the
setting can be changed only while
grinding is proceeding. Otherwise the
coffee machine could be damaged.
The grinder is factory-set to a medium
grinding texture. Notes on changing
the grinder setting can be found in
„Setting the Grinding Texture".
Raise the lid of the coffee bean con-
tainer, and fill the container with fresh
coffee beans (Fig. 12). Then reclose
the lid.
Note!Make sure that no foreign bod-
ies, such as stones, enter the coffee
bean container. Damage caused by
foreign bodies in the grinder is
excluded from the guarantee.
6.2 Select Cup Size
Depending on your taste, select a
„short“ espresso or a „long“ milky cof-
fee.
For this press the „Cup Size“ key (Fig. 3,
d) until the desired cup sym-
bol is selected or the desired cup size is
indicated on the display.
The cup sizes are indicated as follows:
The bottom line in the display shows
the coffee quantity. The procedure for
changing this is described in the fol-
lowing section.
The machine is set to standard quanti-
ties at the factory. Instructions for
changing the set coffee quantities are
to be found under „Programming the
cup measure and the coffee quantity".
6.3 Selecting the coffee quantity
Press the „Coffee Quantity“ key (Fig. 3,
c) until the desired coffee
quantity symbol lights or the desired
coffee quantity is selected on the dis-
play.
The coffee quantities are indicated as
follows:
«CUP SMALL» Espresso cup
«CUP MEDIUM» Coffee cup
«CUP LARGE» Coffee mug
«EXTRA MILD» extra mild
«MILD»mild
«NORMAL» normal
«STRONG»strong
«EXTRA-
STRONG»extra strong
GB

The top line in the display indicates the
cup size. The instructions for selectig a
different cup size are contained in the
previous section.
To save having to select the coffee
quantity every time you switch on the
coffee machine, you can permanently
save the coffee quantity in relation to
the cup size. Instructions are to be
found under „Programming the cup
measure and the coffee quantity".
6.4 Setting the number of cups and
dispensing coffee
Place one or two cups under the coffee
dispenser. The dispenser can be slid up
or down to match the height of your
cup/mug to reduce heat loss and cof-
fee splashes (Fig. 13).
If the height adjuster is stiff, proceed
as described under „Cleaning the
height adjustment“.
Press the key „1 or 2 cups of coffee“
(Fig. 3, b) once or twice in order
to select 1 or 2 cups. The display shows
«1CUP» or «2CUPS». If you have
selected «2CUPS», the key lights up.
Press the „OK“ key (Fig. 3, g).
The coffee is now made.
In the coffee-making process, the
ground coffee is first of all wetted with
a small quantity of water for pre-
brewing. Following a short pause, the
actual brewing process commences.
You can prematurely stop the coffee
being dispensed at any time by briefly
pressing the previously actuated „OK“
key (Fig. 3, g) once again. This is indi-
cated in the display with «BREAK».
If you have not dispensed coffee for a
long period of time with the machine
switched on, you should rinse the sys-
tem before dispensing again. Start the
rinsing with the „Rinse“ key (Fig. 3, e),
the display shows «UNIT RINSES».
With this additional rinsing phase the
brewing unit is brought back to the
initial coffee dispensing temperature.
7 Making Ready-ground
Coffee
This function allows you to brew pre-
ground coffee, e.g. decaffeinated cof-
fee.
Note that you must use only the sup-
plied measuring spoon, and never put
more than 1 level measuring spoon of
ground coffee into the ground coffee
filler.
Note! Make sure that no ground coffee
has remained in the filler, and that no
foreign bodies enter the filler. The
ground coffee filler is not a storage
container. The ground coffee must be
fed directly into the coffee-making
unit.
If the brewing unit is overfilled, the
machine indicates a fault; the display
then shows «CLEAN BREWING
UNIT» and «SWITCHES OFF
UNIT» alternately. For instructions on
cleaning the brewing unit, see „Clean-
ing the Coffee-making Unit“.
Do not put any water-soluble or
freeze-dried instant powders or any
other drink powder into the ground
coffee filler. Coffee powder, which is
too fine, can lead to blockages.
GB
Please note that the appliance brews
in the two cup operation two cups of
coffe one after another.
Remove the cups not till both
brewing processes are complete.
While the 2 CUP procedure is
running, the OK key indicator is
flashing.
New brewing unit allows only to fill in
1 measuring spoon or ground coffee.

7.1 Filling the ground coffee filler
Turn the coffee bean container to the
„Ground Coffee“ position (Fig. 14).
The mechanism sets to the required
function.
When using ready ground coffee, the
„Coffee Quantity“ function is inactive.
So no coffee quantity signal lamps
light.
Open the lid of the ground coffee filler,
and spoon in the 1 measuring spoon
of the fresh ground coffee (Fig. 15).
Do not add coffee during the brewing
process. Only put in ground coffee for
the next cup when the brewing process
has completely finished and the coffee
machine is ready.
Close the lid.
7.2 Selecting cup size
See „Select Cup Size".
8 Frothing Milk
The steam can be used to froth milk
and to heat liquids. Since a higher
temperature is needed to produce
steam than to make coffee, the coffee
machine has an additional steam
mode.
To make a cappuccino, fill a large cup
1/2 to 2/3 full with espresso, and then
add the frothed milk.
Caution! Danger of scalding when the
steam nozzle is activated! Hot water or
steam output can cause scalding. Do
not activate the steam nozzle until it is
immersed in the milk.
To produce steam, press the „Steam
Pre-selector“ key (Fig. 3, a) . The
indicator illuminates; the „Unit heats“
indicator (Fig. 3, i) can also flash and
the display shows «UNIT HEATS».
When the heating process is finished,
the „Unit heats“ indicator (Fig. 3, i)
lights continuously the display shows
«STEAM READY – OPEN STEAM
NOZZLE». The machine is ready for
the milk frothing.
If the steam function is not used for
longer than 1minute, the machine
switches back automatically to the
coffee mode.
Pour low-fat, cold milk into a mug
which must be small enough to fit
under the steam nozzle.
The milk should be cold. You should
also use a cold mug, preferably a stain-
less steel one which should not be
rinsed beforehand in hot water.
Swing out the steam nozzle and hold
the mug under the steam nozzle so
that the nozzle opening is just
immersed in the milk.
GB

Attention! Impurities from dried milk
residues in the steam nozzle. Take care
not to immerse the steam nozzle in the
milk far enough to cover the air intake
opening at the top of the steam nozzle.
Otherwise milk can be sucked into the
nozzle and cause impurities in the
steam nozzle.
Turn the Selection dial for steam and
hot water (Fig. 1, D) to the position
(Fig. 16). The display shows the
steam process (indication «STEAM»).
The milk is frothed.
Hold the mug steady during the froth-
ing. The nozzle should not be allowed
to touch the bottom of the mug and
cut off the steam supply. Froth the milk
to at least twice its volume.
To end the frothing, turn the Selection
dial for steam and hot water (Fig. 1, D)
to the position and then remove the
vessel (Fig. 16). The display returns to
the steam readiness indication (indica-
tion «STEAM READY – OPEN
STEAM NOZZLE»).
Caution! Danger of scalding from hot
milk spray! Switch the steam off,
before removing the mug with the
frothed milk.
Exit the steam mode by pressing the
„Steam Pre-selector“ key (Fig. 3, a)
or wait ca. 60 sec., for the machine to
automatically return to the coffee
mode; the indication is extinguished.
Now the machine is once again ready
for making coffee; the last selected
coffee setting is shown in the display.
Each time you have frothed milk, let
off some hot water through the nozzle
for a short time by setting the Selec-
tion dial for steam and hot water (Fig.
1, D) to the position. This is nec-
essary to prevent milk residues drying
inside the nozzle, and thereby blocking
it. Use a suitable container to catch the
water. During this process the display
shows «HOTWATER». Then return
the Selector dial to the position ; the
last selected coffee setting is shown in
the display.
Remove the frothing aid after each use
(Fig.17). For this, take hold of the
frothing aid by the black seal and dis-
engage the bayonet connector by
turning it slightly anticlockwise.5LQVH
off the milk residues under running
water. Wipe the steam nozzle with a
damp cloth.
Caution! Danger of burns from the
frothing aid! Hold the frothing aid only
by the black seal.
9 Preparing Hot Water
The hot water can be used to pre-heat
cups and for making hot drinks, e.g. tea
or instant soups.
Caution! Danger of scalding when the
hot water nozzle is activated! Hot
water or steam output can cause
scalding. Activate the hot water nozzle
only when a container is under the hot
water nozzle.
Place a container under the hot water
nozzle. Set the Selection dial for steam
and hot water (Fig. 1, D) to the
position (Fig. 18). Hot water is ready;
the display shows «HOTWATER».
After you have dispensed the hot water
turn the Selection dial for steam and
hot water (Fig. 1, D) back to the
position (Fig. 18) and remove the
container.
GB

10 Programming the cup
measure and the coffee
quantity
The coffee machine is factory-set to
standard measures. These measures can
be individually changed to your own
taste and saved for each cup size.
10.1 Changing and saving the cup
measure and the coffee quantity
Here it is possible to change and save
the cup measure for each of the three
cup sizes and for coffee bean mode
also the coffee quantity. To program
the setting correctly, note the order:
– First select the cup size for which
you wish to make the settings.
– Next select the coffee quantity (only
for coffee bean mode) (i.e. how
strong you want the coffee to be).
– Then determine how full the cup is
to be filled.
First press the „Cup Size“ key (Fig. 3, d)
until the cup symbol is illuim-
inated for which you want set the cup
measure. The display shows e.g.
«1CUPLARGE».
Only with coffee bean mode: Next
press the „Coffee Quantity“ key (Fig. 3,
c) until the desired coffee
quantity symbol illluminates. The dis-
play shows e.g. «STRONG».
The top line in the display indicates the
selected cup size. The bottom line in
the display indicates the selected cof-
fee quantity.
Place a corresponding cup under the
coffee dispenser (e.g. coffee mug).
Next press the „OK“ key (Fig. 3, g) and
keep it pressed until the desired cup
measure is reached.
During the filling the display indicates
«CUP LEVEL» ; the bar indicator in
the bottom line moves up. The max.
bar indication corresponds to the max.
possible cup measure of ca. 240 ml.
When you save the cup measure in
coffee bean mode, firstly the grinder
starts and grinds the coffee. Keep the
„OK“ key pressed (Fig. 3, g) until the
desired cup measure is reached.
Release the key once your desired cup
measure is reached. This cup measure is
now saved. The display briefly indicates
«PROGRAMMED».
Repeat the action if you would also
like to adjust the measures for the
other cup sizes.
The machine switches off automati-
cally on reaching the max. cup meas-
ure. The saved values are retained also
when the machine is switched off. If
you would like to change your cup size
or flavour, you can individually adjust
the cup measure at any time or return
them to the factory setting with a
reset. You will find which settings are
reset under „Resetting the machine to
the factory setting (Reset)“.
The saving of the cup measure is only
possible for 1 cup. For dispensing of 2
cups the saved values are doubled.
GB

10.2 Changing and saving the coffee
quantity
This is only possible with coffee bean
mode, not for use with ground coffee.
Should your taste change or you find
the coffee to strong or too mild, you
can change just the coffee quantity
without changing the cup measure.
First press the „Cup Size“ key (Fig. 3, d)
until the cup symbol illumi-
nates, for which you would like to
adjust the coffee quantity. The display
shows e.g. «1 CUP LARGE».
The top line in the display shows the
selected cup size. The bottom line in
the display always shows the coffee
quantity you have saved previously for
this cup measure, e.g. «STRONG»
Next press the „Coffee quantity“ key
(Fig. 3, c) until the desired cof-
fee quantity symbol is illuminated. The
display shows e.g. «MILD». The value is
now saved.
Repeat the process if you also want to
adjust the coffee quantities for the
other cup sizes.
Be sure the follow the order; first select
the cup size, then the coffee quantity.
The saved quantities remain stored
when the coffee machine is switched
off.
11 Setting the Grinding
Texture
Note! The grinder settings must be
changed only while coffee is being
ground. Making adjustments to the
stationary grinder can damage the cof-
fee machine.
Dispense a coffee with beans. During
the grinding, set the grinding texture
with the grinding texture setting lever
(Fig. 2, V) and (Fig. 19).
The lever positions have the following
effects:
Fine grade for intensive taste
Medium grade for normal
taste
Coarse grade for mild coffee
Remove foreign bodies from the
grinder
Foreign bodies, such as small stones in
the grinder can damage the grinder.
The coffee machine includes a stone
detector. A foreign body in the coffee
causes a loud, even rattle. If you hear
this noise while coffee is being ground,
immediately switchoff the coffee
machine and remove the foreign body,
as described in „Cleaning the Grinder“.
12 Menu settings
12.1 Setting language
You can select between several lan-
guages. The factory setting is
«ENGLISH». You can change
this setting as follows:
Press the „Menu“ key (Fig. 3, f) .
The manu point «LANGUAGE»
appears.
Confirm the menu point with the „OK“
key (Fig. 3, g). The set language appears
in the display (on placing in operation
for the first time, the factory setting
«ENGLISH»).
Press the paging keys or (Fig. 3, c
or d) until the desired language
appears.
When the desired language is dis-
played, confirm it with the „OK“ key
(Fig. 3, g). This languaage is now pro-
grammed.
GB
20
Table of contents
Languages:
Other Fagor Coffee Maker manuals

Fagor
Fagor CR-16 Manual

Fagor
Fagor Built-In Coffee Machine MQC-A10 US Manual

Fagor
Fagor FG784 User manual

Fagor
Fagor CR-15 User manual

Fagor
Fagor CG-2005 User manual

Fagor
Fagor CEI-600 User manual

Fagor
Fagor CEI-600 User manual

Fagor
Fagor CR-282 User manual

Fagor
Fagor CR-20 User manual

Fagor
Fagor CG-312 User manual

Fagor
Fagor CG-414 D User manual

Fagor
Fagor CG806-810-810V-812 User manual

Fagor
Fagor CR-750 User manual

Fagor
Fagor CG-414 D User manual

Fagor
Fagor CR-282 User manual

Fagor
Fagor CEI-400 User manual

Fagor
Fagor CR-312 User manual

Fagor
Fagor CG-314 User manual

Fagor
Fagor CR-1000 - 2008 User manual

Fagor
Fagor CG-306 User manual