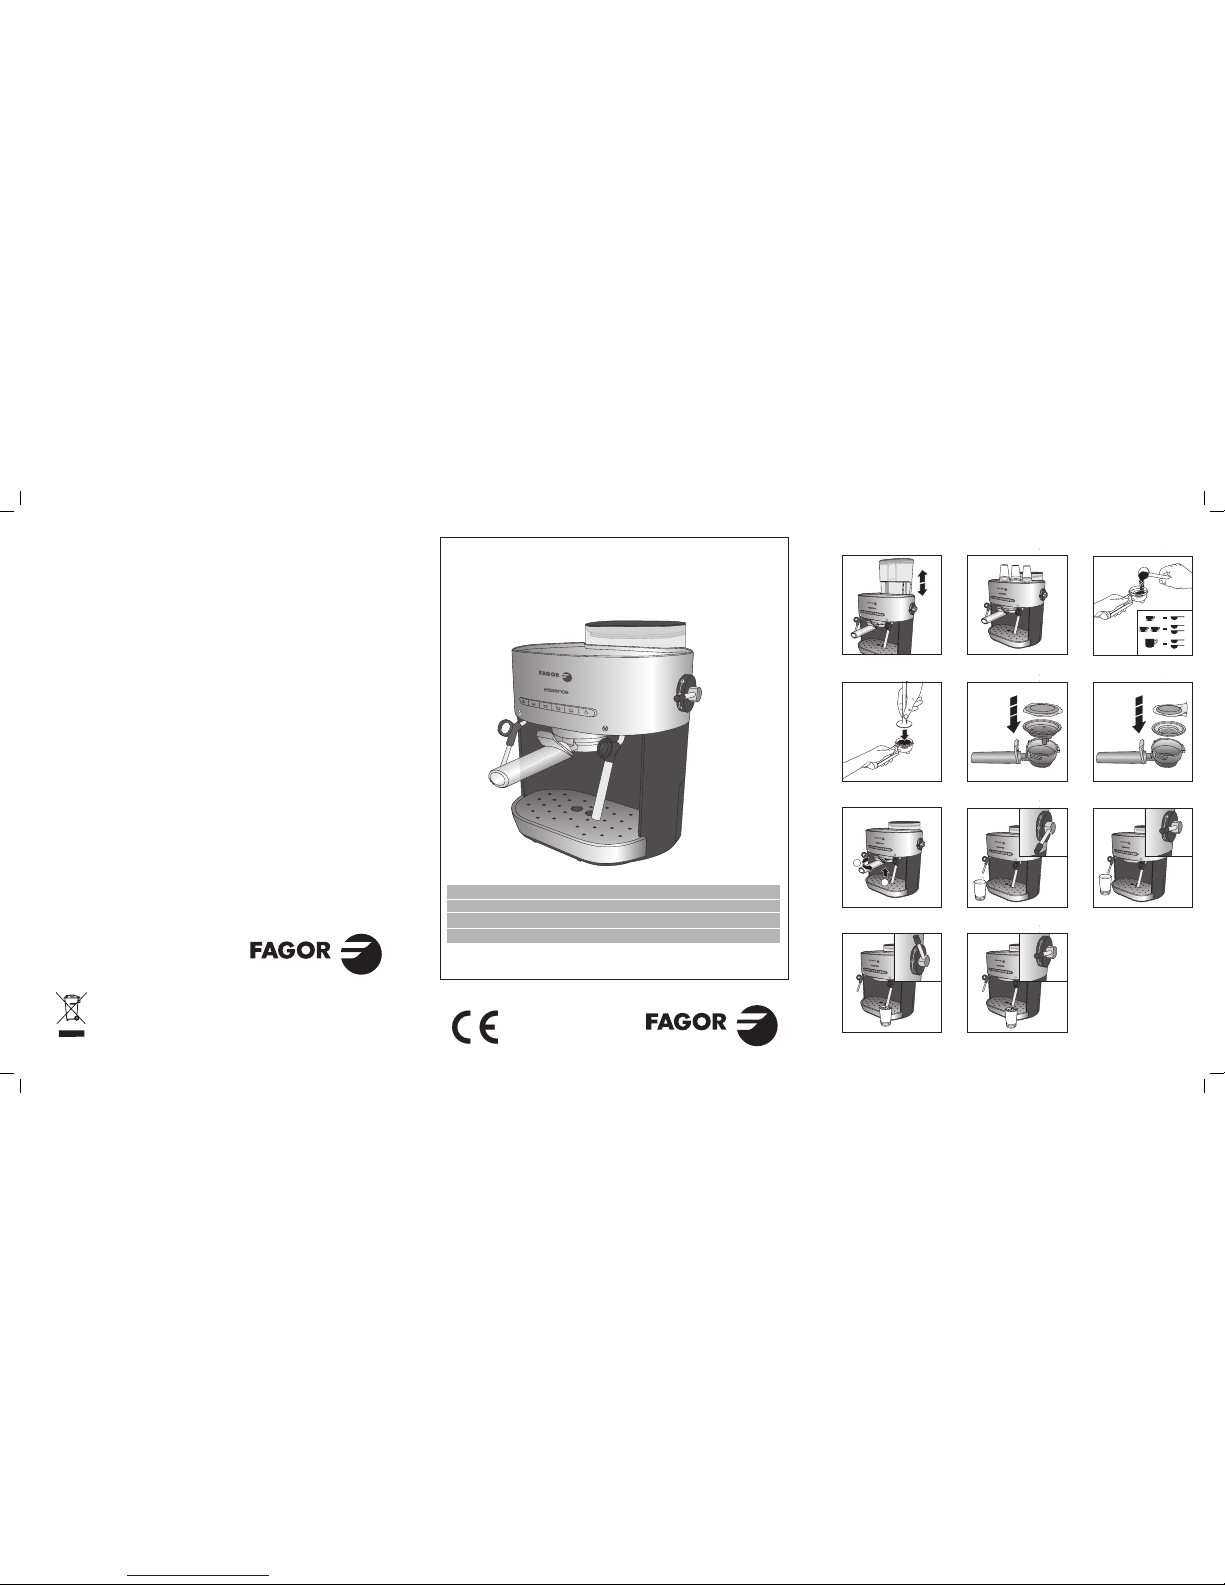
Fagor CR-22 User manual

1
2
MOD.: CR-22
CAFETERA EXPRESS / CAFETEIRA EXPRESS / EXPRESS COFFEE MACHINE / CAFETIÈRE
EXPRESS / ESPRESSO-KAFFEEMASCHINE / MACCHINA DA CAFFÈ EXPRESS / ΚΑΦΕΤΙΕΡΑ
ΕΣΠΡΕΣΣΟ / ESZPRESSZÓ KÁVÉFŐZŐ / KÁVOVAR EXPRESS / CIŚNIENIOWY EKSPRES DO
KAWY / КАФЕМАШИНА ЗА ЕСПРЕСО / ЭКСПРЕСС-КОФЕВАРКА /
ES
PT
EN
FR
DE
IT
EL - ENTY¶√ √¢∏°πøN
HU
CS -
SK -
PL -
BG - ИНСТРУКЦИЯЗАУПОТРЕБА
RU -
ИНСТРУКЦИЯПОЭКСПЛУАТАЦИИ
O k·t·ÛkÂv·Ût‹ç ‰È·tËp› ·okÏÂÈÛtÈk¿ to ‰Èk·›ˆÌ· v· tpoooȋۛ t· Ìovt¤Ï· ou ÂpÈyp¿ºovt·È Ûto ·pfiv Evtuo O‰ËyÈÒv
.
A gyártó fenntartja magának a jogot a használati útmutatóban közölt műszaki adatok megváltoztatására.
Výrobce si vyhrazuje právo modifikovat modely popsané v tomto uživatelském návodu.
Výrobca si vyhradzuje právo modifikovať modely opísané v tomto užívateľskom návode.
Производителясизапазваправотопроменямоделитеописанивтозинаръчник.
Производительоставляетзасобойправозаменымодели,описанныевданномРуководствепользователя.
MANUAL DE INSTRUCCIONES
EXPRIMIDOR
El fabricante se reserva los derechos de modificar los modelos descritos en
este manual de instrucciones
Diciembre 2004
2004
MANUAL DE INSTRUCCIONES
EXPRIMIDOR
El fabricante se reserva los derechos de modificar los modelos descritos en
este manual de instrucciones
Diciembre 2004
2004
MANUAL DE INSTRUCCIONES
TOSTADOR
El fabricante se reserva los derechos de modificar los modelos descritos en
este manual de instrucciones
Junio 2004
2004
Фиг.B
Рис.B
B
Фиг.E
Рис.E
E
Фиг.H
Рис.H
H
Фиг.K
Рис.K
K
Фиг.C
Рис.C
C
Фиг.F
Рис.F
F
Фиг.I
Рис.I
I
Фиг.L
Рис.L
L
Фиг.D
Рис.D
D
Фиг.G
Рис.G
G
Фиг.J
Рис.J
J
ϝΎϤόΘγϻ ΕΩΎηέ·
Δόϳήδϟ ΓϮϬϘϟ ΔϳϼϏ
ϞϳΩϮϤϟ:
1
22
6
7
8
9
17
1
19 20 21

Фиг.A
Рис.A
A
:
H
:
7
1
2
9
8
3
4
5
6
10
11
12
13
14
15
16
18
19
20
21
17
22

11
EN
1. DESCRIPTION (Fig. A)
1. Receptacle for accessories
2. Function selector
3. Cup warming plate
4. Water tank
5. Water tank lid
6. Drip tray lid
7. Drip tray
8. Steam jet
9. Hot water pipe
10. Top filter
11. Hot water button
12. Espresso button
13. Latte button (white coffee)
14. Cappuccino button
15. American-style coffee button
16. Steam button
17. On/Off switch
18. Filter holder
19. Ground coffee filter
20. Hard single measure filter
21. Soft single measure filter
22. Measuring spoon
Interference suppression: The
interference of this appliance has been
suppressed in accordance with interference
suppression standards.
Electromagnetic compatibility: This
appliance complies with the CEM
standards of electromagnetic compatibility.
in your home corresponds to that
indicated on the appliance.
•In the event of incompatibility between
the mains socket and the appliance
plug, replace the socket with a suitable
one, using a qualified professional.
•The electrical safety of the appliance is
only guaranteed if it is connected to an
efficient earth installation, as foreseen in
applicable electrical safety regulations.
If in doubt, contact a qualified
professional.
•The use of adaptors, multiple sockets
and or extension cables is not
recommended. Where it is not possible
to avoid their use, only adaptors or
extensions that comply with applicable
safety regulations should be used, and
ensuring that the indicated voltage limit
is not exceeded.
•After removing the packaging, check
that the appliance is in perfect
condition, if in doubt, contact the
nearest Technical Support Service.
•Packaging elements (plastic bags,
polystyrene foam, etc.), should not be
left within the reach of children because
they can be dangerous.
•The appliance is for domestic use only.
Any other use is considered unsuitable
or dangerous.
•The manufacturer shall not be
responsible for any damages that may
arise from improper or inadequate
use, or for repairs conducted by non-
qualified personnel.
•Do not touch the appliance with wet or
damp hands or feet.
•Keep the appliance separate from water
or other liquids, to avoid electric shock;
do not connect the appliance to the
mains if it is on a damp surface.
•Place the appliance on a dry, firm and
stable surface.
•Do not allow children or the disabled to
handle the appliance unsupervised.
•This appliance should not be used
by physically, sensorially or mentally
handicapped people or people without
experience or knowledge of it (including
children), unless they are supervised or
instructed in the use of the appliance by
•Before using this appliance for the first
time, read the following instructions
carefully and keep them for future
reference.
•Make sure that the mains voltage
3. SAFETY PRECAUTIONS
2. TECHNICAL CHARACTERISTICS
See characteristics plate.
This product complies with the European
Directives on Electromagnetic Compatibility
and Low Voltage.

12
a person responsible for their safety.
•Children should be watched to ensure
they do not play with the appliance.
•For greater protection, we recommend
installing a residual current device
(RCD) with an operational residual
current not exceeding 30 mA. Ask your
installer for advice.
•Do not leave the appliance unattended
when it is turned on because it can be
dangerous.
•When removing the plug never pull on
the cable.
•Unplug the appliance before cleaning
or maintenance.
•In the event of fault or malfunction
where the appliance is not to be used,
turn off the appliance and do not
attempt to repair. If a repair is required,
contact a Technical Assistance Service
authorised by the manufacturer and
request the use of original spare parts.
•If the cable for this appliance is
damaged, contact an authorised
Technical Assistance Service for it to be
replaced.
•Do not leave the appliance exposed to
the elements (rain, sun, ice, etc.).
•Do not use or let any part of the
appliance come into contact or near
hot surfaces (kitchen gas or electric
hobs or ovens).
•Do not use detergents or abrasive
sponges to clean the appliance.
•Do not touch the hot surfaces. Use the
handles.
•Do not let the cable come into contact
with the hot parts of the appliance.
•Do NOT use the coffee machine when
the water tank is empty.
•The steam jet, hot water pipe and
filter holder become very hot when
the machine is working and can cause
burns.
•This coffee machine works under
pressure and therefore the risk of burns
exists.
•Do NOT heat inflammable liquids with
the steam jet.
•Do NOT remove the filter holder when
the machine is working or still under
pressure.
•Unplug the coffee machine from the
electricity supply before cleaning.
4. DESCRIPTION OF
CHARACTERISTICS
5. SERVICING
PUMP POWER RATING: The machine
is fitted with a 15 bar pump capable
of producing excellent Espresso or
Cappuccino coffee.
TERMOBLOC ALUMINIUM: The machine
is built with thermo bloc aluminium for
faster warming to ensure excellent hot
water and steam supply.
HOW TO IMPROVE FROTH: The machine
is fitted with a device on the steam jet to
make better froth. Enjoy plenty of frothy
milk for your Cappuccino in minutes
without having to learn the ‘techniques’ of
the skilled barman.
REMOVABLE DRIP TRAY: The drip tray
can be removed for easy cleaning.
REMOVABLE WATER TANK: The 1.5 litre
water tank is fitted with a handle so that
it can be removed for easy cleaning and
can be filled directly through the top of the
machine.
SAFETY SYSTEM: The thermo bloc heating
element has a heat protection device to
prevent it from burning in the event that the
thermo bloc should boil dry.
1. Before using the machine for the first time,
it is necessary to wash the filters (19, 20 &
21), the measuring spoon (22), the water
tank (4), the hot water pipe (9) and the
steam jet (8). Rinse all parts well.
2. The coffee machine should also be
cleaned on the inside. To do so, fill the
tank with water and run the machine
without coffee several times.
3. Once the coffee machine has been
cleaned, place the machine on a dry,
firm and stable worktop.
4. Remove the water tank (4) by pulling it
upwards (Fig. B). Open the tank lid (5)
and fill it with clean fresh water. Refit the
tank onto the back of the machine.

13
5. Make sure that the ON/OFF (I/0) switch
(17) is off (“0”) and that the function
selector (2) is at the position marked
“” and plug the machine into the
electricity supply.
6. Press the On/Off switch (17) to “I” to
turn on the machine. The lights for the
4 types of coffee (12, 13, 14 & 15) will
flash until the machine has warmed up.
7. When the lights stay on permanently,
the machine has reached its ideal
working temperature and is ready to
make coffee.
Warming the cups:
Place the coffee cups upside down on the
cup heating plate (3). When the machine
is hot, the plate (3) will warm the cups that
are on top of it (fig. C). A warm cup makes
for better and stronger cream.
6. BEFORE MAKING THE COFFEE
Once the machine has warmed up, select
one of the filters depending on the type of
coffee you wish to make (see the following
recommendations):
•Ground coffee filter (19): this filter is
suitable for making one or 2 cups of
coffee (Espresso, Latte, Cappuccino
or American-style) with ground coffee.
Place the filter in the filter holder (18).
Fill the filter with a spoonful of ground
coffee to make 1 cup of coffee or with
two spoonfuls if you wish to make 2
cups (fig. D).
We recommend you use the measuring
spoon (22) provided as the correct
measurement for 1 cup. Press the
coffee down into the filter with the back
of the spoon (fig. E) and always remove
any surplus coffee from the edge of the
filter.
Always wipe away any overflowing
coffee from the edge of the filter in order
to make sure that the filter holder does
not leak without having to be forced
closed.
•Hard single-measure filter (20):
this filter is used to prepare a cup of
Espresso or Café Latte using a hard
coffee capsule. Fit the filter into the filter
holder (18) and place the capsule inside
the filter (fig. F).
•Soft single-measure filter (21): this
filter is suitable for making one cup of
Cappuccino or American-style coffee
with a single-dose sachet. Fit the filter
onto the filter-holder (18) and place the
soft capsule into the filter (fig. G).
Single-serving sachets and therefore
the single-serving filters (20 and 21) are
designed to make a single cup of coffee. If
you wish to make two cups of coffee, you
should use the ground coffee filter (20).
Place the filter-holder onto the top filter
head (10) and rotate it firmly from left to
right as shown in Figure H. Place one or
two warmed cups under the filter-holder.
7. MAKING THE COFFEE
•To make an Espresso coffee, press the
Espresso button (12). Remember that
to make Espresso coffee, you must
use the ground coffee filter or the hard
capsule filter.
•To make a Café latte (white coffee)
press the Latte button (13). Remember
that to make white coffee, you must
use the ground coffee filter or the hard
capsule filter.
•To make a Cappuccino coffee, press
the Cappuccino button (14). Remember
that to make a Cappuccino, you must
use the ground coffee filter or the soft
sachet filter.
•To make an American-style coffee,
press the Americano button (14).
Remember that to make an Americano
coffee, you must use the ground coffee
filter or the soft sachet filter.
The indicator light for the type of coffee
you have selected will come on whereas
the other lights will turn off. The coffee will
begin to be dispensed and will stop when
the programmed amount of coffee has been
poured. If you wish to stop the coffee when it
is running, press the same button again.

14
8. HOT WATER
9. STEAM FUNCTION
•Follow the steps described in the
‘SERVICING’ section above and press
the hot water button (11). The button
will begin to flash and when it remains
on permanently, the coffee machine has
reached a suitable hot water temperature.
•Place a cup under the hot water pipe (9)
and move the function selector (2) to the
position marked (fig. I).
•Hot water will be served and when
enough has been supplied, move the
function selector (2) back to the position
marked (Fig. J).
•To return to the coffee making mode,
press the hot water button (11) again.
•Follow the steps described in the
‘SERVICING’ section above and press
the steam button (16). The button will
begin to flash and when it remains on
permanently, the coffee machine has
reached a suitable temperature to make
steam.
•Place the steam jet (8) into the liquid
you wish to heat and move the function
selector (2) to the position marked
(Fig. K).
•When the liquid has been warmed
sufficiently, move the function selector (2)
back to the position marked (Fig. L).
•To return to the coffee-making mode,
press the steam button (16) again.
•The Espresso (13) and Cappuccino (14)
lights will start to flash until the machine
has cooled down enough to make
coffee. When it has reached a suitable
temperature for coffee-making, the four
lights for the different types of coffee
(12, 13, 14 & 15) will come on.
Once the machine has dispensed the
programmed coffee, a whistle brings three
times, which means that the machine has
returned to the coffee-making mode.
Once the coffee machine has whistled three
times, the filter holder (18) can be removed.
Hold the front of the filter seal and empty
the used coffee.
N.B. Do NOT remove the filter holder
(18) until the machine has whistled three
times.
The preset amount and temperature for
each function are approximately as follows:
AMOUNT TEMPERATURE
EXPRESSO: 50 ml 75ºC
LATTE (white coffee): 80 ml 80ºC
CAPUCCINO: 120 ml 80ºC
AMERICANO: 250 ml 80ºC
For a manual control of the amount of
coffee, hold the button down continuously
for three seconds and the coffee will begin
to be dispensed. When the amount of
coffee you require has been reached, press
the button again. After a few seconds,
three whistles will be heard and then the
filter holder (18) can be removed. Because
the machine that memorises the amount of
coffee it has dispensed and next time will
supply the same amount of coffee.
10. CLEANING AND MAINTENANCE
Before any maintenance or cleaning takes
place, first unplug the machine from the
electricity supply and wait for it to cool
down.
Never immerse the machine in water or use
abrasive cleaning fluids or solvents.
•Clean the outside of the machine with a
soft damp cloth and then dry.
•Wash the water tank (4), filter holder
(18), drip tray cover (6), drip tray (7) and
filters (19, 20 & 21) in warm water with
neutral soap.
•Clean spray jet (8) and hot water pipe
(9) with a damp cloth.

15
11. INFORMATION FOR THE
CORRECT DISPOSAL OF ELECTRICAL
AND ELECTRONIC APPLIANCES
At the end of its working
life, the product must not be
disposed of as urban waste.
It must be taken to a special
local authority differentiated
waste collection centre or to
a dealer providing this service. Disposing
of a household appliance separately avoids
possible negative consequences for the
environment and health deriving from
inappropriate disposal and enables the
constituent materials to be recovered to
obtain significant savings in energy and
resources.
To remind you that you must collaborate
with a selective collection scheme, the
symbol shown appears on the product
warning you not to dispose of it in
traditional refuse containers.
For further information, contact your local
authority or the shop where you bought the
product.
Other manuals for CR-22
1
Table of contents
Other Fagor Coffee Maker manuals

Fagor
Fagor CR-16 Manual

Fagor
Fagor CR-312 User manual

Fagor
Fagor CG-2005 User manual

Fagor
Fagor CEI-600 User manual

Fagor
Fagor ETNA Series User manual

Fagor
Fagor Built-In Coffee Machine MQC-A10 US Manual

Fagor
Fagor CG-1100 User manual

Fagor
Fagor CR-282 User manual

Fagor
Fagor CEI-400 User manual

Fagor
Fagor CR-10 User manual

Fagor
Fagor CG-312 User manual

Fagor
Fagor CR-14 User manual

Fagor
Fagor CR-1000 - 2004 User manual

Fagor
Fagor CR-284 User manual

Fagor
Fagor CR-1000 - 2008 User manual

Fagor
Fagor CR-20 User manual

Fagor
Fagor CG-512 User manual

Fagor
Fagor CR-750 User manual

Fagor
Fagor CAT 40 NG User manual

Fagor
Fagor CR-282 User manual