Festina IFM0S90 User manual
IFM0S90
CHRONOGRAPH CALENDAR
MANUAL DE INSTRUCCIONES • INSTRUCTION MANUAL
MANUEL D’INSTRUCTIONS • BETRIEBSANLEITUNG • MANUALE DI FUNZIONAMENTO
MANUAL DE INSTRUÇÕES

IFM0S90 CRONOGRAPH
CALENDAR
MANUAL DE INSTRUCCIONES _____________________________________________________________________________________ 5
INSTRUCTION MANUAL __________________________________________________________________________________________________13
MANUEL D’INSTRUCTION ______________________________________________________________________________________________ 21
BETRIEBSANLEITUNG _____________________________________________________________________________________________________29
MANUALE DI FUNZIONAMENTO ______________________________________________________________________________ 37
MANUAL DE INSTRUÇÕES __________________________________________________________________________________________ 45

IFM0S90
5
ESPAÑOL
MANUAL DE INSTRUCCIONES
CRONÓGRAFO
Visualización y botones ______________________________________________________________________________________________________________ 6
Ajustando la hora___________________________________________________________________________________________________________________________ 7
Ajustando la fecha ________________________________________________________________________________________________________________________ 7
Usando el cronógrafo ___________________________________________________________________________________________________________________ 8
Reposición del cronógrafo (incl. después de reemplazar la batería) _______________________11

I
I
I
I
I
I
I
I
I
I
I
I
I
I
I
I
I
I
I
I
I
I
I
I
I
I
I
I
I
I
I
I
I
I
IFM0S90 IFM0S90
67
ESPAÑOL
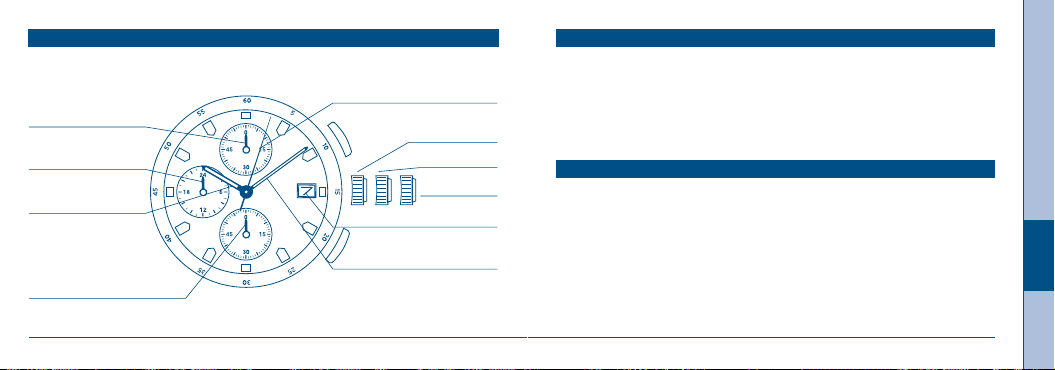
VISUALIZACIÓN Y BOTONES
Botón A
Botón B Manecilla
de los minutos
Manecilla
de la hora
Manecilla de segundos
del cronógrafo
(Manecilla de minutos
de cronógrafo)
Manecilla de 24 horas
Calendario
1ª posición
2ª posición
Posición normal
de la corona
Manecilla de 1/100 de
segundos del cronógrafo
Manecilla pequeña de los
segundos (Manecilla de
segundos del cronógrafo)
AJUSTANDO LA HORA
1. Tire de la corona hacia afuera hasta la segunda posición.
2. Gire la corona para ajustar las manecillas de la hora y los minutos.
3. Al volver a colocar la corona en la posición normal, se pone en marcha la
manecilla pequeña de los segundos.
1. Tire de la corona hacia afuera hasta la primera posición.
2. Gire la corona en sentido antihorario hasta ajustar la fecha.
* Si se ajusta la fecha entre alrededor de las 9:00 PM y la 1:00 AM, puede
suceder que la fecha no cambie al día siguiente.
3. Tras ajustar la fecha, vuelva a colocar la corona en la posición normal.
AJUSTANDO LA FECHA

IFM0S90 IFM0S90
89
ESPAÑOL
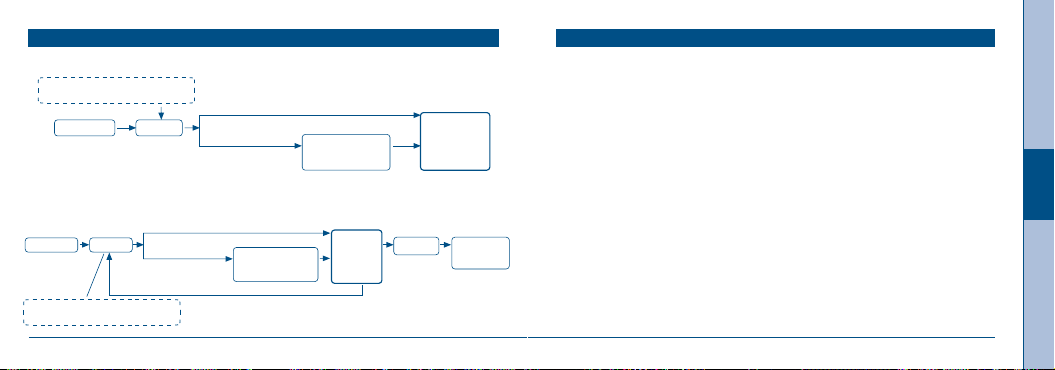
USANDO EL CRONÓGRAFO
EL cronógrafo puede medir y visualizar el tiempo en unidades de 1/100 de segundos
hasta un máximo de 59 minutos 59 segundos 99.
[Manecilla de 1/100 de segundos del cronógrafo]
• La manecilla de 1/100 de segundos del cronógrafo se mueve durante 61 segundos
después de iniciarse la medición, después de lo cual se detiene en la posición 0.
Después de este lapso, se cambia a la operación de demostración, realizando una
vuelta cada minuto.
[Para poner en marcha el cronógrafo]
• Presione el botón A.
• La manecilla pequeña de los segundos avanzará a la posición cero en el momento
de ponerse en marcha el cronógrafo, y luego empezará a funcionar como la
manecilla de los segundos del cronógrafo.
Transcurrido 1 minuto y 1 segundo después de ponerse en marcha el cronógrafo:
• La manecilla de los segundos del cronógrafo empezará a funcionar como la
manecilla de los minutos del cronógrafo.
[Para detener el cronógrafo]
• Presione el botón A.
• Cuando el tiempo medido sea de menos de 61 segundos, las manecillas de
los minutos, segundos y 1/100 de segundos del cronógrafo se pararán en el
tiempo medido.
• Cuando el tiempo medido sea de más de 61 segundos, las manecillas de
los minutos y segundos del cronógrafo se pararán en el tiempo medido. La
manecilla de 1/100 de segundos del cronógrafo permanecerá detenida en la
posición cero. En este momento, lea los segundos y minutos del ,cronógrafo.
Seguidamente, presione de nuevo el botón A para avanzar la manecilla de
1/100 de segundos del cronógrafo hasta el tiempo medido. En este momento,
lea el tiempo en 1/100 de segundos del cronógrafo.
[Para reposicionar el cronógrafo]
• Presione el botón B.
• La manecilla de segundos del cronógrafo empezará a funcionar como
la manecilla de segundos para la hora actual. Las otras manecillas del
cronógrafo vuelven a la posición cero.
USANDO EL CRONÓGRAFO

“A”“ A”
“A”“ B”
“A”“ A”
“A” “A”
“A” “B”
IFM0S90 IFM0S90
10 11
ESPAÑOL
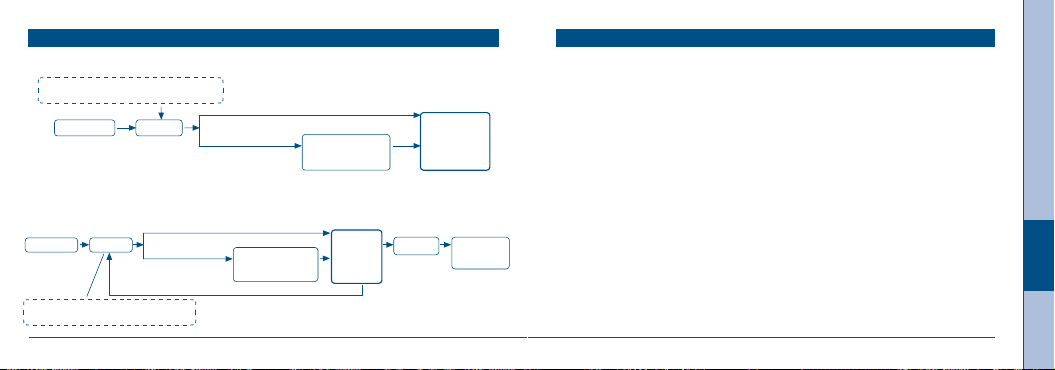
[MEDICIÓN ESTÁNDAR]
[MEDICIÓN DEL TIEMPO TRANSCURRIDO ACUMULADO]
REPOSICIÓN DEL CRONÓGRAFO (incluso después de cambiar la pila)USANDO EL CRONÓGRAFO
Los minutos y segundos del
cronógrafo se leen aquí.
Lectura del
cronógrafo de
1/100 de segundos
Lectura del
cronógrafo de 1/100
de segundos
Cuando el tiempo medido
sea menos de 61 segundos
Cuando el tiempo medido
sea menos de 61 segundos
Cuando el tiempo medido
sea de más de 61 segundos
Cuando el tiempo medido
sea de más de 61 segundos
Los minutos y segundos del
cronógrafo se leen aquí.
INICIO
INICIO
REINICIO
REPOSICIÓN
REPOSICIÓN
PARADA
PARADAPARADA
1. Tire de la corona hacia afuera hasta la segunda posición.
2. Presione el botón “A” para poner la manecilla de 1/100 de segundo del
cronógrafo en la posición cero.
3. Presione el botón “B” para poner la manecilla de los segundos del
cronógrafo en la posición de las 6 horas a posición cero. Una presión
continua sobre el botón “A” o “B” permite avanzar rápidamente las
manecillas del cronógrafo.
4. Una vez que las manecillas se pongan en cero, vuelva a colocar la corona en
la posición normal.
* No presione la corona en la posición normal mientras la manecilla de 1/100
de segundo del cronógrafo vuelve a la posición cero.
Todas las manecillas de los segundos se paran cuando presiona la corona para
ponerla en la posición normal, y estas posiciones de parada serán consideradas
como posición cero.
Este procedimiento se debe realizar cuando la manecilla de 1/100 de segundo del
cronógrafo y la manecilla de los segundos del cronógrafo no vuelven a la posición
cero después de haber reposicionado el cronógrafo, e incluso después de haber
reemplazado la pila.
Puede operarse repetidamente

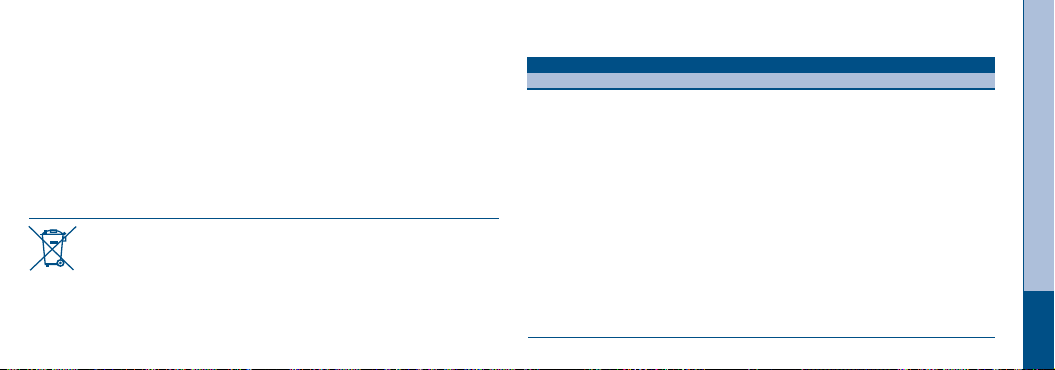
En aplicación de la normativa sobre los desechos de equipos eléctricos y
electrónicos, los productos de relojería de cuarzo que se encuentran al final
de su vida útil deben ser sometidos a una recogida selectiva en vistas a
su posterior tratamiento. También puede depositar nuestros productos de relojería
de cuarzo en uno de nuestros puntos de venta autorizados, así como en cualquier
punto de recogida habilitado. La recogida selectiva, el tratamiento, la valoración y el
reciclaje contribuyen a la salvaguarda de nuestro medio ambiente y a la protección
de nuestra salud.
13
ENGLISH
IFM0S90
INSTRUCTION MANUAL
STOPWATCH
Displays and buttons __________________________________________________________________________________________________________________ 14
Setting the time ___________________________________________________________________________________________________________________________ 15
Setting the date ___________________________________________________________________________________________________________________________ 15
Using the chronograph ______________________________________________________________________________________________________________ 16
Chronograph reset (incl. after replacing battery) __________________________________________________________ 19
I
I
I
I
I
I
I
I
I
I
I
I
I
I
I
I
I
I
I
I
I
I
I
I
I
I
I
I
I
I
I
I
I
I
IFM0S90 IFM0S90
14 15
ENGLISH
DISPLAYS AND BUTTONS SETTING THE TIME
1. Pull the crown out to the 2nd position.
2. Turn the crown to set hour and minute hands.
3. When the crown is pushed back to the normal position, small second hand
begins to run.
1. Pull the crown out to the 1st position.
2. Turn the crown counter-clockwise to set the date.
* If the date is set between the hours of around 9:00 PM and 1:00 AM, the
date may not change on the following day.
3. After the date has been set, push the crown back to the normal position.
SETTING THE DATE
Button A
Button B Minute hand
Hour hand
Chronograph second hand
(Chronograph minute hand)
24 hour hand
Calendar
1st position
2nd position
Normal crown
position
Chronograph 1/100
second hand
Small Second hand
(Chronograph second hand)
IFM0S90 IFM0S90
16 17
ENGLISH
USING THE CHRONOGRAPH USING THE CHRONOGRAPH
The chronograph is able to measure and display time in 1/100 second united up to
maximum of 59 minutes 59 seconds 99.
[The chronograph 1/100 second hand]
• The chronograph 1/100 second hand moves for 61 seconds after measurment is
started, after which time it will stop at 0 position. After that time, it then changes
to demonstration operation, making one revolution every minute.
[To start the chronograph]
• Press button A.
• The small second hand will advance to the zero position at the same time the
chronograph starts, and then begin to run as the chronograph second hand.
Passed at 1 minute and 1 second after the chronograph has been started:
• The chronograph second hand will change over to running as the chronograph
minute hand.
[To stop the chronograph]
• Press button A.
• When the measured time is less than 61 seconds, the chronograph minute,
second and 1/100 second hands will stop at the measured time.
• When the measured time is over 61 seconds, the chronograph minute and
second hands will stop at measured time. The chronograph 1/100 second
hand will remain stopped at the zero position. Read the seconds and minutes
from the chronograph at this time.
Next, press button A again to advance the chronograph 1/100 second hand to
the measured time.
Read the time in 1/100 seconds from the chronograph at this time.
[To reset the chronograph]
• Press button B.
• The chronograph second hand will change over to running as the second
hand for current time. The other chronograph hands are returned to the zero
position.
“A”“ A”
“A”“ B”
“A”“ A”
“A” “A”
“A” “B”
IFM0S90 IFM0S90
18 19
ENGLISH
[STANDARD MEASUREMENT]
[ACCUMULATED ELAPSED TIME MEASUREMENT]
Chronograph minutes and
seconds are read here
*Read
inchronograph
1/100 seconds
*Read
inchronograph
1/100 seconds
When the measured time is
less than 61 seconds
When the measured time is
less than 61 seconds
When the measured time is
over 61 seconds
When the measured time
is over 61 seconds
Chronograph minutes and
seconds are read here
Can be operated repeatedly
START
START
RESTART
RESET
RESET
STOP
STOPSTOP
1. Pull the crown out to the 2nd position.
2. Press button “A” to set the chronograph 1/100 second hand to zero position.
3. Press button “B” to set the chronograph second hand at 6 o’clock to zero
position. The chronograph hands can be advanced rapidly by continuously
pressing button “A” or “B”
4. Once the hands have been zeroed, return the crown to the normal position.
* Do not push the crown to the normal position while the chronograph 1/100
second hand and the chronograph second hand return to zero position. Each
hands stop on the way when crown are returned to the normal position and
these positions are recognized as zero position.
second hand do not return to zero position after the chronograph has been reset,
and including after the battery has been replaced.
USING THE CHRONOGRAPH CHRONOGRAPH RESET (incl. After replacing battery)
By virtue of the regulations pursuant to the handling of waste products
deriving from electronic and electrical equipment, end of lifecycle watch
making products must be selectively collected for processing. You may
therefore dispose of your quartz watch making products at any of our retail outlets
or any other authorized collection point. The selective collection, processing, rating
and recycling of these products helps contribute to safeguarding the environment and
protecting our health.
21
FRANÇAIS
IFM0S90
MANUEL D’INSTRUCTION
CHRONOGRAPHE
Indications et boutons ______________________________________________________________________________________________________________ 22
Réglage de l’heure _____________________________________________________________________________________________________________________ 23
Réglage de la date______________________________________________________________________________________________________________________ 23
Utilisation du chronographe___________________________________________________________________________________________________ 24
Réinitialisation du chronographe _________________________________________________________________________________________ 27
(y compris après remplacement de la pile)

I
I
I
I
I
I
I
I
I
I
I
I
I
I
I
I
I
I
I
I
I
I
I
I
I
I
I
I
I
I
I
I
I
I
IFM0S90 IFM0S90
22 23
FRANÇAIS
INDICATIONS ET BOUTONS RÉGLAGE DE L’HEURE
1. Tirez la couronne
2. Tournez la couronne pour régler les aiguilles des heures et des minutes.
3. Lorsque vous renfoncez la couronne jusqu’à sa position normale, la petite
trotteuse se met à tourner.
1. Tirez la couronne jusqu’à la 1e position.
2. Tournez la couronne dans le sens antihoraire pour régler la date.
* Si la date est réglée entre 9:00 du soir et 1:00 du matin environ, elle ne
changera peut-être pas le jour suivant.
3. Lorsque la date a été réglée, renfoncez la couronne jusqu’à sa position
normale.
RÉGLAGE DE LA DATE
Bouton A
Bouton B
Aiguille des minutes
Aiguille des heures
Trotteuse du chronographe
(Aiguille des minutes du
chronographe)
Aiguille de 24 heures
Calendrier
1e position
2e position
Normal crown
position
Aiguille des 100es de seconde
Petite Trotteuse
(Trotteuse du chronographe)
IFM0S90 IFM0S90
24 25
FRANÇAIS
UTILISATION DU CHRONOGRAPHE UTILISATION DU CHRONOGRAPHE
Le chronographe peut chronométrer et afficher l’heure en 100es de seconde jusqu’à
59 minutes 59 secondes 99.
[Aiguille des 100es de secondes du chronographe]
• L’aiguille des 100es de secondes du chronographe tourne les 61 secondes qui
suivent la mise en marche du chronographe, puis s’arrête à la position 0. Ensuite,
elle passe en mode de démonstration et fait un tour toutes les minutes.
[Pour mettre le chronographe en marche]
• Appuyez sur le bouton A.
• La petite trotteuse se met en position zéro au moment où le chronométrage
commence, puis indique les ,secondes chronométrées.
Après 1 minute et 1 seconde de chronométrage :
• L’aiguille des secondes du chronographe indique les minutes chronométrées.
[Pour arrêter le chronographe]
• Appuyez sur le bouton (A).
• Si le temps chronométré est inférieur à 61 secondes, les aiguilles des
minutes, secondes et 100es de seconde du chronographe s’arrêtent au temps
chronométré.
• Lorsque le temps chronométré est supérieur à 61 secondes, les aiguilles des
minutes et des secondes du chronomètre s’arrêtent au temps chronométré.
L’aiguille des 100es de secondes reste à la position zéro. Relevez les minutes
et les secondes chronométrées à ce moment. Appuyez ensuite sur le bouton
A pour faire avancer l’aiguille des 100es de seconde du chronographe au
temps chronométré. Relevez les 100es de seconde du chronographe à ce
moment.
[Pour remettre à zéro le chronographe]
• Appuyez sur le bouton B.
• L’aiguille des secondes du chronographe indique de nouveau les secondes
de l’heure actuelle. Les autres aiguilles du chronographe reviennent à leur
position zéro.
“A”“ A”
“A”“ B”
“A”“ A”
“A” “A”
“A”
“B”
IFM0S90 IFM0S90
26 27
FRANÇAIS
RÉINITIALISATION DU CHRONOGRAPHE (PAR EX. APRÈS LE REMPLACEMENT DE LA PILE)
[CHRONOMÉTRAGE ORDINAIRE]
[ACCUMULATED ELAPSED TIME MEASUREMENT]
Les minutes et les secondes du
chronographe sont indiquées ici
Indication des
100es de seconde
du chronographe
Indication des
100es de seconde
du chronographe
Lorsque le temps chronométré
est inférieur à 61 secondes
Lorsque le temps chronométré
est inférieur à 61 secondes
Lorsque le temps chronométré
est supérieur à 61 secondes
Lorsque le temps
chronométré est
supérieur à 61 secondes
Les minutes et les secondes du
chronographe sont indiquées ici
Peut être répété
Démarrage
Démarrage Nouveau
démarrage
Remise à
zéro
Remise à
zéro
Arrêt
ArrêtArrêt
1. Tirez sur la couronne pour la mettre en 2e position.
2. Appuyez sur le bouton « A » pour mettre la trotteuse des 100 es de seconde
à la position zéro.
3. Appuyez sur le bouton « B » pour mettre la trotteuse du chronographe à
6 heures à la position zéro. Les aiguilles du chronographe avanceront plus
rapidement si vous appuyez en continu sur le bouton « A » ou « B ».
4. Lorsque les aiguilles ont été remises à zéro, renfoncez la couronne jusqu’à
sa position normale.Do not push the crown to the normal position while the
chronograph 1/100 second hand and the chronograph second hand return to
zero position. Each hands stop on the way when crown are returned to the
normal position and these positions are recognized as zero position.
* Ne renfoncez pas la couronne jusqu’à sa position normale lorsque la
trotteuse des 100es de seconde et la trotteuse du chronographe reviennent
à la position zéro.
Chaque aiguille en cours s’arrête lorsque la couronne est renfoncée et leurs
positions sont reconnues comme position zéro.
Cette opération doit être effectuée lorsque la trotteuse des 100es de seconde
du chronographe ne revient pas à la position zéro après la remise à zéro du
chronographe, ou bien lorsque la pile a été remplacée.
UTILISATION DU CHRONOGRAPHE
En application de la réglementation sur les déchets des équipements
électriques et électroniques, les produits horlogers à quartz en fin de vie
font l’objet dúne collecte sélective en vue de leur traitement. Vous pouvez
ainsi déposer nos produits horlogers à quartz dans l’un de nos points de vente agréés,
ainsi que dans tout point de collecte habilité. La collecte sélective, le traitement, la
valorisation et le recyclage contribuent à la sauvegarde de notre environnement et à
la protection de notre santé.
29
DEUTSCH
IFM0S90
BETRIEBSANLEITUNG
CHRONOGRAPHEN
Displays und Knöpfe __________________________________________________________________________________________________________________ 30
Einstellung der Zeit ____________________________________________________________________________________________________________________ 31
Einstellung des Datums ____________________________________________________________________________________________________________ 31
Verwendung des Chronographen _________________________________________________________________________________________ 32
Rückstellung des Chronographen ________________________________________________________________________________________ 35
(einschließlich nach dem austauschen der Batterie)
I
I
I
I
I
I
I
I
I
I
I
I
I
I
I
I
I
I
I
I
I
I
I
I
I
I
I
I
I
I
I
I
I
I
IFM0S90 IFM0S90
30 31
DEUTSCH
DISPLAYS UND KNÖPFET EINSTELLUNG DER ZEIT
1. Ziehen Sie die Krone in die zweite Position heraus.
2. Drehen Sie die Krone, um den Stundenzeiger und den Minutenzeiger
einzustellen.
3. Wenn Sie die Krone in die Normalposition zurückdrücken, beginnt der kleine
Sekundenzeiger seine Bewegung.
1. Ziehen Sie die Krone in die erste Position heraus.
2. Drehen Sie die Krone gegen den Uhrzeigersinn, um das Datum (den
Kalendertag) einzustellen.
* Falls Sie das Datum zwischen den Stunden um ca. 9:00 p.m. (abends) bis
1:00 a.m. (morgens) einstellen, wechselt das Datum (der Kalendertag) am
nächsten Tag vielleicht nicht.
3. Nachdem Sie das Datum (den Kalendertag) eingestellt haben, drücken Sie
die Krone zurück in die Normalposition.
EINSTELLUNG DES DATUMS
Knopf A
Knopf B Minutenzeiger
Stundenzeiger
Sekundenzeiger
des Chronographen
(Minutenzeiger des
Chronographen)
24-Stundenzeiger
Kalender
Erste Position
Zweite Position
Normale
Kronenposition
1/100-Sekundenzeiger
des Chronographs
Kleinen Sekundenzeiger
(Sekundenzeiger des
Chronographen)
IFM0S90 IFM0S90
32 33
DEUTSCH
VERWENDUNG DES CHRONOGRAPHEN VERWENDUNG DES CHRONOGRAPHEN
Mit dem Chronographen können Zeiten bis max. 59 Min. 59 Sek. 99 Hundertstel auf
1/100 Sekunden genau gemessen und angezeigt werden.
[Chronograph-1/100-Sekunden-Zeiger]
• Der 1/100-Sekunden-Zeiger des Chronographen bewegt nach dem Messungsstart
während der ersten 61 Sekunden und stoppt dann in der 0-Position. Danach
wechselt er in den Demo-Betrieb mit einer Umdrehung pro Minute.
[Starten des Chronographen]
• Drücken Sie Knopf A.
• Mit dem Starten des Chronographen bewegt sich der kleine Sekundenzeiger in die
Nullposition vor und läuft dann als Chronograph-Sekundenzeiger weiter.
Nach Ablauf von 1 Minute und 1 Sekunde nach dem Starten des Chronographen:
• Der Chronograph-Sekundenzeiger wechselt auf Funktion als
Chronograph-Minutenzeiger.
[Stoppen des Chronographen]
• Drücken Sie Knopf A.
• Wenn die gemessene Zeit unter 61 Sekunden beträgt, stoppen die
Chronograph-Minuten-, Sekundenund 1/100-Sekundenzeiger auf der
gemessenen Zeit.
• Wenn die gemessene Zeit über 61 Sekunden beträgt, stoppen die
Chronograph-Minuten- und Sekundenzeiger auf der gemessenen Zeit.
Der Chronograph-1/100-Sekundenzeiger verbleibt in der Nullposition.
Lesen Sie zunächst die Sekunden und Minuten des Chronographen ab.
Drücken Sie dann als nächstes den Knopf A, wodurch der Chronograph-
1/100-Sekundenzeiger die gemessene Zeit anzeigt. Lesen Sie nun die
1/100-Sekunden des Chronographen ab.
[Rücksetzen des Chronographen]
• Drücken Sie Knopf B.
• Der Chronograph-Sekundenzeiger wechselt auf Funktion als Sekundenzeiger
für die laufende Uhrzeit. Die anderen Chronographzeiger stellen sich in die
Nullposition zurück.
“A”“ A”
“A”“ B”
“A”“ A”
“A” “A”
“A”
“B”
IFM0S90 IFM0S90
34 35
DEUTSCH
RÜCKSTELLUNG DES CHRONOGRAPHEN (Einschliesslich Nach Dem Austauschen Der Batterie)
VERWENDUNG DES CHRONOGRAPHEN
[NORMALE MESSUNG]
[MESSUNG DER AKKUMULIERTEN ABGELAUFENEN GESAMTZEIT]
Hier werden die Minuten und Sekunden
des Chronographen abgelesen.
Ablesen der
1/100-Sekunden des
Chronographen
Ablesen der
1/100-Sekunden des
Chronographen
Gemessene Zeitspanne weniger
als 61 Sekunden
Gemessene Zeitspanne weniger
als 61 Sekunden
Gemessene Zeitspanne
mehr als 61 Sekunden
Gemessene Zeitspanne
mehr als 61 Sekunden
Hier werden die Minuten und Sekunden
des Chronographen abgelesen.
Wiederholte Betätigung möglich
START
START Nouveau
démarrage
Rückstellung
Rückstellung
STOPP
STOPPSTOPP
1. Ziehen Sie die Krone in die zweite Position heraus.
2. Drücken Sie den Knopf „A“, um den 1/100-Sekundenzeiger des
Chronographen auf die Nullposition zu stellen.
3. Drücken Sie den Knopf „B“, um den Sekundenzeiger des Chronographen auf
die 6-Uhr-Nullposition zu stellen. Sie können die Zeiger des Chronographen
schnell vorstellen, indem Sie den Knopf „A“ oder „B“ gedrückt halten.
4. Sobald Sie die Zeiger auf Null zurückgestellt haben, drücken Sie die Krone
in die Normalposition zurück.
* Drücken Sie die Krone niemals in die Normalposition zurück, während der
Sekundenzeiger des Chronographen und der 1/100-Sekundenzeiger des
Chronographen auf die Nullposition zurückkehren.
Jeder Zeiger stoppt an der jeweiligen Position, wenn Sie die Krone in die
Normalposition zurückdrücken und diese Positionen als Nullposition erkannt
werden.
Sie sollten diesen Vorgang ausführen, wenn der Sekundenzeiger des
Chronographen und der 1/100-Sekundenzeiger des Chronographen nicht an die
Nullposition zurückkehren, nachdem der Chronograph zurückgestellt bzw. die
Batterie ausgetauscht wurde.
Gemäß den Bestimmungen über die Behandlung von Abfällen durch
Elektronik- und Elektro-Altgeräte sind Quarzuhrenprodukte, deren
Lebensdauer abgelaufen ist, selektiv zu sammeln, um sie dem Recycling
zuzuführen. Sie können Ihre Quarzuhrenprodukte daher in einer unserer
Verkaufsstellen oder an einer beliebigen Sammelstelle abgeben. Die selektive
Sammlung, die Verarbeitung, die Bewertung und das Recycling dieser Produkte ist ein
Beitrag zum Umweltschutz und zum Schutz unserer Gesundheit.
37
ITALIANO
IFM0S90
MANUALE DI FUNZIONAMENTO
CRONOGRAFO
Visualizzazioni e pulsanti ________________________________________________________________________________________________________ 38
Impostazione dell’orario __________________________________________________________________________________________________________ 39
Impostazione della data ___________________________________________________________________________________________________________ 39
Uso del cronografo _____________________________________________________________________________________________________________________40
Azzeramento del cronografo (incluso dopo la sostituzione della pila)_________________ 43

I
I
I
I
I
I
I
I
I
I
I
I
I
I
I
I
I
I
I
I
I
I
I
I
I
I
I
I
I
I
I
I
I
I
IFM0S90 IFM0S90
38 39
ITALIANO
VISUALIZZAZIONI E PULSANTI IMPOSTAZIONE DELL’ORARIO
1. Estrarre la corona alla 2a posizione.
2. Girare la corona per impostare le lancette delle ore e dei minuti.
3. Quando la corona viene spinta indietro alla posizione normale, la lancetta
piccola dei secondi inizia a muoversi.
1. Estrarre la corona alla 1a posizione.
2. Ruotare la corona in senso antiorario per impostare la data.
* Se la data viene impostata tra le ore 9:00 PM e 1:00 AM, la data potrebbe
non cambiare al giorno seguente.
3. Dopo aver impostato la data, spingere la corona indietro alla posizione
normale.
IMPOSTAZIONE DELLA DATA
Pulsante A
Pulsante B
Lancetta dei minuti
Lancetta delle ore
Lancetta dei secondi del
cronografo (Lancetta dei
minuti del cronografo)
Lancetta delle 24 ore
Calendario
1a posizione
2a posizione
Posizione normale
della corona
Lancetta di 1/100 di
secondo del cronografo
Lancetta piccola dei
secondi (Lancetta dei
secondi del cronografo)
Table of contents
Languages:
Other Festina Watch manuals

Festina
Festina IFM6P25_75 User manual

Festina
Festina IFMJR00 User manual

Festina
Festina Jaguar IJM5040 User manual

Festina
Festina IFM0S10 User manual

Festina
Festina IFM6P23/73 User manual

Festina
Festina F68442 User manual

Festina
Festina IFM6S20 User manual

Festina
Festina IFMOS00 User manual

Festina
Festina F16642 User manual

Festina
Festina IFM JS20 User manual

Festina
Festina IFM82S0 User manual

Festina
Festina IFMFS00/01 User manual

Festina
Festina IFMOS60 User manual

Festina
Festina IFM6P23/73 User manual

Festina
Festina IFM6S10 User manual

Festina
Festina IFMOS20 User manual

Festina
Festina M6P89 User manual

Festina
Festina 915.03 User manual

Festina
Festina IFM0S04 User manual

Festina
Festina Hybrid User manual


 instruction manual")


