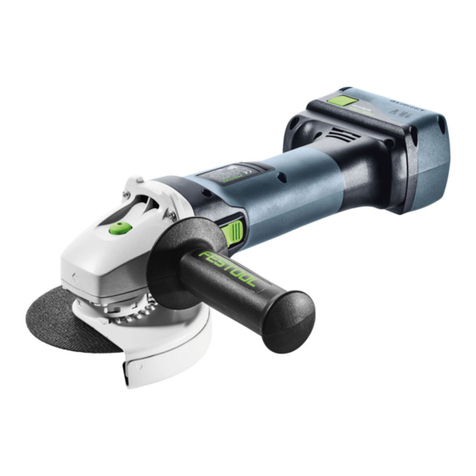
Festool RG 130 E User manual

Instruction manual
Guide d’utilisation
Manual de instrucciones
R E N O F I X
RG 130 E
Instruction manual - Reinstating grinder
Page 6
IMPORTANT: Read and understand all instructions before using.
Guide d’utilisation - Ponceuse de crépi
Page 19
IMPORTANT: Lire et comprendre toutes les instructions avant de
démarrer les travaux.
Manual de instrucciones - Rectificadora de saneamiento
Pagina 33
IMPORTANTE: Lea y comprende todas las instrucciones antes de
usar.
Festool GmbH
Wertstrasse 20
73240 Wendlingen
Germany
www.festoolusa.com
717714_D / 2019-08-22

1-9
1
1-3
1-4
1-1
1-2
1-5
1-6
1-7
1-8

6
About this manual
Save these instructions
It is important for you to read and understand this
manual. The information it contains relates to pro-
tecting your safety and preventing problems. The
symbols below are used to help you recognize this
information.
DANGER
Description of imminent
hazard and failure to avoid
hazard will result in death.
WARNING
Description of hazard and
possible resulting injures
or death.
CAUTION
Description of hazard and
possible resulting injuries.
Notice Statement including nature
of hazard and possible re-
sult.
Hint Indicates information, notes,
or tips for improving your
success using the tool.
Safety rules
General Power Tool Safety Warnings
WARNING! Read all safety warnings,
instructions, illustrations and specifications
provided with this power tool. Failure to follow all
instructions listed below may result in electric shock,
fire and/or serious injury.
Save all warnings and instructions for future ref-
erence.
The term "power tool" in the warnings refers to
your mains-operated (corded) power tool or battery-
operated (cordless) power tool.
1) Work area safety
a) Keep work area clean and well lit. Cluttered or
dark areas invite accidents.
b) Do not operate power tools in explosive atmo-
spheres, such as in the presence of flammable
liquids, gases or dust. Power tools create sparks
which may ignite the dustor fumes..
c) Keep children and bystanders away while oper-
ating a power tool. Distractions can cause you to
lose control.
2) Electrical safety
a) Power tool plugs must match the outlet. Never
modify the plug in any way. Do not use any
adapter plugs with earthed (grounded) power
tools. Unmodified plugs and matching outlets will
reduce risk of electric shock.
b) Avoid body contact with earthed or grounded
surfaces, such as pipes, radiators, ranges and
refrigerators. There is an increased risk of elec-
tric shock if your body is earthed or grounded.
c) Do not expose power tools to rain or wet condi-
tions. Water entering a power tool will increase
the risk of electric shock.
d) Do not abuse the cord. Never use the cord for
carrying, pulling or unplugging the power tool.
Keep cord away from heat, oil, sharp edges or
Contents
About this manual ...............................................6
Safety rules.........................................................6
Technical data ..................................................10
Symbols ............................................................10
Intended use .....................................................10
Functional Description......................................10
Starting up and using the machine ...................11
Switching the machine on and off..................... 12
Extension cord................................................... 12
Electronic control..............................................12
Starting current limitation ................................ 12
Electronic revolutions pre-setting .................... 13
Switching off during back thrust....................... 13
Protection against re-starting........................... 13
Constant Electronic function............................. 13
Temperature cut-out......................................... 13
Current limiting ................................................. 13
Operation...........................................................14
Fastening the grinding wheel............................ 14
Positioning the handle....................................... 14
Dust suction....................................................... 14
Lifting the front brush ....................................... 14
Brush replacement............................................ 15
Grinding wheel................................................... 15
Milling depth...................................................... 16
Systainer ...........................................................16
Service and maintenance..................................16
Accessories, tools ............................................18
Environment......................................................18
The table with recommended types of grinding
wheels...............................................................18

7
moving parts. Damaged or entangled cords in-
crease the risk of electric shock.
e) When operating a power tool outdoors, use an
extension cord suitable for outdoor use. Use of a
cord suitable for outdoor use reduces the risk of
electric shock.
f) If operating a power tool in a damp location is
unavoidable, use a residual current device (RCD)
protected supply. Use of an RCD reduces the risk
of electric shock.
3) Personal safety
a) Stay alert, watch what you are doing and use
common sense when operating a power tool. Do
not use a power tool while you are tired or under
the influence of drugs, alcohol or medication.
A moment of inattention while operating power
tools may result in serious personal injury.
b) Use personal protective equipment. Always
wear eye protection. Protective equipment such
as a dust mask, non-skid safety shoes, hard hat
or hearing protection used for appropriate condi-
tions will reduce personal injuries.
c) Prevent unintentional starting. Ensure the
switch is in the off-position before connecting to
power source and/or battery pack, picking up or
carrying the tool. Carrying power tools with your
finger on the switch or energising power tools that
have the switch on invites accidents.
d) Remove any adjusting key or wrench before
turning the power tool on. A wrench or a key left
attached to a rotating part of the power tool may
result in personal injury.
e) Do not overreach. Keep proper footing and bal-
ance at all times. This enables better control of
the power tool in unexpected situations..
f) Dress properly. Do not wear loose clothing or
jewellery. Keep your hair and clothing away
from moving parts. Loose clothes, jewellery or
long hair can be caught in moving parts.
g) If devices are provided for the connection of dust
extraction and collection facilities, ensure these
are connected and properly used. Use of dust
collection can reduce dust-related hazards.
h) Do not let familiarity gained from frequent use
of tools allow you to become complacent and ig-
nore tool safety principles. A careless action can
cause severe injury within a fraction of a second.
4) Power tool use and care
a) Do not force the power tool. Use the correct pow-
er tool for your application. The correct power
tool will do the job better and safer at the rate for
which it was designed.
b) Do not use the power tool if the switch does not
turn it on and off. Any power tool that cannot be
controlled with the switch is dangerous and must
be repaired.
c) Disconnect the plug from the power source and/
or remove the battery pack, if detachable, from
the power tool before making any adjustments,
changing accessories, or storing power tools.
Such preventive safety measures reduce the risk
of starting the power tool accidentally.
d) Store idle power tools out of the reach of chil-
dren and do not allow persons unfamiliar with
the power tool or these instructions to operate
the power tool. Power tools are dangerous in the
hands of untrained users.
e) Maintain power tools and accessories. Check for
misalignment or binding of moving parts, break-
age of parts and any other condition that may
affect the power tool’s operation. If damaged,
have the power tool repaired before use. Many
accidents are caused by poorly maintained power
tools.
f) Keep cutting tools sharp and clean. Properly
maintained cutting tools with sharp cutting edges
are less likely to bind and are easier to control.
g) Use the power tool, accessories and tool bits
etc. in accordance with these instructions, tak-
ing into account the working conditions and the
work to be performed. Use of the power tool for
operations different from those intended could
result in a hazardous situation.
h) Keep handles and grasping surfaces dry, clean
and free from oil and grease. Slippery handles
and grasping surfaces do not allow for safe han-
dling and control of the tool in unexpected situa-
tions.
5) Service
a) Have your power tool serviced by a qualified
repair person using only identical replacement
parts. This will ensure that the safety of the power
tool is maintained.
Safety Warnings Com-
mon for Grinding:
a) This power tool is intended to function as a
grinder. Read all safety warnings, instructions,
illustrations and specifications provided with
this power tool. Failure to follow all instructions
listed below may result in electric shock, fire and/
or serious injury.

8
b) Operations such as sanding, wire brushing, pol-
ishing or cutting-off are not recommended to be
performed with this power tool. Operations for
which the power tool was not designed may cre-
ate a hazard and cause personal injury.
c) Do not use accessories which are not specifi-
cally designed and recommended by the tool
manufacturer. Just because the accessory can
be attached to your power tool, it does not assure
safe operation.
d) The rated speed of the accessory must be at
least equal to the maximum speed marked on
the power tool. Accessories running faster than
their rated speed can break and fly apart.
e) The outside diameter and the thickness of your
accessory must be within the capacity rating of
your power tool. Incorrectly sized accessories
cannot be adequately guarded or controlled.
f) Threaded mounting of accessories must match
the grinder spindle thread. For accessories
mounted by flanges, the arbour hole of the ac-
cessory must fit the locating diameter of the
flange. Accessories that do not match the mount-
ing hardware of the power tool will run out of bal-
ance, vibrate excessively and may cause loss of
control.
g) Do not use a damaged accessory. Before each
use inspect the accessory such as abrasive
wheels for chips and cracks, backing pad for
cracks, tear or excess wear, wire brush for
loose or cracked wires. If power tool or acces-
sory is dropped, inspect for damage or install
an undamaged accessory. After inspecting and
installing an accessory, position yourself and
bystanders away from the plane of the rotating
accessory and run the power tool at maximum
no-load speed for one minute. Damaged acces-
sories will normally break apart during this test
time.
h) Wear personal protective equipment. Depending
on application, use face shield, safety goggles or
safety glasses. As appropriate, wear dust mask,
hearing protectors, gloves and workshop apron
capable of stopping small abrasive or workpiece
fragments. The eye protection must be capable
of stopping flying debris generated by various
operations. The dust mask or respirator must be
capable of filtrating particles generated by your
operation. Prolonged exposure to high intensity
noise may cause hearing loss.
i) Keep bystanders a safe distance away from work
area. Anyone entering the work area must wear
personal protective equipment. Fragments of
workpiece or of a broken accessory may fly away
and cause injury beyond immediate area of opera-
tion.
j) Hold the power tool by insulated gripping sur-
faces only, when performing an operation where
the cutting accessory may contact hidden wiring
or its own cord. Cutting accessory contacting a
"live" wire may make exposed metal parts of the
power tool "live" and could give the operator an
electric shock.
k) Position the cord clear of the spinning accessory.
If you lose control, the cord may be cut or snagged
and your hand or arm may be pulled into the spin-
ning accessory.
l) Never lay the power tool down until the acces-
sory has come to a complete stop. The spinning
accessory may grab the surface and pull the
power tool out of your control.
m)Do not run the power tool while carrying it at
your side. Accidental contact with the spinning
accessory could snag your clothing, pulling the
accessory into your body.
n) Regularly clean the power tool’s air vents. The
motor’s fan will draw the dust inside the housing
and excessive accumulation of powdered metal
may cause electrical hazards.
o) Do not operate the power tool near flammable
materials. Sparks could ignite these materials.
p) Do not use accessories that require liquid cool-
ants. Using water or other liquid coolants may
result in electrocution or shock.
Kickback and Related Warnings
Kickback is a sudden reaction to a pinched or
snagged rotating wheel, backing pad, brush or
any other accessory. Pinching or snagging causes
rapid stalling of the rotating accessory which in turn
causes the uncontrolled power tool to be forced in
the direction opposite of the accessory’s rotation at
the point of the binding.
For example, if an abrasive wheel is snagged or
pinched by the workpiece, the edge of the wheel
that is entering into the pinch point can dig into
the surface of the material causing the wheel to
climb out or kick out. The wheel may either jump
toward or away from the operator, depending on
direction of the wheel’s movement at the point of
pinching. Abrasive wheels may also break under
these conditions.
Kickback is the result of power tool misuse and/
or incorrect operating procedures or conditions
and can be avoided by taking proper precautions
as given below.
9
a) Maintain a firm grip on the power tool and po-
sition your body and arm to allow you to resist
kickback forces. Always use auxiliary handle,
if provided, for maximum control over kickback
or torque reaction during start-up. The operator
can control torque reactions or kickback forces, if
proper precautions are taken.
b) Never place your hand near the rotating acces-
sory. Accessory may kickback over your hand.
c) Do not position your body in the area where
power tool will move if kickback occurs. Kick-
back will propel the tool in direction opposite to
the wheel’s movement at the point of snagging.
d) Use special care when working corners, sharp
edges etc. Avoid bouncing and snagging the ac-
cessory. Corners, sharp edges or bouncing have
a tendency to snag the rotating accessory and
cause loss of control or kickback.
e) Do not attach a saw chain woodcarving blade or
toothed saw blade. Such blades create frequent
kickback and loss of control
Safety Warnings Specific for
Grinding Operations:
a) Use only wheel types that are recommended for
your power tool and the specific guard designed
for the selected wheel. Wheels for which the
power tool was not designed cannot be adequate-
ly guarded and are unsafe.
b) The grinding surface of centre depressed
wheels must be mounted below the plane of
the guard lip. An improperly mounted wheel that
projects through the plane of the guard lip cannot
be adequately protected.
c) The guard must be securely attached to the
power tool and positioned for maximum safety,
so the least amount of wheel is exposed towards
the operator. The guard helps to protect the op-
erator from broken wheel fragments, accidental
contact with wheel and sparks that could ignite
clothing.
d) Wheels must be used only for recommended
applications. For example: do not grind with the
side of cut-off wheel. Abrasive cut-off wheels are
intended for peripheral grinding, side forces ap-
plied to these wheels may cause them to shatter.
e) Always use undamaged wheel flanges that
are of correct size and shape for your selected
wheel. Proper wheel flanges support the wheel
thus reducing the possibility of wheel breakage.
Flanges for cut-off wheels may be different from
grinding wheel flanges.
f) Do not use worn down wheels from larger power
tools. Wheel intended for larger power tool is not
suitable for the higher speed of a smaller tool and
may burst.
Machine-related safety instructions
-The machine may not be used in damp and wet
spaces, outdoor when it is rainy, foggy or snowy
or in the explosive environment.
-Before use always inspect the flexible cord lead
and the plug. Have the defects repaired by a spe-
cialist repair shop.
-Outside the premise use only approved extension
cord leads and cable connections.
-Apply the machine to the material only when
switched on.
-Do not work on a ladder.
-Materials containing asbestos can only be pro-
cessed by qualified individuals. Comply with the
safety regulations that apply in your country.
-Flexible power supply cable always route from
the tool backwards.
-The machine can only be used with attached pro-
tective cover and attached front handle.
-Insert the flexible supply plug into the socket only
if the machine is off.
-Make yourself sure whether the material that is
going to be machined does not contain electric,
water or gas lines – an injury could occur.
-Do not grind metal surfaces, nails or screws.
-The machine is not allowed to be operated by a
person under 16 years of age.
-For safety reason the workpiece must be clamped
in a vice or a clamping jig. In such a way the tool
can be operated by both hands.
Health hazard by dust
Various dust created by power sand-
ing, sawing, grinding, drilling and other construction
activities contains chemicals known (to the State of
California) to cause cancer, birth defects or other
reproductive harm. Some examples of these chemi-
cals are:
• Lead from lead-based paints,
• Crystalline silica from bricks and cement and
other masonry products,
• Arsenic and chromium from chemically-treated
lumber.
The risk from these exposures varies, depending
on how often you do this type of work.

10
To reduceyourexposuretothesechemi-
cals work in a well ventilated area and
use approved safety equipment, such as
dust masks that are specially designed
to filter out microscopic particles. Wash
hands after handling.
TO REDUCE THE RISK OF IN
JURY, USER MUST READ INSTRUCTION MANUAL.
Technical data
Nominal voltage 120 V ~
Power consumption 13 A
Mains frequency 60 Hz
Power input 1600 W
Adjustable rpm 5000 – 7700 min–1 (rpm)
Tool 130 mm (5,1")
Connecting thread of the drive shaft M14
Backing flange 25mm (0,99'')
Weight 3.8 kg (8,4 lb)
Protection class II /
Symbols
Warning of general danger
Risk of electric shock
Read the Operating Instructions/Notes!
Wear ear protection
Wear protective goggles
Wear a dust mask
Use protective gloves!
Disconnect from power supply
Both hands required
Double insulation
Do not dispose of as domestic waste.
LAdvice or tip
V Volts
A Amperes
Hz Hertz
W Watt
~Alternating current
n0No load speed
Class II Construction
min-1 Revolutions per minute
(rpm)
" inch
lb pound
Ø Diameter
mm millimeter
kg kilogramm
°C Celsium
°F Fahrenheit
Intended use
The machine can only be used for dry grinding using
an efficient suction device.
The machine is constructed for use with special
wheels recommended by the manufacturer and
they must not be used with a wheel made from
connected ABRASIV material.
The device is designed to remove paint and glue
from wooden and concrete surfaces.
Further it is also an initial use to flatten and smooth-
en wooden and concrete surfaces.
Noncompliant use of the machine is a sole respon-
sibility of the user.
Functional Description
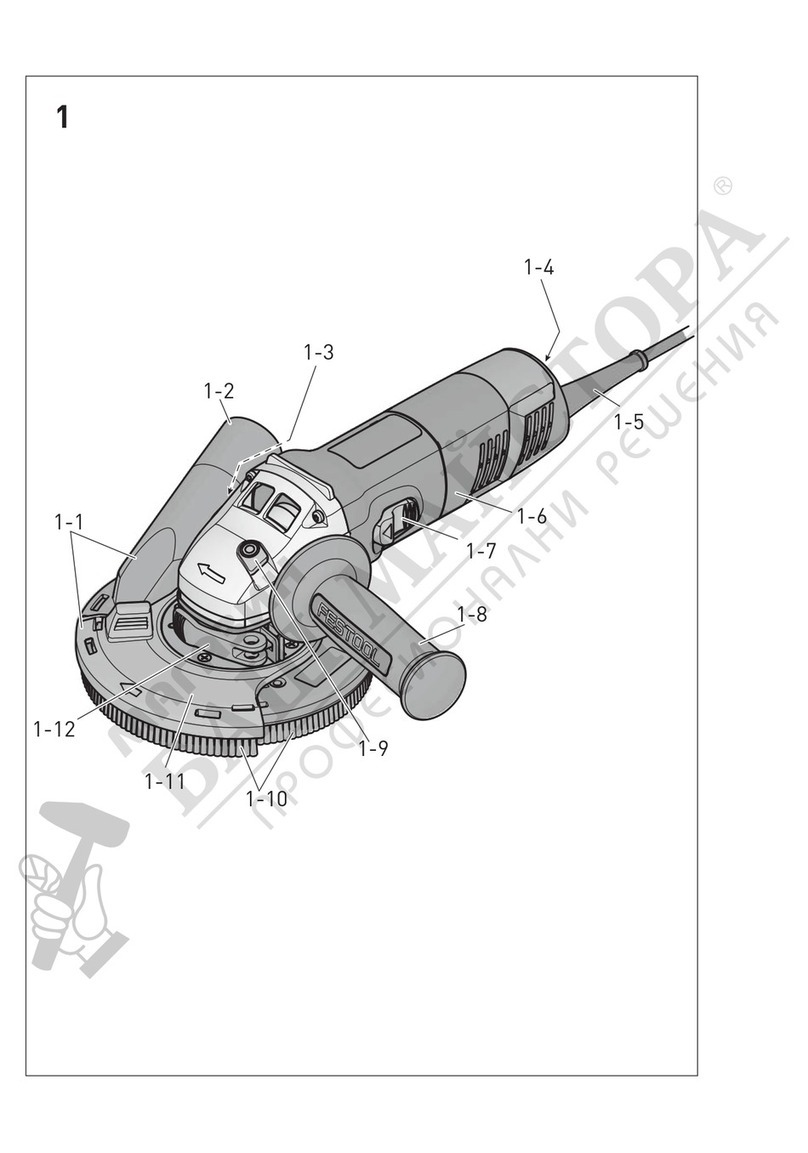
The pictures for the functional description are on
a fold-out page at the beginning of the instruction
manual. While reading the manual you can fold out
the page for comparison and quick reference.
[1-1] Switch
[1-2] Arresting lever
[1-3] Suction extension
[1-4] Revolutions regulation wheel
[1-5] Front handle
[1-6] Spindle arresting button
[1-7] Brush tilting segment
[1-8] Brush
[1-9] Handle manual screw
[2-1] Backing flange

11
[2-2] Grinding wheel
[2-3] Clamping nut (Locking flange)
[2-4] Key
[2-5] Spindle
[3-1] Brush tilting segment
[4-1] Brush
[4-2] Screws with washers
[4-3] Cover
[4-4] Springs
[6-1] Depth gauge (Adapter)
[6-2] Nut
Accessories that are illustrated or described here
are not always included in the scope of delivery.
The specified illustrations can be found at the be-
ginning of the operating instructions.
Starting up and using the machine
WARNING
Risk of accident if the machine is operated us-
ing unauthorised voltages or frequencies.
fThe mains voltage and the frequency of the
power source must correspond with the
specifications on the machine’s name plate.
fIn North America, only Festool machines with
the voltage specifications 120 V/60 Hz may
be used.
WARNING
Risk of accident, electric shock
fAlways pull the plug out of the socket before
performing any type of work on the machine.
fAlways switch the machine off before connect-
ing or disconnecting the mains power cable!.
CAUTION
Inhaling the dust may damage the respiratory
tract.
fWhen working with dust, you must wear re-
spiratory protection.
LThe network voltage must conform to the voltage
indicated on the rating plate. A 16 A safety use (for
120 V) or a corresponding protective circuit-breaker
is required.

12
Switching the machine on and off
Always hold the machine with both hands.
Switching on
fPush the locking lever [1-2] forwards to unlock
the on/off switch [1-1].
fPress the on/off switch [1-1] at the same time.
fContinuous operation: simultaneously pressing
the locking lever [1-2] forwards locks the on/off
switch.
The electric power tool starts.
Only make contact with the material once the ma-
chine has reached operating speed.
Switching off
fLift the electric power tool from the processed
material.
fRelease the on/off switch [1-1].
fDuring continuous operation: briefly press the
on/off switch [1-1].
WARNING
Risk of injury
Rebound, ejected parts
fBefore setting down the machine, wait until
the rotating tool has come to a complete stop.
Extension cord
If an extension cord is required, it must have suf-
ficient cross-section to prevent an excessive drop in
voltage or overheating. An excessive drop in voltage
reduces the output and can lead to failure of the
motor. The table adjacent shows you the correct
cord diameter as a function of the cord length for
the RG 130 E.
Use only U.L. and CSA listed extension cords. Never
use two extension cords together. Instead, use one
long one.
Note: The lower the AWG number, the stronger the
cord.
Electronic control
Starting current limitation
Electronically controlled continual running secures
device acceleration without back thrust. Due to
starting current limitation in the device, 16 A pro-
tection is sufficient.
Total Extension Cord
Lenght (feet) 25 50 100 150
Cord size (AWG) 16 12 10 8

13
Electronic revolutions pre-setting
Use the revolutions regulator [1-4] for smooth
revolutions pre-setting:
Level 1: 5000 min–1 Level 4: 6500 min–1
Level 2: 5500 min–1 Level 5: 7000 min–1
Level 3: 6000 min–1 Level 6: 7700 min–1
Required number of revolutions depends on applied
grinding wheel and worked material.
Switching off during back thrust
During sudden drop of revolutions under extreme
load, the input current is reduced up to 5 seconds
- after this the motor stops. For re-starting, the
device must be first switched off and again switched
on.
Protection against re-starting
Prevents the uncontrolled starting of the device af-
ter current supply cut off. For re-starting, the device
must be first switched off and again switched on.
Constant Electronic function
The pre-selected speed remains constant whether
the machine is in operation or in no load.
Temperature cut-out
This machine is equipped with “cooling mode”
which protects the machine from overheating. If the
machine is under load and overheats, it may shut
down and enter the cooling mode. It is possible to
run the machine, without load, at a reduced speed
in the cooling mode which may reduce the cooling
period. Once the motor is cool, normal operational
speed should resume.
Alternatively, leaving the machine rest for a period
of at least 5 minutes should return the machine to
normal operational speed.
Current limiting
Current limiting prevents permissibly high current
consumption under extreme overload. This can lead
to a decrease in the motor speed. The motor im-
mediately restarts after the load is removed. The
input power is reduced up to 5 seconds - after this
the motor stops. For re-starting, the device must
be first switched off and again switched on.

14
Operation
Fastening the grinding wheel
fClean the backing flange [2-1] and clamping nut
[2-3], as well as grinding wheel fastening areas
[2-2].
fMount grinding wheel [2-2]. Flange fitting must
fit the grinding wheel aperture.
fPress in the spindle blocking plunger [1-6].
Press in the blocking plunger only when device
is switched off and spindle not active.
fTurn the spindle until blocking plunger fits in.
fAdjust the two wings of the clamping nut [2-3]
to match the two grooves of the spindle.
fScrew the clamping nut [2-3] by fitting it from
the grinding wheel [2-2] on the spindle [2-5].
fFasten the clamping nut [2-3] with key [2-4].
fBefore starting the device, make sure the grind-
ing wheel rotates smoothly.
LUse only grinding wheels recommended by
the manufacturer and designed flange, which are
included in the package.
Positioning the handle
Sufficiently release the handle manual screw [1-9]
and tilt the handle [1-5] to set the most suitable
working position. Re-fasten the manual screw [1-9].
Dust suction
Always work with connected suction device. Insert
the suction device pipe into the suction extension
– see figure [5]. In order to increase the efficiency,
we recommend to use pipes with 36 mm ( 1,4 ").
LUse solely suction devices with antistatic
pipe design.
Lifting the front brush
For wall lifting, it is possible to lift the lifting seg-
ment [3-1] – see figure [3].
2
2-1
2-2
2-3
2-4
2-5
2
2-3
3
3-1

15
Brush replacement
After wear and tear of the brush [4-1], it must be
replaced.
fAt first unscrew the screws with washers [4-2],
remove the brush from the cover [4-3] with the
springs [4-4].
fInsert the springs into the holes in the new
brush and secure the in the holes by turning
them clockwise – see figure [4 a]. Deflecting the
springs from vertical direction does not consti-
tute a defect.
fThen remove the brush with fitted springs, attach
them on the cover [4-3] from the front end and
tilt them – see figure [4 b].
fMake sure that the springs in the cover fit into
the guiding holes and screw back the screws
with washers [4-2].
Grinding wheel
Use solely wheels of Festool trademark, which
guarantees the grinding output of the machine –
see page 18.
fBacking flange [2-1].
44-2
4-1
4-4
4-3
4a
4b

16
Milling depth
The setting of the milling depth depends on the ma-
terial to be machined.
fPosition the adapter [6-1] on the three screws.
fTurn the adapter to set the milling depth (left
rotation = higher cutting depth, right rotation =
lower cutting depth).
fTighten the nut [6-2].
Systainer
Many Festool products are shipped in a unique
system container, called "Systainer". This provides
protection and storage for the tool and accessories.
The Systainers are stackable and can be interlocked
together. They also can be interlocked atop Festool
CT dust extractors.
– To open the Systainer:
• Turn the T-loc [7-1] to the position .
–To lock the Systainer:
• Turn the T-loc [7-1] to the position .
–To connect two Systainers:
• Place one Systainer on the top of the other
(Fig. 7 A).
• Turn the T-loc [7-1] to the position or
(Fig. 7 B).
The Systainers are connected and locked.
fA new generation Systainer is connectable on
top of a previous generation Systainer by the four
latches of the previous Systainer.
Service and maintenance
WARNING
Risk of accident, electric shock
fAlways pull the plug out of the socket before
performing any type of work on the machine.
fAlways keep the tool and in particular the ven-
tilation slots clean.
5
6
6-1
6-2

17
WARNING
Any maintenance or repair work requiring the
motor housing to be opened must be carried out
only by an authorized service workshop.
fMaintenance or repair work carried out by an
unauthorized person can lead to the incorrect
connection of the wiring or other components,
which in turn can lead to accidents with serious
consequences.
fIf the replacement of the supply cord is neces-
sary, this has to be done by the manufacturer
or his agent in order to avoid a safety hazard.
CAUTION
Never use a machine that is damaged in any way!
(Damage also includes a ripped or worn flexible
switch protection.
fHave a damaged machine repaired in an au-
thorised Festool workshop.
Always contact the manufacturer or
an authorised service workshop.
Find the address of your nearest
workshop at:
www.festoolusa.com/service
Always use original Festool spare
parts! Order no. at:
www.festoolusa.com/service
- Wrapped electric tools can be stored in a dry place
without heating, with temperatures not lower than
−5 °C (23 °F). Unwrapped electric tools can only be
stored in dry places with temperatures not lower
than +5 °C (41 °F), without sudden changes in the
temperature.
- To ensure the airflow is sufficient, cooling open-
ings of the motor must be always clean and free.
- The machine is equipped with special self-discon-
necting brushes. When the brushes are worn, the
power supply is automatically disconnected, and
the machine is stopped.
open
lock
connect
connect
T-loc
7-1
A
7
B

18
The table with recommended types of grinding wheels
Grinding wheel Application Electronic ad-
justing wheel
DIA PAINT-D130
Removal of extensive coats
of paint and clear coat on
floorboards, chipboard, wooden
cladding or wooden doors
1 – 6
DIA STONE-D130
For extremely hard materials
and hard concrete (harder than
B 35)
1 – 6
DIA HARD-D130
For old solid concrete, removal
of epoxy resin from solid
surfaces or coatings/paints
from concrete
1 – 6
DIA ABRASIVE-D130
For sand-based materials,
screed, fresh concrete,
adhesive on screed, sand-lime
brick and cellular concrete
1 – 6
DIA THERMO-D130 For removing thermoelastic
materials 1 – 6
Accessories, tools
For safety reasons, only use
original Festool accessories and tools!
The accessory and tool order number can be found
in the Festool catalog or on the Internet under www.
festoolusa.com.
Environment
Do not dispose of the device as domestic waste!
Dispose of machines, accessories and packaging
at an environmentally responsible recycling centre.
Observe the respective national regulations.

19
Au sujet de ce guide
Conservez les présentes instructions
Il est important pour vous de lire et de comprendre
le contenu de ce guide. Il contient des informations
relatives à votre sécurité et à la prévention des pro-
blèmes. Les symboles ci-dessous sont utilisés pour
vous aider à identifier ces informations.
DANGER
Description d'un danger
imminent entraînant la mort
s'il n'est pas évité.
AVERTISSE-
MENT
Description d'un danger
pouvant entraîner des bles-
sures ou la mort.
ATTENTION
Description d'un danger
pouvant entraîner des bles-
sures.
Remarque
Indication précisant la na-
ture du danger et les consé-
quences potentielles.
Conseil
Informations, remarques
ou recommandations vous
permettant d'utiliser l'outil
avec plus d'efficacité.
Consignes de sécurité
Avertissements généraux relatifs
aux outils électroportatifs
AVERTISSEMENT! Lisez l'en-
semble des avertissements, instructions,
illustrations et spécifications fournis avec cet outil
électroportatif. Le non-respect des instructions
fournies ci-dessous peut entraîner une décharge
électrique, un incendie et/ou des blessures graves.
Conservez l'ensemble des avertissements et ins-
tructions afin de pouvoir les consulter ultérieure-
ment.
Le terme « outil électroportatif » utilisé dans les
avertissements se réfère à votre outil électroportatif
alimenté par secteur (filaire) ou par batterie (sans fil).
1) Sécurité sur le lieu de travail
a) Veillez à ce que votre lieu de travail soit toujours
bien rangé et suffisamment éclairé. Les endroits
encombrés ou sombres sont propices aux acci-
dents.
b) N'utilisez pas d'outils électroportatifs dans
des atmosphères explosives, parexemple en
présence de liquides, gaz ou poussière inflam-
mables. Les outils électroportatifs génèrent des
étincelles qui peuvent enflammer les poussières
ou les fumées.
c) Tenez les enfants et autres personnes présentes
à l'écart pendant l'utilisation de l'outil électro-
portatif. Un manque de concentration peut vous
faire perdre le contrôle de l'appareil.
Sommaire
Au sujet de ce guide ..........................................19
Consignes de sécurité.......................................19
Caractéristiques techniques ............................24
Symboles ..........................................................24
Utilisation conforme .........................................24
Description des
éléments fonctionnels ......................................24
Démarrage et utilisation
de l'appareil .....................................................25
Mise en marche et
à l'arrêt de l'appareil......................................... 26
Rallonge............................................................. 26
Régulation électronique....................................27
Limitation du courant de démarrage................ 27
Préréglage électronique de la vitesse de rota-
tion...................................................................... 27
Mise à l'arrêt en cas de rebond......................... 27
Protection contre le redémarrage .................... 27
Fonction Constant Electronic............................ 27
Sécurité thermique............................................ 27
Limitation de courant ........................................ 28
Utilisation..........................................................28
Serrage du disque de ponçage ......................... 28
Positionnement de la poignée .......................... 28
Aspiration de la poussière................................. 29
Pivotement de la brosse avant.......................... 29
Remplacement de la brosse ............................. 29
Disque de ponçage ............................................ 29
Profondeur de fraisage...................................... 30
Systainer ...........................................................30
Entretien et maintenance..................................30
Tableau des types de disques de ponçage
recommandés ...................................................32
Accessoires, outils ............................................32
Environnement..................................................32

20
2) Sécurité électrique
a) La fiche de l'outil électroportatif doit corres-
pondre à la prise secteur utilisée. Toute modifi-
cation de la fiche de l'outil est interdite. N'utili-
sez aucun adaptateur avec un outil électropor-
tatif mis à la terre. L'utilisation d'une fiche non
modifiée et d'une prise secteur appropriée réduit
le risque de décharge électrique.
b) Évitez tout contact avec des surfaces mises à la
terre tels que tuyaux, radiateurs, cuisinières et
réfrigérateurs. Si votre corps est mis à la terre, le
risque de décharge électrique augmente.
c) N'exposez pas les outils électroportatifs à la
pluie ou à des liquides. La pénétration d'eau dans
un outil électroportatif augmente le risque de dé-
charge électrique.
d) Ne faites pas un usage incorrect du câble. N'uti-
lisez jamais le câble pour porter, tirer ou dé-
brancher l'outil électroportatif. Tenez le câble à
l'écart des sources de chaleur, des angles tran-
chants et des pièces en mouvement. Un câble
endommagé ou emmêlé augmente le risque de
décharge électrique.
e) En cas d'utilisation d'un outil électroportatif à
l'extérieur, utilisez une rallonge conçue pour
l'extérieur. L'utilisation d'un câble conçu pour
l'extérieur réduit le risque de décharge élec-
trique.
f) Si l'utilisation de l'outil électroportatif dans
un endroit humide est inévitable, utilisez une
source d'alimentation électrique protégée par
un dispositif différentiel résiduel (DDR). L'uti-
lisation d'un DDR réduit le risque de décharge
électrique.
3) Sécurité des personnes
a) Durant l'utilisation d'un outil électroportatif,
restez vigilant, concentrez-vous et faites preuve
de bon sens. N'utilisez pas d'outil électroportatif
si vous êtes fatigué ou sous l'emprise de dro-
gues, de l'alcool ou de médicaments.Un moment
d'inattention pendant l'utilisation d'un outil élec-
troportatif peut provoquer des blessures graves.
b) Utilisez un équipement de protection indivi-
duelle. Portez toujours une protection oculaire.
Les équipements de protection tels qu'un masque
antipoussière, des chaussures de sécurité anti-
dérapantes, un casque ou une protection auditive
utilisés dans les conditions appropriées réduisent
le risque de blessures.
c) Évitez un démarrage accidentel. Assurez-vous
que l'interrupteur est en position d'arrêt avant
le branchement à la source d'alimentation élec-
trique et/ou à la batterie et avant de soulever ou
de porter l'outil. Porter un outil électroportatif
avec le doigt sur l'interrupteur ou mettre sous
tension un outil électroportatif dont l'interrupteur
est en position de marche est propice aux acci-
dents.
d) Retirez toute clé de réglage avant de mettre en
marche l'outil électroportatif. Une clé restée
fixée sur une pièce rotative de l'outil électropor-
tatif peut provoquer des blessures.
e) Ne prenez aucun risque. Veillez à toujours avoir
une position stable et à rester bien en équilibre.
Ceci permet de mieux contrôler l'outil électropor-
tatif dans les situations imprévues.
f) Portez des vêtements appropriés. Ne portez
pas de vêtements amples ni de bijoux. Veillez
à tenir vos cheveux et vos vêtements à l'écart
des pièces en mouvement. Les vêtements
amples, les bijoux ou les cheveux longs peuvent
se prendre dans des pièces en mouvement.
g) Si des dispositifs sont fournis pour le raccorde-
ment d'un équipement d'aspiration et de récu-
pération des poussières, veillez à les raccorder
et à les utiliser correctement. L'utilisation d'un
collecteur de poussières peut réduire les risques
causés par ces dernières.
h) Ne relâchez pas votre attention et continuez à
respecter les règles de sécurité même si vous
connaissez bien les outils parce que vous les
utilisez souvent. Une négligence peut provoquer
des blessures graves en une fraction de seconde.
4) Utilisation de l'outil électroportatif et précau-
tions à prendre
a) N'exposez pas l'outil électroportatif à une
charge excessive. Utilisez l'outil électroportatif
adapté à l'application concernée. Un outil élec-
troportatif adapté permet d'obtenir de meilleurs
résultats et de travailler dans des conditions plus
sûres lorsqu'il est utilisé à la vitesse pour laquelle
il est conçu.
b) N'utilisez pas l'outil électroportatif si l'interrup-
teur ne permet pas de le mettre en marche et à
l'arrêt. Un outil électroportatif qui ne réagit pas à
l'actionnement de l'interrupteur est dangereux et
doit être réparé.
c) Avant de procéder à des réglages quelconques,
de changer d'accessoire ou d'entreposer l'outil
électroportatif, débranchez-le de la source d'ali-
mentation électrique et/ou retirez-en la batterie
(si elle est amovible). Les mesures de sécurité
préventive de ce genre réduisent le risque de dé-
marrage accidentel de l'outil électroportatif.
d) Conservez les outils électroportatifs inutilisés
hors de portée des enfants et veillez à en empê-

21
cher l'utilisation par des personnes qui ne se sont
pas familiarisées à leur fonctionnement ou aux
présentes instructions. Les outils électroporta-
tifs sont dangereux pour toutes les personnes qui
n'ont pas été formées à leur utilisation.
e) Assurez l'entretien des outils électroportatifs
et de leurs accessoires. Vérifiez la mobilité et
le bon positionnement des pièces mobiles ain-
si que l'absence de pièces cassées et de toute
autre anomalie susceptible de compromettre
le bon fonctionnement de l'outil électroportatif.
S'il est endommagé, l'outil électroportatif doit
être réparé avant son utilisation. De nombreux
accidents sont dus à des outils électroportatifs
mal entretenus.
f) Veillez à ce que les outils de coupe soient tou-
jours bien affûtés et propres. Les outils de coupe
correctement entretenus et bien affûtés ont
moins tendance à se bloquer et sont plus faciles à
maîtriser.
g) Utilisez l'outil électroportatif, les accessoires
et les outils rapportés, etc. conformément aux
présentes instructions, en tenant compte des
conditions de travail et du type d'opération à ef-
fectuer. L'utilisation de l'outil électroportatif pour
des opérations autres que celles pour lesquelles
il est conçu peut provoquer une situation dange-
reuse.
h) Veillez à ce que les poignées et les surfaces
de prise soient toujours sèches, propres et
exemptes d'huile et de graisse. Les poignées et
surfaces de prise glissantes ne permettent pas
de manipuler l'outil dans des conditions sûres et
d'en garder le contrôle dans les situations impré-
vues.
5) Entretien
a) Confiez l'entretien de votre outil électroportatif
à un réparateur qualifié utilisant uniquement
des pièces de rechange identiques. Ceci permet
de continuer à assurer la sécurité d'utilisation de
l'outil électroportatif.
Avertissements communs re-
latifs au ponçage:
a) Cet outil électroportatif est conçu pour l'utili-
sation comme ponceuse. Lisez l'ensemble des
avertissements, instructions, illustrations et
spécifications fournis avec cet outil électropor-
tatif. Le non-respect des instructions fournies
ci-dessous peut entraîner une décharge élec-
trique, un incendie et/ou des blessures graves.
b) Il n'est pas recommandé d'utiliser cet outil
électroportatif pour des opérations telles que le
sablage, l'utilisation d'une brosse métallique,
le polissage ou le tronçonnage. Les opérations
pour lesquelles l'outil électroportatif n'est pas
conçu peuvent être à l'origine de dangers et pro-
voquer des blessures.
c) N'utilisez pas d'accessoires qui ne sont pas
spécialement conçus et recommandés par le fa-
bricant de l'outil. Le fait qu'un accessoire puisse
être fixé sur votre outil électroportatif ne signifie
pas qu'il peut être utilisé sans danger.
d) La vitesse nominale de l'accessoire doit être
au moins égale à la vitesse maximale indiquée
sur l'outil électroportatif. Les accessoires utili-
sés au-delà de leur vitesse nominale peuvent se
rompre et être projetés.
e) Le diamètre extérieur et l'épaisseur de votre ac-
cessoire doivent correspondre aux dimensions
de votre outil électroportatif. Les accessoires
de dimensions incorrectes ne peuvent pas être
sécurisés ou contrôlés de manière appropriée.
f) Les accessoires à visser doivent correspondre
au filet de la broche de la ponceuse. Dans le cas
des accessoires à montage par bride, le dia-
mètre de l'orifice doit correspondre au diamètre
d'installation sur la bride. Les accessoires qui ne
peuvent pas être montés correctement sur l'outil
électroportatif n'ont pas une rotation régulière,
génèrent des vibrations excessives et risquent
d'entraîner une perte de contrôle.
g) N'utilisez pas d'accessoire endommagé. Avant
chaque utilisation, vérifiez l'absence de fissures
et de points de rupture sur les accessoires tels
que les disques abrasifs, l'absence de fissures,
d'arrachements ou d'usure excessive sur les
plateaux de ponçage, et l'absence de fils des-
serrés ou cassés sur les brosses métalliques.
En cas de chute de l'outil électroportatif ou d'un
accessoire, assurez-vous de l'absence de dom-
mages ou installez un accessoire intact. Après
l'inspection et l'installation d'un accessoire,
placez-vous ainsi que les autres personnes pré-
sentes en dehors du plan de l'accessoire en ro-
tation et faites fonctionner l'outil électroportatif
à la vitesse maximale sans charge pendant une
minute. Normalement, les accessoires endom-
magés se rompent durant ce test.
h) Portez un équipement de protection indivi-
duelle. Selon l'application concernée, utilisez
un écran facial, une protection oculaire ou des
lunettes de sécurité. Si nécessaire, portez un
masque antipoussière, des protections audi-
tives, des gants et un tablier d'atelier pouvant

22
arrêter les petits fragments de pièce à usiner
ou ceux générés lors du ponçage. La protection
oculaire doit pouvoir arrêter les débris projetés
lors de diverses opérations. Le masque antipous-
sière ou de protection respiratoire doit pouvoir
filtrer les particules générées lors de l'opération
concernée. Une exposition prolongée à un niveau
sonore élevé peut entraîner une perte auditive.
i) Tenez les autres personnes présentes à une dis-
tance sûre de la zone de travail. Toute personne
pénétrant dans la zone de travail doit porter un
équipement de protection individuelle. Des frag-
ments de pièce à usiner ou d'accessoires rompus
peuvent être projetés et provoquer des blessures
au-delà de la zone de travail directe.
j) Tenez l'outil électroportatif uniquement par les
parties isolées lors d'opérations impliquant un
risque de contact entre l'accessoire de coupe
et des câbles invisibles à l'œil nu ou le câble de
l'appareil lui-même. Un accessoire de coupe qui
entre en contact avec un câble sous tension peut
transmettre la tension à des pièces métalliques
non protégées et provoquer une décharge élec-
trique.
k) Placez le câble à l'écart de l'accessoire en ro-
tation. Si vous perdez le contrôle de l'appareil, le
câble peut être coupé ou accroché et votre main
ou votre bras risque d'entrer en contact avec l'ac-
cessoire en rotation.
l) Ne posez jamais l'outil électroportatif tant que
l'accessoire n'est pas totalement immobilisé.
L'accessoire en rotation peut entrer en contact
avec la surface et vous faire perdre le contrôle de
l'outil électroportatif.
m)Ne faites pas fonctionner l'outil électroportatif
lorsque vous le portez. En cas de contact acci-
dentel avec l'accessoire en rotation, vos vête-
ments peuvent être accrochés par l'accessoire,
lequel risque de s'enfoncer dans votre corps.
n) Nettoyez régulièrement les fentes de ventila-
tion de l'outil électroportatif. Le ventilateur du
moteur aspire la poussière dans le boîtier et une
accumulation excessive de poudre métallique
peut provoquer des dangers électriques.
o) N'utilisez pas l'outil électroportatif à proximité
de matières inflammables. Des étincelles pour-
raient enflammer ces matières.
p) N'utilisez pas d'accessoires nécessitant un li-
quide de refroidissement. L'utilisation d'eau ou
d'autres liquides de refroidissement peut provo-
quer une électrocution ou une décharge.
Rebond et avertisse-
ments correspondants
Le rebond est une réaction soudaine qui se pro-
duit lorsqu'un disque en rotation, un plateau de
ponçage, une brosse ou un autre accessoire quel-
conque s'accroche ou se bloque. L'accessoire en
rotation est alors brusquement stoppé et l'outil
électroportatif est projeté de manière incontrôlée
dans la direction opposée au sens de rotation de
l'accessoire, au niveau du point de blocage.
Par exemple, si un disque abrasif s'accroche ou se
coince dans la pièce à usiner, le bord du disque qui
pénètre dans le matériau peut se bloquer. Le disque
peut alors se casser ou provoquer un rebond. Selon
le sens de fonctionnement du disque au point de
blocage, le disque peut être projeté vers l'opérateur
ou dans la direction opposée. Dans ces conditions,
les disques abrasifs risquent aussi de se rompre.
Le rebond résulte d'une mauvaise manipulation
de l'outil électroportatif et/ou de méthodes ou de
conditions d'utilisation incorrectes. Il est possible
de l'éviter en prenant des mesures de précaution
appropriées, comme indiqué ci-dessous.
a) Tenez fermement l'outil électroportatif et placez
votre corps et votre bras de manière à pouvoir
amortir les forces de rebond. Utilisez toujours la
poignée auxiliaire, si disponible, pour maîtriser
au mieux le rebond ou le couple de réaction au
démarrage. L'utilisateur peut maîtriser le couple
de réaction ou les forces de rebond s'il prend les
mesures de précaution appropriées.
b) Ne placez jamais votre main près de l'accessoire
en rotation. L'accessoire peut reculer sur votre
main.
c) Ne vous tenez pas à l'endroit où l'outil électro-
portatif pourrait être projeté en cas de rebond.
Le rebond projette l'outil dans la direction oppo-
sée à celle du disque au point de blocage.
d) Soyez particulièrement prudent dans les coins,
sur les bords tranchants, etc. Évitez de faire
rebondir et d'accrocher l'accessoire. Les coins,
les bords tranchants ou les points de rebondis-
sement ont tendance à bloquer l'accessoire en
rotation et à provoquer une perte de contrôle ou
un rebond.
e) Ne montez pas de lame de tronçonneuse ou de
lame de scie à denture. Ces lames provoquent
fréquemment des rebonds et une perte de
contrôle.

23
Avertissements spécifiques
relatifs aux opérations de ponçage:
a) Utilisez uniquement des types de disques re-
commandés pour votre outil électroportatif et
le capot de protection spécialement conçu pour
le disque choisi. Les disques pour lesquels l'outil
électroportatif n'a pas été conçu ne peuvent pas
être sécurisés de manière appropriée et consti-
tuent une source de danger.
b) La surface de ponçage des disques à moyeu
déporté doit se trouver à un niveau inférieur au
plan du bord du capot de protection. Un disque
monté de manière incorrecte, plus haut que le
plan du bord du capot de protection, ne peut pas
être sécurisé de manière appropriée.
c) Le capot de protection doit être fixé de manière
fiable sur l'outil électroportatif. Pour une sé-
curité maximale, il doit être positionné de ma-
nière à réduire au maximum la partie du disque
à découvert dirigée vers l'opérateur. Le capot
contribue à protéger l'opérateur des projections
de fragments de disque, d'un contact accidentel
avec le disque et des étincelles susceptibles d'en-
flammer les vêtements.
d) Les disques doivent uniquement être utili-
sés pour les applications recommandées.
Parexemple, ne poncez pas avec le côté d'un
disque de tronçonnage. Les disques abrasifs de
tronçonnage sont conçus pour le ponçage sur la
périphérie; ils peuvent se rompre sous l'effet de
forces appliquées latéralement.
e) Utilisez toujours des brides de serrage non
endommagées et de taille et forme adaptées
au disque de votre choix. Les brides de serrage
adaptées soutiennent le disque et réduisent ainsi
le risque de rupture de ce dernier. Les brides pour
disques de tronçonnage peuvent différer de celles
conçues pour les disques de ponçage.
f) N'utilisez pas de disques usés provenant d'ou-
tils électroportatifs plus grands. Les disques
conçus pour un outil électroportatif plus grand
ne conviennent pas à la vitesse plus élevée d'un
outil de taille moins importante et risquent de se
rompre.
Consignes de sécurité
relatives à l'appareil
-L'appareil ne doit pas être utilisé dans des en-
droits humides ou mouillés, ni à l'extérieur par
temps pluvieux, brumeux ou neigeux, ni dans un
environnement explosif.
-Avant l'utilisation, inspectez toujours le câble et
la fiche de l'appareil. Faites remédier aux défauts
par un atelier de réparation spécialisé.
-À l'extérieur, utilisez uniquement des rallonges
et des liaisons par câble conçues pour l'extérieur.
-Appliquez l'appareil sur le matériau uniquement
après l'avoir mis en marche.
-Ne travaillez pas sur une échelle.
-Les matériaux contenant de l'amiante peuvent
uniquement être traités par des personnes qua-
lifiées. Respectez les prescriptions de sécurité
en vigueur dans votre pays.
-Le câble d'alimentation flexible doit toujours se
trouver derrière l'outil.
-L'appareil peut uniquement être utilisé lorsque
le capot de protection et la poignée avant sont
montés.
-Ne branchez la fiche du câble d'alimentation
flexible dans la prise secteur que si l'appareil est
éteint.
-Assurez-vous que le matériau à traiter ne contient
pas de câbles ni de conduites d'eau ou de gaz. Ces
derniers provoquent un risque de blessures.
-Ne poncez pas sur des surfaces métalliques, des
clous ou des vis.
-Les personnes de moins de 16ans ne sont pas
autorisées à utiliser l'appareil.
-Pour des raisons de sécurité, la pièce doit être
fixée avec un étau ou un serre-joint. De cette
manière, il est possible d'utiliser l'outil des deux
mains.
Risques pour la santé dus
à la poussière
Différentes poussières dégagées
lors du sablage, sciage, ponçage, perçage et autres
opérations de construction contiennent des subs-
tances chimiques établies (par l'État de Californie)
comme responsables du cancer, de malformations
congénitales ou autres dysfonctionnements géné-
siques. Exemples de ces substances chimiques:
• plomb provenant de peintures à base de plomb,
• silice cristalline provenant de briques et de ci-
ment ou autres produits de maçonnerie,
• arsenic et chrome provenant de bois de construc-
tion traité avec des produits chimiques.
Les risques provoqués par l'exposition à ces subs-
tances varient en fonction de la fréquence d'exécu-
tion des travaux correspondants.
Other manuals for RG 130 E
1
Table of contents
Languages:
Other Festool Grinder manuals

Festool
Festool BS 75 Installation instructions

Festool
Festool RG 150 E Installation instructions

Festool
Festool AGC 18 User manual

Festool
Festool DSC-AG 125 FH Installation instructions

Festool
Festool RG 130 ECI User manual

Festool
Festool RG 130 E Operation instructions

Festool
Festool AGC 18 User manual

Festool
Festool AGC 18 User manual

Festool
Festool DSG-AG 125 Installation instructions

Festool
Festool PLANEX LHS 225 EQ User manual