Fiamma VENT 50 White Setup guide

fiamma.com
Dachhaube DE Montage- und
Gebrauchsanleitung
Rooflight EN Installation and
usage instructions
Lanterneau FR Instructions de montage et
mode d’emploi
Claraboya ES Instruciones de montaje y uso
Obló IT Istruzioni di montaggio e d’uso
COMFORT
White
Crystal
50

COMFORT
2
EN Product instructions for
ES Instructiones producto para
DE Produktanleitung für
FR Instructions de produit pour
IT Istruzioni prodotto per
DE Verpackungsinhalt
FR Contenu de l’emballage
IT Contenuto dell’imballo
EN Package contents
ES Contenido del embalaje
Code Description
01668-01-
VENT 50 White
01668-01D
VENT 50 Crystal
x1
x1 x1
x1
A B
D
x1
C
DE
Dieses Produkt wurde im Rahmen des nationalen (deutschen)
Typprüfverfahrens für Fahrzeugteile - nach Prüfung durch den TÜV Rheinland -
vom Kraftfahrt-Bundesamt (KBA) zertifiziert. Die Allgemeine Betriebserlaubnis
(ABE) KBA 19930 kann von der Homepage www.fiamma.com unter “Service”
heruntergeladen werden oder finden
Sie auf den Seiten 18-19 dieser Montageanleitung.
fiamma.com
Dachhaube
DE
Montage- und
Gebrauchsanleitung
Rooflight
EN
Installation and
usage instructions
Lanterneau
FR
Instructions de montage et
mode d’emploi
Claraboya
ES
Instruciones de montaje y uso
Obló
IT
Istruzioni di montaggio e d’uso
COMFORT
White
Crystal
50

COMFORT 3
DE Kontrolle bei der Übernahme
FR Contrôle à la réception
IT Controllo al ricevimento
EN Goods receipt inspection
ES Control al recibimiento
DE
Bitte kontrollieren Sie, dass alle Einzelteile einwandfrei sind und nicht während dem
Transport beschädigt wurden. Wenden Sie sich in diesem Falle an Ihren Händler.
EN
Check that nothing has been damaged or deformed during transport.
In case of damage please contact the dealer.
FR
Contrôler qu’aucune pièce ne soit cassée ou déformée suite au transport.
En cas contraire, contacter le revendeur.
ES
Controlar que ningún detalle se haya roto o deformado durante el transporte.
En este caso contactar al revendedor.
IT
Controllare che nessun particolare sia rotto o deformato a causa di errori di
trasporto. In questo caso contattare il rivenditore.
DE
Gebrauchsanweisungen und Ratschläge
FR Instructions et conseils
IT Avvertenze e suggerimenti
EN Maintenance instructions
ES Recomendaciones
DE
Um das Produkt optimal nutzen zu können, lesen Sie bitte die Bedienungsanleitung
aufmerksam durch und bewahren Sie sie zur späteren Verwendung auf.
EN
To use the product in the best way, read the user’s instructions carefully and
keep them to hand for future consultation.
FR
Pour tirer le meilleur parti de votre produit, nous vous invitons à lire attentivement les
notices d’emploi et à les conserver pour toute consultation
ultérieure.
ES
Para usar el producto en lo mejor de los modos, os invitamos a leer
atentamente las instrucciones de uso, guardándolas en caso de necesidad.
IT
Per utilizzare al meglio il prodotto, vi invitiamo a leggere attentamente
le istruzioni d’uso e a conservarle in caso di necessità.

COMFORT
4
DE Montageanleitung
FR Instructions de montage
IT Istruzioni di montaggio
EN Installation instructions
ES Instrucciones de montaje
1
2 3
A
A
SIKALASTOMER-710/THEROSTAT II
57 cm
8,5 cm
55 cm
3,5 cm 3,5 cm
3 cm
min 3 cm
max 7 cm
57 cm
50 cm

COMFORT 5
DE Montageanleitung
FR Instructions de montage
IT Istruzioni di montaggio
EN Installation instructions
ES Instrucciones de montaje
DE - NICHT MITGELIEFERT
EN - NOT SUPPLIED
FR - NON FOURNIES
ES - NO SUMINISTRADOS
IT - NON FORNITE
x12 Ø4.8
UNI EN ISO 7049
x4 Ø3,5x15
UNI EN ISO 7049
A
B
C
D
4

COMFORT
6
DE Montageanleitung
FR Instructions de montage
IT Istruzioni di montaggio
EN Installation instructions
ES Instrucciones de montaje
1)
Eine quadratische Öffnung mit
Seitenlänge max. 50x50cm an der für die
Dachhaube vorgesehene Stelle schneiden.
Die Dachhaube ist auf Dächern mit einer
Stärke von 25 mm bis 70 mm einzubauen.
Bei Dächern von weniger als 25 mm Stärke
einen Rahmen schaffen, der innerhalb des
Fahrzeuges zwischen dem Dach und dem
inneren Rahmen eingesetzt wird.
2)
Den inneren Rahmen abnehmen und die
Wasserabdichtungsmasse, wir empfehlen
SIKALASTOMER-710/THEROSTAT II, auf
die Unterseite des äußeren Rahmens auf
eine Stärke von mind. 3 mm anbringen.
3)
Die Auflagestelle gründlich reinigen, den
äußeren Rahmen auflegen, den inneren
Rahmen in die vorbereitete Öffnung setzen
und von Innen die beiden Rahmen mit 12
Schrauben ø4,8mm UNI EN ISO 7049
zusammenschrauben.
Damit das äußere Teil der Dachhaube sicher
und korrekt angebracht ist, müssen die
Schrauben min. 15mm tief eingeschraubt
werden.
4)
Den gesamten Umfang des äußeren
Rahmens sorgfältig mit Silikon einfetten und
eventuell die zwischen dem Dach und dem
Rahmen vorhandenen Zwischenräumen
ausfüllen.
Anschließend den Innenrahmen mit
Moskitonetz und Verdunklung, durch
Festschrauben mit 4 Schrauben ø3,5 x 15
UNI EN ISO 7049, einsetzen.
1)
Decide where the Vent should be installed
and make a square hole of between
50x50cm.
The rooflight is ready for installation on roofs
of thickness from 25 to 70mm.
For thickness lower than 25mm set a
suitable frame to be positioned on the roof
inside the vehicle between the roof and the
inside frame.
2)
Remove the inside frame and spread
water-proof sealant over greater part of the
bottom of the outside frame to a minimum
thickness of 3mm.
Suggested material: SIKALASTOMER-710/
THEROSTAT II.
3)
Clean the bearing surface on the roof, put
the outside part of the rooflight on the
roof, insert the inside frame in the provided
square hole and from inside the vehicle
screw the two frames together with 12
ø4,8mm UNI EN ISO 7049 wood screws.
4)
Apply sealant to the whole perimeter of the
outer frame and fill any gaps between
the frame and the roof.
Finally insert the inside frame with the
mosquito net and the blind and fit them with
screws ø3,5x15mm UNI EN ISO 7049.

COMFORT 7
EN Installation instructions
ES Instrucciones de montaje
DE Montageanleitung
FR Instructions de montage
IT Istruzioni di montaggio
1)
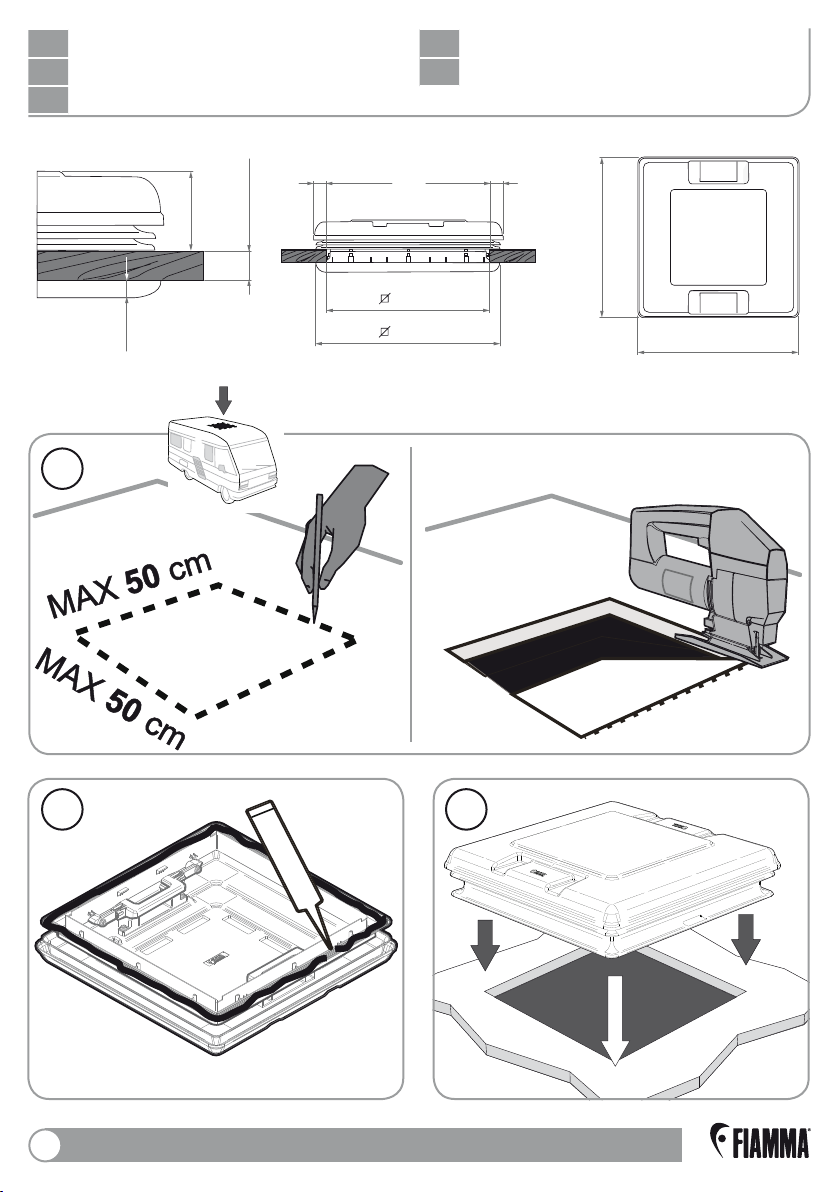
Une fois la place du lanterneau choisie, faire
une ouverture carrée de dimensions
maximales 50x50cm.
Pour des toits dont l’épaisseur est comprise
entre 25mm et 70mm, le lanterneau est prêt
à être installé. Pour les toits dont l’épaisseur
est inférieure à 25mm, il convient de
préparer un cadre approprié qui sera placé
depuis l’ intérieur du véhicule, entre le toit et
le châssis interne du lanterneau.
2)
Enlever le châssis interne et mettre une
couche d’au moins 3mm de mastic le long
du cadre interne du châssis afin d’en
assurer l’étanchéité.
Produit conseillé : SIKALASTOMER-710/
THEROSTAT II.
3)
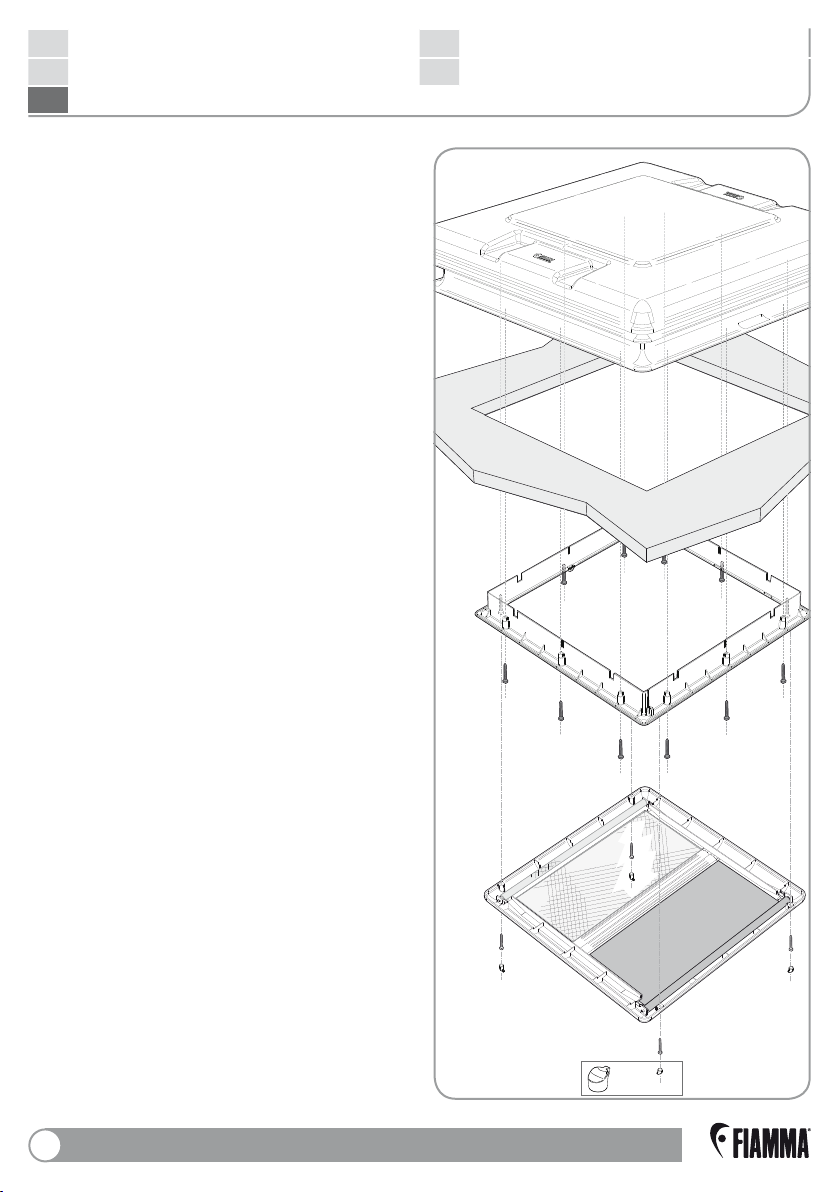
Nettoyer soigneusement toute la zone
d’appui au niveau du toit et y poser le
châssis extérieur du lanterneau. Installer
ensuite le châssis intérieur dans l’ouverture
prévue et fixer les deux châssis l’un à l’autre
à l’aide de 12 vis autotaraudeuses
Ø 4,8mm UNI EN ISO 7049. Les vis doivent
s’enfoncer d’au moins 15mm afin de
garantir une bonne fixation de la partie
externe du lanterneau.
4)
Enduire de silicone tout le contour du cadre
externe du lanterneau, en prenant soin de
boucher tout éventuel espace entre le toit et
le châssis.
Installer enfin le store interne, fait d’une
moustiquaire et d’un rideau occultant, grâce
aux 4 vis Ø 3,5 x 15 UNI EN ISO 7049.
1)
Una vez elegido el punto donde instalar la
claraboya, hacer una apertura cuadrada
de 50x50cms.
La claraboya se instala en los techs con
espesor entre 25 y 70mm. Para espesores
de techo inferiores de 25mm se precisa un
marco apropiado que se pone por adentro
del vehículo, entre techo y marco interno.
2)
Sacar el marco interno y sellar bien la parte
inferior del marco esterno por una
anchura mínima de 3mm con un adhesivo
resistente al agua.
Adhesivo aconsejado:
SIKALASTOMER-710/THEROSTAT II.
3)
Limpiar perfectamente la zona de apoyo,
colocar sobre el techo la parte esterna de
la claraboya, insertar el marco interno en la
apertura que hemos precedentemente
creado y por adentro atornillar los dos
marcos entre ellos con 12 tornillos
autorrascantes ø4,8mm UNI EN ISO 7049.
Para que el marco esterno de la claraboya
esté fijado con seguridad, el tornillo debe
atornillarse por al menos 15mm.
4)
Sellar con esmero todo el perimetro del
marco esterno, llenar eventuales espacios
entre techo y marco.
Fijar el marco interno con mosquitera y
oscurecedor con 4 tornillos ø3,5x15mm
UNI EN ISO 7049.

COMFORT
8
EN Installation instructions
ES Instrucciones de montaje
DE Montageanleitung
FR Instructions de montage
IT Istruzioni di montaggio
1)
Scelto il punto dove installare l’oblò,
realizzare un’apertura quadrata di lato
50x50cm max.
L’oblò si installa su tetti con spessore
compreso tra 25 e 70mm. Per spessori
inferiori a 25mm, predisporre un’adeguata
cornice da posizionare sul tetto all’interno
del mezzo, tra tetto e telaio interno.
2)
Togliere il telaio interno e stendere il
materiale idoneo alla tenuta all’acqua
nella parte inferiore della cornice del telaio
esterno su uno spessore min. di 3mm
Materiale consigliato: SIKALASTOMER-710/
THEROSTAT II.
3)
Pulire perfettamente la zona d’appoggio,
porre sul tetto la parte esterna dell’oblò,
inserire il telaio interno nell’apertura
precedentemente effettuata e dall’interno
avvitare i due telai fra loro con 12 viti
autofilettanti Ø 4,8 UNI EN ISO 7049.
Affinché la parte esterna dell’oblò sia fissata
con sicurezza, la vite deve avvitarsi almeno
per 15mm.
4)
Siliconare con cura tutto il perimetro del
telaio esterno, riempire eventuali spazi tra
tetto e telaio stesso.
Montare infine il telaio interno con zanzariera
ed oscurante fissandolo con 4 viti Ø3,5x15
UNI EN ISO 7049.
A
B
C
D

COMFORT 9
EN Warranty Fiamma
ES Garantía Fiamma
DE Garantie Fiamma
FR Garantie Fiamma
IT Garanzia Fiamma
DE
Im Falle einer Vertragswidrigkeit der Ware, kann der Verbraucher unter
den erforderlichen Voraussetzungen gegenüber dem Verkäufer von dem
Garantieanspruch zu den festgelegten Bedingungen gemäss den lokalen
Rechtsvorschriften Gebrauch machen.
EN
In case of defects with regards to materials and manufacturing, the customer is
entitled to the warranty in accordance with local laws and regulations of the country
in which the product was purchased.
FR
En cas d’un défaut de conformité du produit, le consommateur pourra faire valoir
ses droits de recours en garantie selon les modalités prévues par les dispositions
légales locales, pour autant que les conditions de recours soient remplies.
ES
En caso de fallos o defectos de material y de fabricación, el cliente puede hacer
valer la garantía de acuerdo con las leyes y reglamentaciones del país en el que el
producto haya sido comprado.
IT
In caso di difetto di conformità dei beni, il consumatore potrà far valere nei confronti
del venditore la garanzia secondo le modalità previste dalle disposizioni di legge
locali, ove ne ricorrano i presupposti.
DE
Gebrauchsanweisungen und Ratschläge
FR Instructions et conseils
IT Avvertenze e suggerimenti
EN Maintenance instructions
ES Recomendaciones

COMFORT
10
DE
Gebrauchsanweisungen und Ratschläge
FR Instructions et conseils
IT Avvertenze e suggerimenti
EN Maintenance instructions
ES Recomendaciones
DE
1) Kontrollieren Sie regelmäßig, dass alle an der Dachhaube vorhandenen Schrauben
korrekt angezogen sind, da sich diese durch die Vibrationen während der Fahrt
lockern könnten.
2) Bei Verhärtung des Griffes zum Öffnen und Schließen, was sehr unwahrscheinlich
ist, diesen mit etwas Schmierfett einschmieren.
3) Wir raten ausdrücklich davon ab, die Dachhaube während der Fahrt geöffnet zu
lassen.
EN
1) Periodically check the proper state of tightening of all the screws on the roof-light,
because vehicle’s vibrations could slacken them.
2) In the improbable case the opening-closing device should get stiff, oil the opening
device with some drops of grease.
3) We absolutely advise not to keep the roof light open during traveling.
FR
1) Contrôler périodiquement le bon état du serrage de toutes les vis du lanterneau :
elles pourraient se desserrer suite aux vibrations du véhicule.
2) Même si le durcissement du dispositif d’ouverture-fermeture est peu probable, il
vous suffira de lubrifier le mécanisme d’ouverture du capot à l’aide de quelques
gouttes de graisse.
3) Il est vivement déconseillé de rouler avec le lanterneau ouvert.
ES
1) Controlar periódicamente el perfecto estado de cierre de todos los tornillos sobre la
claraboya, porque las vibraciones podrían aflojarlos.
2) En caso de endurecimiento, aunque improbable, del dispositivo de apertura-cierre,
lubricar con unas gotas de grasa el dispositivo de apertura de la tapa.
3) Desaconsejamos tener la claraboya abierta cuando el vehículo está en movimiento.
IT
1) Periodicamente controllare il perfetto stato di serraggio di tutte le viti presenti
nell’oblò che le vibrazioni del mezzo potrebbero aver allentato.
2) In caso di indurimento, anche se improbabile, del dispositivo di apertura-chiusura,
lubrificare con qualche goccia di grasso il dispositivo di apertura del coperchio.
3) È vivamente sconsigliato tenere l’oblò aperto durante la marcia.

COMFORT 11
COMFORT
11 COMFORT
11
EN Maintenance
ES Mantenimento
DE Wartung
FR Entretien
IT Manutenzione
DE
PFLEGE UND INSTANDHALTUNG:
-
Die Innen- und Aussenreinigung der Dachhaube muss mit neutralen und nicht
aggressiven Reinigungsmitteln sowie einem weichen Lappen erfolgen, um die Oberfläche
nicht zu zerkratzen. Der Gebrauch von jeglichen Arten von Benzin zur Reinigung der
Dachhaube ist strengstens untersagt.
- Die Reinigung des Moskitonetz kann mit Wasser und neutralem Putzmittel erfolgen.
Es ist ausreichend die 4 Befestigungsschrauben des Moskitonetz zu lösen, um dies
so zur Reinigung herausnehmen zu können.
EN
MAINTAINING AND CLEANING:
-
For the internal and external cleaning of the rooflight use only neutral or non-aggressive
detergents with a soft cloth so as not to scratch the surface.
It’s strictly forbidden to use any kind of petrol to clean the rooflight
- Clean the mosquito net with water and neutral detergent removing the roller blind and
the four fastening screws.
FR
ENTRETIEN:
-
Le nettoyage interne et externe du lanterneau doit être effectué avec un produit détergent
neutre et un chiffon de nettoyage non-abrasif de façon à ne pas érafler la surface.
Il est interdit l’utilisation de n’importe quel type d’essences pour le nettoyage du matériel
du lanterneau.
- Nettoyer la moustiquaire avec un détergent neutre et de l’eau en enlevant au
préalable du rouleau les 4 vis de fixation.
ES
MANTENIMIENTO Y LIMPIEZA:
-
Para la limpieza interna y externa de la claraboya usar solo detergentes neutros o no
agresivos con un paño suave para no rayar la superficie.
Queda totalmente prohibido el uso de cada tipo de gasolina para limpiar la claraboya.
- Limpiar la mosquitera con agua y detergente suave extrayendo el marco de la
persiana enrollable con los 4 tornillos de fijación.
IT
CURA E MANUTENZIONE:
-
La pulizia interna ed esterna dell’oblò da tetto dovrà essere eseguita con detergenti neutri
o detergenti non aggressivi, tramite un panno morbido in modo tale da non graffiare la
superficie. E’ assolutamente vietato l’uso di benzine di qualsiasi genere per la pulizia del
materiale dell’oblò.
- La pulizia della zanzariera è realizzabile con acqua e detergente neutro rimuovendo il
telaio rollo le 4 viti di fissaggio.

COMFORT
12
DE Ersatzteile
FR Piecès detachées
IT Ricambi
EN Spare parts
ES Recambios

COMFORT 13

COMFORT
14
DE Informationen zum umweltschutz
FR Conseils pour la protection de
l’environnement
IT Consigli per la salvaguardia
dell’ambiente
EN Safe guarding the environment
ES Informaciones para la proteccion
del ambiente
DE
ENTSORGUNG VON VERPACKUNGSMATERIALIEN
Das Verpackungmaterial ist zu 100% wiederverwertbar.
Werfen Sie das Verpackungsmaterial deshalb nicht einfacht fort, sondern entsorgen
Sie es so, wie es die verantwortlichen Stellen vorschlagen.
EN
DISPOSAL OF PACKAGING MATERIALS
The packaging material is 100% recyclable Packing materials should therefore
not be thrown away with household rubbish but disposed of as directed by local
authorities.
FR
ÉLIMINATION DES EMBALLAGES
Les matériaux d’emballage sont entièrement recyclables.
Par conséquent, ne les jetez rien dans la nature mais conformez-vous aux
réglementations locales en vigueur en matière d’élimination des déchets.
ES
ELIMINACION DEL EMBALAJE
El material del embalaje es reciclable al 100%. Las diferentes partes del embalaje
no tienen que dispersarse en el ambiente, sino tienen que ser eliminadas en
conformidad con las normas establecidas por las autoridades locales.
IT
SMALTIMENTO IMBALLAGGIO
Il materiale di imballaggio è riciclabile al 100%. Le diverse parti dell’imballaggio non
devono quindi essere disperse nell’ambiente, ma smaltite in conformità alle norme
stabilite dalle autorità locali.

COMFORT 15
DE Notiz
FR Note
IT Note
EN Notes
ES Notas

fiamma.com
All rights reserved.
Fiamma S.p.A. reserves the right to
modify at any time, without notice, prices,
materials, specifications and models or
to cease production of any model.
Fiamma SpA - Italy
Via San Rocco, 56
21010 Cardano al Campo (VA)
E0_IS_98690-575_revP
COMFORT
01668-01-
White
01668-01D
Crystal
This manual suits for next models
1
Table of contents
Other Fiamma Lighting Equipment manuals

Fiamma
Fiamma 98655A884 Setup guide

Fiamma
Fiamma LED SENSOR DOOR LIGHT Setup guide

Fiamma
Fiamma F65L Setup guide

Fiamma
Fiamma LED AWNING LIGHT Setup guide

Fiamma
Fiamma Turbo-Vent Premium Setup guide

Fiamma
Fiamma VENT 28 F Setup guide

Fiamma
Fiamma RAFTER LED Setup guide

Fiamma
Fiamma Turbo-Vent Premium Setup guide
Popular Lighting Equipment manuals by other brands

Protect
Protect KN-6120LSMD user manual

Velleman
Velleman HQ POWER NUROLED 2000 user manual

Holtkoetter
Holtkoetter 6562 Assembly instructions

Xstatic Pro Lighting
Xstatic Pro Lighting Spacex RX user manual

Godox
Godox M1 instruction manual

Daintree
Daintree GE current Tetra PowerStrip Snap DS installation guide