EnglishDeutsch
 logo
Brands
  1. Home
  2. •
  3. Brands
  4. •
  5. Fisher-Price
  6. •
  7. Toy
  8. •
  9. Fisher-Price C5959 User manual

Fisher-Price C5959 User manual

Other Fisher-Price Toy manuals

Fisher-Price DUNE RACER W2602 Use and care manual

Fisher-Price

Fisher-Price DUNE RACER W2602 Use and care manual

Fisher-Price R7140 User manual

Fisher-Price

Fisher-Price R7140 User manual

Fisher-Price POWER WHEELS 74598 Use and care manual

Fisher-Price

Fisher-Price POWER WHEELS 74598 Use and care manual

Fisher-Price Calming Vibrations Cuddle Soother Soothe... User manual

Fisher-Price

Fisher-Price Calming Vibrations Cuddle Soother Soothe... User manual

Fisher-Price V4271 User manual

Fisher-Price

Fisher-Price V4271 User manual

Fisher-Price G6540 User manual

Fisher-Price

Fisher-Price G6540 User manual

Fisher-Price CHR31 User manual

Fisher-Price

Fisher-Price CHR31 User manual

Fisher-Price POWER WHEELS BY  FISHER PRICE 73210 Use and care manual

Fisher-Price

Fisher-Price POWER WHEELS BY FISHER PRICE 73210 Use and care manual

Fisher-Price 71988 User manual

Fisher-Price

Fisher-Price 71988 User manual

Fisher-Price LittlePeople GGX51 User manual

Fisher-Price

Fisher-Price LittlePeople GGX51 User manual

Fisher-Price Miracles & Milestones H9998 User manual

Fisher-Price

Fisher-Price Miracles & Milestones H9998 User manual

Fisher-Price FPF84 User manual

Fisher-Price

Fisher-Price FPF84 User manual

Fisher-Price Pixter Cyberchase User manual

Fisher-Price

Fisher-Price Pixter Cyberchase User manual

Fisher-Price Cars J5981 User manual

Fisher-Price

Fisher-Price Cars J5981 User manual

Fisher-Price X7669 User manual

Fisher-Price

Fisher-Price X7669 User manual

Fisher-Price V6939 User manual

Fisher-Price

Fisher-Price V6939 User manual

Fisher-Price Thomas & Friends GLK80 User manual

Fisher-Price

Fisher-Price Thomas & Friends GLK80 User manual

Fisher-Price CBJ32 User manual

Fisher-Price

Fisher-Price CBJ32 User manual

Fisher-Price Musical Fingerpaint User manual

Fisher-Price

Fisher-Price Musical Fingerpaint User manual

Fisher-Price Rescue Heroes Action Trackers H7232 User manual

Fisher-Price

Fisher-Price Rescue Heroes Action Trackers H7232 User manual

Fisher-Price Disney Tot Rod R2510 User manual

Fisher-Price

Fisher-Price Disney Tot Rod R2510 User manual

Fisher-Price B8551 Datasheet

Fisher-Price

Fisher-Price B8551 Datasheet

Fisher-Price H8093 User manual

Fisher-Price

Fisher-Price H8093 User manual

Fisher-Price W9536 User manual

Fisher-Price

Fisher-Price W9536 User manual

Popular Toy manuals by other brands

marklin 37321 instruction manual

marklin

marklin 37321 instruction manual

Canon PAPER CRAFT Assembly instructions

Canon

Canon PAPER CRAFT Assembly instructions

GREAT PLANES Pitts M-12S instruction manual

GREAT PLANES

GREAT PLANES Pitts M-12S instruction manual

NOCH 14261 manual

NOCH

NOCH 14261 manual

Hausler 450 SE V2 quick start

Hausler

Hausler 450 SE V2 quick start

Dynaflite Daydream instruction manual

Dynaflite

Dynaflite Daydream instruction manual

Kenner Batman 63651 instructions

Kenner

Kenner Batman 63651 instructions

LEGO 8527 instructions

LEGO

LEGO 8527 instructions

Multiplex EasyStar II Building instructions

Multiplex

Multiplex EasyStar II Building instructions

iKarus ECO 8 Assembly instruction

iKarus

iKarus ECO 8 Assembly instruction

Walkera 38 User handbook

Walkera

Walkera 38 User handbook

Hasbro TRANSFORMERS BUMBLEBEE manual

Hasbro

Hasbro TRANSFORMERS BUMBLEBEE manual

MD MXION SWD user manual

MD

MD MXION SWD user manual

Mattel Disney Pixar Cars Cozy Cone Spiral Rampway instructions

Mattel

Mattel Disney Pixar Cars Cozy Cone Spiral Rampway instructions

marklin 39671 user manual

marklin

marklin 39671 user manual

LEGO TECHNIC 8735 instructions

LEGO

LEGO TECHNIC 8735 instructions

Mattel HOTWHEELS DWL04 instructions

Mattel

Mattel HOTWHEELS DWL04 instructions

REVELL Bristol Beaufighter TF.X Assembly manual

REVELL

REVELL Bristol Beaufighter TF.X Assembly manual

https://manuals.online logo
https://manuals.online logoBrands
  • About & Mission
  • Contact us
  • Privacy Policy
  • Terms and Conditions

Copyright 2026 Manuals.Online. All Rights Reserved.

w
w
w
.r
e
s
cu
e
h
e
r
o
e
s
.
c
o
m
eThis toy is English speaking.
Please keep this instruction sheet for future reference, as it contains important information.
Requires three “C” (LR14) and three “AAA” (LR03) alkaline batteries (not included).
Adult assembly is required.
Tool required for battery installation: Phillips screwdriver (not included).
fJouet d’expression anglaise.
Conserver ces instructions, car elles contiennent des renseignements importants.
Fonctionne avec 3 piles alcalines C (LR14) et trois piles alcaline AAA (LR03), non fournies.
Doit être assemblé par un adulte.
Outil requis pour l’installation des piles : tournevis cruciforme (non fourni).
C5959
eFigures sold separately and subject to availability.
fFigurines vendues séparément. Certains produits peuvent ne pas être commercialisés.
2
eFront Landing Gear (Smaller)
fTrain d’atterrissage avant (petit)
eTough Terrain Vehicle
fVéhicule tout-terrain
eKeytron™Robot
fRobot Keytron
e2 Glider Supports
f2 supports du deltaplane
eWater Cannon Launcher
fCanon à eau
eCargo Door
fPorte du compartiment à fret
e2 Water Missiles
f2 missiles d’eau
e2 Rear Landing Gear (Larger)
f2 trains d’atterrissage arrière (gros)
eJet Body
fFuselage du jet
eSpace Pod
fNacelle
eStretcher
fCivière
eRamp
fRampe
eHose
fTuyau
e2 Wings
f2 ailes
eParts fPièces
eNot shown: Label Sheet
fNon illustrée : feuille d’autocollants
eMission Central Console
fConsole de mission
eGlider Wing
fAiles du deltaplane
e• Position the jet body with the bottom facing you.
•“Snap” the smaller front landing gear into the jet body.
•“Snap” the two larger rear landing gear into the jet body.
• Turn the jet body upright.
f• Positionner le fuselage du jet de façon que le dessous soit face
à soi.
•Emboîter le train d’atterrissage avant (petit) dans le fuselage.
•Emboîter les deux trains d’atterrissage arrière (gros) dans
le fuselage.
• Remettre le fuselage à l’enTrain d’atterrissage arrière (gros) droit.
e•“Snap” the hose into the hole in the cargo bay.
f•Emboîter le tuyau dans le trou du compartiment à fret.
13
e•“Snap” the two wings into the jet body, as shown.
f•Emboîter les deux ailes dans le fuselage comme illustré.
e•“Snap” the ramp into the cargo door, as shown.
f•Emboîter la rampe dans la porte du compartiment à fret,
comme illustré.
2
4
3
eRear Landing Gear (Larger)
fTrain d’atterrissage arrière (gros)
eCargo Door
fPorte du compartiment à fret
eWing
fAile
eHose
fTuyau
eRamp
fRampe
eFront Landing Gear (Smaller)
fTrain d’atterrissage avant (petit)
eBuilding the Hyper Jet™
fAssemblage du Building Hyper Jet
e• Position the cargo door near the back of the jet with the ramp
facing up.
• At an angle, fit the right side door peg into the right hole in the
jet body .
• Bend the door slightly and fit the left side door peg into the left
hole in the jet body .
• Rotate the cargo door up to close it.
f• Placer la porte du compartiment à fret près de l’arrière du
fuselage, la rampe dirigée vers le haut.
• Insérer de biais la cheville du côté droit de la porte dans le trou
du côté droit du fuselage .
• Courber légèrement la porte et insérer la cheville du côté
gauche de la porte dans le trou du côté gauche du fuselage .
• Relever la porte pour la fermer.
e• Fit the pegs on the sides
of the Mission Central
Console into the two
grooves on the top of
the jet body, as shown.
• Rotate the Mission Central Console down to store it in the jet
cargo bay.
f• Insérer les chevilles situées sur les côtés de la console dans les
deux rainures sur le dessus du fuselage comme illustré.
• Baisser la console pour la ranger dans le compartiment à fret.
5 7
e•“Snap” the two glider supports into the jet body, as shown.
f•Emboîter les deux supports du deltaplane dans le fuselage
comme illustré.
6
4
eCargo Door
fPorte du compartiment à fret
eMission Central
Console
fConsole
de mission
ePeg
fCheville
eGlider Support
fSupport du deltaplane
eGroove
fRainure


eBuilding the Hyper Jet™
fAssemblage du Building Hyper Jet
e• Fit the glider wing onto the two pegs on the glider supports.
• The glider wing is removable and will attach to the back of
most figures.
f• Fixer les ailes du deltaplane aux deux chevilles sur les supports
du deltaplane.
• Les ailes du deltaplane sont amovibles et peuvent être fixées au
dos de la plupart des figurines.
8
e• Press and hold the latch on the jet body.
• Fit the space pod into the opening at the front of the jet body
and release the latch.
f• Appuyer sur le verrou du fuselage sans le relâcher.
• Insérer la nacelle dans l’ouverture sur le devant du fuselage
et relâcher le verrou.
9
5
eGlider Wing
fAiles du deltaplane
eSpace Pod
fNacelle
e
P
R
E
S
S
f
A
P
P
U
Y
E
R
eBuilding the Hyper Jet™
fAssemblage du Building Hyper Jet
6
®
®
®
®
33
2
5
29
14
24
25
30
30
28
1
17
3
27
34
20
31
31
23
4
16
e• Make sure the areas where the labels will be applied are clean and dry. Apply the labels as shown in the illustration above.
• For best results, do not attempt to apply a label more than once.
f• S’assurer que les endroits où seront apposés les autocollants sont propres et secs. Apposer les autocollants comme indiqué
dans l’illustration ci-dessus.
• Pour de meilleurs résultats, éviter d’apposer un autocollant plus d’une fois.
21
6
26
26
15
15
32
eLabel Decoration fPose des autocollants
7
11
10 19
19
9
10
11
7
8
12
13
18
18
22
eLabel Decoration fPose des autocollants
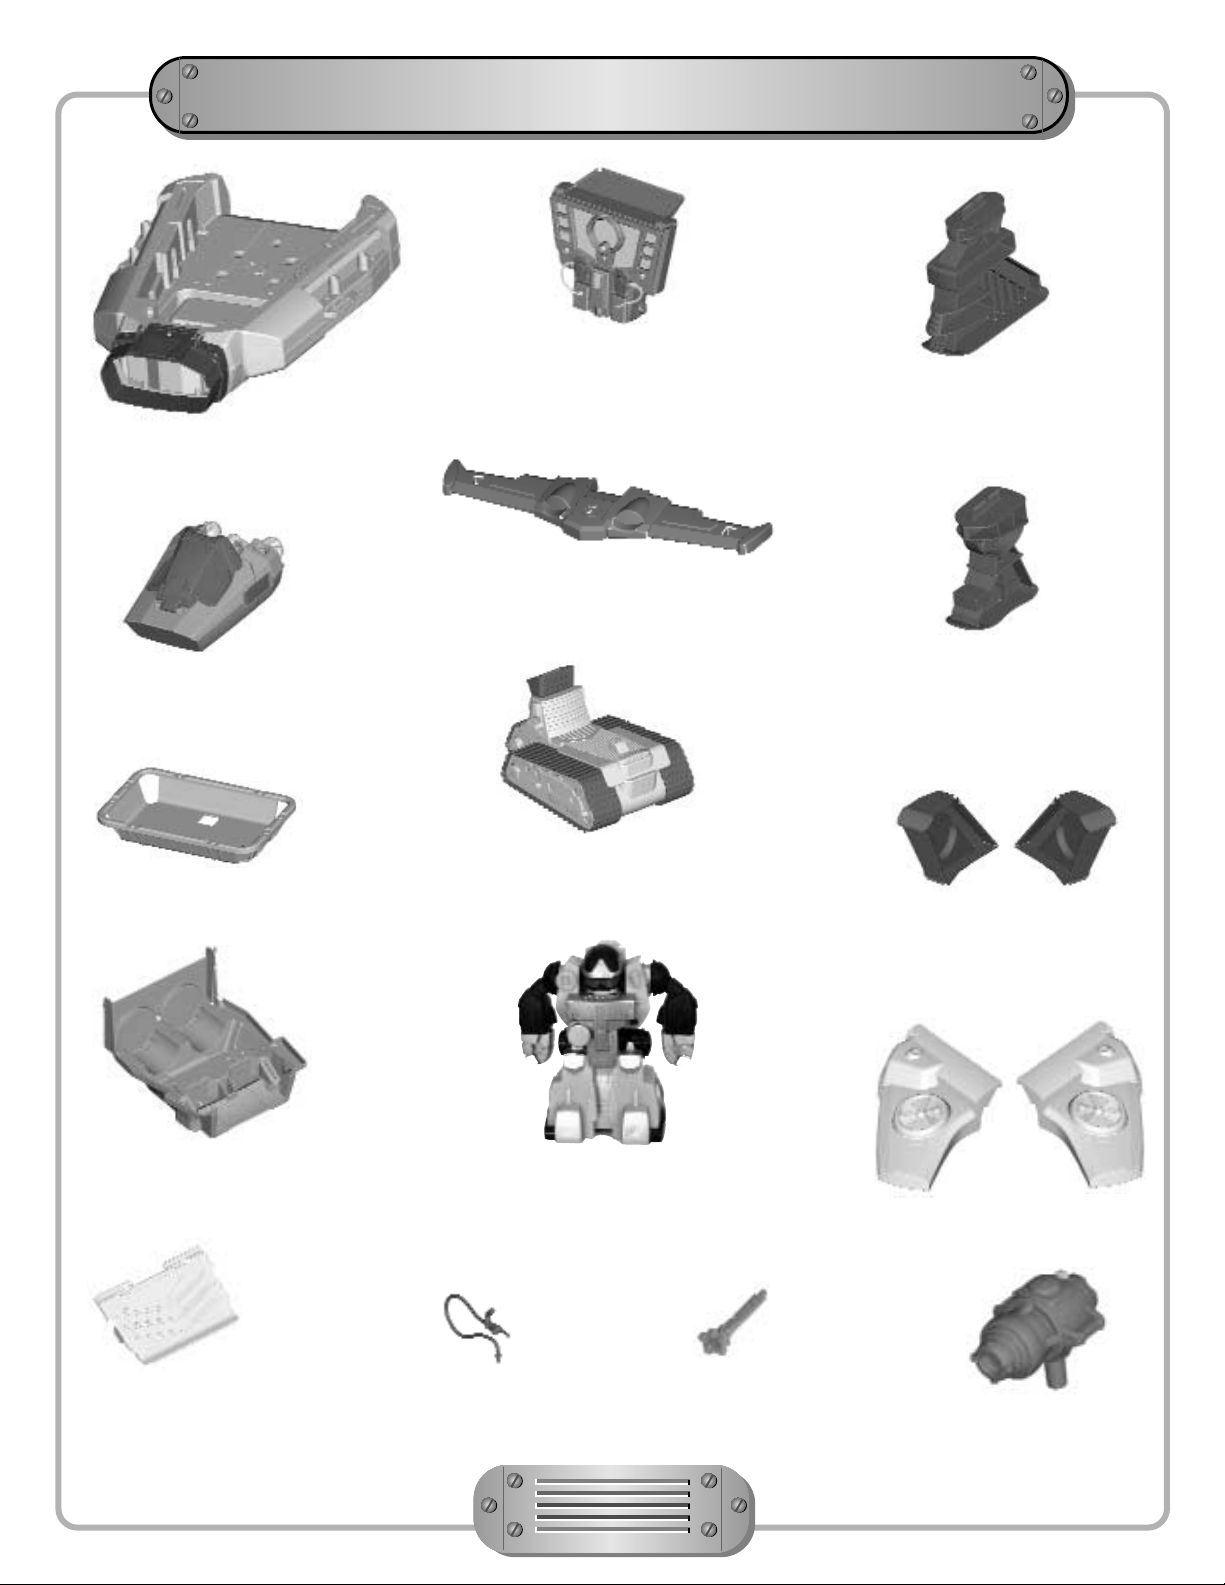
e• Locate the battery compartment on the back of the Mission
Central Console.
• Loosen the screws in the battery compartment door with a
Phillips screwdriver. Remove the battery compartment door.
• Insert three “C” (LR14) alkaline batteries as indicated inside
the battery compartment.
Hint: We recommend using alkaline batteries for longer life.
• Replace the battery compartment door and tighten the screws
with a Phillips screwdriver. Do not over-tighten.
• When lights or sounds from the Mission Central Console become
faint or stop, it’s time for an adult to change the batteries.
f• Trouver le compartiment des piles à l’arrière de la console.
• Dévisser les vis du couvercle du compartiment avec un tournevis
cruciforme. Retirer le couvercle.
• Insérer 3 piles alcalines C (LR14) comme indiqué à l’intérieur
du compartiment.
Remarque : Il est recommandé d’utiliser des piles alcalines, car
elles durent plus longtemps.
• Remettre le couvercle en place et serrer les vis à l’aide d’un
tournevis cruciforme. Ne pas trop serrer.
• Lorsque les lumières ou les sons de la console faiblissent ou
cessent, un adulte doit remplacer les piles.
8
eBattery Compartment Door
fCouvercle du compartiment
des piles
1.5V x 3
“C” (LR14)
e• Locate the battery compartment on the bottom of the robot.
• Loosen the screw in the battery compartment door with a
Phillips screwdriver. Open the battery compartment door.
• Insert three “AAA” (LR03) alkaline batteries as indicated on
the outside of the door.
Hint: We recommend using alkaline batteries for longer life.
• Close the battery compartment door and tighten the screw with
a Phillips screwdriver. Do not over-tighten.
• When sounds from the robot become faint or stop, it’s time for
an adult to change the batteries.
f• Trouver le compartiment des piles sous le robot.
• Dévisser la vis du couvercle du compartiment avec un
tournevis cruciforme. Ouvrir le compartiment.
• Insérer trois piles alcalines AAA (LR03) comme indiqué sur
l’extérieur du couvercle.
Remarque : Il est recommandé d’utiliser des piles alcalines,
car elles durent plus longtemps.
• Remettre le couvercle en place et serrer la vis à l’aide d’un
tournevis cruciforme. Ne pas trop serrer.
• Quand les lumières ou les sons du robot s’affaiblissent ou
cessent, un adulte doit remplacer les piles.
eBattery Compartment Door
fCouvercle du compartiment
des piles
1.5V x 3
“AAA” (LR03)
eShown Actual Size
fDimensions réelles
eShown Actual Size
fDimensions réelles
eBottom View
fVue du dessous
eBattery Installation - Keytron™Robot
fInstallation des piles – Robot Keytron
eBattery Installation - Mission Central Console
fInstallation des piles – Console
9
eBatteries may leak fluids that can cause a chemical burn injury or ruin your toy.
To avoid battery leakage:
• Do not mix old and new batteries or batteries of different types: alkaline, standard (carbon-zinc) or rechargeable (nickel-cadmium).
• Insert batteries as indicated.
• Remove batteries during long periods of non-use. Always remove exhausted batteries from the toy. Dispose of batteries safely.
Do not dispose of batteries in a fire. The batteries may explode or leak.
• Never short-circuit the battery terminals.
• Use only batteries of the same or equivalent type, as recommended.
• Do not charge non-rechargeable batteries.
• Remove rechargeable batteries from the toy before charging.
• If removable, rechargeable batteries are used, they are only to be charged under adult supervision.
fDes substances liquides peuvent s’écouler des piles et provoquer soit des brûlures chimiques soit endommager le jouet.
Pour éviter tout écoulement des piles :
• Ne pas mélanger des piles usées avec des piles neuves ou différents types de piles : alcalines, standard (carbone-zinc) ou
rechargeables (nickel-cadmium).
• Insérer les piles comme indiqué à l’intérieur du compartiment des piles.
• Enlever les piles lorsque le jouet n'est pas utilisé pendant une longue période. Ne jamais laisser des piles usées dans le jouet.
Jeter les piles usées dans un conteneur réservé à cet usage.
• Ne jamais court-circuiter les bornes des piles.
• Utiliser uniquement des piles de même type ou de type équivalent, comme conseillé.
• Ne pas recharger des piles non rechargeables.
• Les piles rechargeables doivent être retirées du jouet avant chargement.
• En cas d’utilisation de piles rechargeables, celles-ci ne doivent être chargées que par un adulte.
eBattery Safety Information
fConseils de sécurité concernant les piles
e• Press the latch on the jet body to detach the space pod.
f• Appuyer sur le verrou du fuselage pour en détacher la nacelle.
e• Open the canopy and slide a figure into the cockpit.
• Rotate the “arms” towards the front of the space pod.
• Close the canopy.
f• Ouvrir le couvercle de l’habitacle et installer une figurine
à l’intérieur.
• Diriger les «bras» du Hyperbot vers le devant de la nacelle.
• Fermer le couvercle.
10
eFigures sold separately and subject to availability.
fFigurines vendues séparément. Certains produits peuvent ne pas être commercialisés.
21
e• Fit the post on the bottom of the pod into the rectangular opening
on the Tough Terrain Vehicle.
• Rotate the “head” up over the canopy.
• Fit the water cannon into the hole in the “hand.”
• Place the stretcher on the back of the Tough Terrain Vehicle.
f• Insérer la tige sous la nacelle dans l’ouverture rectangulaire du
véhicule tout-terrain.
• Faire tourner la «tête» située au-dessus du couvercle de l’habitacle.
• Insérer le canon à eau dans le trou de la «main».
• Placer la civière sur la partie arrière du véhicule tout-terrain.
3
e• Hyperbot™is now ready for action!
f• Le Hyperbot est prêt à passer à l’action!
4
eHyperbot™
fHyperbot
eBuild the Hyperbot™!
fAssemblage du Hyperbot
eSpace Pod
fNacelle