manuals.online logo
Brands
  1. Home
  2. •
  3. Brands
  4. •
  5. Flexispot
  6. •
  7. Indoor Furnishing
  8. •
  9. Flexispot H2W User manual

Flexispot H2W User manual

This manual suits for next models

2

Other Flexispot Indoor Furnishing manuals

Flexispot FlexiHome EB011Q User manual

Flexispot

Flexispot FlexiHome EB011Q User manual

Flexispot EN1B User manual

Flexispot

Flexispot EN1B User manual

Flexispot S05P User manual

Flexispot

Flexispot S05P User manual

Flexispot BH1B User manual

Flexispot

Flexispot BH1B User manual

Flexispot Q8B-EU User manual

Flexispot

Flexispot Q8B-EU User manual

Flexispot M5B User manual

Flexispot

Flexispot M5B User manual

Flexispot Comhar Pro Q8 User manual

Flexispot

Flexispot Comhar Pro Q8 User manual

Flexispot CB31B User manual

Flexispot

Flexispot CB31B User manual

Flexispot F3B User manual

Flexispot

Flexispot F3B User manual

Flexispot WB101 User manual

Flexispot

Flexispot WB101 User manual

Flexispot E1LB User manual

Flexispot

Flexispot E1LB User manual

Flexispot E5B User manual

Flexispot

Flexispot E5B User manual

Flexispot GC02-BW-US User manual

Flexispot

Flexispot GC02-BW-US User manual

Flexispot BS11-PRO User manual

Flexispot

Flexispot BS11-PRO User manual

Flexispot EG1B-4024-EU User manual

Flexispot

Flexispot EG1B-4024-EU User manual

Flexispot EF1 User manual

Flexispot

Flexispot EF1 User manual

Flexispot E7CB User manual

Flexispot

Flexispot E7CB User manual

Flexispot FLEXIHOME EB011Q User manual

Flexispot

Flexispot FLEXIHOME EB011Q User manual

Flexispot S09-BB User manual

Flexispot

Flexispot S09-BB User manual

Flexispot Comhar EG8B User manual

Flexispot

Flexispot Comhar EG8B User manual

Flexispot 1388 User manual

Flexispot

Flexispot 1388 User manual

Flexispot EM6S User manual

Flexispot

Flexispot EM6S User manual

Flexispot ET026-7040 User manual

Flexispot

Flexispot ET026-7040 User manual

Flexispot EC1B User manual

Flexispot

Flexispot EC1B User manual

Popular Indoor Furnishing manuals by other brands

Regency LWMS3015 Assembly instructions

Regency

Regency LWMS3015 Assembly instructions

Furniture of America CM7751C Assembly instructions

Furniture of America

Furniture of America CM7751C Assembly instructions

Safavieh Furniture Estella CNS5731 manual

Safavieh Furniture

Safavieh Furniture Estella CNS5731 manual

PLACES OF STYLE Ovalfuss Assembly instruction

PLACES OF STYLE

PLACES OF STYLE Ovalfuss Assembly instruction

Trasman 1138 Bo1 Assembly manual

Trasman

Trasman 1138 Bo1 Assembly manual

Costway JV10856 manual

Costway

Costway JV10856 manual

moss DESIGN Caisson Credenza Assembly instructions

moss DESIGN

moss DESIGN Caisson Credenza Assembly instructions

Aquaglide FULL DECK 15.0 owner's manual

Aquaglide

Aquaglide FULL DECK 15.0 owner's manual

AREBOS AR-HE-SW30 user manual

AREBOS

AREBOS AR-HE-SW30 user manual

Till-Hilft Fulda 87005.330 Assembly instructions

Till-Hilft

Till-Hilft Fulda 87005.330 Assembly instructions

Twoey Outside 2010 quick start guide

Twoey Outside

Twoey Outside 2010 quick start guide

Hettich Easys 200 operating instructions

Hettich

Hettich Easys 200 operating instructions

The bedboss RELAX 404 Series owner's manual

The bedboss

The bedboss RELAX 404 Series owner's manual

Oeseder Möbelindustrie Bern 991 720 Assembly instructions

Oeseder Möbelindustrie

Oeseder Möbelindustrie Bern 991 720 Assembly instructions

Costway HW68469 user manual

Costway

Costway HW68469 user manual

Next ALIX A27743 Assembly instructions

Next

Next ALIX A27743 Assembly instructions

BROSA Hans Assembly guide

BROSA

BROSA Hans Assembly guide

Prodigg MINIKA PBA015T-FUR installation manual

Prodigg

Prodigg MINIKA PBA015T-FUR installation manual

manuals.online logo
manuals.online logoBrands
  • About & Mission
  • Contact us
  • Privacy Policy
  • Terms and Conditions

Copyright 2025 Manuals.Online. All Rights Reserved.

Item No. H2W H2S H2B
Installation Guide
EN
DE
FR
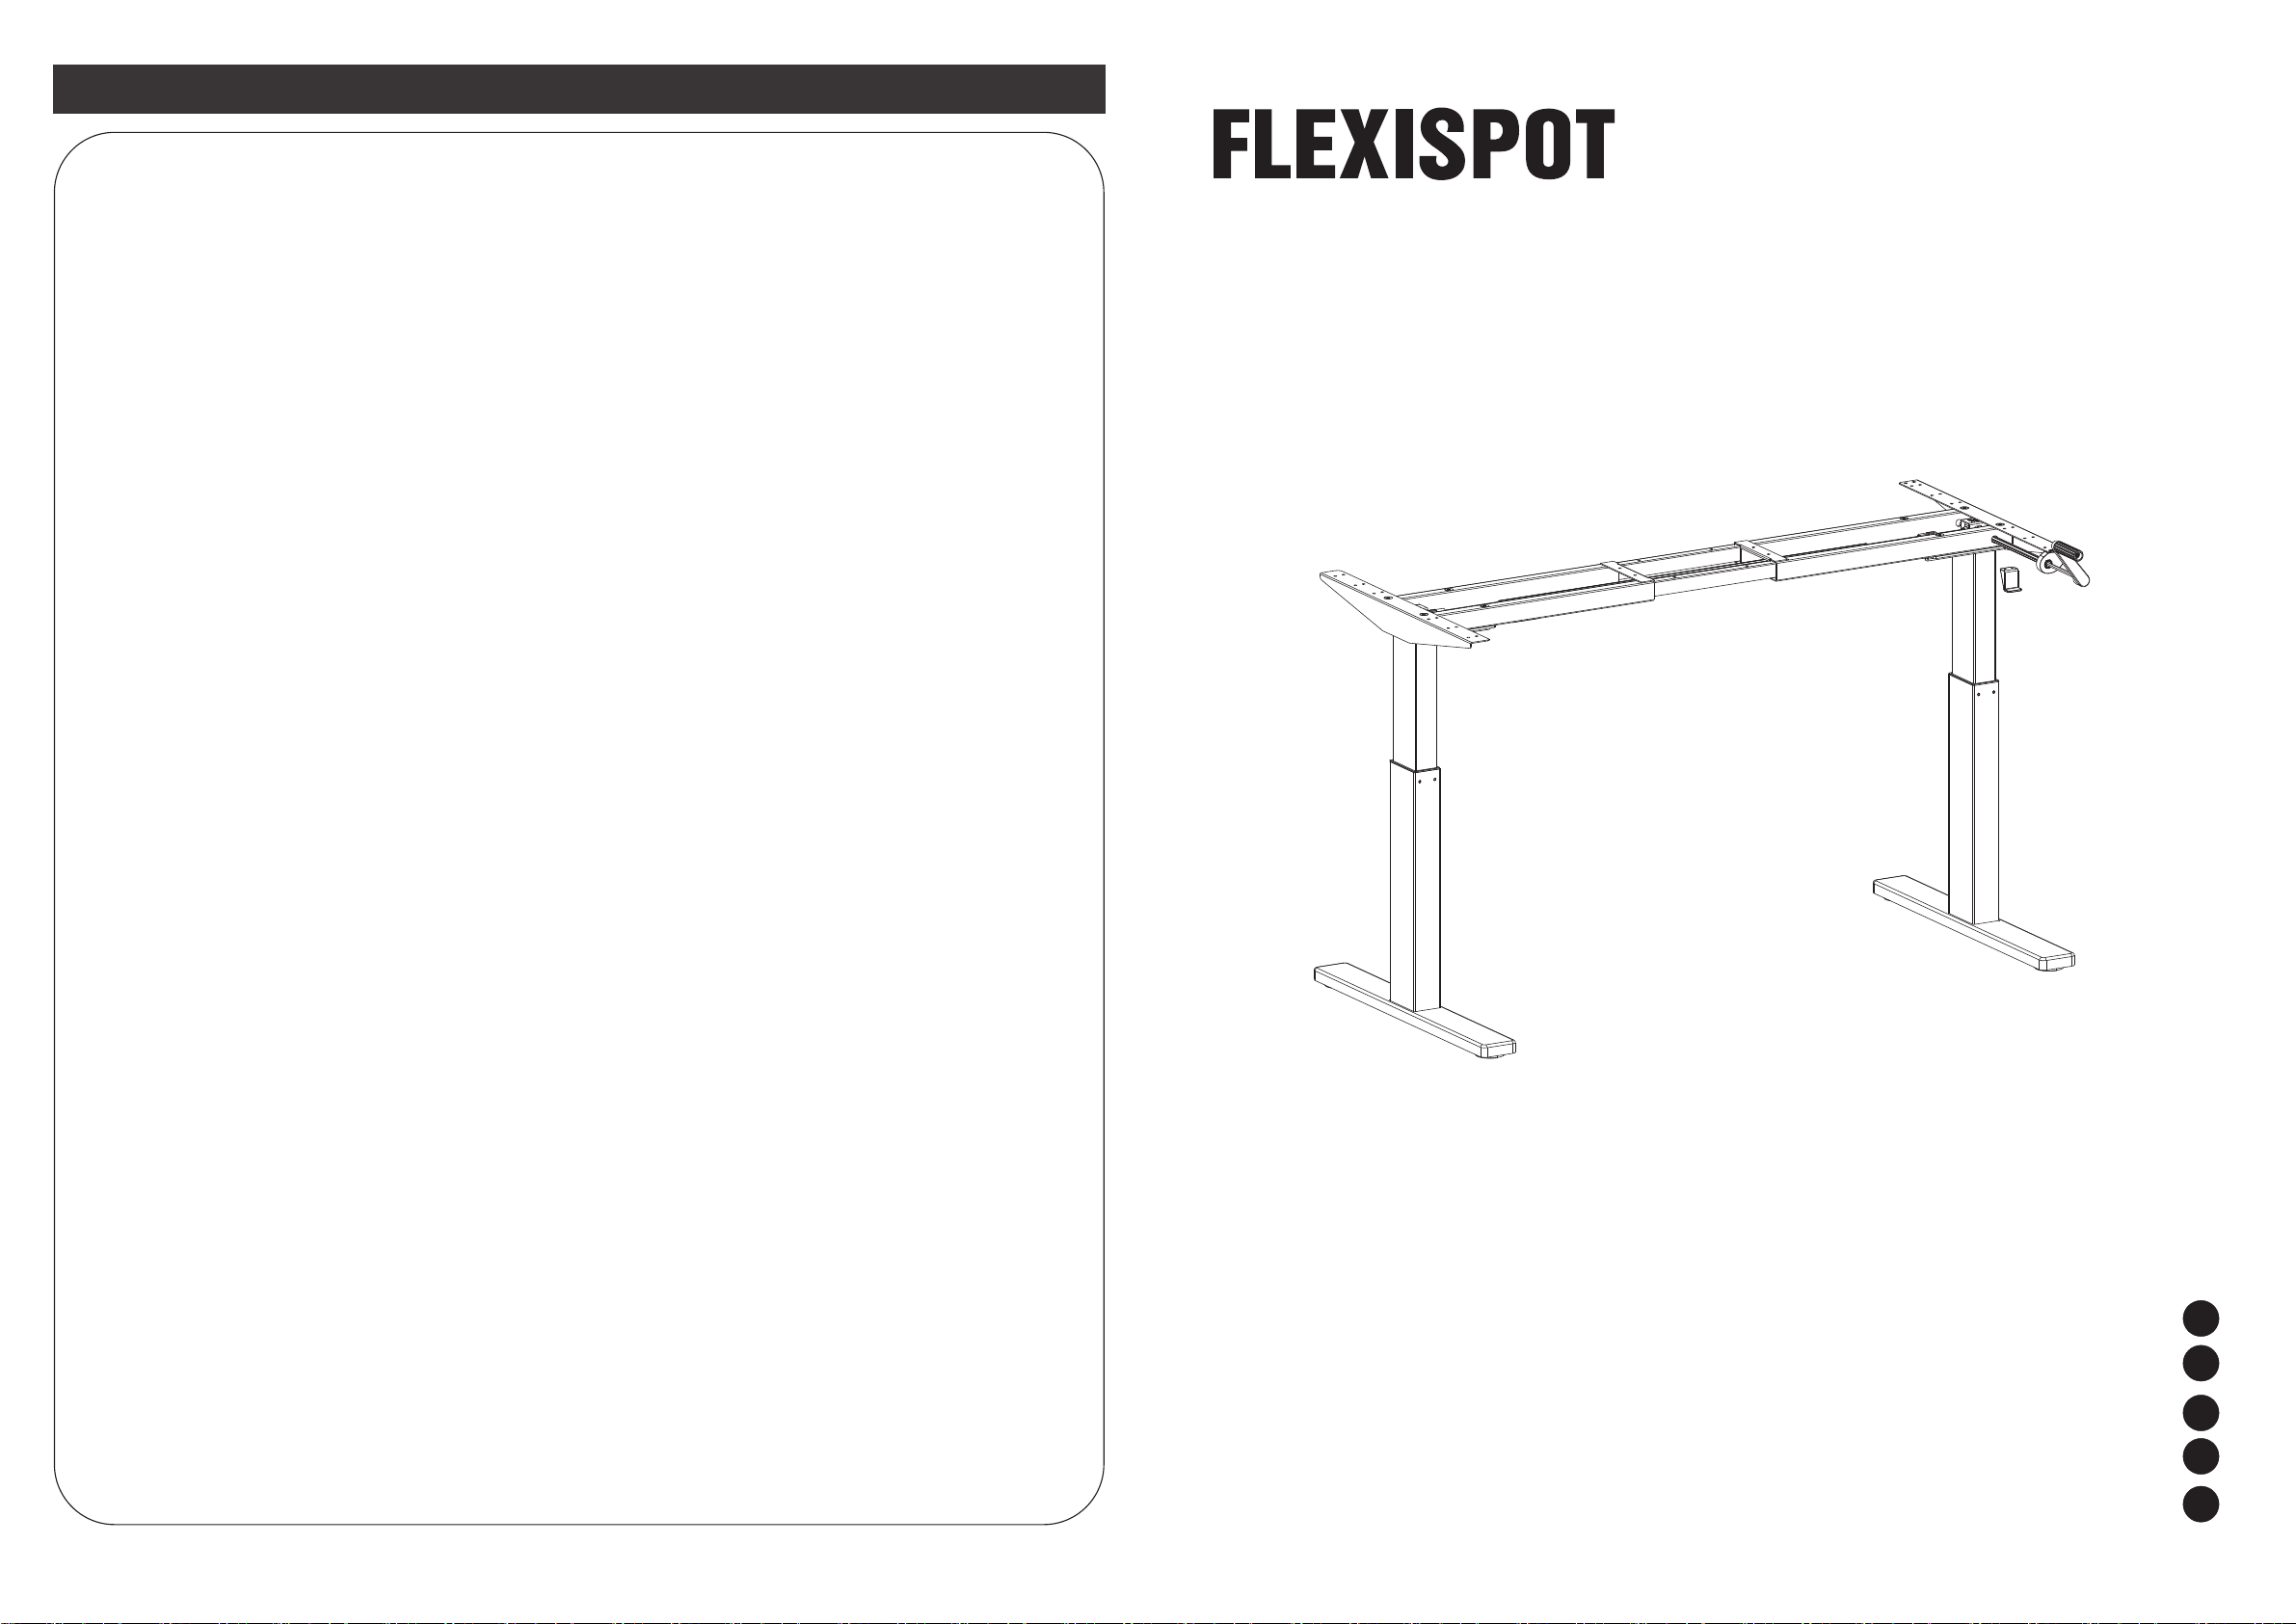
Crank adjustable desk frame
Kurbelverstellbares Tischgestell
Cadre de bureau réglable à manivelle
Marco de escritorio ajustable
Telaio scrivania regolabile a manovella
Website: www.flexispot.com
Tel: 1-855-421-2808
FlexiSpot Limited Warranty
This limited warranty offered by FlexiSpot covers defects in material or workmanship in new Flexispot products.
This warranty extends to the original purchaser only and is non-transferable. Only consumers purchasing
FlexiSpot products from authorized FlexiSpot retailers or resellers may benefit from our limited warranty.
What is Covered?
The FlexiSpot limited warranty covers our products against defects in material or workmanship as follows:
·FlexiSpot Height Adjustable Desk Frames
All height – adjustable desks purchased on or after October 1, 2016 include a 5-year warranty for the frame, and a
3-year warranty for the motor, controller, switch and other mechanisms.
·FlexiSpot Sit-Stand Desktop Workstations
All standing desks purchased on or after October 5, 2016 include a 5-year warranty for the frame and medium-fiber
desktop, and a 3-year warranty for gas spring system and mechanisms.
·FlexiSpot Desk Bikes
All desk bikes purchased on or after October 5, 2016 include a 3-year warranty for the frame, and a 1-year warranty
for the electronics and other mechanisms.
·Accessories
All monitor mounts purchased on or after October 5, 2016 include a 5-year warranty for the arms, and a 3-year warranty
for gas spring system and mechanisms.
What are your Remedies?
FlexiSpot will replace at no charge to the consumer the defective parts only or, at FlexiSpot's option, replace
any product or part of the product that is defective because of improper workmanship and/or material, under normal
installation, use, service and maintenance. If FlexiSpot is unable to provide a replacement and repair is not
practical or cannot be completed in a timely fashion, FlexiSpot may elect to refund the purchase price in exchange
for the return of the product. In the rare event that your FlexiSpot product is defective, we will provide you with a
replacement item shipped at no cost to you within the continental Europe. The shipping method for replacement
products is DHL Classic, but expedited shipping is available if you choose to pay the additional expense. In addition,
you will need to pay the shipping costs if any products need to be shipped to you at an address outside the continental
Europe.
REPAIR OR REPLACEMENT (OR, IN LIMITED CIRCUMSTANCES, REFUND OF THE PURCHASE PRICE) AS
PROVIDED UNDER THIS WARRANTY IS THE EXCLUSIVE REMEDY OF THE PURCHASER. FLEXISPOT
NEITHER ASSUMES NOR AUTHORIZES ANY PERSON TO CREATE FOR IT ANY OTHER OBLIGATION OR
LIABILITY IN CONNECTION WITH THIS PRODUCT.
What is Not Covered?
Our limited warranty does not cover any problem that is caused by:
1. Conditions, malfunctions or damage not resulting from defects in material or workmanship.
2. Conditions, malfunctions or damage resulting from normal wear and tear, improper installation, improper
maintenance, misuse, abuse, negligence, accident or alteration.
3. Accessories, connected materials and products, or related products not manufactured by FlexiSpot.
4. Conditions, malfunctions or damage resulting from failure to follow the instructions and guidelines relating to the
product's intended use.
Our limited warranty is void if a product is returned with removed, damaged or tampered labels or any alterations
(including removal of any component or external cover).
How to File a Claim?
In order to receive the benefit of our limited warranty, you need to process your claim in compliance with the terms of
this limited warranty and follow proper return procedure. To request warranty service, please contact customer
service via email at contact@flexispot.com or toll free at 855-421-2808. You will need to provide the sales
receipt or other evidence of the date and place of purchase for your FlexiSpot product.
Implied Warranties and Limitation of Damages
EXCEPT TO THE EXTENT PROHIBITED BY APPLICABLE LAW, ALL IMPLIED WARRANTIES (INCLUDING
WARRANTIES OF MERCHANTABILITY AND FITNESS FOR A PARTICULAR PURPOSE) SHALL BE LIMITED IN
DURATION TO THE DURATION OF THIS WARRANTY, AND FLEXISPOT SHALL NOT BE LIABLE FOR ANY
INCIDENTAL, INDIRECT, SPECIAL, OR CONSEQUENTIAL DAMAGES, INCLUDING BUT NOT LIMITED TO
LOSS OF PROFITS OR REVENUE, RESULTING FROM ANY BREACH OF EXPRESS OR IMPLIED WARRANTY
OR CONDITION, OR UNDER ANY OTHER LEGAL THEORY, EVEN IF FLEXISPOT HAS BEEN ADVISED OF
THE POSSIBILITY OF SUCH DAMAGES. Some jurisdictions do not allow limitations on the duration of an implied
warranty or the exclusion or limitation of special, indirect, incidental or consequential damages, so the above
limitations or exclusions may not apply to you.
Governing Law
This Warranty shall be governed by the laws of the State of California, USA, without giving effect to any conflict of
laws principles that may provide the application of the law of another jurisdiction.
How State Law Applies
This Warranty gives you specific legal rights, and you may also have other rights which vary from state to state.
ES
IT
Specifications
Accessory Package
Parts Included
Step 1
01 02
Frame 2-tier
Max. Weight Capacity
Adjustable Height
Wide expand 110 - 180 cm
A B C D E
x2
M5 x 8 mm
F
x1
5x5 Square
gasket
x6 x8
Figures shown are for reference only. Please contact customer service if there are any accessories or
tools missing.
Diagram of Components
NO. Parts Qty
Step 2
80 kg
72 - 123 cm
G H
x1
4x4
x1
3x3 M8 x 16 mm
Bolt
x8 x24
St4.8 x 20 mm
Screw
M8 x 35 mm
Bolt
Screw
NO. Parts Qty
1 2
3 4
5 6
7 8
910
2
1
1
1
11
11
11
Turn the legs (2,3) upside down. Attach the feet (1) to the bottom of the legs using 8pcs M8x16mm
bolts (F) and tighten with 5x5 hex key (A).
Attach the legs (2, 3) to the cross bar (4) using 4pcs of the M8x35mm bolts (G). Use the 5x5 hex key
to lock bolts firmly in place. Then, using the 4x4 hex key (B), adjust the 8 screws on the bottom of the
cross bar (4) so that they will accommodate the actual size of your work surface.
1
2
3
F
A
F
A
1
2
3
4
6
5
7
8
10 9
110 - 180 cm
3
A
G
2Note:
Tighten those screws in case of the
cross bar sagged.
B
Step 3
03
Step 4
04
Step 5
The crank handle can be installed for either left-hand or right-hand orientation simply by reversing
its position as in the following figure.
9
DC
Using the hex key (A), connect both the left and right side brackets (6, 7) to the bottom legs
using 4 bolts (G).
Please note:
Do not misplace the two brackets (6, 7).
Slightly loosen the adjustable nuts to adjust the length of the drive shaft (5). Insert the assembled
drive shaft into the slots that located at the top of each leg.
Remove the Bearing block
from the crank shaft (8),
change its postion as in
figure, install it for left-hand
using.
Option 1: installing for right-hand orientation Option2: installing for left-hand orientation
1. Insert the crank shaft (8) into the right leg which has a shaft hole.
2. Use 2pcs bolts (D) and lock firmly with hex key (C).
3. Then insert crank handle (9) into crank shaft (8).
4. The crank handle(9) can be adjusted depending on your preference.
Insert the assembled drive shaft into the slots
that located at the top of each leg.
12
G
A
6
7
7
8
A
8
A
Left Leg Right Leg
Loosen the adjustable nuts
Insert into the slots
Fully tighten the nuts
Loosen the adjustable nuts
Stretch the drive shaft
Fully tighten the nuts
Warning
·The packaging materials of this product could be dangerous to young children. Please keep all
plastic bags, screws, tools and other small or potentially hazardous materials away from young
children as they may present a choking risk.
·This Flexispot desk should not be used by children. To avoid potential danger, keep children and
people with cognitive impairments away from this height-adjustable desk, its control unit.
The manufacturer is not responsible for unintended use of this equipment.
·Before using this product, please read the instructions carefully and make sure you fully
understand all the product's functions and settings. If you have any questions, please contact us.
05 06
Step 6 Step 7
H
6
7
Evenly place the work surface onto the legs then attach it to the side brackets (6, 7) using
screws (H). Tighten screws firmly with a drill or screwdriver.
Place the work surface upside down, then screw the frame for easy-installation.
Attach the crank handle holder (10) to the underside of the table top using 2 screws (H). Ensure
that the crank handle will properly settle onto the holder when pushed in before screwing crank
handle holder (10) to surface.
Flip over the desk gently after installing all the frame parts.
10
H
Place the crank here
after you use.
Use the gaskets (E) while
screw the cross bar (4).
E
The quantity of gaskets (E) and screws depends on
the length of your desktop.