FLIR DM285 User manual

QUICK START
FLIR DM285
Imaging MultiMeter with IGMTM and Bluetooth®

FLIR DM285 - QUICK START Document Identifier: DM285-QS-en-US_AC
QUICK START –EN
The latest versions of the detailed User Manual and Quick Start, with translations, are located on the support.flir.com
web site (download tab). Please read the User Manual and Quick Start carefully before use. Please Register for
Extended Warranty and Product Updates at support.flir.com/prodreg
METER DESCRIPTION
1. NCV sensor
2. LCD display
3. Navigation/OK keypad
4. MODE button
5. RANGE button
6. Display Hold/Work Light button
7. Function Switch
8. Positive (+) Probe Input Jack for Amps
9. Positive (+) Probe Input Jack for mA
10. COM (-) Probe Input Jack
11. Positive (+) Probe Input Jack for all except A/mA
12. Display Save button
13. Return/Exit menu button
14. Thermal imager button
Battery compartment, tilt stand, tripod mount, test lead holder, lenses/lens cover on back of meter
FUNCTION SWITCH POSITIONS
Detect AC Voltage through the non-contact sensor at the top of the meter.
Measure voltage through the probe inputs with a low-impedance load positioned across input
Measure Current and Frequency from optional FLIR Flexible Current clamp meters/adaptors.
Meter is OFF and in full power-saving mode.
Measure AC Voltage (V) and Frequency (Hz) through the probe inputs.
Measure DC Voltage (V) through the probe inputs.
Measure milli-volts or temperature through probe inputs (use thermocouple adaptor for temperature).
Measure Resistance, Continuity, Diode, and Capacitance through probe inputs.
Measure µA Current through the probe inputs.
Measure Current (A or mA) and Frequency (Hz) through the probe inputs.

FLIR DM285 - QUICK START Document Identifier: DM285-QS-en-US_AC
FUNCTION BUTTONS
Press to select one of the available functions for a multi-selection switch position.
Press to toggle AC and DC measurements when available.
Press to view Frequency in AC voltage and A, mA current modes.
From Auto range mode, short press to select Manual range mode.
From Manual mode, short press to change the range. Long press to return to the Auto mode.
Short press to open/close the Thermal Imager.
OK button with Navigation keypad arrows to confirm settings and navigate menus
Press to exit modes or return from menu screens
Short press: Hold mode (select hold or auto hold in Settings Menu). Long press: Work Light ON/OFF.
Display Save button. Short press to capture a fully radiometric thermal image or DMM screenshot
DISPLAY SYMBOLS
The Status Bar icons (shown above) appear at the top of the display.
•L to R, row 1: Flex clamp icon/range, Laser, Relative, Continuity, Diode, VFD, LoZ, Work light, Bluetooth®, APO,
Battery
•L to R, row 2: Datalogger, Data Hold, Auto Hold, Auto Range.
•Additional display symbols are shown below:
Non-Contact Voltage detector mode
Ԑ
Emissivity
Low sensitivity voltage detector (160~1000V)
AC and DC current or voltage icons
High sensitivity voltage detector (80~1000V)
OL
Over range reading
MAX and MIN readings
PEAK MAX and PEAK MIN
AVG (Average) reading
Resistance (ohms)
Capacitance
Hz
Frequency (Hertz)
oC
Celsius Temperature units
oF
Fahrenheit Temperature units
METER POWER
Use three (3) 1.5V ‘AA’ batteries or the optional FLIR TA04 rechargeable battery pack to power the meter. Set function
switch to any position to switch on the meter. If the battery icon appears low, if the meter does not power on, or if a
low battery screen appears, recharge or replace the batteries. The meter switches off after 10 minutes of inactivity.
Change the APO time in the General Settings menu.

FLIR DM285 - QUICK START Document Identifier: DM285-QS-en-US_AC
THERMAL IMAGER with IGMTM (Infrared Guided Measurements)
a. Set the function switch to any position. Short press the IGMTM button to switch the thermal imager ON/OFF.
b. Point the lens (back of meter) toward the target surface. Lighter shades indicate warmer temperatures and darker
shades indicate cooler temperatures.
c. View the surface temperature measurement (upper left). Use the Thermal Settings menu to control laser pointer,
crosshairs, color palette, and emissivity. Set temperature units oC oFin the General Settings menu.
d. All DMM functions are operational In the Thermal imaging mode; the electrical symbols appear on the left.
e. The Distance to Spot ratio for the imager is 30:1 (measurement spot is 30 times smaller than the meter-to-spot
distance). The Field of View is 44o(top view) x 57 o (side view).
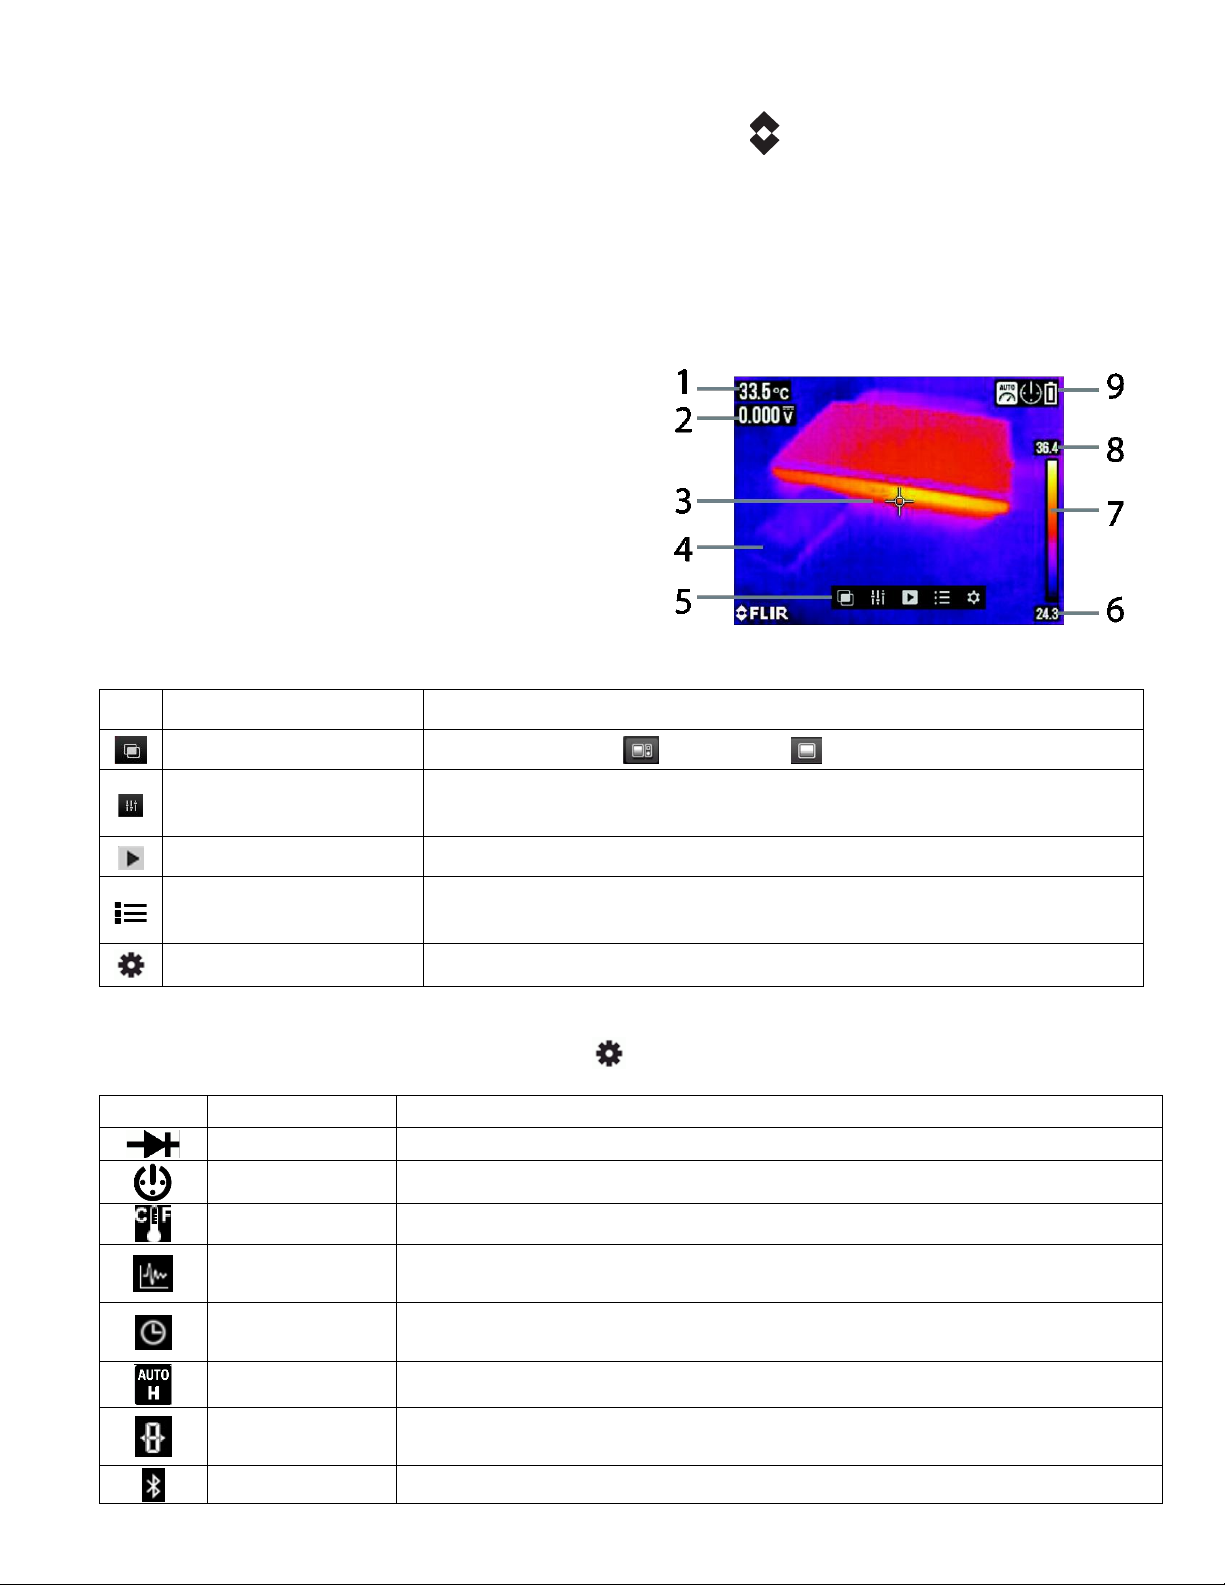
f. Refer to screen shot for the descriptions below:
1. Surface Temperature (dashes while stabilizing
2. DMM function
3. Crosshairs
4. Thermal image (120 x 160 pixels)
5. Main menu (press OK to open)
6. Lowest temperature reading in frame
7. Thermal scale
8. Highest temperature reading in frame
9. Status icons (see Display Symbols section)
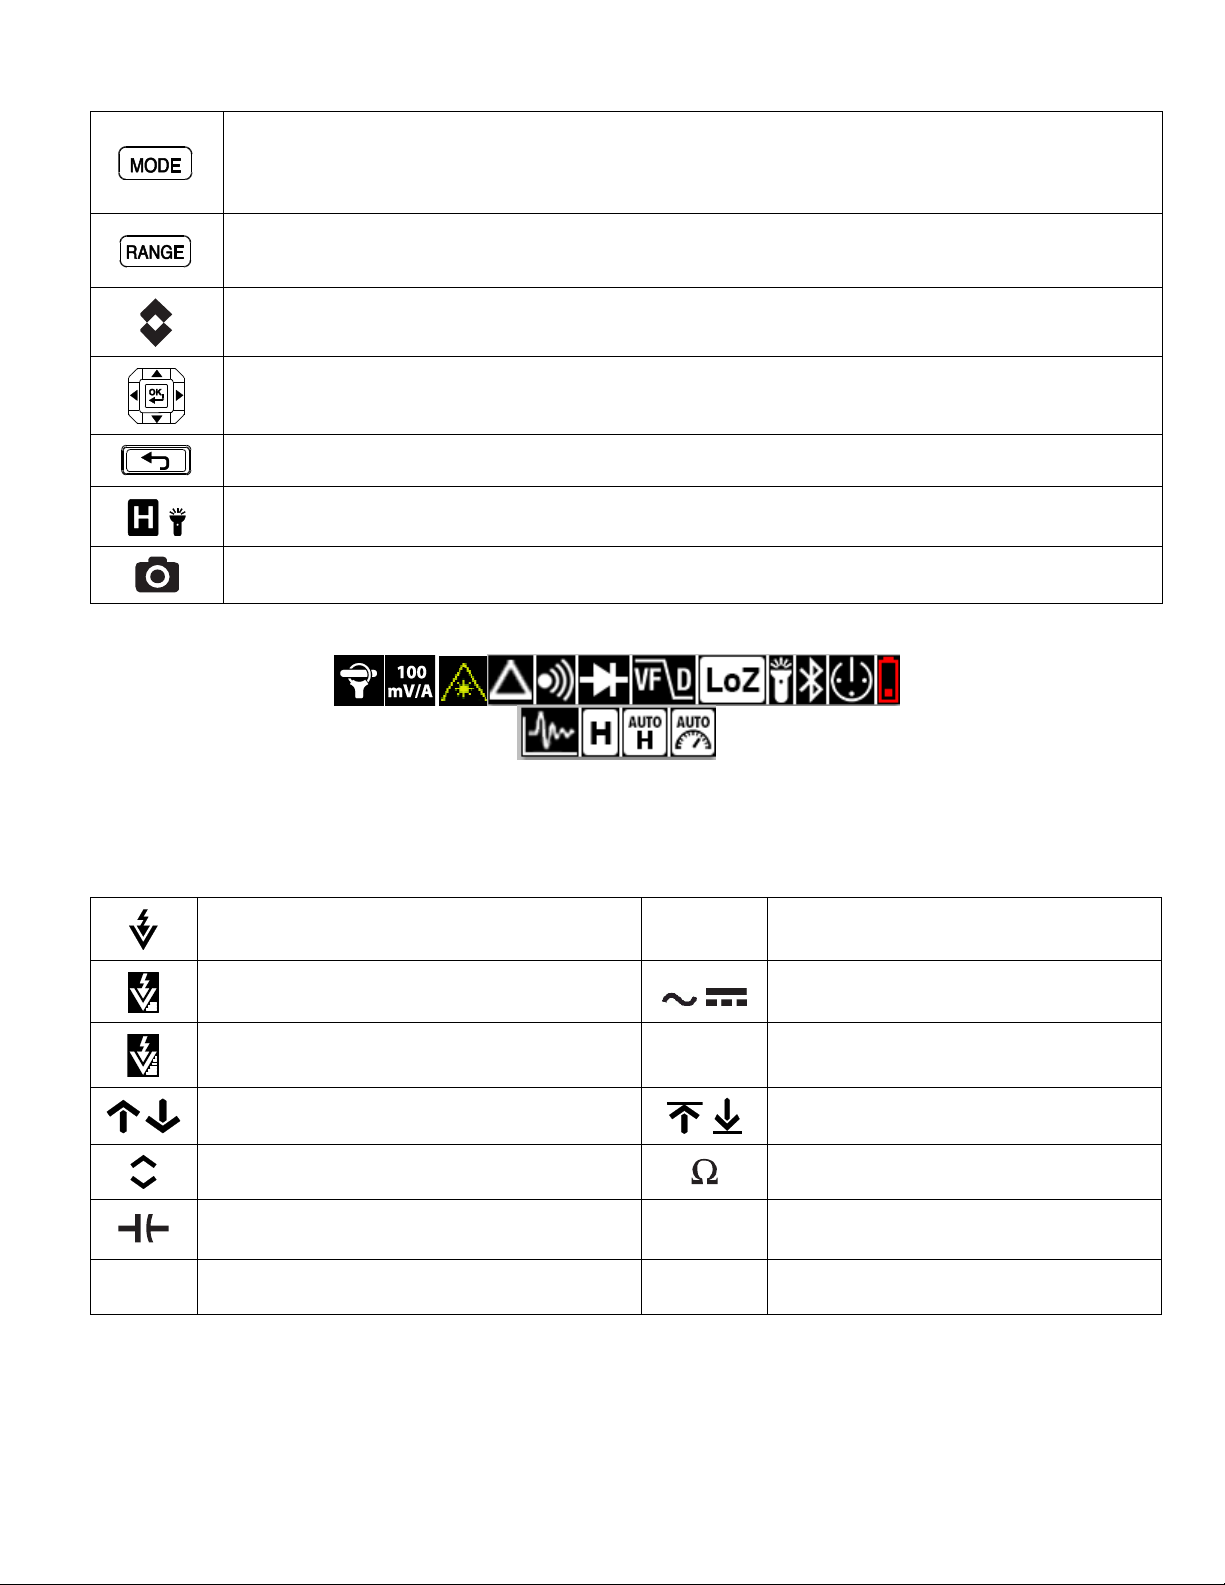
MAIN MENU
Press OK to open Main menu. Scroll to an icon and press OK. Refer to table below:
Icon
Description
Operation
Image mode
Select image + DMM or Image only for imager display default
Thermal settings
See thermal settings menu section to control color palette, emissivity, Laser
pointer, and crosshairs
Gallery mode
View stored data logs and images
Advanced settings menu
See Advanced Settings menu section to control VFD, MAX-MIN-AVG, Peak,
Relative, and Datalogger functions
General settings
Refer to General settings menu below
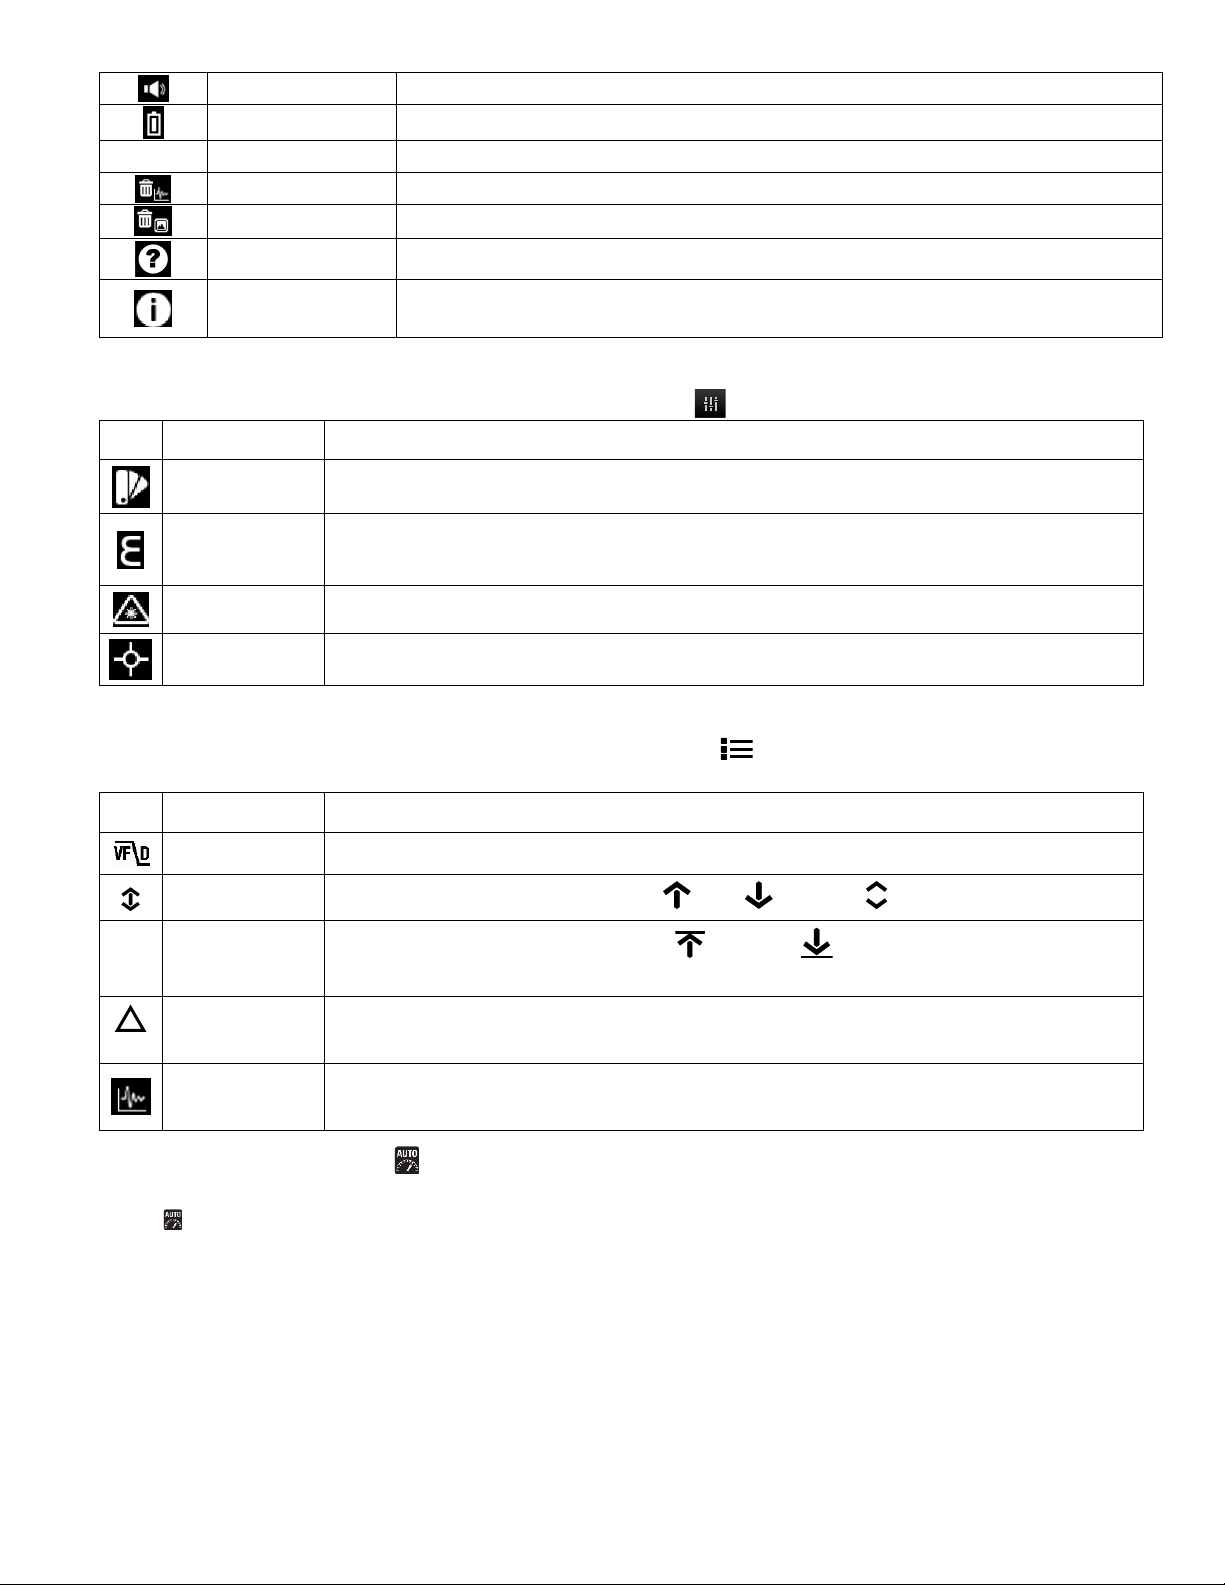
GENERAL SETTINGS MENU
Press OK to open Main menu. Scroll to the Settings icon and press OK. Press OK on any menu item and then refer
to the table below. The user manual, available at website, provides in-depth information on each menu item.
Icon
Description
Operation
Diode mode
Press OK to toggle SMART and CLASSIC modes
APO
Press OK to open sub-menu. Scroll to setting, press OK and press Return to exit
Units
Press OK to toggle temperature units
Sample rate
Press OK to open the selector. Use arrows to set datalogger sample rate (1~99
seconds) and press OK
Real-time clock
Press OK to open sub-menu. Use arrows to scroll through setting fields and to
select the date and time. Press OK to confirm
Auto/Data Hold
Use the OK button to toggle AUTO and DATA Hold mode as the default
Coarse Resolution
Press OK to toggle ON/OFF. When on, the display resolution decreases to inhibit
quickly changing digits for easier viewing
Bluetooth®
Press OK to toggle ON/OFF. Refer to the User Manual for complete details

FLIR DM285 - QUICK START Document Identifier: DM285-QS-en-US_AC
Button tone
Press OK to toggle the button-press beeper ON/OFF
Battery type
Press OK to select battery type in use: Alkaline or Lithium
Language
Language
Press OK and scroll to desired language then press OK. Press Return to exit
Delete data logs
Press OK to delete all stored data logs
Delete images
Press OK to delete all stored images
Help screen
Press OK to view Customer Care contact info
View Information
Press OK to see Firmware, Lepton, Bluetooth®, and Laser icons. Press OK at the
desired icon to view its information screen
THERMAL SETTINGS MENU
Press OK to open the main menu and scroll to the Thermal Settings icon, press OK
Icon
Description
Operation
Palette
Press OK to set a thermal imager color palette (Iron, Rainbow, Gray)
Emissivity
Press OK and scroll to a preset or to the fine-tuning icon Ԑ. For fine-tuning, press OK at
the fine-tuning icon and use the arrow buttons to set value, press OK to confirm.
Laser pointer
Press OK to toggle the laser ON/OFF
Crosshairs
Press OK to toggle crosshairs ON/OFF
ADVANCED SETTINGS MENU
Press OK to open the Main Menu, scroll to the Advanced Settings icon , and press OK. Scroll to the icons shown
below and press OK to activate (blue dot next to icon indicates mode is enabled)
Icon
Description
Operation
VFD
Press OK to enable/disable the low pass filter that eliminates high-frequency noise
MAX-MIN-AVG
Press OK to enable/disable the MAX , MIN , and AVG readings
P
Peak mode
Press OK to enable/disable PEAK Max PEAK Min for ACA/ACV measurements.
Refer to the user manual for more detailed information
Relative mode
Press OK to store a reading as reference with which to compare subsequent readings.
Refer to the user manual for more detailed information
Datalogger
Press OK to start/stop logging data (up to 40k readings in 10 sets. Use Gallery mode
(Main Menu) to view logged data. Refer to the user manual for detailed information
AUTO/MANUAL RANGE
Auto range mode is the default mode of operation. When you select a new function, the starting mode is Auto range
and the indicator appears.
1. To enter Manual range mode, short press the RANGE button. Then use the RANGE button to change the range.
2. To return to the Auto range mode, long press the RANGE button.
DATA HOLD and AUTO HOLD
The meter has two HOLD modes: classic Data Hold (freezes displayed reading) and Auto Hold (advanced version of
data hold detailed in the user manual). To select Data Hold or Auto Hold as the default, please use the General
Settings menu. Press the H (HOLD) button to activate/deactivate the selected HOLD mode. In HOLD mode the H
indicator appears.

FLIR DM285 - QUICK START Document Identifier: DM285-QS-en-US_AC
MEASUREMENTS

FLIR DM285 - QUICK START Document Identifier: DM285-QS-en-US_AC

FLIR DM285 - QUICK START Document Identifier: DM285-QS-en-US_AC
We show CLASSIC diode mode here only. In
SMART mode, the meter sends a polarity-
alternating signal through the diode (no need
to reverse polarity manually). Select ‘SMART’
diode in the General Settings Menu.
In SMART mode, the meter will show ± 0.400
~ 0.800V for a good diode, ‘BAD’ for a
shorted diode, and ‘O.L’ for an opened
diode. Refer to the User Manual for detailed
information.

FLIR DM285 - QUICK START Document Identifier: DM285-QS-en-US_AC
Corporate Headquarters
FLIR Systems, Inc.
27700 SW Parkway Avenue
Wilsonville, OR 97070 USA
Customer Support
Technical Support Website https://support.flir.com
Publication Identification No.: DM285-QS
Release version: AC
Release Date: March 2020
Language: en-US
Copyright ©2020 FLIR Systems, Inc.
All rights reserved including the right of reproduction in whole or in part in any form.
www.flir.com
Table of contents
Other FLIR Multimeter manuals

FLIR
FLIR DM93 User manual

FLIR
FLIR DM93-2 User manual

FLIR
FLIR DM91 User manual

FLIR
FLIR IM75 User manual

FLIR
FLIR EXTECH INSTRUMENTS MA120 User manual

FLIR
FLIR Extech Instruments MultiMaster MM560A User manual

FLIR
FLIR IM75-2 User manual

FLIR
FLIR Extech Instruments MG302 User manual

FLIR
FLIR DM92 User manual

FLIR
FLIR DM93 User manual

FLIR
FLIR DM284 User manual

FLIR
FLIR EXTECH INSTRUMENTS DM110 User manual

FLIR
FLIR Extech Instruments MN15 User manual

FLIR
FLIR Extech Instruments MN16 User manual

FLIR
FLIR Extech EX505 User manual

FLIR
FLIR DM90 User manual

FLIR
FLIR DM166 User manual

FLIR
FLIR DM286 User manual

FLIR
FLIR Extech EX510 User manual

FLIR
FLIR DM284 User manual