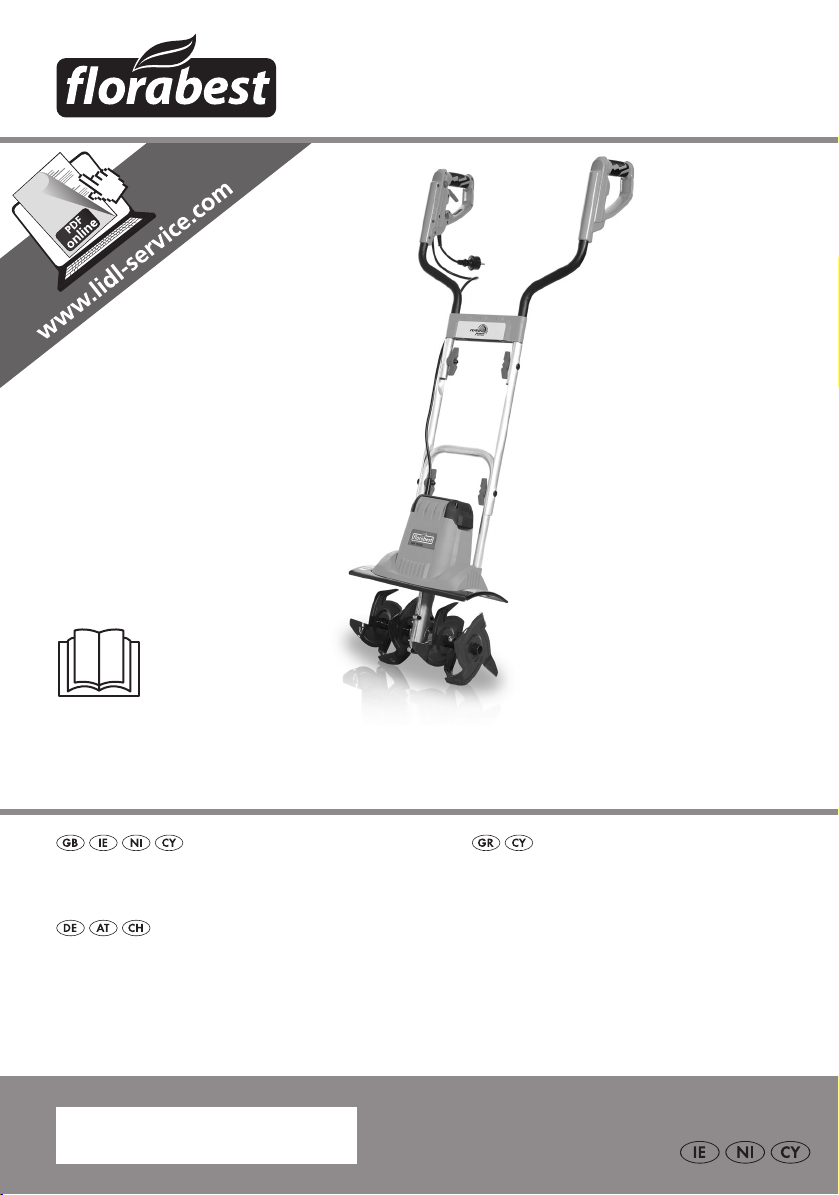
FLORABEST FGH 750 B2 User manual

GARDEN CULTIVATOR FGH 750 B2
IAN 291816
GARTENKULTIVATOR
Originalbetriebsanleitung
GARDEN CULTIVATOR
Translation of the original instructions
ΗΛΕΚΤΡΙΚΌ ΣΚΑΛΙΣΤΗΡΙ
Μετάφραση των αυθεντικών οδηγιών λειτουργίας
®
291816_par_Gartenkultivator_cover_IE_NI_CY.indd 2 13.09.17 17:18

GB / IE/ NI / CY Translation of the original instructions Page
GR / CY Μετάφραση των αυθεντικών οδηγιών λειτουργίας Σελίδα
DE/ AT/ CH Originalbetriebsanleitung Seite
Before reading, unfold the page containing the illustrations and familiarise yourself with all
functions of the device.
Πριν ξεκινήσετε την ανάγνωση, ανοίξτε τη σελίδα με τις εικόνες και εξοικειωθείτε με όλες τις
λειτουργίες της συσκευής.
Klappen Sie vor dem Lesen die Seite mit den Abbildungen aus und machen Sie sich anschließend
mit allen Funktionen des Gerätes vertraut.
291816_par_Gartenkultivator_cover_IE_NI_CY.indd 3 13.09.17 17:18
4
17
32

A
D
E
B
10
9
7
8
6
4
5
3
1a 1b
2
3
14
14
14
14
15
15
5
15
15
6
16
2
18
17
12
12
11
1a 1b
13
4
4
2
C
20
19 11
10

4
GB IE NI CY
Introduction
Congratulations on the purchase of your
new device. With it, you have chosen a
high quality product.
During production, this equipment has
been checked for quality and subjected
to a nal inspection. The functionality of
your equipment is therefore guaranteed. It
cannot be ruled out that residual quantities
of water or lubricants will remain on or in
the equipment/hose lines in isolated cases.
This is not a fault or defect and it repre-
sents no cause for concern.
The operating instructions constitute
part of this product. They contain
important information on safety, use
and disposal.
Before using the product, familiarise
yourself with all of the operating
and safety instructions. Use the
product only as described and for
the applications specied.
Keep this manual safely and in the
event that the product is passed on,
hand over all documents to the third
party.
Intended purpose
The tool is intended for breaking up and
tilling coarse soil for the purpose of mixing
in fertiliser, peat and compost in domestic
areas.
Any use other than that specically named
in this manual may lead to damage to the
tool and represents a serious injury hazard
for the operator.
The operator or user of the tool is respon-
sible for any damage or injury caused to
other persons or property.
Contents
Introduction .................................4
Intended purpose ........................4
General description......................5
Scope of delivery ...........................5
Functional description .....................5
Overview ......................................5
Technical data..............................5
Safety precautions .......................6
Symbols used in the manual.............6
Symbols on the implement ...............6
General notes on safety ..................7
Residual risks ...............................10
Assembly instructions.................11
Fitting the grip tubing....................11
Operation ..................................11
Switching on and off.....................11
Operating instructions...................12
Cleaning/Maintenance ...............12
General cleaning and maintenance
work...........................................12
Changing the tines .......................13
Storage......................................13
Disposal, environmental
protection ..................................14
Spare Parts/Accessories .............14
Guarantee .................................15
Repair Service............................16
Service-Center............................16
Importer ....................................16
Translation of the original
EC declaration of conformity ......47
Exploded Drawing ............... 51/52

5
CYNIIEGB
This tool is intended for use by adults.
Children and persons unfamiliar with the
manual must not be allowed to use the
tool. Do not use the tool in rain or damp
surroundings.
The manufacturer shall not be held liable
for damage arising from improper use or
incorrect operation of the tool.
General description
The major functional parts are
shown on the foldout page.
Scope of delivery
Carefully remove the tool from the packag-
ing and check that the following parts are
complete:
• Motor housing with tines and frame
tubing
• Right-hand fork with dead-man lever
and permanently xed mains cable
• Left-hand fork grip
• Plastic cross-plate with cable guide
• Assembly tools, cable clip and belt clip
• Instructions for use
Functional description
Your hand-operated garden tiller is
equipped with a maintenance free electric
motor and a gearbox with sump lubrica-
tion.
The tool is tted with four rotating tine
wheels that automatically dig themselves
into the ground.
The aluminium frame can be folded to aid
storage.
Please refer to the following descriptions
for the function of the controls.
Overview
A
1a Right-hand fork grip with dead-
man lever, safety release catch
and cable tension relief
1b Left-hand fork grip
2 Mains cable
3 Plastic cross-plate
4 Two central tubes
5 Cable clamp
6 Frame tubing
7 Vent
8 Motor housing
9 Gearbox
10 Driveshaft
11 Tines
12 Belt clip
B
13 Bolts provided
14 Screws
15 Wing nuts
C
16 Cable tension relief
17 Safety release catch
18 Dead-man lever
D
19 Hex bolt
20 Self-locking nut
Technical data
Garden Cultivator.................. FGH 750 B2
Motor power input (P).................. 750 W
Rated input voltage (U) .....230 V~, 50 Hz
Leerlaufdrehzahl (n0)..................350 min-1
Safety class ...................................... II
Degree of protection.........................IPX4
Working width ..........................360 mm
Max working depth............max. 180 mm
Number of tine wheels..........................4
Weight (m).................................. 8.6 kg

6
GB IE NI CY
Acoustic pressure level
(LpA)............... 76.9 dB(A), KpA = 2.5 dB
Sound power level (LWA)
Measured .. 90.97 dB(A), KWA = 2.31 dB
Guaranteed...........................93 dB(A)
Vibration at hand grip (ah).....2.886 m/s2
Kh= 1.5 m/s2
Noise and vibration values have been
determined according to the standards and
regulations named in the declaration of
conformity.
The stated vibration emission value was
measured in accordance with a standard
testing procedure and may be used to com-
pare one power tool to another.
The stated vibration emission value may
also be used for a preliminary exposure
assessment.
Warning:
The vibration emission value may
differ during actual use of the
power tool from the stated value
depending on the manner in which
the power tool is used.
Safety precautions aimed at protect-
ing the user should be based on
estimated exposure under actual
usage conditions (all parts of the
operating cycle are to be consid-
ered, including, for example, times
during which the power tool is
turned off and times when the tool
is turned on but is running idle).
Safety precautions
This section deals with the basic safety
regulations while working with the electric
tiller.
Symbols used in the manual
Warning symbols with
information on damage
and injury prevention.
Risk of burns!
Instruction symbols with infor-
mation on preventing dam-
age.
Unplug the machine.
Wear protective gloves when
carrying out maintenance
and cleaning work on the
tool to avoid injury from cuts.
Help symbols with informa-
tion on improving tool han-
dling.
Symbols on the implement
Caution!
Read the user manual.
Caution! Protect from
rain and damp.
Danger of injury from ob-
jects spinning off! Keep
surrounding persons away
form the hazard area.

7
CYNIIEGB
Caution! Switch off the tool
and disconnect it from the
mains before carrying out
any cleaning or mainte-
nance work.
Danger from damaged
mains cable! Keep mains
cables away from tines.
Danger of injury from rotat-
ing parts. The tines will con-
tinue to rotate after the tool
has been switched off. Wait
for them to stop moving.
Working width
Working depth
Run direction
dB
LWA Sound power level LWA in dB
Safety class II
(Double insulation)
Do not dispose of electri-
cal equipment in household
waste.
Caution!
Read the user manual.
Make sure that the cables
are correctly routed dur-
ing assembly.
General notes on safety
Warning! Improper use of
this tool may lead to serious
injury. Read this instruction
manual carefully before you
start working with the tool,
and familiarise yourself with
its controls.
If the power cable for this
equipment is damaged, it
must be replaced with a spe-
cial power cable, which is
available from the manufac-
turer or a customer service
agent of the same.
Please read the following
safety guidelines in order
to avoid risk of re, electric
shock, personal injury and
damage to objects:
Preparation:
• This appliance is not intended
for use by persons with reduced
physical, sensory or mental ca-
pabilities, or lack of experience
and knowledge, unless they
have been given supervision or
instruction concerning use of the
appliance by a person responsi-
ble for their safety.
• Children should be supervised
to ensure that they do not play
with the appliance.
• The equipment is to be used
only by people who are ad-
equately trained.
• Never allow children or other
persons unfamiliar with the user
manual to use the shredder. Lo-
cal regulations or bylaws may

8
GB IE NI CY
determine the minimum age for
using the device.
• Never use the tool while others,
especially children or pets, are
close by.
• Remember: the user is responsi-
ble for accidents involving other
people or their property.
• Familiarise yourself with han-
dling the tool and pay attention
to all possible dangers that may
be overheard while working
with the tool.
• Check the terrain on which
you will be using the tool, and
remove stones, sticks, wires or
other foreign objects that may
be caught up and spun off.
• Wear proper working clothes,
such as rm footwear with
non-slip soles and strong long
trousers. Do not use the tool
barefoot or wearing open-toed
sandals.
• Use personal protective equip-
ment. Always wear eye protec-
tion. Protective equipment such
as dust mask, non-skid safety
shoes, hard hat, or hearing
protection used for appropriate
conditions will reduce personal
injuries.
• To prevent injury from the tines,
only switch the tool on in its
working position.
• Examine the tool beforehand
every time you use it. Do not
use the tool when the safety
components (such as the power
safety catch or guard), cutting
parts or bolts are missing, worn
or damaged. In particular,
check the mains cable and
dead-man lever for damage.
• Only replace damaged bolts or
tines in complete sets to prevent
imbalance.
• Only use replacement and ac-
cessory parts delivered and
recommended by the manu-
facturer. Using foreign parts
will immediately lead to loss of
guarantee.
Working with the tool:
Keep your hands and feet
away from the tines while
working, especially when
starting up the tool – injury
hazard!
• Observe any noise-prevention
regulations and local by-laws.
• Do not use the tool to chop up
stones or till lawn soil, as such
use may damage the tool.
• Do not use the tool in rain, foul
weather or damp surroundings
(such as near garden ponds or
swimming pools). Only use in
daylight or good lighting condi-
tions.
• Be sensible. Do not use the tool
if you are tired or easily dis-
tracted, or after the use of alco-
hol or medicines. Take a break
as soon as you need one.
• Make sure that you are stand-
ing rmly when using the tool,
especially on slopes. If work-
ing on a slope, work along the
slope, not upwards or down-
wards. Be particularly careful
when changing direction on the
slope. Do not use the tool on
excessively steep slopes.
• If there is any danger of slip-

9
CYNIIEGB
ping on sloped ground, have a
second person secure the tool
with a rod or cable. The second
person should stand up the
slope at a safe distance from
the tool.
• Always hold the tool securely in
both hands while working with
it.
• Make sure that the grips are
dry and clean. Be careful while
moving backwards – danger of
tripping over!
• Take particular care when turn-
ing or raising the machine.
• If the chopping knife is blocked
by a foreign body, switch off
the equipment and disconnect
at the plug. Remove the foreign
body (e.g. root) before restart-
ing the equipment.
• Do not use the tool if it is dam-
aged, incomplete or altered
without the approval of the
manufacturer. In particular, do
not work with the tool if guards
or protection ttings are dam-
aged or missing.
• Do not overload the tool. Only
work in the performance range
stated. Do not use tools that do
not have sufcient power for
heavy jobs. Do not use the tool
for any use other than that in-
tended by the manufacturer.
• Avoid damage to the tool. Do
not apply extra weight and do
not drag the tool over hard sur-
faces such as tiles or steps.
• Remove plants and root remains
regularly in the area of the
drive shaft. Thus, you avoid an
overload and damage the appli-
ance.
• Watch out for special hazards
when working on difcult (Rocky,
hard or similar) soil.
Stopping work:
Warning! The tines will con-
tinue to turn for a few seconds
after you switch the tool off.
Wait until they have stopped
moving – injury hazard!
• Do not lift or transport the tool
while the motor is running. Turn
the tool off and wait for the tines
to stop moving, then disconnect
the tool from the mains before
changing the area you are work-
ing on.
• Never leave the tool unattended
where you were using it.
• Switch the tool off, wait for the
tines to stop moving and discon-
nect the tool from the mains un-
der the following circumstances:
- Always before leaving the tool.
- Before removing remnants of
soil and plants.
- When the tool is not in use.
- Before you conduct mainte-
nance or cleaning work on the
tool.
- If the mains cable is damaged
or caught up.
- If the tool collides with an ob-
stacle or starts to vibrate in an
unusual manner. In this case,
examine the tool for damage,
and have it repaired if neces-
sary.
• Use the tool away from am-
mable uids or gases. Failure to
do so may result in re or explo-
sion.

10
GB IE NI CY
Maintenance and storage:
• Make sure that all nuts, bolts
and screws are tight and that
the tool is in safe working or-
der.
• Do not attempt to repair the tool
yourself unless you are qualied
to do so. Return the tool to our
service centre to carry out any
work not listed in the user
manual.
• Keep the tool in a dry place out
of children’s reach.
• Be careful in handling the tool.
Keep the tines sharp and clean
to improve its working safety
and effectiveness.
• Follow the maintenance regula-
tions.
Electrical safety:
Warning! Do not use the tool
if the mains or extension ca-
ble is damaged – danger of
electrical shock.
• Keep the mains cable away
from the tines. Always trail the
mains cable behind you or the
person operating the tool. If the
cable becomes damaged dur-
ing use, immediately disconnect
it from the mains.
Never touch the mains cable
before unplugging it from the
mains.
• Make sure that the mains volt-
age matches the data on the
tool’s rating label.
• Avoid skin contact with earthed
objects such as metal fences
and posts.
• Make sure that the connector on
the extension cable is protected
from splash water, and is made
of rubber or has a rubber cover-
ing. Only use extension cables
that are intended for outdoor
use and are labelled as such.
Use extension cables with a
cable core diameter of at least
one square millimetre. Always
completely unwind the cable
reel before use. Check the ca-
ble for damage.
• Use the cable hanger tted for
the purpose when using an ex-
tension cable.
• Do not carry the tool by the ca-
ble. Do not unplug the cable by
tugging on it. Keep the cable
away from heat, oil and sharp
edges.
• Connect the appliance to a
power socket with a residual
current circuit breaker of rated
residual current no more than
30 mA.
Residual risks
Even if properly operating and han-
dling this electric tool, some residual
risks will remain. Due to its construc-
tion and build, this electric tool may
present the following hazards:
a) Cuts
b) Ear damage if working without
ear protection.
c) Damage to your health caused
by swinging your hands and
arms when operating the appli-
ance for longer periods of time
or if the unit is not held or main-
tained properly.

11
CYNIIEGB
Warning! During operation,
this electric tool generates an
electromagnetic eld which,
under certain circumstances,
may impair the functionality
of active or passive medical
implants. To reduce the risk
of serious or lethal injuries,
we recommend that per-
sons with medical implants
consult their doctor and the
manufacturer of their medical
implant before operating the
machine.
Assembly instructions
Always disconnect the tool
from the mains before con-
ducting any work on it.
While assembling the tool,
make sure that the mains
cable (2) does not become
caught and has enough
slack.
Fitting the grip tubing
B
1. Push the two fork grips (1a/1b)
into the plastic cross-plate (3),
and screw the plate into the
corresponding holes in the grip
tubing using the bolts provided
(13).
2. Screw both central tubes (4) onto
the fork handles (1a/1b). To do
this, push the enclosed screws
(14) inwards through the holes
and screw them in place with the
wing nuts (15).
3. Position the handle rod with the
pipe ends to the left and right
on the lower frame tubing (
A
6) and screw it in place with the
enclosed screws (14) and wing
nuts (15).
When assembled correctly, the
handle ends point away from the
equipment front with the ventilation
slits (see
A
7).
4. Fasten the mains cable (2) with
the cable clip supplied (5). Posi-
tion the cable clamp (5) on the
upper end of the centre spar (4).
Press the cable clamp (5) onto
the centre spar (4) and slide the
cable clamp (5) onto the round
part of the centre spar (4).
Operation
Observe noise-abatement laws and
local by-laws.
Switching on and off
Before switching the tool on,
make sure that the tool is not
touching any other objects
and hold it rmly in both
hands.
C
1. Plug the tool into the extension
cable.
2. Loop the end of the extension
cable and hang it onto the cable
tension relief (16) to ease the
tension on the cable.
3. Plug the tool into the mains.
4. Hang the extension cable onto
the belt clip (12) and fasten it to
your trouser belt.
5. To switch on, press the safety
release catch (17) and then
squeeze the dead-man lever

12
GB IE NI CY
(18). Release the safety release
catch (17).
The tines (
A
11) will begin to
rotate and dig themselves into
the earth.
6. To switch off, release the dead-
man lever (18).
Warning! The tines will
continue to turn for a
few seconds after the
tool has been switched
off. Do not touch the
rotating tines – injury
hazard!
Operating instructions
Alwayskeeparm
grip on the tool with
booth hands and watch
your feet. The tines (11)
may cause an accident.
Be careful while moving
backwards – danger of
tripping!
Do not touch the gear-
box, as it may become
hot during operation –
danger of burns!
Switch the tool off after work-
ing with it and for transport;
disconnect from the mains
and wait for the tines (11) to
stop moving.
To avoid damage to
the tool:
• Never lift or drag the tool
with the motor running.
• Lift the tool while moving it
over hard surfaces such as
tiles or steps.
• Walk the tool through the
soil at normal pace and in
a line as straight as
possible.
• Always work away from
the mains socket. Make
sure that the cable is kept
well away from the working
area. Hanging the cable
into the belt clip included in
the package will help.
Overload protection: The motor
will cut out immediately if overload-
ed. The tool cannot be used until it
has completely cooled down again.
Cleaning/Maintenance
Always return the tool to the
service centre for work not
described in the manual.
Only use original parts.
Switch the tool off, unplug it
from the mains, and wait for
the tines (11) to stop mov-
ing before carrying out any
maintenance or cleaning
work on the tool.
Perform regular maintenance and
cleaning on the tool. This will en-
sure long, reliable service.
General cleaning and
maintenance work
Do not spray the tool
down with water (es-
pecially not under pres-
sure), and do not clean
it under running water.

13
CYNIIEGB
Wear protective gloves when
carrying out maintenance
and cleaning work on the
tool to avoid injury from cuts.
Always clean the tool thoroughly after
each use. Always keep the tool clean. Do
not use cleaning uids or solvents.
• Remove any soil and dirt residues stuck
to the tines (11), driveshaft (10), tool
surface and vents (7) with a brush or
dry cloth.
• Spray or rub biodegradable oil into
the tines (11).
• Clean soiled grips with a damp cloth.
• Always check the tool for obvious dam-
age such as loose, worn or damaged
parts before using it. Check that all
nuts, bolts, and screws are tight.
• Check the covers and guards for dam-
age and correct t. Change them if
necessary.
Changing the tines
The tool is tted with four tine wheels that
can easily be changed in pairs. Both of the
tine-wheel pairs can be tted on the left or
right, as required.
Always change both
tine pairs at the same
time to avoid damage
to the tool from imbal-
ance.
Switch the tool off, unplug it
and wait for the tines to stop
turning.
D
1. Unscrew the hex bolt (19) and
the self-locking nut (20) on the
tine-wheel pair (11). To do this,
use two spanners
(SW13 / SW14).
2. Slide the tine-wheel pair off the
shaft (10).
3. Clean the driveshaft with
biological oil.
4. Slide the new tines onto the
driveshaft with the holes on the
axles aligned to the holes on the
driveshaft (see
D
).
Make sure that the tines are set to
their proper turning direction. The
arrows on the gearbox and tines
should point the same way
(see
D
).
5. Slide the hex bolt through the
hole and tighten on the self-lock-
ing nut (supplied with each new
tine wheel pair (see
D
).
Storage
• Leave the motor to cool down before
you put the tool into a closed space.
• Keep the tool clean, dry and out of the
reach of children.
• Do not cover the tool in plastic bags as
moisture may form.
E
Unscrew the wing nuts (15) and
fold the fork grips down to reduce
the space taken by the tool.
The frame tubing (6) also serves as
a hook to hang up the tool at the
place of storage.
Make sure that the cable does not
become jammed.
Do not use the tool
with the handle folded
closed. There is a risk of
injury!

14
GB IE NI CY
Disposal, environmental
protection
Be environmentally friendly. Return the
tool, accessories and packaging to a recy-
cling centre when you have nished with
them.
Do not dispose of electrical appli-
ances in household waste.
Return the tool to a recycling centre. The
plastic and metal parts used can be sepa-
rated and sorted for recycling. Ask our
service centre for details.
Spare Parts/Accessories
Spare parts and accessories can be obtained at
www.grizzly-service.eu
If you do not have internet access, please contact the Service Centre via telephone (see
“Sercice-Center” Page 16). Please have the order number mentioned below ready.
Set of tines Right/left ............................................................... Order No. 91104325

15
CYNIIEGB
Guarantee
Dear Customer,
This equipment is provided with a 3-year
guarantee from the date of purchase.
In case of defects, you have statutory rights
against the seller of the product. These
statutory rights are not restricted by our
guarantee presented below.
Terms of Guarantee
The term of the guarantee begins on the
date of purchase. Please retain the original
receipt. This document is required as proof
of purchase.
If a material or manufacturing defect
occurs within three years of the date of
purchase of this product, we will repair or
replace – at our choice – the product for
you free of charge. This guarantee requires
the defective equipment and proof of pur-
chase to be presented within the three-year
period with a brief written description of
what constitutes the defect and when it oc-
curred.
If the defect is covered by our guarantee,
you will receive either the repaired product
or a new product. No new guarantee pe-
riod begins on repair or replacement of the
product.
Guarantee Period and Statutory
Claims for Defects
The guarantee period is not extended by
the guarantee service. This also applies for
replaced or repaired parts. Any damages
and defects already present at the time of
purchase must be reported immediately af-
ter unpacking. Repairs arising after expiry
of the guarantee period are chargeable.
Guarantee Cover
The equipment has been carefully pro-
duced in accordance with strict quality
guidelines and conscientiously checked
prior to delivery.
The guarantee applies for all material and
manufacturing defects. This guarantee
does not extend to cover product parts that
are subject to normal wear and may there-
fore be considered as wearing parts (e.g.
Set of tines) or to cover damage to break-
able parts (e.g. switches).
This guarantee shall be invalid if the prod-
uct has been damaged, used incorrectly or
not maintained. Precise adherence to all of
the instructions specied in the operating
manual is required for proper use of the
product. Intended uses and actions against
which the operating manual advises or
warns must be categorically avoided.
The product is designed only for private
and not commercial use. The guarantee
will be invalidated in case of misuse or
improper handling, use of force, or inter-
ventions not undertaken by our authorised
service branch.
Processing in Case of Guarantee
To ensure quick handling of you issue,
please follow the following directions:
• Please have the receipt and identica-
tion number (IAN 291816) ready as
proof of purchase for all enquiries.
• Please nd the item number on the rat-
ing plate.
• Should functional errors or other de-
fects occur, please initially contact the
service department specied below by
telephone or by e-mail. You will then
receive further information on the pro-
cessing of your complaint.
• After consultation with our customer

16
GB IE NI CY
service, a product recorded as defec-
tive can be sent postage paid to the
service address communicated to you,
with the proof of purchase (receipt)
and specication of what constitutes
the defect and when it occurred. In or-
der to avoid acceptance problems and
additional costs, please be sure to use
only the address communicated to you.
Ensure that the consignment is not sent
carriage forward or by bulky goods,
express or other special freight. Please
send the equipment inc. all accessories
supplied at the time of purchase and
ensure adequate, safe transport pack-
aging.
Repair Service
For a charge, repairs not covered by the
guarantee can be carried out by our ser-
vice branch, which will be happy to issue
a cost estimate for you.
We can handle only equipment that has
been sent with adequate packaging and
postage.
Attention: Please send your equipment to
our service branch in clean condition and
with an indication of the defect.
Equipment sent carriage forward or by
bulky goods, express or other special
freight will not be accepted.
We will dispose of your defective devices
free of charge when you send them to us.
Service-Center
GB Service Great Britain
Tel.: 0871 5000 720
(£ 0.10/Min.)
IAN 291816
IE Service Ireland
NI
Service Northern Ireland
Tel.: 1890 930 034
(0,08 EUR/Min., (peak))
(0,06 EUR/Min., (off peak))
IAN 291816
CY Service Cyprus
Tel.: 8009 4409
IAN 291816
Importer
Please note that the following address is
not a service address. Please initially con-
tact the service centre specied above.
Grizzly Tools GmbH & Co. KG
Stockstädter Straße 20
63762 Großostheim
Germany
www.grizzly-service.eu

17
GR CY
Εισαγωγή
Συγχαρητήρια για την αγορά της νέας συ-
σκευής σας. Προτιμήσατε να αγοράσετε
ένα προϊόν ανώτερης ποιότητας.
Η ποιότητα αυτής της συσκευής ελέγ-
χθηκε κατά τη διάρκεια της παραγωγής,
αλλά και σε τελικό έλεγχο. Με τον τρόπο
αυτό εξασφαλίστηκε η λειτουργικότητα
της συσκευής σας. Δεν αποκλείεται σε
μεμονωμένες περιπτώσεις να βρίσκονται
στη συσκευή ή στους σωλήνες κατάλοιπα
νερού ή λιπαντικών. Το γεγονός αυτό δεν
αποτελεί ελάττωμα ή βλάβη της συσκευής
και δεν είναι καθόλου ανησυχητικό.
Οι οδηγίες χρήσης αποτελούν ανα-
πόσπαστο τμήμα αυτού του προϊ-
όντος. Περιέχουν σημαντικές υπο-
δείξεις για την ασφάλεια, τη χρήση
και διάθεση της συσκευής. Πριν τη
χρήση του προϊόντος να εξοικειωθεί-
τε με όλες τις οδηγίες χειρισμούς και
τις υποδείξεις ασφαλείας. Να χρη-
σιμοποιείτε το προϊόν μόνο όπως
περιγράφεται και μόνο για τον ανα-
φερόμενο σκοπό. Να φυλάξετε καλά
τις οδηγίες και να τις παραδώσετε σε
τρίτους μαζί με το προϊόν.
Σκοπός χρήσης
Η συσκευή προορίζεται για την εκσκαφή
και τη λείανση σβολώδους εδάφους και
την προσθήκη λιπάσματος, τύρφης και
υλικού βιοαποικοδόμησης στην οικιακή
περιοχή.
Οποιαδήποτε άλλη χρήση, η οποία δεν
εγκρίνεται ρητά μέσα από τις οδηγίες αυ-
τές, μπορεί να προκαλέσει ζημιές στη συ-
σκευή και να αποτελέσει σοβαρό κίνδυνο
για το χρήστη.
Περιεχόμενα
Εισαγωγή ............................................ 17
Σκοπός χρήσης .................................. 17
Γενική περιγραφή............................... 18
Παραδοτέα υλικά .............................. 18
Λειτουργικά εξαρτήματα ................... 18
Περιγραφή λειτουργίας .................... 18
Τεχνικά στοιχεία.................................. 19
Υποδείξεις ασφαλείας........................ 19
Σύμβολα στις οδηγίες ....................... 19
Επιγραφές πάνω στη συσκευή ........ 20
Γενικές υποδείξεις ασφαλείας .......... 20
Υπολειπόμενου κινδύνου ................. 25
Οδηγίες συναρμολό-
γησης................................................... 25
Συναρμολόγηση διαμήκων δοκίδων ..25
Χειρισμός ............................................ 26
Ενεργοποίηση και
απενεργοποίηση ............................. 26
Υποδείξεις εργασίας ......................... 26
Καθαρισμός/Συντήρηση .................... 27
Γενικές εργασίες καθαρισμού και
συντήρησης ...................................... 27
Ανταλλαγή λεπίδων .......................... 28
Ανταλλακτικά/Αξεσουάρ .................... 29
Αποθήκευση ....................................... 29
Απόσυρση/προστασία του
περιβάλλοντος.................................... 29
Εγγύηση .............................................. 30
Σέρβις επισκευής................................ 31
Service-Center .................................... 31
Εισαγωγέας......................................... 31
Μετάφραση της πρωτότυπης
Δήλωσης συμμόρφωσης CE............. 48
Επί μέρoυς σχεδιαγράμματα ........ 51/52

18
GR CY
Ο χειριστής ή χρήστης είναι υπεύθυνος
για ατυχήματα και ζημιές άλλων ανθρώ-
πων ή των περιουσιών τους.
Η συσκευή προορίζεται για χειρισμό από
ενήλικα άτομα. Παιδιά ή πρόσωπα που
δεν είναι εξοικειωμένα με τις οδηγίες αυ-
τές, απαγορεύεται να χρησιμοποιήσουν
τη συσκευή. Απαγορεύεται η χρήση της
συσκευής κατά τη διάρκεια της βροχής ή
σε νωπό περιβάλλον.
Ο κατασκευαστής δεν ευθύνεται για ζημιές
που προκλήθηκαν λόγω μη ενδεδειγμένης
χρήσης ή λόγω εσφαλμένου χειρισμού.
Γενική περιγραφή
Την απεικόνιση των σημαντι-
κότερων εξαρτημάτων λειτουρ-
γίας θα βρείτε στη σελίδα-φά-
κελλο.
Παραδοτέα υλικά
Βγάλτε προσεκτικά τη συσκευή από τη συ-
σκευασία και ελέγξτε αν τα ακόλουθα τεμά-
χια είναι πλήρη:
• Πλαίσιο κινητήρα με λεπίδες και δια-
μήκη δοκίδα.
• Δύο μεσαίες λαβές
• Δεξιά λαβή με ενεργοποιητή και στα-
θερά προσαρμοσμένο καλώδιο ηλε-
κτρικού ρεύματος
• Αριστερή λαβή
• Πλαστική εγκάρσια βέργα
• Αξεσουάρ συναρμολόγησης, σφιγκτή-
ρες καλωδίου και κλιπ ζώνης
• Οδηγίες χειρισμού
Λειτουργικά εξαρτήματα
A
1a Δεξιά λαβή με μοχλό εκκίνησης,
πλήκτρο απασφάλισης και αρ-
πάγη καλωδίου
1b Αριστερή λαβή
2 Καλώδιο ρεύματος
3 Πλαστική εγκάρσια βέργα
4 Δύο μεσαίες λαβές
5 mεγάλος σφιγκτήρας καλωδίου
6 Διαμήκης δοκίδα
7 Σχισμή εξαερισμού
8 Πλαίσιο κινητήρα
9 Κιβώτιο μετάδοσης κίνησης
10 Άξονας μετάδοσης κίνησης
11 Λεπίδες
12 Κλιπ για τη ζώνη
B
13 βίδες
14 συμπαραδιδόμενες βίδες
15 πτερυγωτά παξιμάδια
C
16 αρπάγη του καλωδίου
17 πλήκτρο απασφάλισης
18 μοχλό εκκίνησης
D
19 τη βίδα Άλλεν
20 αυτασφαλιζόμενο παξιμάδι
Περιγραφή λειτουργίας
Ο χειροκίνητος ηλεκτρικη τσάπά είναι
εξοπλισμένος με έναν ηλεκτρικό κινητήρα
που δε χρειάζεται συντήρηση και με ένα
μηχανισμό μετάδοσης κίνησης με λίπανση
μέσω εμβάπτισης. Ως διάταξη κοπής η
συσκευή διαθέτει τέσσερις περιστρεφόμε-
νες, σφυρηλατημένες λεπίδες που διεισ-
δύουν αυτόνομα στο έδαφος.
Οι αλουμινένιοι σωλήνες είναι πτυσσόμε-
νοι, για την ευκολότερη αποθήκευση της
συσκευής. Για τη λειτουργία των εξαρτη-
μάτων χειρισμού ανατρέξτε στις παρακά-
τω περιγραφές.

19
GR CY
Τεχνικά στοιχεία
Ηλεκτρικη τσάπά .................FGH 750 B2
Απόδοση κινητήρα (P) .................... 750 W
Ονομαστική τάση εισόδου
(U) ........................................ 230 V~, 50 Hz
Αριθμός στροφών εργασίας (n0) .. 350 min-1
Κατηγορία προστασίας ........................ II
Είδoς προστασίας ..............................IPX4
Εύρος εργασίας ............................360 mm
Ανώτατο βάθος εργασίας ..... μέγ. 180 mm
Αριθμός λεπίδων .....................................4
Βάρος (m) ........................................8,6 kg
Στάθμη ηχητικής πίεσης
(LpA) ..................... 76,9 dB(A); KpA = 2,5 dB
Επιτρεπόμενη στάθμη θορύβου (LWA)
εγγυημένη ....................................93 dB(A)
μετρημέvη ...... 90,97 dB(A); KWA = 2,31 dB
Δόνηση στη λαβή ......................2,886 m/s2
.............................................. Kh = 1,5 m/s2
Οι τιμές θορύβου και δόνησης διαπιστώ-
θηκαν σύμφωνα με τις προδιαγραφές και
οδηγίες που κατονομάζονται στη δήλωση
συμμόρφωσης.
H αφερόμενη τιμή μετάδοσης δόνησης
μετρήθηκε βάσει τυποποιημένης μεθόδου
δοκιμής και μπορεί να χρησιμοποιηθεί για
τη σύγκριση μίας ηλεκτρικής συσκευής με
μία άλλη.
Η αναφερόμενη τιμή μετάδοσης δόνησης
μπορεί επίσης να χρησιμοποιηθεί και για
αρχική εκτίμηση της έκθεσης.
Προειδοποίηση:
Η τιμή μετάδοσης της δόνησης
μπορεί να διαφέρει κατά την πραγ-
ματική χρήση της ηλεκτρικής συ-
σκευής από την αναφερόμενη τιμή,
ανάλογα με τον τρόπο χρήσης της.
Πρέπει να οριοσθούν μέτρα
ασφαλεάις για την προστασία του
χειριστή βασιζόμενα σε εκτίμηση
της έκθεσης κατά τη διάρκεια των
πραγματικών συνθηκών χρήσης
(εδώ να ληφθούν υπόψη τα πο-
σοστά του κύκλου λειτουργίας, για
παράδειγμα οι χρόνοι κατά τους
οποίους είναι απενεργοποιημένη
η συσκευή και οι χρόνοι κατά τους
οποίους είναι μεν ενεργοποιημένη
η συσκευή αλλά λειτουργεί χωρίς
φορτίο).
Υποδείξεις ασφαλείας
Αυτό το κεφάλαιο αναφέρεται στις βασικές
προδιαγραφές ασφαλείας κατά την εργα-
σία με τη συσκευή αυτή.
Σύμβολα στις οδηγίες
Σύμβολα κινδύνου με
στοιχεία για την πρόληψη
προσωπικών και υλικών
ζημιών.
Κίνδυνος εγκαύματος.
Σύμβολο υποχρέωσης με
στοιχεία για την πρόληψη ζη-
μιών.
Αποσυνδέστε το βύσμα δι-
κτύου.
Κατά τη διάρκεια εργασιών
καθαρισμού και συντήρησης
φοράτε προστατευτικά γάντια
για να μην κοπείτε.
Σύμβολο υπόδειξης με πλη-
ροφορίες για τον καλύτερο
χειρισμό της συσκευής.

20
GR CY
Επιγραφές πάνω στη συσκευή
Προσοχή!
Διαβάστε τις οδηγίες
χειρισμού.
Προσοχή! Προστα-
τεύετε τη συσκευή
από τη βροχή και την
υγρασία.
Κίνδυνος τραυματισμού
από εκσφενδονιζόμενα
τεμάχια! Απομακρύνετε τα
πρόσωπα που βρίσκονται
κοντά στη συσκευή από
την περιοχή κινδύνου.
Προσοχή! Πριν από
οποιεσδήποτε εργασίες
καθαρισμού και συντήρη-
σης απενεργοποιείτε τη
συσκευή και βγάζετε το φις
από την πρίζα.
Κίνδυνος από ελαττωματι-
κό καλώδιο ρεύματος. Κρα-
τάτε τα καλώδια σύνδεσης
μακριά από τις λεπίδες της
συσκευής.
Κίνδυνος τραυματισμού
από περιστρεφόμενα τεμά-
χια! Οι λεπίδες συνεχίζουν
να κινούνται και μετά την
απενεργοποίηση της συ-
σκευής. Περιμένετε μέχρι
η συσκευή ακινητοποιηθεί
εντελώς.
πλάτος εργασίας
βάθος εργασίας
Κατεύθυνση
dB
LWA Ένδειξη της επιτρεπόμενης
στάθμης θορύβου LWA σε dB.
Κατηγορία προστασίας II
(Διπλή μόνωση)
Μην πετάτε τις ηλεκτρικές
συσκευές στα σκουπίδια.
Προσοχή! Διαβάστε τις
οδηγίες χειρισμού.
Προσέξτε κατά τη συ-
ναρμολόγηση για τη σω-
στή διαδρομή του καλω-
δίου.
Γενικές υποδείξεις ασφαλείας
Προειδοποίηση! Η συσκευή
αυτή, αν δε χρησιμοποιηθεί
σωστά, μπορεί να προκα-
λέσει σοβαρούς τραυμα-
τισμούς. Πριν αρχίσετε να
εργάζεστε με τη συσκευή,
διαβάστε προσεκτικά τις
οδηγίες χειρισμού και εξοι-
κειωθείτε με όλα τα εξαρτή-
ματα χειρισμού.
Σε περίπτωση βλάβης του
καλωδίου αυτής της συσκευ-
ής, πρέπει να αντικαταστα-
θεί από ειδικό καλώδιο που
προσφέρει ο κατασκευαστής
ή το τμήμα του εξυπηρέτη-
σης πελατών.
Table of contents
Languages:
Other FLORABEST Tiller manuals

FLORABEST
FLORABEST FGH 709 User manual

FLORABEST
FLORABEST FGH 710 A1 Quick start guide

FLORABEST
FLORABEST FGH 710 A1 Owner's manual

FLORABEST
FLORABEST FLV 1300 A1 Owner's manual

FLORABEST
FLORABEST FGH 700 Installation and operating manual

FLORABEST
FLORABEST FGH 700/10 User manual

FLORABEST
FLORABEST FLV 1300 A2 User manual

FLORABEST
FLORABEST FGH 710 A1 Quick start guide

FLORABEST
FLORABEST FGH 700/9 User manual

FLORABEST
FLORABEST FGH 700/9 User manual