Francis-Barnett FBST User manual

Owner
Manual
Classic Electric Bicycle
FBST

2
DEALERSTAMP
FBST
FW
BATTERY SERIAL NUMBER:-
/
/ 20
PURCHASE DATE:-
DAY MONTH YEAR
DATATAG ID:-
DATATAG ETCH NUMBER:-
Register your Francis-Barnett
Electric Bicycle Warranty
online at batribike.com/
warranty-registration
Register your DATATAG online at
datatag.co.uk/cycle/validate.php
IMPORTANT PLEASE READ THIS MANUAL FULLY BEFORE USE
For your safety and to ensure a long and trouble free life of your Francis-Barnett
Electric bicycle, check the operation of brakes, lights, bell and gears,
and check tyre pressures are correct.
Also check all fasteners, including quick release mechanisms,
before every ride.
C
BICYCLE SERIAL NUMBER:-
S/N
S
T

3
Thank you for purchasing a Francis-Barnett Electric Bicycle
With care and correct usage your bicycle
will give many years of service.
Important
PLEASE CHARGE THE BATTERY
BEFORE FIRST USING THE BICYCLE
Even though the battery indicator will show charge this cannot be
relied upon until the battery has had the initial full charge.
1 ELECTRIC BICYCLE
1 BATTERY with 2 Keys
1 BATTERY CHARGER with UK Mains Lead
1 MANUAL
1 WARRANTY CARD
1 DATATAG Registration Certificate
Contents
Parts Identification ............................................ PAGE 4
Battery Care & Charging ...................................PAGE 6
Using the Power Assistance ............................. PAGE 8
Programmable Functions ................................. PAGE 15
Troubleshooting ................................................ PAGE 19
Cycle Computer Functions ............................... PAGE 20
Standard Bicycle Functions .............................. PAGE 23
Datatag ............................................................. PAGE 26
Maintenance Schedule ..................................... PAGE 28
Special Battery Features .................................. PAGE 30
Warranty ........................................................... PAGE 32
Specifications ................................................... PAGE 34
Certificate of Compliance ................................. PAGE 35
PACKAGE
CONTENTS

4
10
11
UNDERSIDE VIEW
OF BATTERY
DISPLAY
POWER
SWITCH
LEFT SIDE VIEW
OF BATTERY
31
30
32
9
3
4
1
2
8
7
2
5
6
LCD (Display)
1
Half-Grip Throttle
2
Rear Brake Lever
3
Front Brake Lever
4
Motor Cutout Switch
5
Gear Selector Levers
6
Bell
7
Gear Indicator
8
9
10
11
Front Tyre 26 x 1.75
Front LED Light
Front Vee Brake
Battery Security Lock
Front Rack
Battery
12
Battery Power Switch
13
Charging Socket
14
15
Controller Box
16
17
18
19
Fuse 20A
20
21
Rear Vee Brake
22
Datatag Label
Bicycle Serial Number
Battery Serial Number
Side Stand
Front Hub Motor
8 Spd Alfine Hub
Rear Tyre 26 x 1.75
23
Seat Height Adjuster
24
Rear Light Switch
25
26
Rear LED Light
27
28
29
Battery Power Meter
30
PARTS IDENTIFICATION
We continually strive to ensure that we provide you with
the best possible products, therefore
SPECIFICATIONS ARE SUBJECT TO CHANGE WITHOUT NOTICE
Handlebar Height Adjust
31
32
Power Check Button

5
16
13
18
19
21
12
LOWER PART OF
SEAT TUBE
OTHER
SIDE
27
26
25
24
15
17
14
23
22
20
19
16
15
12
26
27
25
14
17
LOWER PART
OF SEAT TUBE
OTHER
SIDE
18
21
22
20
23
24
13
29
28
RIGHT SIDE VIEW OF BATTERY

6
BATTERY CARE & CHARGING
Your Francis-Barnett Electric Bicycle uses a Lithium battery for it's power and the
following points will directly affect battery life and performance.
Storage
Batteries do not like to be stored in very hot or very cold conditions or to be
subject to conditions of high moisture. They also do not like to be left in a fully
discharged state. If Lithium batteries are left flat for an extended period they may
no longer be functional.
• Store your battery between 15º C and 25º C
in a dry area. (The conditions found in a
normal domestic house).
• If your bicycle is not in use for an extended
period it is imperative that you charge the
battery before storage and then charge the
battery once a month to prevent deterioration.
Charging
Lithium batteries do not like to be left discharged.
It is good practice to recharge as soon as is
reasonably possible after the battery goes flat.
We recommend charging after every ride, that
way your electric bike is always ready for your
next outing.
• Do not charge at temperatures below 0º C
• Switch off the battery before charging, using
switch located on the side of the battery.
• Battery can be charged on or off the bike.
• Always make sure the battery and charger
are on a non-flammable, dry surface away
from sources of heat, humidity and flammable
materials.
• Do not cover the battery
or charger whilst charging.
• Only use the charger
supplied with your battery.
• Even if not in use recharge
your battery a minimum of
once a month.
Removing the Battery
To remove the battery, switch off at the power
switch underneath the rear of the battery and
then unlock by turning the key anti-clockwise
and holding there whilst sliding out the battery
from the rear of the carrier. A handy inset
finger grip is provided to make this easier.
For Your Safety
• Keep battery away
from children
• Do not dismantle
• Do not pierce or crush
• Do not immerse in liquid
• Do not expose to
temperatures over 60ºC
• Do not short circuit the
battery connections
• Do not leave unattended
whilst charging
• Do not sleep near a
battery that is charging
Failure to adhere to these
Battery Care instructions
can allow the battery to
deteriorate and may pose
a serious risk of Fire

7
Using the Charger
Two types of battery charger are
used by Francis-Barnett. (Only one
will be supplied). Both have a charge
light which will display RED when
charging and change to GREEN
when the battery is charged.
The alternative type charger also has a second light
which shows RED when mains power is applied.
• Ensure the battery is switched off.
• Plug the charging lead into the battery.
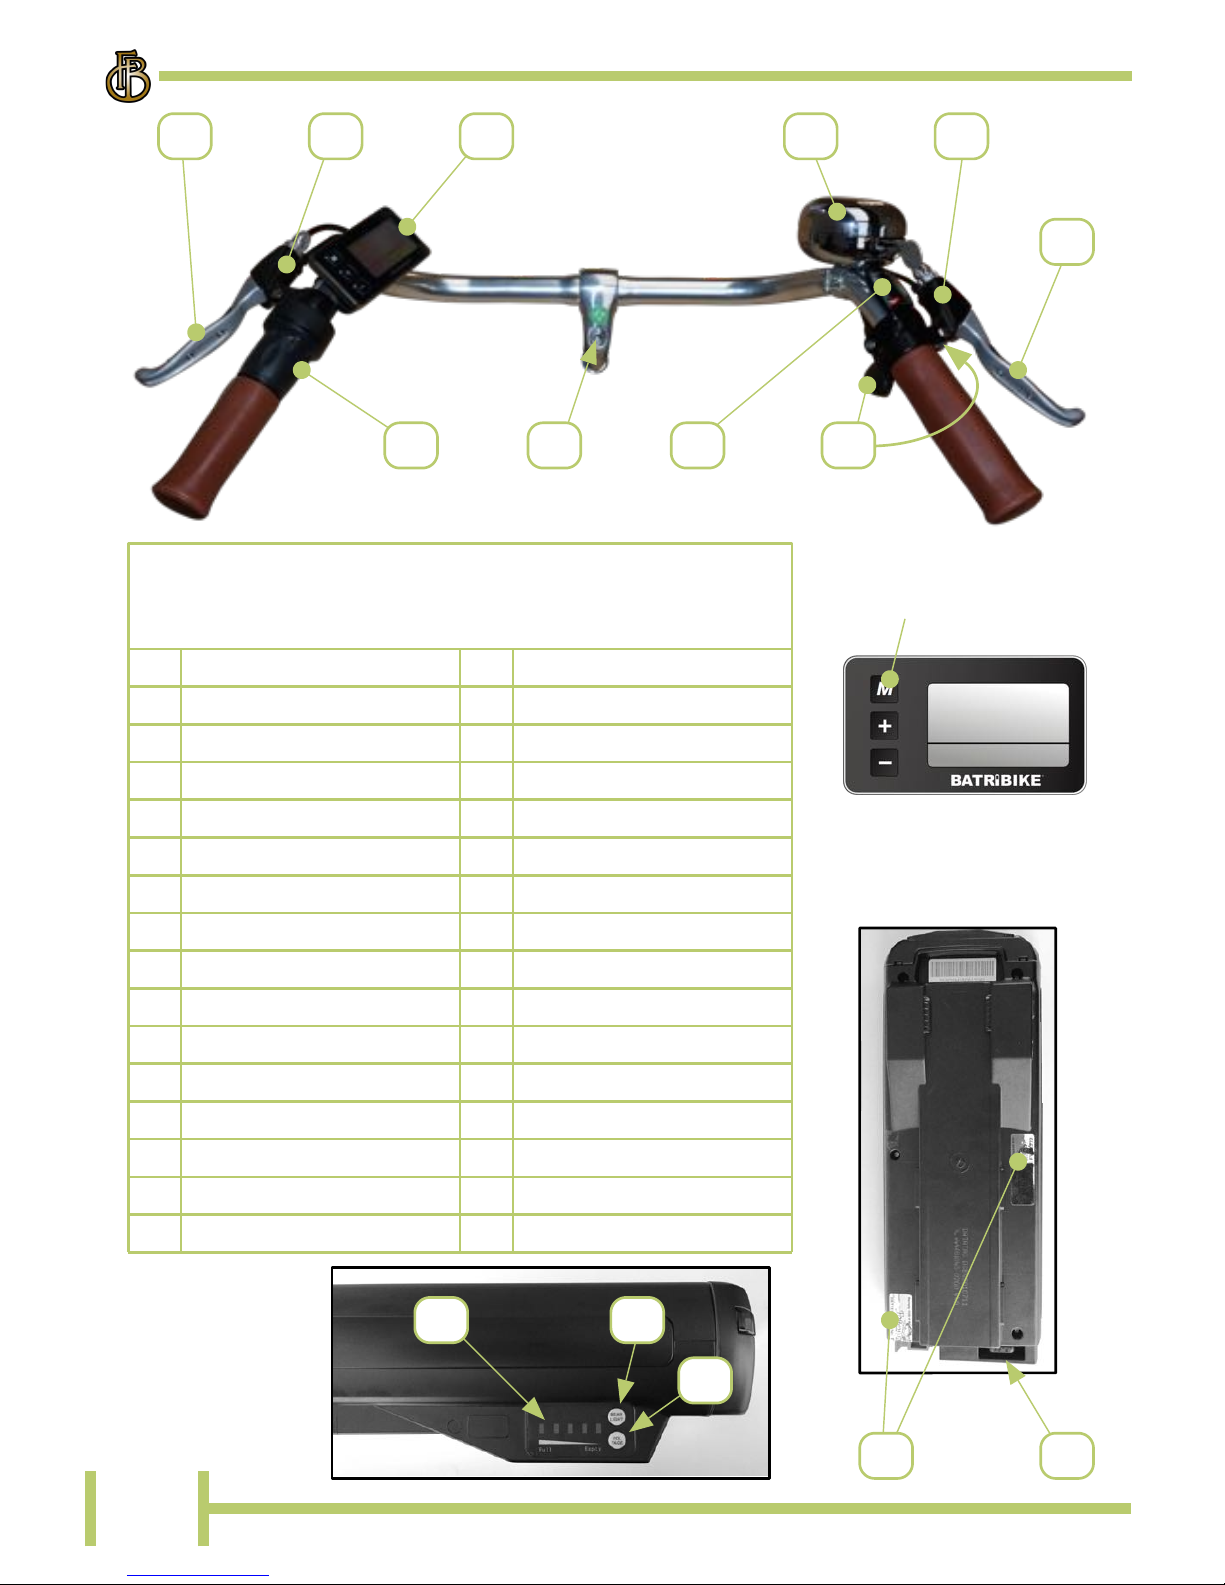
The charging lead plugs into the charging socket
located beneath the cover on the side of the battery
casing. It can only be inserted one way.
• Plug the charger into the mains socket and
switch on at the wall outlet.
• The lights on the charger will illuminate after a
few seconds.
When charging is complete the RED charge light will
change to GREEN. May take up to 6 hrs for flat battery.
• Once charged, switch off at the wall outlet and unplug.
• Disconnect the charging lead from the battery and
replace the cover over the charging socket.
The battery does not have to be completely discharged before it is recharged. The
Lithium battery has no "memory" and therefore can be charged at any time. It is
perfectly acceptable to recharge the battery after a short ride so that the battery is
fully charged before the next ride.
NOTE: If the battery is charged
and the charger left switched
on for an extended period the
alternative type charger will enter
a low power state, indicated by
both the RED and ORANGE/
GREEN LEDs flashing slowly.
Switch off and unplug as above.
IMPORTANT
Plug the charger into the battery
before switching on at the mains.
Similarly, switch off at the mains before
unplugging the charger from the battery.
DO NOT LEAVE PERMANENTLY
CONNECTED

8
Your Francis-Barnett Electric
Bicycle can be used as a normal
pedal cycle by simply not
switching on the battery.
(or using in Zero
Assist - see below)
Usage
Buttons
Display Information Areas
UP
MODE
DOWN
CYCLE
COMPUTER
FUNCTION
TYPE
BATTERY
STATUS
POWER
USAGE
Display Information Areas
ASSIST
LEVEL
DATA AREA
/ASSIST LEVEL

9
To use under electric power, switch on at
the power switch on the side of the battery,
then press the MODE button on the
handlebar LCD display.
Control Buttons
Switching On
ELECTRIC BICYCLE FUNCTIONS
By means of the three buttons, MODE, UP and
DOWN, on the handlebar mounted display unit,
the various functions of the power controller and
Cycle Computer can be utilised.
See the following sections for details.
To turn off the LCD and the power to the
bike, press and hold the MODE button for 2
seconds.
If the power is left on for an extended period
and the bike is not used, then the power will
automatically be turned off.
Switching Off

10
The LCD shows the charge remaining in the
battery in the lower right of the display. The
indicators will gradually go out as the battery
power is used up. Refer to the table below
for details.
Battery Meter
70 - 100%
SYMBOL
DISPLAYED
CHARGE
REMAINING
BATTERY METER DISPLAYS THE CHARGE REMAINING IN THE BATTERY
BATTERY IS
EXHAUSTED AND
SHOULD BE
RECHARGED AS
SOON AS POSSIBLE
50 - 70%
30 - 50%
15 - 30%
0 - 15%
FLASHING
Display Backlighting - Night Mode
Note: This also operates the front
LED light. (Where fitted)
TOGETHER
The LCD has a backlight for night time use. This is switched on by
pressing and holding the MODE and UP buttons together.
To turn the backlight off,
again press and hold the
MODE and UP buttons.

11
The top right large digits will normally display the current speed of
the bicycle. For the UK market this is set to show miles per hour
(MPH). The display is accurate to about 10% when the wheel size
is correctly calibrated and the tyre inflated as per the
manufacturers recommendations.
Speed Display
During normal use the display will also show the amount of power
(WATTS) being used by the motor.
This is shown in the lower right of the display.
Power Usage

12
There are 5 levels of pedal
assistance available from the motor.
Using the UP and DOWN buttons
you can select from Level 2 (ECO),
to Level 6 (BOOST). The motor will
then be activated upon pedalling. There is a rotation
sensor located near the crank which senses when the
pedals are being used.
Pedal Assistance
Please remember that the above values are provided as a guide.
Due to manufacturing tolerances the performance may vary.
PEDAL ASSISTANCE FROM THE MOTOR
28 miles
LEVEL
36 miles
RANGE (up to)
32 miles
Provides maximum power when
negotiating hills and head winds.
Great when needing to simply get from
A to B as fast as possible.
Great for commuting to work.
45 miles
EXAMPLE OF USAGE
50 miles
Normal Use Mode.
These are the levels to use for everyday
cycling. Gives good performance whilst
maximising usable range per charge.
Best for Leisure Use.
Use these lower power levels when
negotiating busy cycle paths and
crowded areas. Also use when setting
off and gradually increase through the
levels for a smoother performance.
Ideal for negotiating obstacles.

13
Weather and terrain will affect the performance. In hilly areas, or
when the bike is heavily loaded, there will be a significant increase
in the power used from the battery and hence the range will
decrease accordingly. A lightly loaded bike will achieve higher
performance levels. (These results were obtained by test riders in
optimal conditions - 75kg rider, level ground, no wind).
If the assistance level is set to ZERO, then the motor
will not be turned on. Your Francis-Barnett Electric
Bicycle will now act and feel like a normal bicycle.
This is useful when you are feeling fit at the start of a
journey or using your bike for exercise purposes.
Power is still only a button press away.
No Assistance - Normal Pedal Bicycle
In this mode the power will be controlled
by the throttle alone, (where fitted) and
the pedal rotation sensor will be turned
off.
Great for everyday use when you want
exercise, help is only a quick twist away.
Variable
Power
Delivery
THROTTLE CONTROL OF THE MOTOR
LEVEL
EXAMPLE OF USAGE
PERFORMANCE
The throttle is also available in pedal assist modes PAS 2 to PAS 6
to enable the user to override the power response to give a quick
boost of power when required. Great for overtaking slower riders.

14
BS EN15194 Compliance
The Francis-Barnett Electric range is compliant with BS EN15194.
For the British market, the addition of a throttle control has
rendered this not compliant in some countries.
●You are recommended to seek advice from the relevant
authorities in the country you are visiting before travelling.
Your Francis-Barnett Electric Bicycle has a
Walk Assist Mode. This is designed to propel
the bike under power at a low speed of 6 km/h
(4 MPH) and is ideal to help you when
pushing the bike up steep hills. It is not
designed for prolonged use or whilst riding.
Assisted Walking Mode (PUS)
THEN HOLD
PUS flashes
whilst in Walk
Assist mode.

15
As delivered the Francis-Barnett Electric range is set up to use
straight away in the most popular configuration, but there are a
number of functions which can be tailored to suit the individual
rider. These are user set as per the following sections.
Programmable Functions
TOGETHER
User Settings
To enter the User Settings press and hold
the UP (+) and DOWN (-) buttons
together for 2 seconds.
Press the MODE (M) button to select the
desired function and use the Up and
DOWN buttons again to select the
required value. A long press of the Mode
button will activate the setting and return
to normal bike display .
Three settings are available to the user:-
1. Backlight Level
2. Wheel Size
3. Speed Max
When in the settings mode the display will show SET
in the bottom right of the display.
Use of these settings is explained on the following pages.

16
Backlight Contrast
The backlight of the display can be set to one of three values. level
3 is the brightest, level 2 medium and level 1 is the lowest setting.
Adjust to suit for night time riding.
To change the level use the UP and
DOWN buttons. The display will show
the level at the top right of the
display.
TO CONFIRM SETTING
The display will
now change to the
next settings mode
OR
When the desired level is reached, press the MODE button to
accept and move to the next settings menu.

17
Wheel Size
OR
TO CONFIRM SETTING
The display will
now change to the
next settings mode
This menu is for setting the size of the wheel and tyre combination
so that the speed display is accurate.
The 26" x 1.75" tyres fitted to the Francis-Barnett Electric Bicycles
as supplied require a setting of 26 in
Replacement tyres rarely require a
change of setting.
DEFAULT
FBST and
FBCB
models
There is a Max Speed setting available on the User Menus. This
has no effect on the performance of the bike as the system
hardware has been internally set to cut off the motor
assistance at 25 km/h and cannot be overridden. The default
setting is 25 to comply with UK and EU Electric Bike Regulations.
Max Speed

18
DEALER SETTINGS - DO NOT ADJUST
BATTERY DISPLAY VOLTAGE
If you see any of the screens
shown on the right then you have
inadvertantly entered a dealer
configuration menu. You must not
edit any of these settings as they
will affect how your display shows
battery levels, and changes may
invalidate your warranty.
If you change any of the values by
mistake, please ensure that they
are set as shown.
To exit this menu, press and hold
the MODE (M) key on the display.
To exit and return to
normal display, press and
hold the MODE (M)
button.

19
TO EXIT
SETTINGS
The changes you made in the
three screens will be saved
and the display will return to
normal operating mode
THIS ACTION CAN BE PERFORMED FROM ANY OF THE SETTINGS SCREENS
TROUBLESHOOTING
The display can also show diagnostic information in the event of a
malfunction.
If an error occurs the
display will show a code
as in the example shown.
Make a note of the error
number and turn off the
bicycle power at both the
LCD & the battery switch.
After 2 minutes turn on the power again. If the code re-occurs
contact your dealer for assistance.
Diagnostic Error Messages

20
CYCLE COMPUTER
The Francis-Barnett Electric range has useful Cycle Computer
functions built in. There is a built in sensor and pickup located in
the rear hub which activates the speed and distance readings.
When first turned on
the display shows the
Speed (in MPH) in the
top right.
The assistance level
(PAS) is set to the
lowest level, (1 ECO).
To change the display to show the Average Speed, simply press
the MODE button. Repeat to show the other available functions as
shown below. The display will eventually return to SPEED display.
Display Sequence
Initial Display (SPEED)
Table of contents