manuals.online logo
Brands
  1. Home
  2. •
  3. Brands
  4. •
  5. Fromm&Starck
  6. •
  7. Projector Accessories
  8. •
  9. Fromm&Starck STAR PMW 01 User manual

Fromm&Starck STAR PMW 01 User manual

STAR_PMW_01
BEDIENUNGSANLEITUNG
INSTRUKCJA OBSŁUGI
NÁVOD K POUŽITÍ
MANUEL D´UTILISATION
ISTRUZIONI PER L‘USO
MANUAL DE INSTRUCCIONES
PROJECTOR MOUNT
expondo.de
USER MANUAL
18.12.2019
2 3
NAZWA PRODUKTU BEAMER HALTERUNG
PRODUKTNAME PROJECTOR MOUNT
PRODUCT NAME UCHWYT PROJEKTORA
NÁZEV VÝROBKU DRŽÁK NA PROJEKTOR
NOM DU PRODUIT SUPPORT POUR PROJECTEUR
NOME DEL PRODOTTO SUPPORTO PER PROIETTORE
NOMBRE DEL PRODUCTO SOPORTE PARA PROYECTOR
MODEL PRODUKTU
STAR_PMW_01
MODELL
PRODUCT MODEL
MODEL VÝROBKU
MODÈLE
MODELLO
MODELO
IMPORTEUR
EXPONDO POLSKA SP. Z O.O. SP. K.
IMPORTER
IMPORTER
DOVOZCE
IMPORTATEUR
IMPORTATORE
IMPORTADOR
ADRESSE VON IMPORTEUR
UL. NOWY KISIELIN-INNOWACYJNA 7, 66-002 ZIELONA GÓRA | POLAND, EU
IMPORTER ADDRESS
ADRES IMPORTERA
ADRESA DOVOZCE
ADRESSE DE L'IMPORTATEUR
INDIRIZZO DELL'IMPORTATORE
DIRECCIÓN DEL IMPORTADOR
CONTENT
CONTENT | INHALT | TREŚĆ | OBSAH | CONTENU | CONTENUTO | CONTENIDO
3
5
7
9
11
13
15
DE
BEDIENUNGSANLEITUNG
TECHNISCHE DATEN
Die Begrie „Gerät“ oder „Produkt“ in den Warnungen und
Beschreibung des Handbuchs beziehen sich auf < Beamer
Halterung >.
a) Bei Zweifeln, ob das Produkt ordnungsgemäß
funktioniert, oder wenn Schäden festgestellt werden,
wenden Sie sich bitte an den Kundendienst des
Herstellers.
b) Bewahren Sie die Gebrauchsanleitung für
den weiteren Gebrauch auf. Sollte das Gerät
an Dritte weitergegeben werden, muss die
Gebrauchsanleitung mit ausgehändigt werden.
c) Verpackungselemente und kleine Montageteile
außerhalb der Reichweite von Kindern aufbewahren.
d) Im Laufe der Nutzung dieses Werkzeugs
einschlieβlich anderer Werkzeuge soll man sich nach
übrigen Betriebsanweisungen richten.
e) Das Gerät ist kein Spielzeug. Kinder sollten in der
Nähe des Geräts unter Aufsicht stehen, um Unfälle
zu vermeiden.
f) Reparatur und Wartung von Geräten dürfen
nur von qualiziertem Fachpersonal und mit
Originalersatzteilen durchgeführt werden. Nur
so wird die Sicherheit während der Nutzung
gewährleistet.
g) Das Gerät muss regelmäßig gereinigt werden, damit
sich nicht dauerhaft Schmutz festsetzt.
h) Es ist untersagt, in den Aufbau des Geräts
einzugreifen, um seine Parameter oder Konstruktion
zu ändern.
i) Geräte von Feuer – und Wärmequellen fernhalten.
j) Überschreiten Sie nicht die maximale Belastung des
Produkts.
k) Die Fläche, an die das Produkt montiert werden soll,
muss dem Gewicht des Produkts zusammen mit dem
daran montierten Gerät standhalten (≥10kg).
l) Zwei Personen werden für die Installation des
Produkts sowie die Montage des Beamers benötigt.
Ein Herunterfallen oder eine unsachgemäße
Handhabung des Produkts und des Gerätes kann
zu Schäden am Gerät oder Verletzungen beim
Installateur führen.
m) Stellen Sie vor dem Bohren von Önungen für
Spreizdübel oder dem Eindrehen von Schrauben
in die Wand sicher, dass diese Tätigkeiten die
elektrischen Leitungen nicht beschädigen.
n) Die Montageäche darf keinen Vibrationen,
Verschiebungen oder Stößen ausgesetzt sein.
Parameter Werte
Produktname Beamer Halterung
Modell STAR_PMW_01
Winkeleinstellbereich der
Halterungsneigung entlang
der Führungsschienen [°]
-48~+59
Winkeleinstellbereich der
Halterungsneigung quer zu
den Führungsschienen [°]
links = 62
rechts = 70
Drehwinkel [°] 360
Maximale Belastbarkeit [kg] 10
Abstand zur Wand [mm] 340
Höhenverstellung [mm] 210
Abmessungen
(Länge x Höhe) [mm] 535x240
Gewicht [kg] 1,50
3. NUTZUNGSBEDINGUNGEN
Das Produkt ist für die Wandmontage und zum Halten
eines Beamers in einer ausgewählten Position vorgesehen.
Für alle Schäden bei nicht sachgemäßer Verwendung
haftet allein der Betreiber.
Gebrauchsanweisung beachten.
1. ALLGEMEINE BESCHREIBUNG
Diese Anleitung ist als Hilfe bei der sicheren und
zuverlässigen Nutzung gedacht. Das Produkt wurde strikt
nach den technischen Vorgaben und unter Verwendung
modernster Technologien und Komponenten sowie unter
Wahrung der höchsten Qualitätsstandards entworfen und
angefertigt.
VOR INBETRIEBNAHME MUSS DIE ANLEITUNG
GENAU DURCHGELESEN UND VERSTANDEN
WERDEN.
Für einen langen und zuverlässigen Betrieb des Geräts muss
auf die richtige Handhabung und Wartung entsprechend
den in dieser Anleitung angeführten Vorgaben geachtet
werden. Die in dieser Anleitung angegebenen technischen
Daten und die Spezikation sind aktuell. Der Hersteller
behält sich das Recht vor, im Rahmen der Verbesserung der
Qualität Änderungen vorzunehmen.
ERLÄUTERUNG DER SYMBOLE
HINWEIS! In der vorliegenden Anleitung sind
Beispielbilder vorhanden, die von dem tatsächlichen
Aussehen der Maschine abweichen können.
Die originale Anweisung ist die deutschsprachige Fassung.
Sonstige Sprachfassungen sind Übersetzungen aus der
deutschen Sprache.
2. NUTZUNGSSICHERHEIT
ACHTUNG! Lesen Sie alle Sicherheitshinweise und
alle Anweisungen durch. Die Nichtbeachtung der
Warnungen und Anweisungen kann zu schweren
Verletzungen bis hin zum Tod führen.
ACHTUNG! Obwohl das Gerät in Hinblick
auf Sicherheit entworfen wurde und über
Schutzmechanismen sowie zusätzlicher
Sicherheitselemente verfügt, besteht bei
der Bedienung eine geringe Unfall- oder
Verletzungsgefahr. Es wird empfohlen, bei der
Nutzung Vorsicht und Vernunft walten zu lassen.
18.12.2019
4 5DE EN
USER MANUAL
3.2. AUFBAU DES GERÄTES
1. Entfernen Sie die Abdeckung von der vertikalen
Führung.
2. Installieren Sie die vertikale Führung an der Wand:
a) Beton- oder Ziegelwand
b) Holzwand
3. Schieben Sie die horizontale Führung in die vertikale
Führung und verriegeln Sie sie mit dem Knopf in der
gewünschten Höhe.
4. Befestigen Sie die vier Arme mit den Schrauben
und Unterlegscheiben an der Halterung. Ziehen Sie
die Schrauben nicht bis zum Anschlag an, die Teile
sollten sich noch bewegen können.
3.4. REINIGUNG UND WARTUNG
a) Verwenden Sie zur Reinigung der Oberäche
ausschließlich Mittel ohne ätzende Inhaltsstoe.
b) Lassen Sie nach jeder Reinigung alle Teile gut
trocknen, bevor das Gerät erneut verwendet wird.
c) Bewahren Sie das Gerät an einem trockenen, kühlen,
vor Feuchtigkeit und direkter Sonneneinstrahlung
geschütztem Ort auf.
d) Zum Reinigen ist ein weicher, feuchter Lappen zu
verwenden.
e) Zum Reinigen darf man keine scharfen und/
oder Metallgegenstände (z.B. Drahtbürste oder
Metallspachtel) benutzen, weil diese die Oberäche
des Materials, aus dem das Gerät hergestellt ist,
beschädigen können.
3.1. GERÄTEBESCHREIBUNG
ACHTUNG: Die Explosionszeichnungen von diesem
Produkt benden sich auf den letzten Seiten der
Bedienungsanleitung S. 17-18.
5. Richten Sie die vier Arme an den Schraubenönungen
des Beamers aus. Befestigen Sie dann den Beamer
mit den Schrauben an den vier Armen. Ziehen Sie
die Schrauben und die Schrauben an den Armen
vollständig an.
6. Installieren Sie den Beamer mit dem
Halterungsgelenk am Führungshaken.
7. Ziehen Sie die vier Inbusschrauben des Gelenks mit
einem Schraubenschlüssel an.
3.3. EINSTELLEN DER POSITION/DES NEIGUNGSWINKELS
DER HALTERUNG
a) Lösen Sie die Gelenkschrauben, bevor Sie die
Einstellung vornehmen. Um die Höhe oder den
Abstand zur Wand einzustellen, lösen Sie die
Einstellregler für Höhe/Reichweite an den Führungen.
b) Stellen Sie die gewünschte Position/Neigungswinkel
der Halterung ein.
c) Ziehen Sie jede Schraube und/oder jeden
Einstellregler für Höhe/Reichweite an den Führungen
nach Abschluss der Einstellung an.
TECHNICAL DATA
Parameter description Parameter value
Product name Projector mount
Model STAR_PMW_01
The scope of the mount
angle adjustment along the
guides [°]
-48~+59
The scope of the mount
angle adjustment across the
guides [°]
left = 62
right = 70
Rotation angle [°] 360
Maximum load [kg] 10
Distance from the wall [mm] 340
Height adjustment [mm] 210
Dimensions
(length x height) [mm] 535x240
Weight [kg] 1.50
3. USE GUIDELINES
The product is designed for wall mounting and holding the
projector in a set position.
The user is liable for any damage resulting from
unintended use of the device.
3.1. DEVICE DESCRIPTION
Read instructions before use.
1. GENERAL DESCRIPTION
The user manual is designed to assist in the safe and
trouble-free use of the device. The product is designed
and manufactured in accordance with strict technical
guidelines, using state-of-the-art technologies and
components. Additionally, it is produced in compliance
with the most stringent quality standards.
DO NOT USE THE DEVICE UNLESS YOU HAVE
THOROUGHLY READ AND UNDERSTOOD THIS
USER MANUAL.
To increase the product life of the device and to ensure
a trouble-free operation, use it in accordance with this user
manual and regularly perform the maintenance tasks. The
technical data and specications in this user manual are
up to date. The manufacturer reserves the right to make
changes associated with quality improvement.
LEGEND
PLEASE NOTE! Drawings in this manual are for
illustration purposes only and in some details may
dier from the actual machine.
The original operation manual is in German. Other
language versions are translations from German.
2. USAGE SAFETY
ATTENTION! Read all safety warnings and all
instructions. Failure to follow the warnings and
instructions may result in serious injury or even
death.
The terms „device“ or „product“ are used in the warnings
and instructions to refer to < Projector mount >.
a) If you are unsure about whether the product is
operating correctly or if you nd damage, please
contact the manufacturer’s service centre.
b) Please keep this manual available for future
reference. If this device is passed on to a third party,
the manual must be passed on with it.
c) Keep packaging elements and small assembly parts
in a place not available to children.
d) If this device is used together with another
equipment, the remaining instructions for use shall
also be followed.
e) The device is not a toy. Children must be supervised
to ensure that they do not play with the device.
f) Device repair or maintenance should be carried out
by qualied persons, only using original spare parts.
This will ensure safe use.
g) Clean the device regularly to prevent stubborn grime
from accumulating.
h) It is forbidden to interfere with the structure of
the device in order to change its parameters or
construction.
i) Keep the device away from sources of re and heat.
j) The maximum load of the product must not be
exceeded.
k) The surface to which the product will be attached
must be able to withstand the weight of the product
together with the device mounted on it (≥10kg).
l) Two people should install the product and the
projector on it. Dropping or improper handling of
the product and the device mounted on it may cause
equipment damage or injury to the installer.
m) Before drilling holes for wall plugs and driving screws
into the wall, make sure that these activities will not
damage any electrical cables.
n) The mounting surface should not be subjected to
vibration, displacement or impact.
ATTENTION! Despite the safe design of the device
and its protective features, and despite the use of
additional elements protecting the operator, there
is still a slight risk of accident or injury when using
the device. Stay alert and use common sense when
using the device.
A
B
C
Erforderliche Werkzeuge, die nicht im Produkt enthalten
sind:
360° 180°
90°
A
B
C
D
E
F
G
HL N
M4x16 (x4) M4x40 (x4)
M6x16 (x4) M6x40 (x4)
M5x45 (x2) Ø8x40 (x2)
(x4)
M6 (x1)
M5x16 (x4)Ø5 (x4)Ø15x5,3x1,2 (x4)
18.12.2019
6 7
DANE TECHNICZNE
Przed użyciem należy zapoznać się z instrukcją
1. OGÓLNY OPIS
Instrukcja przeznaczona jest do pomocy w bezpiecznym
i niezawodnym użytkowaniu. Produkt jest zaprojektowany
i wykonany ściśle według wskazań technicznych przy
użyciu najnowszych technologii i komponentów oraz przy
zachowaniu najwyższych standardów jakości.
PRZED PRZYSTĄPIENIEM DO PRACY NALEŻY
DOKŁADNIE PRZECZYTAĆ I ZROZUMIEĆ
NINIEJSZĄ INSTRUKCJĘ.
Dla zapewnienia długiej i niezawodnej pracy urządzenia
należy dbać o jego prawidłową obsługę oraz konserwację
zgodnie ze wskazówkami zawartymi w tej instrukcji. Dane
techniczne i specykacje zawarte w tej instrukcji obsługi są
aktualne. Producent zastrzega sobie prawo dokonywania
zmian związanych z podwyższeniem jakości.
OBJAŚNIENIE SYMBOLI
UWAGA! Ilustracje w niniejszej instrukcji obsługi
mają charakter poglądowy i w niektórych
szczegółach mogą różnić się od rzeczywistego
wyglądu produktu.
Instrukcją oryginalną jest niemiecka wersja instrukcji.
Pozostałe wersje językowe są tłumaczeniami z języka
niemieckiego.
2. BEZPIECZEŃSTWO UŻYTKOWANIA
INSTRUKCJA OBSŁUGI
Termin „urządzenie” lub „produkt” w ostrzeżeniach
i w opisie instrukcji odnosi się do < Uchwyt projektora >.
a) W razie wątpliwości czy produkt działa poprawnie
lub stwierdzenia uszkodzenia należy skontaktować
się z serwisem producenta.
UWAGA! Przeczytać wszystkie ostrzeżenia
dotyczące bezpieczeństwa oraz wszystkie instrukcje.
Niezastosowanie się do ostrzeżeń i instrukcji może
spowodować ciężkie obrażenia ciała lub śmierć.
UWAGA! Pomimo iż urządzenie zostało
zaprojektowane tak aby było bezpieczne, posiadało
odpowiednie środki ochrony oraz pomimo użycia
dodatkowych elementów zabezpieczających
użytkownika, nadal istnieje niewielkie ryzyko
wypadku lub odniesienia obrażeń w trakcie pracy
z urządzeniem. Zaleca się zachowanie ostrożności
i rozsądku podczas jego użytkowania.
b) Zachować instrukcję użytkowania w celu jej
późniejszego użycia. W razie, gdyby urządzenie miało
zostać przekazane osobom trzecim, to wraz z nim
należy przekazać również instrukcję użytkowania.
c) Elementy opakowania oraz drobne elementy
montażowe należy przechowywać w miejscu
niedostępnym dla dzieci.
d) W trakcie użytkowania tego urządzenia wraz
z innymi urządzeniami należy zastosować się również
do pozostałych instrukcji użytkowania.
e) Urządzenie nie jest zabawką. Dzieci powinny być
pilnowane, aby nie bawiły się urządzeniem.
f) Naprawa oraz konserwacja urządzeń powinna być
wykonywana przez wykwalikowane osoby przy
użyciu wyłącznie oryginalnych części zamiennych.
Zapewni to bezpieczeństwo użytkowania.
g) Należy regularnie czyścić urządzenie, aby nie
dopuścić do trwałego osadzenia się zanieczyszczeń.
h) Zabrania się ingerowania w konstrukcję urządzenia
celem zmiany jego parametrów lub budowy.
i) Trzymać urządzenia z dala od źródeł ognia i ciepła.
j) Nie wolno przekraczać maksymalnego obciążenia
produktu.
k) Powierzchnia, do której będzie zamontowany produkt
musi być w stanie wytrzymać ciężar produktu wraz
z zamontowanym do niego urządzeniem (≥10kg).
l) Instalacji produktu oraz montażu projektora na
nim powinny dokonywać dwie osoby. Upuszczenie
lub niewłaściwe obchodzenie się z produktem
oraz urządzeniem do niego montowanym może
spowodować ich uszkodzenia lub obrażenia u osoby
montującej.
m) Przed wywierceniem otworów na kołki rozporowe
lub wkręceniem śrub w ścianę, należy upewnić się, że
czynności te nie uszkodzą przewodów elektrycznych.
n) Powierzchnia montażu nie powinna być narażona
na wibracje, przemieszczenie lub zagrożona
uderzeniem.
EN PL
Opis parametru Wartość parametru
Nazwa produktu Uchwyt projektora
Model STAR_PMW_01
Zakres kąta regulacji
pochylenia uchwytu wzdłuż
prowadnic [°]
-48~+59
Zakres kąta regulacji
pochylenia uchwytu
w poprzek prowadnic [°]
w lewo=62
w prawo=70
Kąt obrotu [°] 360
Maksymalne obciążenie [kg] 10
Odległość od ściany [mm] 340
Regulacja wysokości [mm] 210
Wymiary
(długość x wysokość) [mm] 535x240
Ciężar [kg] 1,50
3. ZASADY UŻYTKOWANIA
Produkt przeznaczony jest do montażu na ścianie
i utrzymywania projektora w wybranej pozycji.
Odpowiedzialność za wszelkie szkody powstałe
w wyniku użytkowania niezgodnego z przeznaczeniem
ponosi użytkownik.
3.1. OPIS URZĄDZENIA
3.2. ASSEMBLING THE APPLIANCE
1. Remove the cover from vertical guide.
2. Install the vertical guide on the wall:
a) Concrete or brick wall
b) Wooden wall
3. Slide the horizontal guide into the vertical guide and
lock it at the desired height using the knob.
4. Fasten the four arms to the mount with screws and
washers. Do not tighten the screws until they stop,
the parts should still be able to move relative to each
other.
5. Align the four arms with the screw holes on the
projector. Then mount the projector to the four arms
with the screws. Tighten the screws and screws on
the arms until they stop.
6. Install the projector on the guide hook using the
joint of the bracket.
7. Tighten the four hex socket head bolts with the
wrench.
3.3. ADJUSTMENT OF THE MOUNT POSITION / ANGLE.
a) Loosen the joint screws before starting adjustment.
To adjust the height or distance from the wall, loosen
the height/reach adjustment knobs on the guides.
b) Set the desired mount position / angle.
c) Tighten each screw and / or height / reach
adjustment knobs on the guides after adjustment.
ATTENTION! This product’s exploded view can be
found on the last pages of the operating instructions
(pp. 17-18).
A
B
C
D
E
F
G
HL N
M4x16 (x4) M4x40 (x4)
M6x16 (x4) M6x40 (x4)
M5x45 (x2) Ø8x40 (x2)
(x4)
M6 (x1)
M5x16 (x4)Ø5 (x4)Ø15x5,3x1,2 (x4)
Required tools not included with the product:
3.4. CLEANING AND MAINTENANCE
a) Use only non-corrosive cleaners to clean the surface.
b) After cleaning the device, all parts should be dried
completely before using it again.
c) Store the unit in a dry, cool place, free from moisture
and direct exposure to sunlight.
d) Use a soft, damp cloth for cleaning.
e) Do not use sharp and/or metal objects for cleaning
(e.g. a wire brush or a metal spatula) because they
may damage the surface material of the appliance.
360° 180°
90°
18.12.2019
8 9
TECHNICKÉ ÚDAJE
CZPL
3.2. MONTAŻ URZĄDZENIA
UWAGA: Rysunki złożeniowe produktu znajdują się
na końcu instrukcji na stronach: 17-18.
1. Zdjąć osłonę prowadnicy pionowej.
2. Zainstalować prowadnicę pionową do ściany
a) Ściana betonowa lub z cegły
b) Ściana drewniana
3. Wsunąć prowadnice poziomą w prowadnicę
pionową i zablokować ją na wybranej wysokości za
pomocą pokrętła.
4. Przymocować cztery ramiona do uchwytu za pomocą
śrub i podkładek . Nie dokręć śrub do oporu, części
powinny jeszcze móc poruszać się względem siebie.
5. Dopasować cztery ramiona, do otworów na
śruby w projektorze. Następnie za pomocą śrub
zamontować projektor do czterech ramion. Dokręć
całkowicie śruby oraz śruby na ramionach .
6. Zainstalować projektor na haku prowadnicy za
pomocą przegubu uchwytu.
7. Dokręć cztery śruby imbusowe przegubu za pomocą
klucza.
3.3. REGULACJA POŁOŻENIA/KĄTA NACHYLENIA
UCHWYTU
a) Poluzować śruby przegubu przed rozpoczęciem
regulacji. Aby regulować wysokość lub odległość
odsunięcia od ściany należy poluzować pokrętła
regulacji wysokości/wysięgu na prowadnicach.
b) Ustawić żądane położenie/kąt nachylenia uchwytu.
c) Dokręcić każdą śrubę lub/oraz pokrętła regulacji
wysokości/wysięgu na prowadnicach po zakończeniu
regulacji.
3.4. CZYSZCZENIE I KONSERWACJA
a) Do czyszczenia powierzchni należy stosować
wyłącznie środki niezawierające substancji żrących.
b) Po każdym czyszczeniu wszystkie elementy należy
dobrze wysuszyć, zanim urządzenie zostanie
ponownie użyte.
c) Urządzenie należy przechowywać w suchym
i chłodnym miejscu chronionym przed wilgocią
i bezpośrednim promieniowaniem słonecznym.
d) Do czyszczenia należy używać miękkiej, wilgotnej
ściereczki.
e) Do czyszczenia nie wolno używać ostrych i/lub
metalowych przedmiotów (np. drucianej szczotki lub
metalowej łopatki) ponieważ mogą one uszkodzić
powierzchnię materiału, z którego wykonane jest
urządzenie.
TECHNICKÉ ÚDAJE
Popis parametru Hodnota parametru
Název výrobku Držák na projektor
Model STAR_PMW_01
Rozsah nastavení úhlu
rukojeti podél kolejnic [°] -48~+59
Rozsah nastavení úhlu
rukojeti přes kolejnice [°]
vlevo = 62
vpravo = 70
Úhel natočení [°] 360
Maximální nosnost [kg] 10
Vzdálenost od stěny [mm] 340
Nastavení výšky [mm] 210
Rozměry
(délka x výška) [mm] 535x240
Hmotnost [kg] 1,50
3. ZÁSADY POUŽÍVÁNÍ
Výrobek je navržen pro montáž na zeď a držení projektoru
ve vybrané poloze.
Odpovědnost za veškeré škody vzniklé v důsledku
použití zařízení v rozporu s určením nese uživatel.
3.1. POPIS ZAŘÍZENÍ
Pojem „zařízení“ nebo „výrobek“ v bezpečnostních
pokynech a návodu se vztahuje na < Držák na projektor >.
Před použitím výrobku se seznamte s návodem.
1. VŠEOBECNÝ POPIS
Návod slouží jako nápověda pro bezpečné a spolehlivé
používání výrobku. Výrobek je navržen a vyroben přesně
podle technických údajů za použití nejnovějších technologií
a komponentů a za dodržení nejvyšších jakostních norem.
PŘED ZAHÁJENÍM PRÁCE SI DŮKLADNĚ PŘEČTĚTE
TENTO NÁVOD A UJISTĚTE SE, ŽE JSTE POCHOPILI
VŠECHNY POKYNY.
Pro zajištění dlouhého a spolehlivého fungování zařízení
provádějte pravidelný servis a údržbu v souladu s pokyny
uvedenými v tomto návodu. Technické údaje a specikace
uvedené v návodu k obsluze jsou aktuální. Výrobce si
vyhrazuje právo provádět změny pro zvýšení kvality.
VYSVĚTLENÍ SYMBOLŮ
POZOR! Obrázky v tomto návodu jsou ilustrační.
V některých detailech se od skutečného vzhledu
stroje mohou lišit.
Originálním návodem je německá verze návodu. Ostatní
jazykové verze jsou překladem z německého jazyka.
2. BEZPEČNOST POUŽÍVÁNÍ
POZNÁMKA! Přečtěte si tento návod včetně všech
bezpečnostních pokynů. Nedodržování návodu
a výstrah může způsobit těžký úraz nebo smrt.
a) Budete-li mít pochybnosti, zda výrobek funguje
správně, nebo zjistíte poškození, kontaktujte servis
výrobce.
b) Návod k obsluze uschovejte za účelem jeho
pozdějšího použití. V případě předánání zařízení
třetím osobám musí být spolu se zařízením předán
rovněž návod k obsluze.
c) Obalový materiál a drobné montážní prvky
uchovávejte na místě nedostupném pro děti.
d) Pokud společně s tímto nástrojem používáte nějaké
další nářadí, pak musíte dodržovat také jeho návod k
použití.
e) Zařízení není hračka. Dohlížejte na děti, aby si nehrály
se zařízením.
f) Opravu a údržbu zařízení by měly provádět
pouze kvalikované osoby za výhradního použití
originálních náhradních dílů. Zajistí to bezpečné
používání zařízení.
g) Pravidelně čistěte zařízení, aby nedošlo k trvalému
usazovaní nečistot.
h) Nezasahujte do zařízení s cílem změnit jeho
parametry nebo konstrukci.
i) Udržujte zařízení mimo zdroje ohně a tepla.
j) Nesmí být překročeno maximální zatížení výrobku.
k) Povrch, na který bude výrobek připevněn, musí být
schopen unést hmotnost výrobku spolu se zařízením
k němu připevněným (≥10kg).
l) Instalovat výrobek a projektor by měly dvě osoby.
Upuštění výrobku nebo nesprávná manipulace s
výrobkem či zařízením na něm namontovaným, může
způsobit poškození nebo zranění osoby provádějící
montáž.
m) Před vyvrtáním otvorů pro hmoždinky nebo
zašroubováním šroubů do zdi se ujistěte, že tyto
činnosti nepoškodí elektrické dráty.
n) Montážní plocha by neměla být vystavována
vibracím, posunutí ani nárazům.
POZNÁMKA! I když zařízení bylo navrženo tak, aby
bylo bezpečné, tedy má vhodné bezpečnostní prvky,
tak i přes použití dodatečné ochrany uživatelem při
práci se zařízením nadále existuje malé riziko úrazu
nebo poranění. Doporučuje se zachovat opatrnost
a zdravý rozum při jeho používání.
Wymagane narzędzia nie dołączone do produktu:
360° 180°
90°
D
E
F
G
HL N
M4x16 (x4) M4x40 (x4)
M6x16 (x4) M6x40 (x4)
M5x45 (x2) Ø8x40 (x2)
(x4)
M6 (x1)
M5x16 (x4)Ø5 (x4)Ø15x5,3x1,2 (x4)
A
B
C
18.12.2019
10 11CZ
MANUEL D‘UTILISATION
FR
3.2. MONTÁŽ ZAŘÍZENÍ
1. Sejměte kryt vertikálního vodítka.
2. Namontujte vertikální vodíko na stěnu
a) Betonová nebo cihlová zeď
b) Dřevěná zeď
3. Zasuňte horizontální vodítko do vertikálního vodítka
a zablokujte jej v požadované výšce knoíkem.
4. Upevněte čtyři ramena k rukojeti pomocí šroubů
a podložek. Neutahujte šrouby, dokud se nezastaví,
díly by se měly stále pohybovat vůči sobě navzájem.
5. Zarovnejte čtyři ramena s otvory pro šrouby na
projektoru. Poté namontujte projektor na čtyři
ramena pomocí šroubů. Utáhněte šrouby a šrouby
na ramenech.
6. Namontujte projektor na kolejnici pomocí kloubu
držáku.
7. Utáhněte čtyři šrouby s vnitřním šestihranem pomocí
klíče.
3.3. NASTAVENÍ POLOHY / ÚHLU KLIKY
a) Před zahájením seřízení povolte šrouby kloubu.
Chcete-li upravit výšku nebo vzdálenost od zdi,
uvolněte knoíky pro nastavení výšky / dosahu na
kolejnicích.
b) Nastavte požadovanou polohu / úhel rukojeti.
c) Po dokončení nastavení dotáhněte všechny
šrouby a knoíky pro nastavení výšky / dosahu na
kolejnicích.
3.4. ČIŠTĚNÍ A ÚDRŽBA
a) K čištění povrchu zařízení používejte výhradně
prostředky neobsahující žíravé látky.
b) Po každém čištění je nutno všechny prvky dobře
osušit, než bude zařízení opět použito.
c) Zařízení skladujte na suchém a chladném místě,
chráněném proti vlhkosti a přímému slunečnímu
svitu.
d) K čištění používejte měkký, vlhký hadřík.
e) K čištění nepoužívejte ostré ani kovové předměty
(například drátěný kartáč nebo kovovou obracečku),
protože mohou poškodit povrch materiálu, z něhož
je zařízení vyrobeno.
POZNÁMKA! Výkresy sestavení produktu jsou na
konci příručky na str. 17-18.
DÉTAILS TECHNIQUES a) En cas de doute quant au bon fonctionnement de
l‘appareil ou si vous constatez des dommages sur
celui-ci, veuillez communiquer avec le service client
du fabricant.
b) Conservez le manuel d’utilisation an de pouvoir
le consulter ultérieurement. En cas de cession de
l’appareil à un tiers, l’appareil doit impérativement
être accompagné du manuel d’utilisation.
c) Tenez les éléments d’emballage et les pièces de
xation de petit format hors de portée des enfants.
d) Lors de l’utilisation combinée de cet appareil avec
d’autres outils, respectez également les consignes se
rapportant à ces outils.
e) Cet appareil n‘est pas un jouet. Les enfants doivent
demeurer sous la supervision d’un adulte an qu’ils
ne jouent pas avec l’appareil.
f) La réparation et l‘entretien des appareils doivent être
eectués uniquement par un personnel qualié, à
l‘aide de pièces de rechange d‘origine. Cela garantit
la sécurité d’utilisation.
g) Nettoyez régulièrement l‘appareil pour en prévenir
l’encrassement.
h) Il est défendu de modier l’appareil pour en changer
les paramètres ou la construction.
i) Gardez le produit à l’écart des sources de feu et de
chaleur.
j) Ne dépassez pas la charge maximale du produit.
k) La surface destinée à la xation du produit doit avoir
la capacité de résister au poids du produit avec
dispositif qui y est xé (≥10kg).
l) L’installation du produit et du projecteur doit être
eectuée par deux personnes. La chute ou une
manipulation incorrecte du produit et de l‘appareil
peut entraîner des dommages ou des blessures chez
la personne qui l‘installe.
m) Avant de faire des trous pour les boulons d‘expansion
ou avant de visser les vis dans le mur, assurez-vous
que cela n‘endommagera pas les ls électriques.
n) La surface de montage ne doit pas être exposée aux
vibrations, aux mouvements ou aux chocs.
Description des paramètres Valeur des paramètres
Nom du produit Support pour projecteur
Modèle STAR_PMW_01
Plage d’angle de réglage de
l’inclinaison du support le
long des guides [°]
-48~+59
Plage d'angle de réglage de
l'inclinaison du support à
travers les guides [°]
vers la gauche = 62
vers la droite = 70
Angle de rotation [°] 360
Capacité de charge
maximale [kg] 10
Distance du mur [mm] 340
Réglage en hauteur [mm] 210
Dimensions
(longueur x hauteur) [mm] 535x240
Poids [kg] 1,50
3. CONDITIONS D’UTILISATION
Ce produit est destiné à être xé au mur et à maintenir le
projecteur dans la position souhaitée.
L’utilisateur porte l’entière responsabilité pour
l’ensemble des dommages attribuables à un usage
inapproprié.
3.1. DESCRIPTION DE L‘APPAREIL
Respectez les consignes du manuel.
1. DESCRIPTION GÉNÉRALE
L‘objectif du présent manuel est de favoriser une utilisation
sécuritaire et able de l‘appareil. Le produit a été conçu
et fabriqué en respectant étroitement les directives
techniques applicables et en utilisant les technologies et
composants les plus modernes. Il est conforme aux normes
de qualité les plus élevées.
LISEZ ATTENTIVEMENT LE PRÉSENT MANUEL ET
ASSUREZ-VOUS DE BIEN LE COMPRENDRE AVANT
LA PREMIÈRE UTILISATION.
An de garantir le fonctionnement able et durable de
l‘appareil, il est nécessaire d‘utiliser et d‘entretenir ce
dernier conformément aux consignes gurant dans le
présent manuel. Les caractéristiques et les spécications
contenues dans ce document sont à jour. Le fabricant se
réserve le droit de procéder à des modications à des ns
d’amélioration du produit.
SYMBOLES
ATTENTION! Veuillez lire attentivement toutes les
consignes de sécurité et toutes les instructions. Le
non-respect des avertissements et des consignes
de sécurité peut entraîner des blessures graves ou
la mort.
REMARQUE! Les illustrations contenues dans le
présent manuel sont fournies à titre explicatif. Votre
machine peut ne pas être identique.
La version originale de ce manuel a été rédigée en
allemand. Toutes les autres versions sont des traductions
de l‘allemand.
2. CONSIGNES DE SÉCURITÉ
Les notions d‘« appareil », de « machine » et de « produit
» gurant dans les descriptions et les consignes du manuel
se rapportent à/au < Support pour projecteur >.
ATTENTION ! Bien que l‘appareil ait été conçu en
accordant une attention spéciale à la sécurité et qu‘il
comporte des dispositifs de protection, ainsi que
des caractéristiques de sécurité supplémentaires,
il n’est pas possible d’exclure entièrement tout
risque de blessure lors de son utilisation. Nous
recommandons de faire preuve de prudence et de
bon sens lorsque vous utilisez l’appareil.
D
E
F
G
HL N
M4x16 (x4) M4x40 (x4)
M6x16 (x4) M6x40 (x4)
M5x45 (x2) Ø8x40 (x2)
(x4)
M6 (x1)
M5x16 (x4)Ø5 (x4)Ø15x5,3x1,2 (x4)
Požadované nářadí, které není součástí produktu:
360° 180°
90°
A
B
C
18.12.2019
12 13FR IT
ISTRUZIONI PER L’USO
3.2. MONTAGE DE L‘APPAREIL
1. Retirez le cache du guide vertical.
2. Installez le guide vertical au mur.
a) Mur en béton ou en brique
b) Mur en bois
3. Faites glisser le guide horizontal dans le guide
vertical et bloquez-le à la hauteur voulue à l‘aide du
bouton.
4. Fixez les quatre bras au support à l‘aide des vis et
des rondelles. Ne serez pas les vis à fond, les pièces
doivent pouvoir se déplacer l‘une par rapport à
l‘autre.
5. Alignez les quatre bras avec les trous à vis dans
le projecteur. Ensuite utilisez les vis pour xer le
projecteur sur les quatre bras. Serrez à fond les vis et
les vis sur les bras.
6. Fixez le projecteur sur le crochet de guide à l‘aide de
l’articulation du support.
7. Serrez les quatre vis à six pans creux de l‘articulation
à l‘aide de la clé.
3.3. RÉGLAGE DE LA POSITION / DE L’ANGLE DU SUPPORT
a) Desserrez les vis de l‘articulation avant de procéder
au réglage. Pour régler la hauteur ou la distance par
rapport au mur, desserrez les molettes de réglage en
hauteur/ de la portée sur les guides.
b) Réglez la position / l’angle d‘inclinaison souhaité du
support.
c) Une fois le réglage terminé, serrez chaque vis et/ou
molette de réglage en hauteur et / de la portée sur
les guides.
3.4. NETTOYAGE ET ENTRETIEN
a) Pour nettoyer les diérentes surfaces, n‘utilisez que
des produits sans agents corrosifs.
b) Laissez bien sécher tous les composants après
chaque nettoyage avant de réutiliser l’appareil.
c) Conservez l‘appareil dans un endroit propre, frais et
sec, à l‘abri de l‘humidité et des rayons directs du
soleil.
d) Il est conseillé de laver l’appareil uniquement avec un
chion mou et humide.
e) N’utilisez aucun objet présentant des arêtes
tranchantes, ni objet métallique (tels qu’une brosse
ou une spatule en métal) pour le nettoyage car ils
pourraient endommager la surface de l’appareil.
ATTENTION! Les vues éclatées de ce produit se
trouvent aux dernières pages du manuel d‘utilisation
p. 17-18.
a) In presenza di dubbi sul corretto funzionamento
del dispositivo o se ci sono dei danni, rivolgersi al
servizio clienti del produttore.
b) Conservare le istruzioni d‘uso per uso futuro. Nel
caso in cui il dispositivo venisse adato a terzi,
consegnare anche queste istruzioni.
c) Tenere gli elementi di imballaggio e le piccole parti
di assemblaggio fuori dalla portata dei bambini.
d) Durante l’impiego del dispositivo in contemporanea
con altri dispositivi, è consigliabile rispettare le altre
istruzioni d’uso.
e) Questo dispositivo non è un giocattolo. I bambini
devono essere sorvegliati anché non giochino con
il prodotto.
f) La riparazione e la manutenzione dell‘attrezzatura
devono essere eseguite esclusivamente da personale
specializzato qualicato e con pezzi di ricambio
originali. Ciò garantisce la sicurezza durante l‘uso.
g) Pulire regolarmente l‘apparecchio in modo da
evitare l‘accumulo di sporcizia.
h) È vietato intervenire sulla costruzione del dispositivo
per modicare i suoi parametri o la sua costruzione.
i) Tenere dispositivi lontano da fonti di fuoco e calore.
j) Il carico massimo del prodotto non deve essere
superato.
k) La supercie sulla quale il prodotto sarà montato
deve essere in grado di sopportare il peso di
quest‘ultimo, compreso il dispositivo ad esso
montato (≥10kg).
l) Il montaggio del prodotto e l‘installazione del
proiettore su di esso devono essere eettuati da due
persone. La caduta o l‘uso improprio del prodotto e
del dispositivo montato su di esso può causare danni
o lesioni all‘installatore.
m) Prima di realizzare i fori per i tasselli o di avvitare
le viti nella parete, assicurarsi che queste azioni non
danneggino il cablaggio elettrico.
n) La supercie di montaggio non deve essere esposta
a vibrazioni, movimenti o colpi.
Parametri - Descrizione Parametri - Valore
Nome del prodotto Supporto per
proiettore
Modello STAR_PMW_01
Angolo di regolazione
dell’inclinazione del supporto
lungo le guide [°]
-48~+59
Angolo di regolazione
dell’inclinazione del supporto
attraverso le guide [°]
a sinistra = 62
a destra = 70
Angolo di rotazione [°] 360
Capacità di carico massima [kg] 10
Distanza dal muro [mm] 340
Regolazione dell’altezza [mm] 210
Dimensioni
(lunghezza x altezza) [mm] 535x240
Peso [kg] 1,50
DATI TECNICI
Leggere attentamente le istruzioni.
1. DESCRIZIONE GENERALE
Queste istruzioni sono intese come ausilio per un uso sicuro
e adabile. Il prodotto è stato rigorosamente progettato
e realizzato secondo le disposizioni tecniche e l‘utilizzo
delle tecnologie e componenti più moderne, seguendo gli
standard di qualità più elevati.
PRIMA DELLA MESSA IN FUNZIONE È NECESSARIO
LEGGERE E COMPRENDERE LE ISTRUZIONI D‘USO
Per un funzionamento duraturo e adabile del
dispositivo bisogna assicurarsi di maneggiarlo e curarne
la manutenzione secondo le disposizioni presentate in
questo manuale. I dati e le speciche tecniche indicati in
questo manuale sono attuali. Il fornitore si riserva il diritto
di apportare delle migliorie nel contesto del miglioramento
dei propri prodotti.
SPIEGAZIONE DEI SIMBOLI
ATTENZIONE! LLe immagini in questo manuale
sono puramente dimostrative per cui i singoli
dettagli possono dierire dall‘aspetto reale
dell‘apparecchio.
Il manuale originale è stato scritto in tedesco. Le versioni in
altre lingue sono traduzioni dalla lingua tedesca.
2. SICUREZZA NELL‘IMPIEGO
ATTENZIONE! Leggere le istruzioni d‘uso e di
sicurezza. Non prestare attenzione alle avvertenze
e alle istruzioni può condurre a gravi lesioni
o addirittura al decesso.
Il termine „apparecchio“ o „prodotto“ nelle avvertenze
e descrizioni contenute nel manuale si riferisce alla/al <
Supporto per proiettore >.
ATTENZIONE! Anche se l‘apparecchiatura è
stata progettata per essere sicura, sono presenti
degli ulteriori meccanismi di sicurezza. Malgrado
l‘applicazione di queste misure supplementari di
sicurezza sussiste comunque il rischio di ferirsi. Si
raccomanda inoltre di usare cautela e buon senso.
3. CONDIZIONI D‘USO
Il prodotto è progettato per il montaggio a parete e per
mantenere il proiettore in una posizione desiderata.
L‘operatore è responsabile di tutti i danni derivanti da
un uso improprio.
3.1. DESCRIZIONE DEL DISPOSITIVO
D
E
F
G
HL N
M4x16 (x4) M4x40 (x4)
M6x16 (x4) M6x40 (x4)
M5x45 (x2) Ø8x40 (x2)
(x4)
M6 (x1)
M5x16 (x4)Ø5 (x4)Ø15x5,3x1,2 (x4)
Outils requis non inclus avec le produit:
360° 180°
90°
A
B
C
18.12.2019
14 15
MANUAL DE INSTRUCCIONES
IT ES
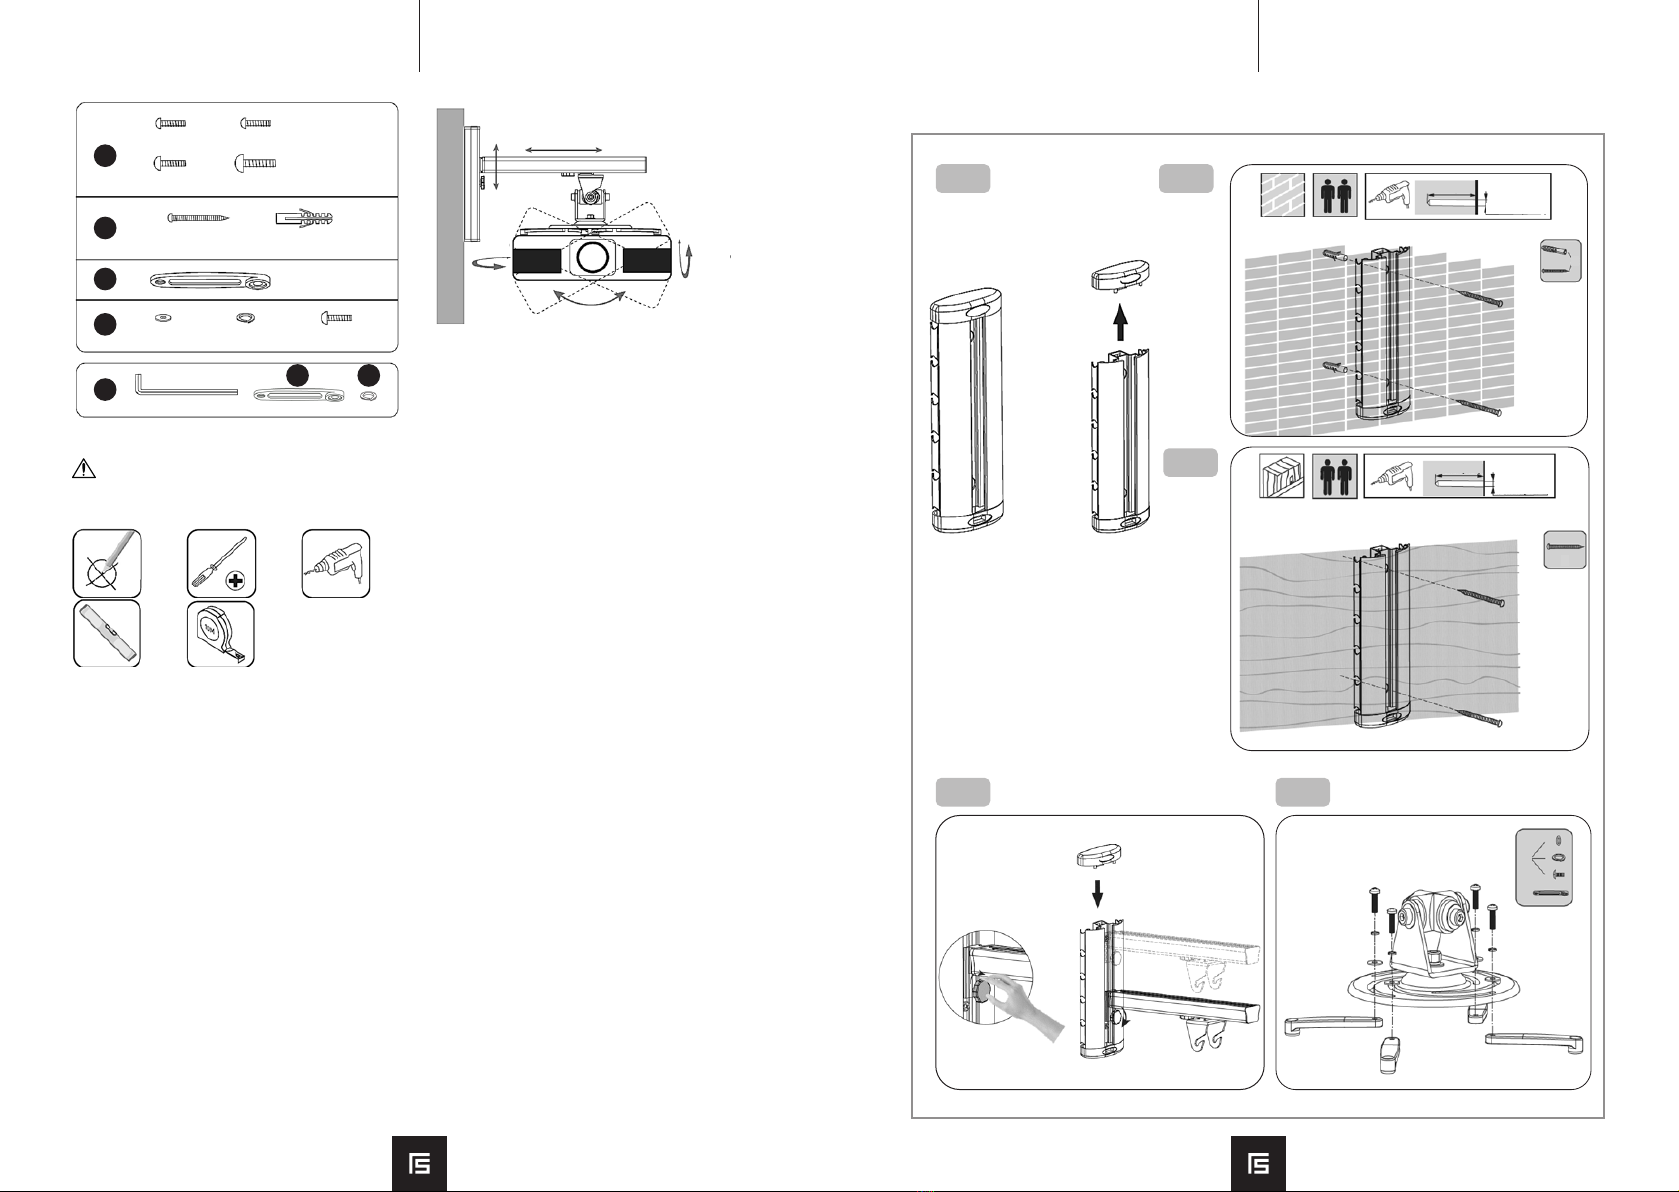
3.2. MONTAGGIO DEL DISPOSITIVO
1. Rimuovere la copertura dalla guida verticale.
2. Installare la guida verticale sul muro.
a) Parete in calcestruzzo o mattoni
b) Parete in legno
3. Far scorrere la guida orizzontale nella guida verticale
e bloccarla all‘altezza desiderata utilizzando la
manopola.
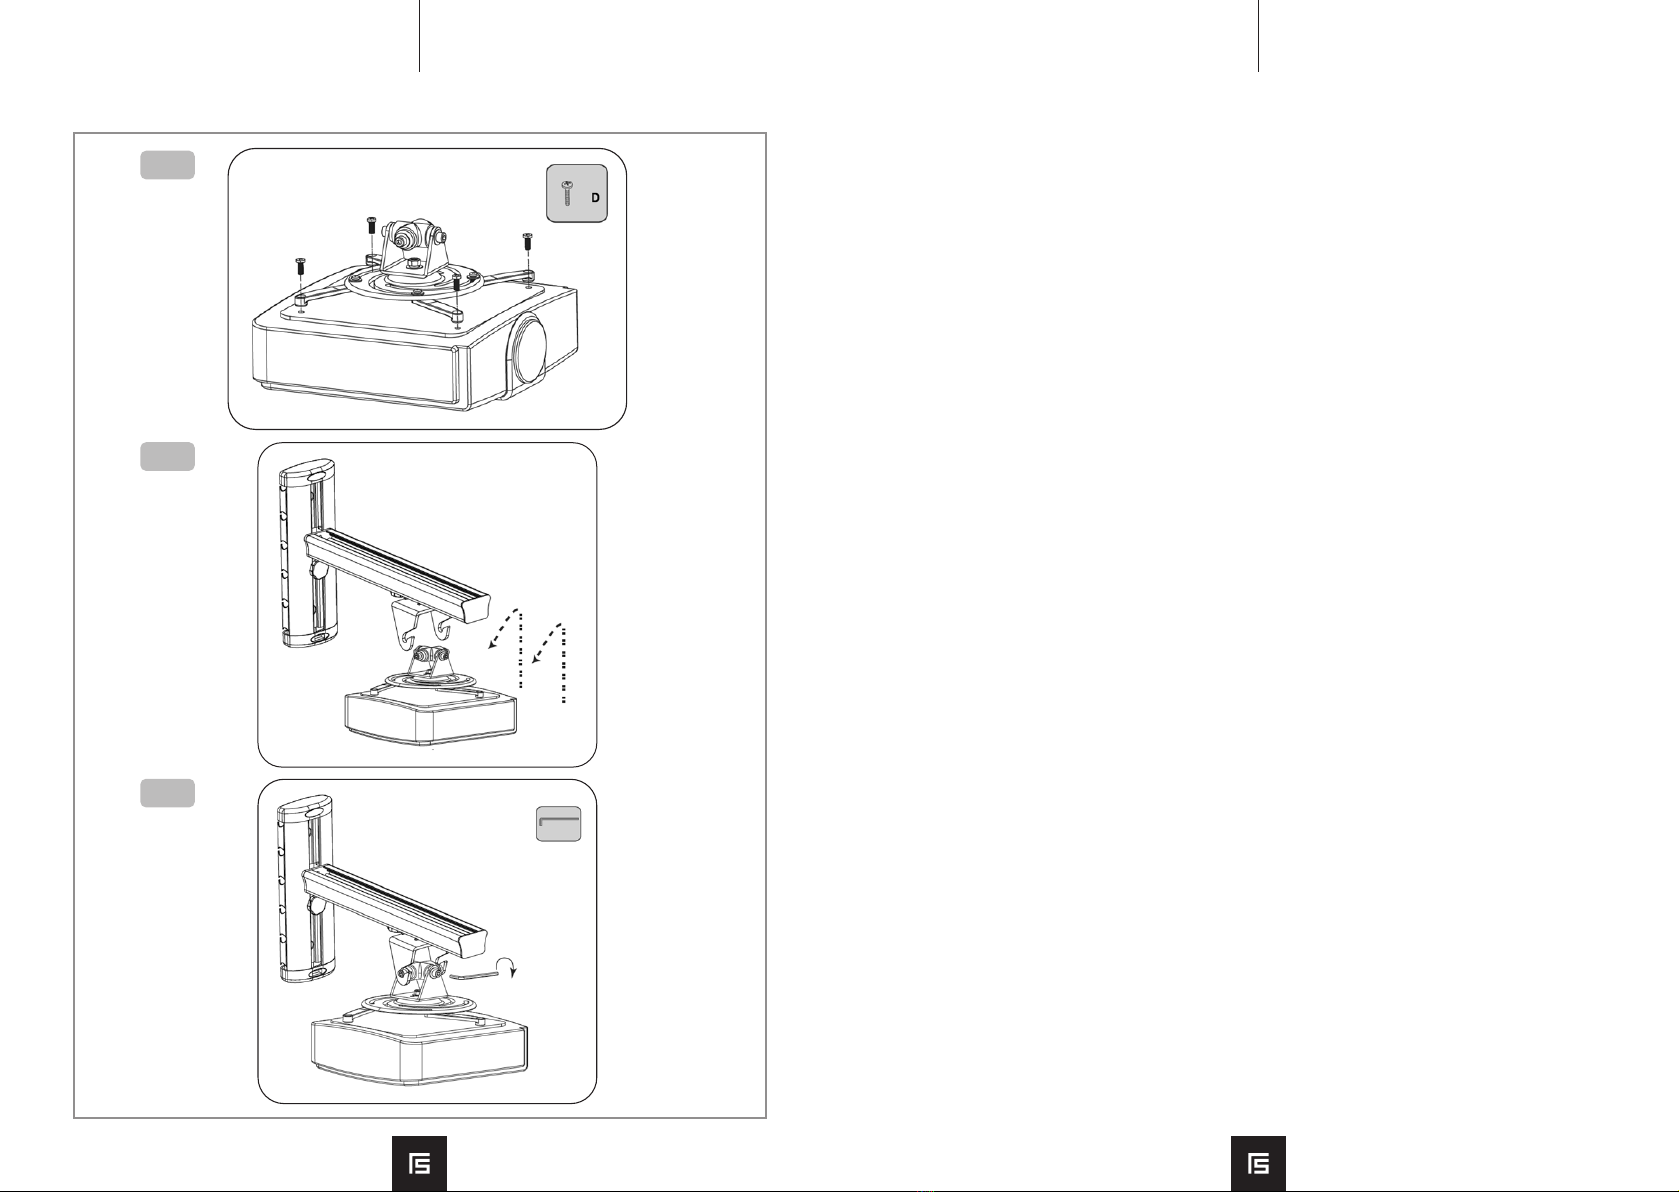
4. Fissare i quattro bracci al supporto utilizzando
i bulloni e le rondelle. Non serrare i bulloni no al
massimo, le parti dovrebbero essere comunque in
grado di muoversi l‘una rispetto all‘altra.
5. Allineare i quattro bracci con i fori per le viti del
proiettore. Quindi utilizzare i bulloni per montare
il proiettore sui quattro bracci. Serrare saldamente
i bulloni e i bulloni sulle braccia.
6. Installare il proiettore sul gancio della guida
utilizzando il giunto del supporto.
7. Serrare le quattro viti a brugola del giunto utilizzando
la chiave.
3.3. REGOLARE LA POSIZIONE/ANGOLO DEL SUPPORTO.
a) Allentare i bulloni di giunzione prima di procedere
alla regolazione. Per regolare l‘altezza o la distanza
dalla parete, allentare le manopole di regolazione
dell‘altezza/sovrapposizione sulle guide.
b) Regolare la posizione/angolo di inclinazione del
supporto desiderato.
c) Serrare le singole viti e/o manopole di regolazione
dell‘ altezza e/o sovrapposizione sulle guide al
termine della regolazione.
ATTENZIONE! Le viste esplose di questo prodotto
sono disponibili nell‘ultima pagina (17-18) del
manuale d´uso.
DATOS TÉCNICOS a) En caso de duda sobre si el producto funciona
correctamente o si detectara daños, póngase en
contacto con el servicio de atención al cliente del
fabricante.
b) Conserve el manual de instrucciones para futuras
consultas. Este manual debe ser entregado a toda
persona que vaya a hacer uso del dispositivo.
c) Los elementos de embalaje y pequeñas piezas de
montaje deben mantenerse alejados del alcance de
los niños.
d) Al utilizar este equipo junto con otros, también
deben observarse otras instrucciones de uso.
e) Este aparato no es un juguete. Debe controlar que
los niños no jueguen con él.
f) La reparación y el mantenimiento de los equipos
solo pueden ser realizados por personal cualicado
y siempre empleando piezas de repuesto originales.
Esto garantiza la seguridad durante el uso.
g) Limpie regularmente el dispositivo para evitar que la
suciedad se incruste permanentemente.
h) Se prohíbe realizar cambios en la construcción del
dispositivo para modicar sus parámetros o diseño.
i) Mantenga el dispositivo alejado de fuentes de fuego
o calor.
j) No se debe exceder la carga máxima del producto.
k) La supercie en la cual se instalará el producto debe
poder soportar el peso del producto junto con el
dispositivo colocado encima (≥10kg).
l) Tanto el producto como el proyector deben ser
instalados por dos personas. La caída o el manejo
incorrecto del producto y del dispositivo montado
encima pueden ocasionar daños o lesiones a la
persona encargada.
m) Antes de perforar agujeros para los pernos de
expansión y apretar los tornillos en la pared,
asegúrese de que estas actividades no dañen los
cables eléctricos.
n) La supercie de montaje no debe exponerse a
vibraciones, desplazamientos o impactos.
Parámetro - Descripción Parámetro - Valor
Nombre del producto Soporte para proyector
Modelo STAR_PMW_01
Rango de ajustes del ángulo
del mango a lo largo de las
guías [°]
-48~+59
Rango de ajustes del ángulo
del mango a través de las
guías [°]
hacia la izquierda = 62
hacia la derecha = 70
Ángulo de rotación [°] 360
Carga máxima [kg] 10
Distancia desde la pared
[mm] 340
Ajuste de altura [mm] 210
Dimensiones
(largo x alto) [mm] 535x240
Peso [kg] 1,50
3. INSTRUCCIONES DE USO
El producto está diseñado para instalarse en paredes y para
sostener el proyector en la posición deseada.
El usuario es responsable de los daños derivados de un
uso inadecuado del aparato.
3.1. DESCRIPCIÓN DEL APARATO
Conceptos como „aparato“ o „producto“ en las
advertencias y descripciones de este manual se reeren
a < Soporte para proyector >.
Respetar las instrucciones de uso.
1. DESCRIPCIÓN GENERAL
Este manual ha sido elaborado para favorecer un empleo
seguro y able. El producto ha sido estrictamente diseñado
y fabricado conforme a las especicaciones técnicas y para
ello se han utilizado las últimas tecnologías y componentes,
manteniendo los más altos estándares de calidad.
ANTES DE LA PUESTA EN FUNCIONAMIENTO,
LEA LAS INSTRUCCIONES MINUCIOSAMENTE
Y ASEGÚRESE DE COMPRENDERLAS.
Para garantizar un funcionamiento duradero y able del
aparato, el manejo y mantenimiento deben llevarse a cabo
de acuerdo con las instrucciones de este manual. Los
datos técnicos y las especicaciones de este manual están
actualizados. El fabricante se reserva el derecho de realizar
modicaciones para mejorar la calidad.
EXPLICACIÓN DE LOS SÍMBOLOS
¡ADVERTENCIA! En este manual se incluyen fotos
ilustrativas, que podrían no coincidir exactamente
con la apariencia real del dispositivo.
El texto en alemán corresponde a la versión original. Los
textos en otras lenguas son traducciones del original en
alemán.
2. SEGURIDAD
¡ATENCIÓN! Lea todas las instrucciones e
indicaciones de seguridad. La inobservancia de
las advertencias e instrucciones al respecto puede
provocar lesiones graves o incluso la muerte.
¡ATENCIÓN! Aunque en la fabricación de
este aparato se ha prestado gran importancia
a la seguridad, dispone de ciertos mecanismos de
protección extras. A pesar del uso de elementos
de seguridad adicionales, existe el riesgo de
lesiones durante el funcionamiento, por lo que se
recomienda proceder con precaución y sentido
común.
D
E
F
G
HL N
M4x16 (x4) M4x40 (x4)
M6x16 (x4) M6x40 (x4)
M5x45 (x2) Ø8x40 (x2)
(x4)
M6 (x1)
M5x16 (x4)Ø5 (x4)Ø15x5,3x1,2 (x4)
Utensili necessari non inclusi in dotazione:
A
B
C
360° 180°
90°
3.4. PULIZIA E MANUTENZIONE
a) Per pulire la supercie utilizzare solo detergenti
senza ingredienti corrosivi.
b) Dopo la pulizia, prima di riutilizzare l‘apparecchio,
asciugare tutte le parti.
c) Tenere l‘apparecchio in un luogo asciutto, fresco,
protetto dall‘umidità e dalla luce diretta del sole.
d) Per la pulizia utilizzare un panno morbido e umido.
e) Non utilizzare oggetti appuntiti o / e metallici (come
una spazzola o una spatola metallica) per la pulizia,
poiché potrebbero danneggiare la supercie del
materiale con cui è fatto il dispositivo.
18.12.2019
16 17ES
PRODUKTMONTAGE | PRODUCT ASSEMBLY | MONTAŻ PRODUKTU | MONTÁŽ PRODUKTU | MONTAGE
MONTAGGIO | MONTAJE
1 2a
2b
3
50mm(2“)
3.2. MONTAJE DE LA MÁQUINA
1. Retirar la cubierta de la guía vertical.
2. Instalar la guía vertical en la pared.
a) Pared de hormigón o de ladrillo
b) Pared de madera
3. Deslizar la guía horizontal en la guía vertical y
bloquear a la altura deseada con ayuda de la perilla.
4. Fije los cuatro brazos al mango con tornillos y
arandelas. No apriete los tornillos al máximo, las
piezas aún deben poder moverse una con respecto
a la otra.
5. Alinee los cuatro brazos con los oricios para
tornillos en el proyector. Después, instale el
proyector en los cuatro brazos, usando los tornillos.
Apriete al máximo los tornillos y los tornillos en los
brazos.
6. Instale el proyector en el gancho de la guía usando la
articulación del mango.
7. Apriete los cuatro tornillos de cabeza Allen con una
llave.
3.3. AJUSTE DE LA POSICIÓN / ÁNGULO DEL MANGO.
a) Aoje los tornillos de la articulación antes de iniciar
los ajustes. Para ajustar la altura o la distancia desde
la pared, aoje las perillas reguladoras de altura/
alcance en las guías.
b) Establezca la posición / ángulo deseado del mango.
c) Apriete cada tornillo y/o perillas reguladoras de
altura / alcance en las guías después de nalizar los
ajustes.
3.4. LIMPIEZA Y MANTENIMIENTO
a) Para limpiar la supercie, utilice solo productos que
no contengan sustancias corrosivas.
b) Después de cada limpieza, deje secar bien todas las
piezas antes de volver a utilizar el aparato.
c) Guarde el aparato en un lugar seco, fresco y
protegido de la humedad y la radiación solar directa.
d) Para su limpieza utilizar un paño húmedo y suave.
e) No utilizar para la limpieza objetos de metal
puntiagudos y/o alados (p.ej. cepillos metálicos
o espátulas de metal), ya que podrían dañar la
supercie del material del que está hecho el aparato.
¡ATENCIÓN! El despiece de este producto se
encuentra en las últimas páginas de las instrucciones
p. 17-18.
Ø8mm (0,31“)
E
E
30mm(1,2“)
Ø3mm (0,12“)
G
F
4
D
E
F
G
HL N
M4x16 (x4) M4x40 (x4)
M6x16 (x4) M6x40 (x4)
M5x45 (x2) Ø8x40 (x2)
(x4)
M6 (x1)
M5x16 (x4)Ø5 (x4)Ø15x5,3x1,2 (x4)
Herramientas requeridas no incluidas con el producto:
360° 180°
90°
18.12.2019
18 19
5
6
7
NOTES/NOTIZEN
D
H
CONTACT
expondo Polska sp. z o.o. sp. k.
ul. Nowy Kisielin-Innowacyjna 7
66-002 Zielona Góra | Poland, EU
e-mail: [email protected] expondo.de
UNSER HAUPTZIEL IST DIE ZUFRIEDENHEIT UNSERER KUNDEN!
BEI FRAGEN KONTAKTIEREN SIE UNS BITTE UNTER:
OUR CUSTOMERS‘ SATISFACTION IS OUR MAIN GOAL!
PLEASE CONTACT US WITH QUESTIONS AT:
NASZYM GŁÓWNYM CELEM JEST SATYSFAKCJA KLIENTÓW
W PRZYPADKU PYTAŃ PROSIMY O KONTAKT Z PRZEDSTAWICIELEM
W DANYM KRAJU:
NAŠÍM HLAVNÍM CÍLEM JE SPOKOJENOST NAŠICH ZÁKAZNÍKŮ! V PŘÍPADĚ
OTÁZEK NÁS PROSÍM KONTAKTUJTE NA:
NOTRE BUT PREMIER EST VOTRE SATISFACTION!
POUR TOUTE QUESTION, CONTACTEZ NOUS SUR:
NUESTRO OBJETIVO PRINCIPAL ES LA SATISFACCIÓN DE NUESTROS CLIENTES!
SI TIENE PREGUNTAS, POR FAVOR PÓNGANSE EN CONTACTO CON NOSTROS EN:
I NOSTRO PRINCIPALE OBIETTIVO È LA SODDISFAZIONE DEI NOSTRI CLIENTI!
PER EVENTUALI DOMANDE PER FAVORE, CI CONTATTINO SOTTO:

Other Fromm&Starck Projector Accessories manuals

Fromm&Starck STAR PMW 04 User manual

Fromm&Starck

Fromm&Starck STAR PMW 04 User manual

Fromm&Starck STAR PMW 07 User manual

Fromm&Starck

Fromm&Starck STAR PMW 07 User manual

Fromm&Starck STAR PS 04 User manual

Fromm&Starck

Fromm&Starck STAR PS 04 User manual

Fromm&Starck STAR PMW 06 User manual

Fromm&Starck

Fromm&Starck STAR PMW 06 User manual

Fromm&Starck STAR PS 04 User manual

Fromm&Starck

Fromm&Starck STAR PS 04 User manual

Fromm&Starck STAR PMW 04 User manual

Fromm&Starck

Fromm&Starck STAR PMW 04 User manual

Fromm&Starck STAR PS 03 User manual

Fromm&Starck

Fromm&Starck STAR PS 03 User manual

Fromm&Starck STAR PS 01 User manual

Fromm&Starck

Fromm&Starck STAR PS 01 User manual

Fromm&Starck STAR PMW 02 User manual

Fromm&Starck

Fromm&Starck STAR PMW 02 User manual

Fromm&Starck STAR CMGS 01 User manual

Fromm&Starck

Fromm&Starck STAR CMGS 01 User manual

Popular Projector Accessories manuals by other brands

infobit iShare Series user guide

infobit

infobit iShare Series user guide

Sharp AN-SV100T instruction manual

Sharp

Sharp AN-SV100T instruction manual

NOBOCOOL Kapture manual

NOBOCOOL

NOBOCOOL Kapture manual

Panasonic ET-PKE300 manual

Panasonic

Panasonic ET-PKE300 manual

Premier Mounts PDS-023 installation instructions

Premier Mounts

Premier Mounts PDS-023 installation instructions

Panasonic PressIT TY-WPSC1 operating instructions

Panasonic

Panasonic PressIT TY-WPSC1 operating instructions

Navitar 641MCL1028 installation instructions

Navitar

Navitar 641MCL1028 installation instructions

Techly ICA-PM 104 Installation instruction

Techly

Techly ICA-PM 104 Installation instruction

Da-Lite Dual Masking Electrol Instruction book

Da-Lite

Da-Lite Dual Masking Electrol Instruction book

Yealink WPP30 quick start guide

Yealink

Yealink WPP30 quick start guide

Maxon DE-35 user manual

Maxon

Maxon DE-35 user manual

XLT Systems XCU 190 installation instructions

XLT Systems

XLT Systems XCU 190 installation instructions

Navitar 567MC500 installation instructions

Navitar

Navitar 567MC500 installation instructions

LG AJ-LCF3 owner's manual

LG

LG AJ-LCF3 owner's manual

Oray OPTCOMTRIG1 manual

Oray

Oray OPTCOMTRIG1 manual

Navitar 648MCL1028 installation instructions

Navitar

Navitar 648MCL1028 installation instructions

Da-Lite 22516 installation instructions

Da-Lite

Da-Lite 22516 installation instructions

Navitar 646MCL1028 installation instructions

Navitar

Navitar 646MCL1028 installation instructions

manuals.online logo
manuals.online logoBrands
  • About & Mission
  • Contact us
  • Privacy Policy
  • Terms and Conditions

Copyright 2025 Manuals.Online. All Rights Reserved.