FUXON R-232 ND User manual

070-50190
BEDIENUNGSANLEITUNG FÜR
RÜCKLICHT »R-232 ND«
GB Manual for »R-232 ND« rear light NL Gebruiksaanwijzing voor »R-232 ND«
achterlicht FMode d’emploi pour »R-232 ND« Feu arrière IT Istruzioni per l’
uso »R-232 ND« fanale posteriore ES Instrucciones de funcionamiento de la luz
trasera del »R-232 ND«

DRÜCKLICHT »R-232 ND«
Technische Daten und Hinweise
uMit roten COB LEDs (24 St.) und Standlicht
über Kondensator
uGeprüft und zugelassen nach StVZO
uDie Rückstrahlerfläche des Rücklichts muss
senkrecht zur Fahrbahn und rechtwinklig
zur Fahrbahnlängsachse ausgerichtet sein.
uNennleistung: 0,6 W
uEingangspannung: 6V AC
ACHTUNG
Bei Ausfall einer Leuchtdiode muss die ge-
samte Leuchteinheit ausgetauscht werden!
Wichtig:
Schlussleuchte und Scheinwerfer dürfen nur
gemeinsam einzuschalten sein, wenn sie mit
Hilfe einer Lichtmaschine betrieben werden.
Diese Schlussleuchte ist zum Anschluss an
ein Frontlicht mit separater Ein- und Aus-
schalttechnik vorgesehen.
Anschluss des Rücklichts:
Ziehen Sie den Schlitten (+ und – ) aus dem Gehäuse (1), führen Sie die Kabel in die dafür
vorgesehenen Löcher ein und drücken die Kabelaufnahme wieder in das Gehäuse (2).
Befestigung des Rücklichts:
uAnbauhöhe: 250-1200 mm
uBefestigen Sie das Rücklicht mit den dafür
vorgesehenen Schrauben, Muttern und
Unterlegscheiben, am Fahrradgepäckträger.
uBei der Befestigung des Rücklichtes ist
darauf zu achten, dass die Schrauben nur
so fest angezogen werden, dass sich das
Licht nicht von selbst verstellen kann.
Achten Sie
vor jeder
Fahrt darauf,
dass das
Rücklicht
nicht ver-
deckt wird.
1
3
2
Schraube:
M5 x 15
Power cable + Power cable -
Schlitten Schlitten
R-232
DC AC 6 V 0,6 W
R-232
DC AC 6 V 0,6 W
R-232
DC AC 6 V 0,6 W
Power cable + Power cable -
R-232
DC AC 6 V 0,6 W
24 COB LED
Input
Fahrzeug-
längsachse
COB Ring rot (24 St.)
IA 150R00 0005
K 1759
K 1793

REAR LIGHT »R-232 ND« GB
Technical facts and references
uWith red COB LEDs (24 pcs), standlight via
capacitor
uTested and approved in accordance with
the German Road Traffic Licensing Regula-
tions (StVZO)
uThe reflector surface of the taillight must
be oriented vertically to the road and at a
right angle to the longitudinal axis of the
road.
uNominal performance: 0,6 W
uInput voltage: 6V AC
PLEASE NOTE
If an LED fails, the entire light unit must
be replaced!
Important:
Rear-light and headlamp must only be
switched on at the same time in case they
are run by one alternator.
This rear-light should only be connected to a
frontlight with separate on and off techno-
logy.
Connecting the rear-light:
Pull the + and – slide-appliance out of the housing (1), insert the designated cables in the
particular port and then push the slide-appliance back into the housing again (2).
Atachment of the rear-light:
uMounting hight: 250-1200 mm
uAttach the rear light with the designated
screws,nuts and washers to the carrier of
the bicycle.
uWhen attaching the tail light, make sure
that the screws are tightened so tightly
that the light can not.
Before every
journey, en-
sure that the
headlight is
not covered.
1
3
2
vehicle`s longitu-
dinal axis
Screw:
M5 x 15
Power cable + Power cable +
Power cable - Power cable -
Slide Slide
R-232
DC AC 6 V 0,6 W
R-232
DC AC 6 V 0,6 W
R-232
DC AC 6 V 0,6 W
R-232
DC AC 6 V 0,6 W
24 COB LED
Input
COB Ring rot (24 St.)
IA 150R00 0005
K 1759
K 1793

NL ACHTERLICHT »R-232 ND«
Technische gegevens en aanwijzingen
uMet rode COB LED‘s (24 stuk) en
parkeerlicht via condensator
uGekeurd en goedgekeurd volgens StVZO
uHet oppervlak van de achterlamp moet ver-
ticaal ten opzichte van de rijbaan en in een
rechte hoek ten opzichte van de lengteas
van de rijbaan zijn uitgelijnd.
uVermogen: 0,6 W
uInvoerspanning: 6V AC
OPGELET
Als er een lichtgevende diode uitvalt, moet de
volledige lampunit worden vervangen!
Belangrijk:
Het mag niet mogelijk zijn het achterlicht en
het koplicht samen in te schakelen, tenzij ze
met één dynamo worden bediend.
Deze achtergrondverlichting is bedoeld voor
aansluiting op een koplamp met aparte in- en
uitschakelingstechniek.
De verlichting monteren:
Trek de slede (+ en - ) uit de behuizing (1), steek de kabels in de daarvoor bestemde gaten en
duw de kabelhouder terug in de behuizing (2).
Bevestiging van het achterlicht:
uMontagehoogte: 250-1200 mm
uBevestig het achterlicht aan de fietsen-
drager met de meegeleverde schroeven,
moeren en ringen.
uLet er bij het bevestigen van het achter-
licht op dat de schroeven alleen worden
aangedraaid, zodat het licht zich niet kan
aanpassen.
Let er voor
iedere rit
op dat de
schijnwerper
niet wordt
bedekt.
1
3
22
Schroef: M5
x 15
Power cable + Power cable -
Sleden Sleden
R-232
DC AC 6 V 0,6 W
R-232
DC AC 6 V 0,6 W
R-232
DC AC 6 V 0,6 W
Power cable + Power cable -
R-232
DC AC 6 V 0,6 W
24 COB LED
Input
Langsas van
het voertuig
COB Ring rood (24 stuk)
IA 150R00 0005
K 1759
K 1793

FEU ARRIÈRE »R-232 ND« F
Données techniques et recommandations
uAvec COB LED rouges (24 pièce) et un feu
de stationnement par condensateur
uTesté et homologué selon les exigences de
circulation routière allemande (StVZO)
uLa surface du catadioptre de la lumière
arrière doit être perpendiculaire à la route
et à l‘axe longitudinal de la chaussée.
uPuissance: 0,6 W
uTension d‘alimentation: 6V AC
ATTENTION
Si une diode électroluminesce te tombe en
panne, toute l‘unité d‘éclairage doit être
remplacée !
Important :
Il ne doit pas être possible d‘allumer le feu
arrière et le projecteur ensemble, sauf s‘ils
sont actionnés par une seule dynamo.
Ce feu arrière est destiné à être connecté à
un feu avant avec une technologie d‘allum-
age et d‘extinction séparée.
Installation des lumières :
Tirez le chariot (+ et - ) hors du boîtier (1), insérez les câbles dans les trous prévus à cet effet
et repoussez le porte-câble dans le boîtier (2).
Fixation du feu arrière :
uHauteur de montage : 250-1200 mm
uFixez le feu arrière sur le porte-vélos à
l‘aide des vis, écrous et rondelles fournis.
uLorsque vous fixez le feu arrière, veillez à
ce que les vis ne soient serrées que de ma-
nière à ce que le feu ne puisse pas s‘ajuster
de lui-même.
Assurez-vous
avant chaque
utilisation
que le phare
ne soit pas
recouvert.
1
3
2
Axe longitudinal
du véhicule
Vis:
M5 x 15
Power cable + Power cable +
Power cable - Power cable -
Traîneaux Traîneaux
R-232
DC AC 6 V 0,6 W
R-232
DC AC 6 V 0,6 W
R-232
DC AC 6 V 0,6 W
R-232
DC AC 6 V 0,6 W
24 COB LED
Input
COB Anneau rouge
(24 pièce)
IA 150R00 0005
K 1759
K 1793

IT FANALE POSTERIORE »R-232 ND«
Dati tecnici e avvisi
uCon COB LED rossi (24 pezzo) e luce di
parcheggio tramite condensatore
uVerificato e autorizzato secondo il rego-
lamento sull‘ammissione alla circolazione
stradale (StVZO)
uLa superficie del catarifrangente del fanale
posteriore deve essere orientata in verti-
cale rispetto alla corsia e in perpendicolare
rispetto all‘asse longitudinale della corsia.
uPotenza nominale: 0,6 W
uTensione d‘ingresso: 6V AC
ATTENZIONE
in caso di guasto di un diodo luminoso deve
essere sostituita l‘intera unità luminosa!
Importante:
Non deve essere possibile accendere la luce
posteriore e il proiettore insieme a meno che
non siano azionati da una sola dinamo.
Questo fanale posteriore è destinato al colle-
gamento ad un fanale anteriore con tecnolo-
gia di accensione e spegnimento separata.
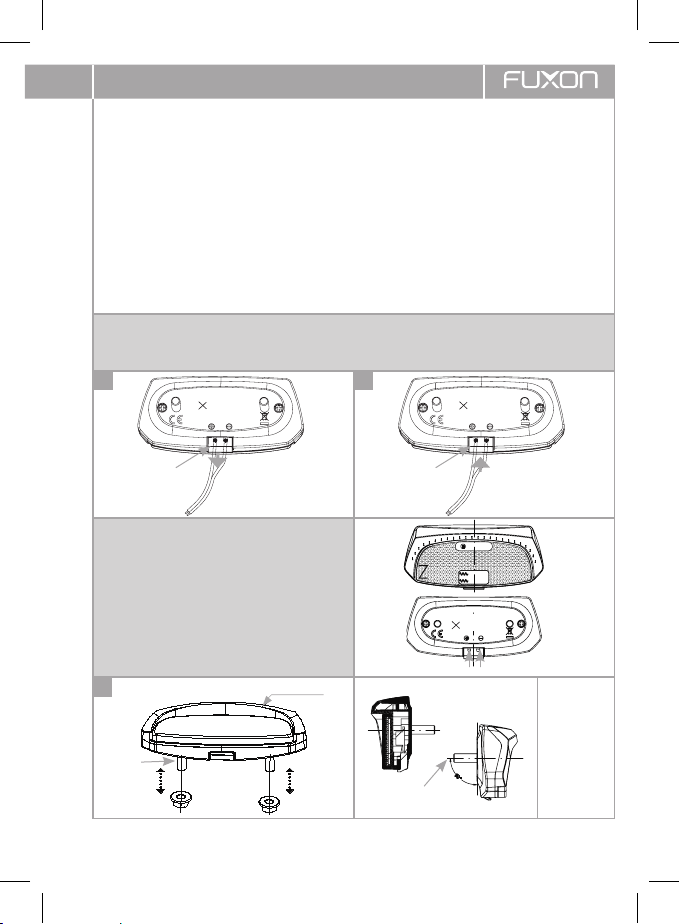
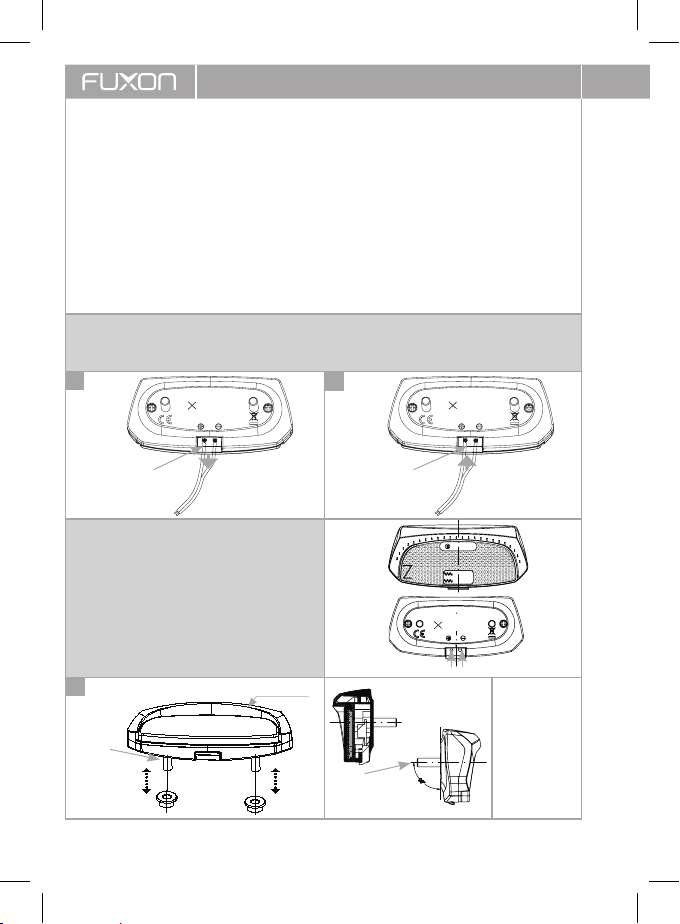
Collegamento della luce posteriore:
Estrarre il carrello (+ e - ) dalla custodia (1), inserire i cavi negli appositi fori e spingere
nuovamente il portacavi nella custodia (2).
Fissaggio della luce posteriore:
uAltezza di montaggio: 250-1200 mm
uFissare la luce posteriore al portabiciclette
con le viti, i dadi e le rondelle in dotazione.
uQuando si fissa la luce posteriore, assicu-
rarsi che le viti siano serrate solo in modo
che la luce non possa regolarsi da sola.
Prima di
ogni giro
in bici, fare
attenzione
affinché il
faro non
venga
coperto.
1
3
2
Vite:
M5 x 15
Power cable + Power cable -
Il carello Il carello
R-232
DC AC 6 V 0,6 W
R-232
DC AC 6 V 0,6 W
R-232
DC AC 6 V 0,6 W
Power cable + Power cable -
R-232
DC AC 6 V 0,6 W
24 COB LED
Input
Asse longitudi-
nale del veicolo
COB LED Anello rosso
(24 pezzo)
IA 150R00 0005
K 1759
K 1793

LUZ TRASERA »R-232 ND« ES
Dati tecnici e avvisi
uCon COB LED rossi (24 pieza) e luce di
parcheggio tramite condensatore
uVerificato e autorizzato secondo il rego-
lamento sull‘ammissione alla circolazione
stradale (StVZO)
uLa superficie del catarifrangente del fanale
posteriore deve essere orientata in verti-
cale rispetto alla corsia e in perpendicolare
rispetto all‘asse longitudinale della corsia.
uPotencia: 0,6 W
uTensión de entrada: 6V AC
¡ATENCIÓN
en caso de fallo de un diodo luminoso, hay
que cambiar toda la unidad de luz!
Importante:
No será posible encender la luz trasera y el
faro juntos a menos que sean accionados por
una dínamo.
Esta luz trasera está destinada a conectarse
a una luz delantera con tecnología de encen-
dido y apagado separada.
Colocación de la iluminación:
Saque el carro (+ y - ) de la carcasa (1), introduzca los cables en los orificios previstos y
vuelva a introducir el soporte de cables en la carcasa (2).
Fijación de la luz trasera:
uAltura de montaje: 250-1200 mm
uFijar la luz trasera al portabicicletas con los
tornillos, tuercas y arandelas suministra-
das.
uAl fijar la luz trasera, asegúrese de que los
tornillos sólo estén apretados para que la
luz no pueda ajustarse por sí misma.
Antes de
montar com-
pruebe que el
faro no esté
tapado.
1
3
2
Eje longitudinal
del vehículo
Tornillo:
M5 x 15
Power cable + Power cable +
Power cable - Power cable -
Trineos Trineos
R-232
DC AC 6 V 0,6 W
R-232
DC AC 6 V 0,6 W
R-232
DC AC 6 V 0,6 W
R-232
DC AC 6 V 0,6 W
24 COB LED
Input
COB LED Anillo rojo
(24 pieza)
IA 150R00 0005
K 1759
K 1793

Comus International
Zweiradteile und Sportartikel Handelsgesellschaft mbH
Ettore-Bugatti-Straße 6 –14 |D-51149 Köln
This manual suits for next models
1
Table of contents
Languages:
Other FUXON Bicycle Accessories manuals

FUXON
FUXON RL-MINI EB User manual

FUXON
FUXON RL-MINI CLIP User manual

FUXON
FUXON 050-20472 User manual

FUXON
FUXON 051-20473 User manual

FUXON
FUXON Quattro Plus User manual

FUXON
FUXON Quattro Plus User manual

FUXON
FUXON R-20 EB User manual

FUXON
FUXON Calvi II User manual

FUXON
FUXON RL-MINI EB CLIP User manual

FUXON
FUXON 070-50200 User manual

FUXON
FUXON R-20 User manual

FUXON
FUXON FS-70 DRL User manual

FUXON
FUXON FS-50 ND User manual

FUXON
FUXON Starlight II User manual

FUXON
FUXON FS-30 SL-ND User manual

FUXON
FUXON 051-20140 User manual

FUXON
FUXON FS-50 SL User manual

FUXON
FUXON Bobby User manual

FUXON
FUXON Starlight II User manual

FUXON
FUXON Triple User manual