Fysic F20 User manual

F20
VOORBEREIDINGEN / PRÉPARATION / VORBEREITUNG / PREPARATION
1Open de achterkant door deze te schuiven.
Ouvrir le dos en le faisant glisser.
Schieben Sie die Rückseite nach unten.
Open the back by sliding it down.
2Kies het formaat Micro SIM.
Choisissez le format Micro SIM.
Wählen Sie das Micro SIM-Kartenformat.
Choose the Micro SIM size.
62 2475
87456
A 01724
62 2475
87456
A 01724
Mini SIM
Micro SIM
Nano SIM
3Schuif het rechtse klepje naar rechts.
Faites glisser le volet á droite vers la droite.
Schieben Sie die rechte Klappe nach rechts.
Slide the rightmost cover to the right.
4Klap het klepje open.
Ouvrir le volet.
Önen Sie die Klappe.
Flip the cover open.
5Plaats de Micro SIM met de metalen
contacten naar onder. 6Sluit het metalen klepje en schuif
deze naar links.
Fermez le couvercle métallique et faites-le
glisser vers la gauche.
Schließen Sie die Metallklappe und schieben
Sie sie nach links.
Close the metal cover and slide it to the left.
7In stap 8-11 kunt u een SD-kaart (excl.) plaatsen
voor extra ruimte voor video en foto. 8Schuif het linker klepje naar boven.
Faites glisser le volet à gauche vers le haut.
Schieben Sie die linke Klappe nach oben.
Slide the leftmost cover up.
Insérez la carte Micro SIM avec les contacts
métalliques vers le bas.
Platzieren Sie die Micro-SIM mit den
Metallkontakten nach unten.
Insert the Micro SIM with the metal
contacts facing down.
Aux 8 à 11, vous pouvez insérer une carte SD
(excl.) pour d’espace pour la vidéo et la photo.
In Schritten 8-11 können Sie für zusätzlichen Speicher
für Fotos und Videos eine SD-Karte (exkl.) einlegen.
In steps 8-11 you can insert an SD card (excl.)
for extra space for video and photo.

9Klap het klepje open.
Ouvrir le volet.
Önen Sie die Klappe.
Flip the cover open.
10 Plaats de SD-kaart met de metalen
contacten naar onder.
11 Sluit het metalen klepje en schuif
deze naar onder. 12 Duw de batterij tegen de metalen contacten
en duw deze zo op zijn plek.
Poussez la batterie contre les contacts
métalliques et poussez-la vers l’intérieur.
Schieben Sie den Akku Richtung Metallkontakte
und drücken Sie ihn an seine Stelle.
Push the battery against the metal contacts
and push it in place.
13 Plaats de achterzijde terug door deze
omhoog te schuiven.
Fermez l’arrière en le faisant glisser vers le haut.
Schieben Sie die Rückseite nach oben.
Close the back by sliding it up.
14 Zet de telefoon aan door de rode toets
ingedrukt te houden.
Allumez le téléphone en appuyant sur la touche
rouge et en la maintenant enfoncée.
Schalten Sie das Telefon ein, indem Sie die rote
Taste eingedrückt halten.
Turn on the phone by pressing and holding
the red button.
Insérez la carte SD avec les contacts
métalliques vers le bas.
Platzieren Sie die SD-Karte mit den
Metallkontakten nach unten.
Insert the SD card with the
metal contacts facing down.
Fermez le couvercle métallique et
faites-le glisser vers le bas.
Schließen Sie die Metallklappe und
schieben Sie sie hinunter.
Close the metal cover and slide it down.

BASIS INSTELLINGEN / RÉGLAGES DE BASE / GRUNDEINSTELLUNGEN / BASIC SETTINGS
TEKST INVOEREN / ENTRER TEXTE / TEXT EINGEBEN / ENTER TEXT (EX. ‘HANS’)
De telefoon start op.
Dit duurt ongeveer
1 min.
Le téléphone démarre.
Cela prend environ
1 min.
Das Telefon startet.
Dies dauert ca.
1 Minute.
The phone’s starting up.
This takes about 1 min.
Veeg 2x naar
links in het
hoofdscherm.
Balayez 2x vers la
gauche sur l’écran
principal.
Wischen Sie auf
dem Haupt-
bildschirm
2x nach links.
Swipe 2x to the
left in the main
screen.
Een SIM is vaak
beveiligd met een 4
cijferige pincode.
Zie hiervoor de kaart
waar de SIM-kaart is
uitgedrukt.
Une SIM est souvent
protégée par un code
PIN à 4 chires.
Voir la carte où la
carte SIM est
exprimée.
Toets met 0 t/m 9
de pincode in.
Appuyez sur 0 à 9
pour entrer le PIN.
Drücken Sie 0-9, um
den PIN einzugeben.
Enter the PIN code
with 0-9.
15 Druk op de
midden-toets.
Appuyer sur la
touche centrale.
Drücken Sie die
Taste in der Mitte.
Press the center
key.
Tik op ‘START’.
Tapez sur
Nederlands,
puis Frans, puis
‘START’.
Tippen Sie auf
„Nederlands“,
dann „Duits“, und
dann START.
Tap Nederlands,
then Engels, then
‘START’.
Tik op
“Instellingen”.
Tapez sur
“Réglages”.
Tippen Sie auf
„Einstellungen“.
Tap
“Settings”.
Tik nu op WiFi.
Tapez sur WiFi.
Tippen Sie auf
WLAN.
Tap WiFi.
Gebruik 0-9 om
het wachtwoord in
te voeren. Zie ‘A’.
Utilisez 0-9 pour
entrer le mot de
passe. Voir “ A “.
Verwenden Sie
0-9, um das
Passwort einzu-
geben, siehe „A“.
Use 0-9 to enter
the WiFi password.
See ‘A’.
Tik op
‘Verbinden’.
Tapez sur
’Connecter’.
Tippen Sie auf
„Verbinden“.
Tap
‘Connect’.
SIM CARD
LOCKED. EMER-
GENCY ONLY
****
123
456
789
0 ok
Micro SIM
SIM CARD
LOCKED. EMER-
GENCY ONLY
Enter sim pin
123
456
789
0 ok
Micro SIM
Choose your language
Nederlands
START
Flight mode Off
WiFi Off
3G/4G Off
Bluetooth Off
Kies uw eigen
WiFi verbinding.
Choisissez
votre propre
connexion WiFi.
Wählen Sie Ihre
eigene WLAN-
Verbindung aus.
Choose your
own WiFi
connection.
A
4
G
H
I
2x
1x G
2x H
3x I
2
A
B
C
1x
1x A
2x B
3x C
6
M
N
O
2x
1x M
2x N
3x O
7
P
QR
S4x
1x P
2x Q
3x R
4x S
Naam
H
Nummer
Nieuwe invoer
Opslaan Terug
NL
Naam
HA
Nummer
Nieuwe invoer
Opslaan Terug
NL
Naam
HAN
Nummer
Nieuwe invoer
Opslaan Terug
NL
Naam
HANS
Nummer
Nieuwe invoer
Opslaan Terug
NL
Naam
HANS
Nummer
Nieuwe invoer
Opslaan Terug
NL
1x abc
2x ABC
3x 123
Naam
HANS
Nummer
Nieuwe invoer
Opslaan Terug
NL
, . ? ! : ;
” ’ - | \ _
/ @ $ % # etc.
Eine SIM-Karte wird
oft mit einem
4-stelligen Pin-Code
geschützt. Sehen Sie
die Karte, auf der
die SIM-Karte
ausgedrückt ist.
A SIM is often
protected with a
4-digit PIN code.
See the card where
the SIM card is
expressed.

FOTOCONTACTEN TOEVOEGEN / AJOUTER DES CONTACTS PHOTO / FOTOKONTAKTE HINZUFÜGEN
16
Options Back
Tik op foto-
contacten.
Tapez sur
contacts photo.
Tippen Sie auf
Fotokontakte.
Tap photo
contacts.
Kies contact 1-8
met links en rechts.
Sélectionner le
contact 1-8 avec
gauche/droite.
Wählen Sie Kontakt
1-8 mit links und
rechts auswählen.
Select contact 1-8
with left and right.
Druk op de
optie-knop.
Appuyez sur le
bouton d’option.
Drücken Sie auf die
Taste Optionen.
Press the
option button.
Gebruik 0-9 om de
naam in te voeren
Zie ‘A’.
Utilisez 0-9 pour en-
trer le nom. Voir “ A “.
Verwenden Sie 0-9,
um den Namen ein-
zugeben, siehe „A“.
Use 0-9 to enter
the name. See ‘A’.
Druk op de
midden-toets
[Bewerk].
Appuyer sur la
touche centrale
[Éditer].
Drücken Sie auf
die mittlere Taste
[Bearbeiten].
Press the
center key [Edit].
1
Fotocontacts
Options Back
1
Fotocontacts
Back
Options
Edit
Import from phonebook
Druk 2x op de om-
laag-knop [Nummer].
Appuyer sur le
bouton vers
le bas 2x [Numéro].
Drücken Sie 2x auf
die Taste nach unten
[Nummer].
Press the
down-button 2x
[Number].
Gebruik 0-9 om het
nummer in te voeren.
Utilisez 0-9 pour
entrer le numéro.
Verwenden Sie 0-9,
um die Nummer
einzugeben.
Use 0-9 to enter
the number.
Druk op de om-
laag-knop [Foto].
Appuyer sur le
bouton vers le bas
[Photo].
Drücken Sie auf
die Taste nach
unten [Foto].
Press the
down-button
[Photo].
Druk op de
midden-toets
[Foto maken].
Appuyer sur la
touche centrale
[Prendre la photo].
Drücken Sie auf die
mittlere Taste
[Foto aufnehmen].
Press the center key
[Take photo].
Druk op de
midden-toets.
Appuyer sur la
touche centrale.
Drücken Sie
auf die mittlere
Taste.
Press the
center key.
Back
Back
Edit
Name
Record name
Number
Photo
Back
Edit
Name
Har ry |
Record name
Number
Photo
Back
Edit
Name
Har ry
Record name
Number
Photo
Back
Edit
Name
Har ry
Record name
Number
0612345678|
Photo
Edit
0612345678
Photo
Back
Options
Take photo
Choose photo
Gebruik links, rechts,
boven en onder om
een selectie te maken.
Utilisez gauche, droite,
haut et bas pour faire
une sélection.
Verwenden Sie oben,
unten, links und
rechts, um eine
Auswahl zu treen.
Use left, right, top and
bottom to make
a selection.
Druk op de
midden-toets.
Appuyer sur la
touche centrale.
Drücken Sie
auf die mittlere
Taste.
Press the
center key.
Druk op einde-toets.
Appuyer sur la
touche de n.
Drücken Sie auf die
Taste Ende.
Press the end key.
Druk op de
optie-knop.
Appuyez sur le
bouton Option pour
sauvegarder.
Drücken Sie auf die
Taste Optionen, um
zu speichern.
Press the option
button to save.
Back
Edit
0612345678
Photo
Druk op de
midden-toets om
een foto te maken.
Appuyez sur la
touche centrale
pour prendre
une photo.
Drücken Sie auf
die mittlere Taste,
um ein Foto
zu machen.
Press the
center key to
take a photo.
Options Back Options Back Options Back Options Back
1
Fotocontacts
Naam

FOTOCONTACT BELLEN / APPELER DES CONTACT PHOTO/ FOTOKONTAKE ANRUFEN / CALL PHOTO CONTACT
17
18
Druk op links/rechts
om meer te zien.
Appuyez à gauche/
droite pour en
voir plus.
Drücken Sie auf
links/rechts, um mehr
anzuzeigen.
Press left/right
to see more.
Druk op het cijfer
van het contact.
Appuyez sur le
numéro du
contact.
Drücken Sie auf
die Zier vom dem
Kontakt.
Press the number
of the contact.
Druk op einde-toets
om gesprek
te stoppen.
Appuyer sur touche
de n pour arrêter
l’appel.
Drücken Sie auf die
Ende-Taste, um den
Anruf zu stoppen.
Press the end key
to stop the call.
Druk op de
contact-knop.
Appuyez sur
le bouton de
contact.
Drücken Sie auf
die Taste Kontakt.
Press the
contact button.
Het contact
wordt
nu gebeld.
Le contact
s’appelle
maintenant.
Der Kontakt wird
jetzt angerufen.
The contact is
now called.
Options Back
Photocontacts
1 2
3 4
Options Back
Photocontacts
1 2
3 4 Calling
Naam
Calling
Naam
SOS-TOETS INSTELLEN / RÉGLAGE DU BOUTON SOS / SOS-TASTE EINSTELLEN / SETTING THE SOS BUTTON
Veeg 2x naar links tot
het SOS-icoon
verschijnt.
Glissez 2x vers la gau-
che jusqu’à ce que l’icô-
ne SOS apparaisse.
Wischen Sie 2x
nach links, bis das
SOS-Symbol erscheint.
Swipe 2x to the left
until the SOS icon
appears.
Druk op het
SOS-icoon.
Appuyez sur
l’icône SOS.
Drücken Sie auf
das SOS-Symbol.
Press the
SOS icon.
Vink ‘Status’ aan om
de SOS-functie
te activeren.
Cochez ’Activé’ pour
activer la fonction SOS.
Indem Sie „Aktiv“
antippen, aktivieren
Sie die SOS-Funktion.
Check ‘Enable’ to
activate the SOS
function.
Druk op contacten om
nummers toe te voegen.
Appuyez sur
Contacts pour ajouter
des numéros.
Drücken Sie auf
Kontakte, um Num-
mern hinzufügen.
Press contacts to add
numbers.
Druk op 1 van de
5 lege plaatsen.
Appuyez sur 1
des 5 cases vides.
Wählen Sie eine
der 5 leeren
Stellen aus.
Press 1 of the 5
empty places.
SOS
SOS
SOS
Enable
Enable
Enable 1.Empty
Contacts
Contacts
Contacts 2.Empty
Alert beeps
Alert beeps
Alert beeps 3.Empty
Send message
Send message
Send message 4.Empty
Send to
Send to
Send to 5.Empty
Contacts
1.Empty 1.Empty 1.Harry
2.Empty 2.Empty 2.Empty
3.Empty 3.Empty 3.Empty
4.Empty 4.Empty 4.Empty
5.Empty 5.Empty 5.Empty
Contacts Contacts Contacts
Number Number
0612345678
OK OKCancel Cancel
Gebruik 0-9 om
het nummer in te
voeren.
Utilisez 0-9 pour
entrer le numéro.
Verwenden Sie
0-9, um die Num-
mer einzugeben.
Use 0-9 to enter the
number.
Druk op de
OK toets.
Appuyer sur
la touche OK.
Drücken Sie auf
die Taste OK.
Press the
OK key.
Druk op de
terug-toets.
Appuyer sur
la touche Retour.
Drücken Sie auf die
Taste Zurück.
Press the
back key.
Vink ‘Waarschuwingstonen’ aan om een alarm
te laten horen bij gebruik van de SOS-toets.
Cochez ’Bips d’avertissement’ pour
déclencher une alarme lorsque vous
utilisez le bouton SOS.
Aktivieren Sie das Kästchen „Warnungstö-
ne“, um bei der Verwendung der SOS-Taste
einen Alarm auszulösen.
Check ‘Alert beeps’ to sound an alarm
when using the SOS button.

VERVOLG STAP 18 / PASSER À L’ÉTAPE 18 / FORTSETZUNG SCHRITT 18 / CONTINUATION STEP 18
1.Harry 1.Harry
2.Ans 2.Ans
3.Bob 3.Bob
4.Niels 4.Niels
5.Empty 5.Empty
SOS SOS
Druk op
‘Stuur naar’.
Appuyez sur
“Envoyer à”.
Drücken Sie
“Senden an”.
Press
“Send To”.
Vink aan wie een
bericht dienen te
ontvangen.
Cochez qui doit
recevoir un
message.
Kreuzen Sie an,
wer eine Nachricht
erhalten soll.
Tick who should
receive a message.
Druk op de
terug-toets.
Appuyer sur
la touche Retour.
Drücken Sie auf die
Taste Zurück.
Press the
back key.
Veeg omhoog en
druk op ‘Bericht’.
Balayez vers le haut et
appuyez sur “Message”.
Wischen Sie nach oben
und drücken Sie auf
„Meldung“.
Swipe up and press
“Message”.
Druk op het
tekstvak.
Appuyez sur la
zone de texte.
Tippen Sie auf
das Textfeld.
Press the
text box.
SOS
Enable
Contacts
Alert beeps
Send message
Send to
Contacts Contacts
Alert beeps Alert beeps
Send message Send message
Send to Send to
Message Message
I am now in danger, please
help me!
I am now in danger, please
help me!
SOS SOS
2.Empty
3.Empty
4.Empty
Message
I am now in danger,
please help me!
OK Cancel
Gebruik 0-9 om de
tekst in te voeren.
Utilisez 0-9 pour
entrer le texte.
Verwenden Sie 0-9,
um den Text
einzugeben.
Use 0-9 to enter
the text.
Druk op de
OK toets.
Appuyer sur
la touche OK.
Drücken Sie auf
die Taste OK.
Press the
OK key.
Contacts
Alert beeps
Send message
Send to
Message
I am now in danger, please
help me!
SOS
2.Empty
3.Empty
4.Empty
Message
I am now in danger,
please help me!
OK Cancel
Contacts
Alert beeps
Send message
Send to
Message
I am now in danger, please
help me!
SOS
2.Empty
3.Empty
4.Empty
Message
I am now in danger,
please help me!
OK Cancel
SOS
SOS
SOS
SOS
Houd de SOS-knop ingedrukt om de
functie te starten.
Druk nogmaals lang
in om de SOS-functie te stoppen.
Er klinkt een alarmtoon vanaf de
telefoon voor lokale hulp.
Alle ingestelde noodnummers ont-
vangen een tekstbericht, met locatie
indien ingesteld. De noodnummers
worden één voor één gebeld, de
boodschap klinkt en u kunt spreken.
Als de oproep wordt aangenomen en
bevestigd wordt er niet meer verder
gebeld.
Halten Sie die SOS-Taste gedrückt, um
die Funktion zu starten. Halten Sie die
Taste nochmals längere Zeit ein, um
den SOS-Modus zu beenden.
Das Telefon gibt einen Alarmton ab, um
Menschen in der Umgebung zu alarm-
ieren.
Alle eingestellten Notnummern erhalten
eine SMS mit Standort, falls eingestellt.
Die Notnummern werden nacheinander
angerufen, die Nachricht wird abge-
spielt und Sie können selbst sprechen.
Wenn der Anruf angenommen und
bestätigt wird, gibt es keine weiteren
Anrufe.
Appuyez sur le bouton SOS et
maintenez-le enfoncé pour démarrer
l’opération. Maintenez la touche
enfoncée à nouveau pour arrêter le
mode SOS.
Une tonalité d’alarme retentit du télé-
phone pour demander de l’aide locale.
Tous les numéros d’urgence dénis
recevront un message texte, avec
l’emplacement s’il est déni.
Les numéros d’urgence sont appelés
un par un, le message retentit et vous
pouvez parler. Si l’appel est répondu et
conrmé, il n’y aura pas d’autres appels.
Press and hold the SOS button to start
operation. Press and hold again to stop
the SOS mode.
An alarm tone sounds from the phone
for local help.
All set emergency numbers will receive
a text message, with location if set.
The emergency numbers are called one
by one, the message sounds and you
can speak.
If the call is answered and conrmed,
there will be no further calls.
SOS
Enable
Contacts
Alert beeps
Send message
Send to
Vink ‘Bericht sturen’ aan om een
bericht te laten sturen als de
SOS-toets wordt ingedrukt.
Cochez ’Envoyer message’ pour
qu’un message soit envoyé lorsque
la touche SOS est enfoncée.
Aktivieren Sie das Kästchen
„Mitteilung schicken“, um eine
Nachricht zu senden, wenn die
SOS-Taste gedrückt wird.
Check ‘Send message’ to have
a message sent when the
SOS key is pressed.

21
FOTO/VIDEO VERWIJDEREN / SUPPRIMER UNE PHOTO/VIDÉO / FOTO/VIDEO LÖSCHEN / DELETE PHOTO/VIDEO
Veeg naar
links in het
hoofdscherm.
Balayez vers
la gauche sur
l’écran principal.
Wischen Sie auf
dem Haupt-
bildschirm
nach links.
Swipe left
on the main
screen.
Veeg naar
links in het
hoofdscherm.
Balayez vers la
gauche sur l’é-
cran principal.
Wischen Sie auf
dem Hauptbild-
schirm nach links.
Swipe left on the
main screen.
Druk op het
galerij-icoon.
Appuyez sur
l’icône de la
galerie.
Drücken Sie
auf das Symbol
Galerie.
Press the
gallery icon.
Druk op het
galerij-icoon.
Appuyez sur
l’icône de la
galerie.
Drücken Sie
auf das Symbol
Galerie.
Press the
gallery icon.
Kies de
map met
afbeeldingen.
Sélectionnez
le dossier
image.
Wählen Sie
den Ordner
Bilder aus.
Select the
image folder.
Kies de map
met afbeeldingen.
Sélectionnez le
dossier image.
Wählen Sie den
Ordner Bilder aus.
Select the
image folder.
Druk op de
afbeelding
en houd de
selectie vast.
Appuyez sur
l’image et
maintenez-la
enfoncée.
Halten Sie das
Bild eingedrückt.
Press and hold
the image.
Druk op de
afbeelding en houd
de selectie vast.
Appuyez sur
l’image et
maintenez-la
enfoncée.
Halten Sie das
Bild eingedrückt.
Press and hold
the image.
Druk op
‘Verwijderen’.
Appuyez sur
’Supprimer’.
Drücken Sie
auf „Löschen“.
Press
‘Delete’.
Druk op ‘Delen’.
Appuyez sur
“Partager”.
Drücken Sie
auf „Teilen“.
Press “Share”.
Druk op OK.
Appuyez sur OK.
Drücken Sie
auf OK.
Press OK.
Gallery
Gallery
Camera pictures
Camera pictures
Camera pictures
Picture options
Picture options
View
View
Share
Share
Rotate
Rotate
Delete
Delete
Crop
Crop
Details
Details
Delete
Delete this picture?
Cancel OK
!
FOTO/VIDEO DELEN / PARTAGER PHOTO/VIDÉO / TEILEN SIE FOTOS/VIDEOS / SHARE PHOTO/VIDEO
22
19 20
VOLUME AANPASSEN / RÉGLAGE DU VOLUME / LAUTSTÄRKE EINSTELLEN / ADJUST VOLUME
Druk tijdens een gesprek
op de toets rechts (- / +)
om het geluid harder of
zachter te zetten.
Pendant un appel,
appuyez sur la touche de
droite (- / +) pour
augmenter ou diminuer le
volume.
Drücken Sie während
eines Anrufs auf die Taste
- / + rechts auf der Seite,
um die Lautstärke zu er-
höhen oder zu verringern.
During a call, press
the right (- / +) button to
increase or decrease the
volume.
Druk op elk ander
moment op de toets rechts
(- / +) om het geluid van
het toestel harder of
zachter te zetten.
Dans n’importe quel
autre écran, appuyez sur
le bouton droit pour
augmenter ou diminuer
le volume de l’appareil.
Drücken Sie zu jedem
anderen Zeitpunkt auf die
Taste auf der rechten Seite,
um die Lautstärke des
Gerätes zu erhöhen oder
zu verringern.
In any other screen,
press the right button to
increase or decrease the
volume of the unit.
Bellen
Bellen
Calling Hans

VERVOLG STAP 22 / PASSER À L’ÉTAPE 22 / FORTSETZUNG SCHRITT 22 / CONTINUATION STEP 22
FABRIEKSINSTELLINGEN / RÉGLAGES PAR DÉFAUT / STANDARDEINSTELLUNGEN / DEFAULT SETTINGS
23 Veeg 2x naar
links in het hoofd-
scherm.
Balayez 2x vers la
gauche sur l’écran
principal.
Wischen Sie auf
dem Hauptbild-
schirm 2x nach links.
Swipe 2x to the left
in the main screen.
Veeg omhoog.
Balayez vers
le haut.
Mit dem Finger
nach nach oben
streichen.
Swipe up.
Tik op
“Instellingen”.
Tapez sur
“Réglages”.
Tippen Sie auf
„Einstellungen“.
Tap
“Settings”.
Druk op
‘Telefoon resetten’.
Appuyez sur
“R
éinitialiser le
téléphone”.
Drücken Sie auf
„Telefon
zurücksetzen“
Press
“Reset phone”.
Veeg omhoog en
druk op ‘Android’.
Balayez vers le
haut et appuyez
sur “Android”.
Wischen Sie
nach oben und
tippen Sie auf
„Android“.
Swipe up and
press “Android”.
Druk op ‘Alles
wissen’.
Appuyez sur
“Tout eacer”.
Drücken Sie auf
„Alles löschen“
Press
“Erase every-
thing”.
Veeg omhoog en
druk op ‘Systeem’.
Balayez vers le
haut et appuyez
sur “Système”.
Wischen Sie
nach oben und
tippen Sie auf
„System“.
Swipe up and
press “System”.
Veeg omhoog en
druk op ‘Opties voor
resetten’.
Balayez vers le haut
et appuyez sur
‘réinitialisation’.
Wischen Sie nach
oben und wählen Sie
„Zurücksetzoptionen“.
Swipe up and press
“Reset options”.
Druk op ‘Alle
gegevens wissen
(fabrieksinstellingen
terugzetten)”.
Appuyez sur “Eacer
toutes les données
(rétablir la congura-
tion d’usine)”.
Wählen Sie „Alle
Daten löschen (Auf
Werkseinstellungen
zurücksetzen)“.
Press ‘Erase all data
(factory reset)’.
Druk op de
contactpersoon.
Appuyez sur le
contact.
Tippen Sie auf
den Kontakt.
Press the
contact.
Druk op het
groene pijltje.
Appuyez sur la
èche verte.
Drücken Sie auf
den grünen Pfeil.
Press the green
arrow.
Voeg eventueel
nog tekst toe.
Si nécessaire,
ajoutez plus de
texte.
Fügen Sie bei
Bedarf Text
hinzu.
If necessary,
add more text.
Druk op het
blauwe pijltje.
Appuyez sur la
èche bleue.
Drücken Sie auf
den blauen Pfeil.
Press the blue
arrow.
My status
Send to my cont...
My status
Send to my cont...
Harry
Hello! I’m using...
Harry
Hello! I’m using...
Ans
Hello! I’m using...
Ans
Hello! I’m using...
Ans
Bob
Hello! I’m using...
Send to... Send to...
Frequently contacted Frequently contacted
Add a caption... Add a caption...
Ans Ans
Share pictures via
Whats-
App
Bluetooth
Camera pictures
Druk op
‘WhatsApp’.
Appuyez sur
’WhatsApp’.
Drücken Sie auf
„WhatsApp“.
Press
‘WhatsApp’.
Android System
Reset options
About phone
Erase all data
(factory reset) RESET PHONE RESET PHONE
ERASE EVERYTHING
Reset app
preferences WhatsApp WhatsApp
Erase all your personal
information and
downloaded apps? You
can’t undo this action!
Reset options Erase all data Erase all data Reset?

24
TOETSENFUNCTIES / FONCTIONS DES TOUCHES / KEY FUNCTIONS / KEY FUNCTION
Menutoetsen / Touches de menu
Menütasten / Menu keys.
Opent optie-menu.
Ouvre le menu des options.
Önet das Menü Optionen.
Opens option menu.
Ga naar vorig menu.
Aller au menu précédent.
Zurück zum vorherigen Menü.
Go to previous menu.
Navigatietoetsen / Touches échées
Pfeiltasten / Navigation keys
Verplaatst de selectie.
Déplace la barre de sélection.
Verschiebt die Auswahl.
Moves the selection bar.
OK-toets; bevestig selectie.
OK; conrmer la sélection.
Taste OK; Auswahl bestätigen.
OK key; conrm selection.
Telefoontoets / Touche du téléphone
Telefontaste
/ Phone key
Belt een contact of ingetypt num-
mer. Neemt inkomende oproep
aan. Opent belgeschiedenis in
het hoofdmenu.
Appeler un contact ou un nu-
méro entré. Accepte un appel
entrant. Ouvre l’historique des
appels dans le menu.
Ruft einen Kontakt oder eine
Nummer an. Nimmt einen
eingehenden Anruf entgegen.
Önet im Menü den Anrufverlauf.
Call a contact or a number you
entered. Accept an incoming call.
Open call history in the main menu.
Eindetoets / Touche n
Taste Ende / End key
(Vasthouden) Schakel de
telefoon uit/aan.
Gesprek weigeren of beëindigen.
Ga terug naar het hoofdmenu.
(En attente) Éteindre/allumer le
téléphone.
Rejeter ou mettre n à l’appel.
Retour au menu principal.
(Gedrückt halten) Schalten Sie
das Telefon ein/aus.
Anrufe ablehnen oder beenden.
Zurück zum Hauptmenü.
(Hold) Turn phone o/on.
Reject or end call.
Go back to main menu.
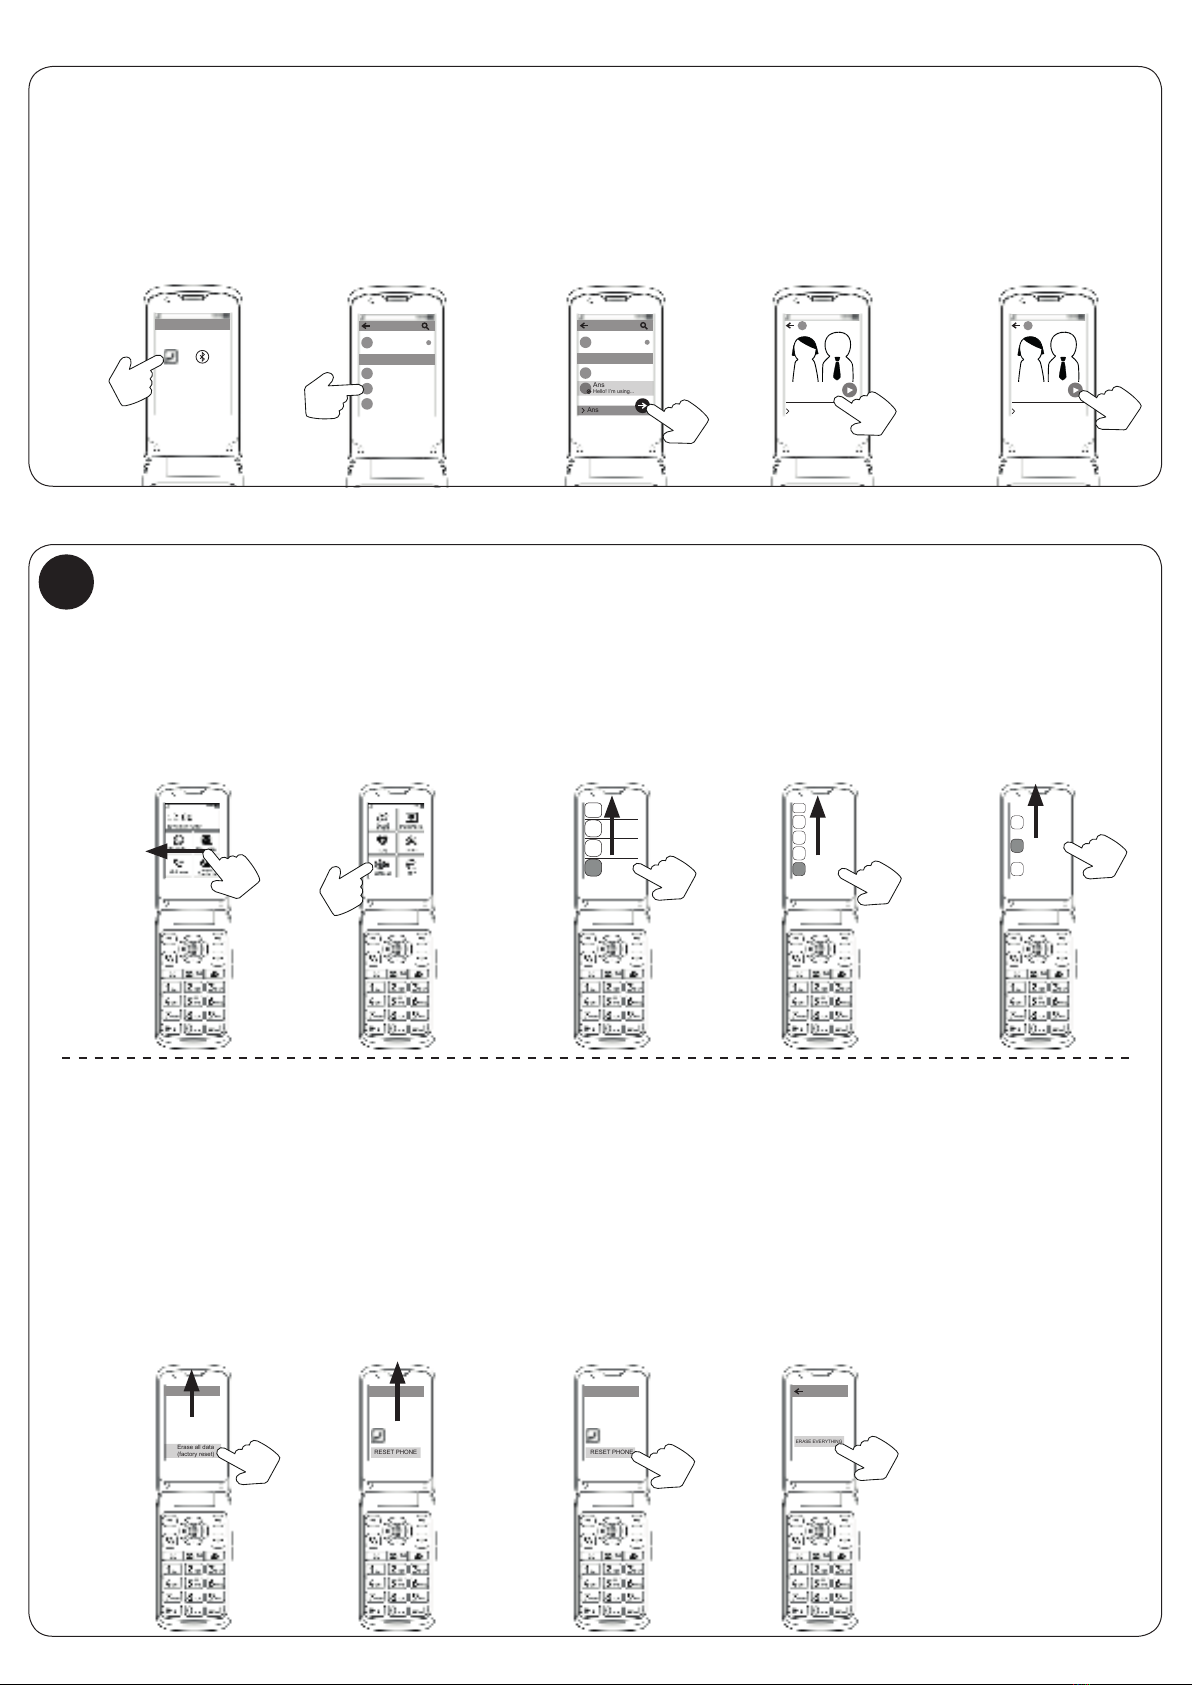
WhatsApp-toets / Touche Whatsapp
WhatsApp-Taste / WhatsApp key
Contacten-toets / Touche Contact
Taste Kontakt / Contact key
Opent direct het WhatsApp
chatprogramma. Volg de stappen
op het scherm om dit de eerste
keer in te stellen.
Ouvre immédiatement le program-
me de chat WhatsApp. Suivez les
étapes à l’écran pour le congurer
pour la première fois.
Önet sofort WhatsApp. Führen
Sie die Schritte am Bildschirm
ein, um WhatsApp beim ersten
Gebrauch einzurichten.
Immediately opens the WhatsApp
chat program. Follow the steps on
the screen to set it up for the rst time.
Opent direct het contactenmenu.
Ouvre immédiatement le menu
des contacts.
Önet sofort das Kontaktmenü.
Immediately opens the contacts
menu.
Camera-toets /
Touche de caméra
Kamera-taste
/ Camera key
Zet tijdens bellen geluids
versterking aan.
Opent direct de fotocamera.
Activer l’amplication pendant
un appel.
Ouvre immédiatement
l’appareil photo.
Önet sofort die Fotokamera.
Während eines Anrufs wird die
Lautstärke verstärkt.
Immediately opens the photo
camera.
Turn on sound amplication
during call.
Ster-toets / Touche étoile
Sterntaste / Star key
Opent tijdens tekstinvoer een
menu met speciale symbolen.
Ouvre un menu avec des sym-
boles spéciaux pendant la saisie
de texte.
Sterntaste Önet während der
Texteingabe ein Menü mit
speziellen Symbolen.
Opens special symbols menu
during text entry.
Hek-toets / Touche pound
Raute-Taste / Hash key
Wisselt tussen hoofd en kleine
letters.(Vasthouden) Zet alle
geluid uit of aan.
Commute entre majuscules et
minuscules. (Attendre) Coupe
ou rétablit le son.
Schaltet zwischen Groß- und
Kleinschreibung um. (Gedrückt
halten) Schaltet alle Töne ein
oder stumm.
Switches between upper and
lower case. (Hold) Mutes or
unmutes all sound.
Houd de volumetoets + ingedrukt
om de zaklamp aan/uit te zetten.
Appuyez sur la touche de
volume + et maintenez-la
enfoncée pour allumer/éteindre
la lampe de poche.
Halten Sie die Lautstärketaste +
eingedrückt, um die Taschenlam-
pe ein- und auszuschalten.
Press and hold the volume but-
ton + to turn the ashlight on/o.

SPECIFICATIONS
Network: GSM900 / DSC1800 / WCDMA / LTE / WIFI
SAR: 1.845W/kg / 0.715W/kg / 1.572W/kg / 0.625W/kg / 0.021W/kg
Power: GSM: 880-960MHz................................................... < 2W
DCS: 1710-1880MHz ............................................... < 1W
WCDMA: 1850MHz-1990MHz............................... < 0.2W
LTE: 1920-2170MHz............................................... <0.2W
WIFI: 2402-2480MHz ............................................. <0.1W
Size: Flip close: 108 x 56,5 x 21 mm
Flip open: 205 x 56,5 x 16
Accu: Li-Ion, 3.7V 1300mAh
Stand-by: ~ 50 hr
(Depends on network)
Working: ~ 8 hr (Depends on the amount of use and settings)
Weight: 130 gr (accu incl.)
SD: Max. 32GB SDHC, FAT32-formatted
MANUAL
Op http://www.fysic.com/ vindt u de meest recente handleiding.
Sur http://www.fysic.com/, ous trouverez le manuel le plus récent.
Auf http://www.fysic.com/ nden Sie das aktuellste Handbuch.
On http://www.fysic.com/ you will nd the most recent manual.
EU-CONFORMITEITSVERKLARING
Hierbij verklaar ik, Hesdo, dat het type radioapparatuur F20 conform is met Richtlijn 2014/53/EU. De volledige tekst
van de EU-conformiteitsverklaring kan worden geraadpleegd op het volgende internetadres:
http://DOC.hesdo.com/F20-DOC.pdf
DECLARATION DE CONFORMITE
Le soussigné, Hesdo, déclare que l’équipement radioélectrique du type F20 est conforme à la directive 2014/53/UE.
Le texte complet de la déclaration UE de conformité est disponible à l’adresse internet suivante:
http://DOC.hesdo.com/F20-DOC.pdf
ÜBEREINSTIMMUNGSERKLÄRUNG
Hiermit erklärt Hesdo, dass der Funkanlagentyp F20 der Richtlinie 2014/53/EU entspricht. Der vollständige Text der
EU-Konformitätserklärung ist unter der folgenden Internetadresse verfügbar:
http://DOC.hesdo.com/F20-DOC.pdf
EU DECLARATION OF CONFORMITY
Hereby, Hesdo declares that the radio equipment type DIVM-850 is in compliance with Directive 2014/53/EU. The
full text of the EU declaration of conformity is available at the following internet address:
http://DOC.hesdo.com/F20-DOC.pdf
Service Help
WWW.FYSIC.COM
NL 073 6411 355
(Lokaal tarief)
BE 03 238 5666
(Lokaal tarief)
(Tarif local)
DE 0180 503 0085
Lokale Festnetzkosten
Hesdo, Australiëlaan 1
5232 BB, ‘s-Hertogenbosch
The Netherlands
V1.1
Other manuals for F20
1
Table of contents
Other Fysic Cell Phone manuals