Gardena 35 User manual

GARDENA
®
1
35 roll-up automatic Li-Ion
Art.8025
DBetriebsanleitung
Akku-Wandschlauchbox
GB Operating Instructions
Roll-up automatic Li-Ion
FMode d’emploi
Dévidoirs box muraux sur accu
NL Instructies voor gebruik
Accu-wandslangenbox
SBruksanvisning
Batteridriven väggslangbox
DK Brugsanvisning
Akku-vægslangeboks
FIN Käyttöohje
Akkukäyttöinen seinään kiinnitettävä
letkukela
NBruksanvisning
Accu-vegg-slangetromler
IIstruzioni per l’uso
Avvolgitubo da parete ad accumulatore
EManual de instrucciones
Soporte portamanguera mural
con Accu
PInstruções de utilização
Caixa de parede para mangueira
com bateria
PL Instrukcja obsługi
Bębna naściennego ze zwijaczem
akumulatorowym
HHasználati utasítás
Akkumulátoros tömlődoboz
CZ Návod k použití
Akumulátorový nástěnný box na hadici
SK Návod na použitie
Akumulátorový nástenný box na hadicu
GR Οδηγίες χρήσεως
Ανέμη τοίχου, με μπαταρία
RUS Инструкция по эксплуатации
Настенный ящик для шланга с
аккумулятором
SLO Navodilo za uporabo
Aku-stensko ohišje za cev
HR Upute za uporabu
Zidna kutija s crijevom na akumulator
SRB Uputstvo za rad
BIH Baterijske zidne kutije za crevo
UA Інструкція з експлуатації
Настінна катушка для шлангів з
акумулятором
RO Instrucţiuni de utilizare
Tambur cu furtun cu acumulator
TR Kullanım Klavuzu
Bataryalı, Duvara monte hortum
muhafazası
BG Инструкция за експлоатация
Стенна кутия за навиване на
маркуч – акумулаторна
AL Manual përdorimi
Kuti tubi e montuar në mur me bateri
EST Kasutusjuhend
Seinale kinnitatav akuga voolikupool
LT Eksploatavimo instrukcija
Akumuliatorinė sieninė žarnos dėžutė
LV Lietošanas instrukcija
Pie sienas uzmontējamā šļūtenes ruļļa
kārba ar akumulatoru

2
Art. 913
Art.
902
Art.
901
Art.
900
Art. 8114
Art. 915
A
122
33
B
7
1216
9
7
10 8
13
14
C

3
18
17
19
20
21
18
13
16
D
E
G
123
22 23
F
D Dies ist die deutsche Originalbetriebsanleitung.
Bitte lesen Sie die Betriebsanleitung sorgfältig und beachten Sie deren
Hinweise. Machen Sie sich anhand dieser Betriebsanleitung mit dem
Produkt, dem richtigen Gebrauch sowie den Sicherheitshinweisen ver-
traut.
Aus Sicherheitsgründen dürfen Kinder und Jugendliche unter 16 Jahren
sowie Personen, die nicht mit dieser Betriebsanleitung vertraut sind, die-
ses Produkt nicht benutzen. Personen mit eingeschränkten körperlichen
oder geistigen Fähigkeiten dürfen das Produkt nur verwenden, wenn sie
von einer zuständigen Person beaufsichtigt oder unterwiesen werden.
Kinder sollten beaufsichtigt werden, um sicherzustellen, dass sie nicht
mit dem Produkt spielen.
Ordnungsgemäßer Gebrauch:
Die Wandschlauchbox mit automatischer Akku-Schlauchaufwicklung
dient der Bewässerung des Gartens und ist zur Verwendung im privaten
Haus- und Hobbygarten bestimmt. Sie darf nicht in öffentlichen Anlagen,
Parks, Sportstätten, an Straßen und in der Land- und Forstwirtschaft
eingesetzt werden. Die Schlauchbox ist ausschließlich für den Außen-
einsatz geeignet.
Die Einhaltung dieser Betriebsanleitung ist Voraussetzung für den
ordnungsgemäßen Gebrauch.
Lieferumfang (Abb. A):
Sicherheitshinweise:
ACHTUNG !
V Vor Inbetriebnahme Betriebsanleitung
lesen.
ACHTUNG !
Die Schlauchbox darf nicht geöffnet werden.
Beachten Sie die Sicherheitshinweise auf dem Ladegerät.
EXPLOSIONSGEFAHR ! Körperverletzung!
Das Ladegerät darf nicht zum Laden anderer Akkus / Batterien ver-
wendet werden.
Mit dem Ladegerät darf ausschließlich der im Steuerteil befindliche
GARDENA Li-Ion-Akku geladen werden.
Setzen Sie das Ladegerät niemals Feuchtigkeit oder Nässe aus.
BRANDGEFAHR ! Kurzschluss!
Kontakte des Ladegeräts nicht mit Metallteilen überbrücken.
Prüfung vor jeder Benutzung:
Führen Sie vor jeder Benutzung eine Sichtprüfung des Ladegeräts
durch.
Nach starker Belastung Akku vor dem Laden erst abkühlen lassen.
Ladeende / Lagern:
Lagern Sie das Ladegerät mit ausgestecktem Netzstecker.
Beachten Sie die Sicherheitshinweise auf dem Steuerteil.
BRANDGEFAHR ! Kurzschluss!
Kontakte des Steuerteils nicht mit Metallteilen überbrücken.
Prüfung vor jeder Benutzung:
Führen Sie vor jeder Benutzung eine Sichtprüfung des Steuerteils durch.
Verwendung / Verantwortung:
Achtung! Wegen der Gefahr körperlicher Gefährdung darf das Steuerteil
nicht als Energiequelle für andere Geräte verwendet werden. Benützen
Sie das Steuerteil ausschließlich für die dafür vorgesehenen GARDENA
Wand-Schlauchbox Art. 8025.
Elektrische Sicherheit:
BRANDGEFAHR !
Akkus nie in Umgebung von Säuren und leicht entflammbaren
Materialien laden.
Als Ladegerät dürfen nur Original GARDENA Ladegeräte verwendet
werden. Bei Verwendung anderer Ladegeräte können die Akkus zerstört
werden und sogar Brände entstehen.
EXPLOSIONSGEFAHR !
Akku vor Hitze und Feuer schützen. Nicht auf Heizkörpern ablegen oder
längerer Zeit starker Sonneneinstrahlung aussetzen.
Akku nur in einer Umgebungstemperatur zwischen 5 °C bis 45 °C ver-
wenden und laden. Nach starker Belastung Akku erst abkühlen lassen.
Das Ladekabel muss regelmäßig auf Anzeichen von Beschädigungen
und Alterungen (Brüchigkeit) untersucht und darf nur in einwandfreiem
Zustand benutzt werden.
Lagern:
Akku nicht über 45 °C oder unter direkter Sonneneinstrahlung lagern.
Idealer-weise sollte der Akku unter 25 °C gelagert werden, damit die
Selbstentladung gering ist. Lagern Sie ihn nie angeschlossen an einem
der Anschlussgeräte, um missbräuchlichen Gebrauch und Unfälle zu
verhindern.

5
GB This is the translation of the original German operating
instructions.
Please read these operating instructions carefully and note the
information given. Use these operating instructions to familiarise
yourself with the product, the proper use and the safety instructions.
For safety reasons, children and young people under the age of 16, as
well as people not familiar with these operating instructions, may not
use this product. Persons with reduced physical or mental capabilities
may only use this product when supervised or instructed by an
authorised person. Children should be supervised to ensure that they
do not play with the product.
Correct use:
The Wall-Mounted Hose Box with automatic battery-powered hose
roll-up serves the irrigation of the garden and is intended for use in the
private home- and hobby garden. It may not be used in public facilities,
parks, sports facilities, on streets and in agriculture and forestry. The
Hose Box is only suitable for outdoor use.
Observance of this User’s Manual is the condition for correct use.
Contents (Fig. A):
Safety Instructions:
CAUTION !
V Read the Operating Instructions before
initial operation.
CAUTION !
The Hose Box may not be opened.
Follow the Safety Instructions on the Battery Charger.
RISK OF EXPLOSION! Physical injury!
The Battery Charger may not be used to charge other batteries or
rechargeable batteries.
The Battery Charger may only be used to charge the GARDENA
Li-Ion battery located in the Controller.
Never expose the Battery Charger to moisture or wetness.
RISK OF FIRE! Short-circuit!
Do not bridge contacts of the Battery Charger with metal parts.
Check before each use:
Carry out a visual inspection each time before using the
Battery Charger.
After intensive use, first let the battery cool before charging.
End of charging / storage:
Store the Battery Charger with disconnected mains plug.
Follow the Safety Instructions on the Controller.
RISK OF FIRE! Short-circuit!
Do not bridge contacts of the Controller with metal parts.
Check before each use:
Carry out a visual inspection each time before using the Controller.
Use / Responsibility:
ATTENTION! Due to the danger of physical injury, the Controller may
not be used as an energy source for other appliances. You may only
use the Controller for the intended GARDENA Wall-Mounted Hose
Box Art. 8025.
Electrical safety:
RISK OF FIRE !
Never charge batteries near acids and highly flammable materials.
Only Original GARDENA Battery Chargers may be used as battery
chargers. If other battery chargers are used, the batteries may be
destroyed and fires may even be caused.
RISK OF EXPLOSION !
Protect battery against heat and fire. Do not place on radiators or
expose to intense sunlight for long periods.
Only use and charge the battery in an ambient temperature between
5 °C and 45 °C. After long periods of use, first allow the battery to cool
down.
The mains charging cable must be inspected regularly for signs of
damage and ageing (brittleness) and may only be used in perfect
condition.
Putting into storage:
Do not store the battery over 45 °C or under direct sunlight. Ideally, the
battery should not be stored below 25 °C so that the self-discharge is
low. Never store it connected to one of the connecting devices to prevent
misuse and accidents.
Do not store battery in places with static electricity.
The battery must not be opened.
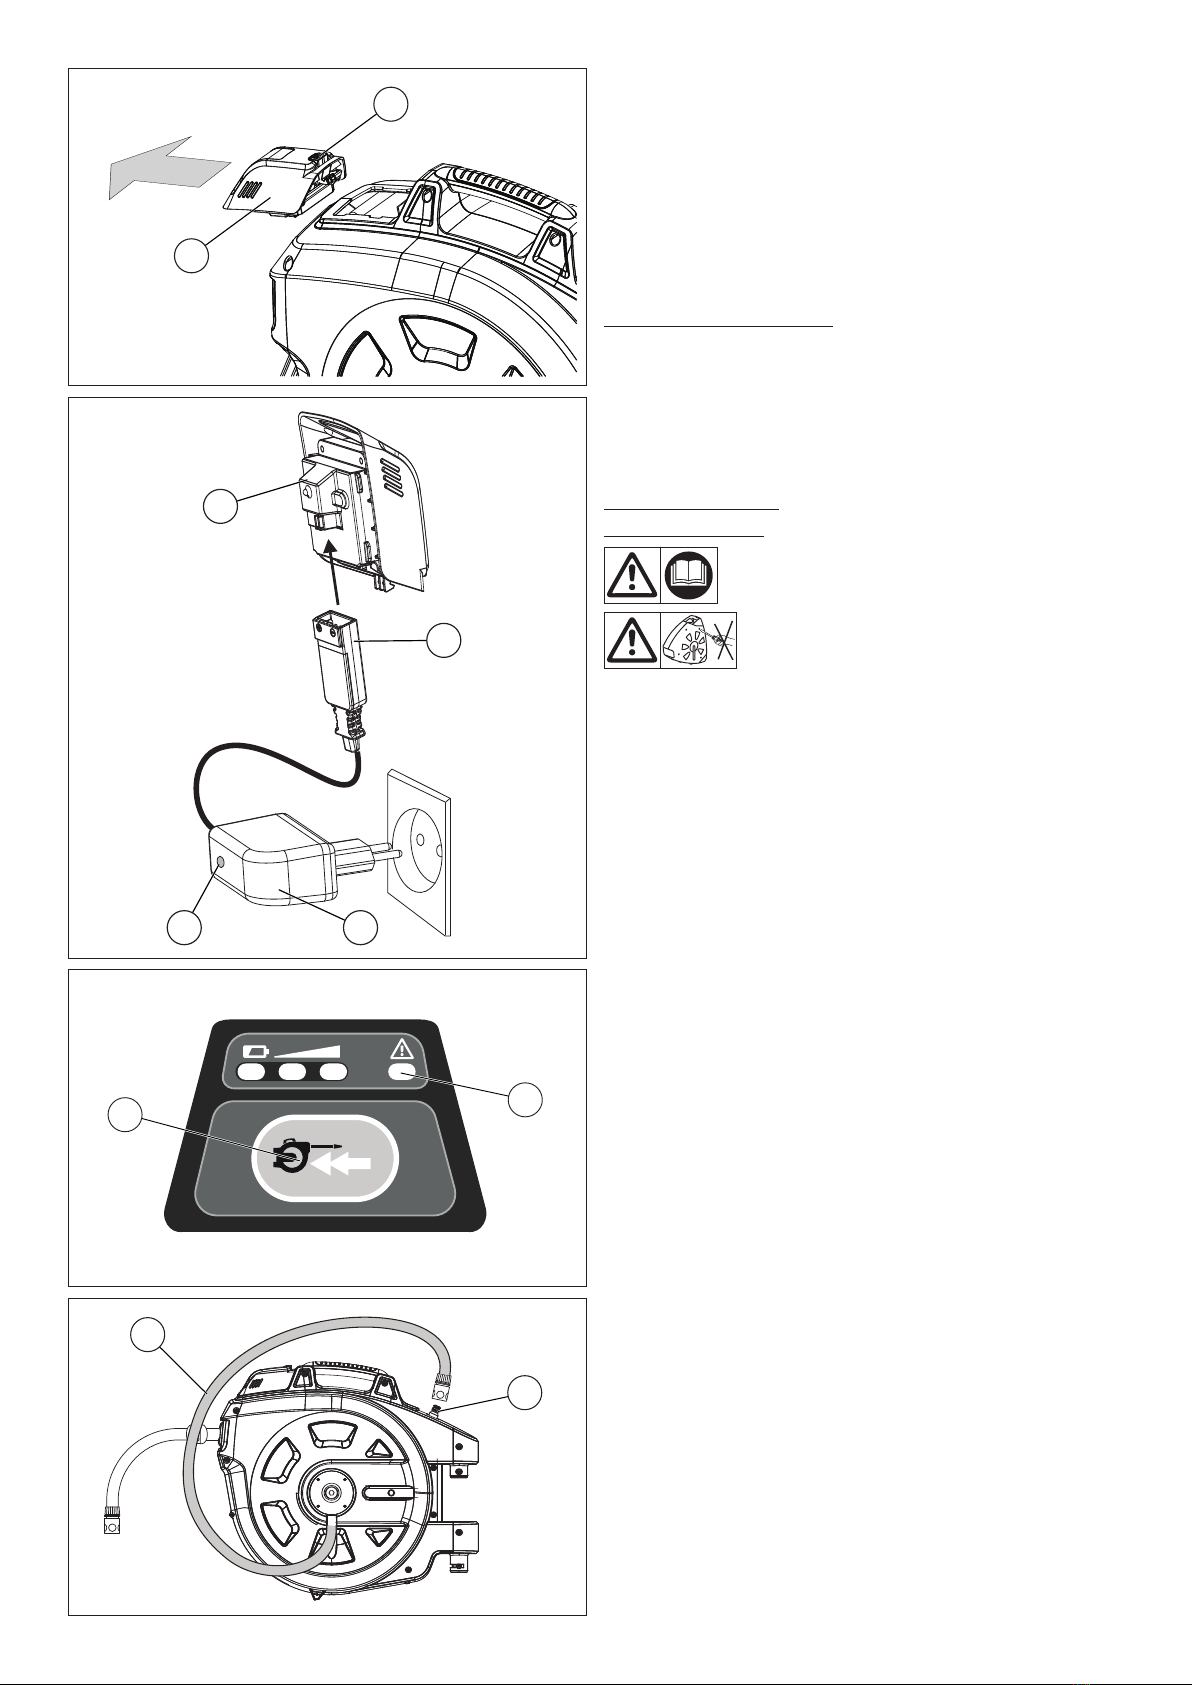
If required, the stopper can be shifted (Fig. B):
1. Press the release button Gand remove the Controller H.
2. Loosen the 2 screws 2on the stopper 3with a screwdriver.
3. Hold the watering hose securely while shifting, shift the stopper 3
and screw tightly again with the 2 screws 2.
Mount wall bracket (Fig. C):
The supplied wall plugs are suitable for cement walls (plaster up
to 1 cm). For other wall types, special wall plugs must be used.
1. Mark holes using the wall bracket 7, drill into the wall with an 8-mm
drill and stick in the wall plugs 8.
2. Screw the wall bracket 7with the 4 screws 9(width across flats
10-mm) and the 4 washers 0.
3. Stick the Hose Box Bonto the wall bracket 7.
4. Secure the Hose Box Bwith the safety screw D.
5. Connect the connecting hose Cto the tap.
Charge battery in the Controller (Fig. D/E):
Before using for the first time, the battery must be fully charged.
The lithium-ion battery can be charged at every charging level and
charging can be interrupted at any time without damaging the battery
(no memory effect).
ATTENTION!
Overvoltage destroys the batteries and the charger.
VObserve correct mains voltage.
1. Press the release button Gand remove the Controller H.
2. Insert the Battery Charger Jinto a mains socket.
3. Insert the plug of the charging cable Iinto the Controller H.
Charging control lamp Kis lit red: Battery is charged.
Charging control lamp Kis lit green: Battery is fully charged.
(For charging time, see Technical Data).
4. First disconnect the plug of the charging cable and then disconnect
the Battery Charger from the mains socket.
5. Slide the Controller Hon the Controller-insert on the Hose Box until
it snaps in.
So that the fully charged battery does not self-discharge via the Battery
Charger, the Controller should be disconnected from the unplugged
Battery Charger after charging.
Operation (Fig. F):
Unwind:
vPull out hose to desired length.
Roll up:
vWith the end of the hose, go back to the Hose Box and hold the
button pressed Luntil the hose has been rolled up to the desired
length.
Protective function: If the hose is blocked or completely rolled up, the
motor automatically switches off.
vWhen the connecting hose Cis removed from the tap, place it onto
the anti-drip device Fso that no water will drip from the hose.
Caution! Do not direct water jet directly into the housing.
LED display of battery-charging status (Fig. F):
The charging level of the battery is displayed briefly every time the
button Lis pressed. When the battery is fully charged, the hose
can be rolled up to 25 times.
LED 3 shines green: Battery is fully charged.
LED 2 shines yellow: Battery is half-charged.
LED 1 shines red: Battery is nearly empty and must be charged.
LED 1 flashes red: Battery is completely empty and must be
charged.
Also with a nearly empty battery (LED 1 shines red), the hose can be
rolled up 1 time and the battery must be charged. When the battery
is completely empty (LED 1 flashes red), the hose can no longer be
rolled up.
Transport position (Fig. G):
Connect the connecting hose Cto the anti-drip device F.
Cleaning:
The hose box is maintenance-free and must not be cleaned internally
with water.

If necessary, clean the contacts of the Controller with a dry cloth.
Do not use any solvents.
Putting into storage:
Storage / overwintering:
Before the onset of the frost period, stow the motorised
Wall-Mounted Hose Box and the control panel in a frost-
proof place in an upright position.
The place of storage must be inaccessible for children.
1. Charge the battery. This increases the life of the battery.
2. Store the battery and the Hose Box in a frost-protected and dry
place.
Disposal of the battery:
The Controller Hcontains lithium-ion batteries which must not be
disposed of with normal household waste at the end of their life.
Important:
Please dispose of the battery via the municipal disposal point.
Troubleshooting:
In the event of other faults, please contact GARDENA Service. Repairs
may only be carried out by GARDENA service centres or by specialist
dealers authorised by GARDENA.
Note:
For safety reasons, the hoses may only be replaced by GARDENA
Service.
Technical data:
Battery 5 Li-Ion batteries
Battery capacity 1.6 Ah with 18 V
Battery charging approx. 3 hrs. 90 %
duration up to 4 hrs. 100 %
Battery Charger
Mains voltage 100
-
240 V/ 50
-
60 Hz
Rated output current 600 mA
FCeci est la traduction du mode d’emploi d’origine allemand.
Veuillez lire ce mode d’emploi attentivement et respecter les indications
qu’il contient. Ce mode d’emploi vous permet de vous familiariser
avec l’appareil et son utilisation correcte ainsi qu’avec les consignes de
sécurité.
Pour des raisons de sécurité, les enfants ou jeunes gens de moins de
16 ans, ainsi que les personnes n’ayant pas lu et compris le présent
mode d’emploi ne peuvent pas utiliser cet appareil. Les personnes dont
les capacités physiques ou mentales sont réduites peuvent utiliser ce
produit uniquement sous la surveillance d’un adulte responsable. Les
enfants doivent être surveillés afin de s’assurer qu’ils ne jouent pas avec
le produit.
Utilisation conforme :
Le dévidoir mural avec enroulement automatique sur accu du tuyau sert
à l’arrosage du jardin et est destiné à une utilisation dans un potager ou
un jardin. Toute utilisation dans les jardins publics, les parcs, les lieux de
sport, aux bords des routes et dans les domaines de l’agriculture et de
la sylviculture est interdite. Le dévidoir mural est exclusivement réservé
à l’usage extérieur.
L’utilisation conforme du chargeur de batterie rapide présuppose le
respect de ce mode d’emploi.
Fournitures (fig. A) :
Consignes de sécurité :
ATTENTION !
V Avant la mise en service, lire le mode
d’emploi.
ATTENTION !
Ne pas ouvrir le dévidoir portable.
Veuillez respecter les consignes de sécurité figurant sur le chargeur.
RISQUE D’EXPLOSION ! Risque de blessure !
Il est interdit d’utiliser le chargeur pour charger d’autres accus /
batteries.
Le chargeur peut charger exclusivement l’accu Ion-Lithium GARDENA
se trouvant dans le module de commande.
Ne jamais exposer le chargeur à l’humidité ou à la pluie.
RISQUE D’INCENDIE ! Court-circuit !
Les éléments de contact du chargeur ne doivent jamais être reliés par
du métal.
A contrôler avant chaque utilisation :
Vérifiez l’état du chargeur avant chaque utilisation.
Après forte sollicitation, laisser d’abord refroidir l’accu avant de le
charger.
Fin de charge / rangement :
Rangez le chargeur après avoir débranché la fiche.
Veuillez respecter les consignes de sécurité figurant sur le module de
commande.
RISQUE D’INCENDIE ! Court-circuit !
Les éléments de contact du module de commande ne doivent jamais
être reliés par du métal.
A contrôler avant chaque utilisation :
Vérifiez l’état du module de commande avant chaque utilisation.
Utilisation / responsabilité :
ATTENTION ! En raison du risque de danger corporel, le module de
commande ne peut pas être utilisé comme source d’énergie pour
d’autres appareils. Utilisez le module de commande exclusivement
pour le dévidoir mural GARDENA réf. 8025 prévu à cet effet.
Sécurité électrique :
RISQUE D’INCENDIE !
Ne jamais charger d’accus à proximité d’acides ou de matières facile-
ment inflammables.
Seuls des chargeurs d’origine GARDENA peuvent être utilisés en tant
que chargeur. L’utilisation d’autres chargeurs risque d’endommager les
accus et même de provoquer un incendie.
RISQUE D’EXPLOSION !
Protéger l’accu de la chaleur et du feu. Ne jamais les déposer sur des
radiateurs ni les exposer pour une période de temps prolongé au rayon-
nement solaire intense.
L’accu doit être utilisé et chargé à une température ambiante comprise
entre 5 °C et 45 °C. Après une sollicitation importante, laisser d’abord
refroidir l’accu.
Examiner régulièrement tout indice d’endommagements ou de dégrada-
tions (friabilité) sur le câble de chargement et utiliser celui-ci uniquement
s’il est dans un état irréprochable.
6
Fault
Hose is not
completely
retracted.
During charging,
the charging control
lamp Kflashes red.
Error LED Mflashes
red.
Error LED Mlights up
red.
Possible cause
Hose was not rolled
up correctly.
There is a fault during
charging.
Overtemperature in
the Controller or
motor.
Controller His
defective.
Controller Hnot
pushed onto the
hose box.
Remedy
Pull out hose
completely under
water pressure and
roll up completely
as described under
“Operation”.
Unplug charging cable
and plug in again.
The fault will be reset.
Let cool off (wait at
least 5 min.).
Contact GARDENA
Service.
Push controller onto
the hose box.
Other manuals for 35
1
Table of contents
Other Gardena Tools manuals

Gardena
Gardena 2691 User manual

Gardena
Gardena RollUp M User manual

Gardena
Gardena 756 User manual

Gardena
Gardena 756 User manual

Gardena
Gardena RollUp M/L User manual

Gardena
Gardena 8022 User manual

Gardena
Gardena 2674 User manual

Gardena
Gardena Roll-Up 15 User manual

Gardena
Gardena 2650 User manual

Gardena
Gardena 8022 User manual
Popular Tools manuals by other brands

ISCO
ISCO MTD MultiClamp Operator's manual

Macnaught
Macnaught HG 20F-012KMM-01 instruction manual

Trelawny
Trelawny SF11EX Operation and maintenance manual

OEM
OEM 24403 Operating instructions and parts manual

MSW Motor Technics
MSW Motor Technics MSW-DA-20 user manual

Matco Tools
Matco Tools MST7842 quick start guide