GASER Super User manual
HAMBURGER FORMING MACHINE
Mod. SUPER

-2-
INDEX
1. INDUSTRIAS GASER .............................................................................................3
2. EC DECLARATION OF CONFORMITY ..................................................................4
3. HYGIENE CERTIFICATE ........................................................................................5
4. INTRODUCTION.....................................................................................................6
4.1 Safety................................................................................................................6
4.2 Hygiene.............................................................................................................6
5. TECHNICAL SPECIFICATIONS..............................................................................7
6. RECEIPT AND START-UP ......................................................................................8
6.1 Receipt..............................................................................................................8
6.2 Start-up..............................................................................................................8
6.3 Notes...............................................................................................................11
6.3.1 Changing patty shape ..............................................................................11
6.3.2 Paper dispenser.......................................................................................11
7. CLEANING............................................................................................................12
9. TROUBLESHOOTING...........................................................................................16
10. GENERAL DIAGRAM..........................................................................................17
10.1 Overview ......................................................................................................17
10.2 Chassis overview ..........................................................................................19
10.3 Former shaft overview...................................................................................21
10.3.1 Overview complete former bearing housing...........................................22
10.4 Tank overview................................................................................................23
10.4.1 Overview complete tank bearing housing ..............................................26
10.4.2 Gear motor.............................................................................................27
10.5 Ejector overview............................................................................................28
10.6, Paper dispenser overview............................................................................29
10.7 External thickness control overview ..............................................................30
10.8 Safety mechanism overview..........................................................................31
10.9 Protectors overview.......................................................................................32
10.10 Electrical cabinet overview..........................................................................33
12. WIRING DIAGRAMS...........................................................................................34

-3-
1. INDUSTRIAS GASER
Since its foundation in 1969, INDUSTRIAS GASER has specialised in manufacturing a range of
stainless-steel machinery for the meat industry.
Since 1985 we have constantly developed technology for GASER-brand hamburger-forming
machines, developing a distinctive system based on a SIMPLER, MORE EFFECTIVE AND MORE
ECONOMICAL TECHNIQUE.
In the 1990s, INDUSTRIAS GASER expanded into markets in various countries around the world, and
not just in the hamburger sector.
We are aware that our work would be of no value without the trust of our existing clients and partners
or the interest shown by those who wish to join them.
We thank them all.
INDUSTRIAS GASER GASER EUROPA
Salt, Girona, SPAIN L’viv, UKRAINE
INDUSTRIAS GASER Ctra, Bescanó, 15, Pol. Torre Mirona 17190 Salt (Girona) - Spain
Tel. 34 972 23 65 72 | Fax 34 972 23 63 66 | Whatsapp: (34) 679 49 65 06
email: [email protected]
GASER EUROPA вул.Б.Лепкого,1 81160 смт.Щирець Пустомитівский р-н Львівська область
Украіна - Ukraine
Tel. 38 (03230) 67251/84
Fax 38 (03230) 67191
email: gasereuropa@gaser.com
For more information about the company and its products: www.gaser.com

-4-
2. EC DECLARATION OF CONFORMITY
We declare under our responsibility that the following machine:
Brand: GASER
Model: SUPER
Serial no.
Year of construction:
is in conformity with the following regulations
UNE-EN ISO 12100:2012
UNE-EN ISO 14120:2016
UNE-EN ISO 14121-1:2008
UNE-EN 60204-1:2007 60204-1:2007 CORR. 2010 60204-1:2007/A1:2009
UNE-EN ISO 13849-1:2008/AC:2009
and is in conformity with the following directives
Machinery directive: 2006/42/CE
Low voltage directive: 2014/35/UE
Electromagnetic compatibility directive: 2014/30/UE
It is forbidden to make any change or modification to the machine without the prior written permission
of our technical department. Use of the machine in these conditions could cause accidents, in which
case INDUSTRIAS GASER S.L. accepts no liability for the improper use of the machine.
Salt,
CARLOS GARGANTA SERRAMITJA
TECHNICAL DIRECTOR INDUSTRIAS GASER S.L.

-5-
3. HYGIENE CERTIFICATE
We declare the machine:
Brand: GASER
Model: SUPER
Serial no.
Year of construction:
is in conformity with the following regulations
Regulation (EC) 1935/2004, materials and articles in contact with food, repealing Directives
80/590/EEC and 89/109/EEC.
This means that all of the types of steel and plastic from which the machine is constructed and which
are in contact with the meat comply with the hygiene rules and regulations in force.
* Plastic material: polyethylene terephthalate (PETP), white, density 1.37 g/cm3,
Manufactured in accordance with DIN 50014.
* Stainless steel: AISI 304, manufactured in accordance with European regulations EN-10088,
Chemical composition: C≤0.07% Si≤0.75% Mn≤2% Cr=18-19% Ni=8-10%
Salt,
CARLOS GARGANTA SERRAMITJA
TECHNICAL DIRECTOR INDUSTRIAS GASER S.L.

-6-
4. INTRODUCTION
Before using or handling the machine, you must read this manual carefully.
The instructions in this document are, whenever possible, accompanied by illustrations to help with
understanding of how to start, use and clean the machine.
This manual is subject to amendment.
4.1 Safety
It is forbidden to make any change or modification to the machine without the prior written permission
of our technical department. Use of the machine in these conditions could cause accidents, in which
case INDUSTRIAS GASER S.L. accepts no liability for improper use of the machine.
The machine has been designed for use with food products and must be used in the way described in
this manual. Any use other than the specified one will involve risk for the user and for the machine.
INDUSTRIAS GASER S.L. accepts no liability either for damage to the machine or personal injury or
injury to third parties that this use might cause.
4.2 Hygiene
All of the materials used in the manufacture of the machine and which come into contact with food
comply with Regulation 1935/2004. Consequently, the machine has the CE mark.
It is not recommended to use detergents containing chlorine, any of its derivatives or any other product
that could damage the construction materials of the machine.

-7-
5. TECHNICAL SPECIFICATIONS
1. Tabletop machine
2. Can be dismantled for ease of cleaning
3. Easy maintenance
4. Made from stainless steel and plastics suitable for use with food
5. Frequency converter
6. Capable of placing paper on one side
7. Produces round patties of 30 to 120 mm diameter and other shapes (these must be concentric
with a circle and of the measurements mentioned above)
8. Weight controllable with a maximum patty thickness of 25 mm
9. Produces 20 to 60 patties/minute
10. Capacity: 15 kg mixture
11. Motor power (single-phase) 750W, 220V, 50Hz.
12. Dimensions of assembled machine: 650 × 450 × 740 mm
13. Machine weight: 77 kg

-8-
6. RECEIPT AND START-UP
6.1 Receipt
When you receive the machine, you must first check that it is in perfect conditions, without any
damage, dents or knocks.
If there is any problem, we advise you notify the distributor or INDUSTRIAS GASER S.L. directly.
6.2 Start-up
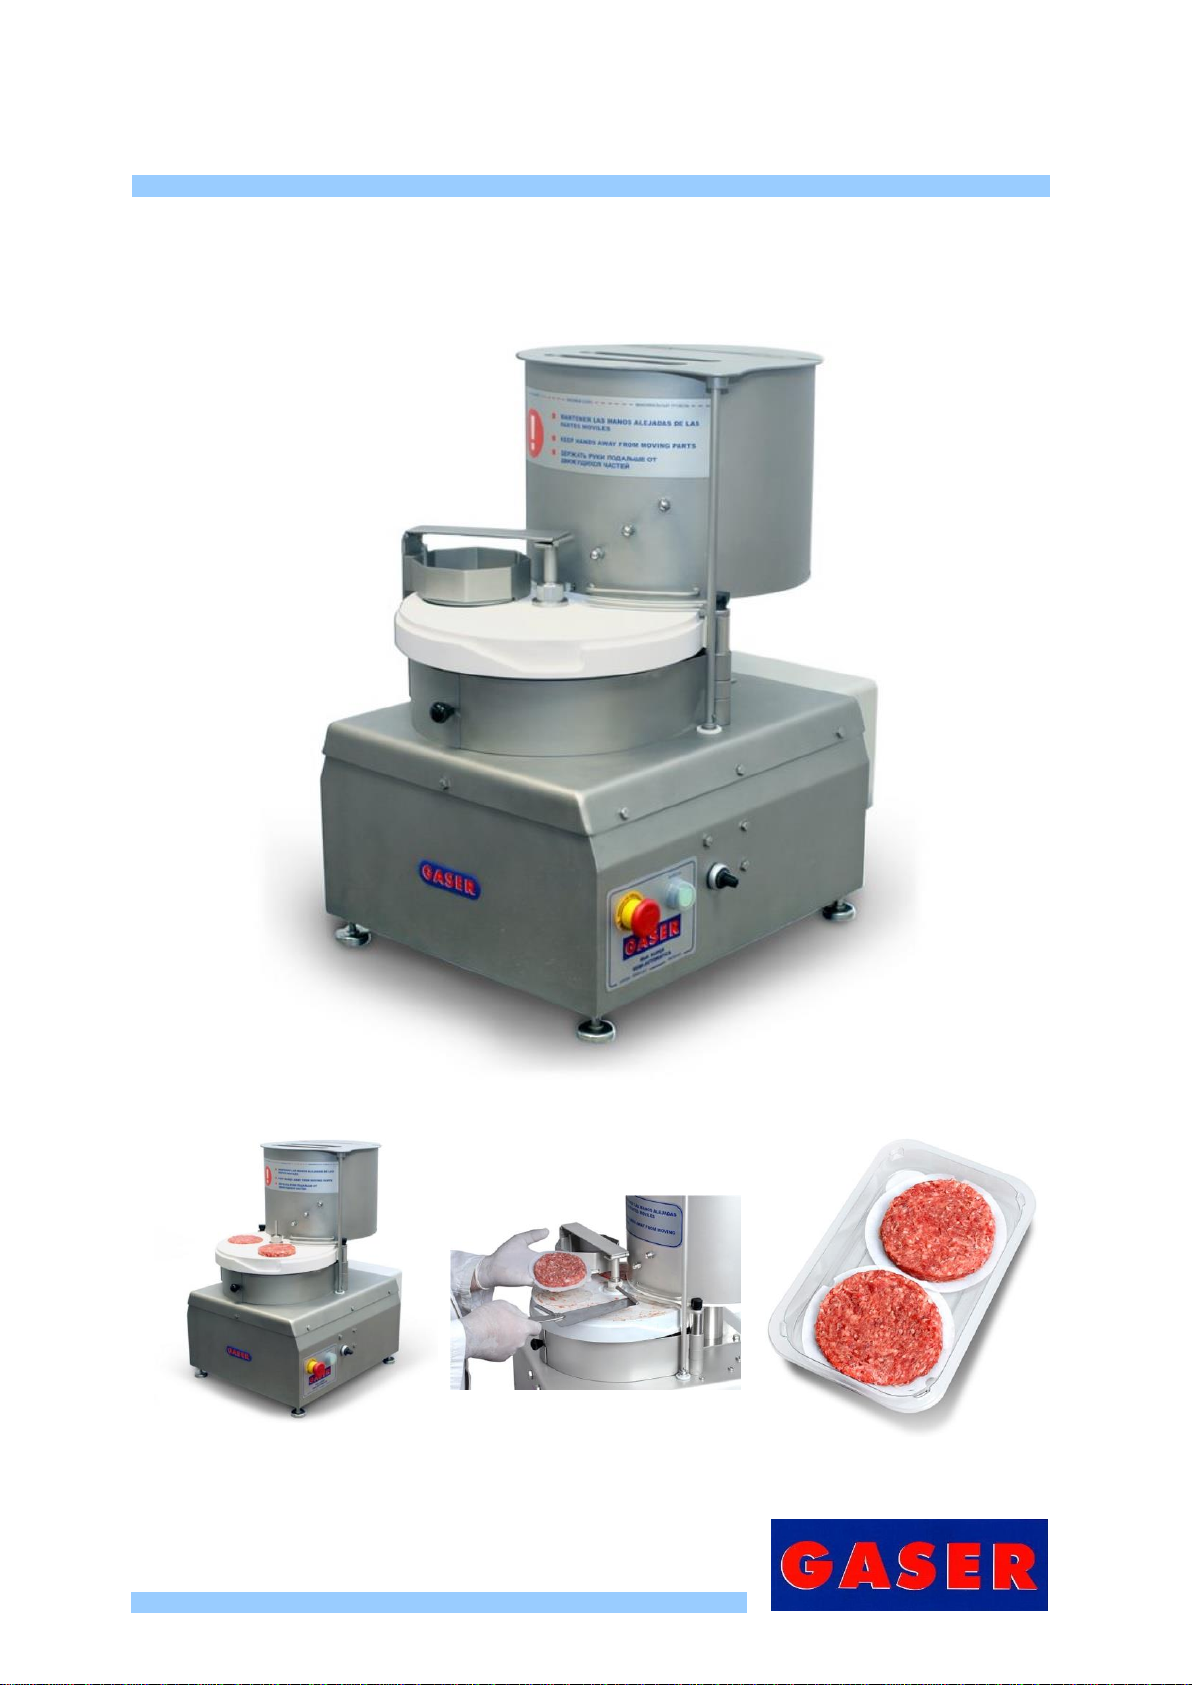
1. These machines essentially consist of 3 parts: chassis, former unit and tank.
Image 1. Main parts
2. It is important that when the machine starts working, it is completely clean to ensure it works
properly.
3. The SUPER model hamburger forming machine works on single phase 220 V 50 Hz electrical
current.
-9-
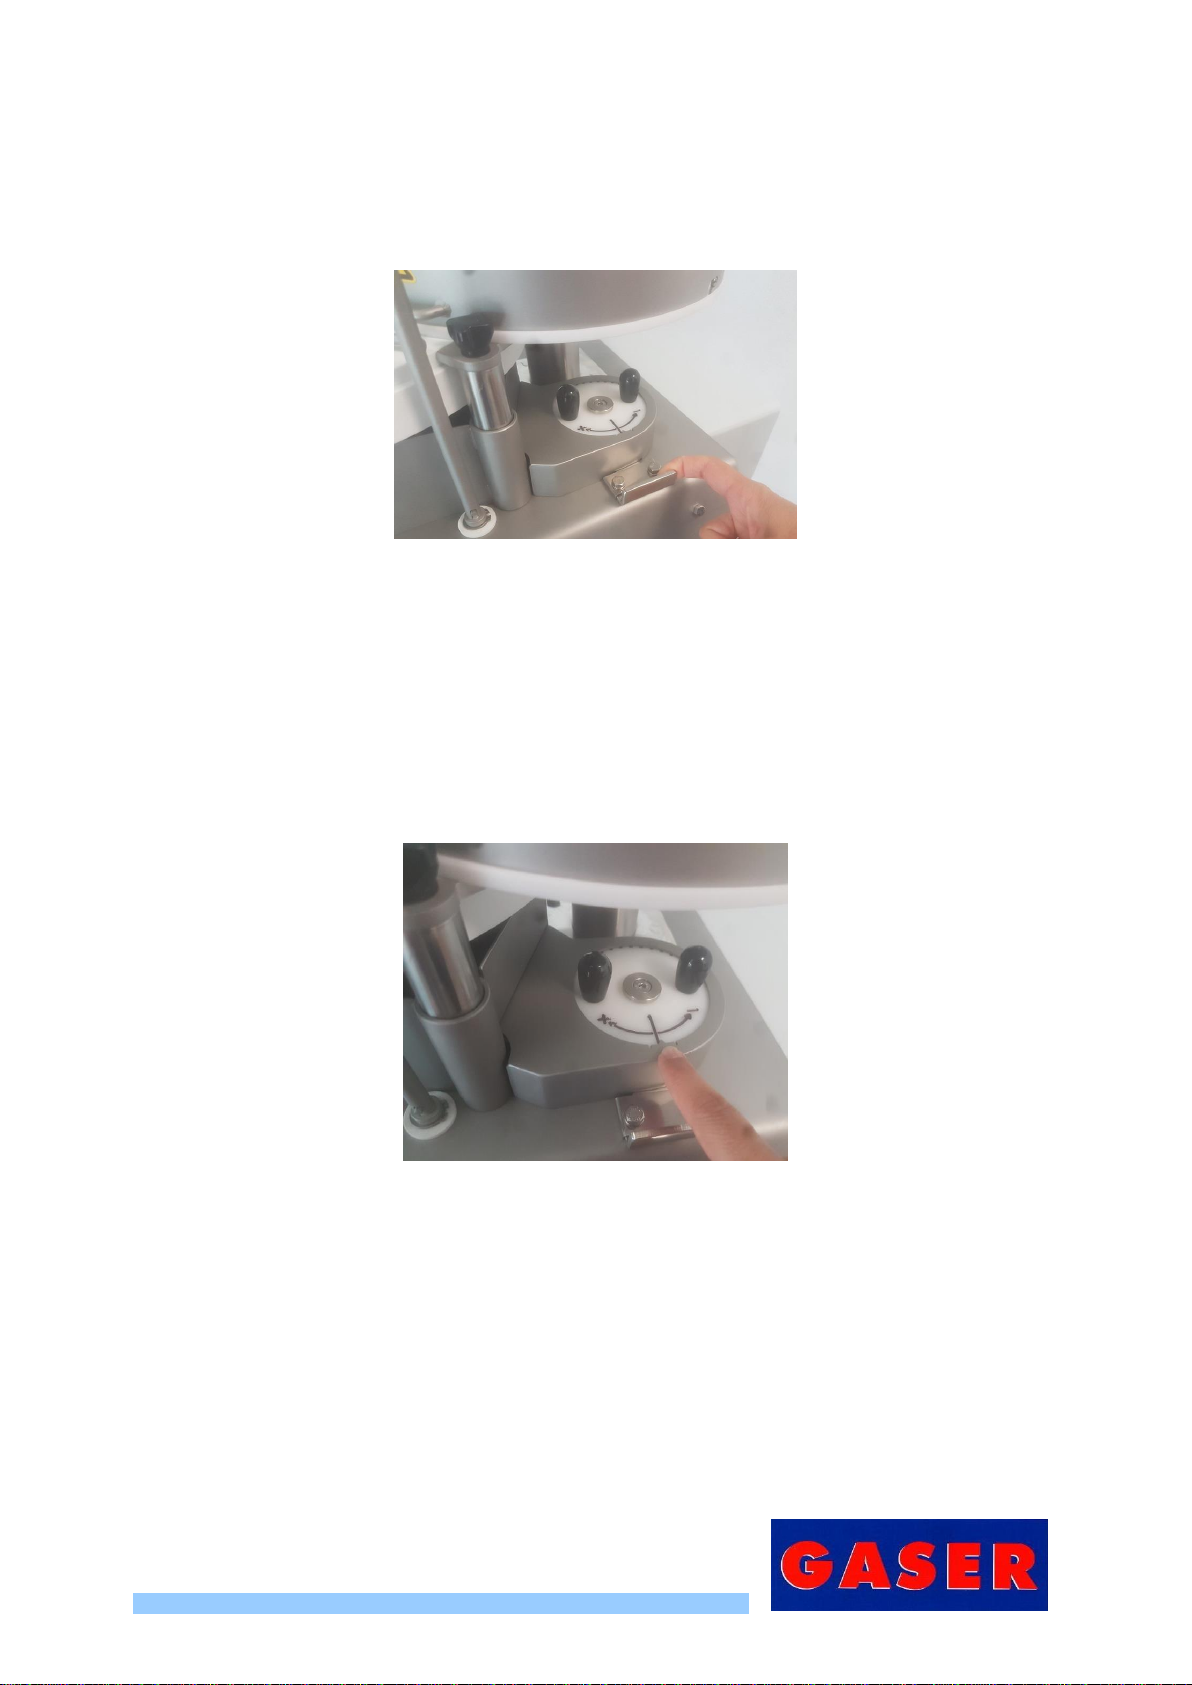
4. Before starting production, if it has not been calibrated previously, the thickness of the patty must
be calibrated. To do so, follow these steps:
4.1.Pull on the latch (Pos. 8, external weight control overview) to expose the calibration gears
(Pos. 1, external weight control overview).
Image 2, Calibration 1
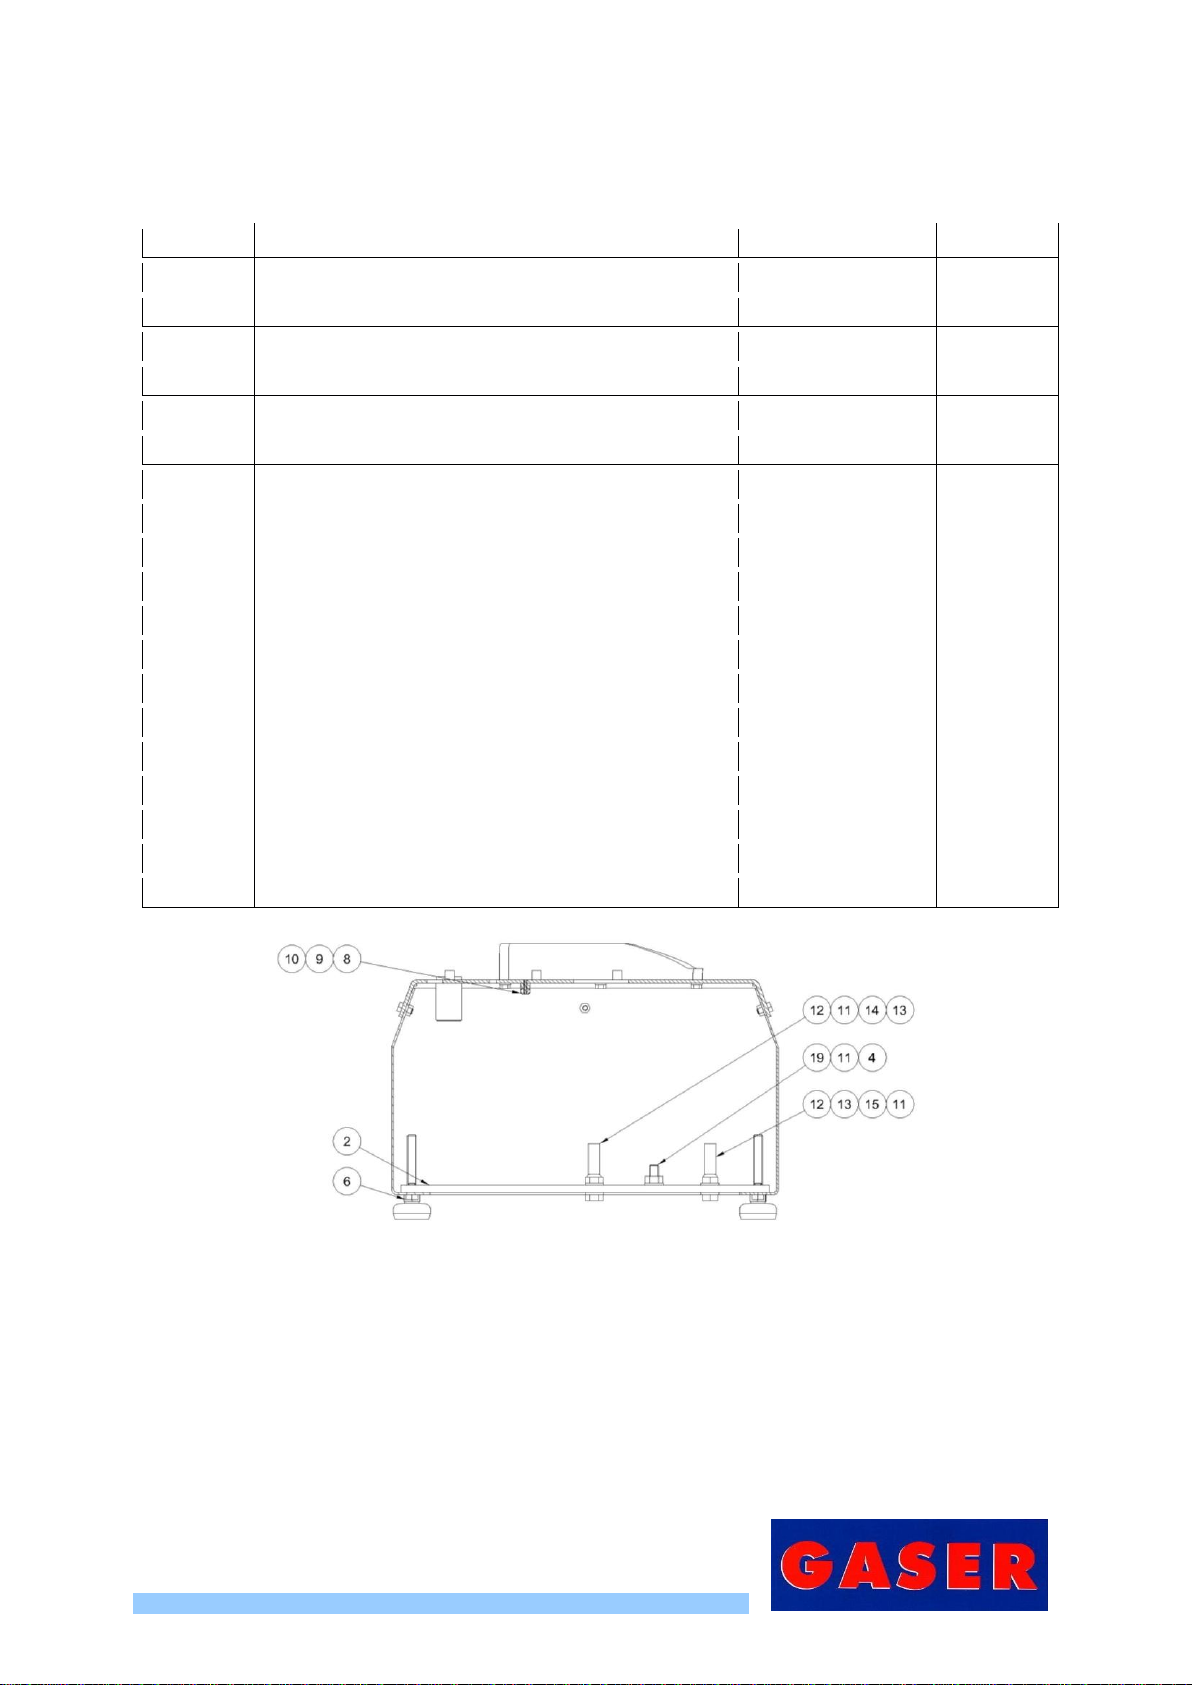
4.2.Turn the plate (Pos. 1, external weight control overview) clockwise to increase the
thickness and anti-clockwise to reduce it. Each turn of the plate changes the thickness of
the patty by 1 mm.
It is vital that when you perform the calibration of the thickness of the patties, the
calibration gear makes full turns, so that the mark on the gear lines up with the arrow on
the protection.
Image 3, Gear position
5. To start production, first fill the machine’s tank (Pos. 8, tank overview) with the mixture you wish to
use.
6. Next, start the machine up using the main switch (Pos. 3, electrical cabinet overview). Once the
machine is ON, press the green “START” button (Pos. 15, overview) and make 2 or 3 patties in
manual mode (Pos. 4, electrical cabinet overview) to check that the weight is correct. If the weight
of the product has to be modified with meat in the machine, it is vital that all of the plate holes

-10-
(Pos. 2, former shaft overview) are exposed. Once the desired weight has been found, select the
automatic mode and press the green start button again.
Image 4, Position of the plate
7. If the patties are seen to come out with a layer above the plate or they are not well compacted, this
can be adjusted using the weight calibration gear. Turn it a few degrees to the left or right until the
mark on the gear lines up with the grooves on the protection.
Image 5, calibration 1
Image 6, calibration 2
8. To extract the patties, use the slice designed for this purpose, sliding it over the plate (Pos. 12,
overview), keeping it completely flat.
The slice must be kept clean at all times. We recommend providing a container with water to wet
the slice and keep it damp during this process.

-11-
6.3 Notes
6.3.1 Changing patty shape
To change the shape of the patties, first disassemble the machine as shown in point “7 CLEANING”.
Once the machine has been disassembled, you can change the shape of the patties and reassemble
the machine by reversing the order of disassembly.
Remember that when you change the shape, the weight might vary.
6.3.2 Paper dispenser
To place paper on the patties, fit the paper dispenser (Pos. 5, overview). First, insert the shaft. Next,
insert the guide into the former shaft keeping it as horizontal as possible.
Image 7, Inserting axle
Image 8, Inserting guide
Insert the paper discs so that the waxed side faces downwards in the dispenser, as this is the side that
will be in contact with the mixture.

-12-
7. CLEANING
When you have finished using the machine, it must be cleaned. To do so, follow these steps:
1. First, remove the paper dispenser unit, keeping it as horizontal as possible when lifting it.
Image 9, Removing paper positioner
2. Next, remove the tank (Pos. 8, tank overview). To do this, lift the cover of the tank (Pos. 15, tank
overview), extract the safety mechanism guide tube (Pos. 9, safety mechanism overview) and
then turn the tank clockwise.
Image 10, Lifting lid
Image 11, Safety guide tube

-13-
Image 12, Turning tank clockwise
Image 13, Removing tank
3. Remove the vanes (Pos. 16, tank overview), loosening the safety screw (Pos. 9, tank overview) by
turning it clockwise.
Image 14, Removing safety screw
Image 15, Removing vanes
4. Next disassemble the base of the tank (Pos. 3, tank overview). The two knobs must be removed
(Pos. 14, tank overview).
Image 15. Removing knobs
Image 14, Removing tank base

-14-
5. Finally, remove the former (Pos. 2, former shaft overview) by loosening the former shaft nut (Pos.
5, former shaft overview).
Image 16. Removing former shaft nut
Image 17. Removing former unit
6. Clean the disassembled components with pressurised water and dry well, using compressed air if
possible. Clean the machine’s chassis with a damp cloth. Never clean it with pressurised water.
Image 18. Machine ready for cleaning

-15-
8. MAINTENANCE
This machine requires virtually no maintenance. Even so, there are a few details that must be taken
into consideration.
1. Periodically check the condition of all moving parts: retainers, gears and bearings.
2. Periodically check the condition of the extractor slice thread (Pos. 12, overview).
If it is necessary to change the thread, to remove it, bend the slice, then you can easily remove the
thread and replace it with a new one.
Image 19, Folding to remove thread
Image 20, removing thread
3. Periodically check the condition of the gear motor.
4. Periodically check the condition of the safety elements.
5. Periodically check the general condition of the machine.

-16-
9. TROUBLESHOOTING
The table below lists the problems that might occur with the machine, their potential causes and how
to solve them.
Problem
Cause
Solution
The machine does not start
Machine unplugged
See manual “6.2. Start-up”, point 3
The safety elements have not
been fitted
Fit safety elements
The machine still does not start
Safety sensors have come lose.
Calibrate security sensors
Electrical connections or
components in poor condition
See manual “8. Maintenance”,
point 4
The patties do not come out well
formed (too little or too much
mixture)
Too little or too much mixture
See manual “6.2. Start-up”, point 7
The patty deforms with the
extractor slice.
The mixture is not correct.
The mixture should be smoother
or colder.
Incorrect use of the slice
See manual “6.2. Start-up”, point 8
Slice thread in poor condition
Change thread

-17-
10. GENERAL DIAGRAM
10.1 Overview
Number
Description
Reference
Units
1
CHASSIS UNIT
S1010000
1
2
FORMER SHAFT UNIT
S1020000
1
3
TANK UNIT
S1030000
1
4
EJECTOR UNIT
PLEASE CONSULT
3
5
PAPER DISPENSER
PLEASE CONSULT
1
6
EXTERNAL THICKNESS CONTROL UNIT
S1120000
1
7
SAFETY MECHANISM UNIT
S1150000
1
8
MAIN PROTECTION UNIT
S1160000
1
9
ELECTRICAL CABINET UNIT
S1250000
1
10
STAINLESS CHEESE HEAD SCREW M6 × 16
DIN84
FE0108M060160084
2
11
STAINLESS CHEESE HEAD SCREW M6 × 20
DIN84
FE0108M060200084
2
12
EXTRACTOR SLICE
S1000100
1
13
POTENTIOMETER
EL102010KM22
1
14
EMERGENCY STOP
SS530000
1
15
GREEN PUSH BUTTON
SS510000
1
16
TEARDROP TYPE GASER BRAND STICKER
PA0230GGASER
1
17
GASER BRAND STICKER
PA0230SUPER
1
18
BASIC/SUPER/MAXI TANK STICKER
PA0230TSUPER
1

-18-
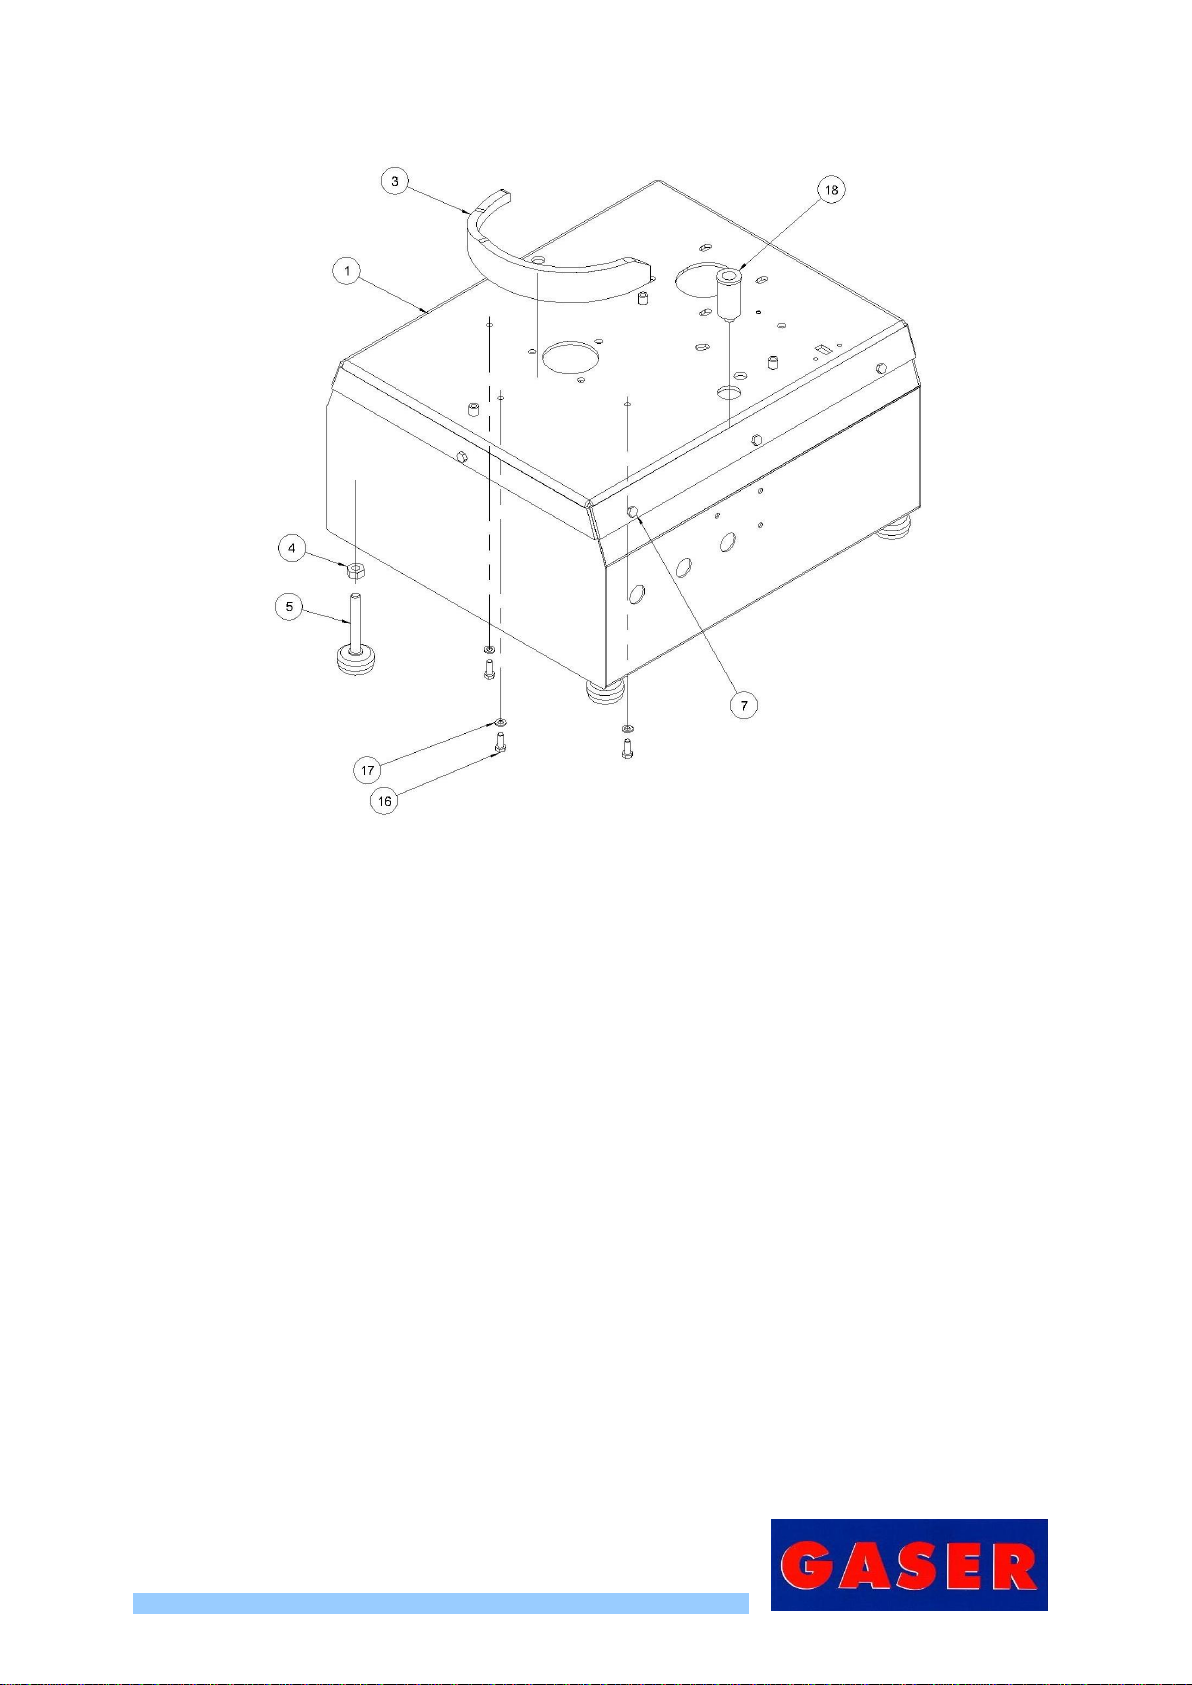
Figure 1, Standard overview 1
Figure 2, Standard overview 2
-19-
10.2 Chassis overview
Ref. S1010000
Position
Description
Reference
Units
1
CHASSIS
S1010100
1
2
MOTOR SUPPORT
S1010400-E
1
3
LIFTING RAMP
S1020900
1
4
STAINLESS HEX NUT M10 DIN934
FE0108M100000934
5
5
STAINLESS STEEL/RUBBER FOOT D-40
SI0226PID40M10
4
6
STAINLESS HEX SCREW M10 × 12 DIN933
FE0108M100120933
2
7
STAINLESS HEX SCREW M6 × 12 DIN933
FE0108M060120933
8
8
STAINLESS HEX LOCK NUT M6 DIN985
FE0108M060000985
1
9
STAINLESS HEX NUT M6 DIN934
FE0108M060000934
1
10
STAINLESS ALLEN GRUB SCREW M6 × 16 DIN913
FE0108M060160913
1
11
STAINLESS WASHER M10 DIN125
FE0108M100000125
5
12
NATURAL POLYAMIDE TUBE 12 × 10 mm
SI0236TPA1210
2
13
STAINLESS HEX LOCK NUT M10 DIN985
FE0108M100000985
2
14
STAINLESS HEX SCREW M10 × 45 DIN933
FE0108M100450933
1
15
STAINLESS HEX SCREW M10 × 55 DIN933
FE0108M100550933
1
16
STAINLESS HEX SCREW M6 × 16 DIN933
FE0108M060160933
3
17
STAINLESS WASHER M6 DIN125
FE0108M060000125
3
18
SAFETY MECHANISM SLEEVE
S1150100
1
19
MOTOR SUPPORT THREADED ROD
S1012000
1
Figure 3, Chassis overview 1
-20-
Figure 4, Chassis overview 2
Table of contents
Other GASER Commercial Food Equipment manuals


Popular Commercial Food Equipment manuals by other brands

Blodgett
Blodgett XR8-G/AB Installation operation & maintenance

Lincat
Lincat UM50 Installation, operating and servicing instructions

CombiSteel
CombiSteel 7292 Series user manual

Falcon
Falcon DOMINATOR PLUS E3405 Installation and servicing instructions

Lincoln
Lincoln V2500 Series Service manual

Electrolux
Electrolux SkyLine ChillS 202 user manual

PERFECT FRY COMPANY
PERFECT FRY COMPANY PFM Series owner's manual

CHEFOOK
CHEFOOK Wi-food 69085003LF User and maintenance manual

KYONE
KYONE ADVANCE PRO manual

LKK
LKK Wok Series User Manual & Servicing Instructions

True
True TCGG-72-S-LD installation manual

Frigomat
Frigomat Taylor CH03 Series Operating instructions and maintenance


