Gate Amfibi Double HighBack 56-275 User manual

1
Instructions for Use
Amfibi
Hygiene chair
Amfibi Double HighBack 56-275
™
PMS 322 C

2
Safety
Read these instructions carefully before use.
• NeverusetheAmBitostandon.
• ThePatientcarer/nurseisresponsibleforensuring
thattheproductissuitableforitsuser.
• Batterycare–getintothehabitofalwaysplacingthebatteryinthechargerovernight
orwheneverthechairwillnotbeinuseforacoupleofdays.Thebatterycannotbe
overchargedwhereasitcanbedamagedifitisnotchargedregularly.
• Theusershouldnotweighmorethanmax150kg.
• Whenadjustingtheheight/recliningangle,makesurethereisnoriskofpinchinjuries.
• Observecautiononinclinesandwhenpassingoverdoorthresholdsorsimilar.
• NeverstandontheFOOTREST–overbalancingrisk.
• BatterychargingmustALWAYStakeplaceindryspaces,neverinwetrooms
orsimilar.
• ThechairmustneverbeusedWITHOUTbatteriesasmoisturemayenteranddamage
thecontrolbox/electronics.
• ThechairmayNEVERbeusedUNDERWATER(inapoolorsimilar).
1. Uttag för batterikontakt
2. Uttag för stickpropp
(OBS! För att IP-klassning ska gälla så ska
stickpropp ALLTID vara ansluten till styrbox)
3. Uttag för fjärrkontroll
4. Uttag för ställdon - höj/sänk
5. Uttag för ställdon - breddning (Endast
Bure Double)
OBS! Var noga med att kontakter ansluts
till rätt uttag eftersom detta annars kan
skada ställdon.
Kopplingsschema Styrbox Laddning Batteri
Laddning av batteri
Laddning av batteri ska ske då gåbordet inte
används. (Batteriet kan aldrig överladdas.)
Laddning görs genom att stickpropp ansluts
till eluttag.
Innan första användningen så
bör batteriet laddas 24 timmar..
2
3
4
1
5
Skötsel • • •
Generell skötselinstruktion Åtgärd
• Torka av gåbord och armstödsplattor vid behov – använd tvållösning
• Produkten ska ALLTID kännas stabil
Om gåbordet lutar eller har missljud – tillkalla servicepersonal.
• Byt ut trasiga delar omedelbart – skall göras av kunnig personal
• För gåbord med elställdon – använd ALDRIG gåbordet under laddning.
• Kontrollera att styrrör (g) är åtdragna i överstativ (3).
Övriga instruktioner • • •
5

3
Forwards
Backwards
Down
Up
Manoeuvring the chair
Foot support / Heel restraint
1Whenraisingandloweringtheseatusethe
"up"and"down"buttons.Thetiltfunctionis
controlledbythe"forwards"and"backwards"
buttons.
a)Thefootsupportcanbeadjustedinheightby
removingtheclips(seegure3)andmovingthe
footsupporttothedesiredheight(makesureto
replacetheclips).
b)Thefootsupportcanbeswungtothesideby
graspingitatarrowBandlifting/swinging.
c)Thefootsupportplatformcanbeswung
uppwards(c1)and/orangled(c2)asdesired.
d)Heelrestraintlengthisadjustedbymeansof
Velcrostripsonthebackoftheheelrestraint.
1. Uttag för batterikontakt
2. Uttag för stickpropp
(OBS! För att IP-klassning ska gälla så ska
stickpropp ALLTID vara ansluten till styrbox)
3. Uttag för fjärrkontroll
4. Uttag för ställdon - höj/sänk
5. Uttag för ställdon - breddning (Endast
Bure Double)
OBS! Var noga med att kontakter ansluts
till rätt uttag eftersom detta annars kan
skada ställdon.
Kopplingsschema Styrbox Laddning Batteri
Laddning av batteri
Laddning av batteri ska ske då gåbordet inte
används. (Batteriet kan aldrig överladdas.)
Laddning görs genom att stickpropp ansluts
till eluttag.
Innan första användningen så
bör batteriet laddas 24 timmar..
2
3
4
1
5
Skötsel • • •
Generell skötselinstruktion Åtgärd
• Torka av gåbord och armstödsplattor vid behov – använd tvållösning
• Produkten ska ALLTID kännas stabil
Om gåbordet lutar eller har missljud – tillkalla servicepersonal.
• Byt ut trasiga delar omedelbart – skall göras av kunnig personal
• För gåbord med elställdon – använd ALDRIG gåbordet under laddning.
• Kontrollera att styrrör (g) är åtdragna i överstativ (3).
Övriga instruktioner • • •
5
Manoeuvringmaytakeplacewiththe
patientinthechair;makesurethereis
noriskofpinchinjuries.
Audiblesignalsduringoperations
(warningsymbol);
•3shortbuzzesmeansthebattery
mustberecharged(chaircanonly
belowered).
•1shortbuzzmeansthebatteryis
empty.
2
aB
b
d
c2
c1
3

4
Tip protection – backwards (Accessory)
Locking the wheels
1. Uttag för batterikontakt
2. Uttag för stickpropp
(OBS! För att IP-klassning ska gälla så ska
stickpropp ALLTID vara ansluten till styrbox)
3. Uttag för fjärrkontroll
4. Uttag för ställdon - höj/sänk
5. Uttag för ställdon - breddning (Endast
Bure Double)
OBS! Var noga med att kontakter ansluts
till rätt uttag eftersom detta annars kan
skada ställdon.
Kopplingsschema Styrbox Laddning Batteri
Laddning av batteri
Laddning av batteri ska ske då gåbordet inte
används. (Batteriet kan aldrig överladdas.)
Laddning görs genom att stickpropp ansluts
till eluttag.
Innan första användningen så
bör batteriet laddas 24 timmar..
2
3
4
1
5
Skötsel • • •
Generell skötselinstruktion Åtgärd
• Torka av gåbord och armstödsplattor vid behov – använd tvållösning
• Produkten ska ALLTID kännas stabil
Om gåbordet lutar eller har missljud – tillkalla servicepersonal.
• Byt ut trasiga delar omedelbart – skall göras av kunnig personal
• För gåbord med elställdon – använd ALDRIG gåbordet under laddning.
• Kontrollera att styrrör (g) är åtdragna i överstativ (3).
Övriga instruktioner • • •
5
Allofthecastorsarelockable.Theyarelockedbyusinga
foottopressthebrake(green)againstthewheel.Releasethe
brakewithyourfoot.
AmbiDoubleisttedwithtipprotectionthatmustalwaysbeinposition/deployedwhen-
everthechairisreclinedbackwards.Thisensuresthatthechaircannottipbackwardsin
unfavourableloadcircumstances.
Thetipprotectionconsistsoftwoanti-tiptubesthatarelockedmagneticallyagainstthe
tiltactuator.
Thetiltprotectiondropsintopositionwhenthechairisreclinedbackwards.
Checkthattheanti-tiptubesarelockedintheextendedpositionwiththe
snaplocks.
Whenretracting,releasethetubesfromthesnaplocks,liftthemandlockthemusingthe
magneticlocks.
5
6

5
Adjustment of the
neck support
Sanitary pan
Thesanitarypanisslidintopositionfrom
behindbetweentheseatandwireguides
asshowningure7.
Makesurethesanitarypanisslidinto
positionabovethewireguides.Alsomake
surethatthepanisintherightpositionin
relationtotheseat/cut-out.
8
Adjusttheneckrestbyslidingitupor
downtothedesiredposition.Otherneck
restsizesareavailableasoptions.
7
Installing/removing the seat Installing seat with the rear
opening (Accessory)
9
Theseatcomprisestwohalvesthatare
snappedinplacewiththeaidofclamps
ontheseat'sunderside.
Toinstall- placeseatonframe
andpushintoplace
Toremove- holdoneachside
andpullupwards.
10

6
Locking the armrests
Actuator calibration
“Driving” the chair
Thearmrestislockedinthe
extendedposition.
Toliftthearmrest,pulloutthepin
(1)andraisethearmrest(2).
Werecommendusingthehandlebar
wheneverthechairmustbemoved(with/
withoutapatient).Thehandlebaris
designedsothatthechaircanbemoved
forwardsandturnedeasilyusinglittle
force(seegure12).
Ifpoweriscuttothecontrolboxduringoperationorindirectconnectiontooperation
(within5secondsofthechair'shavingbeenmanoeuvred)itmaymeanthattheUP/
DOWNorFORWARD/BACKWARDfunctionhasceasedtowork.Itisthennecessaryto
reset/recalibratetheactuatorpositionsensors.
Calibration UP/DOWN:
1. PressbothoftheremotecontrolbuttonsUP/DOWNsimultaneouslyforaround
10secondsuntilabeepisheard.Releasethebuttons.
2. PresstheDOWNbuttonandrunthechairtoitsminimumposition.
Releasethebutton.UP/DOWNfunctionisnowcalibrated.
Calibration FORWARD/BACKWARD:
1.PressbothoftheremotecontrolbuttonsFORWARD/BACKWARDsimultaneously
foraround10secondsuntilabeepisheard.Releasethebuttons.
2.PresstheBACKWARDbuttonandrunthechairtoitsmaximumbackwardposition.
Releasethebutton.FORWARD/BACKWARDfunctionisnowcalibrated.
1211
1
2

7
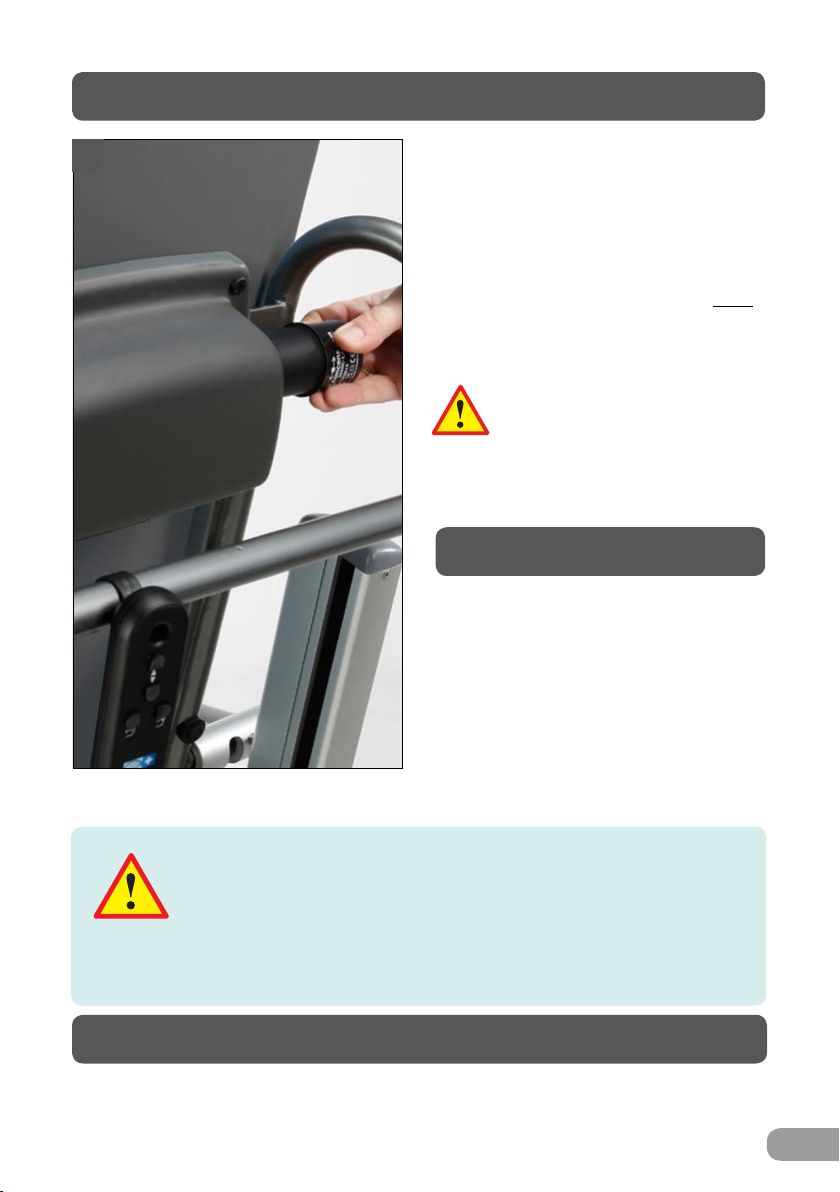
Battery installation/removal
Charging the battery
Thebatteryisusuallylocatedinthecontrol
boxandisheldinplacemagnetically.
Battery removal:Twistthebattery90°–
pullitout.
Installation:Slidethebatteryintothe
controlbox.Thebatteryislockedinto
positionmagneticallyfollowedbyabeep to
signaleverythingisOK.
Audiblewarningswhenbatteryisinserted;
•2longbuzzesmeanscalibration
mustbecarriedout(seeabove).
•5shortbuzzesmeansthe
batterymustberechargedbefore
operation.
Removethebatteryfromthecontrolbox
andplaceitinthechargersupplied.Con-
nectthechargertothemains(redlamp
shines–powerconnected,greenlamp
ashes–batteryischarging).Whenthe
batteryisfullychargedthegreenlamp
willshine.NOTE!Batterychargingmust
alwaystakeplaceindryspaces.The
chairmayNOTbeusedwhenthebattery
isremoved–watermayenterthecontrol
boxanddamageit.
Battery care –Getintohabitofalwaysremovingthebatteryfrom
thecontrolboxandplacingitinthechargerwheneverthechairis
notused(especiallyovernightorwhenthechairwillnotbeused
forafewdays).Thecontrolboxalwaysusesasmallquantityof
powerandthereforethebatteryisatriskofseriousdamageifitis
notchargedregularly.
1. Uttag för batterikontakt
2. Uttag för stickpropp
(OBS! För att IP-klassning ska gälla så ska
stickpropp ALLTID vara ansluten till styrbox)
3. Uttag för fjärrkontroll
4. Uttag för ställdon - höj/sänk
5. Uttag för ställdon - breddning (Endast
Bure Double)
OBS! Var noga med att kontakter ansluts
till rätt uttag eftersom detta annars kan
skada ställdon.
Kopplingsschema Styrbox Laddning Batteri
Laddning av batteri
Laddning av batteri ska ske då gåbordet inte
används. (Batteriet kan aldrig överladdas.)
Laddning görs genom att stickpropp ansluts
till eluttag.
Innan första användningen så
bör batteriet laddas 24 timmar..
2
3
4
1
5
Skötsel • • •
Generell skötselinstruktion Åtgärd
• Torka av gåbord och armstödsplattor vid behov – använd tvållösning
• Produkten ska ALLTID kännas stabil
Om gåbordet lutar eller har missljud – tillkalla servicepersonal.
• Byt ut trasiga delar omedelbart – skall göras av kunnig personal
• För gåbord med elställdon – använd ALDRIG gåbordet under laddning.
• Kontrollera att styrrör (g) är åtdragna i överstativ (3).
Övriga instruktioner • • •
5
Warranty
Weprovideatwo-yearwarrantyagainstanymanufacturingdefects(doesnotapplyto
wearparts).
1. Uttag för batterikontakt
2. Uttag för stickpropp
(OBS! För att IP-klassning ska gälla så ska
stickpropp ALLTID vara ansluten till styrbox)
3. Uttag för fjärrkontroll
4. Uttag för ställdon - höj/sänk
5. Uttag för ställdon - breddning (Endast
Bure Double)
OBS! Var noga med att kontakter ansluts
till rätt uttag eftersom detta annars kan
skada ställdon.
Kopplingsschema Styrbox Laddning Batteri
Laddning av batteri
Laddning av batteri ska ske då gåbordet inte
används. (Batteriet kan aldrig överladdas.)
Laddning görs genom att stickpropp ansluts
till eluttag.
Innan första användningen så
bör batteriet laddas 24 timmar..
2
3
4
1
5
Skötsel • • •
Generell skötselinstruktion Åtgärd
• Torka av gåbord och armstödsplattor vid behov – använd tvållösning
• Produkten ska ALLTID kännas stabil
Om gåbordet lutar eller har missljud – tillkalla servicepersonal.
• Byt ut trasiga delar omedelbart – skall göras av kunnig personal
• För gåbord med elställdon – använd ALDRIG gåbordet under laddning.
• Kontrollera att styrrör (g) är åtdragna i överstativ (3).
Övriga instruktioner • • •
5
13

8
2014-10-10,2
1
5
6
4
3
Maintenance
2
Would you like to know more?
Contactusat:Tel:+4637131800
GateRehabDevelopmentAB
Industrigatan2|SE-33021Reftele
[email protected]|www.gaterd.com
PMS 322 C
DIN PARTNER I VÅRDEN
CEmarkedaccordingtoMDD93/42/EEC.
Thechairisfabricatedfromsteeltubes(ED-painted(inside/
outside)//Powdercoted(outside))andaluminium.Exposed
partsthatarenotpaintedaremadeofaluminiumorstainless
steel.Takecaretocheckthattheproductfeelsstable/freefrom
play–nofastenersmaybeloose.Damagedordefectiveparts
shouldbereplacedassoonaspossible.
Cleaning
• Cleanthechairbywipingwithregularcleaning
agent(NOTcontaining/basedonPentanol)orplaceina
washer/autoclave(max85°C).Makesurethecontrolbox/
batteryisremovedbeforemachinewashing.
• Seat–mayberemovedforseparatecleaningor
placedinawasher/autoclave(max85°C)
withthechair.
Special check items (once per year)
1. Armrest–checkthatslipprotection/wrist
protectionisintactandsecured.
2. Electricactuator/recliner:checkthe
functionoftheremotecontroland
thattheelectricactuatorattache-
mentdeviceisnotloose.
3. Seat/paddedseat–wholeand
withoutcracks.Nosharp
edgesmustbepresent.
4. Footsupportplatforms–
wholeandadjustableintheintended
manner.Checkthattheclipsarewhole
andproperlyfastened.Heelrestraintsmust
beinpositionatthebackofeachfootsupport
platform.
5. Castors–mustnotbestifforloose.
Alsocheckthatthebrakeswork.
6. Backrest/Necksupportmustbeintactwithoutany
holesorotherdamagetothebeltsandanchors.
Table of contents
Other Gate Medical Equipment manuals

Gate
Gate Bure Rise & Go DB 56-309 User manual

Gate
Gate Bure Standard EL 56-312T User manual

Gate
Gate Easy SoftBack 56-270 User manual

Gate
Gate Bure Space User manual

Gate
Gate Mover Aqua 53-301 User manual

Gate
Gate Bure Rise & Go 56-316 User manual

Gate
Gate Bure Standard EL 56-312T User manual

Gate
Gate Bure Double 2.0 56-303 User manual

Gate
Gate Bure Rise & Go DB 56-309 User manual

Gate
Gate Bure Standard GAS 56-311 User manual