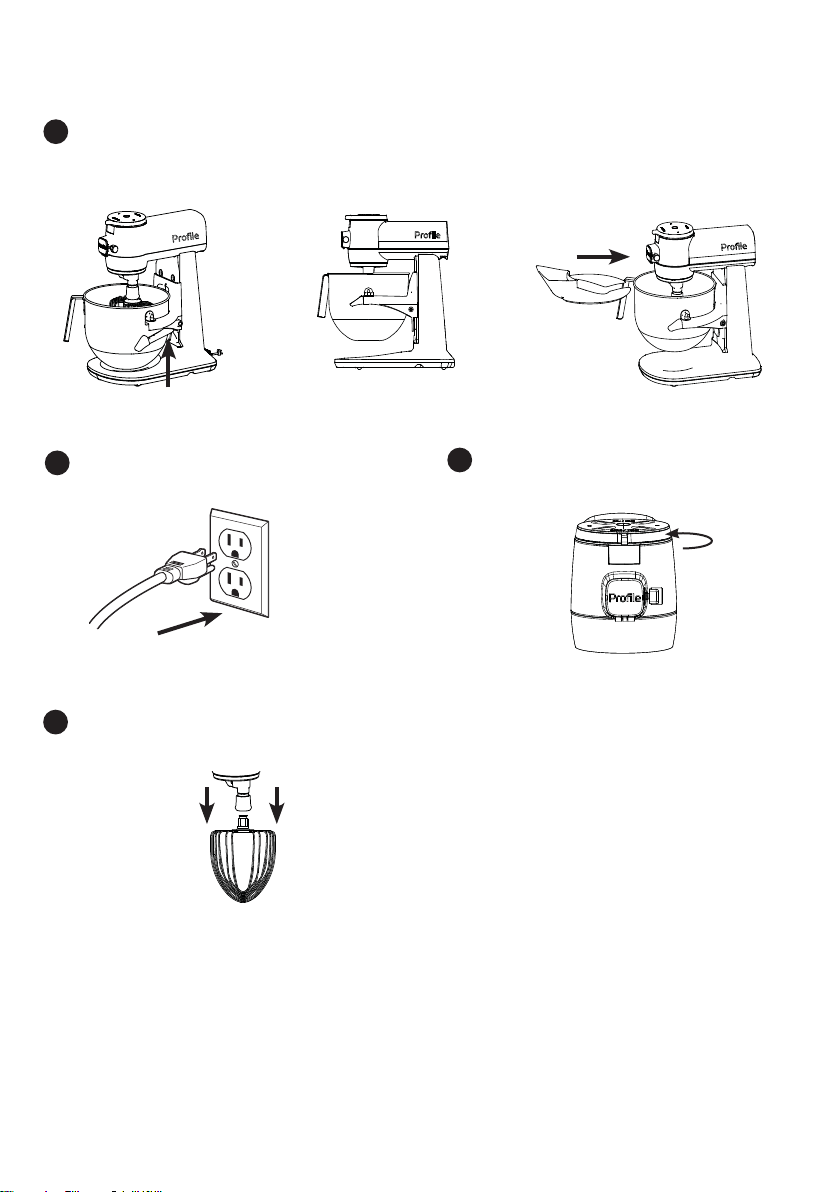
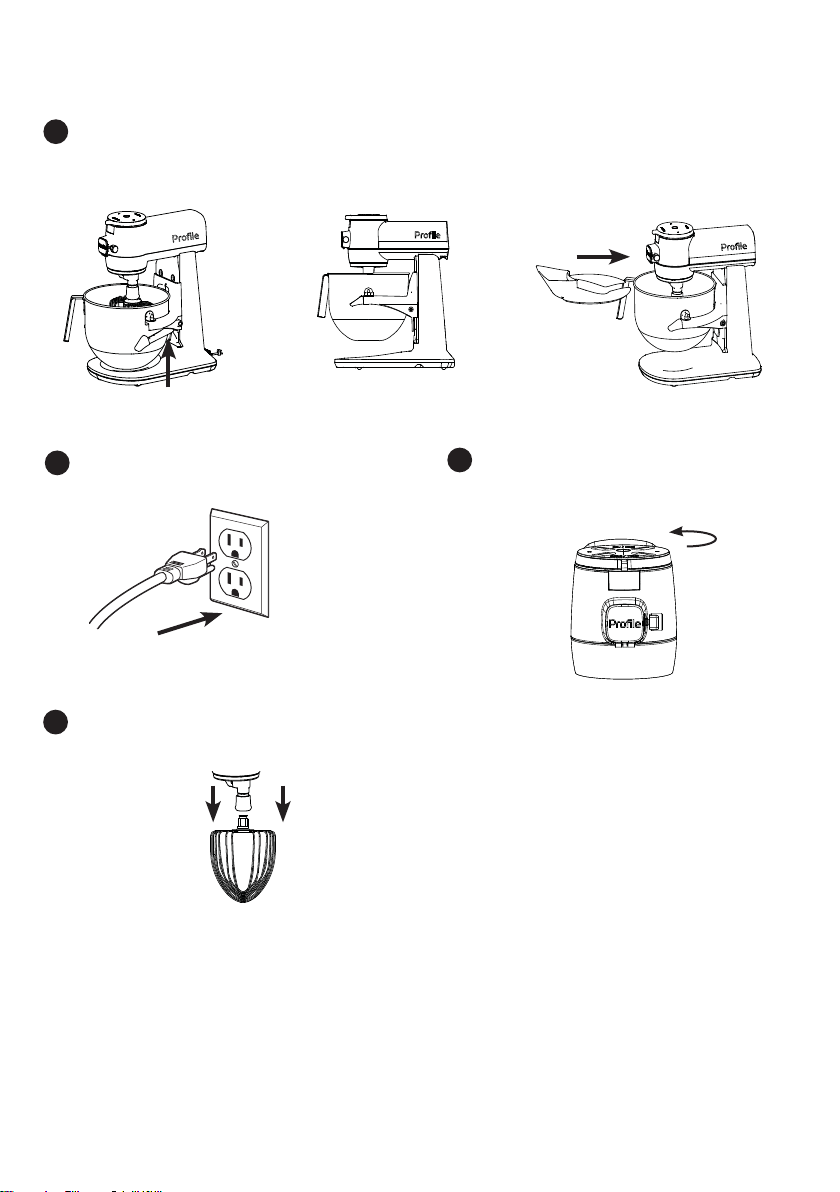
GE PROFILE SMART MIXER WITH AUTO SENSE User manual

Parts IncludedGetting Started
GE PROFILE SMART MIXER WITH AUTO SENSE
QUICK START GUIDE
WARNING Read the full safety
information listed in the Owner’s Manual
before operating your Smart Mixer.
• DO NOT immerse the appliance in water
or any other liquids. This will damage the
appliance and be a risk of an electric shock.
• DO NOT use an extension power cord.
• Remove beater, whisk, and dough hook from
appliance before washing.
• Slowly pour hot liquids in the mixing bowl to
avoid splashing and burns.
• Avoid contacting moving parts. Keep hands, hair,
clothing, as well as spatulas and other utensils
away from attachments (beaters, whisks, dough
hook, etc) during operation to reduce the risk of
injury to persons, or damage to the mixer.
• Do not use outdoors.
• Use this product only for its intended purpose as
described in this user manual.
Bowl
Commercial
Grade
Stainless
Steel Dough
Hook
Bowl Shield
Commercial
Grade
Stainless Steel
Beater
Scan the QR code below to get started
ZLWK\RXU*(3UR¿OH6PDUW0L[HU
11-Wire Whisk
WiFi Setup
PAIRING
WiFi Connect – SmartHQ™ App
Your GE Profile Smart mixer is WiFi Connect Enabled. A WiFi module is
built into the product allowing it to communicate with your Smart Phone for
remote monitoring, control, notifications, and appliance software updates. To
take advantage of your appliance’s connected features, please download the
SmartHQ™ mobile app.
Scan the QR code to take you to the app download page.
Slide the speed dial to the connected icon and follow the directions within the
SmartHQ70 app to get connected.
For assistance with connectivity to your appliance or to learn more about your Smart appliance features
visit geappliances.com/ge/connected-appliances/

Getting Started
NOTE: If your smart mixer is plugged in and not turned on, press any button to wake up the
machine.
Scale
7KH0DQXDO6FDOHPRGHPHDVXUHVWKH
amount of ingredients in grams/lb/kg/oz.
The direct weight can be taken in the mixer
bowl or in any container on the base of the
smart mixer.
To start, in the mixing OFF position, press the
Scale/Timer Button. The light bar will show
yellow.
0DNHVXUHWKHVFUHHQVKRZV]HUREHIRUH
weighing your ingredients.
Then the screen will read the weight.
Example: "200g"
To Zero the scale feature, press the Rev/Zero
button. The smart mixer screen will show
"----" while it is setting to zero. Then "0g" will
show on the screen when it is complete. If the
screen does not show zero, press the Rev/
=HUREXWWRQWRUHVHW0DNHVXUHWKHVFUHHQ
shows zero before weighing your ingredients.
Use the toggle arrows when using the scale
to change the scale's units.
Timer
Press the Timer button to initiate the Timer
VHWWLQJ7KHVFUHHQZLOOEULHÀ\UHDG7LPHU
then switch to 00:00. The light bar will show
blue. Use the left and right arrows to set the
timer to your desired mix time.
Press the center button to start the timer.
To cancel the timer when the unit is not
mixing, rotate the speed dial to any position
on the right and back quickly.
NOTE: The Timer increases at 15 second
increments with a single press. Press and
hold the Scale/Timer button to increase by 1
minute increments.
$XWR6KXWRႇ
After starting the timer, turn the speed dial to
GHVLUHGPL[LQJVSHHG7KHDXWRPDWLFVKXWRႇ
IHDWXUHWXUQVWKH6PDUW6WDQG0L[HURႇZKHQ
the timer ends for extra convenience and
perfectly executed recipes.
NOTE: Time can be added while the timer is
running.
Over-the-air (OTA) updates
With over-the-air updates, you get new fea-
tures like Auto Sense and Guided Recipes as
WKH\EHFRPHDYDLODEOHVRWKH6PDUW0L[HU
keeps getting better with time.
Screen
Connected position
Speed
Dial
Control
Rev / Zero
Scale / Timer
Stir 24681011

Getting Started
2Lower the bowl support by pressing down on the lift arms.
10DNHVXUHWKHPL[HULVXQSOXJJHGDQGWXUQHG
off.
Before you begin, note the Rev/Zero and Scale/
Timer buttons are one single button with two
functions that should be pressed in the middle.
3Place the bowl into the bowl arms and align on pins. Push the bowl backward and down to lock the
bowl. Insert your desired attachment. Push attachment upward into the attachment output shaft until
a click is heard and the attachment is held firmly in place. This may require a slight turn to lock into
place.
Push upward
(may require turn
slightly to lock).
Rev / Zero
Scale / Timer

49-9000048 Rev. 1 12-22 GEA
*(LVDWUDGHPDUNRIWKH*HQHUDO(OHFWULF&RPSDQ\0DQXIDFWXUHGXQGHUWUDGHPDUNOLFHQVH
4When the bowl and attachment are in place, raise the bowl arms by slowly pushing up on arms until
they lock into place. Slide the bowl shield onto the bowl if desired.
NOTE:5HIHUWRWKHIXOO2ZQHU¶V0DQXDOIRUDFRPSOHWHRYHUYLHZRIIXQFWLRQV
5Plug the mixer into an outlet. 6Use the speed dial and turn to your desired
speed. When finished, turn back to the
mixing OFF position.
7Pull down on the quick change to
release your attachment.
Ready
Bowl support in locked position
Image shows
the control
knob in the
mixing OFF
position
Attachment
output shaft
Getting Started

Pièces inclusesComment démarrer
BATTEUR INTELLIGENT À DÉTECTION AUTOMATIQUE
GE PROFILE GUIDE DE DÉMARRAGE RAPIDE
AVERTISSEMENT Lisez toutes les
informations de sécurité répertoriées dans le
manuel d’utilisation avant d’utiliser votre batteur
sur socle.
• N’immergez PAS l’appareil dans l’eau ou dans tout
autre liquide. Cela peut endommager le cordon et
poser un risque de choc électrique.
• N’utilisez PAS un cordon électrique de rallonge.
• Retirez le batteur, le fouet et le crochet pétrisseur
de l’appareil avant le lavage.
• Versez lentement les liquides chauds dans le bol
à mélanger pour prévenir les éclaboussements et
les brûlures.
• Évitez de toucher aux pièces mobiles. Gardez les
mains, les cheveux, les vêtements, ainsi que les
spatules et autres ustensiles à l’écart des accessoires
(batteur, fouets, crochet pétrisseur, etc.) pendant le
fonctionnement afin de réduire les risques de blessures
ou d’endommagement du batteur.
• N’utilisez pas l’appareil à l’extérieur.
• Utilisez ce produit uniquement aux fins auxquelles
il est destiné qui sont décrites dans ce manuel
d’utilisation.
Bol
Qualité commerciale crochet
pétrisseur en acier
inoxydable Bouclier
du bol
Qualité commerciale
batteur en acier
inoxydable
Fouet à 11
broches
&RQ¿JXUDWLRQGX:,),
APPARIEMENT
$SSOLFDWLRQ:L)L&RQQHFW±6PDUW+4
Votre four Profile est compatible avec la connexion réseau Wi-Fi. Un module Wi-Fi est
intégrée dans votre produit, lui permettant de communiquer avec votre téléphone intelligent
pour surveillance, contrôle, notification et mises à jour du logiciel. Pour tirer avantage des
fonctions de connexion de votre électroménager, veuillez télécharger l’application mobile
SmartHQ™.
Une fois l’application Smart HQ téléchargée depuis l’Apple Store ou Google Play, connectez-
vous ou créez un nouveau compte. Cliquez ensuite sur l’ajout d’un appareil connecté dans
OHFRLQVXSpULHXUGURLWHWVpOHFWLRQQH]ODPDUTXHGXSUR¿OSRXUDMRXWHUYRWUH6PDUW0L[HUj
l’application.
Une fois connecté, suivez les instructions de l’application pour savoir comment utiliser les
fonctions intelligentes.
Faites glisser le cadran des vitesses jusqu’à l’icône connectée et suivez les instructions dans l’application Smart HQ
pour vous connecter.
Pour de l’assistance concernant la connexion réseau de votre électroménager, ou pour en apprendre davantage sur les
fonctions de nos électroménagers intelligents, visitez JHDSSOLDQFHVFRPJHFRQQHFWHGDSSOLDQFHV
Balayez le code 2D ci-dessous pour com-
PHQFHUYRWUH6PDUW0L[HUGH*(3UR¿OH

Comment démarrer
REMARQUE : Si votre batteur sur socle est branché et n’est pas allumé, appuyez sur
n’importe quel bouton pour activer l’appareil.
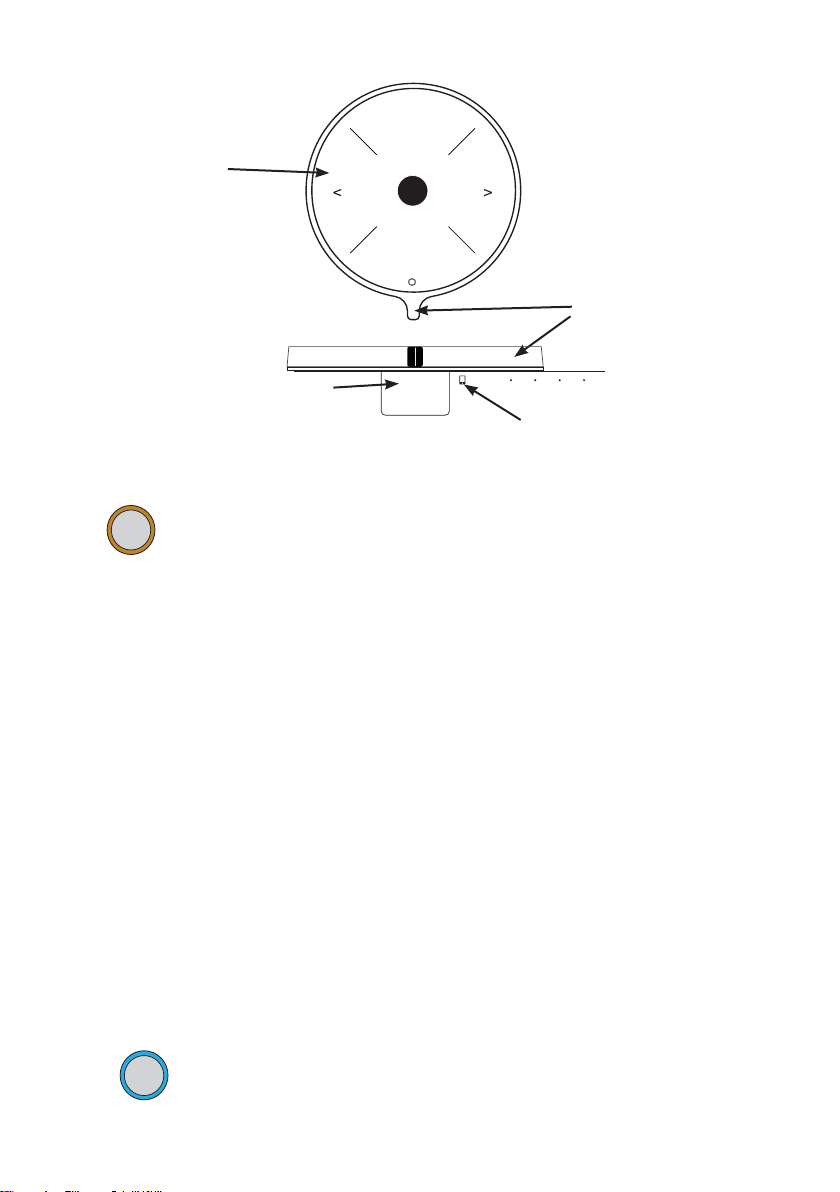
%DODQFH6FDOH
Le mode Balance manuelle mesure la quantité
d’ingrédients en grammes/lb/kg/oz.
Le poids direct peut être mesuré dans le bol
mélangeur ou dans n’importe quel récipient sur la
base du batteur sur socle.
Pour commencer, en position de mélange « OFF
» (arrêt), appuyez sur le bouton Scale/Timer. La
barre lumineuse s’illumine en jaune.
$VVXUH]YRXVTXHO¶pFUDQDႈFKH]pURDYDQWGH
peser vos ingrédients.
/¶pFUDQDႈFKHDORUVOHSRLGV([HPSOH©Jª
Pour mettre à zéro la fonction de balance, appuyez
sur le bouton Rev/Zero. L’écran du batteur sur
VRFOHDႈFKH©ªORUVTX¶LOHVWUpJOpVXU]pUR
3XLV©JªV¶DႈFKHjO¶pFUDQXQHIRLVODSURFpGXUH
WHUPLQpH$VVXUH]YRXVTXHO¶pFUDQDႈFKH©Jª
avant de peser vos ingrédients.
8WLOLVH]OHVÀqFKHVGHVpOHFWLRQORUVTXHYRXV
utilisez la balance pour changer les unités de
mesure.
0LQXWHULH7LPHU
$SSX\H]VXUOHERXWRQ©7LPHUªSRXUHႇHFWXHUOH
UpJODJHGHPLQXWHULH/¶pFUDQDႈFKHEULqYHPHQW©
7LPHUªSXLVSDVVHj/DEDUUHOXPLQHXVH
V¶LOOXPLQHHQEOHX8WLOLVH]OHVÀqFKHVJDXFKHHW
droite pour régler la minuterie selon la durée de
mélange désirée.
Appuyez sur le bouton du centre pour démarrer la
minuterie.
To cancel the timer when the unit is not mixing,
rotate the speed dial to any position on the right
and back quickly.
REMARQUE : La minuterie augmente par
incréments de 15 secondes d’une simple pression.
0DLQWHQH]OHERXWRQ6FDOH7LPHUHQIRQFpSRXU
augmenter par incréments de 1 minute.
$UUrWDXWRPDWLTXH$XWR6KXWRႇ
Après le départ de la minuterie, tournez le cadran
des vitesses à la vitesse de mélange désirée. La
fonction d’arrêt automatique éteint le mélangeur
sur socle intelligent lorsque la minuterie se termine
pour plus de commodité et des recettes parfaite-
ment exécutées.
REMARQUE: Le temps peut être ajouté pendant
que la minuterie fonctionne.
0LVHVjMRXURYHU²WKHDLU27$
Avec les mises à jour over—the-air (OTA) , vous
EpQp¿FLH]GHQRXYHOOHVIRQFWLRQQDOLWpVWHOOHVTXHOD
détection automatique et les recettes guidées dès
qu’elles sont disponibles, de sorte que le batteur
sur socle intelligent continue de s’améliorer avec
le temps.
Screen
Connected position
Speed
Dial
Commande
Rev / Zero
Scale / Timer
Stir 24681011

Comment démarrer
2Abaissez le support du bol en appuyant sur les bras de levage.
1Assurez-vous que le batteur est débranché et
éteint.
Avant de commencer, notez que les boutons Rev/
Zero et Scale/Timer sont un seul bouton avec
deux fonctions et ils doivent être enfoncés au
milieu.
3Placez le bol dans les bras et alignez-le sur les tiges. Repoussez le bol vers le corps du batteur
jusqu’à ce qu’il s’enclenche. Insérez l’accessoire desire. Poussez l’accessoire vers le haut dans
la sortie d’arbre de l’accessoire jusqu’à ce qu’un clic se fasse entendre et que l’accessoire est
fermement enclenché. Vous pourriez avoir à tourner légèrement pour fixer l’accessoire.
Pousser vers le haut
(pour nécessiter un léger
tour pour enclencher)
Rev / Zero
Scale / Timer

5HY*($
*(HVWXQHPDUTXHGHFRPPHUFHGH*HQHUDO(OHFWULF&RPSDQ\)DEULTXpVRXVOLFHQFHGHPDUTXH
4Une fois le bol et l’accessoire en place, relevez les bras de levage en les poussant lentement
jusqu’à ce qu’ils se verrouillent en place. Glissez le bouclier du bol sur le bol si vous le désirez.
REMARQUE : Reportez-vous au manuel d’utilisation complet pour une description détaillée des
fonctions.
5Branchez le mélangeur dans une prise
électrique. 6Utilisez le cadran des vitesses et tournez-le
à la vitesse désirée. Lorsque vous avez
terminé, remettez-le en position de mélange
« OFF » (arrêt)
7Tirez vers le bas sur la douille à
changement rapide pour libérer
l’accessoire.
Ready
Support du bol en position verrouillée
L’image
montre le
cadran à la
en position
de mélange «
OFF » (arrêt)
Douille à
changement
rapide
Comment démarrer
Table of contents
Languages:
Other GE Kitchen Appliance manuals

GE
GE GCS04 Safety guide

GE
GE PXR03FLMFSC User manual

GE
GE JXPROBE1 User manual

GE
GE Monogram ZEP30FRSS User manual

GE
GE Profile TRATTORIA PS96PZRSS User manual

GE
GE 168998 User manual

GE
GE GWS04 Original instructions

GE
GE GVS04BDWASS Safety guide

GE
GE HOTPOINT RS504GN User manual

GE
GE GWV045FARRBS User manual