GEA GEA Bock HG66e Series User manual

GEA Bock HG66e
HG66e/1340-4
HG66e/1540-4
HG66e/1750-4
HG66e/2070-4
HGX66e/1340-4
HGX66e/1540-4
HGX66e/1750-4
HGX66e/2070-4
HG66e/1340-4 S
HG66e/1540-4 S
HG66e/1750-4 S
HG66e/2070-4 S
HGX66e/1340-4 S
HGX66e/1540-4 S
HGX66e/1750-4 S
HGX66e/2070-4 S
Assembly instructions
96446-04.2019-Gb
Translation of the original instructions

2
D
GB
F
E
I
Ru
96446-04.2019-DGbFEIRu
About these instructions
Read these instructions before assembly and before using the compressor. This will avoid misunder-
standings and prevent damage. Improper assembly and use of the compressor can result in serious
or fatal injury.
Observe the safety instructions contained in these instructions.
These instructions must be passed onto the end customer along with the unit in which the compres-
sor is installed.
GEA Bock GmbH
72636 Frickenhausen
GEA Bock GmbH
Benzstraße 7
72636 Frickenhausen
Germany
Phone +49 7022 9454 0
Fax +49 7022 9454 137
www.gea.com
Manufacturer
Contact

D
GB
F
E
I
Ru
3
96446-04.2019-DGbFEIRu
1 Safety 4
1.1 Identicationofsafetyinstructions
1.2 Qualicationsrequiredofpersonnel
1.3 General safety instructions
1.4 Intended use
2 Product description 6
2.1 Short description
2.2 Name plate
2.3 Type key
3 Areas of application 8
3.1 Refrigerants
3.2 Oil charge
3.3 Limits of application
4Compressor assembly 11
4.1 Storage and transport
4.2 Setting up
4.3 Pipe connections
4.4 Pipes
4.5 Start unloader (external)
4.6 Laying suction and pressure lines
4.7 Operating the shut-off valves
4.8 Operating mode of the lockable service connections
4.9 Suctionpipelter
5 Electrical connection 15
5.1 Information for contactor and motor contactor selection
5.2 Standard motor, design for direct or partial winding start
5.3 Basic circuit diagram for partial winding start with standard motor
5.4 Special motor: design for direct or star-delta start
5.5 Basic circuit diagram for star-delta start 230 V ∆/ 400 V Y
5.6 Electronic trigger unit INT69 G
5.7 Connecting of the trigger unit INT69 G
5.8 Functional test of the trigger unit INT69 G
5.9 Oil sump heater (accessories)
6 Commissioning 26
6.1 Preparations for start-up
6.2 Pressure integrity test
6.3 Leak test
6.4 Evacuation
6.5 Refrigerant charge
6.6 Start-up
6.7 Avoid slugging
7 Maintenance 28
7.1 Preparation
7.2 Work to be carried out
7.3 Spare parts recommendation
7.4 Extract from the lubricants table
7.5 Decommissioning
8 Accessories 30
8.1 Capacity regulator
8.2 Oil separator
8.3 Oil level regulator
9 Technical data 33
10 Dimensions and connections 34
11 Declaration of incorporation 36
12 Service 37
Contents Page

4
D
GB
F
E
I
Ru
96446-04.2019-DGbFEIRu
1|Safety
1.2 Qualicationsrequiredofpersonnel
DANGER Indicates a dangerous situation which, if not avoided,
will cause immediate fatal or serious injury.
WARNING Indicates a dangerous situation which, if not avoided,
may cause fatal or serious injury.
CAUTION Indicates a dangerous situation which, if not avoided,
may cause fairly severe or minor injury.
ATTENTION Indicates a situation which, if not avoided,
may cause property damage.
INFO Important information or tips on simplifying work.
WARNING Inadequatelyqualied personnelposes therisk ofaccidents,the
consequencebeingseriousorfatalinjury.Workoncompressors
isthereforereservedforpersonnelwhichisqualiedtoworkon
pressurized refrigerant systems:
• For example, a refrigeration technician, refrigeration mechatronic
engineer. As well as professions with comparable training, which
enables personnel to assemble, install, maintain and repair
refrigeration and air-conditioning systems. Personnel must be capable
of assessing the work to be carried out and recognising any potential
dangers.
1.1 Identicationofsafetyinstructions:

D
GB
F
E
I
Ru
5
96446-04.2019-DGbFEIRu
1|Safety
1.4 Intended use
1.3 General safety instructions
WARNING Risk of accidents.
Refrigerating compressors are pressurised machines and as such
call for heightened caution and care in handling.
The maximum permissible overpressure must not be exceeded,
even for testing purposes.
Risk of burns!
- Depending on the operating conditions, surface temperatures of
over 60°C on the discharge side or below 0°C on the suction side
can be reached.
- Avoid contact with refrigerant necessarily.
Contact with refrigerant can cause severe burns and skin
damage.
WARNING The compressor may not be used in potentially explosive
environments!
These assembly instructions describe the standard version of the compressor named in the title man-
ufactured by GEA. GEA refrigerating compressors are intended for installation in a machine (within the
EUaccordingtotheEUDirectives2006/42/ECMachineryDirective,2014/68/EUPressureEquipment
Directive).
Commissioning is permissible only if the compressor has been installed in accordance with these as-
sembly instructions and the entire system into which it is integrated has been inspected and approved
in accordance with legal regulations.
The compressors are intended for use in refrigeration systems in compliance with the limits of
application.
Onlytherefrigerantspeciedintheseinstructionsmaybeused.
Any other use of the compressor is prohibited!

6
D
GB
F
E
I
Ru
96446-04.2019-DGbFEIRu
2|Product description
• Semi-hermetic six-cylinder reciprocating compressor with suction-gas cooled drive motor.
• The stream of refrigerant sucked out of the evaporator flows over the motor and cools it
intensively. In this way, the motor can be kept at a relatively low temperature level, particularly
under high loads.
Fig. 1
2.1 Short description
Dimension and connection values can be found in Chapter 10
Cylinder
cover
Terminal box Suction
shut-off valve
Transport
eyelet
Name plate
Motor section
Drive section
Valve plate
Discharge
shut-off valve
Oil pump
Oil sight glass

D
GB
F
E
I
Ru
7
96446-04.2019-DGbFEIRu
2|Product description
2.2 Name plate (example)
2.3 Type key (example)
SE 55IP 65
BB12345-A001
HGX66e/2070-4
GEA Bock GmbH
72636 Frickenhausen, Germany
/
HG 66 e 2070 -4 SX
¹) HG - Hermetic Gas-Cooled (suction gas-cooled) for the normal- / air conditioning applications
²) X - Ester oil charge (HFC refrigerant, e.g. R134a, R404A/R507, R407C, R407F)
3) S - More powerful motor, e.g. for air-conditioning applications
Motor variant 3)
Number of poles
Swept volume
e-series
Numbers of cylinders
Size
Oil charge ²)
Series ¹)
107,0 A
YY: 335,0 AY: 196,0 A
180,0
217,2
380-420 Y/YY
440-480 Y/YY
1 Type designation 6 Voltage,circuit,frequency
2 Machine number 7 Nominal rotation speed
3 maximum operating current 8 Displacement
4 Starting current (rotor blocked) 9 Voltage,circuit,frequency
Y: Part winding 1 10 Nominal rotation speed
YY: Part windings 1 and 2 11 Displacement
5 ND (LP):
Max. admissible operating pressur
e12 Oiltypelledatthefactory
(g) Low pressure side 13 Terminal box protection type
HD (HP):
Max. admissible operating
Electrical accessories can change
pressur
e(g) High pressure side the IP protection class!
Observe the limits of application
diagrams!
50 Hz
}
60 Hz
}
Fig. 2

8
D
GB
F
E
I
Ru
96446-04.2019-DGbFEIRu
3|Areas of application
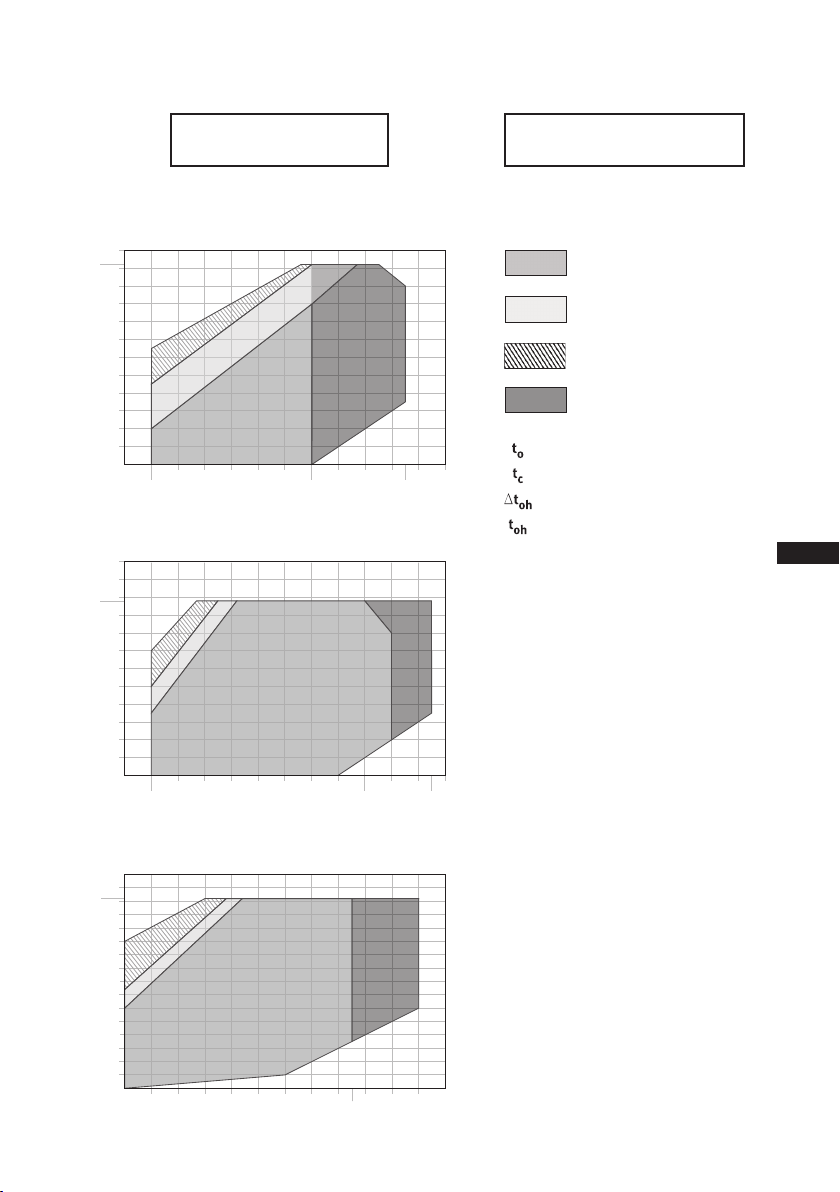
ATTENTION Compressor operation is possible within the operating limits
showninthediagrams.Pleasenotethesignicanceoftheshaded
areas. Thresholds should not be selected as design or continuous
operation points.
- Permissible ambient temperature (-20°C) - (+60°C)
- Max. permissible discharge end temperature 140°C.
-Max.permissibleswitchingfrequency12x/h.
- A minimum running time of 3 min. steady-state condition
(continuous operation) must be achieved.
For operation with supplementary cooling:
- Use only oils with high thermal stability.
- Avoid continuous operation near the threshold.
- Additional fans (accessories) can be used for additional cooling.
For operation with capacity regulator:
-
Continuous operation, when the capacity regulator is activated,
is not permissible and can cause damage to the compressor.
- The suction gas superheat temperature may need to be reduced
or set individually when operating near to the threshold.
- When the capacity regulator is activated, the gas velocity in the
systemcannotundercertaincircumstancesensurethatsuf-
cient oil is transported back to the compressor.
Foroperationwithfrequencyconverter:
- The maximum current and power consumption must not be
exceeded.Inthecaseofoperationabovethemainsfrequency,
the application limit can therefore be limited. Max. 60 Hz.
When operating in the vacuum range, there is a danger of air
entering on the suction side. This can cause chemical reactions,
a pressure rise in the condenser and an elevated compressed-gas
temperature. Prevent the ingress of air at all costs!
3.3 Limits of application
Thecompressorsarelledatthefactorywiththefollowingoiltype:
- für R134a, R404A/R507, R407C, R407F FUCHS Reniso Triton SE 55
- für R22 FUCHS Reniso SP 46
Compressors with ester oil charge (FUCHS Reniso Triton SE 55) are marked with an X in the type
designation (e.g. HGX66e/2070-4).
3.1 Refrigerants
• HFKW / HFC: R134a, R404A/R507, R407C, R407F • (H)FCKW / (H)CFC: R22
3.2 Oil charge
INFO For refilling, we recommend the above oil types.
Alternatives: see lubricants table, Chapter 7.4
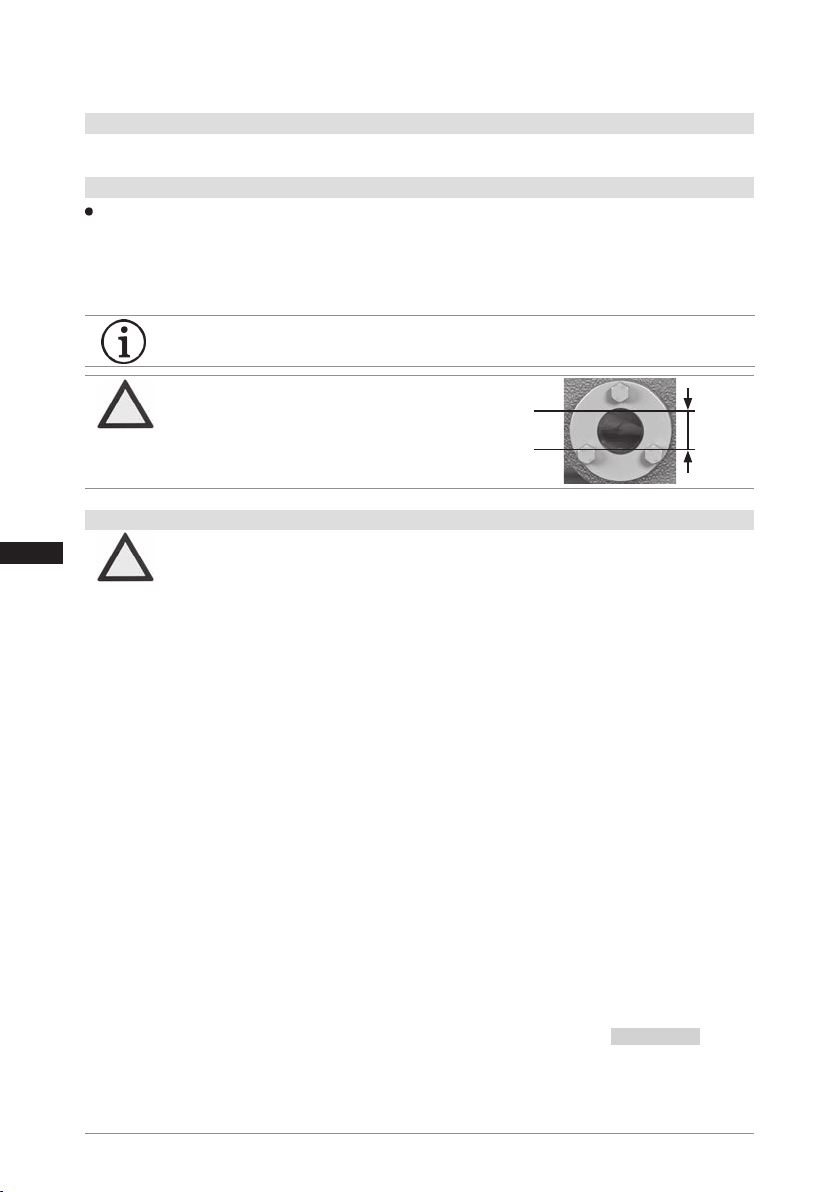
ATTENTION The oil level must be in the
visible part of the sight glass;
damage to the compressor is
possible if overfilled or under-
filled!
Max.
Min.
1,9 Ltr.
Oil level
Fig. 3
~
~

D
GB
F
E
I
Ru
9
96446-04.2019-DGbFEIRu
3|Areas of application
Maximum admissible operating
pressure (LP/HP)1): 19/28 bar
Maximum admissible
frequency:60Hz
1) LP = Low pressure
HP = High pressure
Fig. 5
Fig. 6
Fig. 4
Unlimited application range
Supplementary cooling or
reduced suction gas temperature
Supplementary cooling and
reduced suction gas temperature
Motor version S
(more powerful motor)
Evaporation temperature (°C)
Condensing temperature (°C)
Suction gas superheat (K)
Suction gas temperature (°C)
30
40
60
80
90
-20 -10 100 20 30 t (°C)
o
t (°C)
c
82
-30
50
70
12,5 25
20 t = 20 °C
Oh
EGD HG66e+88e
R134a
20
10
0
-10
-20
-30
50
70
t (°C)
o
t (°C)
c
-5 12,5
-25
R407C
20
10
0
-10
-20
-30
-40
10
20
30
50
60
70
t (°C)
o
t (°C)
c
66
-35
t = 20 °C
oh
-5 12,5
?t
oh
< 20 K
R22
10
0
-10
-20
-30
-40
-50
20
30
40
50
60
70
t (°C)
o
t (°C)
c
? t
oh
< 20 K
t = 20 °C
oh
58
-5 7,5-45
R404A/R507
40
10
10
10
30
60
40
?t
Oh
<20K
t = 20 °C
Oh
20
?t
Oh
< 20 K
R513A
R448A/R449A
20
10
0
-10
-20
-30
-40
10
20
30
50
60
70
t (°C)
o
t (°C)
c
t = 20 °C
oh
-5 12,5
?t
oh
< 20 K
40
30
40
60
80
90
-20 -10 100 20 30 t (°C)
o
t (°C)
c
82
-30
50
70
12,5 25
20 t = 20 °C
Oh
10
?t
Oh
< 20 K
?tOh = 20 K
30
40
60
80
90
-20 -10 100 20 30 t (°C)
o
t (°C)
c
82
-30
50
70
12,5 25
20 t = 20 °C
Oh
EGD HG66e+88e
R134a
20
10
0
-10
-20
-30
50
70
t (°C)
o
t (°C)
c
-5 12,5
-25
R407C
20
10
0
-10
-20
-30
-40
10
20
30
50
60
70
t (°C)
o
t (°C)
c
66
-35
t = 20 °C
oh
-5 12,5
?t
oh
< 20 K
R22
10
0
-10
-20
-30
-40
-50
20
30
40
50
60
70
t (°C)
o
t (°C)
c
? t
oh
< 20 K
t = 20 °C
oh
58
-5 7,5-45
R404A/R507
40
10
10
10
30
60
40
?t
Oh
<20K
t = 20 °C
Oh
20
?t
Oh
< 20 K
R513A
R448A/R449A
20
10
0
-10
-20
-30
-40
10
20
30
50
60
70
t (°C)
o
t (°C)
c
t = 20 °C
oh
-5 12,5
?t
oh
< 20 K
40
30
40
60
80
90
-20 -10 100 20 30 t (°C)
o
t (°C)
c
82
-30
50
70
12,5 25
20 t = 20 °C
Oh
10
?t
Oh
< 20 K
?tOh = 20 K
R404A/R507
R134a
R22

10
D
GB
F
E
I
Ru
96446-04.2019-DGbFEIRu
3|Areas of application
Maximum admissible operating
pressure (LP/HP)1): 19/28 bar
Maximum admissible
frequency:60Hz
1) LP = Low pressure
HP = High pressure
Unlimited application range
Supplementary cooling or
reduced suction gas temperature
Supplementary cooling and
reduced suction gas temperature
Motor version S
(more powerful motor)
Evaporation temperature (°C)
Condensing temperature (°C)
Suction gas superheat (K)
Suction gas temperature (°C)
30
40
60
80
90
-20 -10 100 20 30 t (°C)
o
t (°C)
c
82
-30
50
70
12,5 25
20 t = 20 °C
Oh
EGD HG66e+88e
R134a
20
10
0
-10
-20
-30
50
70
t (°C)
o
t (°C)
c
-5 12,5
-25
R407C
20
10
0
-10
-20
-30
-40
10
20
30
50
60
70
t (°C)
o
t (°C)
c
66
-35
t = 20 °C
oh
-5 12,5
?t
oh
< 20 K
R22
10
0
-10
-20
-30
-40
-50
20
30
40
50
60
70
t (°C)
o
t (°C)
c
? t
oh
< 20 K
t = 20 °C
oh
58
-5 7,5-45
R404A/R507
40
10
10
10
30
60
40
?t
Oh
<20K
t = 20 °C
Oh
20
?t
Oh
< 20 K
R513A
R448A/R449A
20
10
0
-10
-20
-30
-40
10
20
30
50
60
70
t (°C)
o
t (°C)
c
t = 20 °C
oh
-5 12,5
?t
oh
< 20 K
40
30
40
60
80
90
-20 -10 100 20 30 t (°C)
o
t (°C)
c
82
-30
50
70
12,5 25
20 t = 20 °C
Oh
10
?t
Oh
< 20 K
?tOh = 20 K
30
40
60
80
90
-20 -10 100 20 30 t (°C)
o
t (°C)
c
82
-30
50
70
12,5 25
20 t = 20 °C
Oh
EGD HG66e+88e
R134a
20
10
0
-10
-20
-30
50
70
t (°C)
o
t (°C)
c
-5 12,5
-25
R407C
20
10
0
-10
-20
-30
-40
10
20
30
50
60
70
t (°C)
o
t (°C)
c
66
-35
t = 20 °C
oh
-5 12,5
?t
oh
< 20 K
R22
10
0
-10
-20
-30
-40
-50
20
30
40
50
60
70
t (°C)
o
t (°C)
c
? t
oh
< 20 K
t = 20 °C
oh
58
-5 7,5-45
R404A/R507
40
10
10
10
30
60
40
?t
Oh
<20K
t = 20 °C
Oh
20
?t
Oh
< 20 K
R513A
R448A/R449A
20
10
0
-10
-20
-30
-40
10
20
30
50
60
70
t (°C)
o
t (°C)
c
t = 20 °C
oh
-5 12,5
?t
oh
< 20 K
40
30
40
60
80
90
-20 -10 100 20 30 t (°C)
o
t (°C)
c
82
-30
50
70
12,5 25
20 t = 20 °C
Oh
10
?t
Oh
< 20 K
?tOh = 20 K
30
40
60
80
90
-20 -10 100 20 30 t (°C)
o
t (°C)
c
82
-30
50
70
12,5 25
20 t = 20 °C
Oh
EGD HG66e+88e
R134a
20
10
0
-10
-20
-30
50
70
t (°C)
o
t (°C)
c
-5 12,5
-25
R407C
20
10
0
-10
-20
-30
-40
10
20
30
50
60
70
t (°C)
o
t (°C)
c
66
-35
t = 20 °C
oh
-5 12,5
?t
oh
< 20 K
R22
10
0
-10
-20
-30
-40
-50
20
30
40
50
60
70
t (°C)
o
t (°C)
c
? t
oh
< 20 K
t = 20 °C
oh
58
-5 7,5-45
R404A/R507
40
10
10
10
30
60
40
?t
Oh
<20K
t = 20 °C
Oh
20
?t
Oh
< 20 K
R513A
R448A/R449A
20
10
0
-10
-20
-30
-40
10
20
30
50
60
70
t (°C)
o
t (°C)
c
t = 20 °C
oh
-5 12,5
?t
oh
< 20 K
40
30
40
60
80
90
-20 -10 100 20 30 t (°C)
o
t (°C)
c
82
-30
50
70
12,5 25
20 t = 20 °C
Oh
10
?t
Oh
< 20 K
?tOh = 20 K
R407C
R448A/R449A
Fig. 8
Fig. 9
R513A
Fig. 7
Designforotherareasonrequest
30
40
60
80
90
-20 -10 100 20 30 t (°C)
o
t (°C)
c
82
-30
50
70
12,5 25
20 t = 20 °C
Oh
EGD HG66e+88e
R134a
20
10
0
-10
-20
-30
50
70
t (°C)
o
t (°C)
c
-5 12,5
-25
R407C
20
10
0
-10
-20
-30
-40
10
20
30
50
60
70
t (°C)
o
t (°C)
c
66
-35
t = 20 °C
oh
-5 12,5
?t
oh
< 20 K
R22
10
0
-10
-20
-30
-40
-50
20
30
40
50
60
70
t (°C)
o
t (°C)
c
? t
oh
< 20 K
t = 20 °C
oh
58
-5 7,5-45
R404A/R507
40
10
10
10
30
60
40
?t
Oh
<20K
t = 20 °C
Oh
20
?tOh < 20 K
R513A
R448A/R449A
20
10
0
-10
-20
-30
-40
10
20
30
50
60
70
t (°C)
o
t (°C)
c
t = 20 °C
oh
-5 12,5
?toh < 20 K
40
30
40
60
80
90
-20 -10 100 20 30 t (°C)
o
t (°C)
c
82
-30
50
70
12,5 25
20 t = 20 °C
Oh
10
?tOh < 20 K
?tOh = 20 K
Requiredminimumsuperheating
∆tOh = 20 K

D
GB
F
E
I
Ru
11
96446-04.2019-DGbFEIRu
4|Compressor assembly
Fig. 12
Fig. 13
Fig. 14
Fig. 15
Installationofpipevibrationmufersisrecommended!
F
E
D
C
B
A
1
2
3
4
F
E
D
C
4
3
2
1
A
B
Tol.-Ang. DIN ISO 2768-mK
Ra Rz
Maß
Passung
Freigabe
Alternativbezug:
Baumustergeprüft
Teil inaktiv
Lieferantenzeichnung
-
-
K.-Auftrag:
PL:
Zeichnung ungültig
Entwicklungsstand
Teil keine Serie
120
400
±0.5
über 0.5
bis 6
Benzstraße 7 - 72636 Frickenhausen - Germany - www.bock.de
-
-
Unbemaßte Radien:
-
Diese Zeichnung ist unser Eigentum!
Sie darf ohne unsere Genehmigung weder nach-
gebildet, vervielfältigt, oder Dritten Personen zu-
gänglich gemacht werden. Der Nachbau nach
dieser Zeichnung, oder an Hand der nach dieser
Zeichnung hergestellten Gegenstände durch den
Abnehmer oder Dritte ist nicht gestattet.
Wir behalten uns alle Rechte, gemäß DIN ISO 16016
an dieser Zeichnung vor.
Bearb.
Datum
Änderungs-Nr.
Werkstoff:
Ausgangsteil, bzw. Rohteil:
--
Gepr.
Name
Datum
19.04.
Werkstückkanten
DIN ISO 13715
Ersatz für:
Ersetzt durch:
Erstellt
2010
Geprüft
-
Kurz
Zone
1/x
Oberflächenbehandlung / Härte:
-
Blatt:
Änderungsbeschreibung
400
Benennung:
±0.8
1000
30
6
-
±0.3
120
30
±0.2
Zeichn.-Nr. Teile-Nr.
Oberflächenangaben ISO 1302
x.xxxx-xxxxx.x
Zust.
Gußtoleranzen:
Gewicht: (kg)
±0.1
Maßstab:
1:1
Wasserwaage
für Indesign
Der Lieferant muß sicherstellen, dass die Ware in
einwandfreiem Zustand angeliefert wird (Korrosions-
schutz, Verpackung für sicheren Transport).
Rz 25
Rz 160
s
25
z
y
x
w
u
t
0,05
Rz 1,6
0,3
0,7
1,6
2
Rz 16
6,3
Rz 63
Rz 6,3
Rz 12,5
F:\user\kurz\3D Sachen\3D Teile\Zeichnungen\Wasserwaage
?
Fig. 11
Fig. 10
INFO New compressors are factory-lled with inert gas. Leave this
service charge in the compressor for as long as possible and pre-
vent the ingress of air. Check the compressor for transport damage
before starting any work.
ATTENTION Attachments (e.g. pipe holders, additional units, fastening parts,
etc.) directly to the compressor are not permissible!
Setuponanevensurfaceorframewithsufcient
load-bearing capacity.
Single compressor preferably on vibration damper.
Duplex and parallel circuits always rigid.
Provideadequateclearanceformaintenancework.
Ensureadequatecompressorventilation.
Do not use in a corrosive, dusty, damp atmosphere or a
combustible environment.
4.2 Setting up
4.1 Storage and transport
Use transport eyelet.
Donotliftmanually!
Useliftinggear!
Storage at (-30°C) - (+70°C), maximum permissible relative humidity
10% - 95%, no condensation
Do not store in a corrosive, dusty, vaporous atmosphere or in a com-
bustible environment.

12
D
GB
F
E
I
Ru
96446-04.2019-DGbFEIRu
4|Compressor assembly
Fig. 17
4.3 Pipe connections
ATTENTION Damage possible.
Superheating can damage the valve.
Remove the pipe supports from the valve for soldering.
Only solder using inert gas to inhibit oxidation products (scale).
The discharge gas connection can be moved upwards with an
adapter (accessory). This makes it easier to remove the com-
pressor from a refrigerating system.
Fig. 16: graduated
internal diameter
Pipe connections on the compressor are available for soldering or
welding (accessories). The discharge and suction line valves have
graduated inside diameters so that pipes with standard millimetre and
inch dimensions can be used. The pipe will be immersed more or less
deeply according to dimension.
The connection diameters of the shut-off valves are rated for maximum
compressor output. Theactualrequiredpipecrosssectionmustbe
matched to the output. The same applies for non-return valves.
4.4 Pipes
Pipes and system components must be clean and dry inside and free of scale, swarf and layers of
rust and phosphate. Only use air-tight parts.
Lay pipes correctly. Suitable vibration compensators must be provided to prevent pipes being
cracked and broken by severe vibrations.
Ensure a proper oil return.
Keep pressure losses to an absolute minimum.
4.5 Start unloader (external)
A internal start unloader ex factory is not available. Alternatively a start unloader can be installed in
the plant.
Operation:
When the compressor is started, a solenoid valve receives power via a time switch and opens a by-
pass between the discharge- and suction line. At the same time, a non-return valve in the discharge
lineclosesandpreventsabackowofrefrigerantfromthecondenser(Fig.17).
Thecompressorisnowshort-circuitedanddeliversfromtheoutowdirectlyintotheintake.The
pressuredifferentialconsequentlydecreasessubstantially.Asaresult,thetorqueonthedriveshaft
of the compressor is considerably diminished. The drive motor can now start with a low level of
startingtorque.Assoonasthemotorandthecompressorreachtheirratedspeed,thesolenoidvalve
closes and the non-return valve opens (Fig. 18). The compressor now works under normal load.
Solenoid valve actuated
Non-return valve closed

D
GB
F
E
I
Ru
13
96446-04.2019-DGbFEIRu
4|Compressor assembly
Fig. 18
Rigid
fixed point Fig. 19
As short as
possible
4.6 Laying suction and pressure lines
A rule of thumb: Alwayslaytherstpipesectionstartingfromtheshut-offvalvedownwards
and parallel to the drive shaft.
ATTENTION Improperly installed pipes can cause cracks and tears, the result
being a loss of refrigerant.
INFO Proper layout of the suction and discharge lines directly after
the compressor is integral to the system’s smooth running and
vibration behaviour.
Important:
- Start unloader may only be employed during the starting phase.
- Check the solenoid valve and the non-return valve regularly for tightness.
- In addition, we recommend to use a heat protection thermostat on the discharge side of the com-
pressor. This protects the compressor against thermal overloading. Connect the heat protection
thermostat in series on the safety chain of the control circuit, to switch off the compressor if
necessary.
- Follow these instructions to avoid thermal overloading.
Solenoid valve dead
Non-return valve open

14
D
GB
F
E
I
Ru
96446-04.2019-DGbFEIRu
4|Compressor assembly
Fig. 20 Fig. 21
Valve spindle seal
Release
Tighten
Pipe connection
Pipe connection
4.8 Operating mode of the lockable service connections
Fig. 22
Opening the shut-off valve:
Spindle: turn to the left (counter-clockwise) as far as it will go.
—> Shut-off valve completely opened / service connection closed.
Fig. 23
Opening the service connection
Spindle: Turn 1/2- 1 turn clockwise.
—> Service connection opened / shut-off valve opened.
Connection
blocked
Spindle
Spindle Connection
open
Compressor
Compressor
Service connection
closed
Service connection
opened
Afteractivatingthespindle,generallytthespindleprotectioncapagainandtightenwith14-16Nm.
This serves as a second sealing feature during operation.
4.7 Operating the shut-off valves
Before opening or closing the shut-off valve, release the valve spindle seal by approx. 1/4of a turn
counter-clockwise.
After activating the shut-off valve, re-tighten the adjustable valve spindle seal clockwise.

D
GB
F
E
I
Ru
15
96446-04.2019-DGbFEIRu
4|Compressor assembly
5|Electrical connection
5.1 Information for contactor and motor contactor selection
Allprotectiondevicesandswitchingormonitoringunitsmustbettedinaccordancewiththelocal
safetyregulationsandestablishedspecications(e.g.VDE)aswellaswiththemanufacturer’sinfor-
mation. Motor protection switches are required! Motor contactors, feed lines, fuses and motor
protection switches must be rated on the basis of the maximum working current (see name plate).
For motor protection use a current-dependent and time-delayed overload protection device for moni-
toring all three phases. Set the overload protection device so that it must be actuated within 2 hours,
if there is 1.2 times the max. working current.
INFO Connect the compressor motor in accordance with the circuit diagram
(see inside of terminal box).
Use suitable cable entry point of the correct protection type (see
name plate) for routing cables into the terminal box. Insert the strain
relieves and prevent chafe marks on the cables.
Comparethevoltageandfrequencyvalueswiththedataforthe
mains power supply.
Only connect the motor if these values are the same.
DANGER Risk of electric shock! High voltage!
Only carry out work when the electrical system is disconnected
from the power supply!
5 Electrical connection
ATTENTION When attaching accessories with an electrical cable, a minimum
bending radius of 3 x the cable diameter must be maintained for
laying the cable.
For systems with long pipes and higher degree of contamination, a lter on the suction-side is
recommended.Thelterhastobebereneweddependingonthedegreeofcontamination(reduced
pressure loss).
4.9Suctionpipelter

16
D
GB
F
E
I
Ru
96446-04.2019-DGbFEIRu
Designation on the name plate Sticker on the terminal box
Y/YY
Y/YY
5.2 Standard motor, design for direct or partial winding start
INFO A mechanical unloaded start with bypass solenoid valve is
notrequired.
5|Electrical connection
Compressors with this marking are suitable for direct or partial winding start. The motor winding is
subdivided into two parts:
Part winding 1 = 50 % and part winding 2 = 50 %.
This winding division reduces the start-up current needed for a part winding start to approx. 50 % of
that for a direct start.

D
GB
F
E
I
Ru
17
96446-04.2019-DGbFEIRu
The motor is wired for direct start (YY) at the factory. For part winding start Y/YY the bridges must
be removed and the motor feed line connected according to the circuit diagram:
5|Electrical connection
ATTENTION Failure to do this results in opposed rotary elds and results in
damage to the motor. After the motor starts up via partial winding
1, partial winding 2 must be switched on after a maximum delay
of one second. Failure to comply can adversely affect the service
life of the motor.
400 V
Direktstart YY Teilwicklungsstart Y/YY
1V1 1W11U1
2W12V12U1
L3L2L1 L3L2L1
L3L2L1
1V1 1W11U1
2W12V12U1
Direct start YY
Part winding start Y/YY

18
D
GB
F
E
I
Ru
96446-04.2019-DGbFEIRu
5.3 Basic circuit diagram for part winding start with standard motor
Fig. 24
Οnderung
0
Datum Name
Datum
Bearb.
Gepr.
Norm
1
20.02.2009
bauknecht
04.08.2017
Urspr.
2
Ers. f.
3
Ers. d.
4
PW INT69 HG44/66
567
BOCK COMPRESSORS
8
=
+
9
Bl.
6.c Bl.
6.a
2
Anschlußkasten Verdichter
BT1
INT69
DELTA- P II
QA1
L1 L2 L3 N PE
FC1.1
I> I>
I>
QA2
1U1
1V1
1W1
PE
EC1
M
Y/YY
2U1
2V1
2W1
FC1.2
I> I>
I>
QA3
FC1.1
FC1.2
FC2
SF1
BP2
P>
QA2
BP3
P
QA2
KF1
KF1
6.c.8
QA2
L1.1
L2.1
L3.1
L1.2
N
PE
QA3
BT3
BT2
Θ
1112 14
L N B1 B2
12
11
10
9
8
7
6
5
4
3
2
1
Θ
vio bn bu gr
Θ
EB1
pk og
50% 50%
BP2 High pressure safety monitor
BP3 Safety chain (high/low pressure monitoring)
BT1 Cold conductor (PTC sensor) motor winding
BT2 Thermal protection thermostat (PTC sensor)
BT3 Release switch (thermostat)
DELTA-P II Oil differential pressure sensor DELTA-P II (accessory)
EB1 Oil sump heater
EC1 Compressor motor
Compressor terminal box

D
GB
F
E
I
Ru
19
96446-04.2019-DGbFEIRu
FC1.1/1.2 Motor protection switch
FC2 Control power circuit fuse
INT69 G Electronic trigger unit INT69 G
KF1 Delay relay for contactor switch over
QA1 Main switch
QA2 Mains contactor (part winding 1)
QA3 Mains contactor (part winding 2)
SF1 Control voltage switch
Οnderung
0
Datum Name
Datum
Bearb.
Gepr.
Norm
1
20.02.2009
bauknecht
04.08.2017
Urspr.
2
Ers. f.
3
Ers. d.
4
PW INT69 HG44/66
567
BOCK COMPRESSORS
8
=
+
9
Bl.
6.c Bl.
6.a
2
Anschlußkasten Verdichter
BT1
INT69
DELTA- P II
QA1
L1 L2 L3 N PE
FC1.1
I> I>
I>
QA2
1U1
1V1
1W1
PE
EC1
M
Y/YY
2U1
2V1
2W1
FC1.2
I> I>
I>
QA3
FC1.1
FC1.2
FC2
SF1
BP2
P>
QA2
BP3
P
QA2
KF1
KF1
6.c.8
QA2
L1.1
L2.1
L3.1
L1.2
N
PE
QA3
BT3
BT2
Θ
1112 14
L N B1 B2
12
11
10
9
8
7
6
5
4
3
2
1
Θ
vio bn bu gr
Θ
EB1
pk og

20
D
GB
F
E
I
Ru
96446-04.2019-DGbFEIRu
5|Electrical connection
5.4 Special motor: design for direct or star-delta start
Amechanicalunloadedstartwithbypasssolenoidvalveisrequiredforthestar-deltastart.
Designation on the name plate Sticker on the terminal box
∆/ Y
5.4 Sondermotor: Ausführung für Direkt- oder Stern-Dreieck-Anlauf
Für den Stern-Dreieck-Anlauf ist eine mechanische Anlaufentlastung mit Bypass-Magnetventil
(Zubehör) erforderlich.
Bezeichnung auf dem Typschild Aufkleber auf Klemmenkasten
∆/ Y
Stern-Dreieck-Anlauf ist nur im Spannungsbereich ∆(230 V) möglich. Beispiel:
230 V ∆
Direktstart Stern-Dreieck-Start
L3L1
V1 W1
U1
V2
U2
W2
L1 L2 L3
L2
V1 W1
U1
V2
U2
W2
L3L2L1
400 V Y
nur Direktstart
V1 W1U1
V2U2W2
L1 L2 L3
This manual suits for next models
16
Table of contents
Other GEA Air Compressor manuals

GEA
GEA HGX34/110-4 ML CO2 T User manual

GEA
GEA HG76e/1620-4 User manual

GEA
GEA Bock HGX2 CO2 T Series User manual

GEA
GEA HG34P/e User manual

GEA
GEA Bock HGX2 CO2 T Series User manual

GEA
GEA HG44e User manual

GEA
GEA HG5/725-4 User manual

GEA
GEA Grasso M-Series User manual

GEA
GEA FK40 Series User manual

GEA
GEA Bock F76 Series User manual
Popular Air Compressor manuals by other brands

Stanley
Stanley HY 227/10/5 Instruction manual for owner's use

Craftsman
Craftsman 919.72755 owner's manual

Mea
Mea SMARTPACK 35 Owner's/operator's manual

airmaster
airmaster TIGER 11/550 Operation & maintenance instructions

Vector
Vector AIRPRO VEC258 owner's manual

Anest Iwata
Anest Iwata SLBE-2 instruction manual