Geemarc CL8700 User manual

English
CL8700
Mobile Phone with SOS
emergency key

1
!!! Please refer to our website: www.geemarc.com for an up to
date user guide, as there may be important updates and
changes you need to be aware of !!!
CONTENTS ................................................................ 1
INTRODUCTION ........................................................ 4
Unpacking the Telephone............................................5
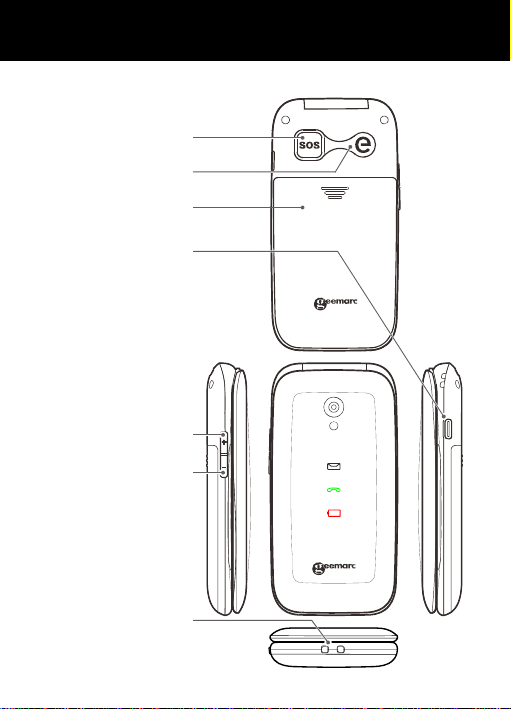
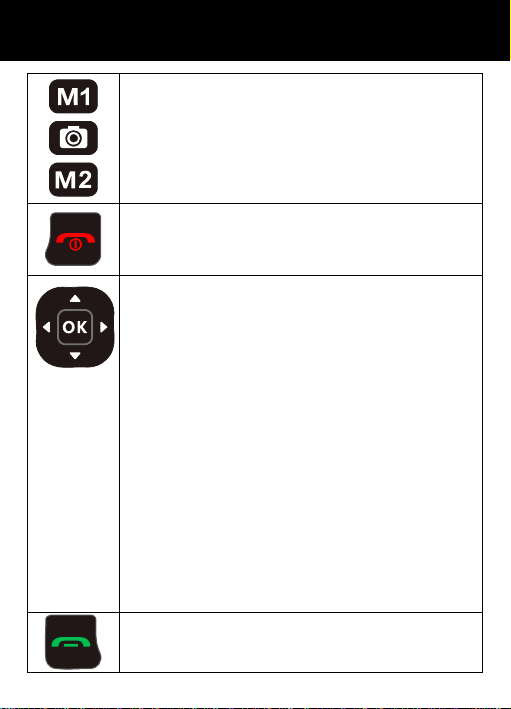
DESCRIPTION ........................................................... 6
General Description....................................................6
LCD Screen Description ............................................11
Menu Navigation........................................................13
Menu Map..................................................................13
Network Services & Password...................................15
SETTING UP, Install SIM Card,
Battery and micro SD card ......................................16
Charging the Battery..................................................17
Switching On/Off & Battery Use.................................18
USING THE TELEPHONE, Standby Mode, Making a
Call ............................................................................19
Making a Call from the Call Record & Phone Book....20
Making a Call using Quick Dial ..................................20
Making a Call using Dialled Numbers List..................20
Receiving a Call, Rejecting a Call, Switch Off Alerts..21
Options During a Call.................................................21
Receiving Volume......................................................22
Ringer Volume ...........................................................22
Call Timer...................................................................22
CONTENTS

2
SMS ...........................................................................23
Send a Text Message ................................................23
Receiving a Text Message.........................................23
Reviewing Stored Text Messages (Inbox) ................23
Sent Messages..........................................................24
Draftbox .....................................................................24
Delete SMS................................................................24
Text Message Settings...............................................25
Broadcast Messages .................................................26
VOICEMAIL ...............................................................27
Voicemail Number Setting..........................................27
Listen to Voicemail.....................................................27
PHONEBOOK ...........................................................28
Create a Phone Book Entry .......................................28
Create a Phone Book Entry from Standby .................29
View Phone Book Entries...........................................29
Options within Phone Book contact ...........................30
Options within Phone Book........................................30
Create a Picture Phone Book Entry...........................30
Dial a Picture Phone Book Entry................................31
Storing or Dialing a Speed Dial Number.....................31
CALL RECORD.........................................................32
Display Missed Calls..................................................32
Display Dialled Calls..................................................32
Display Received Calls..............................................33
Delete Call Logs.........................................................33
Call Settings...............................................................34
CONTENTS

3
HANDSET SETTINGS...............................................36
Phone Settings, Led setting, M1/M2 numbers...........36
I.C.E...........................................................................36
Torch, Flight mode .....................................................37
Profiles, Call Settings.................................................37
Speed dial..................................................................37
Display.......................................................................38
Security Settings........................................................38
Connections...............................................................39
SOS ...........................................................................40
SOS Function, SOS mode setting..............................40
SOS Number Settings................................................40
SOS Text Message ....................................................41
SOS Message Record ...............................................41
SOS actively obtains the local location ......................41
ADVANCED SETTINGS............................................43
Tools ..........................................................................43
Multimedia..................................................................44
File Manager..............................................................44
TROUBLESHOOTING ..............................................45
SAFETY INFORMATION...........................................48
HEARING AID INFORMATION .................................51
NETWORK SERVICES .............................................52
GUARANTEE ............................................................53
RECYCLING DIRECTIVES .......................................54
CONTENTS

4
Congratulations on purchasing your Geemarc CL8700
telephone 4G. This telephone is hearing aid compatible.
It offers many functions such as an alarm, calendar,
camera, video, SMS text messaging, a phone book and
picture phone book, human voice options with talking
keypad, a speakerphone and speed dial buttons. It has
an emergency function in which five numbers can
be programmed as emergency contacts. In case of
emergency these contacts will be called and SMS
messages sent with the press of just one button.
The font size on the colour LCD display is large and the
buttons on the keypad are easy to see and use. This
mobile telephone has a loud ringer and strong vibrating
setting. There is adjustable receiving volume control
reaching up to 40dB with boost key. All these features
add up to make this a highly suitable telephone for the
elderly, hard of hearing or sight people and anyone who
simply wants to keep in touch with a great degree of
ease.
Its is important that you read the instructions below in
order to use your Geemarc telephone to its full potential.
Keep this user guide in a safe place for future reference.
This guide explains how to use the following telephone:
CL8700
INTRODUCTION

5
Unpacking the Telephone
When unpacking the telephone, you should find the
following in the box:
•1 CL8700 mobile telephone handset 4G
•1 Desktop charging unit
•1 cable USB/ type C
•1 Mains power adaptor
•1 x Li-Polymer rechargeable battery
•1 User Guide
For product support and help visit our website at
www.geemarc.com
Telephone : 01707 387602
lines are open 09h00 to 16h00 Mon to Fri
Parc de l’Etoile, 2 Rue Galilée, 59791 Grande-Synthe,
France.
INTRODUCTION

6
General Description
Handset Description (front)
Earpiece
Display
Right Soft key
End/Power key
Navigation keys
Confirm key
Left Soft key
Dial key
M1, camera , M2
Keypad
Torch
DESCRIPTION

7
Handset Description (Rear)
DESCRIPTION
SOS key
Loudspeaker
Battery door
Type-C USB Port /
Type-C Headset
Jack
Volume Up /
Amplify button
Down Button
Charging Contacts

8
Charging Contacts
Type-C USB port
DESCRIPTION

9
One touch dialing keys
A telephone number can be assigned to each of
these buttons. To dial the number all you have to
do is press the button once and the number will
be dialed automatically
This is a dedicated key in Standby. It provides
access to the Camera function in stand by mode.
Power key/On-hook key
Long press to power the telephone on and off.
End a call.
Cancel current process and return to standb
y
.
Navigation Button
Up Key
Scroll up through lists and menu options.
This is a dedicated key in Standby. It can be set
up in Handset Settings or Recorder function in
stand by mode.
Down Key
Scroll down through lists and menu options.
This is a dedicated key in Standby. It can be set
up in Handset Settings or Dual SIM function in
stand by mode.
Right Key
This is a dedicated key in Standby. It can be set
up in Handset Settings or Profile function in stand
by mode.
Left Key
This is a dedicated key in Standby. It can be set
up in Handset Settings or Write SMS function in
stand by mode.
Call Key
Make a call after dialling the number.
Receive a call. Access at the outgoing call list
DESCRIPTION

10
Left/Right key
These are softkeys i.e. they take on different
functions depending on the menu displayed.
The current function is always displayed by the text
above the key.
Asterisk key
Press this key to insert one or more symbols while
composing a message or editing a phonebook
entry name. Then use the navigation keys to move
to the symbols you want to insert.
Hash Key
Press to switch between different input modes
while composing a text message or editing a
contact name.
In standby mode, if you press and hold this key, you
set your phone in Silence mode, if you press and
hold again, you are in shaker mode, if you press
and hold again, you come back in normal mode.
0 / Torch Key
In standby, press and hold for a few seconds and
the torch will shine steadily. Press and hold once
more to turn it off.
Volume Up and Down Key
Use this key to increase ringer volume when you
access Profiles menu or when receiving an
incoming call. Increase the earpiece /
speakerphone volume during a call. There are 9
volume levels available. Start the amplifier
function after level 6.
Volume Down Key
Use key to decrease the ringer volume when you
access Profiles menu or when receiving an
incoming call. Decrease the earpiece /
speakerphone volume during a call.
DESCRIPTION

11
Front Cover
When there are unread text messages, the white
light is on.
Front Cover
When there is a missed call, the green light is on.
Front Cover
When the voltage is low, the red light flashes at an
interval of 2.5 seconds, when charging, the red
light flashes at an interval of 1 second, and when
it is fully charged, it displays blue.
LCD Screen Description
The LCD screen is split into three distinct areas:
The icon area.This is found at the top of the screen. This
displays the various system icons which help you to use the
telephone.
The main area. This is found across the centre of the screen.
It displays the following:
•number being dialled
•caller ID information
•phonebook
•menu information
•in standby mode current time, date and service provider
name
The soft key area. This is found at the bottom of the screen.
DESCRIPTION

12
Signal Strength icon
This is always displayed when your telephone is
switched on. It shows the current signal strength.
More bars indicate more signal strength. There is
one of these icons per SIM.
Alarm icon
The alarm has been set to ring at a specified time.
Battery Status icon
This is always displayed when your telephone is
switched on. It shows the level of battery charge.
More bars indicate more battery charge.
R Roaming icon
A roaming call is taking place i.e.international call –
outgoing or incoming.
SMS icon
A new SMS (text message) has been received.
Mute icon
The microphone is temporarily muted during the
conversation.
Silent icon
The telephone is in silent mode. There will be no call
alert.
Headset icon
The headset is plugged in
Missed Call
Shaker icon
The telephone is in shaker mode
DESCRIPTION

13
Menu Navigation
The MENU soft key or central square key is used to activate
the menu. The BACK soft key is used to go back a level in the
menu system. Press to deactivate the menu and return
to standby mode from any menu.
The ▼and▲keys are used to scroll through the menu.
▲move backward through the menu
▼move forward through the menu
Sometimes <and >are used to navigate through sub menus.
The OK soft key is used to confirm/ select an action or choice
on a screen.
The central square key is used to go to Menu or to confirm /
select an action or choice on a screen.
Menu Map
Contacts Photo contacts
Normal Phonebook
Message Write Message
Inbox
Outbox
Drafts
Sentbox
Broadcast Message
Voice mail server
Call logs Missed calls
Dialed calls
Received calls
Rejected calls
Delete all
DESCRIPTION

14
Call timers
Data service cournter
SOS Mode
SOS number
Set call center
SOS SMS
Set outgoing voice
Settings Phone Settings
LED Setting
M1/M2 memories
I.C.E
Torch
Flight mode
Profiles
Call settings
Speed dial
Display
Security
Connections
Tools Bluetooth
Clock
Calendar
Calculator
Services
Internet Dorado
Opera Mini
Set as default
Multimedia Image
Camera
Make a video
DESCRIPTION

15
Video
FM radio
Audio
Recorder
My files Phone
Memory card
Network Services
To use this mobile telephone you must subscribe to a service
from a service provider. Different service providers offer
different features (at a variety of charges). This may effect
the features made available to you through this mobile
telephone.
Passwords
This mobile telephone allows you to set up passwords to help
protect your telephone from unauthorized use.
The PIN and PIN2 codes are supplied with your SIM card. The
PIN code help to protect the SIM card from unauthorized use.
The PIN2 code is required to access certain services.
The PUK and PUK2 codes may be supplied with the SIM card.
If you enter the PIN code incorrectly three times in succession,
the PUK will be required. If the codes are not supplied, contact
your service provider.
DESCRIPTION

16
Install SIM Card and Battery
Always switch the telephone off and disconnect the charger
before removing the battery.
Take care when handling the SIM card. The SIM card and its
contacts can be easily damaged by scratches or bending.
To remove the battery compartment cover, slide the cover in
the direction shown and pull it off.
Remove the battery (if battery already inside).
Slide a SIM with the gold contacts face down under the silver
SIM holder as shown below.
You can insert 2 SIM cards into this telephone. There are many
reasons to do this, however, one important reason is that if you
use two SIMS from different providers you will probably get
better network coverage. However, just using one will be fine
too!
Observe the battery contacts (the gold coloured contacts must
face towards the bottom right) and insert the battery.
Place the battery cover into position and slide up the cover.
You can insert one micro SD card to
save the pictures. Maximum 32G.
SIM card
SETTING UP

17
Charging the Battery
Charging via the Type-C Port
Plug the charger into a wall socket.
Connect the lead from the charger
into the Type-C port on the side of
the telephone. During charging, the
battery icon starts to fill.
Charging via the Charging Unit
Plug the charger into a wall socket.
Connect the lead from the charger into the
Type-C port on the charging unit.
Place the mobile telephone onto the charging
unit.
Note: Only use batteries and
chargers supplied with the
telephone. The guarantee will
be invalid if an unapproved
cable is used. Keep the battery contacts clean
and free of dirt. Try and avoid removing the
battery as this could short circuit the battery.
If the battery is completely discharged, it may take a few
seconds before the charging indicator appears on the display
or before any calls can be made.
Before the handset is first used, the battery must be
charged for a minimum of 3 hours.
SETTING UP

18
Switching On/Off
Press for 3 seconds or longer to switch the telephone
on.
If no SIM card has been inserted, No SIM card will be displayed.
Only emergency calls can be made until the SIM has been
inserted.
Press again for 3 seconds to switch the telephone off.
At the first starting, your phone will to enter the date and the
hour.
Battery Use
The icon is continuously displayed at the top right corner
of the LCD display. The icon indicates the level of battery power.
The more bars displayed, the more power available.
When the battery charge is low, a warning message will be
displayed. The back lighting and certain other functions may
stop working. When the battery is too weak for the telephone
to operate, the handset will automatically switch off.
Battery talk and standby times are subject to change. Replace
the battery when the battery power has deteriated noticeably
(requires charging more frequently).
SETTING UP

19
Standby Mode
When the telephone is ready for use and you have not entered
any characters, the telephone is in standby mode. You can set
the telephone to standby mode by pressing .
Making a Call
Flip open the cover and dial the number on the keypad.
Press Delete soft key to delete an incorrect digit
Press , the number is automatically dialled
To end the call simply press
To place an international call you need to press +before the
country code. Simply, press *key twice. Some foreign telephone
networks have extension lines that cannot be dialled as
dial-through, but need to be entered by the keypad. To dial
these directly, press *quickly three times in a row after the
telephone number. The pcharacter will appear and then you
can enter the extension.
USING THE TELEPHONE
Table of contents
Other Geemarc Cell Phone manuals

Geemarc
Geemarc CL8360 User manual

Geemarc
Geemarc CL8000 User manual

Geemarc
Geemarc CL8450 User manual

Geemarc
Geemarc CL8300 User manual

Geemarc
Geemarc CLEARSOUND ClearText User manual

Geemarc
Geemarc CL8600 User manual

Geemarc
Geemarc CL8500 User manual

Geemarc
Geemarc Clearsound CL8400 User manual

Geemarc
Geemarc ClearSound CL8400BT User manual

Geemarc
Geemarc CLEARSOUND GSMCL8200 User manual