Gemas SlimLED LIGHT Manual

INSTALLATION AND MAINTENANCE MANUAL
KURULUM VE BAKIM TALİMATI
Version: 2.0
SlimLED LIGHT
SlimLED LAMBA

The light should never be operated without a transformer.
No voltage above 12 V ±2 V should definitely go to the light.
This guide; It contains basic information about the security measures to be applied for
installation and use. Therefore, the person and user to install; should read these instructions
carefully before installation and operation. Keep this manual for future reference.
1. GENERAL FEATURES
• It has a special, elegant, stylish and patented design.
• Compatible with all PAR56 lamp niche on the market.
• Thanks to its ultra-thin design, it is only 35mm thick with its frame.
• It can be easily mounted on concrete pools with only 2 screws.
• Comes with liner mounting kit for easy application in liner pools.
• It gives instant beam thanks to the LEDs used in the light.
• Light scattering angle is 120 °.
• The light complies with IP68 protection degree at 2 m nominal depth.
• Diffuser glass is made of polycarbonate.
• Body part consists of white ABS.
• The light operating voltage is very low (12V AC/DC), making it a Class III electrical device.
• Energy input cable length is 2.5 meter.
1
ENGLISH
Loremipsum

2. TECHNICAL FEATURES
Ambient temperature should be maximum 30°C.
Changes in ambient temperature and product temperature alter current and light intensity values.
2
Name Voltage
(±2V)
Power
(Max.)
Luminous
Flux (Lumen)
Light Beam
Angle
Slim 81 White
Slim 81 Daylight
Slim 81 Turquoise
Slim 81 Blue
Slim 81 Red
Slim 81 Green
Slim 81 RGB Built-in Control
Slim 81 RGB Central Control
Slim 90 RGB Built-in Control
Slim 90 RGB Central Control
Slim 252 White
Slim 252 Daylight
Slim 252 Turquoise
Slim 252 Blue
Slim 252 Red
Slim 252 Green
Slim 252 RGB Built-in Control
Slim 252 RGB Central Control
12V AC/DC
12V AC/DC
12V AC/DC
12V AC/DC
12V AC/DC
12V AC/DC
12V AC/DC
12V DC
12V AC/DC
12V DC
12V AC/DC
12V AC/DC
12V AC/DC
12V AC/DC
12V AC/DC
12V AC/DC
12V AC/DC
12V DC
35
35
30
30
30
30
30
30
36
36
50
50
36
36
36
36
36
36
2739
2739
1241
1241
1241
1241
1241
1241
1081
1081
3536
3536
1011
1011
1011
1011
1011
1011
120 Ý
120 Ý
120 Ý
120 Ý
120 Ý
120 Ý
120 Ý
120 Ý
120 Ý
120 Ý
120 Ý
120 Ý
120 Ý
120 Ý
120 Ý
120 Ý
120 Ý
120 Ý
278
168
35
191
278
252 252 160
80
168
35

The people who are in charge of assembly should have the required qualifications for this type of work.
Before starting the installation, make sure that the disconnect the line from the lamps. RGB lights must
be connected to a single source of suitable capacity. The lamp should be operated only under water
and fixed to the vertical wall of the pool. The lamp must not be operated if it is not under water.
3. INSTALLATION - USE
3.1. Safety Warnings
• The people who are in charge of assembly should have the required qualifications for this type of work.
• Avoid making contact with the electric voltage.
• Comply with the current standards regarding accident prevention.
In this regard, the IEC 364-7-702 standards must be observed:
WIRING IN BUILDINGS. SPECIAL WIRING. SWIMMING POOLS.
• Any operation related to the maintenance or replacement of parts should be performed with the light’s electricity
disconnected from the main power.
• Any electrical material should not be touched with wet hands and feet.
3.2. Mounting
3
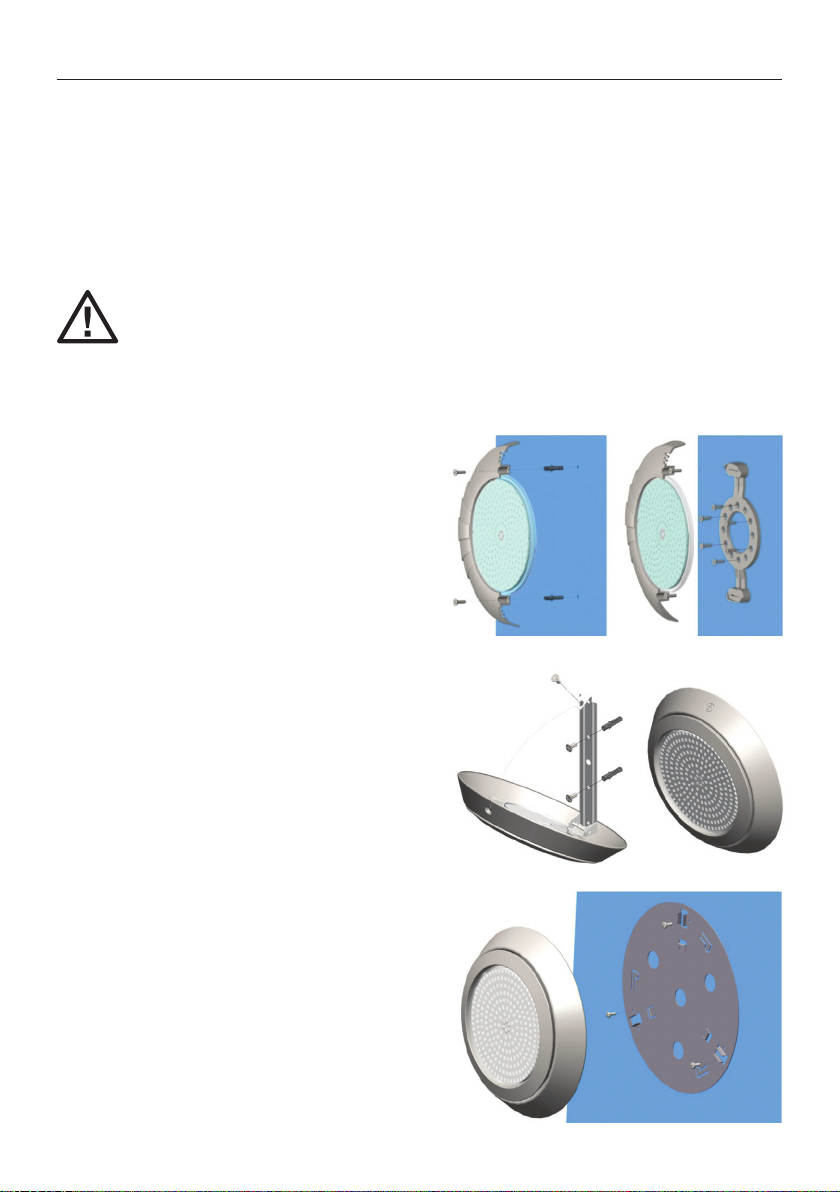
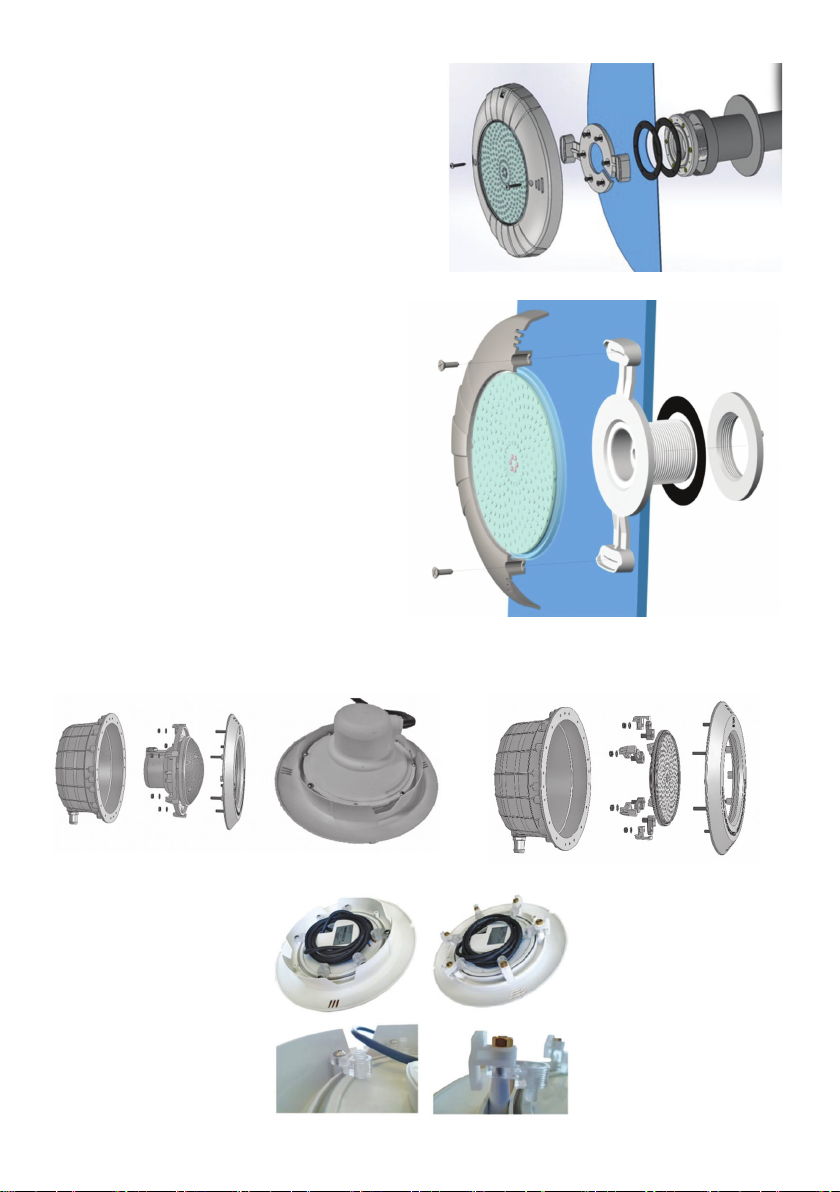
3.2.1. Installation to the Concrete Pool
As shown in the adjacent picture (method-1), it can be directly attached to the pool wall with only 2 fixing plugs and 2
screws using the mounting holes on the rim.
If the cross is used (method-2):
• As seen in the adjacent picture, the cross
is fixed to the pool with 6 screws.
• The cable outlet must be centered in the
space in the middle of the cross.
• Light is fixed to the cross with two screws
3.2.1a. Inox Framed Light Installation to Concrete Pool
• As seen in the adjacent picture,
the cross is fixed to the pool wall with 2 fixing plugs
and 2 screws.
• The frame is attached to the channel inside
the rim, matching the pin on the cross.
• The frame is fixed to the cross with
the screw on the upper part.
3.2.1b. Inox Click Framed Light Installation to Concrete Pool
Inox click model SlimLED Lights have a very easy installation.
• As seen in the adjacent picture, the cross
is fixed to the pool wall with 3 fixing plugs and 3 screws.
• The assembly is completed by placing the frame on
the cross and pressing firmly.
Method-2Method-1

3.2.2. Installation to Liner Pool
• As seen in the adjacent picture, the insulation
gaskets are placed to meet the screw holes.
• The cross is screwed to the connection apparatus
with 6 screws so that it presses smoothly on the gasket.
• The light is fixed to the cross using the
mounting holes on the frame.
3.2.3. Installation to Polyester Pool
• As seen in the adjacent picture, the insulation
gasket is placed under the tightening nut properly
and tightened well.
• The light is fixed to the cross using the
mounting holes on the frame.
3.2.4. Niche Assembly with the Replacement Kit
The present PAR56 lamp is easy to replace. It can be easily applied to the niche housing of your swimming pool.
Present PAR56 Lamp SlimLED Light Installation in the niche
4

3.3. Usage and Color Changing
The light is powered (12V AC/DC) after making sure that the assembly and electrical connection process are done
correctly. There is no color changing and color transition feature in single color lights. Changing and transitioning of
color in RGB lights (within 3 seconds) is provided by disconnecting the power and re-powered. This process is
UHSHDWHGVR WKDW GLIIHUHQW FRORUV DQG DQLPDWLRQV DUH SHUIRUPHG 7KDQNV WR *(0$û 7 5*% /LJKW &RQWURO XQLWV
designed for this process, it can be done very easily with a remote control.
3.3.1. Lighting Pattern List
3.3.2. Multiple Light Synchronization
Check the lights after connecting and activating all RGB lights. Make sure all lights work in different colors. Turn off the
power and turn it back on after 4-7 seconds. After this process, all RGB lights will turn to the first light pattern (RED).
By using the color changing function (by cutting the energy and re-energizing within 3 seconds), you can use all RGB
lights in any color or animation you desire.
4. MAINTENANCE
There is no need for any maintenance for this lamp. If there is a deterioration, it must be replaced. Make sure the lamp
is de-energized before any operation. Make sure that the new lamp is the same model and feature as the replaced
lamp.
5. GUARANTEE
The manufacturer warrants this underwater resin coated LED light against manufacturing defects and material defects for
a period of 2 years from the date of purchase. This warranty does not cover damage to the installation caused by misuse,
accidental damage, failures arising from the installation of unauthorized person and does not assume direct liability.
Material and workmanship defects do not include the following items:
• In the light with less than 252 LEDs, 3 or less LEDs are off.
• In the light with more than 252 LEDs, 6 or less LEDs are off.
• Air bubbles smaller than 9mm or less than 3 pcs. in the resin in front of the light.
• Air bubbles in the resin on the back of the light.
5
RGB Light Has 13 Different Lighting Patterns Detailed Below:
Red Green Blue Red and Green Red and Blue Blue and Green Red Green Blue
Light Conversion 256 Color Tone Changing Flashing Seven Intermediate Color Tones
Sixteen Color Change Single Color Change

6
Loremipsum
/DPEDNHVLQOLNOHWUDQVIRUPDW|UROPDGDQoDO×üW×U×OPDPDO×G×U
Lambaya kesinlikle 12 V ±2 V üzeri voltaj gitmemelidir.
%XN×ODYX]NXUXOXPYHNXOODQ×PLoLQX\JXODQDFDNJYHQOLN|QOHPOHULQHLOLüNLQWHPHOELOJLOHUL
LoHULU %X QHGHQOH NXUXOXPX \DSDFDN NLüL YH NXOODQ×F× NXUXOXP YH NXOODQ×P |QFHVL EX
WDOLPDWODU×GLNNDWOLFHRNXPDO×G×U%XN×ODYX]XLOHULGHEDüYXUPDN]HUHVDNOD\×Q×]
*(1(/g=(//ú./(5
• g]HO]DULIYHV×NELUWDVDU×PDVDKLSWLU
3L\DVDGDNLWP3$5ODPEDNRYDQODU×LOHX\XPOXGXU
8OWUDLQFHWDVDU×P×VD\HVLQGHoHUoHYHVLLOHEHUDEHUVDGHFHPPNDO×QO×ùDVDKLSWLU
%HWRQKDYX]ODUDVDGHFHYLGDLOHNROD\PRQWDMODQ×U
/LQHUKDYX]ODUGDNROD\FDX\JXODQPDV×LoLQ/LQHUPRQWDMNLWLLOHELUOLNWHJHOLU
/DPEDLoHULVLQGHNXOODQ×ODQ/('·OHUVD\HVLQGHDQ×QGD×ü×NYHULU
,ü×NGDù×OPDDo×V×·GLU
• Lamba, 2 m nominal derinlikte IP68 koruma derecesine uygundur.
'LI]|UFDP×SROLNDUERQDWWDQUHWLOPLüWLU
*|YGHN×VP×EH\D]$%6·GHQROXüPDNWDG×U
/DPEDoDO×üPDYROWDM×oRNGüNROGXùXQGDQ9$&'&6×Q×I,,,NDSVDP×QGDHOHNWULNOLELUFLKD]G×U
(QHUMLJLULüNDEORVXX]XQOXùXPHWUHGLU
TÜRKÇE

278
168
35
191
278
252 252 160
80
168
35
7(.1ú.g=(//ú./(5
2UWDPV×FDNO×ù×PDNVLPXP&ROPDO×G×U
2UWDPV×FDNO×ù×YHUQV×FDNO×ù×QGDNLGHùLüLNOLNDN×PYH×ü×NüLGGHWLGHùHUOHULQLGHùLüWLUPHNWHGLU
úVLP Voltaj
(±2V)
Güç
(Max.)
,ü×N$N×V×
(Lümen)
,ü×N
$o×V×
Slim 81 Beyaz
6OLP*Q×ü×ù×
Slim 81 Turkuaz
Slim 81 Mavi
6OLP.×UP×]×
6OLP<HüLO
Slim 81 RGB Kendinden Entegreli
Slim 81 RGB Merkezi Entegreli
Slim 90 RGB Kendinden Entegreli
Slim 90 RGB Merkezi Entegreli
Slim 252 Beyaz
6OLP*Q×ü×ù×
Slim 252 Turkuaz
Slim 252 Mavi
6OLP.×UP×]×
6OLP<HüLO
Slim 252 RGB Kendinden Entegreli
Slim 252 RGB Merkezi Entegreli
12V AC/DC
12V AC/DC
12V AC/DC
12V AC/DC
12V AC/DC
12V AC/DC
12V AC/DC
12V DC
12V AC/DC
12V DC
12V AC/DC
12V AC/DC
12V AC/DC
12V AC/DC
12V AC/DC
12V AC/DC
12V AC/DC
12V DC
35
35
30
30
30
30
30
30
36
36
50
50
36
36
36
36
36
36
2739
2739
1241
1241
1241
1241
1241
1241
1081
1081
3536
3536
1011
1011
1011
1011
1011
1011
120 Ý
120 Ý
120 Ý
120 Ý
120 Ý
120 Ý
120 Ý
120 Ý
120 Ý
120 Ý
120 Ý
120 Ý
120 Ý
120 Ý
120 Ý
120 Ý
120 Ý
120 Ý
7

0RQWDMGDQ VRUXPOX NLüLOHU EX WU LüOHU LoLQ JHUHNOL QLWHOLNOHUH VDKLS ROPDO×G×U 0RQWDM LüOHPLQH
EDüODPDGDQ|QFHKDWW×QHQHUMLVLQLQNHVLNROGXùXQGDQHPLQROXQX]5*%ODPEDODUX\JXQNDSDVLWHOLWHN
ELUND\QDùDEDùODQPDO×G×U/DPEDVDGHFHVXDOW×QGDYHKDYX]XQGLNH\GXYDU×QDVDELWOHQPLüüHNLOGH
oDO×üW×U×OPDO×G×U6XDOW×QGDGHùLOLVHDVODODPEDoDO×üW×U×OPDPDO×G×U
3. KURULUM - KULLANIM
3.1.*YHQOLN8\DU×ODU×
0RQWDMGDQVRUXPOXNLüLOHUEXWULüOHULoLQJHUHNOLQLWHOLNOHUHVDKLSROPDO×G×U
(OHNWULNYROWDM×\ODWHPDVHWPHNWHQNDo×Q×OPDO×G×U
.D]DODU×Q|QOHQPHVLQHLOLüNLQPHYFXWVWDQGDUWODUDX\XOPDO×G×U
BuEDùODPGD,(&VWDQGDUWODU×QDX\XOPDO×G×U
%ú1$/$5'$(/(.75ú.7(6ú6$7,g=(/(/(.75ú.7(6ú6$7,<h=0(+$98=/$5,
3DUoDODU×QEDN×P×YH\DGHùLüLPL\OHLOJLOLKHUWUOLüOHPODPED\DJLGHQHOHNWULNNHVLOGLNWHQVRQUD\DS×OPDO×G×U
,VODNHOYHD\DNODKHUKDQJLELUHOHNWULNOLPDO]HPH\HGRNXQXOPDPDO×G×U
3.2. Montaj
8
3.2.1. Beton Havuza Montaj
Yandaki UHVLPGHJ|UOGùJLELPHWKRGoHUoHYH]HULQGHNLPRQWDMGHOLNOHULNXOODQ×ODUDNVDGHFHGEHOYHYLGD
LOHGRùUXGDQKDYX]GXYDU×QDEDùODQDELOLU
ûD\HWLVWDYUR]NXOODQ×O×\RULVHPHWKRG
• YandakiUHVLPGHJ|UOGùJLEL×VWDYUR]
vida ile havuza sabitlenir.
• Kabloo×N×ü××VWDYUR]XQRUWDV×QGDNL
ERüOXùDPHUNH]OHQPHOLGLU
• LambaLNLYLGDLOH×VWDYUR]DVDELWOHQLU
D%HWRQ+DYX]D,QR[dHUoHYHOL/DPED0RQWDM×
• <DQGDNLUHVLPGHJ|UOGùJLEL×VWDYUR]
GXEHOYHYLGDLOHKDYX]GXYDU×QDVDELWOHQLU
dHUoHYHLoN×VP×QGDEXOXQDQNDQDOD×VWDYUR]
]HULQGHNLSLPGHQNJHOHFHNüHNLOGHoHUoHYHWDN×O×U
hVWN×V×PGDEXOXQDQYLGDLOHoHUoHYH×VWDYUR]DVDELWOHQLU
E%HWRQ+DYX]D,QR[&OLFNdHUoHYHOL/DPED0RQWDM×
,QR[FOLFNPRGHO6OLP/('/DPEDODU×QROGXNoD
NROD\ELUPRQWDM×EXOXQPDNWDG×U
• <DQGDNLUHVLPGHJ|UOGùJLEL×VWDYUR]
GXEHOYHYLGDLOHKDYX]GXYDU×QDVDELWOHQLU
• dHUoHYH×VWDYUR]]HULQHRWXUWXOXSVHUWoH
EDVW×U×ODUDNPRQWDM×WDPDPODQ×U
Method-2Method-1

3.2.2. Liner Havuza Montaj
<DQGDNLUHVLPGHJ|UOGùJLELL]RODV\RQFRQWDODU×
YLGDGHOLNOHULQLNDUü×OD\DFDNüHNLOGH\HUOHüWLULOLU
,VWDYUR]FRQWD\DG]JQFHEDVDFDNüHNLOGH
DGHWYLGDLOHEDùODQW×DSDUDW×QDYLGDODQ×U
dHUoHYH]HULQGHNLPRQWDMGHOLNOHULNXOODQ×ODUDN
ODPED×VWDYUR]DVDELWOHQLU
3.2.3. Polyester Havuza Montaj
• <DQGDNLUHVLPGHJ|UOGùJLELL]RODV\RQFRQWDV×
V×NPDVRPXQXDOW×QDG]JQGH\HUOHüWLULOLUYH
VRPXQJ]HOFHV×N×O×U
• dHUoHYH]HULQGHNLPRQWDMGHOLNOHULNXOODQ×ODUDN
ODPED×VWDYUR]DVDELWOHQLU
'HùLüLP.LWLúOH.RYDQD0RQWDM×
0HYFXW3$5ODPEDGHùLüLPLNROD\G×U<]PHKDYX]XQX]XQNRYDQ\XYDV×QDNROD\O×NODX\JXODQDELOLU
9
Mevcut PAR56 .RYDQD6OLP/('0RQWDM×

10
.XOODQ×PYH5HQN'HùLüWLUPH
MontajYHHOHNWULNVHOEDùODQW×LüOHPLQLQGRùUX\DS×OG×ù×QDHPLQROGXNWDQVRQUDODPED\DHQHUMLYHULOLU9$&'&7HN
UHQNODPEDODUGDUHQNGHùLüWLUPHYHUHQNJHoLüL|]HOOLùLEXOXQPDPDNWDG×U5*%ODPEDODUGDUHQNGHùLüWLUPHYHJHoLüL
VDQL\H LoHULVLQGH HQHUMLQLQ NHVLOLS WHNUDU HQHUML YHULOPHVL\OH VDùODQ×U %X LüOHP WHNUDUODQDUDN IDUNO× UHQNOHU YH
DQLPDV\RQODUJHUoHNOHüWLULOLU%XLüOHPLoLQWDVDUODQP×ü*(0$û75*%/DPED.RQWUROQLWHOHULVD\HVLQGHoRNUDKDW
ELUüHNLOGHYHX]DNWDQNXPDQGDLOH\DS×ODELOPHNWHGLU
,ü×N0RGHO/LVWHVL
3.3.2. Çoklu Lamba Senkronizasyonu
Tüm5*%ODPEDODU×EDùOD\×SGHYUH\HDOG×NWDQVRQUDODPEDODU×NRQWUROHGLQ7PODPEDODU×QIDUNO×UHQNOHUGHGHROVD
oDO×üW×ù×QGDQHPLQROXQ(QHUML\LNDSDW×QYHVDQL\HVRQUDWHNUDUHQHUML\LDo×Q%XLüOHPVRQUDV×WP5*%ODPEDODU
LON×ü×NPRGHOLQH.,50,=,G|QHFHNWLU5HQNGHùLüWLUPHIRQNVL\RQXQXNXOODQDUDNVDQL\HLoHULVLQGHHQHUMLQLQNHVLOLS
WHNUDUHQHUMLYHULOPHVL\OHWP5*%ODPEDODU×LVWHQLOHQUHQNYH\DDQLPDV\RQGDNXOODQDELOLUVLQL]
4. BAKIM
BuODPEDLoLQKHUKDQJLELUEDN×PDJHUHN\RNWXU(ùHUELUER]XOPDROXUVDGHùLüLPLJHUHNPHNWHGLU+HUKDQJLLüOHPGHQ
|QFHODPEDQ×QHQHUMLVLQLQNHVLNROGXùXQGDQHPLQROXQ<HQLODPEDQ×QGHùLüWLULOHQODPEDLOHD\Q×PRGHOYH|]HOOLNWH
ROGXùXQGDQHPLQROXQ
*$5$17ú
The hUHWLFLEXODPED\×VDW×QDOPDWDULKLQGHQLWLEDUHQ\×OER\XQFDLPDODWKDWDODU×QDYHPDO]HPHER]XOPDODU×QDNDUü×
JDUDQWLHGHU%XJDUDQWLKDWDO×NXOODQ×PQHGHQL\OHROXüDQKDVDU×ND]DUDRODQKDVDU×\HWNLVL]NLPVHOHULQ PRQWDM×QGDQ
ND\QDNO×DU×]DODU×NDSVDPD]YHGRùUXGDQVRUXPOXOXNVWOHQPH]
0DO]HPHYHLüoLOLNKDWDODU×DüDù×GDNLPDGGHOHULLoHUPH]
• /('·GHQGDKDD]RODQODPEDGDYHGDKDD]/('·LQV|QNROPDV×
• /('·GHQGDKDID]ODRODQODPEDGDYHGDKDD]/('·LQV|QNROPDV×
• /DPEDQ×Q|QQGHUHVLQLQLoLQGHPPGHQGDKDNoNKDYDEDORQFXùXROPDV×YH\DWDQHGHQGDKDD]ROPDV×
• /DPEDQ×QDUNDWDUDI×QGDEXOXQDQUHVLQGHKDYDEDORQFXùXROPDV×
5*%/DPEDIDUNO××ü×NPRGHOLQHVDKLSWLU
.×UP×]× <HüLO Mavi .×UP×]×YH<HüLO .×UP×]×YH0DYL 0DYLYH<HüLO .×UP×]×<HüLO0DYL
,ü×N'|QüWUPH 5HQN7RQX'HùLüWLUPH <DQ×S6|QPH Yedi Ara Renk Tonu
2Q$OW×5HQN'HùLüLPL 7HN5HQN'HùLüWLUPH

• We reserve to change all of the articles or contents of this document, without prior notice.
)LUPDP¿]EXEHOJHQLQLoHUL½LQGHKDEHUYHUPHNVL]LQGH½LÁOLNOHU\DSDELOLU
gemas.com.tr
This manual suits for next models
19
Table of contents
Other Gemas Swimming Pool Lighting manuals
Popular Swimming Pool Lighting manuals by other brands

Halco
Halco J&J Electronics PureWhite LPL-P2-WHT-12 Installation and operation guide

Champlain
Champlain ACM-125 Installation

Pentair Pool Products
Pentair Pool Products SpaBrite Installation procedures

weltico
weltico EASYLED instruction manual

Wiedamark
Wiedamark LPL-6 Series instructions

Steinbach
Steinbach 060060 instructions