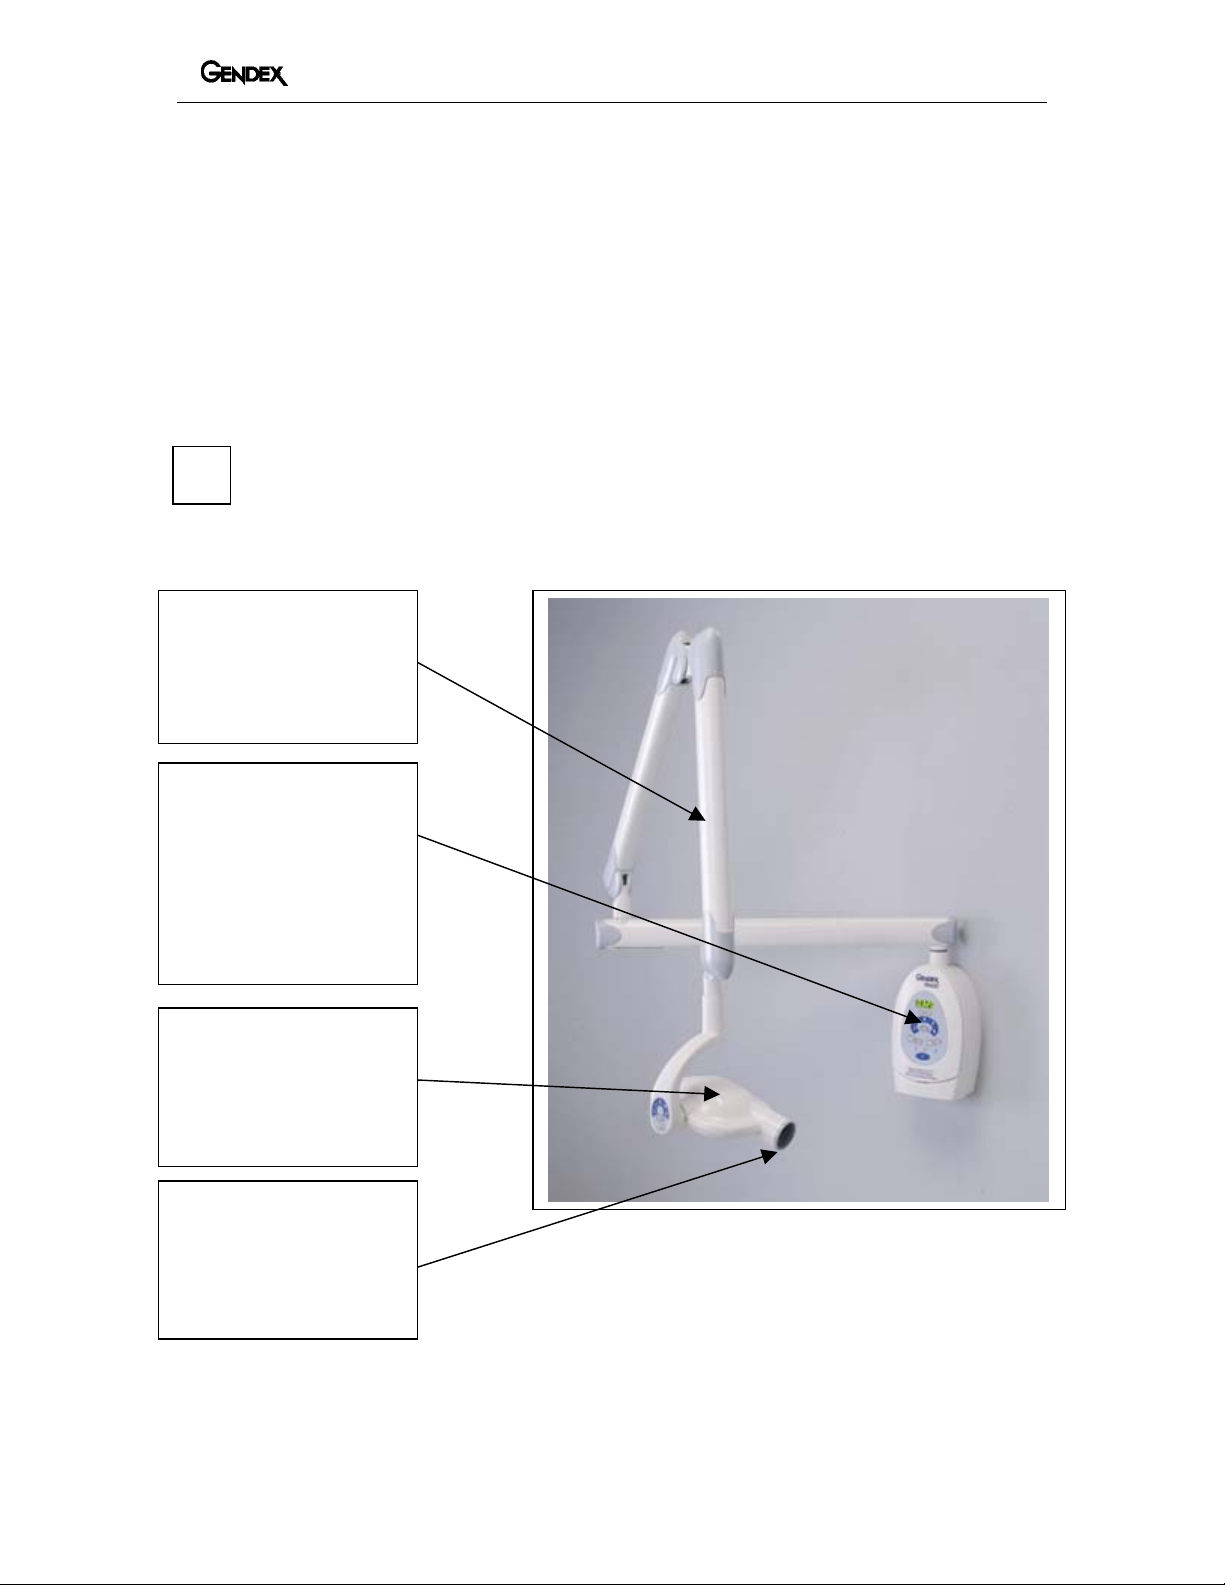
Gendex 765DC User manual

765DC
Intraoral x-ray system
USER MANUAL 1-17
Intraorales Röntgengerät
BENUTZERHANDBUCH 18-34
Sistema radiográfico intrabucal
MANUAL DEL USUARIO 35-51
MANUEL DE L'OPÉRATEUR
de l'appareil de radiographie intra-orale 52-68
Sistema radiologico intra-orale
MANUALE D'USO 69-85

765DC
1
Table of Contents
General Description ……………………………… Page 2
Identification Labels ……………………………... Page 3
Compliance with Applicable Standards …………... Page 4
Explanation of Symbols on Technical Labels ……… Page 6
Safety …………………………………………….. Page 7
Operating Controls ………………………………. Page 8
Operating Procedure ……………………………... Page 9
Configuring Control Settings ……………………. Page 10
Default Exposure Tables ………………………... Page 12
Error Display and Conditions …………………… Page 13
System Specifications ……………………………. Page 14
Recommended Maintenance …………………….. Page 17
Cleaning and Disinfecting ………………………. Page 17

765DC
2
765DC INTRAORAL X-RAY SYSTEM
GENERAL DESCRIPTION
This User Manual is intended to assist the Operator in the safe, and effective operation of
the 765DC high frequency Intraoral x-ray system. It contains the information necessary to operate
the equipment, the technical specifications, and the procedures to perform its simple maintenance.
Before attempting to operate the equipment, read this manual thoroughly. Pay particular attention
to all Warnings and Cautions incorporated in it.
The original language of this manual is English.
SYSTEM COMPONENTS
SUSPENSION
Allows the tubehead
to be positioned with a
reach of 55" (140cm),
65" (165cm) or
75"
(
191cm
)
MASTER CONTROL
Allows anatomical
setting of time.
Single button selection
of adult or child.
Single button selection
of film or digital.
CONE
Standard 8" (20cm)
focal length.
Optional 12" (30cm), or
20 cm rectangular
collimation.
TUBEHEAD
Focal spot indicated by
bump on cover.
Secondary operator
controls.
√

765DC
3
IDENTIFICATION LABELS
The 765DC Tubehead, Master Control, and Cone have identification labels that specify
the model number, serial number and applicable product approval listings. On specified
components, subject to U.S. Government Radiation Performance Standards 21 CFR, Subchapter
J, a certification statement is included with other required information.

765DC
4
COMPLIANCE WITH APPLICABLE STANDARDS
The 765DC complies with the following standards:
General (electrical/mechanical) safety:
UL60601-1 File Number: E185414
MEDICAL EQUIPMENT WITH RESPECT TO ELECTRICAL SHOCK, FIRE AND
MECHANICAL HAZARDS ONLY IN ACCORDANCE WITH UL60601-1, IEC60601-1,
CAN/CSA C22.2 NO,601.1-M90, AND TO THE FOLLOWING PARTICULAR STANDARDS,
IEC60601-2-32, IEC60601-2-7 IEC60601-2-28, IEC60601-1-2.
Radiation protection IEC60601-1-3 Radiation protection/x-ray equipment.
The certified components of the 765DC system comply with Radiation Performance
Standards 21 CFR, Subchapter J, at the time of manufacture.
The equipment must only be installed, and operated in accordance
with the safety procedures and operating instructions given in this User
Manual and in the Installation/Maintenance Manual for the purposes and
applications for which it was designed. Modifications and/or additions to the
equipment may only be carried out by Gendex or by third parties expressly
authorized by Gendex to do so. Such changes must comply with legal
requirements as well as with the generally accepted technical rules. It is the
responsibility of the user to ensure that existing legal regulations regarding
installation of the equipment with respect to the building are observed.
IMPORTANT! …… X-RAY PROTECTION
X-ray equipment may cause injury if used improperly.
The instructions contained in this manual must be read and followed when
operating the 765DC. Your Gendex dealer will assist you in placing the 765DC in
operation.
The 765DC intraoral x-ray system provides a high degree of protection from
unnecessary X-radiation. However, no practical design can provide complete
protection, nor prevent operators from exposing themselves or others to
unnecessary radiation.
34SL
√

765DC
5
Authorized Representative:
GENDEX Dental Systems s.r.l. GENDEX Dental Systems
Via A, Manzoni 44 901 West Oakton Street
20095 Cusano Milanino - Mi Des Plaines, IL 60018-1884
Tel: +39.02.61800.81 Tel: (847)640-4800
Fax: +39.02.61800.809 Fax (847)640-4891
EC Declaration of Conformity
A. Name/Description of product:
Gendex 765DC Intraoral X-Ray System
REF: Model 110-0154G1,G2,G3
Class: IIb
B. Reference Standards under which conformity is declared:
IEC60601-1:1988 +A1:1991 +A2:1995
IEC60601-1-1:2000
IEC60601-1-2:2001 IEC60601-2-28:1993 IEC60522:2003
IEC60601-1-3:1994 IEC60601-2-32:1994 IEC60878:2003
IEC60601-1-4:1996 IEC60336:2005 EN 980:1997
IEC60601-2-7:1998 IEC60417:1973 ISO14971:2000
C. GENDEX Dental Systems, Inc. declares that the products described
herein meet all the applicable Essential Requirements of the EC
Medical Device Directive 93/42/EEC in Annex I. For Class IIb products
described herein, the product is manufactured, inspected, tested, and
released in accordance with the approved quality assurance system
established in accordance with ISO 9001, EN 46001 and Annex II of the
EC Medical Device Directive under the supervision of the British
Standards Institution, a Notified Body carrying the Notified Body
No. 0086.
John R. Miller
Director of QA/RA
GENDEX Dental Systems

765DC
6
EXPLANATION OF SYMBOLS ON TECHNICAL LABELS
Type b: Protection against electric shock (UL60601-1:2003)
Consult written Instructions in this Operator’s Manual
X-RAY SOURCE Assembly
WARNING X-RAY
THIS X-RAY UNIT MAY BE DANGEROUS TO PATIENT
AND OPERATOR UNLESS SAFE EXPOSURE FACTORS
AND OPERATING INSTRUCTIONS ARE OBSERVED.
X-RAY EMISSION
Mains HOT WIRE
Mains NEUTRAL WIRE
Earth Ground
Electronic Equipment
No recycle into normal trash
Classification
The 765DC is a UL Class I Type b equipment (UL60601-1:2003).

765DC
7
SAFETY
Radiation safety
Only qualified and authorized personnel may operate this equipment
observing all laws and regulations concerning Radiation Protection.
The operator at all times must remain 6FT. (2m) from the focal spot and
the X-ray beam for operator protection.
Full use must be made of all radiation features on the equipment, and of
all radiation protection devices, accessories, and procedures available to protect
the Patient and Operator from x-ray radiation.
Electrical safety
Covers on the equipment should only be removed by qualified and
authorized service personnel.
This equipment must only be used in rooms or areas that comply with all
applicable laws and recommendations concerning electrical safety in rooms used
for medical purposes, e.g. IEC, US National Electrical Code, or VDE standards
concerning provisions of an additional protective earth (ground) terminal for
power supply connection.
This equipment must always be electrically disconnected from the mains
electrical supply before cleaning or disinfecting.
ORDINARY MEDICAL EQUIPMENT without protection against ingress
of liquids. No water or any other liquid should be allowed to leak inside the
equipment, as they may cause a short-circuit and corrosion.
Explosion safety
This equipment must not be used in the presence of flammable or
potentially explosive disinfecting gases or vapors, which could ignite causing
personal injury and/or damage to the equipment. If such disinfectants are used,
the vapor must be allowed to disperse before using the equipment
Mechanical safety
Where complete safeguarding of the equipment is not possible, due care
must be taken to ensure that no part of the user’s or patient’s body or clothing
can be trapped or injured by any part of the equipment. In particular, make sure
that fingers are not caught or pinched in the articulated arm when closing it.
√
√
√
√

765DC
8
OPERATING CONTROLS
1. TIME SELECTION - Allows the
operator to override the anatomical
preset time and adjust the exposure time
up or down to a specific value on the
R10 scale.
2. ANATOMICAL TIME SELECTION
- Allows the operator to select the
exposure time based on the tooth area
desired.
3. IMAGING TYPE SELECTION - A
toggle function that allows the operator
to select between the use of film or a
digital imaging system. This will modify
all of the preset anatomical time
selections.
4. PATIENT SELECTION - A toggle
function that allows the operator to
select either an adult or a child. This will
modify all of the preset anatomical time
selections.
5. READY INDICATOR LAMP -
Indicates that the "On" switch has been
pushed and the system is ready for
operation.
6. COOL-DOWN INDICATOR LAMP -
This lamp will light when the duty cycle
of the system requires that the tubehead
cool before the next exposure.
7. RADIATION INDICATOR LAMP -
This lamp will light when the exposure
button is pressed indicating that x-ray
radiation is being produced.
8. PUSH-BUTTON EXPOSURE
SWITCH - Allows the operator to
initiate the exposure directly from the
control panel when it is mounted outside
the operatory.
9. COIL-CORD EXPOSURE SWITCH
(Optional – Not Shown) - Allows the
operator to exit the operatory and then
initiate the exposure.
10. SECONDARY TUBEHEAD
CONTROLS - This allows the operator
to verify and adjust if necessary the
anatomic exposure times directly at the
tubehead. A lamp also indicates whether
the adult or child setting has been
selected.
11. POWER SWITCH - Depressing the
switch to the "on" position will supply
power to the control. The Ready
Indicator Lamp on the control panel will
indicate that the system is ready for use.
1
2
3
4
5
6
7
810
11

765DC
9
OPERATING PROCEDURES
1. Switch the power switch to the "On" position. The Ready indicator lamp on the front
of the control panel will light.
2. Select or verify that the unit is set for either film or digital imaging. The indicator
light should be lit next to the appropriate graphic icon. Press the button between the
two icons to toggle to the correct selection.
3. Select or verify that the system is set for the appropriate patient selection (i.e. an adult
or child). Press the button between the two icons to toggle to the correct selection.
4. Press the selector button in the center of the control to toggle the indicator lamp until
it lights next to the tooth (or bitewing) symbol for the area that you wish to x-ray.
Note: The exposure time defaults (the times displayed when the system is initially
turned on) can be modified per the instructions in the Configuring Control Settings
section on page 10.
5. If desired, the up or down buttons can be used to select a specific exposure time other
than the default setting using the R10 scale. For recommendations for Occlusal film,
see the Default and Recommended Exposure Tables on page 12.
6. Position the tubehead to the patient using standard accepted positioning procedures.
Note: Care should be taken to not place fingers in areas where they may be
potentially pinched during the movement of the arm. Also, be careful to not have the
tubehead hit the wall after returning the arm to the storage position.
7. Prior to making the exposure, verify or modify the time settings as necessary using
the secondary tubehead controls. Note: The unit is supplied with an 8” (20cm) cone.
An optional longer 12” (30cm) cone can be used to sharpen the image as when the
paralleling technique is used. A rectangular cone is available as an option to reduce
the x-ray field size to that of the film and reduce the radiation to the patient.
8. When using the optional coil-cord exposure switch, it is strongly recommended that
the operator exit the operatory. Note: In order to comply with regulations and good
safety practices, the technique factors must be visible to the operator from the remote
location.
9. Press and hold either the coil-cord or push-button exposure switch until the audible
signal and exposure indicator light terminate. (Note: Releasing the exposure button
at any time will immediately terminate the exposure).

765DC
10
Configuring Control Settings
The 765DC control panel is preset at the factory (called default settings) for
operation with a standard configuration. This configuration assumes the use of the
standard 8" focal length cone and D-speed film or a DenOptix digital imaging
system. This standard configuration presets the exposure times for the anatomical
selections. These presets can be changed for use with E-speed or F-speed film or
another type of digital imaging system, or with the optional long cone.
•The film speed and digital option can be changed using the control panel
buttons and software.
•Compensating for the cone length is done by changing a switch inside of
the control box. Note: It is recommended that this be done only by an
authorized Gendex service agent.
Changing the default settings for the film speed used
The 765DC is set at the factory for the use of D-speed film. This can be verified by
turning the control and noting that the time initially displayed is 0.320 seconds. The use of
E-speed or F-speed film requires modifying the exposure times used. The system can be
programmed to accomplish this automatically.
1. Turn the system off.
2. Press and hold the anatomical time selector switch while turning the system on (see Figure 1).
3. The time display will now read "SP 1". This confirms the system is in the film speed menu.
4. To change to E-speed. Press the exposure time 'Up' button. The time display will now read
"SP 2". This confirms that the system is now set for E-speed film.
5. Press the anatomical time selector switch again to store the new setting. The time displayed
should now indicate 0.200 seconds.
6. To change to F-speed. Press the exposure time ‘Up’ button Figure 1
again until the display reads “SP 3”.
7. Press the time selector switch to store the setting. The time
displayed should now indicate 0.125 seconds.
Exposure time select button
Anatomical time selector switch
Film or digital selector switch

765DC
11
Changing the Digital Option
The 765DC is set at the factory for use with the Gendex DenOptix digital imaging
system. This can be confirmed by turning the system on and pressing the button to select
digital. The time displayed should now indicate 0.160 seconds.
1. Turn the system off.
2. Press and hold the anatomical time selector switch while turning the system on (see Figure 1).
3. The time display will now read "SP 1,2, or 3" depending on which film type is configured.
4. Press the film or digital selector switch until the display reads "D1". Press the exposure time
'UP' button. The display will now indicate "D2". This indicates that the system is now
configured for a CCD type digital imaging system.
5. Press the anatomical time selector switch again to store the new setting.
Changing the power on selection
The 765DC is set at the factory to have the film option for an adult selected when the
unit is first turned on. If desired, the unit can be set so that it automatically selects the
digital option or a child instead when the control is turned on.
1. Turn the system off.
2. Press and hold the anatomical time selector switch while turning the system on (see Figure 1).
3. The time display will now read either "SP 1,2, or 3" or "D1" or "D2" depending on
whether the film or digital option is selected. Note that the green indicator light next to the
selection is flashing.
4. To select for the unit to come on in the digital mode, make certain that the green light is
flashing next to the digital option. Press the anatomical selector switch to store the
information and turn the system off. The unit should now automatically select the digital
option when first turned on.
5. To select for the unit to come on in the child mode, press the adult or child selection button
until the green light is flashing next to the child option. Press the anatomical selector switch
to store the information and turn the unit off. The unit should now automatically select the
child option when the unit is first turned on.
Modifying the system for use with the optional 12" (30 cm) cone
The 765DC is set at the factory for use with the standard supplied 8" (20 cm ) cone.
The 12" (30 cm) long cone is recommended when using the paralleling film positioning
technique along with the Rinn XCP kit. Using the long cone requires the use of longer
exposure times, which can be programmed into the system by changing an internal
electrical setting.
This modification should be performed only by a qualified Gendex service
agent. Contact your Gendex service agent to make the change.

765DC
12
Default and Recommended Exposure Tables
SPEED 1: D-speed Film
8” (20cm) Cone 12” (30cm) Cone
Anatomy Selected Adult Child Adult Child
Bitewing 0.320 second 0.160 second 0.630 second 0.320 second
Lower Molar 0.320 second 0.160 second 0.630 second 0.320 second
Upper Molar 0.400 second 0.200 second 0.800 second 0.400 second
Incisor 0.200 second 0.100 second 0.400 second 0.200 second
Bicuspid 0.250 second 0.125 second 0.500 second 0.250 second
Occlusal 0.500 second 0.250 second 1.00 second 0.500 second
SPEED 2: E-speed Film
8” (20cm) Cone 12” (30cm) Cone
Anatomy Selected Adult Child Adult Child
Bitewing 0.200 second 0.100 second 0.400 second 0.200 second
Lower Molar 0.200 second 0.100 second 0.400 second 0.200 second
Upper Molar 0.250 second 0.125 second 0.500 second 0.250 second
Incisor 0.125 second 0.063 second 0.250 second 0.125 second
Bicuspid 0.160 second 0.080 second 0.320 second 0.160 second
Occlusal 0.320 second 0.160 second 0.630 second 0.320 second
SPEED 3: F-speed Film
8” (20cm) Cone 12” (30cm) Cone
Anatomy Selected Adult Child Adult Child
Bitewing 0.125 second 0.063 second 0.250 second 0.125 second
Lower Molar 0.125 second 0.063 second 0.250 second 0.125 second
Upper Molar 0.160 second 0.080 second 0.320 second 0.160 second
Incisor 0.080 second 0.040 second 0.160 second 0.080 second
Bicuspid 0.100 second 0.050 second 0.200 second 0.100 second
Occlusal 0.200 second 0.100 second 0.400 second 0.200 second
D1: Digital (DenOptix)
8” (20cm) Cone 12” (30cm) Cone
Anatomy Selected Adult Child Adult Child
Bitewing 0.160 second 0.080 second 0.320 second 0.160 second
Lower Molar 0.160 second 0.080 second 0.320 second 0.160 second
Upper Molar 0.200 second 0.100 second 0.400 second 0.200 second
Incisor 0.100 second 0.050 second 0.200 second 0.100 second
Bicuspid 0.125 second 0.063 second 0.250 second 0.125 second
Occlusal 0.250 second 0.125 second 0.500 second 0.250 second
D2: Digital (Sensor)
8” (20cm) Cone 12” (30cm) Cone
Anatomy Selected Adult Child Adult Child
Bitewing 0.080 second 0.040 second 0.160 second 0.080 second
Lower Molar 0.080 second 0.040 second 0.160 second 0.080 second
Upper Molar 0.100 second 0.050 second 0.200 second 0.100 second
Incisor 0.050 second 0.025 second 0.100 second 0.050 second
Bicuspid 0.063 second 0.032 second 0.125 second 0.063 second
Occlusal 0.125 second 0.063 second 0.250 second 0.125 second

765DC
13
Error Display and Conditions
The green ‘Ready’ lamp, amber ‘Cool-down’ lamp and 4 digital 7-segment LED displays
on the face of the Operator Control panel can provide indications that errors have occurred. The
following chart provides an explanation of what the indicators mean and required action.
Error Indication Explanation Action Required
The amber ‘Cool-down’ lamp
comes on and exposure cannot
be made.
Normal operation by design.
‘Cool-down’ lamp comes on if
too many exposures are made in
a short period of time. This
feature protects and extends the
life of the tubehead.
Wait until lamp goes out
indicating that the tube has
properly cooled down.
“Err0” flashes on the 7-
segment LED displays..
The exposure has been
terminated prematurely. This
can be caused by an equipment
malfunction or the operator
releasing the exposure switch
prior to the end of the exposure
time selected.
Pressing any key except
exposure switch on the
Operator Control will clear the
display and restore normal
operation. Care must be taken
to press and hold the exposure
button until the exposure is
finished.
“Err1” flashes on the 7-
segment LED.
Power Supply voltage was
outside of required range:
108V – 132V
198V – 253V
Wait until line voltage returns
to normal (indicated by the
lamp being steady) or have a
qualified electrician check the
power line.
“Err2” is displayed on the 7-
segment LED displays.
Power Supply voltage dropped
below the minimum
requirement (108V or 198V)
during the exposure. The
exposure is not terminated but
output may be below normal.
Pressing any key on the
Operator Control will clear the
flashing and restore normal
operation. If the problem
persists, it is strongly
recommended that a qualified
electrician check the power
line.
“Err3” flashes on the 7-
segment LED displays.
A hardware fault has occurred. Reset the unit by Turn OFF
the power switch for 5 seconds
and Turn ON the power
switch, if the problem persists.
Contact your authorized
Gendex service agent.
“Err4” flashes on the 7-
segment LED displays.
A fault has occurred and
terminated the exposure.
Pressing any key except
exposure switch on the
Operator Control may clear
the Error and restore normal
operation. If the problem
persists. Contact your
authorized Gendex service
agent.

765DC
14
SYSTEM SPECIFICATIONS
Cooling and duty rating specification apply at altitudes up to 12,000 ft. (3,600 m), average relative
humidity not exceeding 90 percent, and maximum ambient temperature not exceeding 104 degrees F
(40 degrees C).
TUBEHEAD SPECIFICATIONS
Maximum Rated Tube Potential: 65 kV at 7 mA tube current.
Leakage radiation in the loading state: Less than 250 micro Gy/h at 1 meter from the focal spot.
Minimum permissible first Half Value Layer: Greater than 1.5 mm Aluminum equivalent
Nominal Focal spot size: 0.4 mm (IEC 336/1993)
Anode angle: 12.5 degrees
Anode heat storage: 7 kHU
Duty cycle: 1:30
CONE SPECIFICATIONS
X-ray Field Size: Containable in a 6 cm diameter circle, measured at the distal end of the installed cone.
Distance from the focal spot to the distal end of the cone is: 8 or 12 inches (20 or 30 cm).
POWER SUPPLY REQUIREMENTS
Useful
Nominal Tolerance Range
120 VAC ± 10% 108 - 132 VAC
230 VAC + 10%, -14% 198 - 253 VAC
ACCURACY OF TECHNIC FACTORS
Tube Potential 65 kV ± 3 kV
Current 7 mA ± 5%
Time .02 -.50 Seconds ± .005 Seconds
.63 - 2.00 Seconds ± 1%

765DC
15
Intraoral X-Ray Tube Housing
Product Data Sheet
Gendex©765DC
The Gendex© 765DC housing is designed to operate with the Gendex©GX 70-10DC insert. The
housing has been designed to operate on the Gendex© 765DC high frequency high voltage
control, making up the Gendex©765DC Intraoral Dental X-Ray system.
Specifications
Shockproof Housing: Zinc, hermetically sealed under vacuum with high
dielectric insulating oil. Inherent to the housing is an
expansion chamber designed to provide adequate
compensation for the full temperature range.
Operating Temperature: +50°F to 100°F ≈(+10˚C to +40˚C)
Storage Temperature: -40°F to 160°F ≈(-40˚C to +70˚C)
Inherent Filtration:
Radiation Output:
Technique 65kV, 7mA, 0.50sec. Source to Detector Distance 230mm (9”)
410mR ±125mR (3.55 mGy ± 1.05 mGy)
Typical Half Layer: 1.9mm Aluminum at 65kV
Thickness / mm. AHE1/mm. Al. Equivalent
Material Min. Max. 65 kV Min. Max.
Glass 1.27 1.91 0.51 0.65 0.97
Insulating Oil 6.5 7.7 0.08 0.52 0.62
Polycarbonate 16.4 16.7 0.09 1.48 1.50
Total 2.64 3.09

765DC
16
Leakage Radiation: Complies to 601-1-3 IEC Section 29.204 “Leakage
Radiation”. Maximum continuous power input equals
1,400 heat units per min. (HU/Min.) tube is the limiting
factor. HU/Min. = (kV) x (mA) x (1.4) x (Exp. Time
(sec) / 60)
1,400 HU/Min. = 65 kV x 0.27mA x 1.4 x 60 sec.
X-Ray Coverage: The insert target angle is 12.5°
•Circular cone at 8 inches (200 mm) SSD260 mm
Dia. +0, -3mm.
•Circular cone at 12 inches (300 mm) SSD260 mm
Dia. +0, -3mm.
•Rectangular cone at 8 inches (200 mm) SSD236mm
x 46mm
1 AHE Aluminum Half value Equivalent correlation
2SSD Source to Skin Distance
Weight: 13.0 lbs. 5.9 kg.
Maximum Head Voltage: Anode to Cathode 65 kV
Anode to Ground 70 kV
Thermal Characteristics:
•Housing Heat Storage Capacity 250 kHU’s (177J)
(see Graph for more detail)
•Maximum Cooling Rate 3.3 kHU’s/Min.
Heat Units = (kV * mA * time in seconds * 1.4)
Gendex 765DC Housing
Heating & Coling Chart
20
25
30
35
40
45
0
25
50
75
100
125
150
175
200
225
250
275
300
325
350
Time (min.)
Temperature (°C)
0
50
100
150
200
250
300
Heat Units (kHu's)
Heating, 100% Duty Cycle, ambient
temperature 20°C
Cooling, ambient
temperature 20°C

765DC
17
RECOMMENDED MAINTANCE
In the interest of equipment safety, a maintencnce program must be established. It is the
owner’s responsibility to arrange for this service and to assure that the personnel
performing this are fully qualified to service GENDEX dental x-ray equipment.
The calibration and adjustments to be performed are listed in the System and Function
Checks section of the 765DC Installation and Maintenance manual supplied with the
product.
It is recommended that the following System and Function Checks and
Maintenance Procedure be performed at installation and every twelve months
thereafter.
•System Function Checks listed in Section E, page 35 of the 765DC
Installation / Maintence Manual.
•Suspension Arm Maintenance as listed in Section F, page 43 of the 765DC
Installation / Maintenance Manual.
Note: To avoid any potential hazard to operators or patients, any unusual
operation, mechanical functionality, or debris should be reported to your service
agent immediately.
CLEANING AND DISINFECTING
All external and cleanable surfaces can be cleaned and/or disinfected using the
following list of commonly used solutions:
Isopropyl alcohol
Phenylphenl
Benzyl-P-Chlorophenol
Iodophor
Disobutyl phenoxethoxycthyl Dimethyl Benzyl Ammonium Chloride
Note: Use bleach or glutaraldehydes only occasionally.
Verify the contents of any cleaning or disinfecting solution against the list
above applying it the any surfaces of the 765DC.

765DC
18
Inhaltsverzeichnis
Allgemeine Beschreibung . . . . . .. . . . . . . . . . . . . . . . . Seite 19
Kennzeichnungen . . . . . . . . . . . . . . . . . . . . . . . . . Seite 20
Übereinstimmung mit gültigen Normen . . . . . . . . . . . . . Seite 21
Erklärung der technischen Symbole .. . . . . . . . . . . . . Seite 22
Sicherheit . . . . . . . . . . . . . . . . . . . . . . …. . . . . . . . . . Seite 23
Bedienungselemente . . . . . . . . . . . . .. . . . . . . . . . . . . Seite 24
Bedienung . . . . . . . . . . . . . . . . . . . . . . . . . . . . . . Seite 25
Konfiguration der Timereinstellungen . . . . . . . . . . . . . Seite 26
Standard-Belichtungstabellen . . . . . . . . . . . . . . . . . . . . Seite 29
Fehleranzeige und -zustände . . . . . . . .. . . . . . . . . . . . . Seite 30
Technische Daten des Systems . . . . . . . . . . . . . . . . . . . Seite 31
Empfohlene Wartung . . . . . . . . . . . . . . . . . . . . . . . . . Seite 34
Reinigung und Desinfektion . . . . . . . . . . . . . . . . . . . . . Seite 34

765DC
19
INTRAORALES RÖNTGENGERÄT 765DC
ALLGEMEINE BESCHREIBUNG
Diese Bedienungsanweisung soll dem Anwender bei der sicheren und effizienten Bedienung des
Hochfrequenz-Intraoral-Röntgengeräts 765DC unterstützen. Es enthält die zur Bedienung des Geräts
erforderlichen Informationen sowie technische Daten und Verfahren zur Durchführung einfacher
Wartungsarbeiten. Diese Anweisung sorgfältig durchlesen, bevor das Gerät in Betrieb genommen wird.
Besonders auf alle in der Anweisung enthaltenen Warn- und Vorsichtshinweise achten.
Dieses Handbuch wurde ursprünglich in englischer Sprache verfasst.
SYSTEMKOMPONENTEN
SCHERENTRAGARM
Mit ihm kann der Röntgenstrahler
so positioniert werden, dass er
über eine Reichweite von 140 cm,
165 cm oder 191 cm verfügt.
HAUPTBEDIENELEMENTE
Erlaubt die Einstellung
des anatomischen
Aufnahmeobjektes.
Wahl zwischen Erwachsenen
und Kindern mit einer Taste.
Wahl zwischen Film und digitaler
Bilddarstellung mit einer Taste.
TUBUS
Standardmäßig 20 cm FFA.
Sonderausstattung: 30 cm FFA
oder Rechtwinkelkollimator.
RÖNTGENSTRAHLER
Der Brennfleck wird durch die
Schraube im Deckel angezeigt.
Einzigartige
Zusatzbedienelemente.
√
This manual suits for next models
3
Table of contents
Languages:
Other Gendex Medical Equipment manuals
Popular Medical Equipment manuals by other brands

Polar Electro
Polar Electro Evaporative operating instructions

Getinge
Getinge ArjoHuntleigh Akron Streamline Europa Continental... Instructions for use

Handicare
Handicare SystemRoMedic RiseAtlas450M... manual

ADInstruments
ADInstruments Human NIBP Nano owner's guide

GE
GE Voluson 730 Service manual

ECOPOSTURAL
ECOPOSTURAL C7921 instructions