German RepRap X1000 User manual

Congratulations on your purchase of your personal
X1000 3D printer
x
1000
German
RepRap
3D PRINTER MADE IN GERMANY
X1000 3D printer manual

X1000
3D printer manual
German
RepRap
Table of content
1. General information
1.1 specications................................................................................................................................04
1.2 System requirements................................................................................................................05
1.3 Additional options..................................................................................................................... 05
2. 2.Operating modes of the X 1000
2.1 Red/ Stand-by .............................................................................................................................06
2.2 Green/ work mode ....................................................................................................................07
2.3 Two-hand circuit/removal position.....................................................................................07
2.4 Emergency stop ........................................................................................................................ 08
2.5 Maintenance mode...................................................................................................................08
3. Network and printer set up
3.1 Connection via router .............................................................................................................. 09
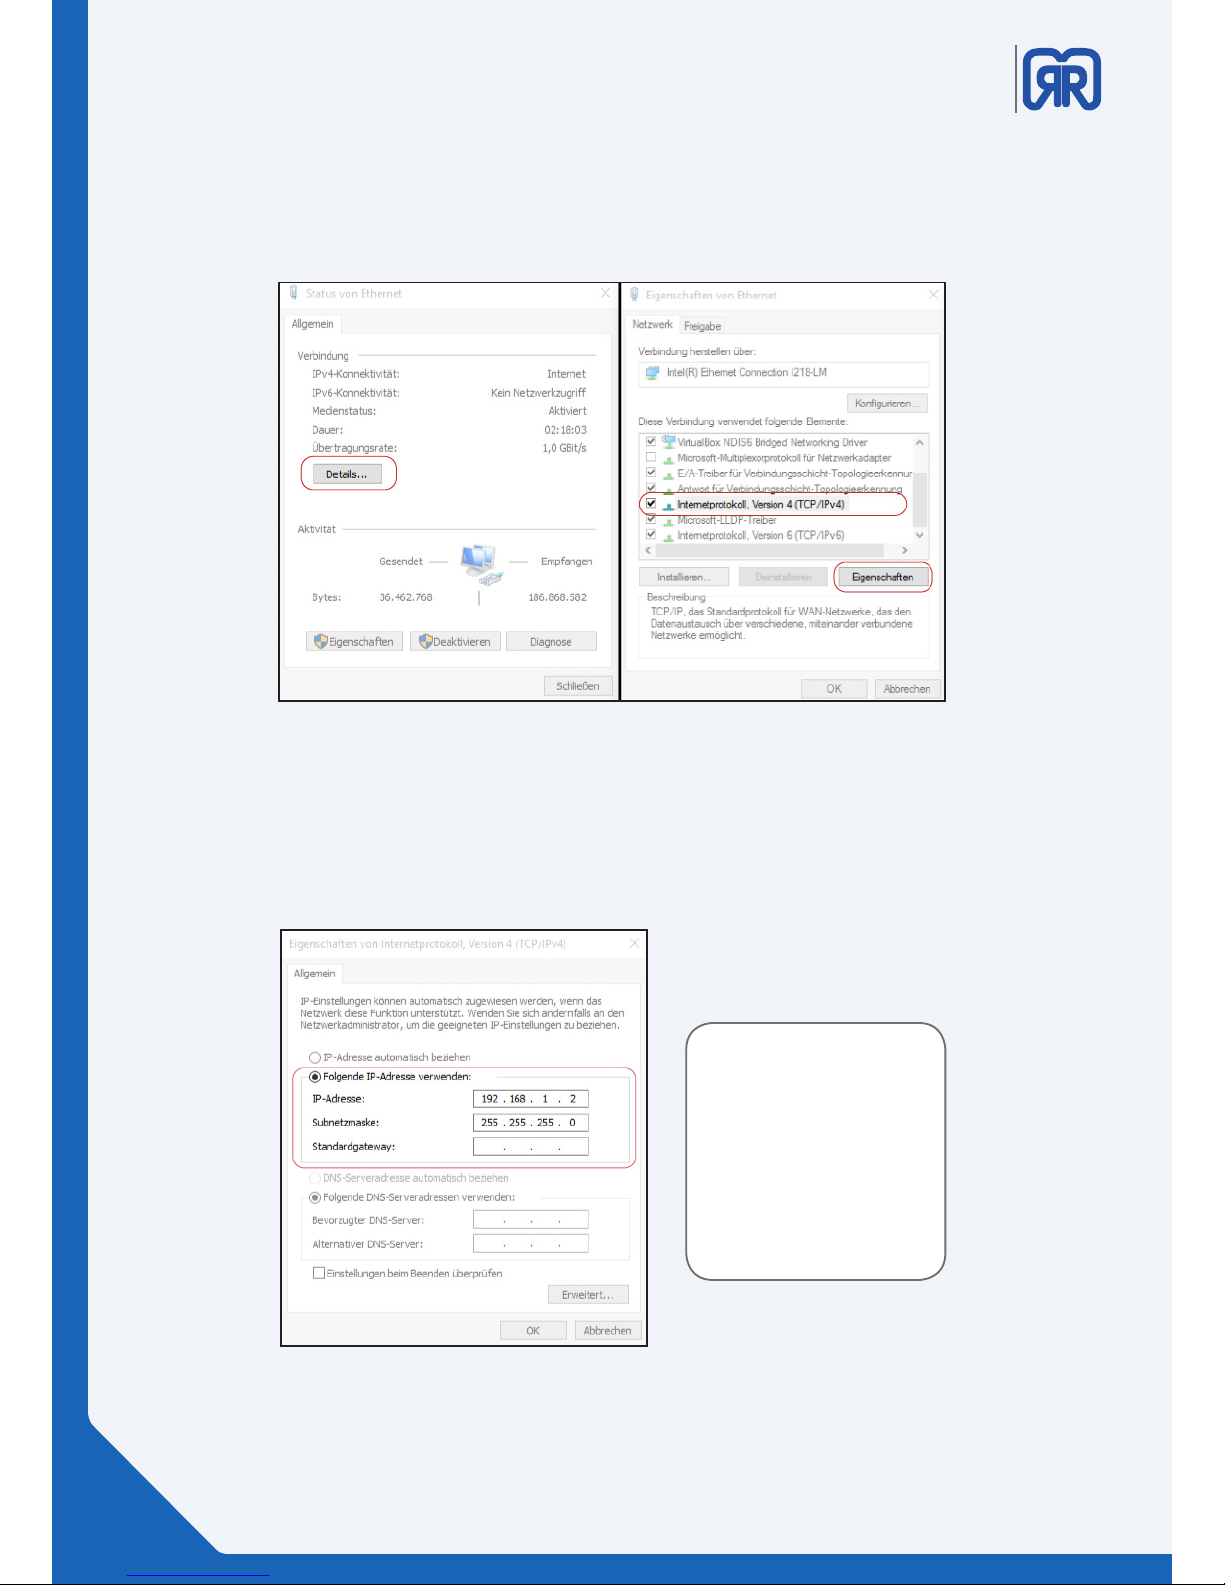
3.2 Direct connection ...................................................................................................................... 09
3.3 Setup routine...............................................................................................................................11
3.4 How to activate the printer and establish a connection ............................................. 16
4. Workow and operation
4.1 Simplify 3D
4.2 Features.........................................................................................................................................18
4.3 Quick Start Guide.......................................................................................................................19
4.4 The Interface Layout ................................................................................................................. 21
5. Repetier Server
5.1 Web interface .............................................................................................................................. 26
5.2 Dashboard....................................................................................................................................27
5.3 Device panel................................................................................................................................ 28
5.4 Device panel operation ...........................................................................................................28
5.5 EEPROM.........................................................................................................................................31
5.6 LOG-Files .......................................................................................................................................32
5.7 Firmwareupdate ............................................................................................. 33
6. Tool heads and cosumables
6.1 Tool head wiring.........................................................................................................................34
6.2 How to set up the second extruder ....................................................................................35
6.3 How to replace the hot end and the extruder .................................................................36
6.4 How to change the laments.................................................................................................38
7. CO2 extinguishing system
7.1 General information..................................................................................................................42
7.2 7.2 Manual triggering............................................................................................................... 43
7.3 Recommissioning after trigger ............................................................................................. 43
8. Tipps & Tricks
8.1 How to determine the X1000s MAC address.................................................................... 44
8.2 How to update Repetier-Server ........................................................................................... 44
8.3 PVA solution for enhanced adhesion ................................................................................. 45
02/51

X1000
3D printer manual
German
RepRap
9. Download area
10. Important notices
Return shipment/ original package ............................................................................................ 46
Operation.............................................................................................................................................. 46
Miscellaneous...................................................................................................................................... 46
Toxic threat...........................................................................................................................................46
Safety switch........................................................................................................................................ 46
Maintenance........................................................................................................................................ 46
11. Safety notes
Power supply.......................................................................................................................................47
Cleaning ................................................................................................................................................47
Playing children..................................................................................................................................47
Mains voltage......................................................................................................................................47
Humidity, solar radiation, heat, open ames...........................................................................47
Ventilation ............................................................................................................................................ 47
Long absence, tempest, power plug reachability ................................................................. 47
Installation site.................................................................................................................................... 48
Disposal................................................................................................................................................. 48
12. Legal disclaimers
Software modications/ use of applications ........................................................................... 48
Rev.Nr. 0.4
03/51

X1000
3D printer manual
German
RepRap
1. General information
1.1 specications
The X1000 is a professional 3D printer, especially designed for processing various plastic mate-
rials with extra-large work area and optional double extruder. With a layer thickness up to 0.1
mm und a printing surface of 1000x800x600 mm, this 3D printer can produce either big models
or several small objects with the highest precision.
A closed switch gear cabinet, an emergency stop switch and an optional CO2 based dual re
protection system ensure that the requirements derived from an industrial work environment
are completely satised.
specication data
working space ( X - Y - Z) 1000 x 800 x 600 mm
printing speed 10 - 150 mm/s
traverse speed 10 - 300 mm/s
layer thickness (minimal) 0,1 mm (depending on nozzle)
lament/nozzle diameter (standard) 1,75mm / 0,8 mm
material PLA, Performance PLA, Laywood, PVA, PET-G, TPU64D
extruder type DD3 Dual
extruder temperature (max) 290° C
data transfer LC Touch display, WLAN, Ethernet
software Simplify3D
power consumption 2500 W
Operating voltage* three phase AC current 400V (CEE 3L+N+PE)
Ambient temperature 15-26° C
external dimensions (WxDxH) 1725 x 1500 x 1320 mm
weight 400 kg
marking DIN 10218-2
options
Heating bed, dual extruder
CO2 based dual re protection system
available nozzles 0,4 / 0,6 mm
available nozzle material brass, hardened steel
printing technology Fused Filament Fabrication (FFF)
04/51

X1000
3D printer manual
German
RepRap
Note that the minimum system requirements listed below are for Simplify3D and Repetier-server only. These
applications are provided with the printer.
• Intel Pentium 4 or better
• 2GB Ram or more
• USB 1.1 optional
• Windows XP or newer
• Mac OS X 10.6 or newer
• Ubuntu/Debian Linux
• OpenGL 2.0
Please note that you must use one of the following browsers to establish a connection with your X1000 3D
printer.
• Chrome
• Firefox
1.2 System requirements
Microsoft´s Internet Explorer is not supported
1.3 Additional options
In addition to the standard version the following options are available:
• Heating bed
• Dual extruder
• CO2 based dual re protection system
For an inquiry please contact our sales partner from your region.
05/51

X1000
3D printer manual
German
RepRap
Never turn on the heating bed while operating in standby mode!
After some time, the printer will switch into DRY-Run mode, so that you
must restart the device if you want to start a new print job
2. 2. Operating modes of the X 1000
The X1000 provides various modes that enable you to perform dierent functions depending on your
current task.
2.1 Red/ Stand-by
When the X1000 is connected to the mains you can reach the stand-by mode by turning on the printer
using the key. After a short initialization phase the startup screen appears on the LCD display and the red
light will light up.
X1000 Standby
In this mode, you can keep the lid of the X1000 open and heat up the extruder heads and let material
extrude simultaneously. All other functions (like traversing the axis) are blocked for safety reasons. In
addition, the standby mode allows you thread new laments easily, to clean the nozzle or even to replace
it completely. Furthermore, the Repetier server is already booted when operating in standby mode, this
means that you can already upload G-codes to the X1000.
06/51

X1000
3D printer manual
German
RepRap
2.3 Two-hand circuit/removal position
After successfully completing a large 3d print you can lift the printing bed up to access is more easily using
the two-hand circuit.
2.2 Green/ work mode
To switch from standby mode to work mode to w After successfully booting the X1000 you must rst close
its lid. Then you must press the green switch underneath the LCD display.
When the green switch is light up the lid will be locked automatically
and the device is now ready to start a 3D print.
two-hand circuitLCD menu, manual control
To do this, proceed as follows:
• Switch into standby mode by pressing the red button
• Open the maintenance lid
• Execute the order “home z” via LCD display or web browser
• The device will stand completely still
• Now press the two blue buttons shown on the picture above simultaneously
• The axes will traverse as long as both buttons are pushed, but not further than the machine zero
07/51

X1000
3D printer manual
German
RepRap
Allow the building platform to cool down, the object will be much
easier to remove.
The X1000 has two machine zeros. Besides the actual one the other
one is located half way up the building platform. When operating the
two-hand circuit this prevent pushing the printed object into the main-
tenance lid.
2.4 Emergency stop
If you press the emergency stop, the printer will shut down immediately.
Warning: RISK OF BURN:
The heating bed as well as the extruder heads will remain hot even
some time after an emergency shut down!
2.5 Maintenance mode
When operating in maintenance mode, it is possible to work with an open maintenance lid. This mode is
intended for repair and maintenance work only!
The maintenance mode must be set up by a trained professional only!
08/51

X1000
3D printer manual
German
RepRap
3. Network and printer set up
To establish a connection with the X1000 you must rst check your computer´s network settings and adapt
them, if necessary. The you can launch the setup routine and put the printer into operation.
3.1 Connection via router
If necessary, contact your network administrator about integrating the
X1000 into your network.
If your network settings are DHCP based, the X1000 is automatically assigned an IP address. If this is the case
the X100 just has to be connected through a patch cable to your network.
Then you can see the printer´s assigned IP address as well as the MAC address on the LCD display.
3.2 Direct connection
To establish a direct connection between the X1000 and your computer you must proceed as follows:
• In the computer´s control panel navigate to network settings
• Click on the network adapter the X1000 is connected to
Choosing network adapter
09/51

X1000
3D printer manual
German
RepRap
• In the pop up window chose “details”
• In the shown list mark “internet protocol, version 4 (TCP/IP)” and click on properties
Network adapter properties
• Enter the following ip address to establish a connection to the 3d printer:
192.168.1.2
Info:
By using this method you
assign a static ip address
in the same name space
as your 3D printer to your
computer
Entering static IP address
10/51

X1000
3D printer manual
German
RepRap
3.3 Setup routine
To congure your 3d printer afterwards you must launch the setup routine. Enter the pre-assigned ip
address of your 3d printer into your browser to establish a connection. The rst step of the set up routine
will appear thereafter :
• 192.168.1.1/setup.php
If you already assigned an ip address to your printer and you want to
restart the setup routine, you must use your new ip to establish a connec-
tion XXX.XXX.X.X/setup.php .
Step 1:
In the rst step, you chose the language of the installation assistant
Setup routine step one
Step 2:
Please contact the support if an error message occurs during the second step or if not all bullet points are
checked with the result “OK”.
https://www.germanreprap.com/support/
11/51

X1000
3D printer manual
German
RepRap
Step 3:
Setup routine step two
Attention!
Please perform software updates only after consultation with the
support. Unauthorized updates can damage the device!
Setup routine step three
Step 4:
In the fourth step, you set the time and the date. You can get them set automatically over the internet. If you
do not have an internet connection, you can also set them both manually.
For some devices, there is a real-time module available. For an inquiry
please contact the support via:
https://www.germanreprap.com/support/
12/51

X1000
3D printer manual
German
RepRap
Step 5:
Here you can connect your printer to a WLAN. Please press the button “Scan Wi”to have all available
wireless networks displayed. Here you can also choose between a static ip address or the use of DHCP.
Setup routine step four
Setup routine step ve
Tip:
Create a screenshot of these settings for later reference.
13/51

X1000
3D printer manual
German
RepRap
Step 6:
In the sixth step you will dene the settings of your network connection. If you assign a static ip address, the
fallback (192.168.1.2) will be overwritten.
Setup routine step six
Please consult your IT department about the possible setting
opportunities.
If you enter incorrect data into this windows it might be impossible to recon-
nect to the printer without the help of our support.
Step 7:
Here you can activate the checkboxes at “Grasche Oberäche”and “Filamentüberwachung”, depending on
your conguration, for single - or double extruder.
Setup routine step seven
14/51

X1000
3D printer manual
German
RepRap
Step 8:
Conrm these settings by clicking on “weiter”. Your print box will reboot afterwards.
Setup routine step eight
After performing a software update with a new image the printer´s display will
remain black. You must restart the setup routine to reactivate the “Grasche
Oberäche”.
Step 9:
Setup routine step nine
Important:
After successfully completing the setup routine, you must restart the device
twice to make sure that all changes have been correctly initialized.
Start the device using the key and wait until it is completely booted. Then shut
it down and repeat the procedure.
15/51

X1000
3D printer manual
German
RepRap
3.4 How to activate the printer and establish a connection
After customizing the network settings and completing the setup routine you are now ready to establish the
connection to the X 1000 3D printer.
To do this enter the printer´s ip address in your browser (e.g. 192.168.1.2)
You will be presented the start screen (dashboard) of the Repetier-Server.
To ensure that everything has been installed correctly click on your 3D printer and then on the right bar on
“Druckereinstellungen”.
Repetier-Server Dashboard
Printer settings, Repetier-Server
16/51

X1000
3D printer manual
German
RepRap
Under the tab “Verbindung”chose
/dev/serial/by-id/usb-FTID form
the “Geräte/Port” dropdown
menu.
Also, ensure that the baud rate is
set to 15200 and the “Communica-
tion-timeout” is enabled.
Attention: Wir empfehlen einen
Wert von 160, dieser kann bei
bestimmten Geometrien jedoch
abweichen.
Gerne berät Sie hierbei einer
unserer Fachhändler.
General printer settings X1000
17/51

X1000
3D printer manual
German
RepRap
4. 4 Workow and operation
The following steps are required for a successful 3D print:
• Creation of a 3D CAD model
• Export of the CAD model into the STL format
• STL check and, if necessary STl repair
• Generation of a G-Code using a coding software like Simplify3D
• Starting the G Code. Either directly via a PC, a SD card or over a network connection
4.2 Features
• One integrated software suite contains everything you need to print high quality parts
• Customizable settings and advanced processes put the controls into your hands
• Support for dual-extruders, multi-part printing and even multiple processes within one part
EINFÜHRUNG CAD
3D CAD
•Im CAD wird ein 3D Modell
z.B.: Auf Grundlage einer
2D Zeichnung oder durch
einen 3D Scan erstellt
STL export 3D Druck
•Aus dem 3D CAD-Modell
muss eine .STL-Datei
erstellt und anschließend
überprüft werden.
•Aus der STL-Datei wird
ein G-Code erstellt und
dieser an den 3D Drucker
geschickt.
Individual work steps
4.1 Simplify 3D
Simplify3D™ Software contains everything you need to begin making parts on
your new 3D printer. Import and manipulate geometry, repair models, generate
G-Code instructions, verify toolpaths, manually control your machine, and print
parts all from the same program!
18/51

X1000
3D printer manual
German
RepRap
4.3 Quick Start Guide
System requirement
• mindestens Intel Pentium 4
• mindestens 2GB Arbeitsspeicher
• mindestens Windows XP
• OS X 10.6 oder neuer
• Ubuntu Linux 12.10 oder neuer
• OpenGL 2.0 oder neuer
• Dauerhafte Internetverbindung zur Installation und Betrieb der Software
Installing Simplify3D™ Software
After buying your Simplify3D license you receive a code so you can create an account on:
https://www.simplify3d.com/redeem/
In the next step you receive and email for the verification of your account. After that you can manage your
license online and download software packages.
Please check your spam-folder if you haven‘t reveived any email.
Windows
Unzip and double-click the .exe file to install. You may need to right-click and choose Run as administrator
depending on your permissions and trust settings. The Windows installation requires Microsoft Visual C++
2010 Redistributable, which should be automatically detected and installed if necessary.
Mac OS X 10.6.8+
Unzip and double-click the .app bundle to install. Enter your administrator password and follow the on-
screen prompts.
Linux
The Linux installer comes with both 32 and 64-bit options. After choosing the appropriate version for your
operating system, unzip the file and launch the .run installation package. It is recommended to launch this
program as super-user by openingTerminal cd‘ing to the directory where you unzipped the file, and then
typing:
sudo ./Simplify3D*installer.run
and entering the administrator password.
19/51

X1000
3D printer manual
German
RepRap
Launching the Software
The installer will guide you through the installation steps. The last step is a prompt to open and launch your
Simplify3D™ Software for the first time.
The software must be activated through an Internet conn
ection after installation. You can deactivate a specific machine at any time by going to Help > Deactivate
Product.
The configuration Assistant
When you open Simplify3D™ for the first time, you
will be greeted by the Configuration Assistant. Select
your printer from the numerous printers listed in the
drop down menu and the Assistant will automatically
configure all of your settings.
If you want to access the Configuration Assi-
stant after installation to change your settings to a
dierent printer, it can be located in the horizontal
Menu Bar under Help > Conguration Assistant.
Conguration assistent
Import proles manually
Furthermore our profiles are available directly to download.
To import the downloaded profile, follow these steps:
• Click on menu “File” “Import FFF-Profile” and choose the downloaded file.
• Open the FFF settings window and check if the profile is visible.
Import prole
Select prole
20/51
Table of contents
Other German RepRap 3D Printer manuals

German RepRap
German RepRap Neo User manual

German RepRap
German RepRap X400 Pro V3 User manual

German RepRap
German RepRap x350pro User manual

German RepRap
German RepRap X400v4 User manual

German RepRap
German RepRap X400CE User manual

German RepRap
German RepRap X500pro User manual

German RepRap
German RepRap Neo User manual

German RepRap
German RepRap X350 User manual