German RepRap X500pro User manual

Congratulations on your purchase of your personal
X500pro 3D printer
German
RepRap
x
500
X500pro 3D Printer Manual

X500pro
3D printer manual
DRAFT
German
RepRap
02/83

X500pro
3D printer manual
DRAFT
German
RepRap
Table of Content
1. General Information
1.1 Specications ............................................................................................................................... 06
1.3 Additional Options.....................................................................................................................07
2. Unpacking and Installation
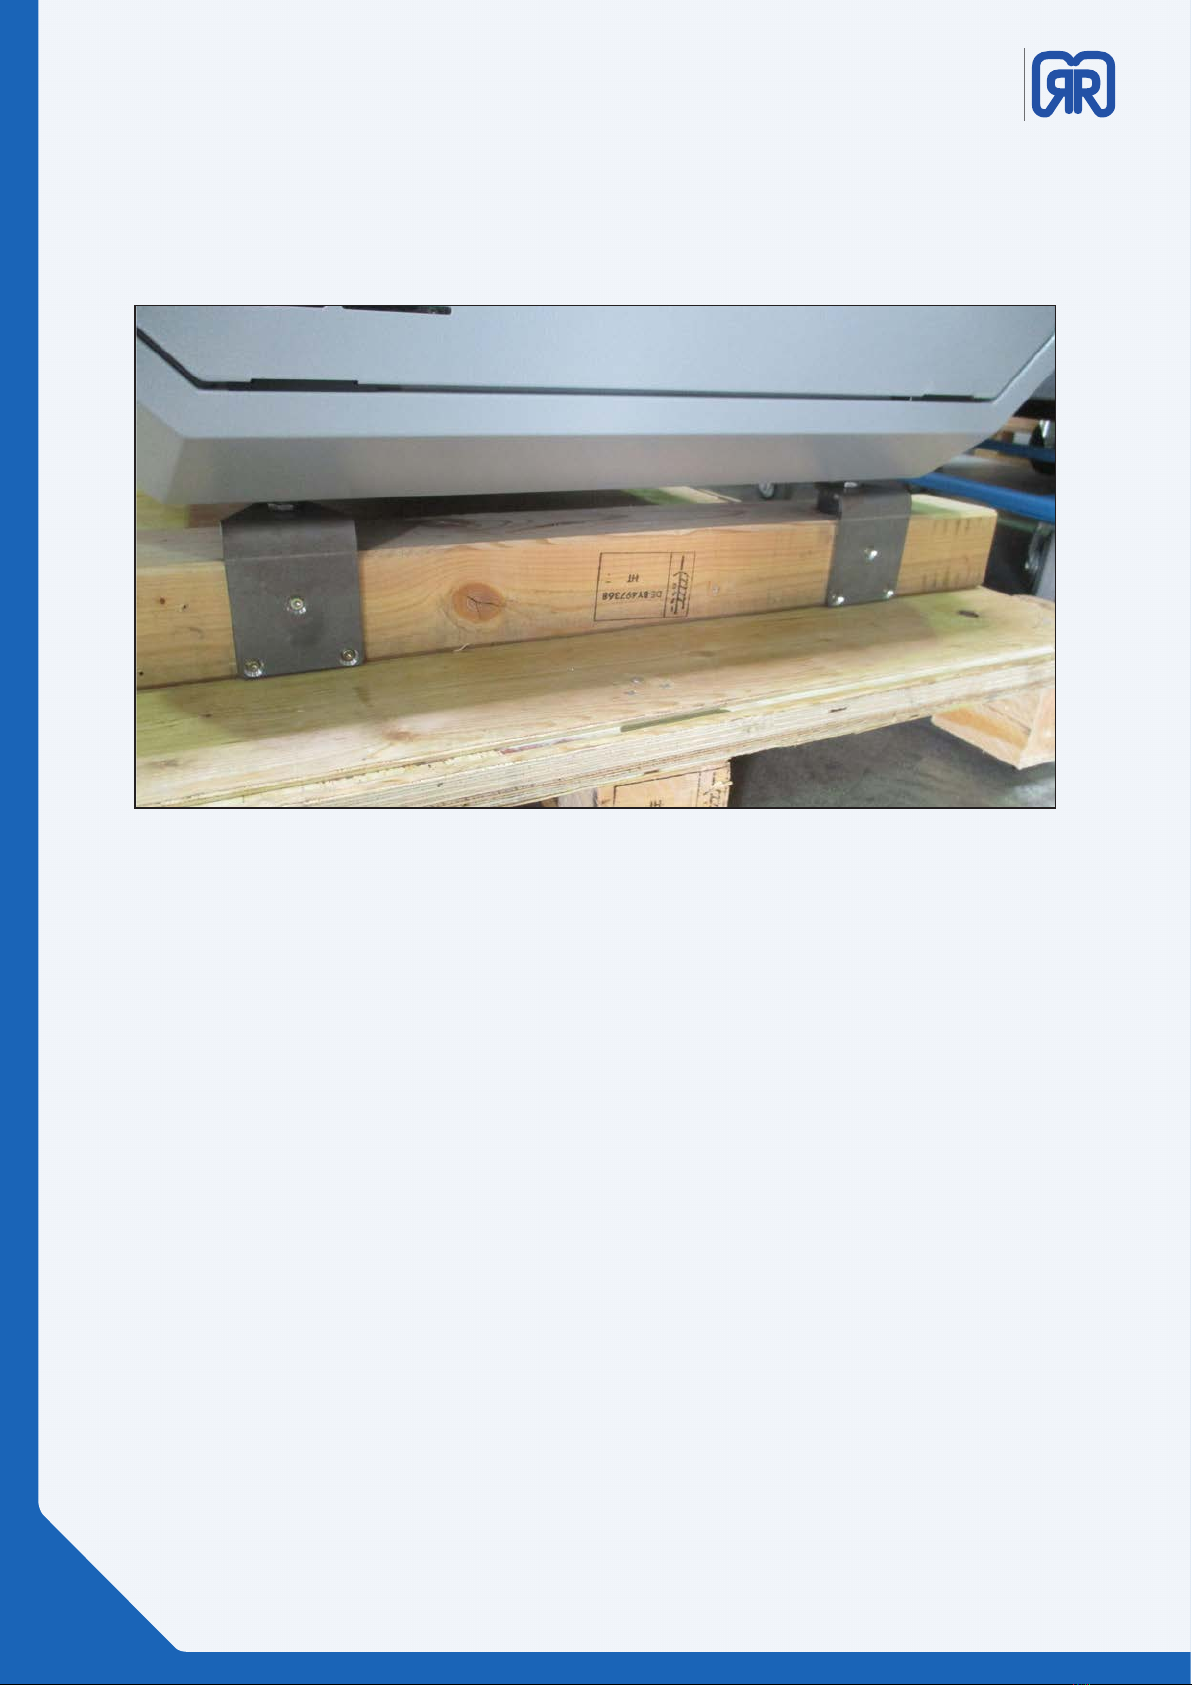
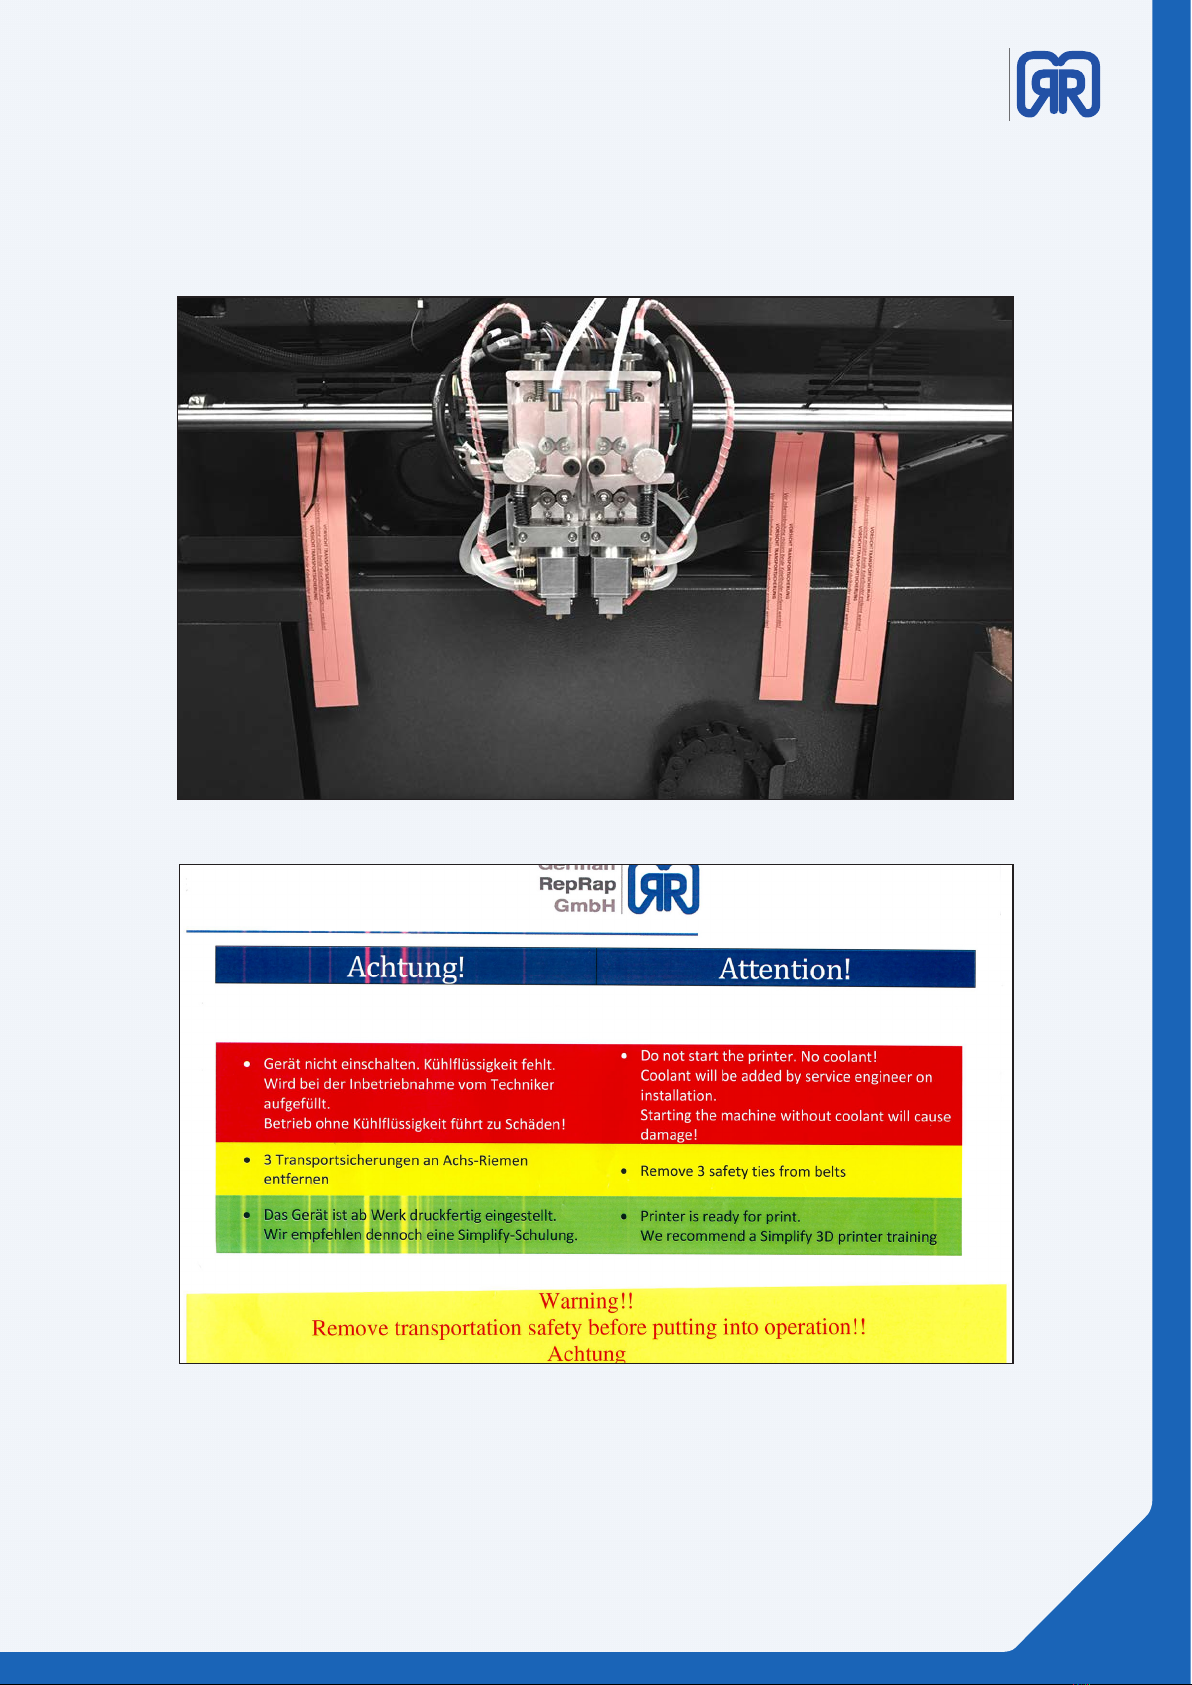
2.1 Removal Securing Devices ......................................................................................................08
2.2 Installation Site ............................................................................................................................ 10
3. Commissioning
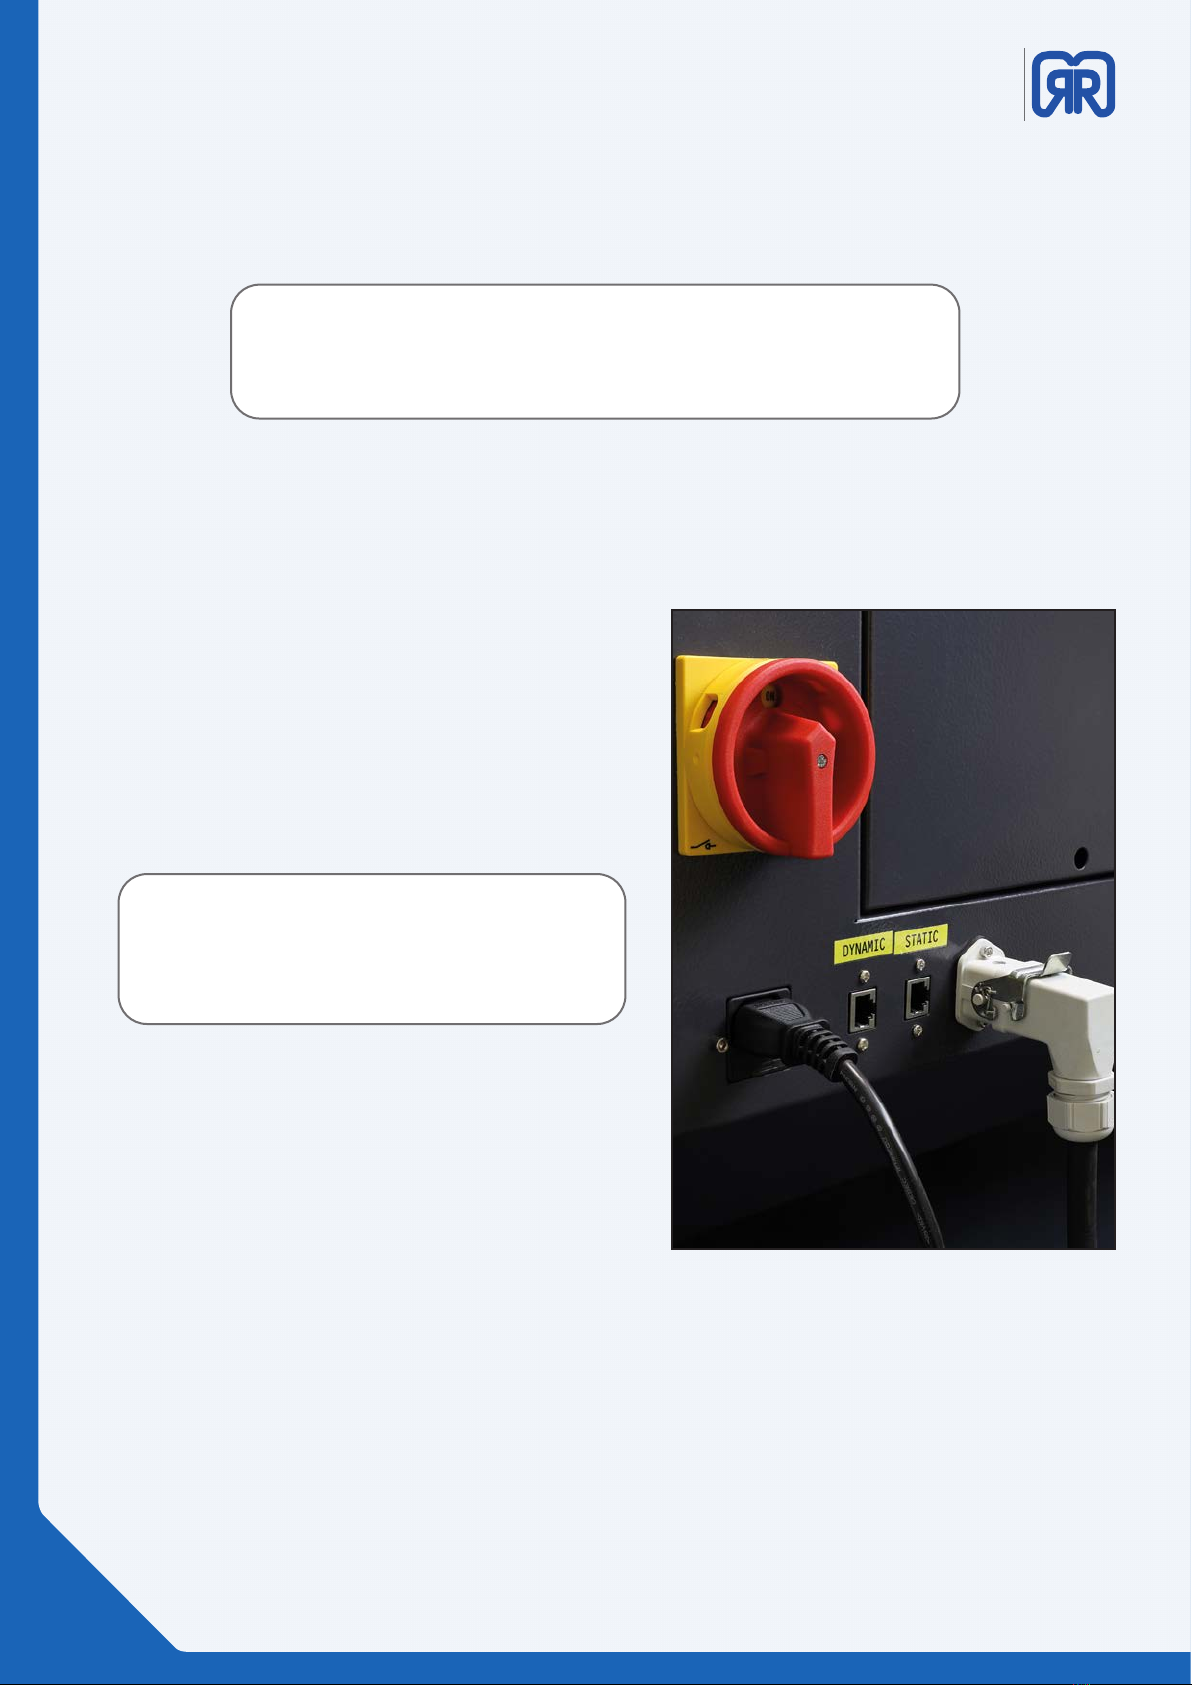
3.1 Connecting.................................................................................................................................... 10
3.2 Keys and Modes...........................................................................................................................10
3.3 Turn 3D Printer On/ O ............................................................................................................12
3.3 Touch Display/ Preparation ....................................................................................................14
3.4 Heating Elements........................................................................................................................14
3.5 Traverse Movements and Machine-Zero............................................................................15
3.7 Z-Oset - Distance Extruder and Printing Bed.................................................................16
3.6 PET-Foil for Print-Bed Coating................................................................................................ 16
3.8 Extruder and Filament Guidance .......................................................................................... 17
4. Starting a 3D Print
4.1 Standalone 3D Print................................................................................................................... 19
4.2 3D Printing via Repetier-Server ............................................................................................. 20
5. Workow and Operation
5.1 Simplify 3D .................................................................................................................................... 21
5.2 Features.......................................................................................................................................... 21
5.3 Quick Start Guide........................................................................................................................ 22
5.4 The Interface Layout ..................................................................................................................24
6. Network and Printer Set Up
6.1 Establishing a Network Connection (DHCP-Based)........................................................30
6.2 Establishing a Direct Connection (Via Router)................................................................. 30
7. Repetier-Server
7.1 Web interface ............................................................................................................................... 30
7.2 Dashboard.....................................................................................................................................31
7.3 Verifying Printer Settings ......................................................................................................... 32
7.4 Device Panel ................................................................................................................................. 36
7.5 Device Panel - Control...............................................................................................................36
7.6 EEPROM.......................................................................................................................................... 39
7.7 LOG-Files ........................................................................................................................................40
7.8 Firmware Update .......................................................................................................................41
7.9 External Manual........................................................................................................................... 42
7.10 API Key.......................................................................................................................................... 42
7.11 G-Code Management ............................................................................................................43
7.12 G-Code Download ................................................................................................................... 44
8. Tool Heads and Consumables
8.1 Tool Head Wiring.........................................................................................................................45
8.2 DD4 Extruder................................................................................................................................ 45
03/83

X500pro
3D printer manual
DRAFT
German
RepRap
8.3 Set Up the Second Extruder ................................................................................................... 47
8.4 Filament Tracking System (FTS) .............................................................................................48
8.5 Removal Object Fan................................................................................................................... 51
8.6 Cooling System............................................................................................................................ 52
8.7 Heated Chamber ........................................................................................................................52
8.8 Z-Home Position..........................................................................................................................53
9. X500pro Display
9.1 Touch-Display Overview........................................................................................................... 54
10. Printer Commands
10.1 Printer Commands - Access .................................................................................................. 65
11. X500pro Auto Bed Levelling
12. Tips & Tricks
12.1 How to Determine the 3D Printer’s MAC Address ........................................................ 68
12.2 How to Update Repetier-Server ........................................................................................ 68
12.3 Import Printer-Conguration............................................................................................... 69
12.3 PVA Solution for Enhanced Adhesion............................................................................... 71
12.4 PET-Foil for Print-Bed Coating.............................................................................................. 71
13. Direct Connection
13.1 Wiring ........................................................................................................................................... 72
13.2 Network Settings......................................................................................................................72
14 Setup Routine ............................................................................................................................... 74
14.1 Starting the Setup Routine ................................................................................................... 74
15. Important Notices
Return Shipment/ Original Package ........................................................................................... 78
Operation.............................................................................................................................................. 78
Miscellaneous...................................................................................................................................... 78
Toxic Threat ..........................................................................................................................................78
Safety Switch .......................................................................................................................................78
Maintenance........................................................................................................................................78
15. Safety notes
Power Supply.......................................................................................................................................79
Cleaning ................................................................................................................................................79
Playing Children ................................................................................................................................. 79
Mains Voltage...................................................................................................................................... 79
Humidity, Solar Radiation, Heat, Open Flames ....................................................................... 79
Ventilation ............................................................................................................................................79
Long Absence, Tempest, Power Plug Reachability ...............................................................79
Installation Site ...................................................................................................................................80
Disposal................................................................................................................................................. 80
16. Legal Disclaimers
Software Modications/ Use of Applications .......................................................................... 80
04/83

X500pro
3D printer manual
DRAFT
German
RepRap
Contact
17. Extract from the Risk Assessment
General Cautiousness (6.3.2)..........................................................................................................81
Residual Risk (6.3.3)........................................................................................................................... 81
Noise (6.3.4).......................................................................................................................................... 81
Removing of Products (6.3.5) ........................................................................................................81
Fire Hazard (6.3.10)............................................................................................................................ 81
Risk of Burn (6.3.11)........................................................................................................................... 82
Mechanical Risks by the Stepper Motors (6.3.12) .................................................................. 82
Lid (6.3.13) ............................................................................................................................................82
Transport 7.1........................................................................................................................................82
Requirements Regarding the Installation Room and the Surface Conditions ............ 83
Repair, Maintenance (7.4)................................................................................................................83
Dismantling, Putting out of Order (7.5) ..................................................................................... 83
Disposal (7.6) .......................................................................................................................................83
05/83

X500pro
3D printer manual
DRAFT
German
RepRap
1. General Information
1.1 Specications
X500pro 3D Printer
The X500pro is the answer to the current demand on the market and oers in addition to the
large construction volume of 500 x 400 x 450 (XxYxZ) millimetres further innovations which are
the focus of the requirements of industrial use. With its steel frame and a total weight of ap-
prox. 180 kg, the machine oers an extremely high stability. A new extruder technology makes
it possible to process future material developments precisely. The cooling circuit allows a stable
process even at maximum building chamber temperature.
Specication Data
working space ( X - Y - Z) 500 x 400 x 450 mm / 19.7 x 15.7 x 18.7 in
printing speed 10 - 150 mm/s
travel speed 10 - 300 mm/s
layer thickness (minimal) 0,02 mm (0.008 in)
lament diameter (standard) 1,75 Ø mm
nozzle diameter (standard) 0,4 Ø mm (opt.: 0,25 / 0,30 / 0,5 / 0,6 / 0,8)
material
Depending on the application, as well as on size and geometry,
a wide range of materials is available. For more information,
contact your reseller.
extruder type DD4 Dual Extruder with Dual Lift System
extruder temperature (maximum) 400° / 752 °F
building plate heatable
le transfer Stand-alone Printing mit Touch Display, USB-Stick, Ethernet
and WLAN optionally
software Simplify3D Software
power consumption 2500 W
operating voltage* 110 / 230 V
ambient temperature 15-26°C / 59 – 78.8°F
external dimensions approx. (W x D x H) 1050 x 820 x 950 mm / 41.3 x 32.3 x 37.4
weight 185 kg / 408 lbs
Heat Bed (max) 150° / 302 °F
Heated Building Chamber 80° / 176 °F
Options Maintenance Contract
06/83

X500pro
3D printer manual
DRAFT
German
RepRap
1.2 System Requirements
Note that the minimum system requirements listed below are for Simplify3D and Repetier-server only. These
applications are provided with the printer.
Recommended Requirements
• Intel Core i7 CPU
• 8GB or more of RAM
Supported Platforms:
• Windows Vista or later, 32 as well as 64-Bit
• Mac OS X 10.7 or later
• Ubuntu, Debian, and Fedora-based
distributions are all supported (Ubuntu 10.04 LTS or later)
Please note that you must use one of the following browsers to establish a connection with your X500pro 3D
printer.
• Google Chrome
• Mozilla Firefox
Microsoft´s Internet Explorer is not supported
1.3 Additional Options
In addition to the standard version the following options are available:
• Maintenance Contract
For an inquiry please contact our sales partner from your region.
Minimum Requirements:
• Intel Pentium 4 CPU
• 4GB RAM
• OpenGL 2.0 capable system
• Internet connection required
• 1GB of available hard-disk space
07/83

X500pro
3D printer manual
DRAFT
German
RepRap
2. Unpacking and Installation
Please make sure not to damage any components or parts with a knife or any other sharp object while
unpacking your 3D printer.
If you discover any kind of damage to the 3D printer please contact your reseller immediately
Securing devices, palette
2.1 Removal Securing Devices
In order to set up your X500pro 3D Printer you need to remove the transport security.
The X500pro 3D printers is delivered on a wooden palette and xed onto that on four points (see image
above).
To be able to lift the 3D printer from the metal bar respectively the wooden palette, please unscrew the
brackets.
In order to level the 3D printer please loosen or fasten the four machine feet, please make sure you x the
position of the feet with the counter nut.
08/83

X500pro
3D printer manual
DRAFT
German
RepRap
Securing devices, axis
Please follow the instruction on the attached safety paper which is xed on the printers print plate.
Securing devices, axis
Please make sure to remove all cable ties in the build chamber of your 3D printer. They are marked with red
or yellow stripes, see pictures below.
09/83

X500pro
3D printer manual
DRAFT
German
RepRap
2.2 Installation Site
Every electronic device is emitting heat, so does your 3D printer. Those emission are within the permitted
range. Never the less it is possible that sensitive surfaces might discolour due to the permanent heat
emission. Please position your 3D printer on a stable, at and resistant surface.
Please note:
Leave at least 1m of open space around all sides of your 3D printer for easy
maintenance.
3. Commissioning
Before starting your rst 3D print, you should do a full check-up to see if the printer is fully functional.
These small tests can be done via the touch display, so you don’t need a computer or any other device.
3.1 Connecting
In order to turn on your 3D printer, please make sure the
main switch is turned o before connecting the power
cable.
After connecting the power cable turn the main switch
on. Turning on the main switch will also activate the
cooling system of the X500pro
Attention:
As there is still air inside the cooling system,
don‘t turn on the main switch before the service
engineer commissioned the machine.
On the backside you can also nd the network slot of
the X500pro. You can integrate your 3D printer into your
network or connect directly with a computer.
Please read chapter 6. Network and Printer Set Up on how
to connect to your 3D printer.
3.2 Keys and Modes
By default the X500pro is in operation mode. Only service
sta can use the maintenance mode through using the
service key.
Backside, X500pro
10/83

X500pro
3D printer manual
DRAFT
German
RepRap
Operating Mode
When the X500pro is connected to the power supply you can start your printer by using the main switch at
the back (red turn). By default the printer is in this operation mode.
After a short initialization phase the start-up screen appears on the display and the printer is ready to use.
In this mode you can upload G-Codes, heat up the machine and traverse the axis.
ATTENTION: If you open the lid while a 3D print is currently running the printer will shut down immediately and the
executed print is lost - if you don’t use the foot paddle. By holding the middle position , the door can be opened. Be
careful it is intentionally that the 3rd position (full pressed) can be reached easily which will lead to a print job loss.
Maintenance Mode
When operating in maintenance mode, it is possible to work with an open maintenance lid. This mode is
intended for repair and maintenance work only! The maintancane mode is switched with a key in the elec-
tronic compartment.
The maintenance mode must be set up by a trained professional only!
WARNING:
Surfaces as well as the extruder and printed object will remain hot for
some time after the printer shuts down.
service key switch in electro panel
foot panel to bridge temporary the safety control
11/83

X500pro
3D printer manual
DRAFT
German
RepRap
3.3 Turn 3D Printer On/ O
Before starting the initial check-up please make sure that your printer is connected to power supply and that
the main-lid is properly closed. Furthermore check that the main switch at the back is turned on and that the
operating key is inserted and turned on
After a short initialising phase you should see the following screen on the touch display.
This chapter only contains view-ports of the display which are necessary for the initial
check-up
Please read chapter 9. Touch-Display for a detailed overview.
The home screen gives you quick access to all functionalities that you need to operate your 3D printer in
standalone-mode.
To see the lower icons on the home screen simply swipe with you nger over the display.
If the touch display stays black, please make sure that you connected your 3D printer to the power grid and
that the main lid is properly closed.
Home-screen, Touch-Display
Please note:
The X500pro has a built-in industrial PC which needs to be shut down before turning the
3D-printer o.
In order to turn o your 3D printer please shut down Repetier-Server rst. Therefore use the button Server
Commands. Here you can nd the command Shutdown Server.
12/83

X500pro
3D printer manual
DRAFT
German
RepRap
Security question, Touch-Display
After hitting Shutdown Server a security question will pop up which needs to conrmed.
Please always shut down the Repetier-Server rst before turning o the power connection.
Server Commands, Touch-Display
13/83

X500pro
3D printer manual
DRAFT
German
RepRap
3.3 Touch Display/ Preparation
In order to familiarize with your 3D printer, its recommended to slow down the travel speed of the printer.
If all axis are traversing slower, you have more time to intervene if, contrary to expectation, problems appear.
Starting from the home screen navigate to Parameter ( see. p.11) and turn down Speed to 50%.
Printer Status, Touch-Display
3.4 Heating Elements
To verify if all heating elements are working properly, please check if in Printer Status temperatures are dis-
played for Extruder 1&2 as well as for the Chamber and the Bed.
Please select Extruder 1 and Extruder 2 in a row and set the desired temperature to 190°C. Afterwards select
the Bed an turn it on to 60°C as well as the Chamber.
Printer Status, Touch-Display
14/83

X500pro
3D printer manual
DRAFT
German
RepRap
It is normal and sometimes inevitable that during the heating process
lament will drip out of the nozzle. It is the leftover lament of the test
prints.
In the Printer Status viewport you should now see rising temperatures for all heating elements as well as the
previous set temperatures.
Important:
Please shut down all heating elements after controlling their function-
ality! You do not have to wait until all temperatures are reached.
In order to turn o an heating element, simply click on it and set a value of zero and conrm it using the
enter button.
3.5 Traverse Movements and Machine-Zero
After reducing the overall machine-speed go to Move on the touch-display.
Use the marked arrows to manually
traverse the axis.
Warning:
If the printer will make any kind
of strange noises executing the
command described below, please
turn o the current immediately.
To do so it is sucient to open the
main lid of the printer.
After assuring that all axis are able to move, please use the command Home-All. This will traverse all axis to
its machine zero. This is the position from where all 3D prints will start.
You can nd the command Home-All in the right upper corner of the touch-display.
Move Head, Touch-Display
X
Y
Z
15/83

X500pro
3D printer manual
DRAFT
German
RepRap
3.6 PET-Foil for Print-Bed Coating
Please make sure that while applying PET-Foil to the printing bed the 3D printer is
not connected to the power grid.
Also, please note that you can take out the ceramic plate while attaching the printed
coating.
The following describes the best way to apply the foil without causing any air bubbles.
• Open the main lid and take out the ceramic plate
• Apply a thin layer of water or glass cleaner (silicone free) on the bed´s surface
• While pulling o the carrier lm from the PET-foil, wet the adhesive side of the PET-Foil continu-
ously.
• Place the damp side of the PET-Foil onto the ceramic plate and align it with the plate borders
• Remove the excess uid with a squeegee. Work from the centre outwards. Use a rag to absorb the
excess water.
After applying the PET-Foil wait at least twelve hours before using the 3D printer again.
The PET-Foil functions as the coating of the ceramic printing bed and increases the adhesion between
the printed object and the surface. Furthermore its prevents the ceramic plate from getting damaged
and doing so it extends the lifespan of it.
Adding the PET-Foil onto the ceramic printing plate is mandatory and ensures a
stable printing process.
Please make sure that there is no humidity at or under the heated bed before restarting
the machine.
3.7 Z-Oset - Distance Extruder and Printing Bed
The oset of the extruder and the printing bed can be adjusted directly on the tool head. This is only nec-
essary if adjustments were made to the printing bed e.g. if you want to work with an alternative print bed
coating.
Simply use the knurled screw on the upper part of the tool head to adjust its height. The distance between
the nozzle and the printing plate should be 0,05mm.
Please read chapter 8. Tool head carefully on how to use the extruder.
16/83

X500pro
3D printer manual
DRAFT
German
RepRap
3.8 Extruder and Filament Guidance
The X500pro is equipped with two extruders, where as the left/rst extruder sits lower compared to the
right/second extruder. This is intentional.
We recommend new users to make their rst 3D printing experience with only one extruder.
Please nd a detailed manual on how to set up the second extruder in chapter 8.3.
Before changing the lament or inserting lament for the rst time, use the touch display to traverse the
tool head to the following position:
X=200mm, Y=350mm, Z=200mm
In order to insert lament into the extruder the extruder needs to be heated up to the material specic tem-
perature. We recommend to make your rst experience in 3D printing using PLA, this is a easy to use and
print, bio-compatible plastic
There is potentially still lament inside the extruder as leftover of test prints. It’s
going to be removed in the next steps.
Please heat up the extruder you want to feed lament into, as described in chapter 3.4.
For PLA lament please heat up the extruder to approx. 210°C.
It is normal that during the heat up, plastic will drop out of the nozzle.
As soon as the extruder reached the desired temperature, go to the Extruder menu. Here you can extrude or
retract lament.
Extrude or Retract, Touch-Display
extrude
retract
17/83

X500pro
3D printer manual
DRAFT
German
RepRap
In order to prevent that the material gets stuck while pushing it out of the extruder, its recommended to
extrude rst approx.10mm of lament (arrow down) before pushing it out of the extruder (arrow up).
To remove the leftover lament please retract at least 60mm of lament using the touch-display. After the
lament was released by the extruder, you can either remove it at the tool head slide or the material storage
(left side of the printer).
The lament storage is on the left side of the X500pro. There is enough space to store one big spool and
three small ones. It also contains the Filament Tracking System (FTS).
This prevents your printer from failing due to a lack of lament while printing. As soon as one of the FTS
detects that it ran out of lament the printer stops and traverses to a parking position.
The left slot is the FTS for the left/ rst extruder, the right one is linked to the second extruder.
To feed lament into one of the extruders, please make sure to rst guide it though the FTS slot and then
into the lament guidance hose of the extra lament feeder. Push the nob on the feeder to release the
spring tension of the feeder. Once the lament is xed with the spring tension of the feeder use the Feed-In
button of the printer commands to automatically feed in the lament to extruder. ATTENTION: The extruder
MUST be heated to the laments extruson temperature!
Material storage, X500pro
Tip:
It is easier to insert the lament, when you
straighten the end and cut it o diagonally. Extruder 02Extruder 01
18/83

X500pro
3D printer manual
DRAFT
German
RepRap
4. Starting a 3D Print
After nishing the rst check-up, your X500pro is now ready for its rst 3D print.
In order to start a print job you rst need to generate a G-Code, as described in chapter 5.Workow.
Please also make sure that you inserted lament into the extruder you are going to use. The chapter before
describes how to do this.
If you already have a G-Code le you can start your rst print using one of the following procedures.
4.1 Standalone 3D Print
It is possible to start a 3D print without connecting to your printer via network, just right on your machine.
Therefore save your G-Code le on a portable ash drive and insert it in the USB-slot at the front next to the
touch display.
Afterwards please navigate from the Home-Screen to the menu Import.
If there are no les displayed please use the refresh button on the left hand side in order to refresh the
viewport.
Select the print le and import it directly onto the internal storage of your 3D printer.
File-transfer, ash-drive File-transfer- ash-drive, Touch-Display
File-transfer - G-Codes, Touch-DisplayFile-transfer - Import ,Touch-Display
19/83

X500pro
3D printer manual
DRAFT
German
RepRap
G-Code upload, Repetier-Server
First select Upload G-Code (marked green) and choose the print-le from your local hard-drive. After the
G-Code has been uploaded, select the pink-marked printing symbol in order to start the print.
Warning:
Please make sure that you have a PET-Foil coating on top of your ceramic print-bed.
Chapter 12.4 PET-Foil for Print-Bed Coating shows how to apply the coating properly.
After the print-le has been imported, it is listed in the G-Code menu of the touch-display. In order to start a
job, please navigate to G-Code an click on the desired print-le.
At rst you will see information about the actual print-le. By clicking on Print the G-Code gets executed and
your 3D printer will start printing.
4.2 3D Printing via Repetier-Server
Important:
Please don’t use Print File (Printing over the ash-drive)! Please import the
G-Code rst before starting a print-job.
Please read chapter 6. Network and Printer Setup in order to connect to your
3D printer.
Please connect to your 3D printer using a web-browser ( 7.1 Web Interface )and click on Go to Printer to
upload a G-Code-le.
20/83
Table of contents
Other German RepRap 3D Printer manuals

German RepRap
German RepRap x350pro User manual

German RepRap
German RepRap X400CE User manual

German RepRap
German RepRap X400 Pro V3 User manual

German RepRap
German RepRap X1000 User manual

German RepRap
German RepRap Neo User manual

German RepRap
German RepRap X400v4 User manual

German RepRap
German RepRap X350 User manual

German RepRap
German RepRap Neo User manual