German RepRap X350 User manual

X350 3D-Printer Quick Start Guide
German RepRap GmbH
https://www.germanreprap.com
English versions are available at https://wiki.germanreprap.com/en/

X350 3D-Printer Quick Start Guide
Seite: /29
Stand: 2016/03/24 13:55

X350 3D-Printer Quick Start Guide
Seite: /29
Stand: 2016/03/24 13:55
© German RepRap GmbH /29
Inhaltsverzeichnis
X350 3D-Printer Quick Start Guide ............................................................................................... 2
Technische Daten ........................................................................................................................... 4
Content ........................................................................................................................................... 4
System requirements ...................................................................................................................... 5
Starting up ...................................................................................................................................... 5
Instructions ................................................................................................................................. 5
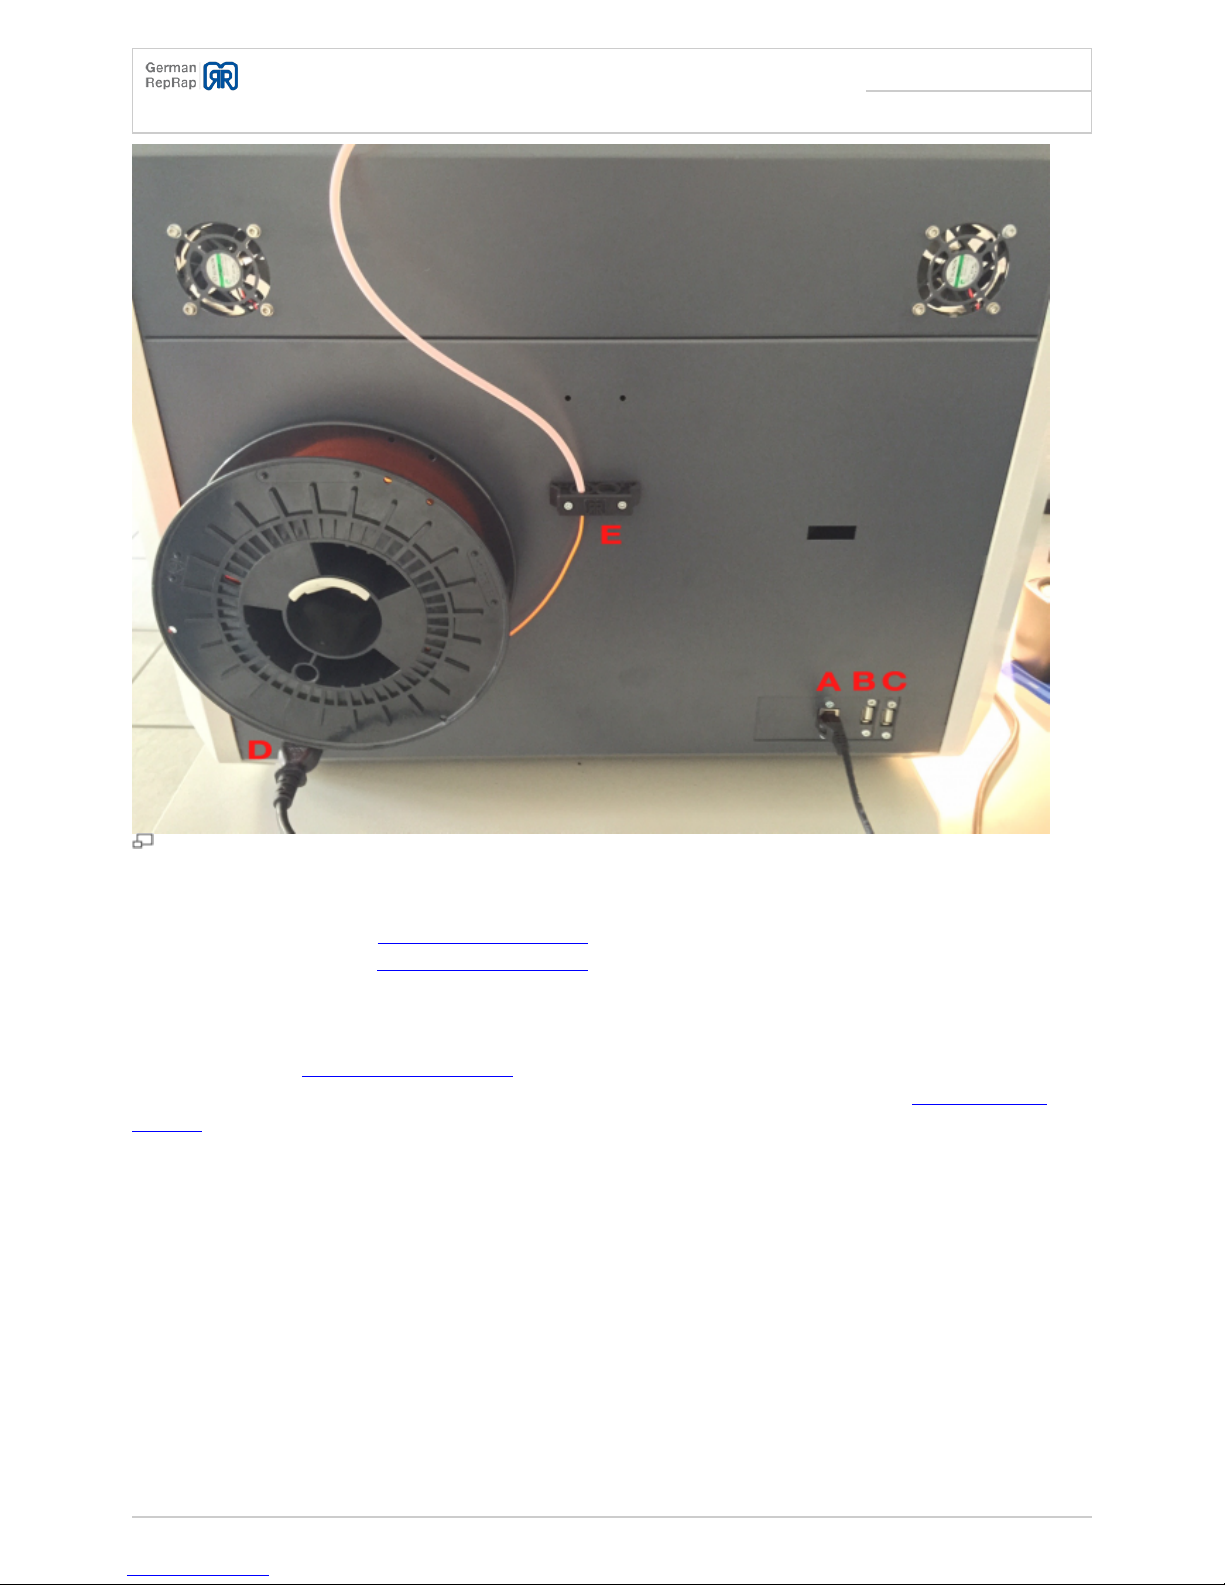
Setting up the printer ................................................................................................................. 5
Levelling the printing bed ........................................................................................................... 7
Stripping container, setup and removal ..................................................................................... 8
Case fan control ......................................................................................................................... 9
Network setup ............................................................................................................................ 9
Inserting filament ..................................................................................................................... 10
Directly at the device ........................................................................................................... 10
Through the network ............................................................................................................ 11
Removing the filament ............................................................................................................. 12
Changing the filament .............................................................................................................. 12
Software installation ................................................................................................................. 12
Printing with SD card ................................................................................................................ 13
Removing the printed object .................................................................................................... 14
Cleaning the printing head (extruder) ...................................................................................... 14
Material selection .......................................................................................................................... 14
Download datasheets ............................................................................................................... 15
Materialinfo ................................................................................................................................... 15
ABS (Acrylonitrile butadiene styrene-copolymer) ......................................................................... 15
Specification ................................................................................................................................. 16
Source ........................................................................................................................................... 16
PLA (Polylactic acid) ...................................................................................................................... 16
Specification ................................................................................................................................. 17
Source ........................................................................................................................................... 17
Troubleshooting ............................................................................................................................ 17
Support ......................................................................................................................................... 18
Documentation ......................................................................................................................... 18
Telephone ................................................................................................................................. 18
Support tickets / E-mail ............................................................................................................ 18
Forum (Community) ................................................................................................................. 19
Important notes ............................................................................................................................. 19
Return / Original wrapping ............................................................................................................ 20
Operation ...................................................................................................................................... 20
Other matters ............................................................................................................................... 20
Toxic fumes ................................................................................................................................... 20
Safety cut-off ................................................................................................................................ 20
Maintenance ................................................................................................................................. 20
Safety notes ................................................................................................................................... 21
Power supply ................................................................................................................................. 22
Cleaning ........................................................................................................................................ 22
Playing children ............................................................................................................................ 22
Mains voltage ................................................................................................................................ 22
Humidity, solar radiation, heat, open fire ..................................................................................... 22
Ventilation ..................................................................................................................................... 23
Long absence, thunderstorms, accessibility of the power plug ..................................................... 23
Installation site ............................................................................................................................. 23
Disposal ........................................................................................................................................ 23

X350 3D-Printer Quick Start Guide
Seite: /29
Stand: 2016/03/24 13:55
© German RepRap GmbH /29
Rechtliche Hinweise ...................................................................................................................... 24
Software-Changes / Use of applications ........................................................................................ 25
Contact ......................................................................................................................................... 25
Links ............................................................................................................................................. 26

X350 3D-Printer Quick Start Guide
Seite: 2/29
Stand: 2016/03/24 13:55
© German RepRap GmbH 2/29

X350 3D-Printer Quick Start Guide
Seite: 3/29
Stand: 2016/03/24 13:55
© German RepRap GmbH 3/29
X350 3D-Printer Quick Start Guide
Congratulations for purchasing your professional X350 desktop 3D printer
Please note that the most recent version of this manual is
always available on our websites. At the time of delivery, it
may happen that the included instruction manual is
out-dated, and there is more current information on the
online documentation.
The stable construction and the high quality components make the X350 the ideal printer for
industrial applications. The X350 is a reliable workhorse, regardless of whether you print for one hour
or for several hours.
The landscape format printing bed allows for a more efficient use of the printing area, as most printed
objects are not square. The integrated web interface is a highlight, as it enables printing through the
wireless network or the LAN, and control through a browser interface. The X350 will print stand-alone,
or integrated into the wireless network or the LAN while being controlled through a browser interface.
The X350 will print stand-alone, or integrated into the wireless network or the LAN while being
controlled through a browser interface.
The German RepRap X350 3D printer is ready to use in just a few minutes, thanks to the user-friendly

X350 3D-Printer Quick Start Guide
Seite: 4/29
Stand: 2016/03/24 13:55
© German RepRap GmbH 4/29
tried and tested software Simplify3D™, an innovative filament management system with an
automated feeder, and the easy to level 3-point printing bed.
The X350 runs with our most recent drive technology. The DD3-Extruder and the Full-Metal-Hot end
are easy to control. The highlights: No adjusting necessary, and a variable contact pressure for soft
materials.
Technische Daten
Material: ABS (Acrylonitrile butadiene styrene-copolymer), PLA (Polylactic acid), PS (Polystyrol), PP
●
(Polypropylen), PVA (Polyvinylalkohol), Wood, Laybrick in 1,75mm
Material management: innovative filament management
●
Dimensions: (B / H / T) 600 x 444 x 517 mm
●
Printing volume: (X / Y / Z) 350 x 200 x 210 mm
●
Operating voltage: 110/230V Wechselspannung
●
POWER CONSUMPTION: 250 W
●
Power consumption: ca. XXX W
●
Setup: Prefabricated unit / Ready-to-print
●
Technology: FFF (Fused Filament Fabrication)
●
Layer thickness: ab 0,02mm
●
Printing speed: 10 - 150 mm/s
●
Traverse speed: 10 - 300 mm/s
●
Printing bed: 3-Punktauflage, beheizbar bis max. 120°C
●
Network: WLAN/Ethernet
●
Weight: ca. 29kg
●
Nozzle: 0,4mm
●
Content
X350 3D-Printer
●
1 * Coil holder
●
LCD Display (installed)
●
SD-Card reader (installed)
●
Heated ceramic printing bed (installed)
●
Simplify3D™ Software
●
4GB SD-Card
●
Spatula
●
Cleaning brush
●
Nozzle tool
●
Quick Start Guide
●
Ethernet network cable
●
Power cord
●
Filament sample
●

X350 3D-Printer Quick Start Guide
Seite: 5/29
Stand: 2016/03/24 13:55
© German RepRap GmbH 5/29
System requirements
These system requirements are exclusive to the use with the included software Simplify3D™.
Intel Pentium 4 or better
●
2GB RAM or more
●
USB from 1.1 optional
●
Windows XP or newer
●
Mac OS X 10.6 or newer
●
Ubuntu/Debian Linux
●
OpenGL 2.0
●
Starting up
Instructions
During shipment of the X350 it may happen that the limit switches shift. This should be checked, and
adjusted.
Warning: Do not fasten the screws too tightly!
The heated printing bed (ceramic) of the X350 is covered in a PET film. ABS and PLA stick to this film
very well. However, this film can get damaged, or lose adhesion after some use. In this case, you can
acquire a new film from us.
The processing PLA (Polylactic acid) is also possible without the PET film on the printing bed. You can
find further details about that in the Overview of filament types in our Wiki, or in the section of the
same name within this instruction manual.
Setting up the printer
The printer is to be plugged into a 230V power outlet via the power cord. The included network cable
allows you to connect the printer to the home network. This is also necessary if you want to use the
printer through the wireless network later. For the first setup, an Ethernet connection is required.

X350 3D-Printer Quick Start Guide
Seite: 6/29
Stand: 2016/03/24 13:55
© German RepRap GmbH 6/29
Data ports

X350 3D-Printer Quick Start Guide
Seite: 7/29
Stand: 2016/03/24 13:55
© German RepRap GmbH 7/29
Ports on the rear
A - Network port
●
B - USB port for internal 3DPrintBox V2 manual
●
C - USB port for internal 3DPrintBox V2 manual
●
D - 230V connector
●
E - Filament feed
●
The USB ports for 3DPrintBox V2 manual may be used to attach USB webcams or similar devices with
later software versions. These will then be available in the operating system of the 3DPrintBox V2
manual.
Levelling the printing bed
In order to level the printing bed, the following steps are necessary.
Heat up the printing bed to room temperature
●
Set the z-axis to its home-position using the control panel: Press the button →”Position” → “Home Z”
●
Wait at least 10-15 minutes to let the printer acclimatise
●
If necessary, turn off the holding torque of the motors using the control panel: Press the button →
●
“Quick Settings” → “Turn off motors”

X350 3D-Printer Quick Start Guide
Seite: 8/29
Stand: 2016/03/24 13:55
© German RepRap GmbH 8/29
Now move the printing head close to each holding point above the adjusting screws, and fasten or
●
loosen the knurled nut a bit until only one sheet of paper (80g/sqm, copy paper) would fit between
the nozzle tip and the printing bed.
Also check other randomly chosen positions for the printing head
●
Repeat until the distance is identical in any position.
●
Printing bed adjusting screws
Re-level the printing bed if you set the temperature of the printing bed to an entirely different value.
This is the case, for example, when switching from PLA (Polylactic acid) to ABS (Acrylonitrile
butadiene styrene-copolymer) or vice versa.
Stripping container, setup and removal
Adjust the distance of the perforated plate so that the nozzle has a distance of about 1mm to the
plate. Use the knurled nut to adjust the height.

X350 3D-Printer Quick Start Guide
Seite: 9/29
Stand: 2016/03/24 13:55
© German RepRap GmbH 9/29
Waste container
Case fan control
Both of the case fans that are installed in the upper printer can be controlled through Gcode:
M806 S<220-255> - Turn on fan, whereby 220 = 86% fan speed, 255 = 100% fan speed
●
M807 - Turn off fan
●
Changes with Firmwareversion 3.1:
M106 P1 S<220-255> - Turn on fan, whereby 220 = 86% fan speed, 255 = 100% fan speed
●
M107 P1 - Turn off fan
●
The fan will only reliably start spinning at a set fan speed of 86%.
If the printing bed temperature is at 60 degrees (PLA) and the fan speed is at 100%, the temperature
in the printing space will be 30 degrees. If the printing bed temperature is at 110 degrees (ABS) and
the fan speed is at 100%, the temperature in the printing space will be 55 degrees.
Network setup

X350 3D-Printer Quick Start Guide
Seite: 10/29
Stand: 2016/03/24 13:55
© German RepRap GmbH 10/29
The X350 printer contains a 3DPrintBox. The manual for the 3DPrintBox includes all information about
the network setup and software updates. Please ignore instructions about the connection to the
3DPrintBox, as it is already installed and integrated.
http://wiki.germanreprap.com/en/handbuch/3dprintbox_v2
Inserting filament
Please do NOT let the extruder remain at temperature for a longer time if you are not using it. This
may lead to so-called “linking” of plastics and can clog your extruder, which is very hard to clean out.
This effect is most often observed when using PLA (Polylactic acid).
The coil with the printing material is hanged in the coil holder in the back, and the end of the wire is
cleanly cut with a wire cutter. Then the wire is lead through the filament conduct and pushed
forwards to the extruder.
E - Filament insertion
Directly at the device

X350 3D-Printer Quick Start Guide
Seite: 11/29
Stand: 2016/03/24 13:55
© German RepRap GmbH 11/29
In order to lead the filament into the extruder, take the following steps:
Heat up the extruder manually using the control panel: Press the button → “Extruder” → “Temp.1”
●
Wait until the Extruder has reached the target temperature
●
In the menu, select: “Position” → “Extr. Position”
●
After activating the menu point, turn the control wheel clockwise in order to pull in or lead the
●
filament, and counter-clockwise to eject the filament
When you are done, please turn off the extruder heating
●
Through the network
Heat up the Hot-End through the web interface. Once the target temperature is reached, you can lead
the inserted filament via the web interface manually, until it exits the nozzle. Afterwards, turn off the
extruder heating.
If the extruder doesn't properly lead the filament, you can adjust the contact pressure on the filament
using the adjusting wheel at the extruder. Depending on the material it may be necessary to adjust
the contact pressure to the material in order to achieve a flawless leading of the filament. To do that,
turn the adjusting wheel at the extruder.
Adjusting wheel

X350 3D-Printer Quick Start Guide
Seite: 12/29
Stand: 2016/03/24 13:55
© German RepRap GmbH 12/29
Manual extrusion
Removing the filament
In order to “unload” the filament, take the steps in reverse. Heat up the extruder until it reaches the
target temperature, and let it spin backwards until you can pull the wire out of the filament lead by
hand. Afterwards, turn of the extruder heating.
Manual retract
Changing the filament
The filament change is in principle done the same way as loading or unloading the wire. However, you
have to adjust the temperature of the extruder to the “higher grade” material. For example, if you
change PLA to ABS, you need a temperature of 250°C. Once you inserted the new material, extrude it
by hand until there are no remains of the previous material coming out of the nozzle anymore.
Afterwards, turn the extruder heating off.

X350 3D-Printer Quick Start Guide
Seite: 13/29
Stand: 2016/03/24 13:55
© German RepRap GmbH 13/29
Software installation
The X350 3D-Printer comes with a license of the software Simplify3D™ You can download the correct
version for your operating system under https://www.simplify3d.com/downloads/ after entering the
license key. Launch the installation in accordance with the installation instructions you find there.
As the X350 has NO direct interface for USB-PC connection, instructions about printing via USB in the
following section are not applicable. The generated Gcode is exported from Simplify3D™ as a file, and
then fed to the printer via SD-card or via the network.
An instruction on Simplify3D™ can be found here:
http://wiki.germanreprap.com/en/software/simplify3d
Printing with SD card
Other than the option to load Gcode files on the printer through the network, there is also the
possibility to save the Gcode from Simplify3D on an SD-card (FAT32 format, max. 4GB).
This SD card can then be inserted into the card reader in the front of the printer. Usually the printer
will then display the content of the SD-card. You can then select the correct file and start the printer
with pressing the button.
SD-Card slot

X350 3D-Printer Quick Start Guide
Seite: 14/29
Stand: 2016/03/24 13:55
© German RepRap GmbH 14/29
If the content of the SD-card is not displayed after inserting it into the card reader, the file may also
be selected through the menu on the LCD display: Press the button →”SD-Card” → “Print file” → Select
file.
Removing the printed object
In order to remove a printed object upon completion, take the following steps:
Let the printing bed cool down
●
Carefully check if the piece can be removed easily by hand
●
If it sticks too strongly, use the included spatula to carefully loosen the object from the printing bed
●
Cleaning the printing head (extruder)
After some time the nozzle and the heating block of the Hot-End may get dirty. In order to clean it,
take the following steps:
Put the printing head into an easily reachable and comfortable position
●
Heat up the Hot-End to the temperature of the respective used material
●
Clean the nozzle and the heating block from below with the included brass brush
●
Material selection
The temperatures listed here are based on our printers and
should be treated as a recommendation only. Please tweak
them to your own needs as required.
3D printers need materials to create object from like “common” printers. Depending on the printers
technology you are able to use different types of materials.
Thermoplastic, also known as a thermosoftening plastic, is a polymer that turns to a liquid when
heated and freezes to a very glassy state when cooled sufficiently. Thermoplastic polymers differ
from thermosetting polymers (Bakelite) in that they can be remelted and remoulded. Many
thermoplastic materials are addition polymers; e.g., vinyl chain-growth polymers such as polyethylene
and polypropylene.
Filament type Melting
point (°C)1) Extruder (°C)2) Printbed (°C)3) Surface4) Stable
(°C)5)
ABS 220° ~230° - 255° ~ 110° - 115° Carbon/PET/Kapton ~ 140°
PLA - Polyactose 200° ~180° - 220° ~ 55° - 65° Carbon/PET/Kapton/Glas ~ 60°
PS - Polystyrol 210° ~190° - 220° ~ 80° - 100° Carbon/PET/Kapton –

X350 3D-Printer Quick Start Guide
Seite: 15/29
Stand: 2016/03/24 13:55
© German RepRap GmbH 15/29
Filament type Melting
point (°C)1) Extruder (°C)2) Printbed (°C)3) Surface4) Stable
(°C)5)
PVA - Polyvinylalkohol6) 210° ~190° - 220° ~ 55° - 115° Carbon/PET/Kapton –
LAYWOOD - Holz 210° ~180° - 230° ~ 0° - 80° Carbon/PET/Kapton ~ 60°
LAYBRICK - Stein 160° ~165° - 210° ~ 0° - 80° Carbon/PET/Kapton ~ 70°
PP 210° ~210° ~ 0° - 80° PP ~ 150°
PA67) 240° ~245° - 265° ~ 130° Kapton –
TPU938) 190°C ~190°C-215°C cold Glas > 120°C
Carbon209) 235°C ~252°C ~45°C PET –
Download datasheets
ABS datasheet (en)
Smart ABS datasheet (en)
Bendlay datasheet (en)
Carbon datasheet (en)
HiPS datasheet (de)
Laybrick datasheet (en)
Laywood datasheet (en)
PA6 Datenblatt (en)
PLA datasheet (en)
PLA soft datasheet (en)
PP datasheet (en)
PS datasheet (en)
PVA datasheet (de)
PVA datasheet (en)
TPU93 datasheet (en)
TPU93 datasheet (de)
Materialinfo

X350 3D-Printer Quick Start Guide
Seite: 16/29
Stand: 2016/03/24 13:55
© German RepRap GmbH 16/29
ABS (Acrylonitrile butadiene styrene-copolymer)
Acrylonitrile butadiene
styrene-copolymer (ABS)
Acrylonitrile butadiene styrene-copolymer (short ABS) is a synthetic terpolymer of three
different kinds of monomers, acrylonitrile, 1.3 butadiene and styrene and belongs to the amorphous
thermoplastics. The proportions can vary from 15 to 35% acrylonitrile, 5 to 30% butadiene and 40 to
60%.
Specification
The following specification refers to the ABS distributed by us.
Density: 1,05 g/cm3
●
Melt mass flow rate MFR: 5-9 (220 °C/10 kg), g/1 0 min
●
Melt volume rate MVR: 5-9 (220 °C/10 kg), cm 3/10 min
●
Tensile strength: 2400 MPa (23°C)
●
Impact strentgth: 130 (bei 23°C), 100 (bei – 30 °C) kJ/ m2
●
Notched bar impact test Izod: 25 (bei 23°C), 12 (bei -30° C) kJ/m2
●
VIcat- softening temperature: ~ 100 °C
●
Melting temperature: from ~ 220 °C
●
Source
Acrylonitrile butadiene styrene
PLA (Polylactic acid)

X350 3D-Printer Quick Start Guide
Seite: 17/29
Stand: 2016/03/24 13:55
© German RepRap GmbH 17/29
PLA (Polylactic acid)
Polylactic acid or polylactide (short PLA) are plastics, malleable by heat supply (also called
thermoplastics). They are made of many chemically bound lactic acid molecules, so they belong to
the polymers. Polylactide plastics are biocompatible.
Specification
The following specification refers to the PLA distributed by us.
Density: 1,24 g/cm3
●
Melt mass flow rate MFR: n/a (220 °C/10 kg), g/10 min
●
Melt volume rate MVR: n/a (220 °C/10 kg), cm 3/10 min
●
Tensile strength: n/a MPa (23°C)
●
Impact strentgth: n/a kJ/ m2
●
Notched bar impact test Izod: n/a kJ/m2
●
VIcat- softening temperature: n/a* °C
●
Melting temperature: from ~ 180 °C
●
Source
Polylactic acid
Troubleshooting
Problem Solution
Device doesn't turn on Check the power supply
Hot-End doesn't heat up Check if the Hot-End plug connection is firm enough, and if needed,
contact our support at [email protected]
Printing bed doesn't heat up Contact our support at [email protected]
Printer stops printing
mid-process
Please check the following things: Power supply, SD card may be faulty,
Gcode may be invalid, otherwise contact our support at
Table of contents
Other German RepRap 3D Printer manuals

German RepRap
German RepRap X400 Pro V3 User manual

German RepRap
German RepRap Neo User manual

German RepRap
German RepRap X400CE User manual

German RepRap
German RepRap X1000 User manual

German RepRap
German RepRap Neo User manual

German RepRap
German RepRap X400v4 User manual

German RepRap
German RepRap X500pro User manual

German RepRap
German RepRap x350pro User manual