German RepRap Neo User manual

NEO 3D-Printer Quick guide
German RepRap GmbH
https://www.germanreprap.com

NEO 3D-Printer Quick guide
Seite: /30
Stand: 2014/06/07 23:06

NEO 3D-Printer Quick guide
Seite: /30
Stand: 2014/06/07 23:06
© German RepRap GmbH /30
Inhaltsverzeichnis
NEO 3D-Printer Quick guide ........................................................................................................... 2
Technical details ............................................................................................................................. 3
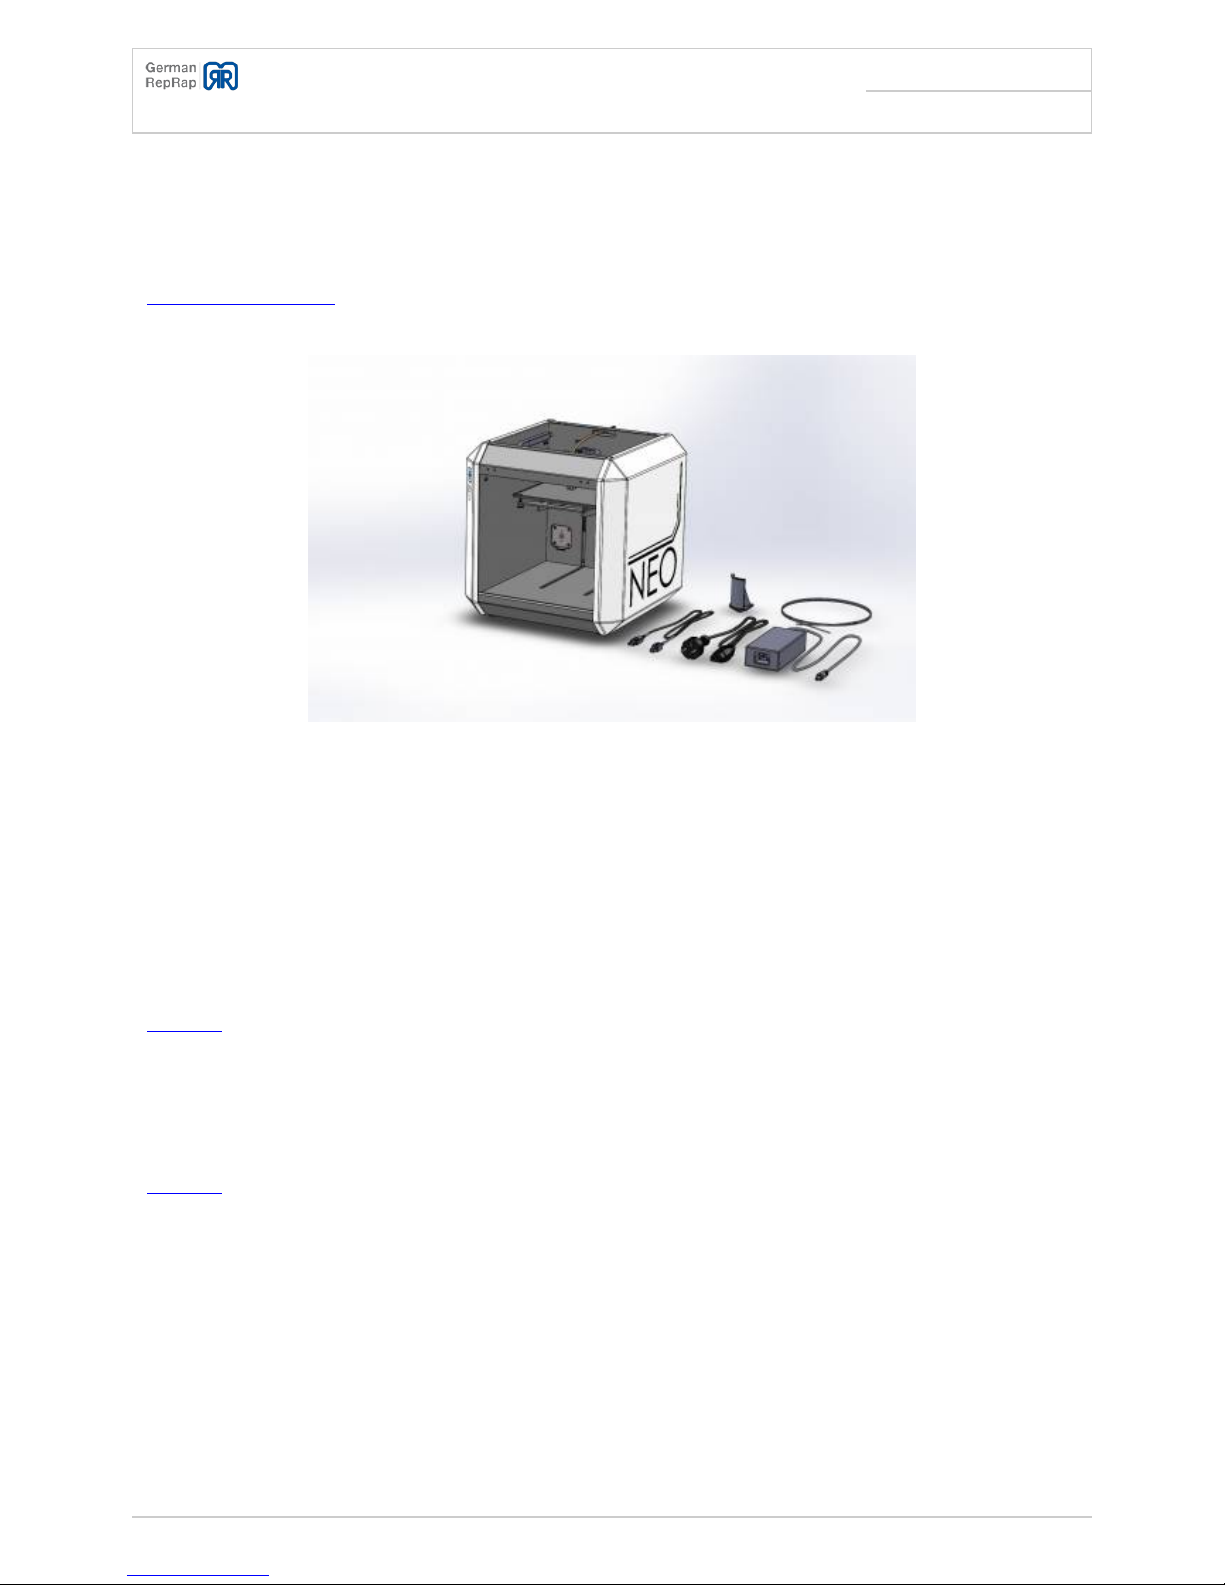
Package contents ............................................................................................................................ 3
System requirements ...................................................................................................................... 4
WINDOWS ................................................................................................................................... 4
LINUX .......................................................................................................................................... 4
MAC OS ....................................................................................................................................... 4
Set up ................................................................................................................................................ 4
Connectivity .................................................................................................................................... 5
Software installation ....................................................................................................................... 5
Components of the Repetier-Host software .................................................................................... 7
Tab: Manual Control ................................................................................................................... 7
Tab: Object Placement ............................................................................................................... 8
Tab: Slicer .................................................................................................................................. 9
Menu icon: Connect .................................................................................................................. 10
Menu icon: Load ....................................................................................................................... 10
Menu icon: Run Job ................................................................................................................... 10
Calibrate ....................................................................................................................................... 10
Attach the spool holder ................................................................................................................. 11
Load filament ................................................................................................................................ 12
First prints ..................................................................................................................................... 13
Using a CAD file ........................................................................................................................ 13
Using a GCODE file ................................................................................................................... 15
Create 3D objects ......................................................................................................................... 16
Troubleshooting NEO 3D-Drucker ............................................................................................... 16
Cannot connect to the NEO using the software or NEO doesn't execute commands .................... 17
Support ........................................................................................................................................... 17
Documentation ............................................................................................................................. 18
Telephone ..................................................................................................................................... 18
Support tickets / E-mail ................................................................................................................. 18
Forum (Community) ...................................................................................................................... 18
EU Declaration of conformity ...................................................................................................... 19
Important notes ............................................................................................................................. 20
Return / Original wrapping ............................................................................................................ 21
Operation ...................................................................................................................................... 21
Other matters ............................................................................................................................... 21
Toxic fumes ................................................................................................................................... 21
Safety cut-off ................................................................................................................................ 21
Maintenance ................................................................................................................................. 21
Safety notes ................................................................................................................................... 22
Power supply ................................................................................................................................. 23
Cleaning ........................................................................................................................................ 23
Playing children ............................................................................................................................ 23
Mains voltage ................................................................................................................................ 23
Humidity, solar radiation, heat, open fire ..................................................................................... 23
Ventilation ..................................................................................................................................... 24
Long absence, thunderstorms, accessibility of the power plug ..................................................... 24
Installation site ............................................................................................................................. 24
Disposal ........................................................................................................................................ 24

NEO 3D-Printer Quick guide
Seite: /30
Stand: 2014/06/07 23:06
© German RepRap GmbH /30
Legal Disclaimer ............................................................................................................................ 25
Software-Changes / Use of applications ........................................................................................ 26
Contact ......................................................................................................................................... 26

NEO 3D-Printer Quick guide
Seite: 2/30
Stand: 2014/06/07 23:06
© German RepRap GmbH 2/30

NEO 3D-Printer Quick guide
Seite: 3/30
Stand: 2014/06/07 23:06
© German RepRap GmbH 3/30
NEO 3D-Printer Quick guide
Congratulations to your
NEO desktop 3D-Printer
It’s simple and easy to create 3D models with the NEO 3D-printer.
Small and compact, the NEO is perfect for the home user - just unpack, set it up and start printing.
Use your creativity and generate real items based on your ideas.
What makes the NEO so special:
Simple: Just unpack it, quickly set it up and start printing
Economical: Start the future today. 3D printing doesn’t have to be expensive
Compact: Measuring just 330x330x330 mm (about 13x13x13 inches) it easily fits on a desk
Easy to print from your PC: Insert the USB cable and upload the file
Precise and fast: The NEO prints at 300 mm/second
Reliable: High-quality parts and a rigid frame. The NEO is the culmination of three
Creative: Solidify your ideas. Print plastic objects (PLA) of up to 150x150x150 mm (about 6x6x6
inches
Technical details
Print material:: PLA (Polylactic acid) 1,75mm
●
Printer dimensions: (W / H / D) 330 x 330 x 330 mm
●
Printing volume: (X / Y / Z) 150 x 150 x 150 mm
●
Supply voltage: 110/230V AC, 50/60hz
●
Power consumption: up to 50W
●
Assembly: Pre-assembled / Ready-to-print
●
Technology: FFF (Fused Filament Fabrication)
●
Weight: ca. 6kg
●
Nozzle: 0.5mm
●
Package contents

NEO 3D-Printer Quick guide
Seite: 4/30
Stand: 2014/06/07 23:06
© German RepRap GmbH 4/30
NEO desktop 3D printer (fully assembled)
●
Spool holder
●
Power supply with Schuko wall plug (Typ F)
●
USB cable
●
Manual and software on CD
●
PLA (Polylactic acid) sample
●
System requirements
WINDOWS
.NET 4.0
●
min. Windows XP
●
OpenGL 1.5
●
LINUX
OpenGL 1.5
●
preferably Ubuntu or Debian
●
MAC OS
min. OS X 10.5
●

NEO 3D-Printer Quick guide
Seite: 5/30
Stand: 2014/06/07 23:06
© German RepRap GmbH 5/30
Set up
Connectivity
To fire up the NEO plug the power supply lead into a compatible wall power outlet and the low voltage
cable into the printer. Next connect the NEO to your computer using the USB cable. It’s not necessary
to flip a switch in order to turn it on.
Software installation
All the required drivers and computer software are available on the CD-ROM. There are also some
sample 3D models in order to get started straight away.
First you need to install the Printerboard driver to facilitate communication between the computer
and the printer.
Despite of correct installation it could be possible that a Windows error occurs. The error
notifies the drivers could not be istalled correctly and have to be integrated manually. This
message can be ignored.

NEO 3D-Printer Quick guide
Seite: 6/30
Stand: 2014/06/07 23:06
© German RepRap GmbH 6/30
Next, install the software called “Repetier-Host” from the CD-ROM which allows you to control the
NEO. It is advisable but not strictly necessary to check the German RepRap website at
http://www.germanreprap.com/de/support/downloads to make sure you have the latest version for the
software packages you are about to install.
Once the Repetier-Host software is running select the pre-configured profile and the correct port and
baud rate for the NEO.
Only Mac OS X and Linux:
For these operating systems the printer settings have to be entered by hand:
Tab Printer:
Traval Feed Rate: 6000 [mm/min]
●
Z-Axis Feed Rate: 300 [mm/min]
●
Default Extruder Temperature: 215 °C
●
Default Heated Bed Temperature: 0 °C
●
Number of Extruder: 1
●
Check Extruder & Bed Temperature: [X]
●
Remove temperature requests from Log: [X]
●
Check every 1 seconds.
●
Park Position: X:0, Y=0, Z-Min=0 [mm]
●
Send ETA to printer display: [X]
●
Go to Park Position after Job/Kill: [ ]
●

NEO 3D-Printer Quick guide
Seite: 7/30
Stand: 2014/06/07 23:06
© German RepRap GmbH 7/30
Disable Extruder after Job/Kill: [X]
●
Disable Heated Bed after Job/Kill: [X]
●
Disable Motors after Job/Kill: [X]
●
Add to comp. Printing Time: 0 [%]
●
Tab Printer Shape:
Pinter Type: Classic Printer
●
Home X: Min
●
Home Y: Min
●
Home Z: Min
●
X Min: 0
●
X Max: 150
●
Bed Left: 0
●
Y Min: 0
●
Y Max: 150
●
Bed Front: 0
●
Print Area Width: 150 [mm]
●
Print Area Depth: 150 [mm]
●
Print Area Height: 150 [mm]
●
Tab Advanced:
FilterPath and Parameter: yourFilter #in #out
●
Run Filter after every Slice: [ ]
●
Components of the Repetier-Host software
Below is a short description of the different components of Repetier-Host software. A more detailed
manual can be found on their website at http://www.repetier.com/.
Tab: Manual Control
To calibrate the print platform select the tab “manual control” on the right hand side of the user
interface. Clicking on the different arrows below moves the axis (+/- X or Y) and the platform (Z)
accordingly. The house icon can be used to move to the home position of the associated axis (X, Y or
Z) or all three axes at once by clicking on the house symbol without any letter written next to it. This
homing is required for the calibration step as explained further down.

NEO 3D-Printer Quick guide
Seite: 8/30
Stand: 2014/06/07 23:06
© German RepRap GmbH 8/30
Tab: Object Placement
The tab “Object Placement” is used to prepare the model to be printed. CAD files in either of the
formats .STL, .OBJ or .AMF can be loaded from the computer’s file system and placed on the virtual
print platform on the left. You can add more than one model as long as they all fit on the print
platform. Make sure no model “sticks out” over the platform boundaries.

NEO 3D-Printer Quick guide
Seite: 9/30
Stand: 2014/06/07 23:06
© German RepRap GmbH 9/30
Tab: Slicer
Make sure to select the “NEO” profile in the print settings of the Slicer tab and “NEO DD Extruder 0.5”
for the printer settings. The filament settings should be set to “PLA 1.75mm DD Extruder”. You only
have to do this step once. The next time you start Repetier-Host they’ll already be selected.
Next click on large button at the top labelled “Slice with Slic3r” to create the G-code based on all the
settings we just made. The resulting file is now tailored to your specific printer and you are ready to
start the print process.

NEO 3D-Printer Quick guide
Seite: 10/30
Stand: 2014/06/07 23:06
© German RepRap GmbH 10/30
Menu icon: Connect
This button initiates the communication between your computer and the printer using the parameters
(port and baud rate) selected earlier.
Menu icon: Load
If you already have a G-code file (the file name ends in .gcode) tailored to your NEO you can load it
into Repetier-Host and therefore skip the “slicing” step above.
Menu icon: Run Job
„Run Job“ starts the actual printing process. Read the next chapter before actually doing it.

NEO 3D-Printer Quick guide
Seite: 11/30
Stand: 2014/06/07 23:06
© German RepRap GmbH 11/30
Calibrate
Before you can start the first print the printer has to be calibrated once: To avoid damaging the print
bed with the print head turn the knurled nuts beneath the print bed to lower it as far as possible. Then
connect the computer to the printer using the “Connect” button (if not already done) and click on the
lower left “Home” button in the “Manual Control” tab of the Repetier-Host (the house symbol without
any letter next to it).
It is very important to adjust the distance between the print nozzle and the print bed in order to get
the first layer of the model to stick to the print bed. This distance should be 0.05mm (2/1000” or 2
thous). In other words, you can just pull a thin strip of paper beneath the nozzle.
Repeat this process for all four corners of the print bed by moving the print head in the X- and
Y-direction using the Repetier-Host software.
Attach the spool holder
Insert the spool holder into the slot in the centre of the back plate and lock it in place by pushing it
downwards.

NEO 3D-Printer Quick guide
Seite: 12/30
Stand: 2014/06/07 23:06
© German RepRap GmbH 12/30
Load filament
Pre-heat the NEO to its working temperature (the nozzle will then be at about 220°C) before loading
the filament. Next push the lever on the extruder motor on the back of the printer and feed the
filament into the tubing until it hits the nozzle. If you keep pushing the filament in manually you’ll see
it exiting the nozzle as a very fine jet of melted plastic. This means there is no blockage in the system.

NEO 3D-Printer Quick guide
Seite: 13/30
Stand: 2014/06/07 23:06
© German RepRap GmbH 13/30
On the picture on the right you can see the inserted filament. You have to push the extruder on the
lower end while inserting the filament.
(Hint: The filament can be inserted more easy, if you bend it straight)
Always leave the filament in the extruder after finishing the printing. This prevents the tubing and
nozzle from getting clogged, e.g. from dust.
First prints
For the first prints you can use the files on the CD-ROM that was shipped with the printer. The CAD
files need to conversion into G-code first. The G-code then contains information specifically tailored
for the NEO. Other files with a file name ending in “.gcode” have already been converted for the NEO.
They will not work on other 3D printers.

NEO 3D-Printer Quick guide
Seite: 14/30
Stand: 2014/06/07 23:06
© German RepRap GmbH 14/30
Using a CAD file
If the CAD file you want to print is in a format that the Repetier-Host software understands, e.g. files
that end in “.STL” or “.stl”, you can load and place it on the print bed using the “Plus” sign under the
tab “Object Placement” as shown below.
Click on the “Slicer” tab, double check the settings there and click on “Slice with Slic3r”. Optionally
you can check the box “Start job after slicing” to kick off the printing process immediately.
Only Mac OS X and Linux:
For these operating systems the Slic3r settings have to be integrated before the appear in the
drop-down menu. The Slic3r settings are available at
https://www.germanreprap.com/en/support/downloads and the must be saved as stated below.
Mac OS X: ~/Library/Application Support/Slic3r/
Linux: ~/.Slic3r

NEO 3D-Printer Quick guide
Seite: 15/30
Stand: 2014/06/07 23:06
© German RepRap GmbH 15/30
Using a GCODE file
If the file has already been sliced for the NEO you can load the gcode by clicking the “Load” button in
the top left corner. Now you can start the print by clicking on the “Run Job” button.
The NEO will start printing as soon as the extruder has reached the correct temperature.

NEO 3D-Printer Quick guide
Seite: 16/30
Stand: 2014/06/07 23:06
© German RepRap GmbH 16/30
Create 3D objects
There are a lot of CAD programs, which can create the files for 3D printing. Almost all of them use
their own proprietary format to store the models, however, they can also export the model in other
formats. (Think of it like Microsoft Office, which uses its own document format but can also read and
write other formats like txt, pdf and html). The most common file format used by 3D printers is .STL.
There are many websites where these files can be downloaded.

NEO 3D-Printer Quick guide
Seite: 17/30
Stand: 2014/06/07 23:06
© German RepRap GmbH 17/30
Troubleshooting NEO 3D-Drucker
If you have further questions or problems with your product
after carefully reading these support pages and diligently
following all steps that apply to your product please contact
your reseller first and subsequently, if necessary, the support
team at German RepRap GmbH (
https://support.germanreprap.com).
Cannot connect to the NEO using the software or NEO
doesn't execute commands
Please check the printer settings in Repetier-Host. Compare them with the screenshot below. The
COM port does vary on different USB controllers.
Please note the option “Reset on connect” which has to be turned “off”.
Other manuals for Neo
1
Table of contents
Other German RepRap 3D Printer manuals

German RepRap
German RepRap Neo User manual

German RepRap
German RepRap X350 User manual

German RepRap
German RepRap X500pro User manual

German RepRap
German RepRap X400 Pro V3 User manual

German RepRap
German RepRap x350pro User manual

German RepRap
German RepRap X400v4 User manual

German RepRap
German RepRap X1000 User manual

German RepRap
German RepRap X400CE User manual