Gigaset DESK 200 User manual

1
en
Gigaset DESK 200 / IM en/ A30054-M6539-R101-3-PF19 / DESK200_en.fm / 17.10.2022
Gigaset DESK 200 overview
1Speed dial key
2Mute key with LED
The LED flashes if the micropho-
ne is switched off
3Set key
The mute key LED flashes while
the telephone is in set mode
4Redial/Pause key
5Recall key
6Handset volume key
7Switch for changing between
pulse and tone dialling mode
2
3
1
6
7
4
5
Call-indicator
flashes on
incoming calls
Insert strip for
writing the assi-
gnment of speed
dial keys

2
en
Gigaset DESK 200 / IM en/ A30054-M6539-R101-3-PF19 / DESK200_en.fm / 17.10.2022
Carefully read through
theoperatinginstructions
and heed the instructions
when using your phone.
Keep the operating instructions for
future reference. Only use the jacks
and leads supplied.
Intended use
Your DESK 200 phone, or phone
below, is suitable for making calls
within a phone network. The phone
is suited solely to private use in
enclosed indoor areas.
Any other use is deemed non-
intended use.
Do not perform any modifications of
or conversions to the device.
Safety precautions
Only connect the connector
cable to the phone socket
intended for it.
Do not use the devices in envi-
ronments with a potential
explosion hazard
(e.g. paint shops).
The devices are not splash-
proof. For this reason do not
install them in a damp environ-
ment such as bathrooms or
shower rooms.
Remove faulty devices from
use or have them repaired by
our Service team, as these
could interfere with other
wireless services.
Check the package
contents
Check the package contents of your
phone, before you start using it:
handset
handset base
connector cable
handset cable
operating instructions
If something is missing or damaged,
please contact our Customer Service
team (page 7).

3
en
Gigaset DESK 200 / IM en/ A30054-M6539-R101-3-PF19 / DESK200_en.fm / 17.10.2022
Connecting the telephone
Connect the phone headset to
the cradle. Use the short end of
the headset cable to connect it to
the phone headset (1) and the
other end of the handset
cradle(2).
Plug your phone into the phone
connector. Connect the cable to
the headset base (3) and your
phone socket. If needed, use one
of the phone adapters included
in the delivery. Route the connec-
tor cable through the cable duct
(table-top (4) or wall fitting (5)) of
the cradle.
Wall mounting
WWarning! Electric shocks and gas
explosions pose a risk to life. When
fitting to a wall, ensure you avoid any
power cables or gas pipes located in
the wall. Ensure that you do not
unintentionally damage power
cables and gas pipes.
This device is only suitable for a max-
imum installation height of 2 m.
Drill two holes into the wall, sepa-
rated horizontally by 52 mm, and
insert two suitable screws (not
included in the delivery).
Fit the phone on the projecting
screws.
1
1
5
2
3
4

4
en
Gigaset DESK 200 / IM en/ A30054-M6539-R101-3-PF19 / DESK200_en.fm / 17.10.2022
Setting up the telephone
for use
Recommended installation of tele-
phone:
Do not expose the telephone to
direct sunlight or other sources
of heat.
Operate at temperatures of
between +5°C and +40°C.
Maintain a distance of at least
one metre between the tele-
phone and radio equipment, e.g.
radio telephones, radio paging
equipment or TV sets.
Otherwise, telephone communi-
cation could be impaired.
Do not install the telephone in
dusty rooms as this can limit the
service life of the telephone.
Furniture lacquer and polish can
be adversely affected by contact
with parts of the unit (e.g. feet).
Dialling and saving
numbers
Dialling a number
( Lift the handset, dial
the number.
Last number redial
The last number dialled is automati-
cally saved.
(RLift the handset, press
the last number redial
key.
Speed dialling
You can save 10 numbers for speed
dial on the number keys (0-9) (each
with max. 21 digits).
Saving number
KPress the set key.
PPress the speed dial
key.
Q... ODefine the speed dial
number.
Enter the number for
the speed dial.
KPress the set key.
Note: The LED on the mute key flashes
while the telephone is in set mode.
Dialling a speed dial number
(P Lift the handset, press
the speed dial key.
Q... OPress the speed dial
number key.
Notes on saving and deleting
speed dial numbers
and #are saved regardless
of the set dialling mode but are only
dialled with tone dialling mode
(page 5).
If the number entered is longer than
21 digits, the saved number is
deleted.
Dialling pauses
One or more dialling pauses can be
entered using
R
(not at 1st digit).
Pauses are transferred to the memory
and are necessary for certain exten-
sion systems (e.g.: 0
R
2368).
Dialling a dialling pause within
the first 5 digits:
The entire number saved is
dialled, including the
2-second dialling pause.
Dialling a dialling pause after the
first 5 digits:
The portion of the number saved
after the pause is only dialled
after pressing the Rkey.

5
en
Gigaset DESK 200 / IM en/ A30054-M6539-R101-3-PF19 / DESK200_en.fm / 17.10.2022
Adjusting the telephone
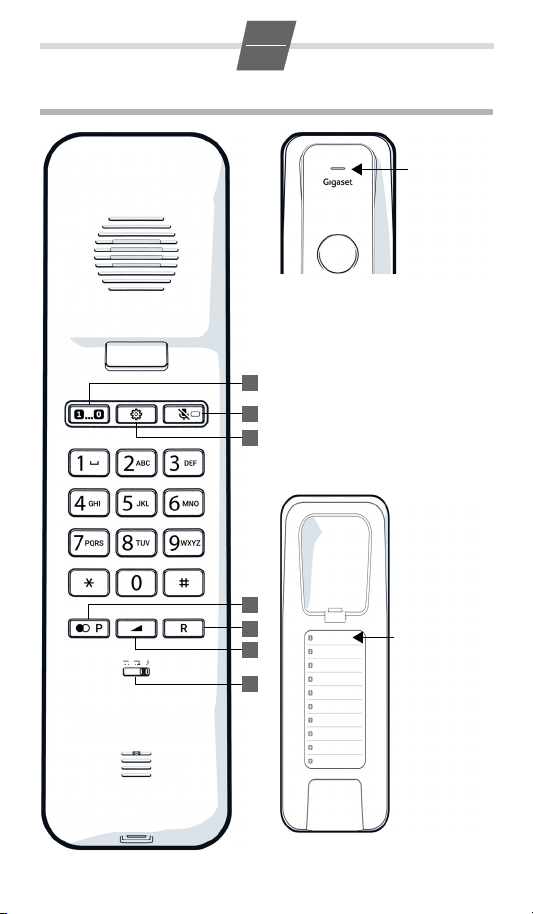
Setting the handset volume
The handset volume can be set to
two levels.
SPress the handset vol-
ume control key.
The primary volume is reset after
hanging up.
Mute
You can deactivate the telephone's
microphone during a call.
QPress the mute key.
To reactivate microphone: Press the
mute key again or press any other
key.
The mute key LED flashes while the
microphone is deactivated.
Setting the ringer
You can set the ringer melody and
volume to 9 levels or turn it off
(factory default: level 6).
(K Lift the handset, press
the set key.
#Press the hash key.
Q... OPress one of the num-
ber keys.
(0: Ringer off until
handset is next lifted).
KPress the set key.
Note: The LED on the mute key flashes
while the telephone is in set mode.
Operation on a PABX
Special functions/Recall key
During an external call, you can
make an enquiry or forward the call.
To do this, press the recall key H.
The subsequent procedure depends
on your PABX.
To set the recall key, the telephone’s
flash time must be set consistent
with your PABX. Please refer to the
operating instructions for your PABX.
Changing the dialling mode/
flash time
The telephone supports the follow-
ing dialling modes:
Depending on your PABX, you may
need to change your telephone’s
dialling mode or the flash time.
Temporary tone dialling switching
in "Pulse" position
To use functions that require tone
dialling (e.g. remote control of
answering machine), you can set the
telephone to tone dialling for the
duration of the call without adjust-
ing the switch.
After the connection is established:
Press the star key.
After the connection is broken, the
setting reverts to pulse dialling.
Operation on public
telephone systems
Public telephone systems - in some
cases by special order/request – offer
you a range of useful additional ser-
vices (e.g. call divert, call back on
busy, three-party conference etc.).
These services can be selected using
specified key combinations, which
your network provider will notify you
of.
You can save the entire key combina-
tion, including the number of a fixed
call divert destination, to your speed
dial keys just like a normal number.
T1: Tone dialling, flash time 100 ms
T2: Tone dialling, flash time 270 /
600ms
P: Pulse dialling
To do this, use the slid-
ing switch below the
keypad.

6
en
Gigaset DESK 200 / IM en/ A30054-M6539-R101-3-PF19 / DESK200_en.fm / 17.10.2022
Recall key
In public telephone systems, the
recall key is required to use certain
additional services; e.g. for "Call back
on busy".
You may need to adjust the flash
time of your telephone to the needs
of the public telephone system. To
do this, use the sliding switch below
the keypad (page 5).
Appendix
Care
Wipe the device with a slightly mois-
tened cloth or an antistatic cloth. Do
not use solvents or microfibre cloths.
Never use a dry cloth; this can cause
static.
In rare cases, contact with chemical
substances can cause changes to the
device’s exterior. Due to the wide
variety of chemical products availa-
ble on the market, it was not possible
to test all substances.
Impairments in high-gloss finishes
can be carefully removed using dis-
play polishes for mobile phones.
Contact with liquid
If the device comes into contact with
liquid:
1 Unplug all cables from the de-
vice.
2 Allow the liquid to drain from the
device.
3 Pat all parts dry,
4 Place the device in a dry, warm
place for at least 72 hours (not
in a microwave, oven etc.) with
the keypad facing down (if appli-
cable).
5 Do not switch on the device
again until it is completely dry.
When it has fully dried out, you will
normally be able to use it again.
Questions and answers
You lift the handset but you hear no
dialling tone: Is the connecting lead
correctly plugged into the telephone
and the telephone socket?
The dialling tone is audible but the
telephone will not dial: The connec-
tion is OK. Is the dialling mode set
correctly?
The other party cannot hear you:
Mute activated?
Regular pulse noises can be heard
during a call: The connection is
receiving metering pulses from the
exchange, which the telephone can-
not interpret. Contact your network
operator.
Protecting our environment
Environmental management
system
Gigaset Com-
munications
GmbH is cer-
tified pursu-
ant to the
international standards ISO 14001
and ISO9001.
ISO 14001 (Environment): Certified
since September 2007 by TÜV SÜD
Management Service GmbH.
ISO 9001 (Quality): Certified since
17/02/1994 by TÜV SÜD Manage-
ment Service GmbH.
Disposal
All electrical and electronic products
should be disposed of separately
from the municipal waste stream via
designated collection facilities
appointed by the government or the
local authorities.
This crossed-out
wheeled bin symbol on
the product means the
product is covered by
the European Directive
2012/19/EU.

7
en
Gigaset DESK 200 / IM en/ A30054-M6539-R101-3-PF19 / DESK200_en.fm / 17.10.2022
UK: The Waste Electrical and Elec-
tronic Equipment Regulations 2013.
The correct disposal and separate
collection of your old appliance will
help prevent potential negative con-
sequences for the environment and
human health. It is a precondition for
reuse and recycling of used electrical
and electronic equipment.
For more detailed information about
disposal of your old appliance,
please contact your local council
refuse centre or the original supplier
of the product.
Authorisation
This device is intended for analogue
phone lines in the UK and on the Irish
network.
Country-specific requirements have
been taken into consideration.
We, GigasetCommunications GmbH,
declare that this device meets the
essential requirements and other rel-
evant regulations laid down in Direc-
tives 2014/30/EU and 2014/35/EU.
The full text of the EU and UK decla-
ration of conformity is available at
the following internet address:
www.gigaset.com/docs.
This declaration could also be availa-
ble in the "International Declarations
of Conformity" or "EuropeanDeclara-
tions of Conformity" files.
Therefore please check all of these
files.
Contacts
If you should encounter any prob-
lems when operating the telephone
conner.ected to a communication
system with analogue network
access, please contact the network
operator responsible or your deal.

8
en
Gigaset DESK 200 / IM en/ A30054-M6539-R101-3-PF19 / DESK200_en.fm / 17.10.2022
Issued by
Gigaset Communications GmbH
Frankenstraße 2, D-46395 Bocholt
© Gigaset Communications GmbH 2022
All rights reserved. Subject to availability.
Rights of modification reserved.
www.gigaset.com
A30054-M6539-R101-3-PF19
Table of contents
Other Gigaset Telephone manuals

Gigaset
Gigaset A390 User manual

Gigaset
Gigaset DA310 Installation guide

Gigaset
Gigaset Gigaset 8825 Operating instructions

Gigaset
Gigaset SL450A Duo Black User manual

Gigaset
Gigaset 5040 User manual

Gigaset
Gigaset T300PRO User manual

Gigaset
Gigaset A120 User manual

Gigaset
Gigaset A18H User manual

Gigaset
Gigaset DL580 User manual

Gigaset
Gigaset E630A GO User manual

Gigaset
Gigaset SL400h User manual

Gigaset
Gigaset C300 User manual

Gigaset
Gigaset DX800 User manual

Gigaset
Gigaset S810H User manual

Gigaset
Gigaset A116 User manual

Gigaset
Gigaset E290 User manual

Gigaset
Gigaset Gigaset DA410 Installation guide

Gigaset
Gigaset DX800+ User manual

Gigaset
Gigaset Gigaset 5010 User manual

Gigaset
Gigaset A120 User manual