Gima 43160 User manual

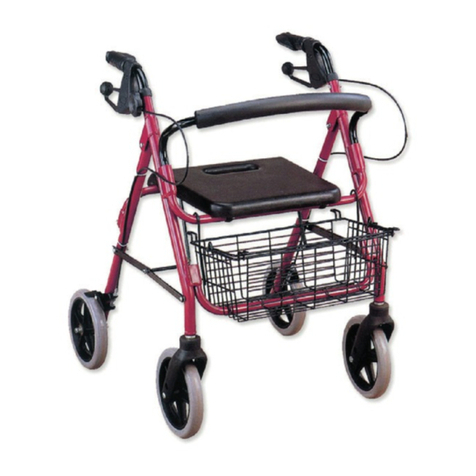
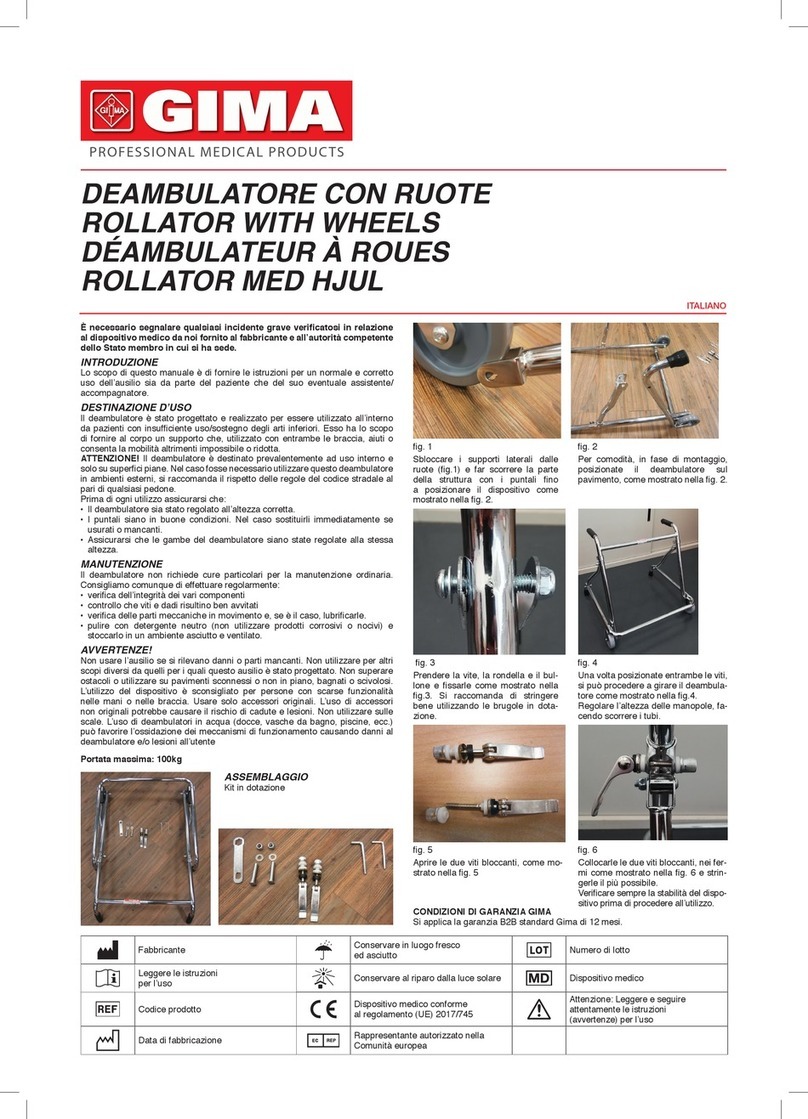
DEAMBULATORE LEGGERO
LIGHTWEIGHT ROLLATOR
DÉAMBULATEUR LÉGER
ANDADOR ROLLATOR LIGERO
PROFESSIONAL MEDICAL PRODUCTS
Gima S.p.A.
Via Marconi, 1 - 20060 Gessate (MI) Italy
gima@gimaitaly.com - export@gimaitaly.com
www.gimaitaly.com
Manuale d’uso - User’s manual - Mode d’emploi - Manual del usuario
M43160-M-Rev.0.01.19
ATTENZIONE: Gli operatori devono leggere e capire completamente questo manuale prima di utilizzare il prodotto.
ATTENTION: The operators must carefully read and completely understand the present manual before using the product.
AVIS: Les opérateurs doivent lire et bien comprendre ce manuel avant d’utiliser le produit.
ATENCIÓN: Los operadores tienen que leer y entender completamente este manual antes de utilizar el producto.
43160
Gima S.p.A. - Via Marconi, 1
20060 - Gessate (MI) - Italy
Made in China

6
ENGLISH
GENERAL SAFETY WARNING
Please ensure these instructions are fully read and implemented. Failure to do so may result in
injury to the user. Retain in a safe place for future reference.
INTENDED USE
The Lightweight 4 wheel Rollator is designed to provide support and assistance to those unable to, or
who lack the condence, to walk without some level of support. This rollator is intended for indoor and
outdoor use, and folds away for easy storage or transportation.
Safety Precautions - Do’s and Don’ts
• Do not exceed the maximum user weight limit of 136Kg.
• Do not use the rollator on stairs or an escalator.
• Do not attempt to push the rollator while someone is sitting in the seat.¬
• Do not use the seat to transport people or objects.
• Do not use the seat without the backrest in place.
• Do not sit on the seat when the rollator is on an incline.
• Only use the rollator as a walking support.
• Only use the specified accessories and spare parts for this rollator
• Loads should only be transported using the bag. Do not hang heavy items from the handles as this
may affect the stability of the Rollator.
Safety Precautions - Pre Use Checks
• Ensure Rollator is locked open before use.
• Check the brakes before use.
• Make sure that all parts are secure and that moving parts are in good working order.
Safety Precautions - During use
• Do not self-propel the rollator while seated. Serious injury to the user and/or damage to the rollator
frame or wheels may result from improper use.
• Do not use the rollator to walk backwards.
• Caution must be taken when negotiating curbs and other obstacles, or when using on sloping, une-
ven or slippery surfaces. Failure to do so may result in a serious risk of a fall or injury.
• Do not perform any adjustments to the rollator while it is in use.
• Exercise caution when there is a heavy load in the bag (max. load 5Kg)
Item Description Qty.
1Rollator assembly 1
2Storage Bag (tted to frame) 1
3Pentagon Hand Bolt 2
4Backrest 1
5Front wheels set 1
6Rear wheel with brake handle
and cable assembly 2
7User instructions 1

7
ENGLISH
• All wheels must be in contact with the floor at all times.
• Brakes must be in the locked position before using the seat.
• When using the rollator in a stationary position, the brakes must be locked.
Unpacking
• Check all parts carefully before assembling the product.
• Do not assemble if any of the parts are damaged.
• Do not assemble if any of the parts in the Contents list are missing.
• When unpacking makes sure the handles and brake cables are not twisted as this can affect the
operation of the brakes, when assembled.
Assembly and Height Adjustment
NOTE: Before assembly consult a suitably qualified healthcare professional regarding the correct
height adjustment for maximum support; and correct brake activation.
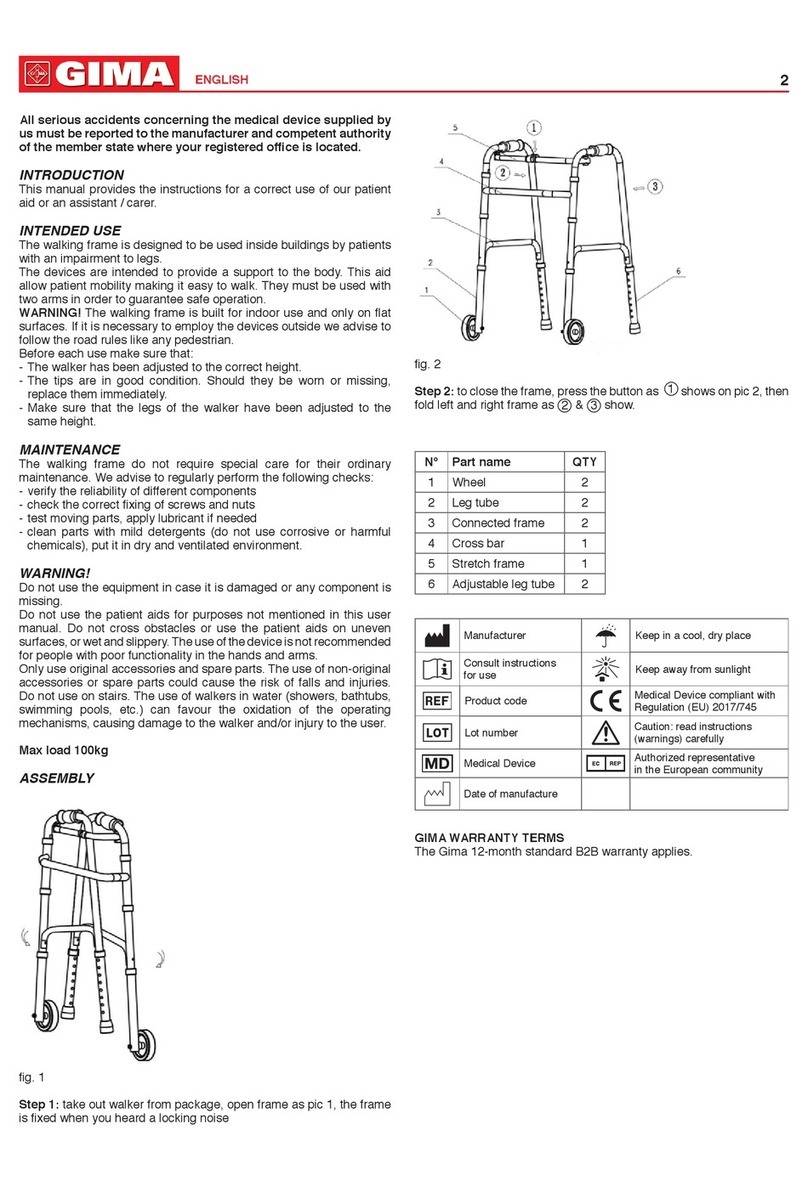
1.To assemble; insert the front & rear wheels, using the button clips on the rear wheels and the “C”
Clips on the front to position. Loosely insert the handlebars, do not fix the handlebars at this stage.
2.Fit the back rest into the frame and secure with snap clips.
3.To set the seat height, with the rollator frame open, push down on the seat until all four wheels are
extended and the cross member is in line, as shown in image 1. The seat height can be adjusted by
sliding the wheel assemblies in the frame tubes and positioning using the button & “C” clips. Make
sure that all the clips “click” into position and all four wheels make contact with the floor and the
rollator is stable.
4.Set the correct height of the handlebars, as follows:
• Stand upright behind the rollator with your shoulders relaxed and your arms by your side,
• Looking straight ahead.
• In this position, the handgrips of the rollator (image 1) should be adjusted to a height level with your
wrists.
• This will position your arms at an approximate 20º to 30º bend when using the rollator.
• Check that the holes in the handle bars and the frame are aligned.
• Place the supplied Hand bolts through the aligned holes in the handlebar and frame, and hand
tighten firmly - but do not over tighten.
5.Check the brakes thoroughly before use. NOTE: The brakes are factory set, and if assembled cor-
rectly do not need adjusting prior to use. To check; Apply and release the parking brake on each side
10 times. (Push brake lever down to lock, lift to release) The brake should grip the wheel and prevent
any movement when applied. When released, the gap between the brake molding and the wheel
should be between 3 to 4 mm. If either of the above conditions is not correct adjust the brakes as
detailed in the maintenance section, and re-check.
6.Check all other nuts, bolts and screws are tightly fastened.
7.Check all wheels are in good working order and roll freely.
8.Check the bag is securely fixed and all fixing buttons are tightly fastened

8
ENGLISH
OPERATING INSTRUCTIONS
Opening the Rollator
• Hold one handlebar and push down on the seat until all four wheels are extended out and the seat
is fully flat.
• Before using the rollator make sure that all four wheels make contact with the floor and the rollator
is stable in the open position, as shown in image 1
Folding the Rollator
• Lift the seat and pull up the seat support bar until the rollator closes as shown in image 2.
• For more compact storage, pull up the backrest
Walking
This unit is to be used as a mobility aid, creating a natural gait as the user walks securely with their
primary weight distribution between the handlebars and with the unit in front of the user.
Sitting
When using the rollator as a seat, ensure the safety precautions detailed on page one are adhered to,
in particular;
• Ensure the parking brakes are in the locked position.
• Do not use as a seat without the backrest being in position
• Do not use as a seat on sloping or uneven ground
• Do not exceed the maximum user weight
• Do not use the rollator as a wheelchair
Checking and Operating the Brakes
• Before using the rollator always check the brakes are working correctly.
• Check the normal brake function by pulling up the brake handles as shown in image 3a, the rollator
should be held firm with no movement.
• To apply the parking brakes, push down the handles until they lock down. A distinct click indicates
that the brake is in the correct position, the rollator should be held firm with no movement. (See ima-
ge 3b) It is important that both brakes are used for parking. Lift up the handles to release the parking
brakes.
Brake Operation
• To slow down, pull up both of the loop handles. (See image 3a)
• To apply the parking brakes, push down both handles until they lock down. A distinct click indicates
that the brakes are in the correct position. (See image 3b) It is important that both brakes are put in
the parking position when they are used.
• Lift up both handles to release the parking brakes.
• If you apply the parking brakes, or pull up the brakes to stop whilst moving, and the rear wheels on
the rollator still move, stop use immediately. Do not use again until the brakes have been checked
and correctly adjusted. Refer to the maintenance section.
Cleaning Instructions
• Clean regularly, wipe down with a soft, non-abrasive cloth.
• Ensure there is no buildup of dirt or debris around the axle, brakes and wheels.
Maintenance
• Regularly check for wear and tear and that all screws and knobs are securely fastened.

9
ENGLISH
• Check brakes are working satisfactorily by both walking and squeezing the brakes and by braking
to a stop.
• Check the parking brakes by pushing the handles into the locked position, and then trying to push
the rollator.
• If the brakes do not completely lock the wheels the brakes need to be adjusted.
Brake Adjustment (image 4)
• There are two brake adjusters on each side of the Rollator, one in front of the brake handle and the
second is positioned on the rear legs behind the wheels
• To adjust the handle brake, loosen the lock nut, you may need a tool to carry out this operation,
turn the adjuster anticlockwise to tighten the brake then retighten the lock nut. (See image 4)
• To adjust the rear legs brake, loosen the lock nut, you may need a tool to carry out this operation,
turn the adjuster anticlockwise to tighten the brake then retighten the lock nut. For correct adjustment
the brake mechanism should not touch the wheel, but the gap should be no greater than 3 to 4mm.
Caution: After making any adjustments to the brakes, you must test them before the rollator is used.
If adjustment does not tighten the brakes, do not use the rollator. Contact your dealer.
2 Closed position
1
3a 3b

IT - Conservare in luogo fresco ed asciutto.
GB - Keep in a cool, dry place.
FR - Á conserver dans un endroit frais et sec.
ES - Conservar en un lugar fresco y seco.
IT - Prodotto conforme alla Direttiva Europea
GB - Product complies with European Directive
FR - Ce produit est conforme à la directive
européenne
ES - Producto conforme a la Directiva Europea
IT - Leggere e seguire attentamente le istruzioni per l’uso
GB - Read instructions carefully
FR - Lire et suivre attentivement la notice
ES - Leer y seguir atentamente las instrucciones de uso
IT - Fabbricante
GB - Manufacturer
FR - Fabricant
ES - Fabricante
IT -
Conservare al riparo dalla luce solare
GB -
Keep away from sunlight -
FR -
Á conserver à l’abri de la lumière du soleil
ES -
Conservar al amparo de la luz solar
IT - Leggere attentamente le istruzioni per lʼuso
GB - Please read instructions carefully
FR - Lire attentivement la notice
ES - Leer atentamente las instrucciones de uso
IT - Codice prodotto
GB - Product code
FR - Code produit
ES - Código producto
IT - Numero di lotto (vedi scatola / bustina)
GB - Lot number (see box / package)
FR - Numéro de lot (voir boîte/sachet)
ES - Número de lote (ver caja / sobre)
Other manuals for 43160
1
Table of contents
Other Gima Mobility Aid manuals