Ginnys 600263 User manual

3-Quart
Deep Fryer
Instruction Manual
ITEM: 600263
Ginnys.com • 1.800.544.1590
BRAND

7
INSTALLATION & GROUNDING
6
10 IMPORTANT SAFEGUARDS
Ginnys.com • 1.800.544.1590
2 3
TABLE OF CONTENTS
President, Ginny’s
“Life is happening.
We’ll help you live it...one moment at a time.” IMPORTANT SAFEGUARDS
When using electrical appliances, basic safety precautions should
always be followed, including the following:
1. Read all instructions before operating.
2. Do not touch hot surfaces. Use handles or knobs if applicable.
3. Remove all packaging, plastics and other materials from unit
before operating.
4. Wash all removable accessories before using for the rst time.
5. To protect against electrical shock, do not immerse cord, plug or
appliance itself in water or other liquids.
6. Close supervision is necessary when appliance is used by or
near children.
7. Unplug from outlet when not in use and before cleaning. Allow
to cool before putting on or taking off parts.
8. Do not operate any appliance with a damaged cord or plug or
after the appliance malfunctions or has been damaged in any
manner. Contact Ginny’s Customer Service for replacement or
return.
9. The use of accessory attachments not recommended by the
appliance manufacturer may cause injuries.
10. Do not use outdoors.
11. Do not let cord hang over edge of table or counter or touch hot
surfaces.
12. Do not place on or near a hot gas or electric burner, or in a
heated oven.
13. Always attach plug to appliance rst, then plug cord into wall
outlet. To disconnect, turn any control to OFF position, then
remove plug from wall outlet.
14. Oversized foods or metal utensils must not be inserted in the
appliance as they may cause a re or risk of electrical shock.
15. A re may occur if the appliance is covered or touching
ammable material including curtains, draperies, walls and the
like when in operation.
16. Do not clean with metal scouring pads. Pieces can break off the
pad and touch electrical parts, causing a risk of electrical
shock, or damage to product.
17. Do not store any materials other than manufacturer's
recommended accessories in this unit when not in use.
18. Do not place any of the following materials in the unit: Paper,
cardboard, plastic and/or similar non-food materials.
Important Safeguards. . . . . . . . . . . . . . . 3-4
Specications.. . . . . . . . . . . . . . . . . . . . .5
Part Names . . . . . . . . . . . . . . . . . . . . . 6-7
Installation . . . . . . . . . . . . . . . . . . . . . . . 7
How to Operate. . . . . . . . . . . . . . . . . . . 8-10
Cleaning & Care. . . . . . . . . . . . . . . . . . .11
Warranty . . . . . . . . . . . . . . . . . . . . . . . . 12
Thank you for purchasing a Ginny’s Brand
3-Quart Deep Fryer. Because foods fried at
consistently hot temperatures hold less oil, we’ve
designed our efcient powerhouse to help you
turn out perfectly light and delicious entrees—
lickety split. Not only will it bring your oil to
temperature within minutes, but it will keep that
temperature going with an impressively fast
recovery time between batches. And when it’s
time to clean up, everything except the control
panel and heat element go right in the
dishwasher. Quick, convenient— and delicious.
Enjoy!

IMPORTANT SAFEGUARDS Ginnys.com • 1.800.544.1590
THIS DEEP FRYER IS ONLY SUITABLE FOR USE WITH OIL, AND
NOT FOR USE WITH SOLID FAT. IF SOLID FAT IS USED, WATER
CAN BECOME TRAPPED INSIDE AND THE HOT LIQUID MAY
SPURT OUT WITH CONSIDERABLE FORCE.
No user-serviceable parts inside. A short cord is provided to reduce
the hazards resulting of entanglement or tripping over a long cord.
An extension cord may be used with care, however, the marked
electrical rating should be at least as great as the electrical rating of
this appliance. The extension cord should not be allowed to drape
over the counter or tabletop where it can be pulled on by children or
tripped over.
SAVE THESE INSTRUCTIONSIMPORTANT SAFEGUARDS
FOR HOUSEHOLD USE ONLY
WARNING: To reduce the risk of electric shock, The cord is
equipped with a detachable magnetic connector. The magnetic
connector should be attached directly to the fryer.
THIS SHOULD BE DONE PRIOR TO PLUGGING THE CORD
INTO THE WALL OUTLET. Do not modify the plug in any way.
SPECIFICATIONS
4 5
Before operating your new appliance, please read all instructions carefully
and keep for future reference.
1. Always place the deep fryer on a stable heat-resistant surface and
keep all ammable materials away from the unit during operation.
2. Before you use the deep fryer it must be lled with the required amount
of cooking oil. *Never use the deep fryer without oil because this will
damage the heating elements.
3. Never move the deep fryer during use. The oil becomes very hot. Wait
until the unit and the oil has completely cooled down before moving.
4. This deep fryer is protected with a thermal safety device which
switches the covered unit off automatically if it over heats.
5. Never immerse the appliance in water.
6. Never leave the deep fryer unattended while in use.
7. Always ensure the safety of children if they are near the deep fryer.
8. Be sure not to damage the heating element. (Do not bend or dent)
9. The covered unit is designed with a safety heat switch, which
ensures that the heating element can only function when the covered
unit is correctly mounted on the frame bracket.
10. In the case of overheating, the thermal protective device will shut off
the covered unit automatically. This device is a small black button found
on the underside of the covered unit. It can be re- activated by pushing
the button in again with a pointed object (e.g. a pen).
**Disconnect from power outlet before re-activating!
6
1
4
3
2
7
5
8
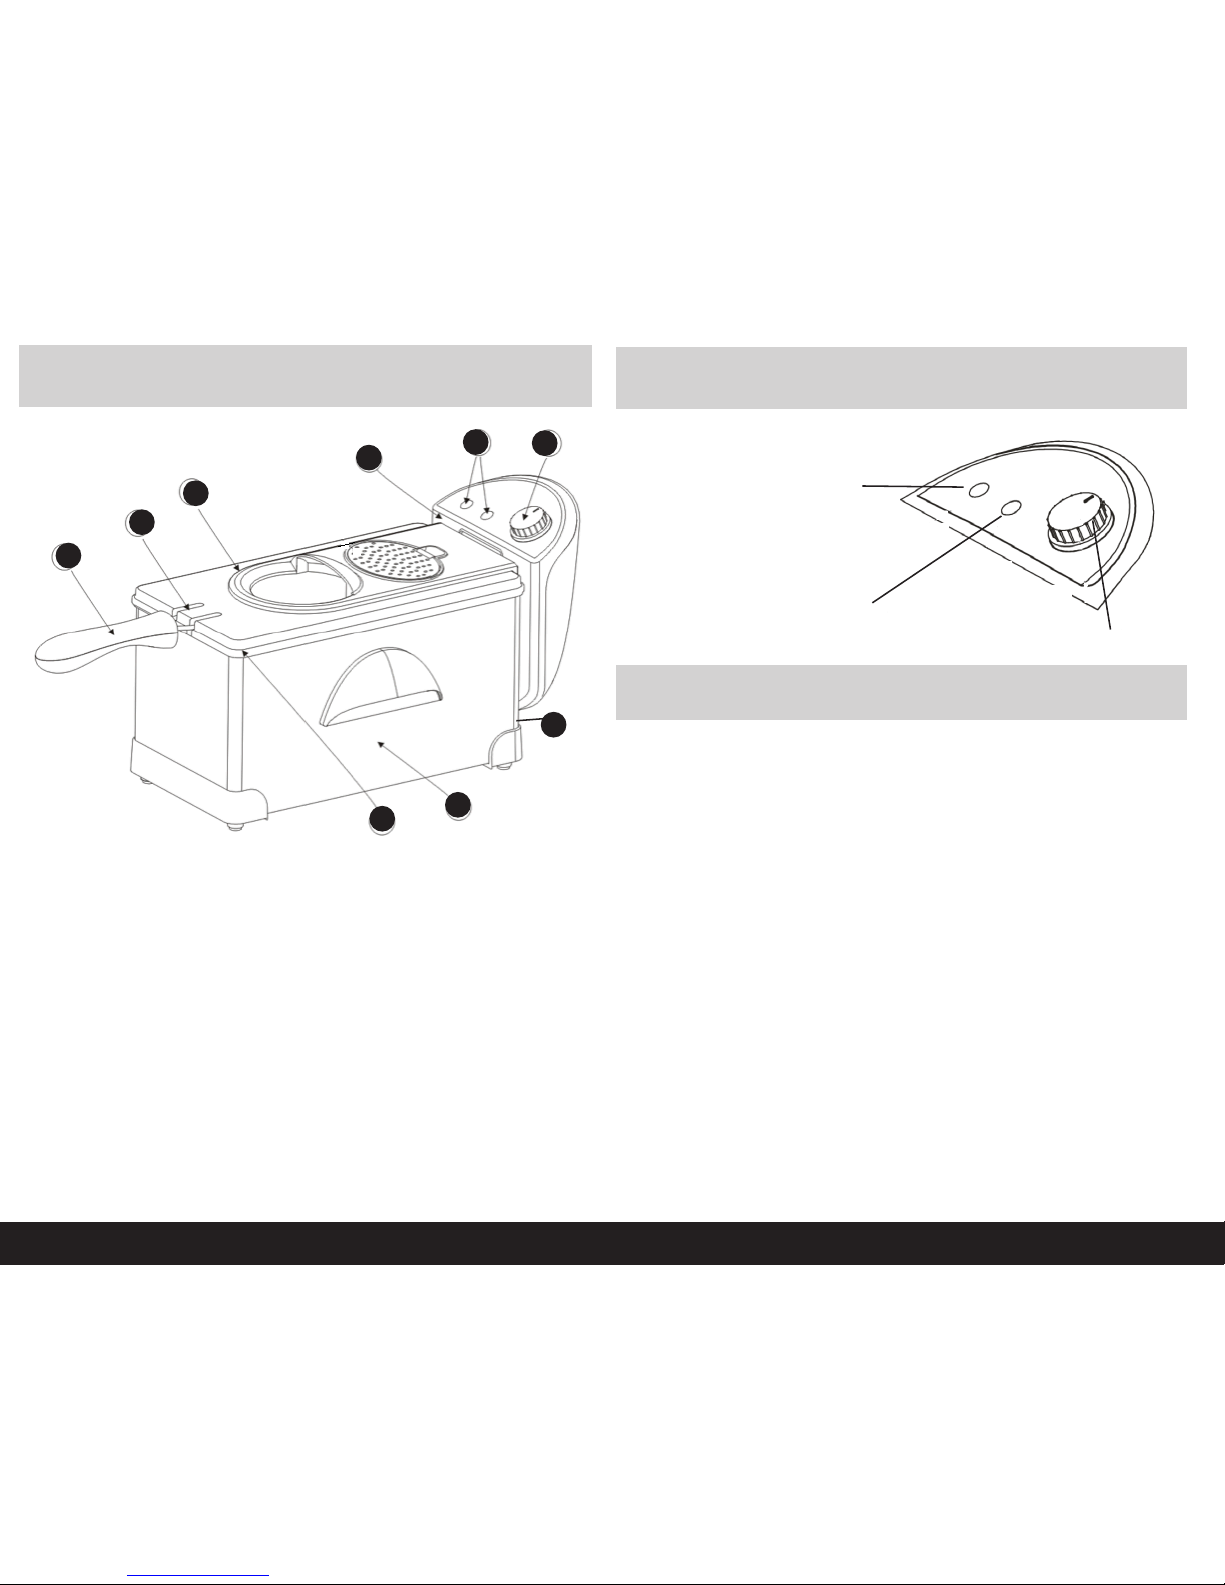
PART NAMES PART NAMES...cont’d.
Heat Indicator Light:
NOTE-This light will cycle on and
off as the thermostat cycles to
maintain the correct temperature
of the oil.
Power Indicator Light
BEFORE USING FOR THE FIRST TIME:
• Remove all printed documents and any other packaging materials.
• Pull out all removable parts and wash gently with hot water.
Do not immerse the power cord and Control Box Assembly & Heating
Element of the deep fryer into any liquids.
• Dry all parts thoroughly before assembling.
• Do not operate the fryer without enough oil in the oil tank.
• The Deep Fryer should always be placed on a at and stable surface
where the power cord is out of reach from children and away from
accidental entanglement.
Tips:
• When you fry several different kinds of food, always fry the food that
uses the lowest temperature setting rst.
• Do not mix different types of oil for frying.
• Frying already pre-cooked foods may take less time to fry than
completely raw food.
• Replace the oil after each 10-15 uses; or earlier if the oil becomes
brown and thick.
• Place the deep fryer on a dry, stable surface. Since the deep fryer
becomes hot during use, make sure that it is not too close to other
objects.
• Never switch on the deep fryer without oil or liquid fat, as this could
damage the machine. Also, do not place any other liquids such as
water or other substances in the pan.
INSTALLATION
INSTALLATION
Ginnys.com • 1.800.544.1590
6 7
1. Basket (Not shown)
2. Lid with handle, double lter, and window
3. Heating element (Not shown)
4. Power and Heat indicator lights
5. Temperature control
6. Removable enameled oil tank (Not shown)
7. Basket Handle
8. Frame
9. Detachable Power Cord (Not shown)
*Illustrations may differ from actual product.
*Read all the sections of this booklet and follow all the
instructions carefully
Temperature Control Knob:
Settings from 250℉ to 375℉
9

UTENSILS & COOKING CUSTOMER REVIEWS
HOW TO OPERATE
8
7
9
8 9
FRYING GUIDE
1. Make sure the Deep Fryer is UNPLUGGED.
2. Place the oil tank into the housing. Mount the control unit onto the
bracket on the frame. Mount the control box into the oil pan. Make
sure the control unit is secured properly and the small red safety
switch is activated, otherwise the fryer will not power on properly.
3. Remove the frying basket and allow it to hang and rest on the
backside of the oil tank.
4. Use only good quality frying oil such as Peanut oil, Vegetable oil,
pure Corn oil, Sunower oil, Canola oil, or Light Olive oil.
(Recommended not to mix oil)
5. Pour the cooking oil into the oil tank approximately between the MIN
marking and the MAX marking.
6. Do not ll over the MAX marking or lower than the MIN marking.
7. Make sure the temperature control knob is set to the OFF or 0
position.
8. PLUG the power cord into an outlet.
9. Move the temperature control knob to desired temperature setting
according to the particular food you are using. The RED and the
GREEN indicator light will turn on.
10. While the oil is preheating, prepare the food that is going to be fried.
11. When the oil has reached the set temperature, the GREEN light will
turn off.
NOTE: The GREEN heat light will cycle On and Off with the thermostat
to maintain the set temperature. The RED power light will
remain illuminated throughout use.
12. When placing the food into the basket, make sure it is as dry as
possible. Do not add water, ice or wet food, it may cause HOT OIL
TO SPLATTER.
13. When frying frozen food, clear off any ice particles and thaw food
thoroughly.
14. Do not overll the basket.
15. Slowly lower the basket of food into hot oil and cover fryer with lid.
WARNING: DO NOT TOUCH THE LID DURING THE
FRYING PROCESS. HOT STEAM MAY BE RELEASED
AND MAY CAUSE INJURY.
16. When food has nished frying, remove the lid. Lift the basket up
slowly out of the hot oil and hang the basket on the rim of the oil tank.
17. After the excess oil has drained, place the food on a paper towel lined
baking sheet to allow any remaining oil to drain away.
18. If you are frying more than once, or a second time, ensure the oil
re-heats to the required temperature.
WARNING: To prevent damage to table or counter surface, always use a
trivet to place item on any non heat resistant surfaces(like
some countertops).
FRYING GUIDE: The frying times given in the chart are only a guide and
should be adjusted accordingly to the quantity of food being fried.
FOOD TEMP°F WEIGHT: (oz) EST. TIME
Shrimp 285° 8 3-5 mins.
Onion 285° 5 3-4 mins.
Mushrooms 285° 10.5 6-8 mins.
Fish Filet 300° 8 5-6 mins.
Fish Filet(Batter) 300° 14 6-8 mins.
Fish Cakes 300° 14 6-8 mins.
Sliced Meat 340° 14 7-10 mins.
Steak 340° 14 7-10 mins.
Chicken Strips 360° 18 7-10 mins.
French Fries:1st 375° 18 6-10 mins.
French
Fries:2nd*
375° 8 3-5 mins.
*French Fries being fried a second time will be lighter and crisper.
HOW TO OPERATE Ginnys.com • 1.800.544.1590
8 9

PART NAMES & CONTROL PANEL PART NAMES & CONTROL PANEL 11
10 1110 11
Ginnys.com • 1 • 800.544.1590 CLEANING & CARE
Ginnys.com • 1.800.544.1590 11
HOW TO OPERATE...cont’d. CLEANING & CARE
AFTER THE FOOD IS FRIED:
1. Make sure to turn the temperature control knob to the OFF or 0
position and unplug the deep fryer.
2. Do not move the deep fryer until it is cooled entirely.
3. Allow the oil to cool completely before storing away.
How to replace the lters:
The lter should be changed every 6 months.
1. Open and remove the lter cover.
2. Take out both white and black lters.
3. Throw out old lters and replace with new lters. Make sure the
White lter rests on the metal surface BELOW the black carbon
lter.
1. Remove the lid and basket.
WARNING: Before cleaning the deep fryer, make sure that it is
disconnected from the power outlet, make sure the unit and
the cooking oil has completely cooled. Oil retains its
temperature for a long period after use. Do not attempt
to carry or move the deep fryer while the oil is hot.
2. Wait for the fryer to cool, lift out the Control Unit Assembly & Heating
element.
3. Remove the oil tank and pour the oil into a container. It is
recommended to lter the oil after each use if you are to re-use the oil.
4. After removing the oil tank, the fryer can be divided into several
separate assemblies to clean.
5. The oil tank and the housing can be immersed into water to clean.
6. Housing, Oil Tank, Basket are dishwasher safe, hand wash the lid
and lter
7. The Control Unit & Heating Element should be wiped clean with
absorbent paper towels. Then use a damp cloth and mild soap to
clean.
WARNING: Do not immerse the Control Unit & Heating Element into
water to clean.
8. Dry all parts thoroughly.
9. Note: Do not use abrasive scrubbing brushes or chemical cleaners
to clean the unit.
10

19
18 19
WARRANTY
12
WARRANTY
Ginny’s warrants this product free from defects in material
and workmanship for one year from provable date of purchase.
Within this warranty period, Ginny’s will repair or replace,
at its option, defective parts at no charge, provided the
product is returned, freight prepaid with proof of
purchase to Ginny’s.
Allow 2-4 weeks for return shipping.
This warranty does not cover improper installation, misuse,
abuse or neglect on part of the owner.
Warranty is also invalid in any case that the
product is taken apart or serviced by an
unauthorized service station.
This warranty gives you specic legal rights
and they may vary from state to state.
THE FOREGOING WARRANTIES ARE IN LIEU
OF ALL OTHER WARRANTIES AND CONDITIONS,
EXPRESS OR IMPLIED,
INCLUDING BUT NOT LIMITED TO THOSE OF
MERCHANTIBILITY OR FITNESS
FOR A PARTICULAR PURPOSE.
Customer Service
Phone: 1•800•544•1590
8:00 am to Midnight, Monday through Friday
Table of contents
Other Ginnys Fryer manuals

Ginnys
Ginnys 62567 User manual

Ginnys
Ginnys 751887 User manual

Ginnys
Ginnys SD-03O User manual

Ginnys
Ginnys 774847 User manual

Ginnys
Ginnys 73311 User manual

Ginnys
Ginnys EDF-3500SS User manual

Ginnys
Ginnys EDF-3060 User manual

Ginnys
Ginnys KDF-550D-3 User manual

Ginnys
Ginnys AF-20 User manual

Ginnys
Ginnys EDF-3060 User manual


