Ginnys EDF-3500SS User manual

1 YEAR LIMITED WARRANTY
Ginny’s warrants this product free from defects in material and workmanship for one
year from provable date of purchase.
Within this warranty period, Ginny’s will repair or replace, at its option, defective parts
at no charge, provided the product is returned, freight prepaid with proof of purchase
to Ginny’s. Allow 2-4 weeks for return shipping.
This warranty does not cover improper installation, misuse, abuse or neglect on part
of the owner. Warranty is also invalid in any case that the product is taken apart or
serviced by an unauthorized service station.
This warranty gives you specific legal rights and they may vary from state to state.
THE FOREGOING WARRANTIES ARE IN LIEU OF ALL OTHER WARRANTIES
AND CONDITIONS, EXPRESS OR IMPLIED, INCLUDING BUT NOT LIMITED TO
THOSE OF MERCHANTIBILITY OR FITNESS FOR A PARTICULAR PURPOSE.
GINNY'S Customer Returns
Phone: 800-991-4442
8:00 am to Midnight, Monday through Friday or
www.ginnys.com
3.5 Qt. Deep Fryer
Model EDF-3500SS
(Stainless Steel Finish)
EDF-3500R
(Red Finish)
INSTRUCTION MANUAL
Before operating your new appliance, please read all instructions carefully and keep for future reference.
w w w . g i n n y s . c o m

IMPORTANT SAFEGUARDS ..
When using electrical appliances, basic safety precautions should always be
followed, including the following:
1. Read all instructions before operating.
2. Do not touch hot surfaces. Use handles or knobs if applicable.
3. Remove all packaging plastics and other materials from unit before operating.
4. Wash all removable accessories before using for the first time.
5. To protect against electrical shock, do not immerse cord, plug or appliance itself
in water or other liquids.
6. Close supervision is necessary when appliance is used by or near children.
7. Unplug from outlet when not in use and before cleaning. Allow to cool before
putting on or taking off parts.
8. Do not operate any appliance with a damaged cord or plug or after the appliance
malfunctions or has been damaged in any manner. Contact Ginny’s Customer
Returns.
9. The use of accessory attachments not recommended by the appliance
manufacturer may cause injuries.
10. Do not use outdoors.
11. Do not let cord hang over edge of table or counter or touch hot surfaces.
12. Do not place on or near a hot gas or electric burner, or in a heated oven.
13. Always attach plug to appliance first, then plug cord into wall outlet. To
disconnect, turn any control to OFF position, then remove plug from wall outlet.
14. Oversized foods or metal utensils must not be inserted in the appliance as they
may cause a fire or risk of electrical shock.
15. A fire may occur if the appliance is covered or touching flammable material
including curtains, draperies, walls and the like when in operation.
16. Do not clean with metal scouring pads. Pieces can break off the pad and touch
electrical parts, involving a risk of electrical shock.
17. Extreme caution should be exercised when using containers constructed of other
material other than metal or glass.
18. Do not store any materials other than manufacturer's recommended accessories
in this unit when not in use.
19. Do not place any of the following materials in the unit: Paper, cardboard, plastic
and the like.
20. Some countertop and table surfaces, such as Corian®, wood and / or laminates,
are not designed to withstand prolonged heat generated by certain appliances. It
is recommended by countertop manufacturers and that a hot pad or trivet be
placed under your deep fryer to prevent possible damage to the surface. Always
place on a heat-resistant surface.
SAVE THESE INTRUCTIONS
THIS PRODUCT IS FOR HOUSEHOLD USE ONLY!
1
PARTS & FEATURES..
2
w w w . g i n n y s . c o m

..RECOMMENDATIONS ..
1. Always place the deep fryer on a stable surface and keep all flammable materials
away from the unit during operation.
2. Make sure that the deep fryer is never near or on a switched-on stove or cooking
surface.
3. Before you use the deep fryer it must be filled with the required amount of oil or
fat. **Never use the deep fryer without oil or fat because this could damage the
unit.
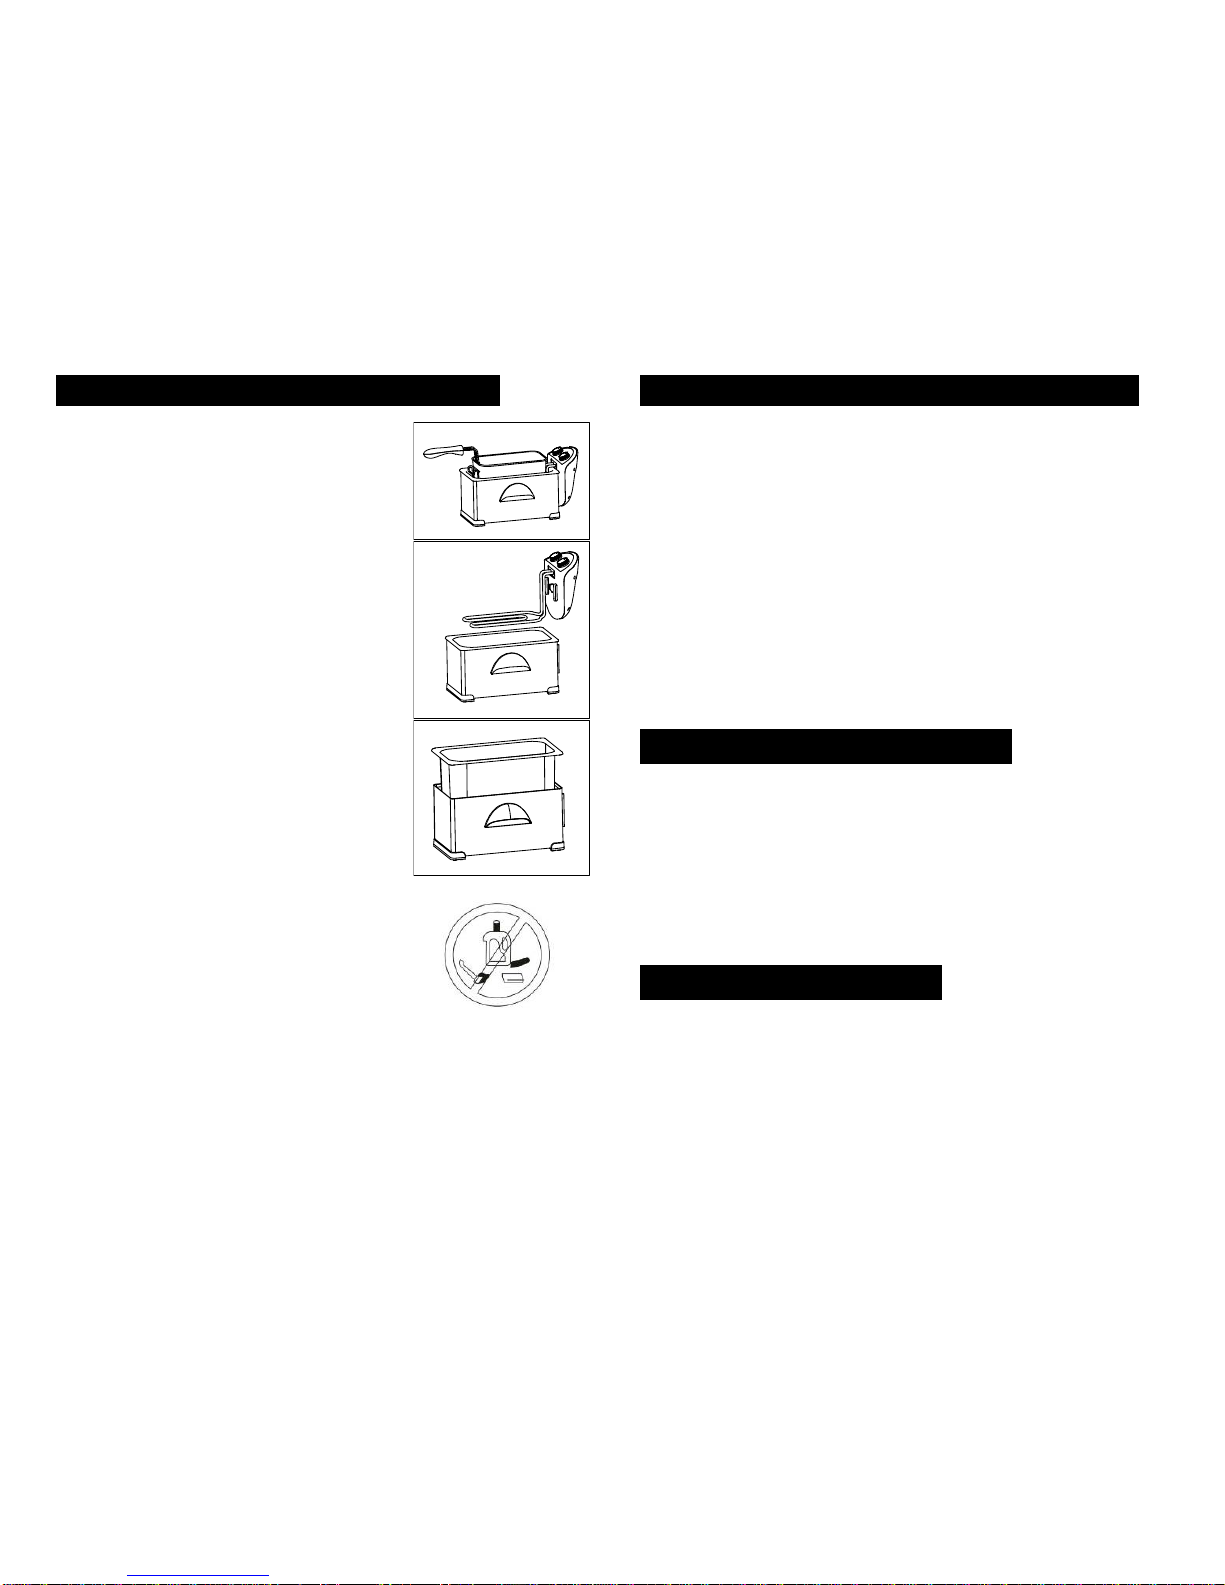
4. Never move the deep fryer during use. The oil becomes very hot. Wait until
the unit and the oil has completely cooled down before moving.
5. This deep fryer is protected with a thermal safety device which switches the
machine off automatically if it over heats.
6. Never immerse the appliance in water.
7. Never leave the deep fryer unattended while in use.
8. Always ensure the safety of children if they are near the deep fryer.
9. If the deep fryer and/or cord are damaged, they must be repaired by a
professional service department. Do not try to repair the unit yourself or replace
the damaged cord. This requires special tools.
10. Be sure not to damage the heating element. (Do not bend or dent)
11. The electrical component is required with a safety heat switch, which ensures
that the heating element can only function when the element is correctly placed
on the fryer.
12. In the case of overheating, the thermal protective device will switch off the fryer
automatically. This device is a small red button found either on the underside of
the electrical component, or in the cord storage compartment. It can be re-
activated by pushing the button in again with a pointed object (e.g. a pen).
**Disconnect from power outlet before re-activating!
PREPARING YOUR FRYER ..
BEFORE USING FOR THE FIRST TIME:
Remove all printed documents and any other packaging materials.
Pull out all removable parts and wash gently with hot water.
Do not immerse the power cord and Control Box Assembly & Heating Element
of the deep fryer into any liquids.
Dry all parts thoroughly before assembling.
Do not operate the fryer without enough oil in the oil tank.
The Deep Fryer should always be placed on a flat surface where the power cord
is out of reach of children and away from accidentally tripping over it.
Tips:
When you fry several different kinds of food, always fry the food that uses the
lowest temperature setting first.
Do not mix different types of oil for frying.
Frying already pre-cooked foods may take less time to fry than completely raw
food.
Replace the oil after each 10-15 uses; or earlier if the oil becomes brown and
thick. 3
KNOW YOUR DEEP FRYER ..
1) Timer Control Knob –To preheat the fryer, turn the timer knob to a set desired
time (after you set a desired temperature). The red indicator light will turn on.
After the temperature has been reached, the red light will turn off.
2) Temperature Control Knob –Adjust the adjustable thermostat to your desired
temperature. Please refer to the temperature in the particular recipe you are
using.
3) Green Indicator Light - Green light indicates the deep fryer is powered on.
4) Red Indicator Light - Red light indicates that the set temperature has been
reached when the light shuts off. Note: You may need to preheat the fryer for 1-
3 minutes before frying foods.
5) Oil Tank –Is removable. Enamel coated and easy to clean.
6) Body –Constructed of stainless steel and easy to clean.
7) Viewing Window –Allows you to see cooking process.
8) Filter –Carbon activated filter reduces odors.
9) Basket Handle –Easily attaches to wire basket to lower food into the fryer and
to also lift out cooked food.
10) Basket –Can be hung on the edge of the deep fryer for food preparation before
lowering into the oil.
11) Control Box Assembly & Heating Element –This piece is attached to each
other. When lifting out the control box, the heating element will come out also.
4
w w w . g i n n y s . c o m

OPERATING INSTRUCTIONS ..
Make sure the Deep Fryer is UNPLUGGED before assembling.
Assemble the deep fryer by sliding the Controls Box & Heating Element
assembly into the Guide Slots on the back of the oil tank body.
Make sure the Safety Switch is properly activated when assembled.
Remove the frying basket and allow it to hang and rest on the backside of the oil
pan.
Use only good quality frying oil such as Peanut oil, Vegetable oil, pure Corn oil,
Sunflower oil, Canola oil, or Light Olive oil. (Recommended not to mix oil)
Fill oil into the oil container approximately between the MIN marking and the
MAX marking.
Do not fill over the MAX marking or lower than the MIN marking.
Make sure the temperature control knob is set to the OFF or 0 position.
PLUG the power cord into an outlet.
The small GREEN indicator light will be activated.
Move the Thermostat knob to desired temperature setting according to the
particular recipe you are using.
PREHEAT:
To preheat the fryer, set the desired temperature and set the timer to five
minutes.
The RED indicator light will be activated.
While the oil is preheating, prepare the food that is going to be fried.
When the oil has reached the set temperature, the RED light will turn off.
Re-set the timer to the desired frying time of food.
NOTE: The RED indicator light will periodically go on and off to maintain the set
temperature.
(Depending on the set temperature and the amount of oil, the heating elements
will take approximately 2-5 minutes to preheat.)
COOKING:
When placing the food into the basket, make sure it is as dry as possible. Do not
add water, ice or wet food, it may cause HOT OIL SPLATTER.
When frying Frozen food, clear off any ice particles and thaw food thoroughly.
Do not overfill the basket.
Lower basket of food into hot oil and cover fryer w/ lid.
Cover with lid.
WARNING: DO NOT TOUCH THE CONTROL KNOB DURING THE FRYING
PROCESS. HOT STEAM MAY BE RELEASED AND MAY CAUSE INJURY.
When food has finished drying, remove the lid. Lift the basket up slowly out of
the hot oil and place the basket on the basket rest located on the back of the fry
basket to drain excess oil.
After the excess oil has drained, place the food on a paper towel lined baking
sheet to allow any remaining oil to drain away.
If you are frying more than one load, ensure the oil re-heats to the required
temperature.
FRYING GUIDE ..
The frying times given in the chart are only a guide and should be adjusted
accordingly to the quantity of food being fried.
FOOD
Temp. °F
Weight
(grams)
Estimated Time
Shrimp
265°
250
3-5 minutes
Onion
285°
150
3-4 minutes
Mushrooms
285°
300
6-8 minutes
Fish Fillet
300°
250
5-6 minutes
Fish Fillet in batter
300°
400
6-8 minutes
Fish Cakes or Balls
300°
400
6-8 minutes
Sliced Meat
340°
400
7-10 minutes
Steak
340°
400
7-10 minutes
Chicken Strips
360°
500
7-10 minutes
French Fries (1st time)
375°
500
6-10 minutes
French Fries (2nd time)
375°
250
3-5 minutes
*French Fries being fried a 2nd time will be lighter and crispier.
AFTER THE FOOD IS FRIED:
1. Make sure to turn the temperature control knob and Timer control knob to
the OFF position and unplug the deep fryer.
2. Once food is done cooking, remove the lid, and hang the basket on the hook
and let excessive oil drip into the oil pot.
Warning: Removing the lid will release hot steam. Take extreme care
when handling. Keep face and bare skin clear of the steam release.
3. Take out the basket and place the food on paper towels to absorb excess oil.
Do not touch the basket while it is still hot. Always use the handle.
4. Transfer food to a clean dish without the paper towels.
5. Place the basket into the deep fryer.
6. Do not move the deep fryer until it is cooled entirely.
7. Unplug the power cord and store away.
5
w w w . g i n n y s . c o m
6
w w w . g i n n y s . c o m

CLEANING THE DEEP FRYER ..
1. Remove the lid and basket.
WARNING: Before cleaning the deep fryer,
make sure that it is disconnected from the
power outlet, make sure the unit and the oil has
completely cooled. Oil retains its temperature
for a long period after use. Do not attempt to
carry or move the deep fryer while the oil is hot.
2. Wait for the fryer to cool, lift out the Control Box
Assembly & Heating element.
3. Remove the oil pot and pour out the oil. It is
recommended to filter the oil after each use if you
are to re-use the oil again.
4. After removing the oil pot, the fryer can be divided
into several separate assemblies to clean.
5. The oil pot and the body can immerse into water to
clean. If you are to immerse the lid of the deep
fryer into water, it is recommended to remove the
filter before doing so.
6. The Control Box & Heating Element should be
wiped clean with absorbent power towels. Then
use a damp cloth and a mild soap to clean.
WARNING: Do not immerse the Control Box &
Heating Element into water to clean.
7. Dry thoroughly all parts.
Note: Do not use abrasive scrubbing brushes
or chemical cleaners to clean the unit.
7
CARING FOR YOUR DEEP FRYER ..
How to replace the filters:
Your carbon filter should be changed every 6 months. The oil filter should be
changed every 12 months.
1) Unclip and remove the filter cover.
2) Take out both white and black filter pieces.
3) Throw out old filters and replace with new filters. Make sure the White filter
piece rests on the metal surface BELOW the carbon filter (black piece).
STORING YOUR DEEP FRYER:
Always allow the appliance to cool completely before storing. Store the appliance in a
dry location. Keep the power cord out of reach of children.
TROUBLESHOOTING YOUR DEEP FRYER:
In the case that your deep fryer does not power on after assembly, double
check the Safety Switch to make sure it is properly activated.
If the Safety Switch is properly activated, you may need to “RESET” the
controls and try again. Push and hold the Reset button for 10-seconds.
Release and assemble fryer and try to power on the machine again.
.. SHORT CORD PURPOSE ..
Please reference the detachable power cord with a magnetic plug.
1) A short power-supply cord is provided to reduce risks of injuring yourself from
becoming entangled in or tripping over a longer cord.
2) Longer extension cords are available and may be used if you exercise caution
during use.
3) If a longer cord is used please note the following:
-The marked electrical rating of the extension cord should be at least as
great as the electrical rating of the appliance.
The longer cord should be arranged so that it will not drape over the counter top of
tabletop where it can be pulled on by children or tripped over unintentionally.
…POLARIZED PLUG …
If this appliance has a polarized plug (meaning one blade is wider than the other
one), please follow the below instructions:
To reduce the risk of electric shock, this plug is intended to fit into a polarized outlet
only in one direction. If the plug does not fit fully into the outlet, reverse the plug. If it
still does not fit, contact a qualified electrician. Do not attempt to modify the plug in
any way.
This appliance is intended for Household Use Only.
8
w w w . g i n n y s . c o m
This manual suits for next models
1
Table of contents
Other Ginnys Fryer manuals

Ginnys
Ginnys AIR FRYER PLUS User manual

Ginnys
Ginnys EDF-3060 User manual

Ginnys
Ginnys SD-03O User manual

Ginnys
Ginnys EDF-3060 User manual

Ginnys
Ginnys 73311 User manual

Ginnys
Ginnys 62567 User manual

Ginnys
Ginnys L-DF401B User manual

Ginnys
Ginnys 600263 User manual

Ginnys
Ginnys KDF-550D-3 User manual

Ginnys
Ginnys DF-101 User manual