Go-Ped Super BigFoot User manual

BEFORE YOU RIDE – Super Go-Peds® should be warmed
up. Simply lift the back end of the Go-Ped® so that the back
tire is not engaged with the ground. Follow the following
instructions on the engine pull start operations that explains
the choke and primer features.
1. Pump primer bulb until fuel flows steadily through clear,
overflow tube. C1
2. Move choke lever to the closed position. C2
3. Set throttle to start position (half). C3
4. Pull starter, until engine starts. C4
5. Move choke lever to the open position as soon at the
engine starts
5. Allow engine to warm up before using.
6. To stop: idle engine, use the brakes to obtain a full stop
position, thus turning off the engine.
After warming up the engine (30 seconds – 1 minute), place
hands on the hand grips (no throttle). Place one foot on Go-
Ped Standing Platform. With the other foot, briskly push the
Bigfoot Go-Ped® forward (this may take a little practice, but
adequate skill should come within a couple of hours). All this
might be easier on a downhill grade.
STARTING INSTRUCTIONS
REAR TIRE ADJUSTMENT
Adjusting your tire before it goes out of adjustment will increase
tire life.
Super Bigfoot Rear Wheel Adjustment: The Lock Down
adjustment on the Super Bigfoot may need to be adjusted
periodically due to tire wear. Signs of slippage requires that you
need to readjust your Lock Down for optimum performance. Refer
to “Lock Down Adjustments” for futher operations.
Super X-Ped Rear Wheel Adjustment: Your rear tire may need to
be adjusted periodically due to tire wear. Signs of slippage
requires that you need to readjust your rear tire. Here is how:
D1. Open quick release axle to unlock and allow free movement of
wheel (wing nut may need to be loosened also).
D2. With Quick Release Axle opened and loosened, rotate purple
engine protection washer (EPW) down, away from rear gas tank
support stud.
D3. Apply up to 75 lb of weight to rear part of Go-Ped® deck (one
knee on the "D" works pretty good) with rear wheel on the ground.
(To apply proper wheel/spindle contact).
D4. Rotate engine protection washer (EPW) up to contact rear gas
tank stud while weight is still applied, this will prevent overload to
engine bearings and crankshaft.
D5. Lock Down quick release lever with snug pressure. This will
lock axle in position until readjustment is required

SUPER BIGFOOT/XPED SPECIFICATIONS
* Speeds, Running Durations, and Fuel Economies vary significantly depending on
the weight of the rider.
Technical Support Line (925) 373-7827
and click on Customer Service.
Go-Ped® is a registered trademark of PMW.
© 1998 PMW All rights reserved
THINGSTOREMEMBER
•Keep air-intake opening clear of debris and do not touch the muffler or cylinder.
These parts get extremely hot from operation, and remain hot for a short time after the
equipment is turned off.
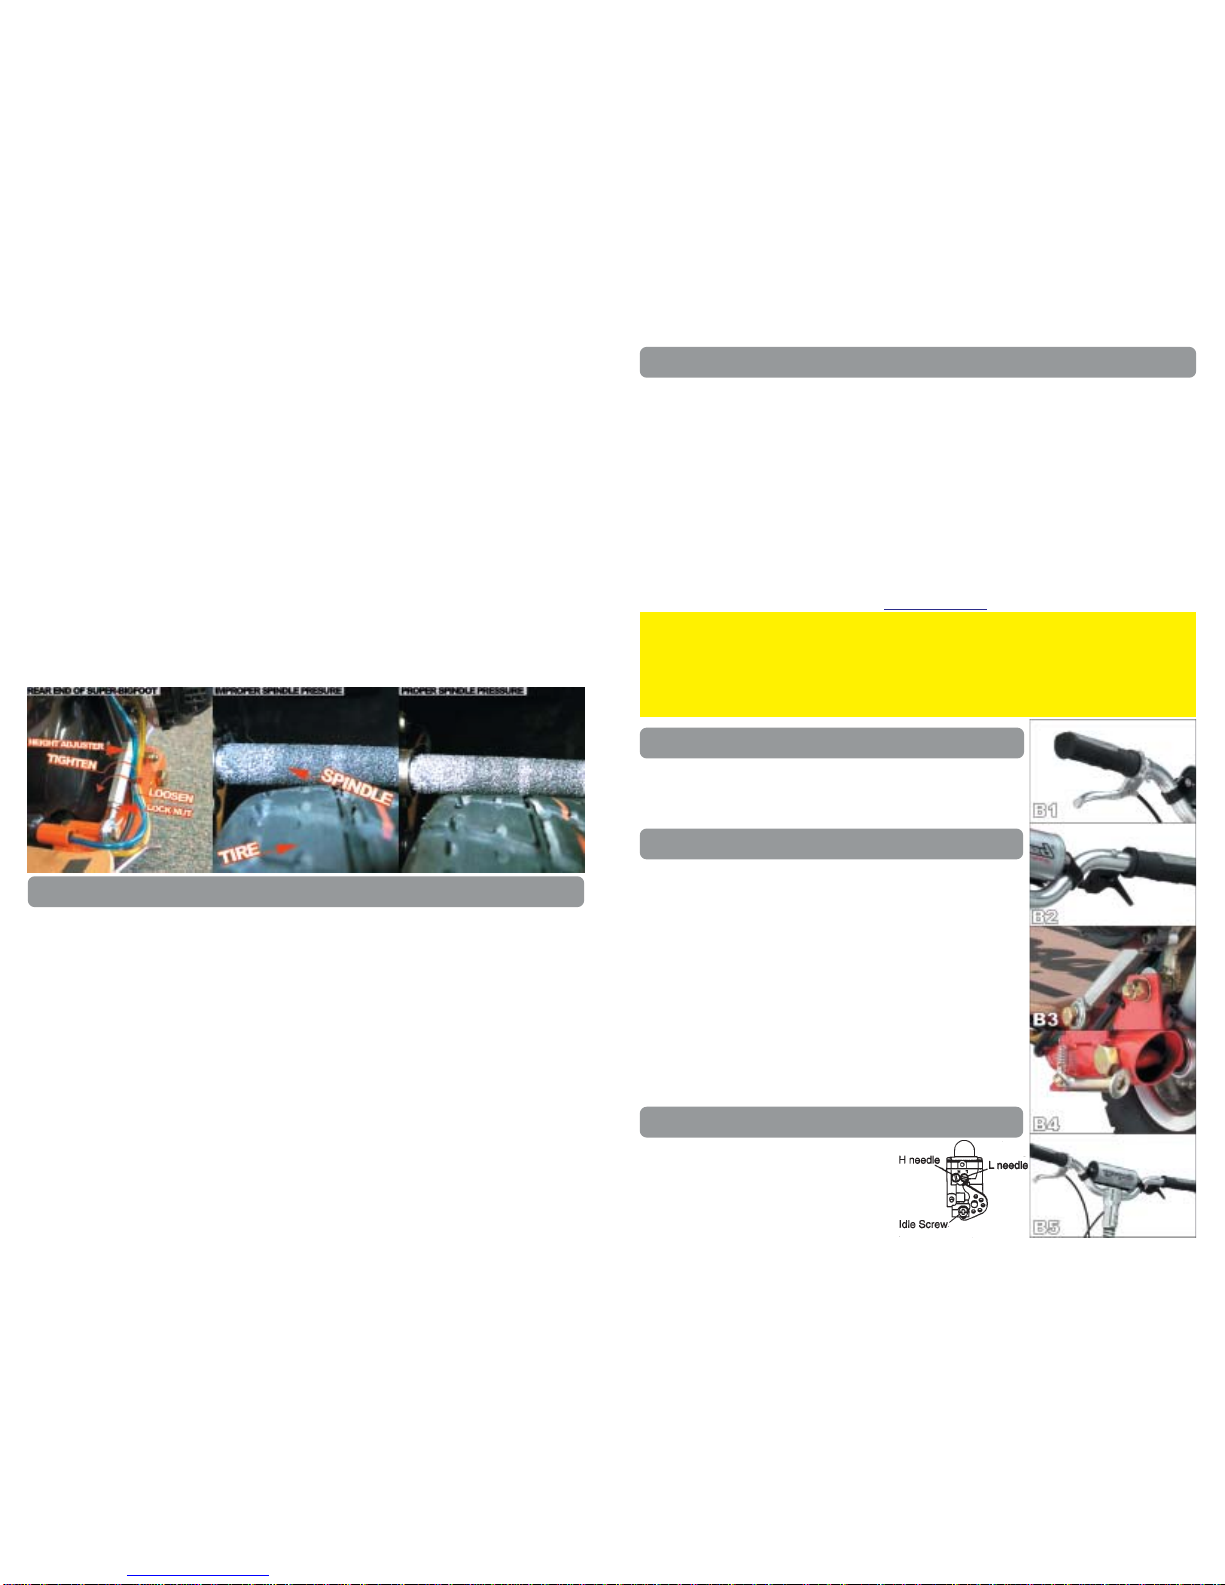
•Avoid allowing the drive spindle from slipping on the tire to prevent abnormal
spindle and tire wear. When riding, be sure your clutch lever is in the full down
position.
SUPPORT
DRIVING DEFENSIVELY
It may be difficult to hear vehicles approaching you. Head-check often, and before
changing direction. These Go-Ped®s have been designed to operate off-road on any
hard-pack, dry surfaces. Avoid wet and/or oily surfaces, loose sand, potholes, etc.
Always use both hands on the handlebar when riding.
NOTE: The Go-Ped® works at optimum performance when used on paved surfaces
SAFETYWARNING
Do not wear loose-fitting clothes or articles such as scarves, strings, chains, ties, etc. Do
not remove rear-fender which guards drive mechanism from foreign objects.
PRE-STARTING INSTRUCTIONS
BEFORE YOU RIDE – Super Go-Peds® should be warmed up. Simply lift the back end
of the Go-Ped® so that the back tire is not engaged with the ground. Follow the
instructions on the engine pull start cover that explains the choke and primer features.
Pay EXTRAATTENTION to the yellow, SAFETY WARNING sections of this
manual.TheseareveryimportanttounderstandbeforeyourideyourGo-
Ped®.
This Product is not for sale, or resale, within the State of California
other than for CLOSED COURSE COMPETITION purposes.
SPECIFICATIONS SUPER X GO-PED® SUPER BIGFOOT GO-PED®
Length 34 inches 42.5 inches
Height 38.5 inches 44 inches
Folded Height 14 inches 18 inches
Width 14 inches 22.5 inches
Dry Weight 25 lbs. 30 lbs.
Engine Type
Single cylinder, 2-stroke, Air-cooled Single cylinder, 2-stroke, Air-cooled
Engine Displacement 22.5 cc 22.5 cc
Ignition Electronic Electronic
Carburetion 12.5 mm Walbro Carb 12.5 mm Walbro Carb
Fuel Gas & 2-stroke oil at 40:1 Gas & 2-stroke oil at 40:1
Fuel Capacity 1 liter 1.5 liter
Running Duration* 45 min -1 hours 1 -1.5 hours
Transmission Direct Drive Direct Drive
Maximum Carrying
Capacity 400 lbs. 400 lbs.
Wheel Type Non-Pneumatic Natural
Rubber Pneumatic Natural Rubber
Front Brake Wheel Caliper Mechanical Disk
Rear Brake Compression Compression
Turning Radius 2.5 ft 3.5 ft
Box Volume 4 cu ft 4 cu ft
Engine Starting Push Recoil Starter
Engine Power 2.5 HP 2.5 HP
Engine Ignition Electronic Electronic
Throttle Control Variable Speed Variable Speed
Minimum Speed* 2 mph 2 mph
Maximum Speed* --
Cruise Speed* --
SAFETYWARNING
This vehicle does not conform to Federal Motor Vehicle Safety Standards and is
not intended for operation on public streets, roads or highways. Serious injuries
can result from unsafe operation of this vehicle. The operator can minimize
these risks by wearing safety equipment. SAFETY HELMET, GOGGLES,
GLOVES, ELBOW & KNEEPADS,AND APPROPRIATE SHOES MUST BE WORN.
Do not operate this vehicle in TRAFFIC, WET, FROZEN, OR OILY SURFACES.
Avoid uneven surfaces, large chuckholes, surface cracks and obstacles. Adult
supervision is strongly recommended.
SAFETYWARNING
• Persons without excellent vision, balance, coordination, reflex, muscle and
bone strength or good decision-making capability should not use this product.
• This product should not be used by minors without adult supervision.
• This product should not be used by persons unwilling to take responsibility for
their actions.
• The user of this product assumes all risks, all user must wear safety helmet,
goggles, gloves, elbow and kneepads, and appropriate shoes with ankle
support.
Super Bigfoot® Features
• Adjustable motor Lock Down
• Larger 1.5L Gas Tank
• Lightweight and extremely strong
single side frame and fork
• Front disk brake
• Hundreds of aftermarket hop up parts
and accessories available
• 10-inch pneumatic tires
• 2.5 Hp Motor upgradeable to 5 Hp
• Reinforced steering components
• Maier GPX rear fender
• “Tim Patmont” Bend bars
• Factory team grips
• Aluminum wheels
• Foldable handlebar
• Available in championship orange
Super X-Ped® Features
• Beefy frame and “bothy” fork
• Fatty standing platform
• 2.5 Hp Motor, upgradeable to 5 Hp
• Reinforced steering components
• Protective bumper
• Grind plate
• Aluminum wheels
• Factory team dual-density grips
• Foldable handlebar
• Available in championship orange
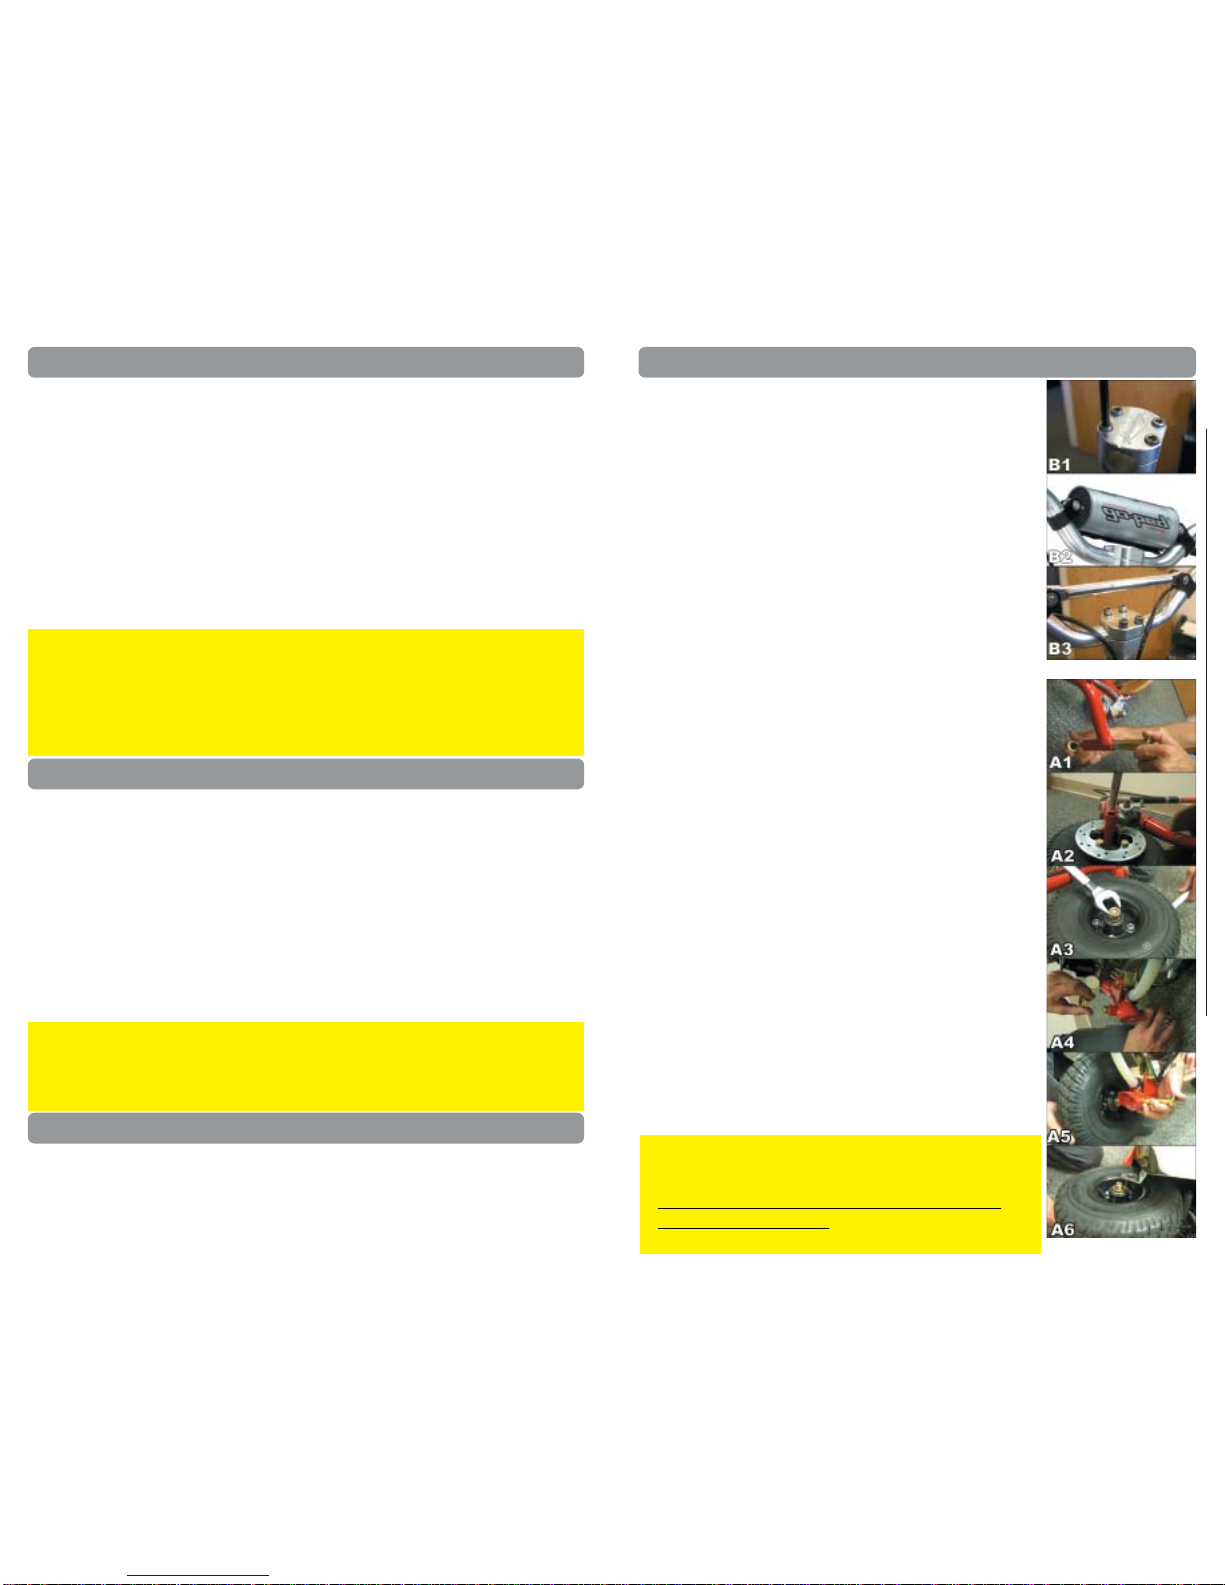
• All frame and engine parts are available through your authorized Go-Ped® reseller or the Go-
Ped® website at www.goped.com.
• Use only manufacturer’s original equipment, replacement parts when servicing this unit. These
parts are available from your authorized dealer. The use of non-standard parts, or other
accessories or attachments not designed for this unit could result in serious injury to the user or
damage to the unit.
MAINTENANCE / PARTS

Note:These Assembly Instructions are only for the Super
Bigfoot Go-Ped® (SBF). The Super X-Ped® arrives already
assembled, so it does not require Assembly Instructions.
SBF ONLY Handle Bar Installation:
• To install the handlebars, a 3/16” allen wrench is required.
• Remove the 4 allen screws off the upper clamp of the
steering stem with a 3/16” allen wrench. B1
• Remove padding on handle bar for ease installation of the
allen screws. B2
• Place the bar on the upper stem and put back on upper
clamp and the 4 allen screws. B3
• Once you have the 4 screws snug, adjust the bars in the
desired location before tightening the 4 allen screws.
• Make sure you do not have any cables kinked or stressed
and all lever move freely and function properly.
• Install padding back onto handle bar.
SBF ONLY Front Wheel:
• Inspect all components for damage.
• Remove bolt and washers from end of front axle. A1
• Remove front axle from front steering arm. A1
• Insert brake disk into front brake caliper, and align wheel
with axle bushing. A2
• Insert axle through steering arm bushing and into wheel
hub. It may be necessary to align inner wheel spacer to allow
axle insertion. A2
• Install and tighten axle bolt. A3
• Check for smooth wheel rotation and proper front brake
actuation.
SBF ONLY Rear Wheel:
• Remove bolt and washers from end of rear axle. A4
• Install rear wheel with valve stem facing the motor to
prevent interference with gas tank bracket. A5
Note: The Super Bigfoot comes with a Lock Down feature. The
Lock Down is an adjustment of the spindle height and
pressure on the tire. The Lock Down may need to be adjusted
for ease installation of the rear tire. Refer to the next step,
“Lock Down”, for adjustments.
• Rotate rear fender and tank mount bracket to align with
rear axle and tighten nut. A6
Note: Make sure right side, fender tab hooks securely on
outside of engine support bracket.
SUPER BIGFOOT GO-PED® ASSEMBLY
Note: Super X Go-Ped® uses natural, rubber non-pneumatic tires.
•Never use tires or tubes not recommended by PMW or exceed maximum P.S.I. limits
as stated on the side of tires.
•The Super Bigfoot Go-Ped® likes higher pressures in the rear (34-45 psi.) for
efficient drive system performance and lower pressures in the front (20-30 psi.) for
smoother ride characteristics.
TIREREPLACEMENT
Super Bigfoot Go-Ped® :
• Replace front or rear tires when tread is worn within 1/16" tread depth, or if obvious
tire damage has occurred.
Super X Go-Ped® :
• Replace front or rear tires when wear-indicator mark (or “dimple” which is located on
the sides of the tire) is no longer visible.
SUPER BIGFOOT GO-PED® PNEUMATIC TIRE INFORMATION
SAFETYWARNING
Tire-wear, punctures or ruptures can cause immediate loss of control, which may
effect operator and precipitate serious bodily injury. Helmets, goggles, gloves,
elbow and kneepads and appropriate shoes with ankle support must be worn at
all times.
TIPS
BEFORE YOU RIDE - Thoroughly inspect the unit for loose or damaged parts before
each use. Do not use until adjustments or repairs are made. New engine break-in
period is a few hours. Avoid full-throttle operation during this time. Position your feet in
any location that is comfortable to you. Most prefer a parallel stance with the left leg
slightly behind the right and bearing most of the weight while bending your knees.
When accelerating or climbing hills you will need to lean forward a little to keep the
front wheel on the ground. Under hard braking conditions you will need to lean back to
keep the rear-wheel on the ground.
SCOOTING CAN BE an environmentally useful, safe, and fun way of reducing traffic
congestion.
MODIFICATIONS to the exhaust or intake will change the noise level of your scooter
which can and will disturb others.
DO NOT make changes or modifications to your scooter which can make your scooter
act in an unsafe manner.
SAFETYWARNING
Operate this unit only in a well-ventilated area (i.e. outdoors). Carbon monoxide
exhaust fumes can be lethal in a confined area.
MOTORIZED RIDING
Power transmission is through a drive spindle connected directly to the engine
crankshaft. The rear wheel must be engaged to the drive spindle for motorized
operation. Your drive spindle can be engaged or disengaged by using the engine, trim
thumb lever. Excessive slippage of the friction-drive spindle will greatly increase rear
tire-wear.
IMPORTANT! If you did not completely fill out and submit a
warranty registration form to your dealer upon purchasing your
Go-Ped® product, return to your dealer immediately and do so.
If your form is not turned into the manufacturer, YOU
DO NOT HAVEAWARRANTY.

FUELING & PRE-OPERATIONAL
Gasoline is extremely flammable, and its vapors can explode if ignited. Always stop the
engine, and allow to cool before filling fuel tank. Do not smoke while filling fuel tank.
Keep sparks and open flames away from the area.
• The Super Models come equipped with a High Performance Motor (G23ORC) that
has different fuel and oil requirements from other Go-Ped® models. 95 Octane
Unleaded Gasoline or greater and 25:1 two-cycle oil mix is required.
• Add fuel in a clean, well-ventilated area. Avoid spilling the fuel when mixing the oil.
Wipe up spilled fuel immediately. If fuel has been spilled, allow to dry completely
before starting the engine.
• Move the unit at least 10 feet (3m) from the fueling point before starting the engine.
Pressure can build up in the fuel tank. Loosen the cap on the fuel tank slowly to relieve
any pressure in the tank.
• Store gasoline and fuel only in containers designed and approved for the storage of
such materials.
FOLDING FEATURE
BEFORE YOU RIDE - Be certain the sliding handle lock tube
is in its full down position, locking the handlebar upright.
The handle latch hooks the motor casing to hold the
handle in the folded position for carrying or for storage.
CONTROLS
BEFORE YOU RIDE - Familiarize yourself with how your Go-
Ped® works.
• The left-hand lever operate the front-wheel caliper brake,
and stops the engine when going 2 mph or less. B1
• The right-hand lever operates the engine throttle. B2
• SBF ONLY The Lock Down prevents the motor from
moving providing minimal spindle slippage and allows the
user to “push start” the Go-Ped®. Refer to “Lock Down
Adjustment” for further operations. B3
• SBF ONLY This kick-stand is used to stand your Go-
Ped® in an upright and stopped position. B4
• The handle bar supports the rider and steers the Go-
Ped® just like a bicycle. Always use both hands on the
handle bar when riding. B5
SBF ONLY Lock Down Adjustment:
The Lock Down is suited for competition purposes. It prevents the motor from moving,
providing minimal spindle slippage and allows the user to “push start” the Go-Ped®.
The function of the Lock Down is to adjust the spindle height adjuster to put the correct
amount of pressure between the spindle and rear tire. You can start by loosening lock
nut (Counterclockwise).
• Rotating the height adjuster, or large nut, clockwise will lower the spindle,
creating more pressure between the spindle and tire.
• Rotating the height adjuster, or large nut, counterclockwise will raise the
spindle, creating less, or no, tension between the spindle and tire.
Lower the spindle enough till you are able to rotate the back tire (with your hands)
without any slippage between the tire and spindle. Too much pressure can cause the
motor to run slow or not run at all. Too little pressure can cause the spindle to slip on
the tire. The correct amount of pressure is critical for optimum performance and the
longevity of the tire ware. PMW suggest you try different pressure settings and try to get
a feel of which setting is giving you the most performance, at the same time, without
any slippage between the tire and spindle. Don’t’ forget to tighten the lock nut after
every time you readjust the Lock Down.
Note: For proper engine operation and maximum reliability, pay strict attention to the
oil and fuel-mixing instructions. Use 95 Octane Unleaded Gasoline or greater. Use a
25:1 fuel/oil ratio (2-cycle). Improperly mixed fuel can severely damage the engine.
Use the following procedure to ensure proper mixing:
• Put a small amount of fresh gasoline (95 Octane or greater) into a clean 1 (U.S.)
gallon (3.875-liter) fuel can.
• Add 5.12 ounces of 2-cycle oil.
• Fill the remainder of the fuel can with gasoline (1 gallon).
• Screw the cap of the fuel can on tight, and SHAKE THE CAN VIGOROUSLY FOR 30
SECONDS.
Note: For your convenience, Go-Ped® has developed specially formulated oil called
Go-Mix II®. This oil was specifically designed for Go-Ped® engines, and is available in
tank and 1-gallon sizes. Go-Mix II® makes filling up while on the road a breeze.
Available through your local dealer at www.goped.com.
OIL & FUEL INFORMATION
BESURE TOREADTHESEINSTRUCTIONS CAREFULLYBEFOREATTEMPTINGTO
START OR OPERATE THIS UNIT. Using old or improper oil or fuel, or improperly
mixing the oil and fuel can cause engine damage. This type of damage will void
engine warranty.
HP CARB SETTINGS
The HP Carb are defualtly set at:
H needle: 1 3/8 ± 1/4 (out)
L needle: 1 1/4 ± 1/4 (out)
Carb may need to be re-adjusted to due
various barometric or motor conditions.
Check Carb Tuning when motor has been
warmed up (Proper Operating Temperature).
This manual suits for next models
1
Other Go-Ped Scooter manuals