Gocycle MOTORFORK G2 User manual

GOCYCLE G2 MOTORFORK GUIDE
Version 1.0
Servicing of the Gocycle G2 MotorFork

Gocycle G2 MotorFork Guide 1.0
© Karbon Kinetics Limited. All Rights Reserved. 2
OVERVIEW
This document details tear down and rebuild of the G2 MotorFork. If you have any
questions, or require any further assistance, please contact techsupport@gocycle.com.
PARTS LIST
To successfully complete the procedure you will require the following parts.
Note: You may
be able to re-use parts on your Gocycle and as such only need to order parts specific to your
repair.
Part Code
Part Description
Quantity
2036
Motor Assembly
1
2041
54:1 2 Stage Gearbox
1
2100
Fork Brace
1
2135
Motor Torque Bung
6
2137
Front Disk Cover
1
2162
M5x25 BH SS A4 w/THDLCK
4
2163
M3x8 SH SS A4
6
2164
M4x6 BH SS A2
1
2256
M3x8 CSK SS A4 TX
4
2345
BLK HtShk 50-55mmLEN6.4mmdia
3
TOOL LIST
To successfully complete this procedure you will require the following tools.
Special KKL
tools can be purchased by their tool number detailed below.
Part Code
Tool Description
1243
2.5mm Allen Key
1244
3mm Allen Key
3177
MotorFork Separator Tool
3178
Motor Holder

Gocycle G2 MotorFork Guide 1.0
© Karbon Kinetics Limited. All Rights Reserved. 3
CONTENTS
Front Disk Cover Removal ..............................................................................................4
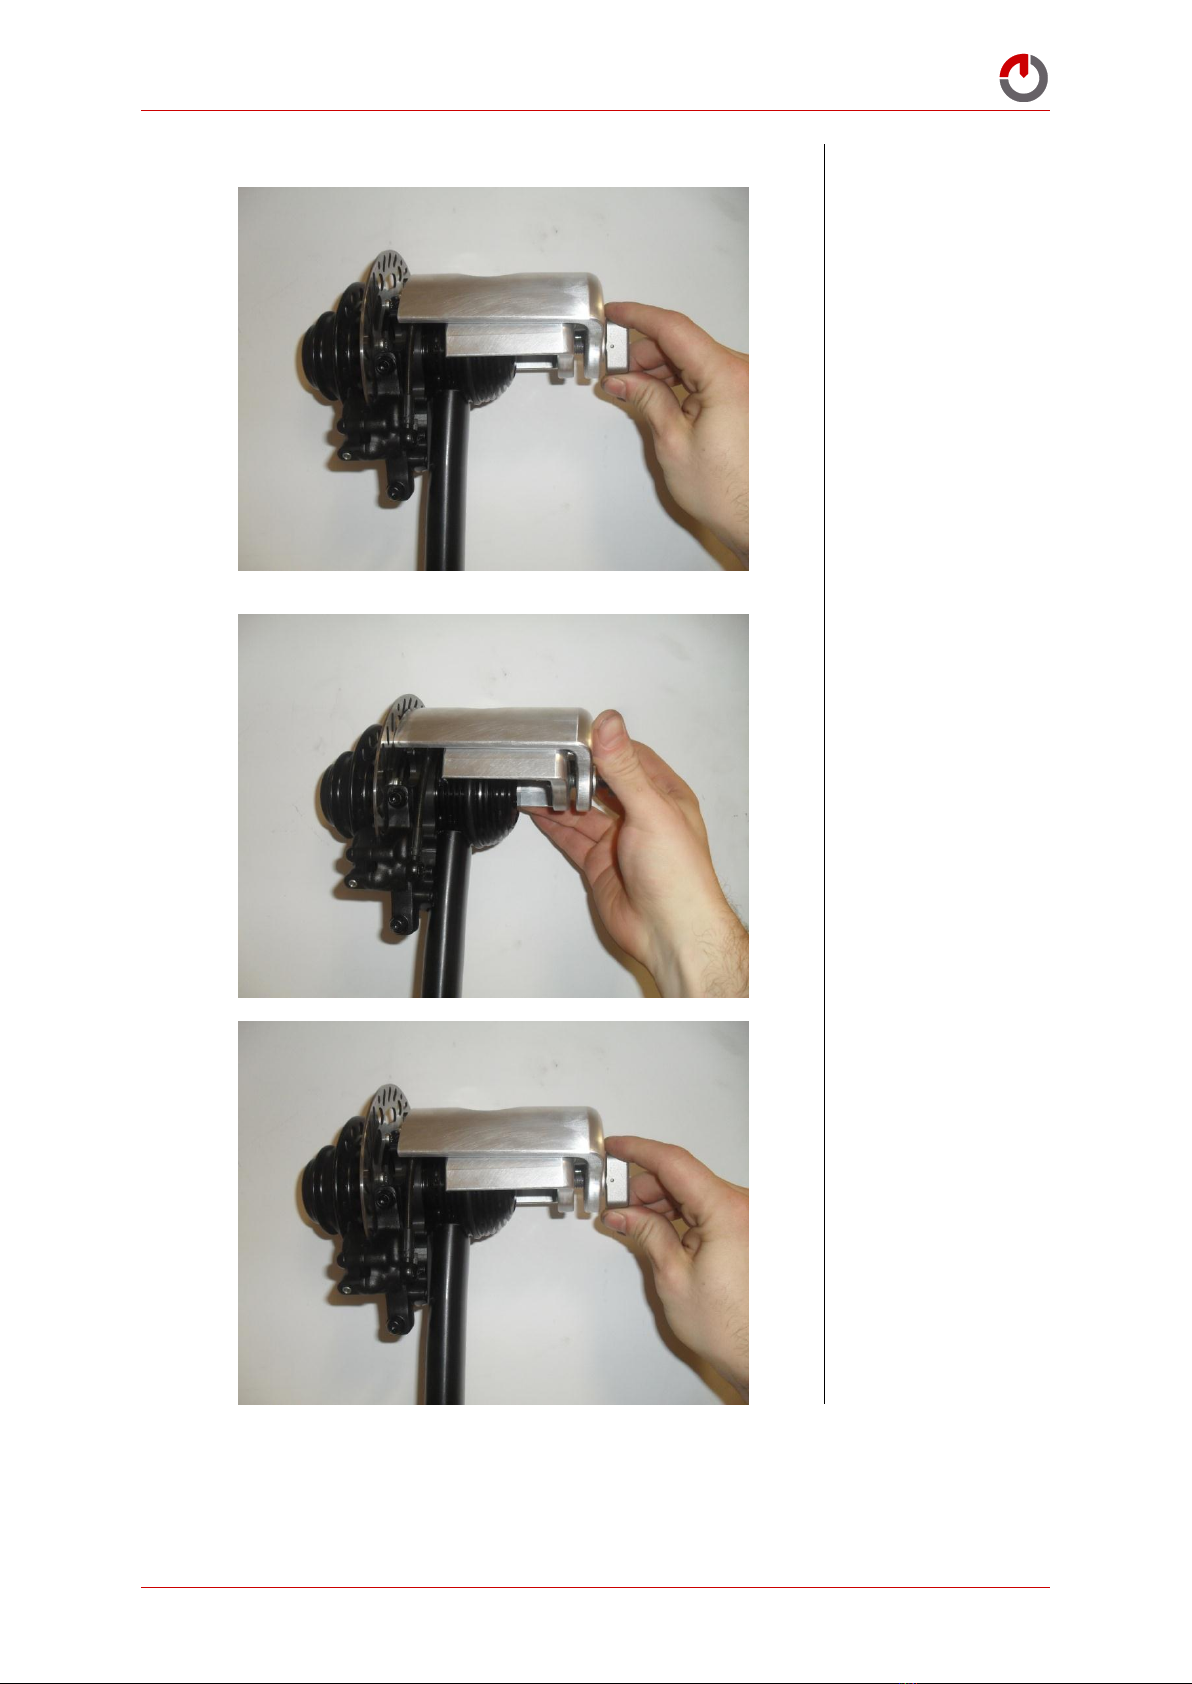
Front Hub Relocation......................................................................................................5
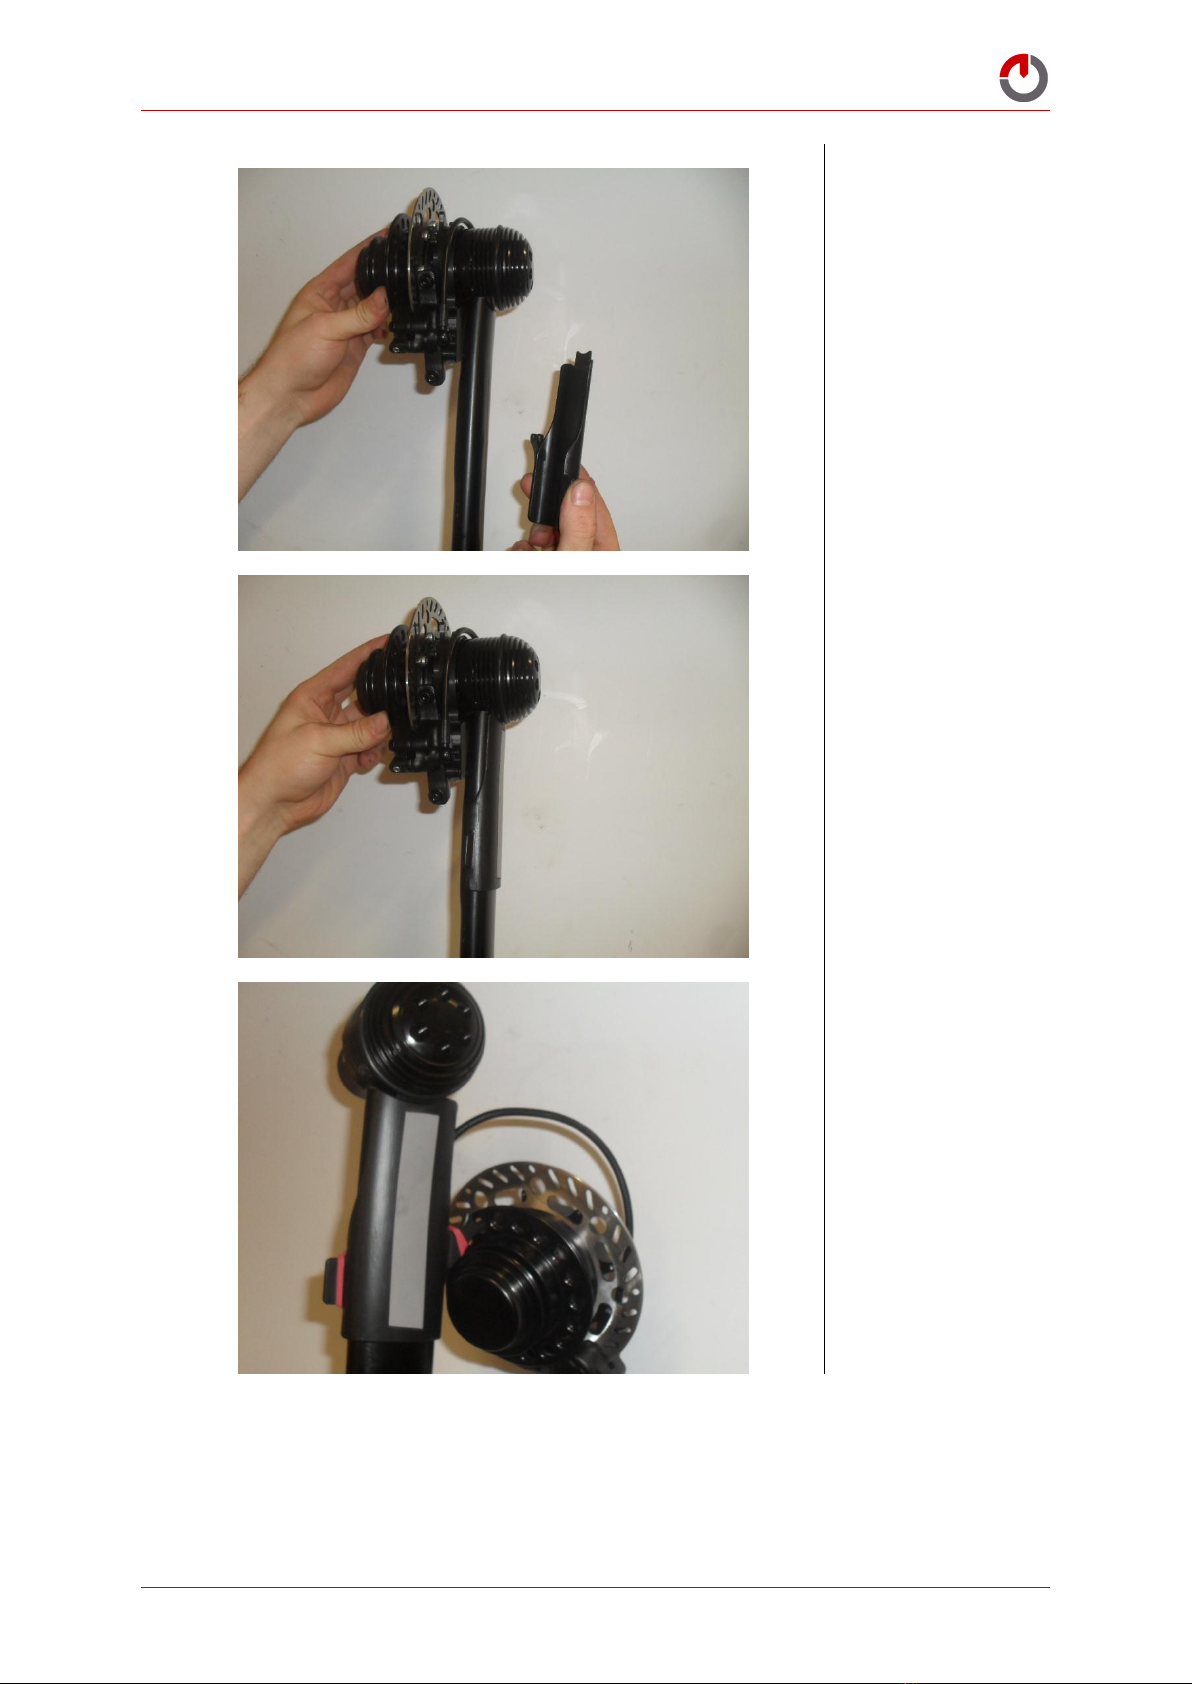
MotorGearbox and Controller Removal ............................................................................8
Controller Removal.........................................................................................................9
MotorGearbox Rework..................................................................................................11
Controller Replacement ................................................................................................ 14
MotorGearbox and Controller Installation.......................................................................16

Gocycle G2 MotorFork Guide 1.0
© Karbon Kinetics Limited. All Rights Reserved. 4
FRONT DISK COVER REMOVAL
NOTE:BEFORE COMMENCING ENSURE THE GOCYCLE IS IN SLEEP MODE
1.1. For ease of
assembly, invert the
Gocycle and locate
on a stand as
demonstrated.
Note: Ensure the
battery pack is in
sleep mode. Consult
your Owner’s Manual
for information.
1.2. Use a 2.5mm
Allen key and
unscrew the 6 bolts
(2163) that secure
the Front Disk Cover
(2137).
1.3. When all 6 bolts
have been removed
the Cover can be
removed.

Gocycle G2 MotorFork Guide 1.0
© Karbon Kinetics Limited. All Rights Reserved. 5
FRONT HUB RELOCATION
2.1. Use the 2.5mm
Allen key to undo the
Controller securing
bolt (2164).
2.2. Use a 3mm Allen
key to undo the 4
bolts (2162) that
secure the Fork Brace
(2100).
2.3. Once all 4 bolts
have been removed
the Fork Brace can
be released from the
MotorFork.

Gocycle G2 MotorFork Guide 1.0
© Karbon Kinetics Limited. All Rights Reserved. 6
2.4. Now the
MotorFork Separator
Tool (3177) must be
located in the
MotorGearbox fins as
demonstrated. The
top half of the tool
should align against
the Front Upright.
Note: Before
installing the tool
ensure the lower
component is
unscrewed to its
maximum extent.
Note: This
demonstrates
incorrect alignment
of the tool. It should
not locate against the
Disk.
2.5. Turn the thumb
screw to separate the
Front Hub from the
MotorFork.

Gocycle G2 MotorFork Guide 1.0
© Karbon Kinetics Limited. All Rights Reserved. 7
2.6. Support the
Front Hub and Locate
the Motor Holder
(3178). This fits onto
the MotorFork as
shown.
2.7. Slide the Motor
Holder up the Fork
into the fins of the
Motor and use the
elastic band to
secure the tool to the
MotorFork. Wrap the
elastic band around
the MotorFork tightly
to ensure the holder
will not move.
2.8. The Front hub
can now be
completely removed
from the MotorFork
and hung on the
Motor Holder as
demonstrated.

Gocycle G2 MotorFork Guide 1.0
© Karbon Kinetics Limited. All Rights Reserved. 8
MOTORGEARBOX AND CONTROLLER REMOVAL
3.1. With the Front
Hub relocated the
MotorGearbox and
Controller assembly
can now be removed.
Carefully begin to
push the unit
upwards as shown.
3.2. As the Anderson
connectors as well as
the ESC cable are
revealed, unplug
them as shown.
3.3. The
MotorGearbox and
Controller Assembly
can now be
completely removed
as demonstrated.

Gocycle G2 MotorFork Guide 1.0
© Karbon Kinetics Limited. All Rights Reserved. 9
CONTROLLER REMOVAL
4.1. Use a sharp
blade and with
extreme caution,
carefully cut the Heat
Shrink (2345) on the
three phase wires
from the Motor to
Controller.
4.2. Pull the heat
shrink back to reveal
the three connectors.
4.3. The three
connectors can be
unplugged releasing
the Controller from
the Motor.

Gocycle G2 MotorFork Guide 1.0
© Karbon Kinetics Limited. All Rights Reserved. 10
4.4. Finally remove
the Heat Shrink from
the phase wires of
the Motor.

Gocycle G2 MotorFork Guide 1.0
© Karbon Kinetics Limited. All Rights Reserved. 11
MOTORGEARBOX REWORK
5.1. Use the T25 bit
to unscrew 3 of 4
Gearbox securing
screws (2256) as
shown.
5.2. There is 1 screw
that requires the
removal of 1 Motor
Torque Bung as
shown.
5.3. Once all 4
screws have been
removed the Gearbox
(2041) can be pulled
off the Motor
Assembly (2036).
The photo
demonstrates how 1
stage can sometimes
be left attached to
the Motor.

Gocycle G2 MotorFork Guide 1.0
© Karbon Kinetics Limited. All Rights Reserved. 12
5.4. If this occurs
then carefully remove
the Gears and
reinstall into the
Gearbox. Take great
care to not
contaminate the
grease or gears.
5.5. In order to refit
a Gearbox and Motor
press the Gearbox
onto the Motor
ensuring to align the
securing holes as
shown. A press may
be required to ensure
the Gearbox is
correctly seated.
5.6. The 4 screws
can be installed as
shown.

Gocycle G2 MotorFork Guide 1.0
© Karbon Kinetics Limited. All Rights Reserved. 13
5.7. Ensure to
reinstall the Motor
Torque Bung.
Rework Complete.

Gocycle G2 MotorFork Guide 1.0
© Karbon Kinetics Limited. All Rights Reserved. 14
CONTROLLER REPLACEMENT
6.1. Install the three
pieces of Heat Shrink
(2345) over each of
the three phase wires
as shown.
6.2. Align the three
phase wires as
shown ready to
connect to the three
Motor wires.
6.3. Align the
connectors and press
them together as
shown. Ensure that
the connectors have
fully engaged
beneath the Heat
Shrink.

Gocycle G2 MotorFork Guide 1.0
© Karbon Kinetics Limited. All Rights Reserved. 15
6.4. Use a heat gun
on the Heat Shrink to
enclose the phase
wires. Ensure to have
the Heat Shrink
pushed as close to
the Motor as
possible. If there is a
gap it should be no
longer than 3mm.
This demonstrates a
connector that has
drifted apart. This
would require
reworking.
6.5. Use a blunt
wooden instrument
to ‘kink’ the phase
wires as shown,
ready for installation.

Gocycle G2 MotorFork Guide 1.0
© Karbon Kinetics Limited. All Rights Reserved. 16
MOTORGEARBOX AND CONTROLLER INSTALLATION
7.1. Carefully lower
the Assembled
MotorGearbox and
Controller into the
MotorFork as shown.
Plug in the two
Anderson and one
white connector as it
is lowered.
7.2. Ensure the
Controller is fully
inserted and that the
Controller securing
hole aligns with the
hole in the MotorFork
to allow installation
of the screw (2164).
7.3. Unhook the
Front Hub and line
up the 6 Spring pins
with the Motor
Torque Bungs. The
Clutch will need to be
manually aligned with
the output shaft of
the MotorGearbox.
To do this, slowly
turn the Hub until it
aligns with the
Output shaft and
then tightly press the
Hub and
MotorGearbox
together.

Gocycle G2 MotorFork Guide 1.0
© Karbon Kinetics Limited. All Rights Reserved. 17
7.4. Ensure the
MotorGearbox and
Front hub assembly
are fully inserted and
the edge of the fork
is on the shoulder of
the Hub assembly as
shown here.
7.5. Install the Fork
Brace and the four
securing bolts.
Tighten in the order
demonstrated to 4-
5Nm.
7.6. Locate the Front
Disk Cover and align
the securing bolt
holes.
1
2
3
4

Gocycle G2 MotorFork Guide 1.0
© Karbon Kinetics Limited. All Rights Reserved. 18
7.7. Tighten the 6
securing bolts to 1-
2Nm.
IMPORTANT NOTE: THE ABOVE REMOVAL AND REPLACEMENT STEPS MUST BE CARRIED
OUT IN ORDER. FAILING TO DO SO MAY RESULT IN DAMAGE TO THE GOCYCLE.
If you have any further queries or comments, please contact Gocycle Technical Support:
techsupport@gocycle.com
Table of contents
Other Gocycle Scooter manuals
Popular Scooter manuals by other brands

CHALLENGER SPORT
CHALLENGER SPORT J55 user manual

Denver Electronics
Denver Electronics DBO-6550 MK2 Original instruction

Scooty
Scooty SCOOT151 instruction manual

Pride
Pride Cyclone owner's manual

Stiga
Stiga KICK SCOOTER CRUISE 145-S Assemble, instruction manual

Add Freedom Scooters
Add Freedom Scooters Swift ES008 J-4 Operation manual