Gomax VW-1404ZH User manual

4-Display HDMI2.0a 4K 4:4:4 Video Wall
Processor
User Manual
rev: 170621
Made in Taiwan
VW-1404ZH

Safety and Notice
The VW-1404ZH 4-Display HDMI2.0a 4K 4:4:4 Video Wall Processor has been tested for
conformance to safety regulations and requirements, and has been certified for international use.
However, like all electronic equipment, the VW-1404ZH should be used with care. Please read and
follow the safety instructions to protect yourself from possible injury and to minimize the risk of
damage to the unit.
●Follow all instructions and warnings marked on this unit.
●Do not attempt to service this unit yourself, except where explained in this manual.
●Provide proper ventilation and air circulation and do not use near water.
●Keep objects that might damage the device and assure that the placement of this unit is on a
stable surface.
●Use only the power adapter and power cords and connection cables designed for this unit.
●Do not use liquid or aerosol cleaners to clean this unit. Always unplug the power to the device
before cleaning.
TABLE OF CONTENTS
INTRODUCTION.................................................................................................................1
FEATURES.........................................................................................................................1
PACKAGE CONTENTS......................................................................................................1
SPECIFICATIONS..............................................................................................................2
HARDWARE INSTALLATION.............................................................................................3
CONNECTION DIAGRAM ..................................................................................................3
PANEL DESCRIPTIONS.....................................................................................................4
SUPPORTED RESOLUTION..............................................................................................5
OPERATION APPROACH..................................................................................................5
EDID LEARNING..............................................................................................................15
WARRANTY .....................................................................................................................16

1
INTRODUCTION
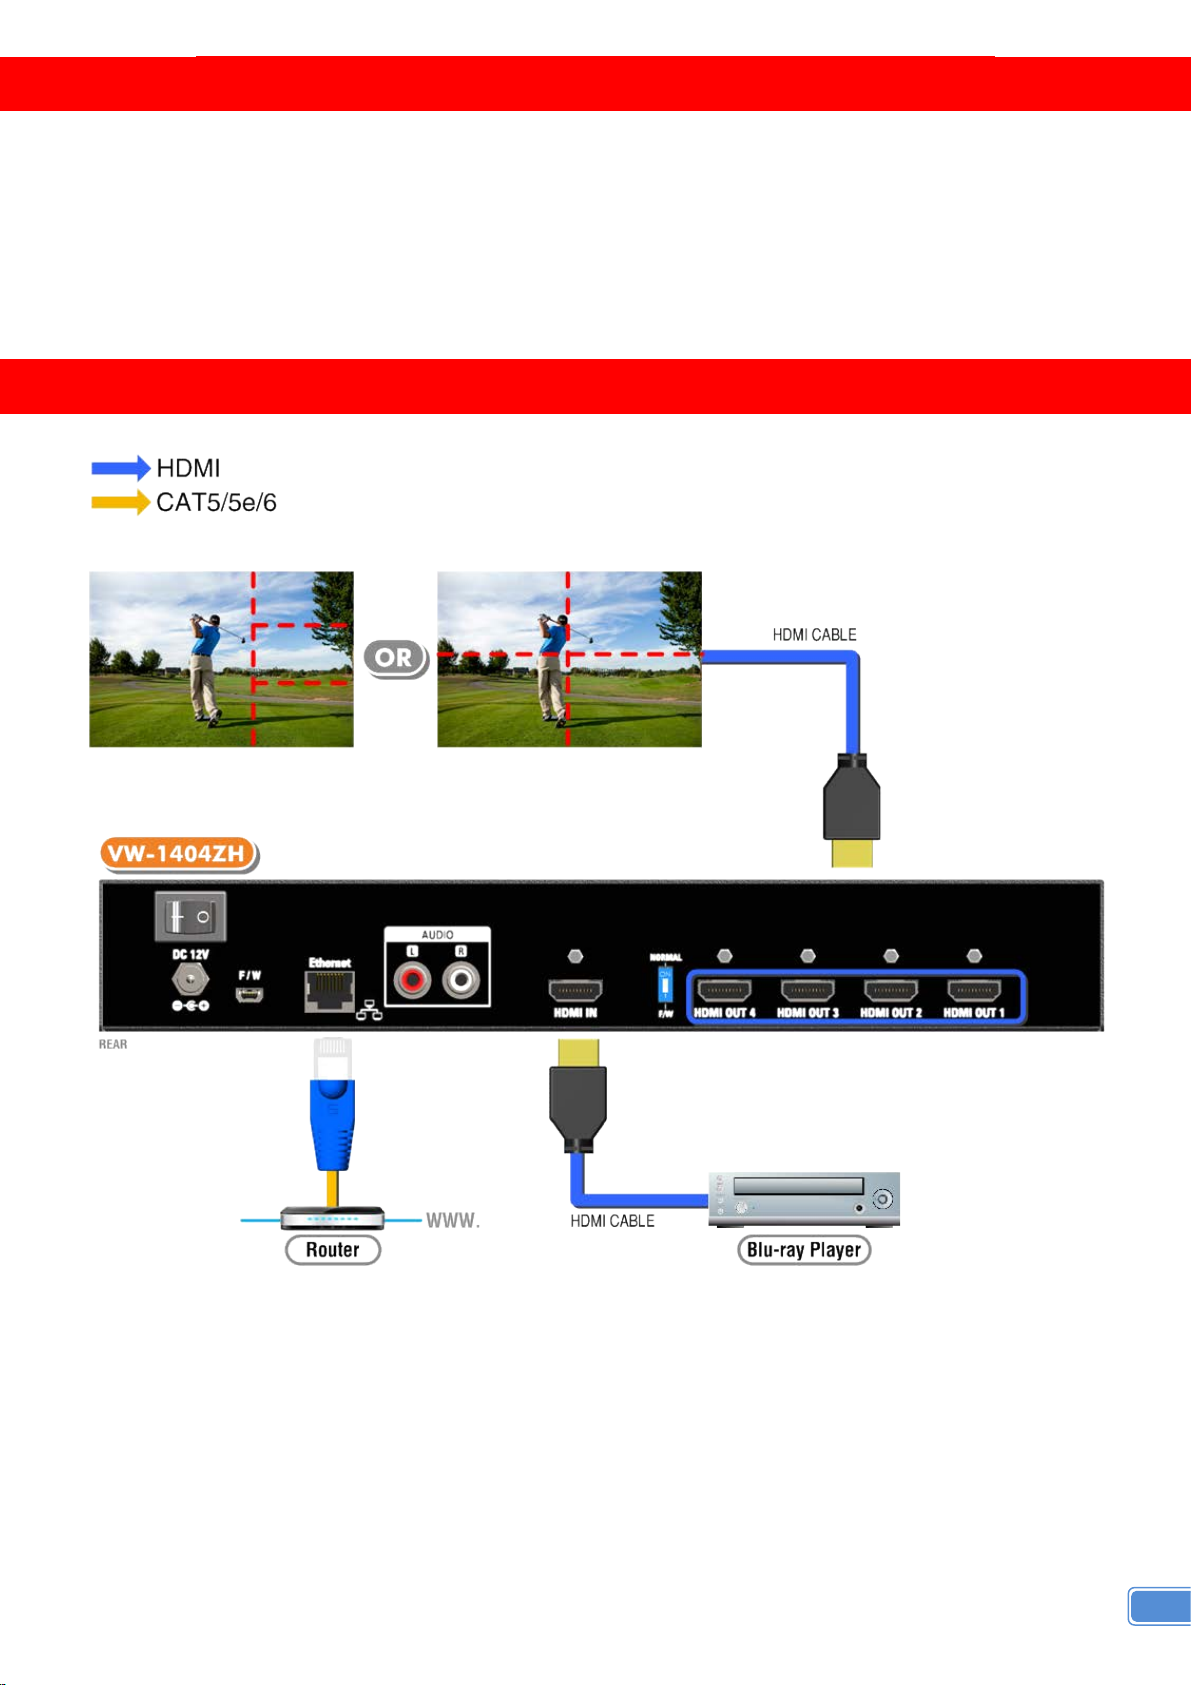
The VW-1404ZH 4-Display HDMI2.0a 4K 4:4:4 Video Wall Processor is a powerful, cost effective, and
fully real time data/video processor for multiple flat panel displays or projectors. Virtually any setups for
the display layout can be possible by the control software. The VW-1404ZH allows user to input HDMI up
to 4K2K@60Hz 4:4:4. And the embedded scaler converts signals from HDMI source to match the native
resolution of monitors, flat panel displays, projectors as well as user-selectable output settings up to
WUXGA (1920x1200). The VW-1404ZH sends the resulting processed video thru HDMI interface to the
connected monitors/projectors based on the setup display layout. The layout can be readily modified to fit
your applications in digital signage, broadcasting, education and surveillance systems and optimize visual
effects.
FEATURES
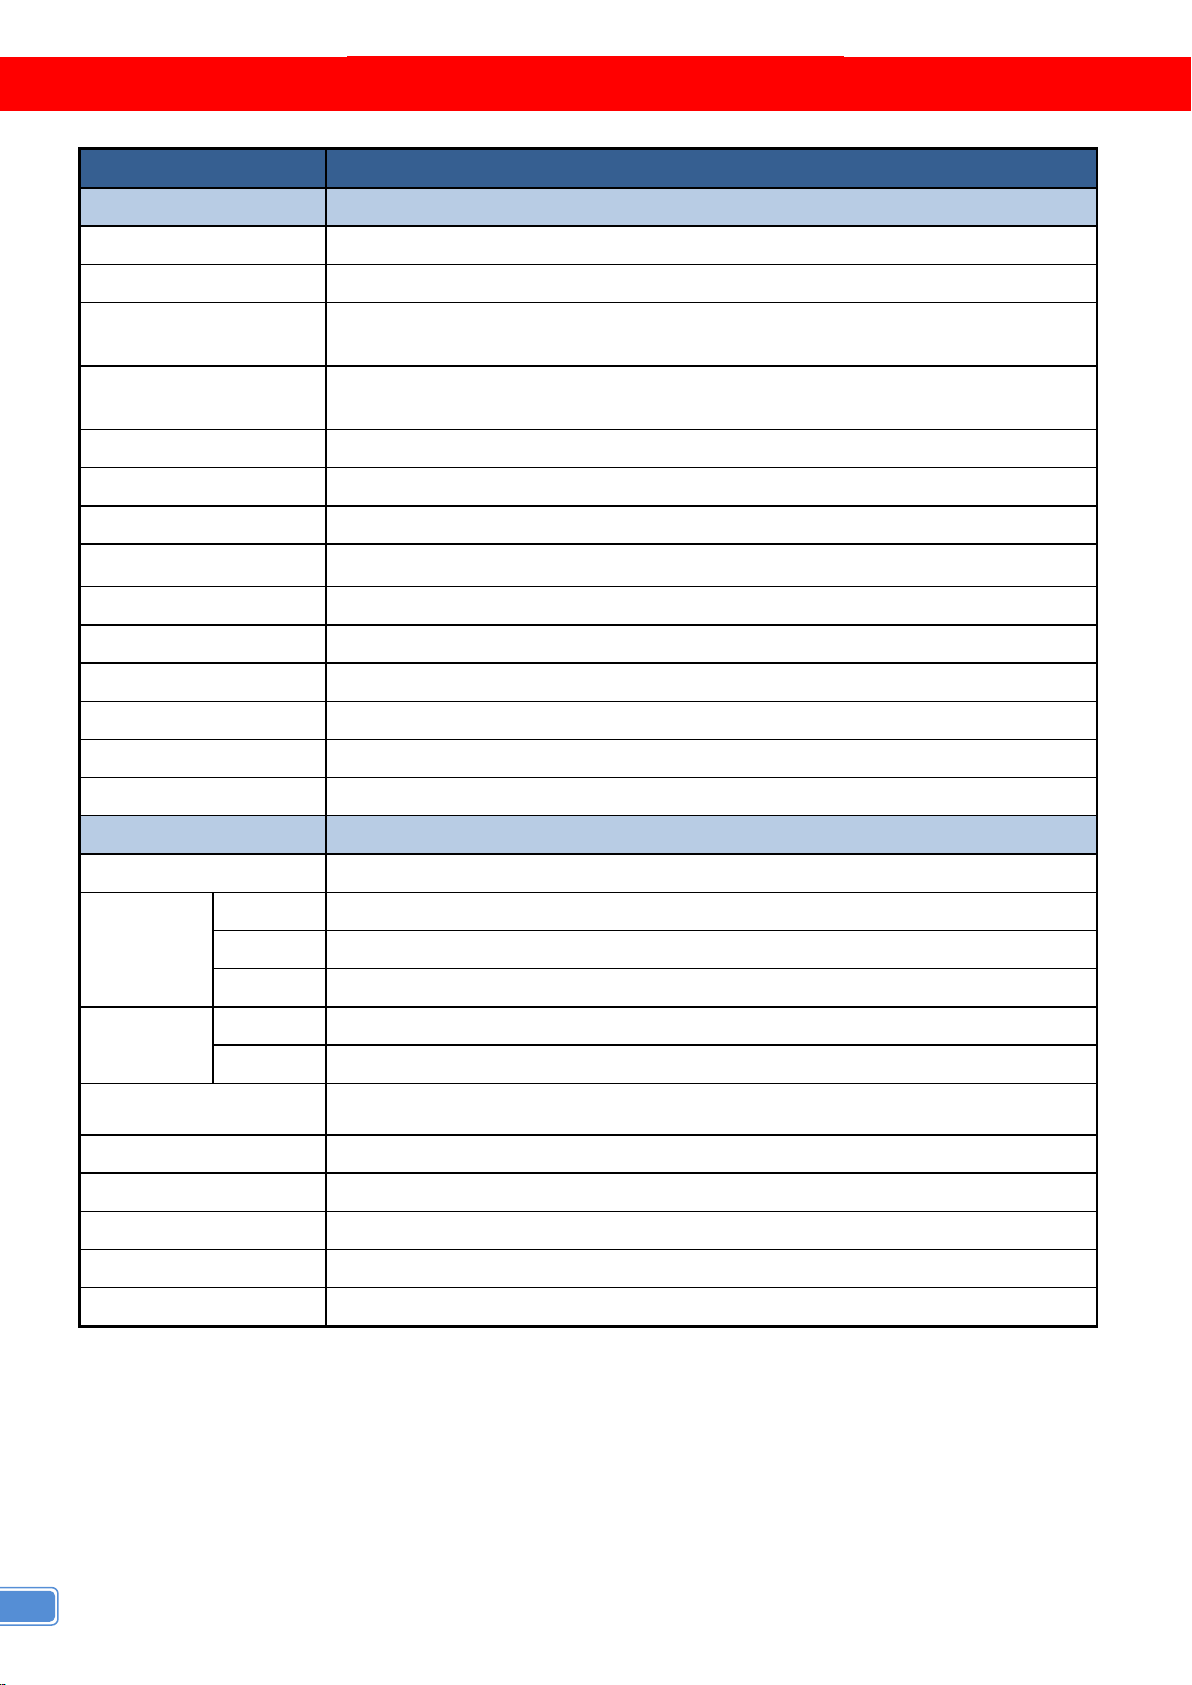
Four HDMI outputs from 640x480 to 1920x1200
Supports HDMI input from 640x480 to 4K2K@60 (YUV 4:4:4), interlaced or progressive
HDCP compliant
Image parameters and layouts are automatically saved in flash memory of the device and can be
recalled for later use
Several image parameters and layouts can be saved in computers and can be loaded for later use
Firmware upgradable for new features and technology enhancements
Supports IR remote control
Software control through USB and Ethernet
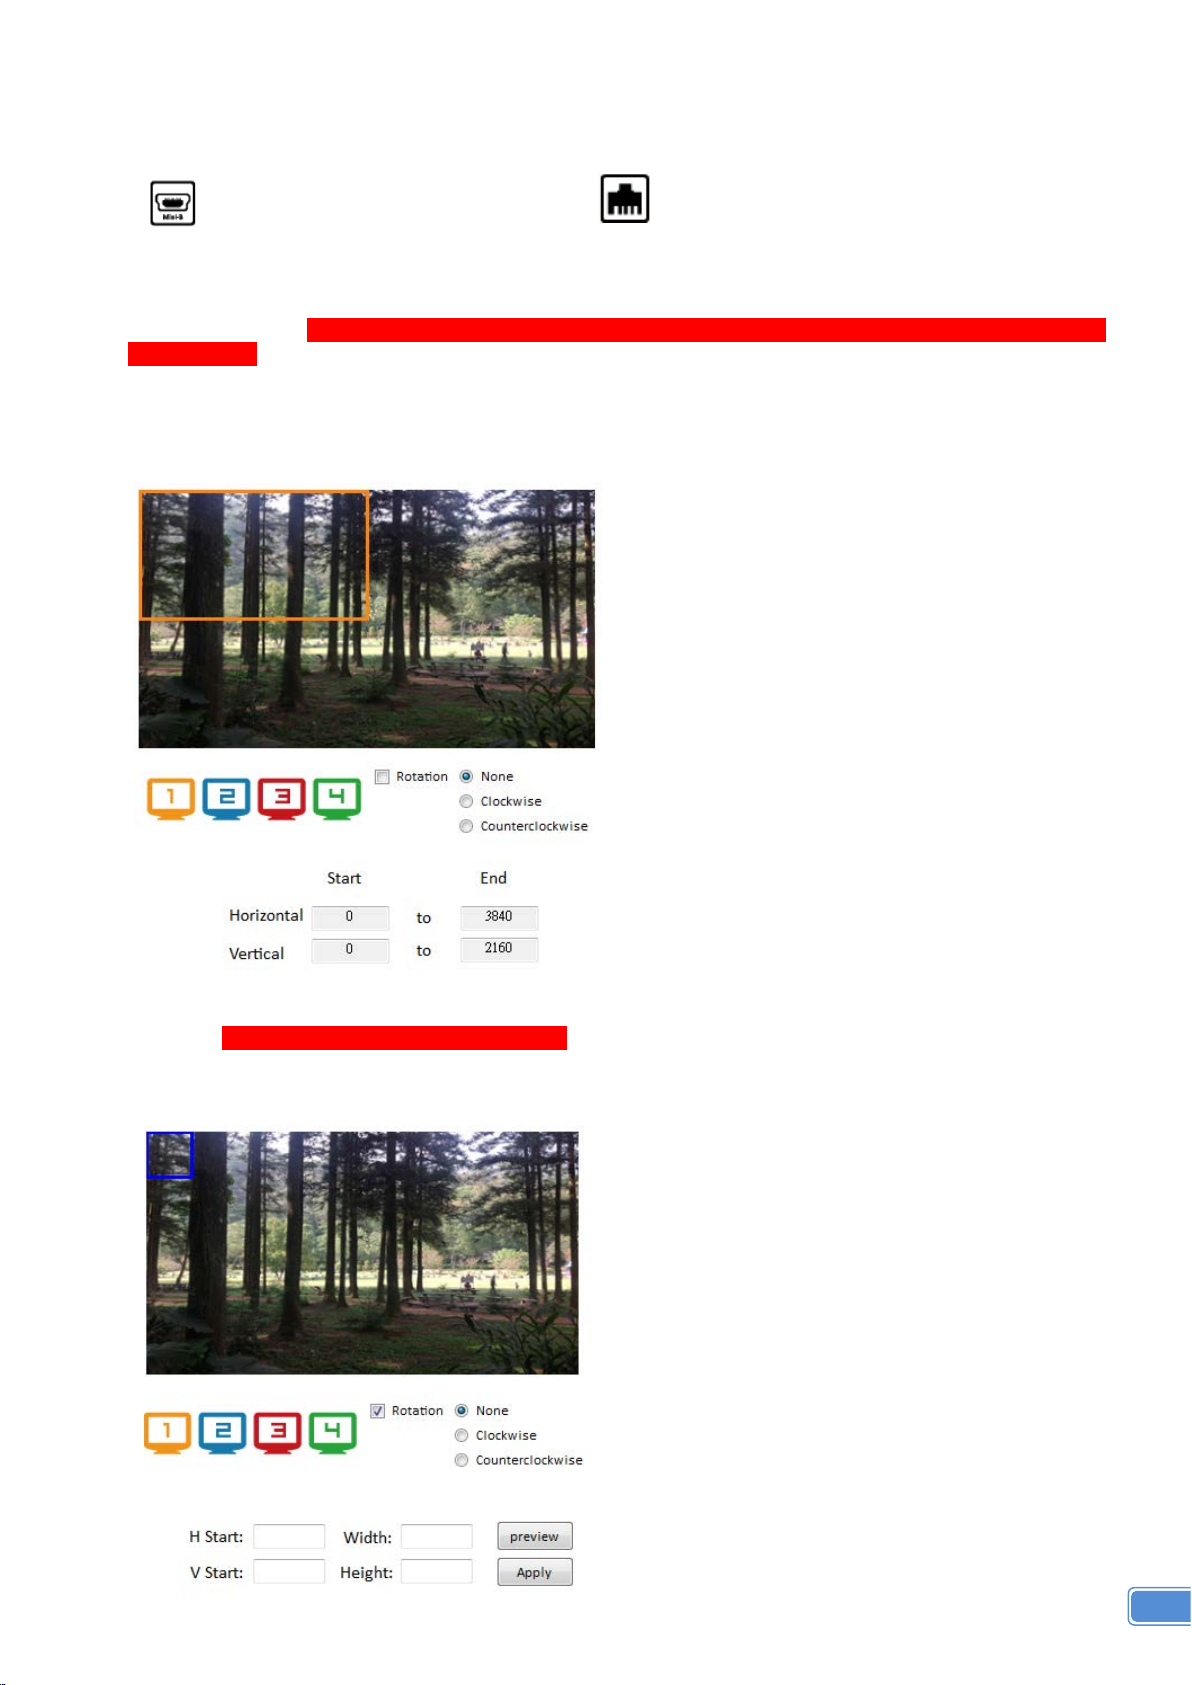
Resize, position, zoom for each HDMI output video
User-selectable output settings, up to 1920x1200
Supports remote control to switch 1x1, 2x2, 1x3 rotate, and 1x4 rotate mode
Supports independent input rotation at the resolution up to 1080p
4K2K60 (YUV 4:4:4) can be divided and displayed onto four 1080p60 TV (2x2 layout only)
Supports individual propagation delay on each display to have the best visual perception
PACKAGE CONTENTS
1x VW-1404ZH
1x User Manual
1x 1U rack-mounting ear set
1x 12V power supply
1x Installation software CD
1x IR Remote control (15 keys)

2
SPECIFICATIONS
Model Name
VW-1404ZH
Technical
Role of usage
Video Wall Processor
HDCP compliance
Yes
Video bandwidth
Input – Single link 600MHz [18Gbps]
Output –Single-link 225MHz [6.75Gbps]
Video support
Input - 4K2K@60 (4:2:0 10bits) / 4K2K@60 (4:4:4 8bits)
Output – 1920x1080@60 / 1920x1200@60
Video Format Support
HDMI
Audio support
Yes
ESD protection
Human body model — ±15kV [air-gap discharge] & ±8kV [contact discharge]
Input
1x HDMI + 1x USB + 1xRJ45
Output
4x HDMI + 1x Stereo
Control
IR remote control / Ethernet / USB (virtual ) / Front Panel
Input TMDS signal
1.2 Volts [peak-to-peak]
HDMI connector
Type A [19-pin female]
Mini-USB connector
Type A
RJ-45 connector
WE/SS 8P8C
Mechanical
Enclosure
Metal case
Dimensions
(L x W x H)
Model
288 x 180 x 43mm [11.3" x 9" x 4.4"]
Package
376 x 240 x 112mm [1'2" x 9.4" x 4.4"]
Carton
590 x 510 x 405mm [1'9" x 1'7" x 1'3"]
Weight
Model
1505g [3.3lbs]
Package
2128g [4.7lbs]
Fixedness 1U rack-mount with ears and Wall hanging holes
Power supply
12V DC
Power Consumption
12W
Operation temperature
0~40°C [32~104°F]
Storage temperature
-20~60°C [-4~140°F]
Relative humidity
20~90% RH [no condensation]

3
HARDWARE INSTALLATION
VW-1404ZH as master
1. Connect the sources to HDMI Input of the VW-1404ZH.
2. Connect all displays to HDMI Outputs of the VW-1404ZH.
3. Connect the +12V DC power supply to the VW-1404ZH.
CONNECTION DIAGRAM

4
PANEL DESCRIPTIONS
Front Panel
1. IR SENSOR: IR sensor for receiving the IR commands from IR remote
2. Power Status: Power indicator LED
3. Control buttons:
Button 1: Reserved
Button 2: Reserved
Button 3 – Previous: Previous rotation setting
Button 4 – Fast switch to 1x1 and 2x2
Button 5 – Fast switch to 3x1 -90° and 90°
Button 6 – Fast switch to 4x1 -90° and 90°
Rear Panel
4. Power Switch: Power ON/OFF switch
5. +12V DC: 12V DC power jack
6. USB virtual COM
7. Ethernet: Ethernet control port
8. Stereo audio output – L
9. Stereo audio output – R
10. INPUT:HDMI input
11. Dip Switch: For firmware update (Default mode: OFF)
12. Output 1-4: HDMI outputs

5
SUPPORTED RESOLUTION
Input resolution Output resolution
720x480@30Hz
720x480@60Hz
720x576@30Hz
720x576@60Hz
1280x720@60Hz
1920x1080@30Hz
1920x1080@60Hz
4K2K@30Hz
4K2K@60Hz (4:2:0 10bits)
4K2K@60Hz (4:2:2 10 bits)
4K2K@60Hz (4:4:4 8bits)
640x480@60Hz
720x480@60Hz
720x576@60Hz
800x600@60Hz
1024x768@60Hz
1280x720@60Hz
1280x768@60Hz
1280x960@60Hz
1280x1024@60Hz
1366x768@60Hz
1440x900@60Hz
1680x1050@60Hz
1920x1080@60Hz
1920x1200@60Hz
1600x1200@60Hz
OPERATION APPROACH
Method A: IR Remote Control
Button Function
POWER
Power On/Off the video wall processor
Audio +
Increase the audio volume
Audio -
Decrease the audio volume
Fast switch to VW1x1 (Full Screen)
Fast switch to VW3x1 (-90°)
Fast switch to VW3x1 (+90°)
Fast switch to VW2x2
Fast switch to VW4x1 (-90°)
Fast switch to VW4x1 (+90°)
Previous
Previous rotation setting
MUTE
Turn off the stereo audio output
Factory Reset
Factory default reset

6
Method B: Software Operation
System Requirement and Precautions
1. Whenever power off VW-1404ZH, please stay unpowered at least 5 to 10 seconds to allow power
capacitors to discharge.
2. The VW-1404ZH provides software control program which runs under Microsoft Windows 98, 2000,
XP, 7, 8 through the interface of USB virtual com control.
3. Before you click on the icon of the software, make sure you have secured the connection between
your computer USB port and the VW-1404ZH.
Start the software control program
Executing the control software, the following dialog will pop up. It has two ways to control the VW-1404ZH
device (under Microsoft Windows 7, please run as administrator).
1. USB Connection: Use USB to connect the port on device and computer. Select correct virtual COM port and
click the OK button.
2. Ethernet Connection: Enter the device IP address and click the OK button.
After the software control setting is accomplished, it will enter directly to the control interface.
1
2
3
4
6
7
8
5

7
Control Interface
1. Connection Status:
Show the connect information and status. If you use USB control Mode to connect device, the graph
is . For IP control, the graph of Ethernet is .
2. Quick Selection: *Quick Selection function is not available when the input resolution is
4K2K@60Hz
In this part, you can set up the screen resolution, screen coordinate and split screen. Firstly, you
should select the TV picture and you can set up the corresponding function. The different colors of
frame represent the different output TVs. The information of coordinate shows the position of output
TV.
Rotation: *only at input is 1080p resolution
Use the software for independent rotation for each input. You can select clockwise or
counterclockwise to rotate the screen.

8
Output Selection and Resolution:
(1) Step 1: check input resolution and choose output resolution
Set the output resolution. You can choose the design display icon to select the output port and
setup resolution. When setting the different resolution, the coordinate of output will also be
changed.
*Note that when you select the Synchronize function, all windows needs to set up in the same
resolution, otherwise the output will be abnormal.
(2) Step 2: output setting
In here, it has three modes can set up the output TV resolution, position, size and split screen.
The details of different mode are described in step 2-1, 2-2 and 2-3.
*Note that when you want to change another mode, you need to back to the step 2 to change.
Quick Selection
From file
Custom define

9
(3) Step 2-1: quick selection
If you choose the Quick Selection mode in step 2, this window will automatically pop up. In this
mode, you can select default screen split and rotate screen (rotate screen only at 080p
resolution).
3x1: This mode will divide the screen into 3 parts and rotate the figure. The remaining part
shows the full screen.
4x1: The mode will divide the screen into 4 parts and rotate the figure.
When select the 3x1 or 4x1 mode, the picture in the right part of control interface will show a
white circle. You can slide this white circle to resize the output screen. In addition, you also can
input the number to adjust the coordinate.
(4) Step 2-2: configuration from file
You can load and read configuration from the existing file on your PC/laptop.
4k2k60 (YUV 4:4:4) only can be displayed as an 2x2 layout (1080p60 for each output)

10
(5) Step 2-3: custom define
In Custom define mode, you can define how to cut in both directions and the part you want to
show on output TV. If you want to understand or estimate which part you may select, you can
select the Grid button to show grid on the graph. After the setting, please click the
button. Besides, you also can click the button to save the configuration for future
usage. You can adjust the output position by setting coordinates.
(6) Step 3: adjust image
Zoom In/Out: You can change pixel size from the edge of image by clicking and
button (the edge of image has four directions). After adjusting the image, the rest of
this image will be auto-scaled to fulfill the screen.
Horizontal shift/ Vertical shift: You can arbitrarily move the image on each screen in
horizontal direction or vertical direction. Move one pixel at a time.

11
3. EDID (Extended Display Identification Data)
(1) Learn EDID from the default
Select Default EDID (1-3 default EDID).
Click button to learn default EDID.
(2) Learn EDID from Display
Select the Output.
Click button to learn display EDID.
(3) Learn EDID from File
Click button to select the EDID file and write it into input.
(4) View EDID content
Select the EDID input source (Input, Output or From File).
Click button to read the EDID description and analysis.
Click button to save the EDID as a file in the connected computer.

12
4. Advanced Setting
(1) Machine Name
You can set up your machine name in here. Please take a closer look at the length of string (Max
Length: 8).
(2) Change Graph
You can change the default graph (splash screen) on this machine.
Click button to select the graph.
After loading the graph step, please click button to write this graph into device.
(3) Factory Reset
Click button to do factory default reset.
This default reset process will take about 5 seconds.
After pop-up a dialog indicates complete, please restart this machine.

13
5. 4K Setting
When input is 4K2K@60Hz Resolution, the output display will be forced to 2x2 layout (other layout
cannot set) and only can set up the output position.
6. IP Configure
You also can use the Ethernet to control software program. First, you should click the
button to setup network set. Next, you can read the Ethernet setting from device
and manually set to device or click the DHCP button to automatically get the IP address. After the
step of IP configuration, please restart the machine.

14
7. Info
Read the software and firmware version.
8. Refresh
This function not only can refresh the information of setting but also can reconnect this device. You
can click button to update the control connection. A “ReConnectForm” window will pop
up for you to select the approach to connect this device.

15
EDID LEARNING
The EDID learning function is only necessary whenever you encounter any display on the HDMI
output port that cannot play audio and video properly. Because the HDMI sources and displays may have
various level of capability in playing audio and video, the general principle is that the source will output the
lowest standards in terms of audio format and video resolutions to be commonly acceptable among all
HDMI displays. In this case, a 720p stereo HDMI signal output would be probably the safest choice.
Nevertheless, the user can force the matrix to learn the EDID of the lowest capable HDMI display among
others to make sure all displays are capable to play the HDMI signals normally.
The method on doing EDID learning please refer to the software operation section.
There are three embedded default EDIDsas below,
1. Full-HD(1080p@60)-24bit 2D & 2ch
2. Full-HD(1080i 720p@60)-24bit 2D & 2ch
3. 4K2K@60-24bit 2D & 2ch

16
WARRANTY
The SELLER warrants the VW-1404ZH 4-Display HDMI2.0a 4K 4:4:4 Video Wall Processor is free
from defects in the material and workmanship for 1 year from the date of purchase from the SELLER or
an authorized dealer. Should this product fail to be in good working order within 1 year warranty period,
The SELLER, at its option, repair or replace the unit, provided that the unit has not been subjected to
accident, disaster, abuse or any unauthorized modifications including static discharge and power surge.
This warranty is offered by the SELLER for its BUYER with direct transaction only. This warranty is void if
the warranty seal on the metal housing is broken.
Unit that fails under conditions other than those covered will be repaired at the current price of parts
and labor in effect at the time of repair. Such repairs are warranted for 90 days from the day of reshipment
to the BUYER. If the unit is delivered by mail, customers agree to insure the unit or assume the risk of loss
or damage in transit. Under no circumstances will a unit be accepted without a return authorization
number.
The warranty is in lieu of all other warranties expressed or implied, including without limitations, any
other implied warranty or fitness or merchantability for any particular purpose, all of which are expressly
disclaimed.
Proof of sale may be required in order to claim warranty. Customers outside Taiwan are responsible
for shipping charges to and from the SELLER. Cables and power adapters are limited to a 30 day
warranty and must be free from any markings, scratches, and neatly coiled.
The content of this manual has been carefully checked and is believed to be accurate. However, The
SELLER assumes no responsibility for any inaccuracies that may be contained in this manual. The
SELLER will NOT be liable for direct, indirect, incidental, special, or consequential damages resulting
from any defect or omission in this manual, even if advised of the possibility of such damages. Also, the
technical information contained herein regarding the VW-1404ZH features and specifications is
subject to change without further notice.
Table of contents
Other Gomax Media Converter manuals

Gomax
Gomax CV-305P User manual

Gomax
Gomax CV-915 User manual

Gomax
Gomax CV-503ZK-A User manual

Gomax
Gomax MX-2000A User manual

Gomax
Gomax SP-5002PZ User manual

Gomax
Gomax HUB-66U User manual

Gomax
Gomax VW-1404ZH-C User manual

Gomax
Gomax CV-503ZKM User manual

Gomax
Gomax SP-5002VZC User manual

Gomax
Gomax CV-5005H User manual

Gomax
Gomax MX-1003A User manual

Gomax
Gomax CV-503SZ User manual

Gomax
Gomax MX-2003B User manual

Gomax
Gomax CV-305VS User manual

Gomax
Gomax CV-C05S User manual

Gomax
Gomax CV-105 User manual

Gomax
Gomax CV-53AK User manual

Gomax
Gomax CV-53BI User manual

Gomax
Gomax VW-1404CZ User manual

Gomax
Gomax MT-305A User manual