Gould 400 Series User manual

Digital Storage Oscilloscopes
Operators Manual
Gould 400 Series

Gould 400 Series
Digital Storage Oscilloscopes
Operators Manual
Copyright@1990 Gould lnc., Instruments Division
(Gould Electronics Ltd.)

400 Operators Manual
Contents
Introduction
Getting Started
1
Advanced Features
2
The Menus
3
Performance Checking
4
Waveform Processing
5
Battery Unit Operation
6
Alphabetical Summary
7
Appendix 1 Error Messages
A1
Appendix 2 Specification
A2
Appendix 3 Remote
Operation
A3
A
ppendix 4 Front & Back
Pictures
I
Service Facilities

Contents 400 Operators Manual
Introduction
2.5
Plot
2.5.1
Internal Colour Plotter
Oti
1.
Getting Started
2.5.2
Pens
1.1
Safety and Power Requirements
2.5.3
Pen Changing
1.1.1
International Safety Warning
2.5.4
Paper Selection
1.1.2
Grounding
2.5.5
Paper Loading
1.1.3
Live Parts
2.5.6
Internal plotting
1.1.4
Ventilation and Dust
2.5.7
External plots
1.1.5
Operating Temperatures
2.5.8
Plot positioning and scaling
1.1.6
Power & Frequency
Requirements
2.6
Data Transfer
1.1.7
Fuse Requirements
2.6.1
Syntax
2.6.2
Receiving Data
1.2
Using the Buttons
2.6.3
Error Status
1.3
Start-Up Display
1.4
Obtaining a Trace
2.7
Real Time Clock
1.4.1
AUTO SETUP
1.4.2
Channel Selection (Off/On/lnv)
3.
The Menus
1.4.3
Coupling (AC/DC/Gnd)
3.1
Additional Buttons
3.1.1
The Numeric Buttons
1.5
Horizontal Adjustments
3.1.2
Menu Traces
1.5.1
TIME/DIVISION
3.1.3
Control
1.5.2
Aliases
3.1.4
Post Store
1.5.3
Position
1.5.4
Magnification
3.2
Control Master Menu
3.3
Status Menu
1.6
Vertical Adjustments
3.3.1
Mode
1.6.1
VOLTS/DIVISION
3.3.2
Max/Min
1.6.2
Position
3.3.3
V/Div
1.6.3
Variable/Uncalibrated
3.3.4
Probe set
1.6.4
Add
3.3.5
Timebase
3.3.6
Trigger
1.7
Manually Obtaining a Trace
1.8
Operating Hints
3.4
Display and Trigger Menu
1.8.1
Intensities too low
3.4.1
Probe ratio
1.8.2
Trace off the top or bottom
3.4.2
Max/Min
of screen
3.4.3
Dot Join
1.8.3
Trace not being acquired
3.4.4
Averaging
1.8.4
Trace unstable
3.4.5
Trig Pos'n
1.8.5
Trace has flat top or bottom
3.5
Display Intensity
2.
Advanced Features
3.6
Reference Trace
2.1
Trigger Control
3.7
RS423 Interface Menu
2.1.1
Selecting Source and Coupling
3.7.1
RS423 Plot Connections
2.1.2
Level
3.7.2
RS423 Data Connections
2.1.3
Trigger Point (T)
2.1.4
Slope
(+/-)
3.8
Special Functions Menu
2.1.5
Trigger Mode (Norm/Auto)
3.9
Post Store Master Menu
2.1.6
Trigger Delay
3.10 Save Trace Menu
3.11
Recall Memory Menu
2.2
Captu e Facilities
r
2.2.1
3.12 Plot Menu
Trace Hold
2.2.2
S/Shot and Run
4.
Performance checking
2.2.3
Acquisition Status-AFTS
4.1
Risetime
4.2
Bandwidth
2.3
Display Modes
4.3
Trigger sensitivity
2.4
Cursor Measurements
4.4
Trigger bandwidth
2.4.1
Cursor and Datum Selection
4.5
Timebase calibration
2.4.2
The Cursor& Datum Lines
4.6
Vertical Calibration
2.4.3
Making Measurements
4.7
Max-Min (Alias Detector)

Contents
400 Series Operators Manual
5.
Waveform Processing Functions
Figure List
5.1
Cursor Measurements
1.2a
Single Function Buttons
5.1.1
Voltage and Time
1.2b
The Toggles
5.1.2
Peak-Peak
1.2c
Pressure Sensitive Buttons
5.1.3
Max-Min
1.3
Start-Up Display
5.1.4
Risetime (falltime)
1.4
Obtaining a trace
5.1.5
Overshoot (preshoot)
1.4.1
An AUTO SETUP Display
5.1.6
Pulse Width
1.5
Horizontal Controls
5.1.7
Frequency, Period, Duty Cycle
1.5.2
Alias Generation
5.1.8
RMS
1.6
Vertical Controls
5.1.9
Area
2.1
Trigger Controls
2.1.6
Trace Capture with Delay
5.2
Trace Manipulation
2.2
Capture Controls
5.2.1
Filter Frequency
2.4
The Cursor and Datum Line Controls
5.2.2
Filter Current Trace
2.4.2
The Cursor and Datum Lines
5.2.3
Invert Current Trace
2.5.5
Paper Loading
5.2.4
Integrate Signal
2.5.8a
Relative Plot Positions
5.2.5
Integrate Current Trace
2.5.8b
Plot Dimensions
3
Menu Overview
5.3
Trace arithmetic
3.1
Numeric Buttons
3.2
Control Master Menu
5.4
Persistence/Limits Testing
3.3
A Status Menu
5.4.1
Limits
3.4
A Display and Trigger Menu
5.4.2
Persistence
3.5
Display Intensity Menu
3.6
Reference Trace Menu
6.
Battery Unit Operation
3.7
An RS423 Interface Menu
3.7.1
400to Gould 6120 or HP7475 Connections
7.
Alphabetical Summary of controls
3.7.2a
400 to IBM-PC/XT Connections
3.7.2b
400 to IBM-PC/AT Connections
Appendix 1: Error Messages
3.8
Special Functions Menu
3.9
Post Storage Master Menu
Appendix 2: Specification
3.10
Save Trace Menu
3.11
Recall Trace Menu
Appendix 3: Remote DC operation of the DSO
3.12
Plot Menu
5.1a
Cursor Measurements Menu
Appendix 4: Front and Back Pictures
5.1b
Example of Calculations on trace
5.1.1
Voltage and Time Measurement
Service Facilities
5.1.2
Peak to Peak Measurement
5.1.3
Max-Min Measurement
5.1.4
Risetime Measurement
5.1.5
Overshoot Measurement
5.1.6
Pulse Width Measurement
5.1.7
Freq. Period and Duty Cycle Measurement
5.1.9
Area Measurement
5.2
Trace Manipulation Menu
5.4
Persistence/Limits Testing Menu
6
Battery Unit Interconnections
6.2
Battery Unit Front Panel Indicators
A2
400 Series Dimensions
A3.2
DC Power Connections
A4a
Rear View
A4b
RS423 Connections
A4c
Front Panel Controls

400 Operators Manual Introduction
I
n
t
ro
d
uc
ti
on
The Gould 400 series instruments are Digital Storage
Oscilloscopes (DSOs). They include all the features
expected of advanced modern oscilloscopes designed for
the professional engineer, whilst retaining the user-
friendliness essential for those learning to use such
instruments for the first time.
The 400 range consists of three basic models; the 400 the
420 and the 450. All versions can be fitted with a battery
unit which provides the instrument with a fully automatic
built in Nickel Cadmium battery and charger which
allows uninterrupted operation of the DSO in the event
of an AC supply failure and complete operation
independent of an AC supply.
Obtaining a trace is especially simple - just connect the
signal and press the Auto Setup button - the 400 does the
rest. Having obtained a trace, readily accessible datum
lines and a cursor make it easy to take automatic timing
and voltage measurements directly from the display. On
the 420 and 450 models, the waveform processing
function increases the power of the cursor measurements
in terms of both capture and post storage analysis and
measurement functions.
The innovative use of ergonomically designed pressure
sensitive push button controls provides a combination of
precision and flexibility for ease of operation.
More advanced features of the 400 series include a co
m
-
prehensive range of menu-controlled functions. For
example, the Display and Trigger menu operates features
such as the trigger delay and pre-trigger display
functions. The pre-trigger display function allows the
signal prior to the trigger point to be captured and
displayed.
Three complete traces can be stored for future use and
recalled to the display via the Save Trace and Recall
Trace menus respectively. With the built in battery back
up facility, these will be retained even when the
instrument is switched off.
In addition to the above features, the 420 and 450 instru-
ments have a built in 4 colour plotter and a battery
backed Real Time Clock. This provides a simple and
convenient method of obtaining permanent hard copy
plots of the screen display. The plots will contain the date
and time of acquisition together with the date and time of
plotting.
The 450 has all the features of the 420 and has a signal
bandwidth of 50MHz and an extra timebase range of
50ns/div.
N
umbers circled in the text refer to the controls shown
on the front panel picture in Appendix 3.

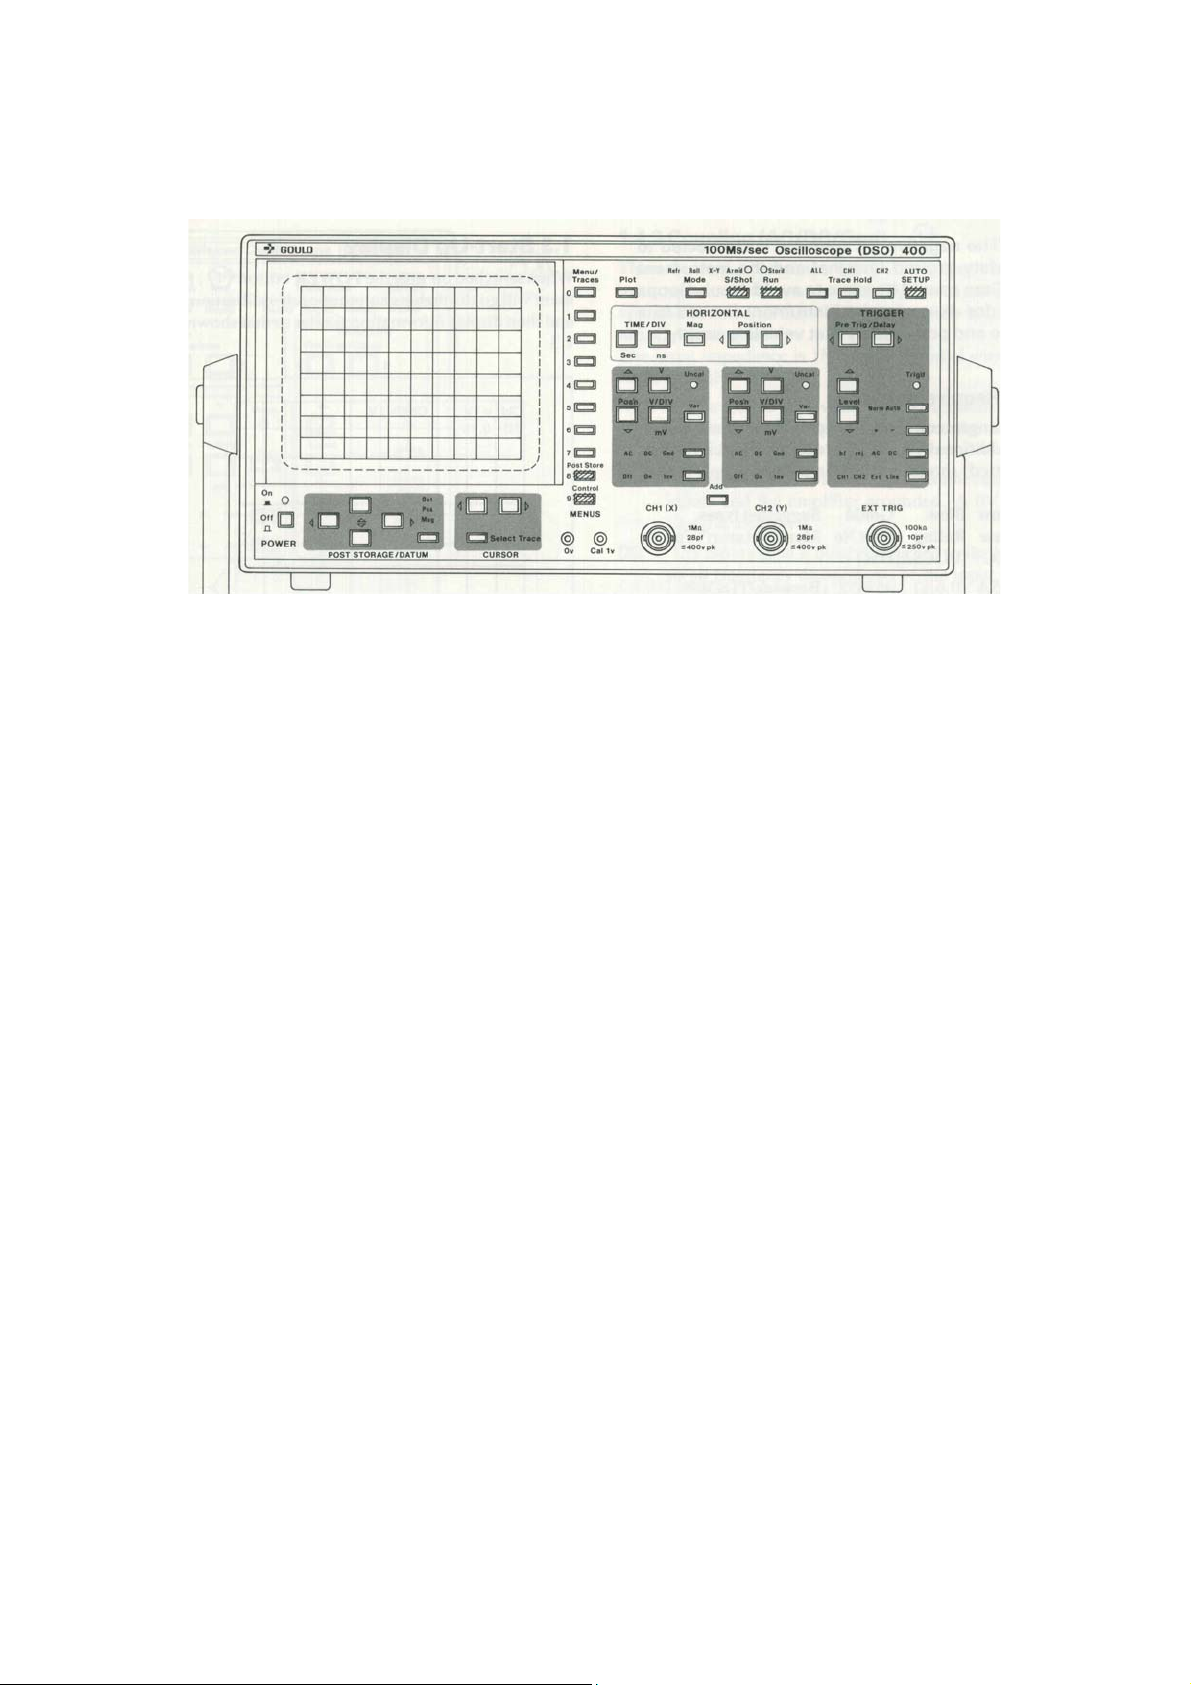
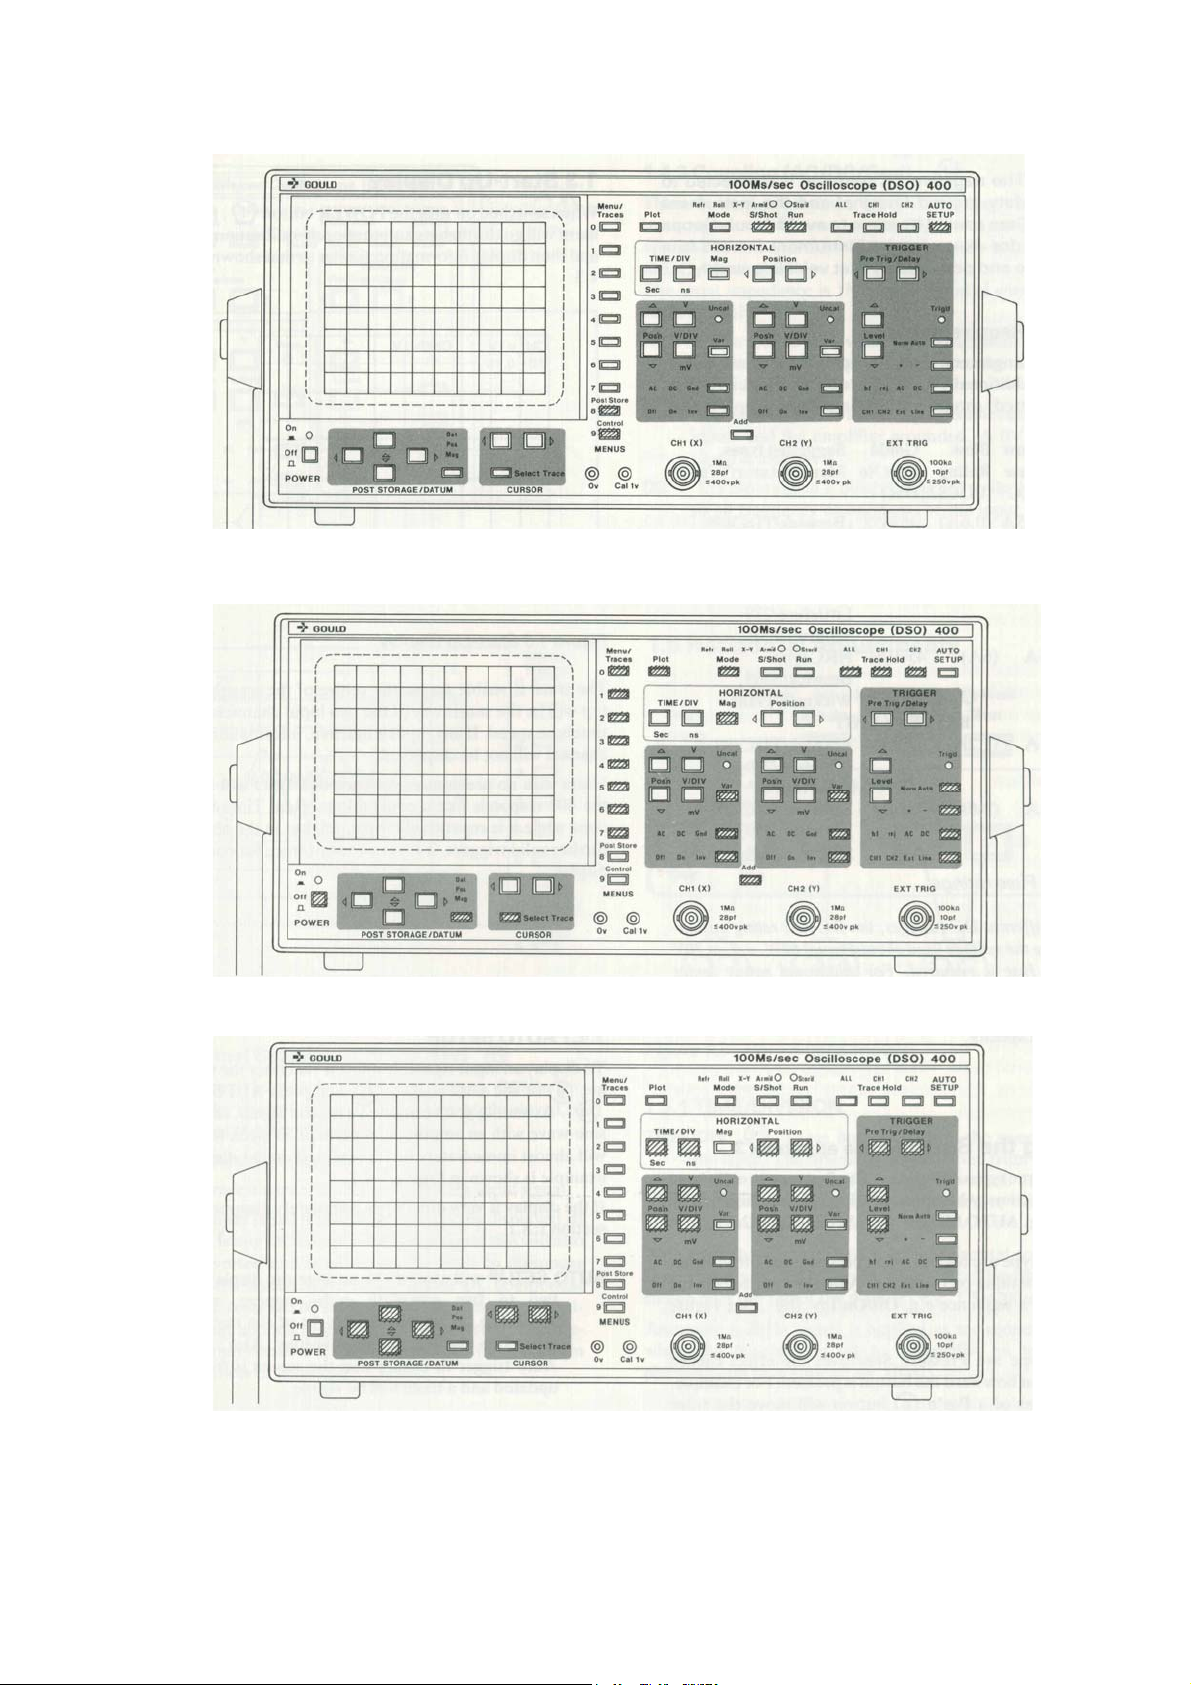
Getting Started 1.1-1.1.6 400 Series Operators Manual
1.1 Safety and Power Requirements
they should be removed only by suitably qualified personnel
for maintenance and repair purposes.
1.1.1 International Safety Warning
(as required for I.E.C. 348 Cat I)
This instrument has been designed and tested in accordance
with IEC publication 348, and has been supplied in a safe
condition. This manual contains information and warnings
which must be observed to keep the instrument in a safe
condition. The instrument should not be switched on if it is
damaged and it should not be used under wet conditions.
For the correct and safe use of this instrument it is essential that
both operating and service personnel follow generally accepted
safety procedures in addition to the safety precautions specified
in this manual.
Whenever it is likely that safety-protection has been impaired,
the instrument must be made inoperative and be secured against
any unintended operation. Qualified maintenance or repair
personnel should be informed. Safety protection is likely to be
impaired if, for example the instrument shows visible damage
or fails to perform the intended measurements correctly.
WARNING: Removing the covers may expose voltages in
excess of 8000V at the side of the display tube; these
may be present for up to one minute after the
instrument has been disconnected from the power
source.
1.1.4 Ventilation and Dust
The instrument relies on forced air cooling via a fan and
ventilation slots. Adequate ventilation can usually be achieved
by leaving a 75mm (3" gap) around the instrument.
The instrument should not be operated in dusty environments.
If the CRT filter requires cleaning it can be easily removed by
pressing in its right hand edge as shown by the moulded arrow.
1.1.5 Operating Temperatures
The instrument is designed to be operated in an environment
having an ambient temperature of between 0 and 50 degrees C,
(0 to 45 degrees if the battery unit is fitted) and to operate with
full accuracy between 15 and 35 degrees C.
Note: Direct sunlight, radiators and other heat sources
should be taken into account when assessing the ambient
temperature.
The instrument may occasionally be subjected to temperatures
between 0
and -10ºC without degradation of its safety.
1.1.2 Grounding
THE INSTRUMENT MUST BE GROUNDED.
AC
The instrument must be operated with a protective ground
connected via the yellow/green conductor of the supply cable.
This is connected to the instrument before the line and neutral
connections when the supply plug is inserted into the socket on
the back of the instrument. If the final connection to the supply
is made elsewhere, ensure that the ground connection is made
before line and neutral.
DC
If the unit is disconnected from the AC supply, and powered
from an isolated DC source or the internal battery unit, the unit
will not be grounded. Independent provision must be made to
maintain the case at a safe potential, by grounding the safety
ground terminal on the DSO rear panel. The safety ground
terminal is connected to the instrument case, to the ground of
the input signals (outer of the BNC connectors), and also
internally to the negative side of the DC supply.
1.1.6 Power and Frequency Requirements
The instrument uses less than 85V A (200V A if battery unit
fitted) and operates from line voltages of 90V to 130V, and
190V to 265V, at 45 to 400Hz. Under the extreme conditions of
90V and 45Hz, the instrument will still operate correctly even if
there is a half cycle dropout in the line supply.
The instrument may be powered from a direct current supply in
the range 12V to 33V. The unit cannot be damaged by applying
power to both inputs simultaneously.
Before connecting the instrument to the supply, ensure that the
rear panel AC supply voltage selectors are set to the appropriate
voltage.
Access to the voltage selector can only be made if the AC
supply connector is removed, and is by hinging open the panel
connector from its top edge. The selector barrel can then be
moved to the required setting. This same operation provides
access to the AC supply fuse, which must be changed to suit
the supply voltage as shown in table 1.1. 7.
The AC power connection is via a standard IEC, CEE 22
connector and the DC power input is via the supplied 0.25"
spade connector (Gould part No. 457839.) See appendix 4 for
polarity details.
WARNING: Any interruption of the protective ground
conductor inside or outside the instrument is likely to
make the instrument dangerous. Intentional
interruption is prohibited.
Signal connections to the instrument should be connected after
the ground connection is made and disconnected before the
ground connection is removed, i.e. the supply lead must be
connected whenever signal leads are connected.
1.1.3 Live Parts
The instrument should not be operated with covers removed.
The covers protect the user from live parts and

400 Operators Manual Getting Started
Figure 1.2a Single Function Buttons
Figure 1.2b The Toggles
Figure 1.2c The Pressure Sensitive Buttons

400 Series Operators Manual
Getting Started 1.1.7-1.4.1
1.3 Start-Up Display
When switched on with the POWER button
(1)
.
the instrument
will go through its automatic self-calibration sequence and then
display information similar to that shown in Figure
1.3.
CAUTION: The negative DC terminal is connected to the
safety ground terminal and the instrument case.
Care should be taken to avoid ground loops when,
for example, the instrument is used in a vehicle and
powered by that vehicle's supply.
1.1.7 Fuse Requirements
The fuse arrangement shown in table 1.1. 7 must be followed,
and additionally in the UK, a 3A fuse (5A if the battery unit is
fitted) should be fitted in the line supply plug .
Su
pp
l
y
Slow Blow Goul
d
Su
gg
ested t
yp
es.
Voltage Fuse Rating Part No Manufacturer/Type No
IEC (ULlCSA) DSO
230V 0.5A (0.6A) 457452 BeswickrrDC488,
Littlefuse/239,
Schurter/FSP
115V lA (1.2A) 457454 BeswickrrDC488,
Littlefuse/239
Schurter/FSP
12VDC 5A (6A) 457979 HRC type
Beswick/S505,
Wickman 19181
BATTERY UNIT
230V lA (1.2A) 457454 BeswickrrDC488,
Littlefuse/239,
Schurter/FSP
115V 2A (2.5A) 457455 BeswickrrDC488,
Littlefuse/239,
Schurter/FS
P
Figure
1.3
Start
-
Up Displa
y
The trace is visible across the centre of the screen. At the top
will be the sensitivity of the two input channels and the
timebase speed. It any input is inactive, information for that
channel will not be displayed.
Users with no previous experience of a DSO will find that the
400 responds like a conventional Real Time Oscilloscope while
it is repetitively triggered, but in the absence of further valid
triggers, it retains the last trace for continuous display.
Table
1.1.7
Fuse rating
s
Note: For different DC voltages, the DC fuse rating multiplied
by the voltage used should equal60W. e.g. at 30V a 2A
fuse is required. For additional safety under extreme
fault conditions, the DC fuse
is
a high rupture current
(HRC) type. This fuse should have a 1500A break
capacity.
1.4 Obtaining a Trace
See Figure 1.4
1.4.1 AUTO SETUP
To display an input signal, connect it via either the CHI socket
(9) or the CH2 socket (12) and press AUTO SETUP (24) .
Assuming you've applied a regular signal, say a 2kHz sine-
wave with an amplitude of perhaps 5V peak to peak, it will
almost immediately be represented on the display. An example
is shown in Figure 1.4.1.
It the display is very dim or has completely disappeared see
section 1.8.1.
1.2 Using the Buttons
see appendix 3
There are three types of buttons. The first type usually have
only one function: when pressed, that one function will be
activated e.g. AUTO SETUP (
24)
.
See Figure 1.2a.
The second type are toggles: each press of the button either
switches something on or off e.g. Add (10) , or selects the
next item in a sequence e.g. Off/On/lnv (13) . See Figure
1.2b.
AUTO SETUP will attempt to arrange the display so that two
to five complete cycles appear, with the amplitude set so
that the height of the trace is between two and five
screen divisions. Also, it selects Auto trigger to ensure
that the screen is frequently updated and a trace will be
visible.
The third type are Pressure Sensitive: the effect caused depends
upon how hard the button is pressed. For example, a gentle
press of a Pos'n (8) button will move the trace slowly. If the
button is pressed harder, the trace will move more quickly. See
Figure 1.2c. If signals are connected to both channels, the
highest amplitude takes priority.

Getting Started 1 .4.2-1 .5.1
400 Series Operators Manual
1.4.3 Coupling (AC/DC/Gnd)
(14)
These buttons control the type of coupling between the input signal
and the instrument. DC is the most generally applicable, and
AUTO SETUP will normally set this control to DC, where
possible.
The input impedance is I M ohm in parallel with a capacitance of
28pF.
AC This is used to remove any DC component from input
signals. Suitable input signals (i.e. the bandwidth) are from
4Hz to 20MHz.
Gnd The input signal is internally disconnected from the inputs and
the amplifier grounded. A OV reference signal is displayed.
DC The input signal is directly coupled to the instrument so all
frequency components of the input signal will be displayed.
The bandwidth will be from DC to 20MHz.
Figure
1.4
Obtaining a Trace
1.5 Horizontal Adjustments
Figure
1.4.1
A
n AUTO SETUP Displa
y
Figure
1.5
Horizontal Control
s
1.4.2
Channel Selection (Off/On/lnv)
(13)
A channel may be switched on or off with its Off/On/Inv button. If
the channel is on, its trace can be displayed in either normal or
inverted mode.
Off The channel is deactivated.
On The trace is a true representation of the input signal. Inv The
input signal is inverted before being displayed. If
there is any DC component in the signal this will also be
inverted and could cause the trace to disappear from the
screen. Such an unwanted DC component can be removed
by selecting AC coupling. Any vertical shift applied to the
trace is not inverted. The trigger point remains at the same
point on the waveform regardless of inversion.
1.5.1
TIME/DIVISION
TIME/DIV
(33) These buttons control the sweep rate of the trace.
The timebase can be varied from 100ns/div to 50s/div in a I,
2, 5 sequence of values. The button marked 'ns' decreases
the time/div, the button marked 'sec' increases the time/div.
With a timebase of say 200/Ls, each horizontal screen division
represents 200/Ls worth of signal. The timebase is shown near the
top of the display - e.g. TB=200/Ls.
Assuming a 2kHz signal is applied as mentioned earlier, when the
timebase is set to 500ms/div, an interesting phenomenon may
appear: an 'alias'.

Getting Started 1 .5.2-1 .6.3 400 Series Operators Manual
1.5.2 Aliases are 20mV to 50V per division at the probe tip. See Section
3.4.1
.
If the Uncal light is on, then these buttons vary the
sensitivity continuously. See Section
1.6.3.
An alias is a false image. The instrument is a digital oscilloscope
and so takes frequent samples of the input signal in order to update
the trace. Thus, if the signal frequency is higher than the sample
frequency, one sample will be taken from a particular point on the
waveform and the next sample may be taken from a point slightly
further along on a subsequent cycle. It will then display the wave
as being much slower than it really is. See Figure 1.5.2. This effect
is only likely to occur if there are more than 100 cycles of
waveform across the screen.
Figure
1.5.2
Alias Generation
There is a 'Max/Min' glitch detection feature which can be used to
detect aliases. With dot join on, this usually results in a filled-in
wave envelope being seen on the screen, indicating a high
frequency. See Section 3
A.
1.5.3 Position
Position (26) These buttons move all traces to the right or
left.
The position of the cursor (Section
2.4)
is fixed in relation to the
trace so it will move with the applied shift. With x-magnified
traces (Section
1.5.4),
the cursor can be off the part of the trace
displayed on the screen. To bring it back into view use the
CURSOR < > buttons(5).
1.6.2 Position
Pos'n (8) These move their respective traces up and down
the display.
If Trace Hold is on (Section 2.2) or a S/Shot capture has been
made, any part of the trace which was captured off-screen
vertically will be shown by a horizontal line.
1.5.4 Magnification
Mag (32) Switches horizontal magnification on or off When
switched on, a xl0 expansion is applied to any displayed
trace, which will expand around the centre of screen. The
timebase setting is adjusted to reflect the expansion. 1.6.3 Variable/Uncalibrated
Var (15) When this is set to 'Uncal', the coarse setting of the
attenuator remains unchanged, but a variable attenuation is
applied to the input signal in the range of 1 to
004.
Thus,
with an initial setting of IV, the actual sensitivity of the
channel could be set by this control to anywhere between I
V and 2.5V per division. The V/DIV buttons are used to
vary the uncalibrated sensitivity.
The instrument displays 50 dots (samples) per screen division, each
plotted dot value being obtained from the 512 byte acquisition
memory. At an expansion of x 10. there are five dots per division.
1.6 Vertical Adjustments
Each channel has its own set of vertical controls. See Figure
1.6.
Example screen display:
CH1 =5V Channel is set to a sensitivity of 5 Volts per screen
division.
1.6.1 VOL TS/DIVISION
V/DIV
(11) Adjusts the sensitivity of the instrument over discrete
calibrated ranges from 2m V to 5V per screen division in
1,2,5 steps. With a x10 probe the ranges
CH2>20mV Channel 2 is uncalibrated and the attenuator is set to a
sensitivity greater than 20m V per screen division.

400 Series Operators Manual Getting Started 1.6.4 - 1.8.5
1.6.4 Add
Add (10) Displays the sum, or if one channel is inverted the
difference, of the input signals. The original traces
disappear and the resultant trace is displayed as a
Channel 2 trace.
1.7
Manually Obtaining a Trace
This subsection describes how to obtain a trace without using
AUTO SETUP.
You may need to consult later sections of the manual as not all
of the operating features have been discussed so far.
1. When switched on, the instrument will go through its
power-up sequence, checking the internal calibration.
2. Decide to which channel you are going to apply the
signal (CH1 or CH2).
3. Make sure the chosen channel is active by setting the
Off/On/lnv (13) for that channel to On.
4. Set the AC/DC/Gnd button (14) for the chosen chan-
nel to Gnd.
5. If necessary, turn that channel's Uncal light out by
pressing Var once. (15)
6. Make sure that horizontal mag is not selected. (32)
7. Adjust the TIME/DIV setting (33) to give a timebase
of
5μs.
8. Set the display Mode (31) to Refr.
9. Set the TRIGGER Norm/Auto button (20) to Auto.
10. Use the CHl/CH2/Ext/Line button (17) to choose the
source for trigger signals.
11. Set the trigger coupling with the hf rej/AC/DC button.
(18)
12. If necessary adjust the position of the trace using the
Position and Pos’n buttons. (26)
&
(8)
13. Ensure that Trace Hold (25) is not selected.
14. Select Run. (27)
15. Apply the signal through a BNC connector to the chosen
CH input socket. (9) or (12)
16. Set the AC/DC/Gnd button (14) for the channel to
either DC or AC, as appropriate.
17. Adjust the gain of the chosen channel using the V/ DIV
buttons (11) . For intermediate settings, set Uncal on
by pressing the Var button once. (15)
18. Adjust the timebase setting using the TIME/DIV but-
tons. (33)
19. If the display is unstable, adjust the trigger Level. (22)
1.8
Operating Hints
The following list gives some of the more commonly met
problems in operating digital oscilloscopes, how to correct
them, and a brief explanation of what was wrong.
You may need to consult later sections of the manual as not all
of the operating features have been discussed so far.
1.8.1 Problem: Traces and Alphanumerics very dim or
completely disappeared.
Intensities too low
- Press the control button (7) to get the control master
menu, then press numeric button 3 to select the intensity
menu. Further presses of numeric button 3 will increase
the brightness of the alphanumerics on the display. The
traces can now be intensified using numeric button I.
Note:- The display may not become visible until the numeric
button
3
has been pressed several times.
1.8.2 Problem: Trace off the top or bottom of the screen. Too
much vertical shift
- correct with that channel's Pos’n buttons. (8)
Input has large DC offset
- AC couple input signal.
- Correct with Pos’n buttons. (8)
- Use a less sensitive range.
1.8.3 Problem: Trace not being acquired.
Instrument in single capture mode
- Press Run. (27)
Trigger level incorrect
- Select Auto and DC trigger, then adjust the level
control until the trigger level indicator bars are lined up
with the centre of the trace.
Trigger source on the wrong input
- Change trigger source. (CH1, CH2, Ext, Line) (17)
Trigger coupling on an unsuitable setting
- Change trigger coupling. (hf rej, AC, DC) (18)
Trace Hold on
- Release Trace Hold. (25)
Timebase on very slow acquisition
-Adjust TIME/DIV. (33)
1.8.4 Problem: Trace is unstable even when triggered.
Alias
- Check for alias using Max/Min (glitch
detection), and select a faster timebase range.
Noisy input
- Select hf rej trigger coupling. (18)
- Adjust trigger Level. (22)
Trigger on Auto
- With low frequency inputs (below 20Hz), Auto trigger
will initiate triggers overriding the input triggers. Select
Norm trigger. (20)
1.8.5 Problem: Trace has a very flat top or bottom.
Trace captured when off screen vertically and Pos’n shift has
been used
- Use less sensitive V/DIV range when acquiring trace. (11)
- Re-position trace prior to capture.

A
dvanced Features 2.1-2.1.5 400 Series Operators Manual
Table
2. 1. 1
Useful Frequency Ranges
of
Coupling
Types
2 Advanced Features
2.1 Trigger Control
Trigger facilities discussed here are controllable directly from
the front panel. For the more advanced menu-controlled
facilities see Section 3.4.
The power-down trigger setting will be retained on future
p
owe
r
-up.
Coupling Input
hfrej 10Hz to 15kHz
AC 4Hz to 20M Hz
DC DCt020MHz
2.1.2 Level
The trigger level is the threshold at which the instrument will
respond to potential triggers; the trace actually has to pass
through the level indicated for a trigger to be valid. See Section
2.1.3.
The level is indicated on the display by two bars, one on each
side. of the screen, and is adjusted by the level buttons. (22)
For an internal trigger the range is approximately
+/-
10
divisions and on external approximately
+/
- 3V. If the trigger
signal is AC coupled, the level bars will be offset from the
actual trigger position on the screen by any DC offset present.
2.1.3 Trigger Point (T)
The trigger point is indicated on the display by a 'T' near the
bottom of the screen underneath the trigger. An arrow next to
the T indicates that the trigger point is off the screen.
2.1.4 Slope
(+/-)
A trigger is generated when the selected source signal passes
through the chosen trigger level. This transition may be either
on a rising or a falling edge. The rising edge is considered to be
a positive slope and the falling edge a negative slope.
+/-
(19)This button selects positive
(+)
or negative (-)
slope triggers.
2.1.5 Trigger Mode (Norm/Auto)
The trigger system operates in either Normal or Auto mode.
In Normal mode, display captures can only occur when a valid
trigger input has been received.
In Auto mode, if no valid trigger has been received for some
time the instrument will generate its own trigger and initiate a
capture. This ensures that the screen is constantly updated
irrespective of the input signal. However, if valid input triggers
are received at a rate of 20Hz or more, the instrument will start
all captures with these triggers and not generate its own.
Auto/Norm (20)This button selects which trigger mode the
instrument is operating in.
Trig'd (21) This LED lights up when the instrument is
receiving valid trigger signals.
Figure
2. 1
Trigger Controls
2.1.1 Selecting Source and Coupling
The lowest button in the TRIGGER section of the front panel
selects the source of the trigger.
CH1/CH2/Ext/line
(17) Steps through the possible sources
of trigger signals. When Ext is selected, the source is the
'EXT TRIG' socket (16) in the lower right corner of the
front panel.
Selecting line is meaningful only if the instrument is
powered from the mains. Triggering is then from an
internal pulse having a fixed phase relation to the mains
voltage waveform. To change this phase relationship,
use the trigger delay buttons. See Section 2.1.6.
hf rej/
AC/DC
(18) Steps through the available trigger cou-
pling options; hf rej is a 15kHz low-pass filter ('high
frequency reject'). All the couplings can be used with
any source except Line, with which the input coupling is
not selectable.

400 Series Operators Manual Advanced Features 2.1.6-2.2.1
2.1.6
Trigger Delay
The amount of data which is acquired for display before or
after the trigger is determined by the pre or post trigger delay
selected, see figure 2.1.6. The value of this delay is shown in
the bottom right hand of the trace display.
Pretrig This allows a section of the trace that occurred
before the trigger point to be included in the display. The
amount of pre-trigger visible can be set with the front
panel PreTrig/Delay buttons. (23) Pre-trigger can be
set anywhere between 0% and 100% of screen width, in
steps as small as 0.4%.
Trig Delay With this set, the oscilloscope will acquire a trace
following both the specified trigger and a specified
delay. The amount of delay is shown beside the 7 key.
Delay is controlled by the PreTrig/Delay keys. (23)
The size of the steps by which the delay can be
incremented or decremented is controlled by the
TIME/DIV keys, i.e., step size is 0.04 x the time/ div
setting. This can be demonstrated by varying both the
timebase and delay settings, while observing the last two
lines of the Display and Trigger Menu (See section 3.4).
Once set, the delay time remains the same regardless of
the selected timebase range.
2.2 Capture Facilities
The capture facilities allow the traces to be frozen.
Figure
2.2
The Capture Controls
2.2.1
Trace Hold
There are two ways to freeze the display: a single-shot capture
whereby a full trace is acquired then frozen (Section
Figure 3.4a Trace Capture with Delay

Advanced Features 2.2.2-2.4.2 400 Series Operators Manual
2.2.2), or by pressing one of the buttons labelled Trace Hold.
Trace Hold: (25) Freezes the relevant trace or traces the moment
they are pressed. A second press releases the trace( s).
2.2.2 Single Shot and Run
These buttons are used to set the instrument into either a capture-
and-freeze mode (S/Shot), or a free running continuous capture
and re-capture mode (Run).
S/Shot
(30) Arms the instrument for a single-shot triggered
acquisition. The Arm'd light will be illuminated to show
that the button has been pressed.
Arm'd (29) Illuminates after the S/Shot button has been pressed;
it will stay lit until either a valid trigger has been received
or until the Run button is pressed.
Stor'd (28) Illuminates on completion of a single-shot
acquisition. This is after the instrument has been Arm'd,
triggered and a complete trace acquired. The light will stay
on until the instrument is re-armed by pressing S/Shot again
or Run is pressed.
Run (27) This button puts the instrument in continuous capture
mode: the instrument will automatically rearm itself after
each capture is completed so that the display will be
updated with each triggered sweep.
2.2.3 Acquisition Status - AFTS
These characters appear on the screen and can be used with the
Arm'd and Stor'd lights to determine the 'status of the acquisition
in progress.
AStands for 'Armed'.
FIndicates that the acquisition store has been filled with
enough pre-trigger information to be ready for a fresh
acquisition.
TStands for 'Triggered': the instrument has received or
generated a valid trigger; acquisition has begun.
S'Stored': acquisition is complete.
2.3 Display Modes
The following three display modes are directly selectable using the
Mode button. (31)
Refreshed The instrument will imitate the style of a conventional
realtime 'scope: the display is plotted from left to right as it
is acquired.
Roll This mode is like a chart recorder: the display scrolls from
right to left until a trace has been acquired. The scrolling
effect is most noticeable on the slower timebase ranges. The
rolling display is frozen by the trigger in S/Shot mode and is
unaffected by trigger in Run.
X-V This mode allows the CH1 socket input to control the X
(horizontal) component of the trace, and the CH2
socket input to control the Y (vertical) component. It
provides an X- Y display of the data captured by the time
base and trigger systems. The timebase should be set slow
enough to capture the whole of the signal of interest. This
mode is not available with magnified traces (Mag).
2.4 Cursor Measurements
The instrument allows you to take direct measurements from the
screen display automatically, using inbuilt datum lines and cursor.
Figure
2.4
The Cursor and Datum Line Control
s
2.4.1 Cursor and Datum Selection
The cursor and datum lines are switched on or off using the Select
Trace button. (4)
Select Trace (4) Successive presses of this button places the
cursor and datum lines on to the displayed traces in turn. i.e.
channel, channel 2, reference, off, channel etc. If any of the
traces are not in use the lines skip to the next valid
selection.
2.4.2 The Cursor and Datum Lines
There are three lines, as indicated in Figure 2.4.2. Movement of
them is aCH1eved using the DATUM and CURSOR buttons, as
described below.
Figure
2.4.2
The Cursor and Datum line
s

400 Series Operators Manual
A
dvanced Features 2.4.3-2.5.5
Dat Selecting this option on the Dat/Pos/Mag button (3)
allows the position of the datum lines to be controlled
using the DATUM buttons. (2)
DATUM (2)
Used for moving the two datum lines. CURSOR
(5) Moves the cursor to the right and left along the trace.
Pos/Mag These selections on the Dat/pos/mag button (3)
allow the DATUM buttons to control post storage
position and magnitude. They can only be used with
stored waveforms. Pressing menu button 1 (opposite the
restore message) will cancel the effect of pos and mag
on the selected trace i.e. the one with the cursor
on
it.
Pos This option on the Dat/Pos/Mag button (3)
allows both
X and Y shift to be applied to the trace on which the
cursor is placed, using the POST STORAGE/ DATUM
keys. (2)
Mag The vertical magnitude of the selected trace can be varied
from X4 to XO.062, using the POST STOR-
AGE/DATUM keys. (2)
The magnification factor is
displayed near the top centre of the CRT.
No horizontal magnification is available using this
control, but x10 magnification may be applied to all
stored traces using the horizontal mag button. See
Section 1.5.4).
2.4.3 Making Measurements
The instrument displays, at the bottom of the screen, the time
and voltage difference between the intersection of the
horizontal and vertical datum lines and the cursor.
The choice of points between which to make the measurements
can influence the accuracy: while the measurements made will
always be within the design limits, placement of the cursor at
the desired position is easier at those points where the slope of
the waveform is at its steepest. For example, on a standard sine
wave, the most accurate measurements of wavelength are likely
to be made if they are taken between two OV crossing points.
2.5
Plot
2.5.1 Internal Colour Plotter Operation
When the internal colour plotter is fitted to the 400 OSO, plots
of the instrument's display can be sent to it by selecting internal
on the Plot Menu, see section 3.12.
The internal plotter is automatically selected on power up if it
is fitted. If required the plot output can be directed via the
RS423 port to an external plotter by selecting RS423 on the
Plot Menu, see section 3.12.
2.5.2 Pens
Only use Gould pens - part number 04101175 for a pack of 4; 1
of each colour.
The normal pen sequence is:
Pen No. Colou
r
1Black
2Blue
3Green
4Re
d
The pen holder is colour coded with this colour sequence.
When pens are fitted in this order, trace 1, the border and all the
alphanumerics are plotted in black, trace 2 in blue, the reference
trace in green and the graticule in red. The cursor and datum
lines and their measurements are plotted in the same colour as
the trace to which they relate. The cursor colour also applies to
the HPGL output on both the 420 and 450.
2.5.3 Pen Changing
Underneath the plotter lid at the front of the plotter there are
two small blue buttons. The right hand button when viewed
from the front of the OSO is the Pen change button, and the left
hand one is the paper advance button.
CAUTION: When changing a pen, extreme care should
be taken not to damage any of the plotter mechanism.
NEVER
move the pen carriage by hand.
To change a pen, ensure that the instrument is switched on and
then proceed as follows:
1. Press the pen change button once. This rotates the pen
carriage and moves the carriage to the right hand side of
the plotter.
2. Gently press the white grooved eject lever towards the
front of the instrument. The top pen will be ejected from
the pen carriage and can be removed from the plotter.
3. Insert the tip of the new pen into the carriage guide hole.
Gently snap the other end of the pen into place.
4. When the pen has been changed, press the left hand
button - the paper advance button - and the carriage will
move back to the left hand side ready for the next plot.
2.5.4 Paper selection
Only use Gould paper - Part number 04101165 for a pack of 8
rolls. Other paper types may damage the mechanism.
2.5.5 Paper Loading
CAUTION: When loading paper, extreme care should be taken
not to force any of the plotter mechanism.
NEVER
pull
paper through by hand, always use the paper advance
button to prevent damage to the plotter mechanism.
1. With scissors, cut the end of the paper square.
2. Open the plotter cover by depressing the catch and
lifting the cover until it is fully open.
3. Remove the shaft from the paper cradle and if the plotter
has been used previously remove the plastic or
cardboard tube from the shaft.

A
dvanced Features 2.5.6-2.5.8 400 Series Operators Manual
4. Insert the shaft through the paper roll and fit the roll into
the paper cradle.
5. Feed the paper from the top of the roll as shown in
figure 2.5.5 below and push it through the slot in the rear
of the printer mechanism.
6. Press the paper advance button - the left hand blue
button at the front of the printer assembly - until the
paper reappears at the front.
7. Feed enough paper through to pass through the top
cover, ensure that it is running around the mechanism
smoothly and that it is straight.
7. Close the plotter cover and ensure that it latches shut.
If the plot button is pressed while the plot is in progress, the
plot will be aborted. Any changes to the instrument status
during a plot will have no effect on the plot as the data has
already been transferred and stored in the plot buffer.
2.5.7 External plots
A plot of the display can be sent to an external plotter by
pressing the plot button @ . The parameters for the plotter
and the plot format can be set as described in section 3.7 and
3.12.
The display is held while a plot is in progress.
Plots can be aborted by a second press of the plot button. If the
plot is aborted, the pen will be left in a random position and the
external plotter may need to be reset to restore the pen to its
start position.
2.5.8
Plot positioning and scaling
The output plot from the 400 has the relative positions shown in
figure 2.5.8a. These may be shifted and scaled to position the
plot exactly over a pre-defined grid using the following
procedure with reference to figure 2.5.8b.
The sides of the pre-defined grid are X and Y, the exact
positions of PI and P2 are found by calculating the dimensions
A, B, C and D:
Measure the vertical dimension of the required grid, note
this as Y.
Measure the horizontal dimension of the required grid,
note this as X.
U sing these values of X and Y, A, B, C and D can be
calculated as follows:
Figure
2.5.5.
Paper Loading
2.5.6
Internal Plotting
When a plot is initiated, the Hold All lamp lights and the
message "PLOTTING - PRESS PLOT TO ABORT" appears
on the screen. After about 9 seconds the hold All lamp goes out
indicating that the data has been transferred to the plot buffer
and that the instrument can be used again. The plotting
message will remain on the screen until the plot is complete
when it will disappear.
In Auto Plot Mode, the instrument is re-armed after the plot
data has been transferred to the plot buffer, but the front panel
controls will remain in-active during plots.
Measure and mark the exact positions of PI and P2 from the
grid edges using figure 2.5.8b and the values obtained above.
The PI and P2 points can now be set on the plotter, refer to the
plotter manual for details.

Advanced Features
400 Series Operators Manual
Figure 2.5.8a Relative Plot Position
s
Figure 2.5.8b Plot Dimension
s

400 Series Operators Manual
A
dvanced Features 2.6-2.7
2.6 Data Transfe
r
Trace data for either CH1, CH2, or the reference trace can be
transferred to and from the 400 oscilloscope and a computer.
There are four I/O commands which are used for the data
transfer, they are: ST1, STI, ST3, and ST? The first three
commands are used to transfer data and the fourth one to
interrogate the 400 for its error status.
2.6.1 Syntax
To receive the data for trace one, the computer sends "STl".
The 400 then responds with:
STl =20m V, 10us, # HdataCRLF
Where #H is:
#H for hexadecimal number base, #0
for octal number base,
#B for binary number base,
or nothing for decimal number base.
Data is: the trace information as described below.
CRLF is: carriage return, line feed.
If the 400 receives ST3 and the reference trace is unused, the
400 will respond with "ST3=UNUSED"
Note: When data is being sent to the 400 #D may be used for
decimal number base.
For decimal, octal and hexadecimal, the "data" field consists of
501 data points separated by commas.
For binary transfer, the "data" field is as follows:
"lldddd ... ddddcc"
Where:
II
is a 2-byte count of the data that follows including
the 2-byte checksum. This will have the value
01F7 (hex) or 503 (decimal). dddd ... dddd is
501 bytes of trace data.
cc is a 2-byte checksum of the preceding data
including the 2-byte length.
The most significant byte is sent first for both the length and
checksum fields.
Note that there are no comma separators between data bytes
during binary transfer.
2.6.2 Receiving Data
The computer may send strings to the 400 at any time in the
same syntax as above. The 400 converts the data into a binary
form in an internal memory, and when all the data has been
collected, transfers the entire memory to the destination trace
store.
For decimal, octal, and hexadecimal the 400 will cease
receiving as soon as a CR or LF is received, and then only
transfer the data received to the required store.
For binary transfer, the 400 will cease receiving when the
amount of data indicated by the length field has been received.
Unless the selected trace for received data is held or acquisition
is not armed, the selected memory data could be overwritten
almost immediately by a fresh acquisition.
Note: The number base for received data is set by the #X field
of the incoming string and not by the menu selection. See
section 3.7
The strings for the horizontal and vertical ranges must be
exactly as follows, anything else will result in error status 102
being generated, as will sending 50ns to a 400 or 420.
50s 20s 10s 5s 2s Is 0.5s
0.2s 0.ls 50ms 20ms10ms 5ms 2ms
1ms 0.5ms 0.2ms 0.1ms 50us 20us 10us
5us 2us 1μs0.5μs 0.2μs 0.1μs 50ns
5V 2V IV O.SY 0.2V 0.1V 50mV
20mV 10mV 5mV 2mV
2.6.3 Error Status
If the 400 receives "ST?", it will respond with a decimal error
status string as follows:
o
No error
96 Invalid command
102 Syntax error
103 Number out of range
104 Length error - Binary transfer only 105
Checksum error - Binary transfer only
If an error condition is detected, the 400 will not make the
transfer of data between its internal memory and the
destination.
2.7 Real Time Clock (420 and 450 only)
A real time clock is fitted to the 420 and 450 instruments. This
enables the current date and time together with the date and
time of acquisition to appear on any screen plot, and to be
transferred to and from a computer if the data transfer facility is
used. See section 2.6. When trace data is transferred to the DSO
the date and time are checked to ensure that they are valid and
syntax error 102 is returned if they are invalid.
The clock will be kept running for at least ten years, even with
the power disconnected, by its own internal battery back-up.
The date and time are set via the special functions menu. See
section 3.8.

400 Series Operators Manual The Menus 3
3. The Menus
The menu structure is summarised in Figure 3. The numbers 1
to 9 refer to the numeric buttons used to select the particular
menus and menu items (Section 3.1.1). All front panel controls
remain "live" when menus are displayed, allowing the control
status to be changed at any time.
Figure
3
Menu Overview
This manual suits for next models
3
Table of contents
Other Gould Test Equipment manuals