Graf EcoPure 150 Instruction Manual

1 / 32
GRAF EcoPure 150
DE
Anleitung für Einbau und Wartung
GRAF EcoPure 150
>> Seite 2-8
EN
Instructions for installing and maintaining
GRAF EcoPure 150
>> Page 9-15
FR
Notice d'installation et de maintenance
GRAF EcoPure 150
>> Page 16-22
ES
Instrucciones de instalación y mantenimiento
GRAF EcoPure 150
>> Página 23-29

Anleitung für Einbau und Wartung
GRAF EcoPure 150
EcoPure 150
Artikelnummer: 340109
Carat Ausbaupaket für
EcoPure 150
Artikelnummer: 342006
Die in dieser Anleitung
beschriebenen Punkte sind
unbedingt zu beachten. Bei
Nichtbeachtung erlischt jeglicher
Garantieanspruch. Für alle über
GRAF bezogenen Zusatzartikel
erhalten Sie separate in der
Transportverpackung beiliegende
Einbauanleitungen.
Eine Überprüfung der
Komponenten auf eventuelle
Beschädigungen hat unbedingt vor
der Installation zu erfolgen.
Fehlende Anleitungen können Sie
unter www.graf.info downloaden
oder bei GRAF anfordern.
Inhaltsübersicht
1. ALLGEMEINE HINWEISE 3
1.1 Sicherheit 3
2. EINBAUBEDINGUNGEN 3
3. TRANSPORT UND LAGERUNG 4
3.1 Transport 4
3.2 Lagerung 4
4. TECHNISCHE DATEN 4
5. EINBAU UND MONTAGE GRAF ECOPURE 150 5
5.1 Vorbereitung am Tank bei EcoPure 150 mit
Regenwassernutzung 5
5.2 Vorbereitung am Tank 5
5.3 Vorbereitung am Filter 6
5.4 Orientierung des Filtergehäuses im Tankdom Maxi 7
5.5 Anschlüsse legen 7
6. INBETRIEBNAHME UND WARTUNG 8
6.1 Substratsäcke und Filterkorb einsetzen 8
6.2 Wartung Filterkorb 8
6.3 Wartung Filtersubstrat 8
6.4 Entsorgung 8

1. Allgemeine Hinweise
1.1 Sicherheit
Bei sämtlichen Arbeiten sind die einschlägigen Unfallverhütungsvorschriften nach BGV C22 zu beachten.
Besonders bei Begehung von Behältern ist eine 2. Person zur Absicherung erforderlich.
Des Weiteren ist bei Einbau, Montage, Wartung, Reparatur usw. die in Frage kommenden Vorschriften und
Normen zu berücksichtigen.
Bei sämtlichen Arbeiten an der Anlage bzw. Anlageteilen ist immer die Gesamtanlage außer Betrieb zu
setzen und gegen unbefugtes Wiedereinschalten zu sichern.
Der Deckel ist stets, außer bei notwendigen Arbeiten am Filter, verschlossen zu halten, ansonsten besteht
höchste Unfallgefahr. Der Sitz des Deckels ist regelmäßig zu kontrollieren.
Die Firma GRAF bietet ein umfangreiches Sortiment an Zubehörteilen, die alle aufeinander abgestimmt
sind und zu kompletten Systemen ausgebaut werden können. Die Verwendung nicht von GRAF
freigegebener Zubehörteile führt zu einem Ausschluss der Gewährleistung/Garantie.
Diese Einbauanleitung gilt nur für den Einbau des Substratfilters in einen Carat-Tank.
Weitere Informationen zu dem Carat-Tank finden Sie in der passenden Einbauanleitung.
2. Einbaubedingungen
•Der Filter ist geeignet für den Einbau in einen Schacht oder eine Zisterne.
•Der Filter darf nicht direkt im Erdreich installiert werden.
•Der Filter ist geeignet für Dachflächen bis 150 m².
•Der Überflutungsnachweis ist bei Überschreitung der Anschlussfläche und einem Starkregen von
r (5,5) ≥100 l/ (s x ha) bei 150 m² Anschlussfläche zu beachten.
•Einbau möglich in Carat-Tank mit Tankdom Maxi (Tankdom Mini nicht zulässig!).
•Der Sedimentationsraum sollte bei dem Einbau in alternative Behälter mindestens der Größe des
Carat 2.700 L entsprechen.
Für den Betrieb der Anlage ist ein Überflutungsnachweis zu führen und eine Rückstauebene konstruktiv
auf dem Grundstück einzurichten. Gerne führen wir für Sie den Überflutungsnachweis durch.

3. Transport und Lagerung
3.1 Transport
Während des Transportes sind alle Bestandteile des Ausbaupaketes gegen Verrutschen und
Herunterfallen zu sichern. Werden die Bestandteile des Ausbaupaketes zum Transport mit Spanngurten
gesichert, ist zu gewährleisten, dass alle Bestandteile des Ausbaupaketes unbeschädigt bleiben.
Beanspruchungen durch Stöße sind unbedingt zu vermeiden. Auf keinen Fall dürfen Bestandteile des
Ausbaupaketes über den Untergrund gerollt oder geschleift werden.
3.2 Lagerung
Eine notwendige Zwischenlagerung des Ausbaupaketes muss auf einem geeigneten, ebenen Untergrund
erfolgen. Während der Lagerung muss eine Beschädigung durch Umwelteinflüsse oder Fremdeinwirkung
vermieden werden. Die Substratsäcke werden in einer separaten Kunststoffverpackung geliefert, die
trocken gelagert werden muss.
4. Technische Daten
Alle Angaben in mm.
DN 110
DN 110
DN 110
DN 110

5. Einbau und Montage GRAF EcoPure 150
5.1 Vorbereitung am Tank bei EcoPure 150 mit Regenwassernutzung
Zum Aufbau einer kombinierten Regenwassernutzung wird im ersten Schritt das Technikpaket für die
Regenwassernutzung im Tank installiert.
5.2 Vorbereitung am Tank
Bevor mit dem Montieren des Filters begonnen werden kann, muss der Tankauslauf installiert werden.
Dieser wird in die vorhandene Öffnung mit Dichtung auf Höhe der Tankschulter eingesetzt*. Dazu muss
zunächst der HT-Abzweig an der Oberseite gekürzt werden.
Das HT-Rohr 250 mm wird mit dem Spitzende von außen durch die eingeschmierte Spezialdichtung in das
Innere des Tanks geschoben (1.). Der HT-Abzweig DN 110 wird anschließend im Tankinnern auf das
installierte HT-Rohr geschoben (2.). An das untere Ende des HT-Abzweig DN 110 wird das HT-Rohr DN
110/150 mm montiert (3.). Der Auslauf muss waagrecht ausgerichtet werden.
Schnittkante
*Wurde der Carat-Tank bisher als Zisterne verwendet, muss
die Öffnung noch gebohrt werden. Dafür wird auf Höhe der
Tankschulter mit dem Kronenbohrer (Art.Nr. 202003 –nicht
im Lieferumfang enthalten) ein Loch mit 124 mm gebohrt
und die Spezialdichtung DN 110 (Art.Nr. 332033 –nicht im
Lieferumfang enthalten) eingesetzt.

www.graf.info
6 / 32
5.3 Vorbereitung am Filter
Vor der Installation im Tank wird der Filter, wie in den untenstehenden Abbildungen gezeigt, vorbereitet.
Die nachfolgende Tabelle gibt die Länge des Stützrohrs für den Carat Tank vom Filter zum beruhigten
Zulauftopf mit Muffe an (siehe Abbildung: Länge L).
Für den Carat-Tank 2.700 L kann das im Lieferumfang enthaltene HT-Rohr gekürzt werden. Für die
größeren Tanks muss es verlängert werden. Das hierfür zusätzlich notwendige Rohr ist nicht im
Lieferumfang enthalten.
Die beiden sich gegenüberliegenden Einlaufstutzen müssen aufgesägt werden. An die Stutzen werden
später der Zulauf und gegenüberliegend ein Zusatzrohr zur Fixierung des Filtergehäuses im Tankdom (oder
als weiterer Zulauf) angeschlossen. Für den Notüberlauf wird, bei Bedarf, der dritte Stutzen aufgesägt.
Schnittkanten siehe Abbildung.
Vor dem Einsetzen des Filters in den Tank werden der beruhigte Zulauf, das Stützrohr und das
Filtergehäuse zusammengesteckt. Die Steckverbindungen können optional mit Spaxschrauben gesichert
werden.
5. Einbau und Montage GRAF EcoPure 150
Tankvolumen
Länge des Stützrohr (L)
2.700L
990 mm
3.750L
1.190 mm
4.800L
1.430 mm
6.500L
1.710 mm
Schnittkanten

www.graf.info
7 / 32
5.4 Orientierung des Filtergehäuses im Tankdom Maxi
Das Filtergehäuse wird so in den Tankdom gesetzt, dass die Rohre durch die Öffnungen des Tankdom
Maxi gelegt werden können. Für den Zulauf und die Fixierung werden die seitlichen Öffnungen in 3- und 9-
Uhr Position verwendet. Falls ein Notüberlauf angeschlossen werden soll, kann die 12-Uhr-Position genutzt
werden. Die 6-Uhr-Position kann nicht genutzt werden, da die Öffnung tiefer liegt.
5.5 Anschlüsse legen
Der Zulauf (1) (HT-Rohr 250 mm DN 110) wird an der 3-Uhr oder 9-Uhr-Position am Tankdom montiert.
Dabei wird das Rohr mit dem Spitzende von innen nach außen eingesteckt und die Muffe mit dem
Filtergehäuse verbunden.
Zur Befestigung des Fixierrohres (250 mm, DN 110) (2) wird eine Doppelmanschette verwendet. Das
Fixierrohr wird mit dem Spitzende von außen nach innen eingesteckt. Das Rohrende und der Stutzen des
Filtergehäuses müssen direkt aneinander liegen, bevor die Doppelmanschette zugezogen wird.
Das Rohr und die Doppelmanschette für den Notüberlauf sind nicht im Lieferumfang enthalten.
5. Einbau und Montage GRAF EcoPure 150

2023-08
6. Inbetriebnahme und Wartung
6.1 Substratsäcke und Filterkorb einsetzen
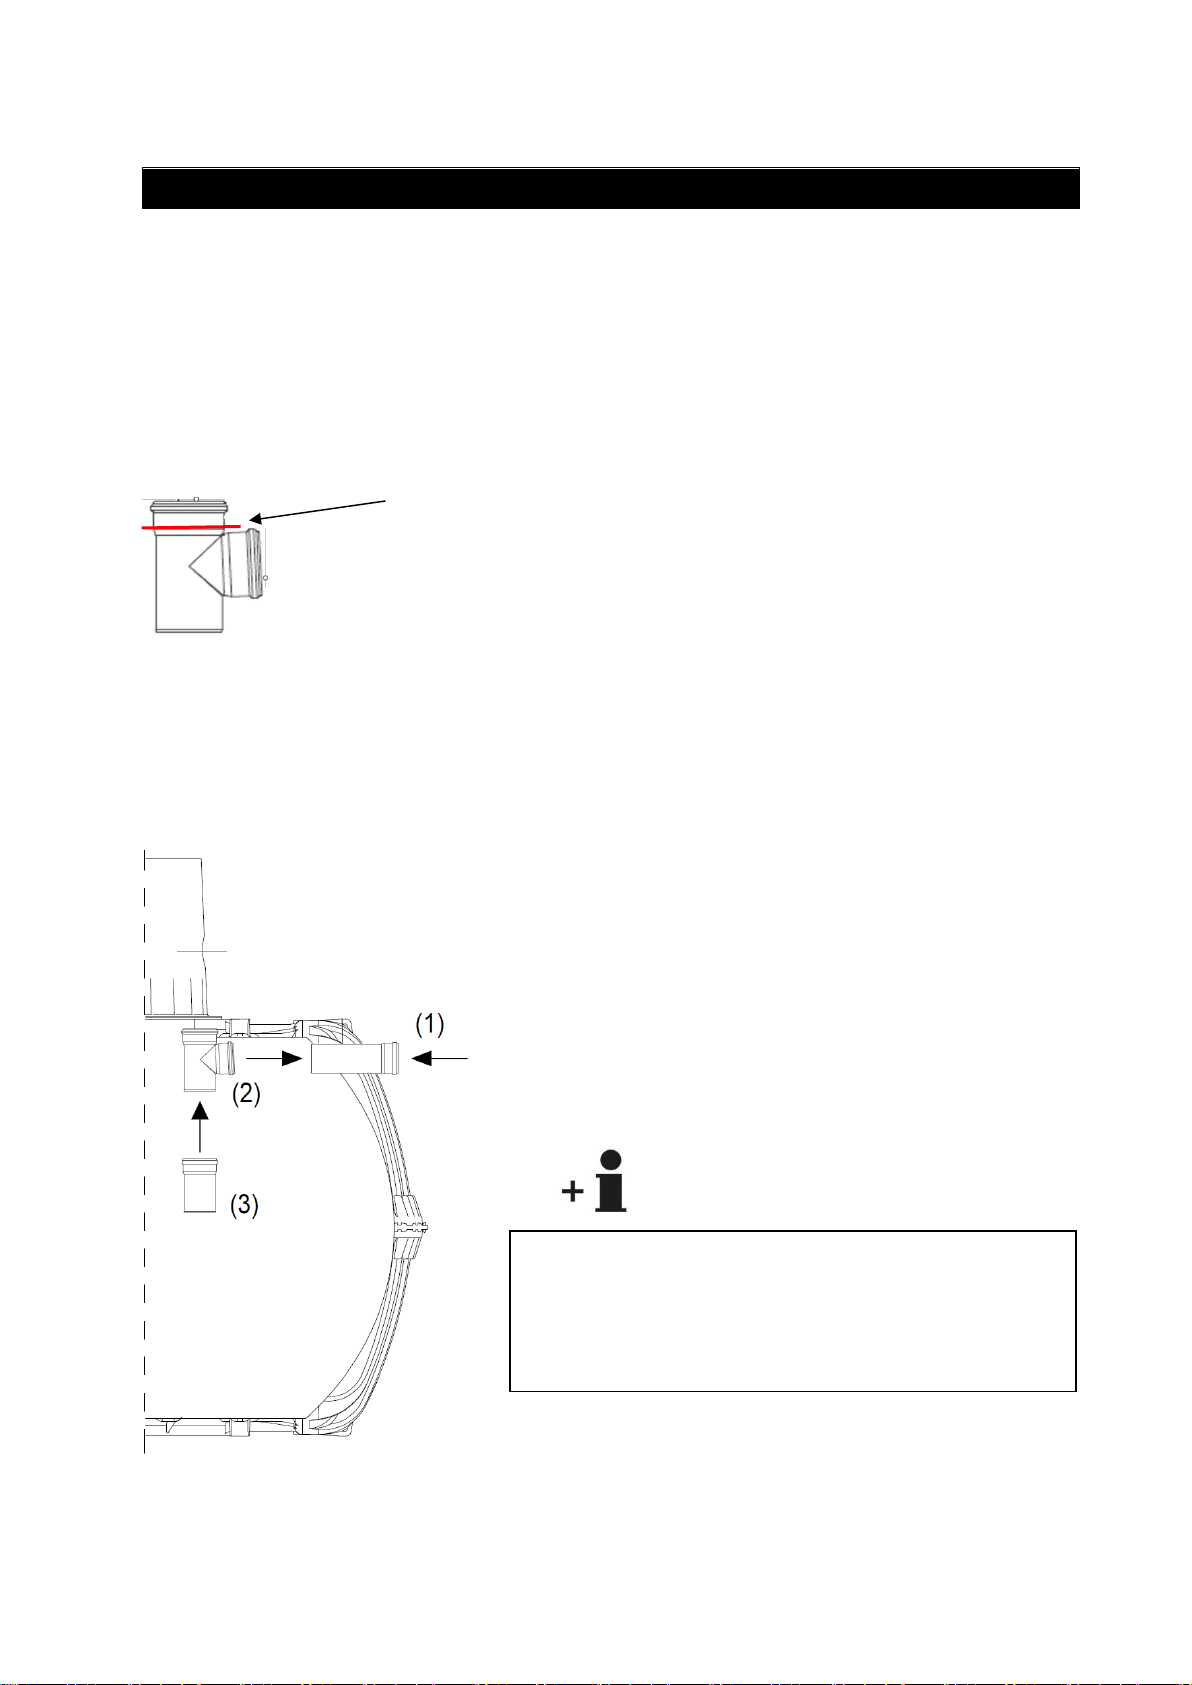
Die drei befüllten Substratsäcke werden in das rote Filtergehäuse gelegt und der Filterkorb eingehängt.
Der Filterkorb muss beim Einsetzen leicht nach unten gedrückt werden, damit die umlaufende Dichtung
passgenau sitzt. Außerdem ist darauf zu achten, dass der Entnahmegriff vor Inbetriebnahme und nach
jeder Wartung im 90° Winkel zum Zulauf ausgerichtet wird, damit sich grobe Schmutzteile nicht am
Entnahmegriff verfangen.
6.2 Wartung Filterkorb
Der Filterkorb wird zur Reinigung entnommen. Der Schmutz wird entsorgt und der Korb mit Wasser
gründlich gereinigt, bis alle Maschen geöffnet sind. Es empfiehlt sich, die Reinigung alle 4 - 5 Wochen (im
Herbst durch starken Laubanfall auch öfter) vorzunehmen. Je nach Schmutzanfall oder Anschlussfläche
können sich die Reinigungsintervalle verschieben.
Der Filterkorb muss nach jeder Reinigung beim Einsetzen leicht nach unten gedrückt werden, damit die
umlaufende Dichtung passgenau sitzt. Außerdem ist darauf zu achten, dass der Entnahmegriff vor
Inbetriebnahme und nach jeder Wartung im 90° Winkel zum Zulauf ausgerichtet wird, damit sich grobe
Schmutzteile nicht am Entnahmegriff verfangen.
6.3 Wartung Filtersubstrat
Das Ersatz-Filtersubstrat (Art.Nr. 231010) muss alle 2-5 Jahre, je nach Schmutzanfall, ausgetauscht
werden. Bei jeder Wartung des Filterkorbs sind die Substratsäcke auf Verblockungen oder ähnliche
Verschmutzungen zu prüfen.
Achtung: Bei Rückstau in die Überflutungsebene, auch bei leichten
Regenereignissen, sind sowohl der Filterkorb als auch die Substratsäcke zu prüfen.
Ein Filter bzw. –Substrataustausch ist erforderlich, wenn die notwendige
Durchlässigkeit nicht mehr erzielt wird.
6.4 Entsorgung
Die im Sieb befindlichen Verschmutzungen sowie die entnommenen Substratsäcke sind entsprechend den
gesetzlichen Regelungen zu entsorgen.

Instructions for installing and maintaining
GRAF EcoPure 150
EcoPure 150
Item number: 340109
Carat filter package for
EcoPure 150
Item number: 342006
The points described in these
instructions must be observed in
all cases. Failure to do so will
invalidate any warranty claim. For
any additional items purchased
through GRAF, you will receive
separate installation instructions in
the transport packaging.
The components must be checked
for any damage before installation.
You can download any missing
instructions from www.graf.info or
request them from GRAF directly.
Contents
1. GENERAL INFORMATION 10
1.1 Safety 10
2. INSTALLATION CONDITIONS 10
3. TRANSPORT AND STORAGE 11
3.1 Transport 11
3.2 Storage 11
4. TECHNICAL DATA 11
5. INSTALLATION AND ASSEMBLY GRAF ECOPURE 150 12
5.1 Preparation on the tank for EcoPure 150 with
rainwater harvesting 12
5.2 Preparations on the tank 12
5.3 Preparations on the filter 13
5.4 Orientation of the filter housing in the Maxi tank dome 14
5.5 Laying connections 14
6. INITIAL USE AND MAINTENANCE 15
6.1 Inserting substrate bags and filter basket 15
6.2 Maintenance of the filter basket 15
6.3 Maintenance of the filter substrate 15
6.4 Disposal 15

1. General information
1.1 Safety
All work should be undertaken in compliance with the relevant accident prevention regulations as per BGV
C22. A second person is required for safety reasons, particularly when inspecting tanks.
In addition, the applicable regulations and standards must be respected during installation, assembly,
maintenance, repairs, etc.
The entire system must always be switched off whilst any work is carried out on the system or system
components.
The cover must always be kept closed, except during necessary work on the filter, otherwise the risk of
accidents is high. The cover must be checked regularly to ensure that it is properly in place.
GRAF provides an extensive range of accessories, which are all modular and can be combined to form
complete systems. Using accessory parts not approved by GRAF will render the warranty/guarantee null
and void.
These instructions only apply to the installation of the substrate filter in a Carat tank. For
more information about the Carat tank, please refer to the relevant installation manual.
2. Installation conditions
•The filter is designed for installation in a shaft or tanks.
•The filter must not be installed directly in the soil.
•The filter is suitable for roof areas of up to 150 m².
•An overflow verification should be carried out for scenarios where the connection surface area is
exceeded or there is heavy rainfall of r (5.5) ≥100 l/ (s x ha) with a connection area of 150 m².
•Installation possible in Carat tank with Maxi tank dome (Not possible with the Mini tank dome).
•If the filter is being installed in an alternative vessel, the sedimentation space must be of at least the
same size as the 2700 litre Carat tank.
To operate the unit, an overflow verification must be carried out and a backed-up water level must be
constructed on the site. We will be happy to carry out the overflow verification on your behalf.

3. Transport and storage
3.1 Transport
All the components of the filter package must be secured to prevent shifting and falling during transport. If
the components of the filter package are secured for transport with tension belts, it must be ensured that
all components of the filter package remain undamaged.
Stress caused by impacts must be avoided at all costs. Under no circumstances should any components
of the filter package be rolled or dragged across the ground.
3.2 Storage
If the filter package requires intermediate storage, this must be done on a suitable level surface. During
storage, damage caused by environmental or external factors must be avoided. The substrate bags are
supplied in separate plastic packaging which must be stored in a dry place.
4. Technical data
All dimensions are in mm.
DN 110
DN 110
DN 110
DN 110

5. Installation and assembly GRAF EcoPure 150
5.1 Preparation on the tank for EcoPure 150 with rainwater harvesting
To construct a combined rainwater harvesting solution, the technical package for rainwater harvesting must
first be installed in the tank.
5.2 Preparations on the tank
Before starting to fit the filter, the tank outlet must be installed. This is inserted into the existing opening
with the seal at the same height as the tank shoulder*. To do this, first shorten the HT branch at the top.
The HT pipe 250 mm is pushed (narrower end first) from the outside through the greased special seal into
the inside of the tank (1.). The HT branch DN 110 is then pushed inside the tank onto the installed HT pipe
(2.). The HT pipe DN 110/150 mm is fitted to the lower end of the HT branch DN 110 (3.). The outlet must
be aligned horizontally.
Cut edge
*If the Carat tank has been used as a cistern up to now, the
opening still has to be drilled. To do this, drill a hole with
124 mm at the height of the tank shoulder with the core drill
(item no. 202003 - not included in the scope of supply) and
insert the special seal DN 110 (item no. 332033 - not included
in the scope of supply).

www.graf.info
13 / 32
5.3 Preparations on the filter
Before installation in the tank, the filter is prepared as shown in the illustrations below.
The following table indicates the length of the support pipe for the Carat tank between the filter and the
calmed inlet boot with socket (see illustration: Length L).
For the Carat tank 2,700 l, the HT pipe included in the scope of supply can be shortened. For the larger
tanks it has to be extended. The additional pipe required for this is not included in the scope of supply.
The two opposite inlet connections have to be sawn open. The inlet and an additional pipe on the opposite
side to fix the filter housing in the tank dome (or as a further inlet) are subsequently attached to the
connections. If necessary, the third connection is sawn open for the emergency overflow. For cutting of the
edges, see illustration.
Before inserting the filter into the tank, the calmed inlet, support pipe and filter housing must be connected
together. The plug connections can be optionally secured with Spax screws.
5. Installation and assembly GRAF EcoPure 150
Tank volume
Length of support pipe
(L)
2,700 l
990 mm
3,750 l
1,190 mm
4,800 l
1,430 mm
6,500 l
1,710 mm
Cut edges

www.graf.info
14 / 32
5.4 Orientation of the filter housing in the Maxi tank dome
The filter housing is placed in the tank dome so that the pipes can be laid through the openings of the Maxi
tank dome. The side openings in the 3 and 9 o'clock position are used for the inlet and fastening. If an
emergency overflow is to be connected, the 12 o'clock position can be used. The 6 o'clock position cannot
be used because the opening is lower.
5.5 Laying connections
The inlet (1) (HT pipe 250 mm DN 110) is fitted at the 3 o'clock or 9 o'clock position on the tank dome. The
pipe is inserted (narrower end first) from the inside to the outside and the sleeve is connected to the filter
housing.
Tosecure the fixing pipe (250 mm, DN 110) (2), use a double sleeve. The fixing pipe is inserted from outside
to inside, narrower end first. The pipe end and the connection of the filter housing must lie directly against
each other before the double sleeve is tightened.
The pipe and the double sleeve for the emergency overflow are not included in the scope of supply.
5. Installation and assembly GRAF EcoPure 150
Double sleeve

2023-08
6. Initial use and maintenance
6.1 Inserting substrate bags and filter basket
The three filled substrate bags are placed in the red filter housing and the filter basket is hooked in.
The filter basket must be pressed down slightly on insertion to make sure the surrounding seal fits snugly.
Also make sure that, before commissioning and after every maintenance, the extraction handle is aligned
at a 90° angle to the inlet to prevent large dirt particles from becoming caught on the extraction handle.
6.2 Maintenance of the filter basket
The filter basket is removed for cleaning. The dirt is disposed of and the basket is thoroughly cleaned with
water until all the meshes are open. We recommend cleaning every 4 - 5 weeks (more often in autumn
when dead leaves accumulate). Cleaning intervals may vary depending on the degree of soiling and the
connection surface.
The filter basket must be pressed down slightly each time it is re-inserted after cleaning to make sure the
surrounding seal fits snugly. Also make sure that, before commissioning and after every maintenance, the
extraction handle is aligned at a 90° angle to the inlet to prevent large dirt particles from becoming caught
on the extraction handle.
6.3 Maintenance of the filter substrate
The replaceable filter substrate (item no. 231010) must be replaced every 2 - 5 years depending on the
degree of soiling. When the filter basket is maintained, check the substrate bags for blockages or soiling.
Please note: If water backs up to the overflow level, even during light rain, both the
filter basket and the substrate bags should be checked. When the required
permeability is no longer achieved, the filter and/or substrate must be replaced.
6.4 Disposal
The dirt in the sieve and the removed substrate bags must be disposed of in accordance with the legal
regulations.

Notice d’installation et de maintenance
GRAF EcoPure 150
EcoPure 150
Réf. : 340109
Pack accessoires
EcoPure 150
Réf. : 342006
Les points décrits dans cette
notice devront être impérativement
respectés. Tout manquement à
ces règles annulera
systématiquement la garantie. Les
articles supplémentaires achetés
auprès de GRAF sont tous
accompagnés de notices
d’installation séparées jointes dans
l’emballage.
Avant d’installer votre filtre, il est
impératif de vérifier que tous les
éléments ne sont pas
endommagés.
Vous pouvez télécharger les
notices d’instructions manquantes
depuis le site www.graf.info ou les
demander à GRAF.
Table des matières
1. CONSIGNES GENERALES 17
1.1 Sécurité 17
2. CONDITIONS D’INSTALLATION 17
3. TRANSPORT ET STOCKAGE 18
3.1 Transport 18
3.2 Stockage 18
4. DONNEES TECHNIQUES 18
5. INSTALLATION ET MONTAGE DE GRAF ECOPURE
150 19
5.1 Préparation EcoPure 150 avec utilisation de l’eau de
pluie 19
5.2 Préparation de la cuve 19
5.3 Préparation du filtre 20
5.4 Orientation du corps de filtre dans le maxi-dôme de
cuve 21
5.5 Mise en place des raccords 21
6. MISE EN SERVICE ET MAINTENANCE 22
6.1 Mise en place des sacs de substrat et du panier
filtrant 22
6.2 Maintenance du panier filtrant 22
6.3 Maintenance des sacs de substrat 22
6.4 Traitement 22

1. Consignes générales
1.1 Sécurité
Les règles de prévention des accidents conformément à BVG C22 doivent être respectées lors de tous les
travaux. Durant l’inspection des cuves, une deuxième personne devra impérativement être présente par
mesure de sécurité.
Veuillez également tenir compte des prescriptions et normes en vigueur lors de l’installation, du montage,
de l’entretien, des réparations, etc.
Lors de tous travaux sur le système et ses composants, mettre toujours l’ensemble du système hors service
et le sécuriser pour empêcher son réenclenchement.
En dehors des interventions nécessaires sur le filtre, le couvercle doit toujours rester impérativement
verrouillé ; sinon très haut risque d’accident. Vérifier régulièrement le bon positionnement du couvercle.
La société GRAF propose une large gamme d’accessoires tous complémentaires et qu’il est possible de
configurer en systèmes complets. L’utilisation d’accessoires non autorisés par GRAF entraîne l’exclusion
de la garantie légale/garantie fabricant.
Cette notice n’est valable que pour l’installation du filtre à substrat dans une cuve Carat.
Vous trouverez plus d’informations sur la cuve Carat dans la notice d’installation
correspondante.
2. Conditions d’installation
•Le filtre est destiné à être installé dans une cuve ou un regard de visite.
•Le filtre ne doit en aucun cas être directement enterré dans le sol.
•Le filtre convient aux surfaces allant jusqu'à 150 m².
•L’indication de dépassement de la surface de raccordement et de fortes inondations est de
r (5,5) ≥ 100 l/ (s x ha) sur une surface de 150 m².
•Installation adaptée pour une cuve Carat avec maxi-dôme (pas pour un mini-dôme !)
•Pour une installation dans une cuve différente, le volume de sédimentation nécessaire est de 2700 L.
Pour optimiser votre installation, vérifier les risques d’inondation et prévoir un fossé de captage. Nous
pouvons organiser pour vous une évaluation des risques.

3. Transport et stockage
3.1 Transport
Durant le transport, le pack accessoires doit être sécurisé pour ne pas glisser ni chuter. Si le pack
accessoire est arrimé avec des sangles, assurez-vous que les sangles n’endommagent pas les
composants.
Manipuler impérativement avec précaution et éviter tout coup. Les composants du pack accessoires ne
doivent pas rouler ni être traînés sur le sol.
3.2 Stockage
Le stockage temporaire du pack accessoires doit se faire sur une surface plane adaptée. Durant le
stockage, veillez à ce qu’aucun élément extérieur ou environnemental n’endommage les éléments. Les
sacs de substrat sont livrés dans un emballage en plastique à part, qu’il faut stocker au sec.
4. Données techniques
Toutes les données sont indiquées en mm.
DN 110
DN 110
DN 110
DN 110

5. Installation et montage de GRAF EcoPure 150
5.1 Préparation sur la cuve pour EcoPure 150 avec utilisation de l’eau de pluie
Pour combiner un système d’utilisation de l’eau de pluie et le kit filtrant à substrat, il faut d’abord installer
dans la cuve le pack technique pour l’utilisation d’eau de pluie.
5.2 Préparation de la cuve
Avant le montage du filtre, installer d’abord le manchon de sortie de la cuve. Cet embout est mis en place*
avec un joint dans l’orifice existant, à la hauteur de l’épaulement de cuve. Pour ce faire, il faut d’abord
raccourcir la pièce PVC sur le côté supérieur.
Insérer l’extrémité pointue du manchon PVC de 250 mm de l’extérieur vers l’intérieur de la cave (1.).
Ensuite, insérer la pièce en T DN 110(2.), à l’intérieur de la cuve, sur le manchon PVC. Placer le tuyau
PVC DN 110/150 mm (3.) contre l’extrémité inférieure de la pièce en T DN 110. Le tuyau de sortie doit être
installé à l’horizontale.
Bord de coupe
*Si jusqu’à présent la cuve Carat avait été utilisée comme
réservoir, il reste encore des trous à percer. Utiliser à cette
fin une scie-cloche (réf. 202003 –non fournie) pour percer
un trou de 124 mm et utiliser le joint d’étanchéité spécial
DN 110 (réf. 332033 –non fourni).

www.graf.info
20 / 32
5.3 Préparation du filtre
Avant l’installation dans la cuve, le filtre doit être préparé comme indiqué sur les figures ci-dessous.
Le tableau suivant indique la longueur du tuyau PVC pour la cuve Carat, du filtre vers le système
d’alimentation avec le manchon (voir la figure : longueur L).
Pour la cuve Carat de 2700 L, vous pouvez raccourcir le tuyau PVC livré d’origine. Avec les cuves de plus
grande taille, il faut le rallonger. Le tuyau supplémentaire nécessaire à cette fin n’est pas fourni.
Scier d’abord les embouts de raccordement d’entrée et de sortie. Puis raccorder le tuyau d’alimentation
et, en face, un tuyau supplémentaire pour immobiliser le corps de filtre dans le dôme (ou comme second
tuyau d’alimentation). Pour le trop-plein d’urgence, scier si nécessaire une ouverture sur le troisième
embout. Bords de coupe : voir la figure.
Avant d’installer le filtre dans la cuve, le tuyau d’alimentation, le tuyau PVC et le corps du filtre doivent être
assemblés. Les raccords peuvent être consolidés à l'aide de vis Spax.
5. Installation et montage de GRAF EcoPure 150
Volume de la
cuve
Longueur du tuyau PVC
(L)
2700 L
990 mm
3750 L
1190 mm
4800 L
1430 mm
6500 L
1710 mm
Bords de coupe
This manual suits for next models
2
Table of contents
Languages:
Other Graf Water Filtration System manuals

Graf
Graf EcoPure 200 Instruction Manual

Graf
Graf Optimax-Pro Operating and maintenance manual

Graf
Graf one2clean+ XXL User manual

Graf
Graf 340037 Operating and maintenance manual

Graf
Graf MINIMAX Series User manual

Graf
Graf MINIMAX-PRO Platin Package 3 Operating and maintenance manual

Graf
Graf UP Series User manual

Graf
Graf Garden Comfort Platin 1500 L User manual

Graf
Graf MINIMAX 340060 User manual

Graf
Graf Universal-Filter 3 Series User manual