manuals.online logo
Brands
  1. Home
  2. •
  3. Brands
  4. •
  5. Grandio
  6. •
  7. Greenhouse Kit
  8. •
  9. Grandio GRA-ELEM-VEN User manual

Grandio GRA-ELEM-VEN User manual

GREENHOU S E S
GRANDIO®
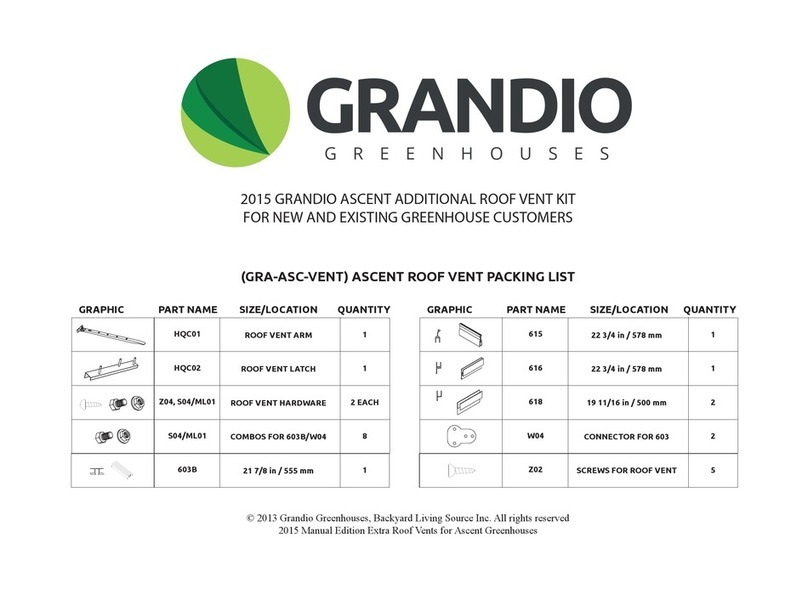
HQC01
HQC02
Z04, S04/ML01
S04/ML01
603C
ROOF VENT ARM
ROOF VENT LATCH
ROOF VENT HARDWARE
COMBOS FOR 603C/W04
21 7/8 in / 555 mm
GRAPHIC PART NAME SIZE/LOCATION QUANTITY
1
1
2 EACH
8
1
(GRA-ELEM-VENT) ELEMENT ROOF VENT PACKING LIST
GRANDIO ELEMENT ADDITIONAL ROOF VENT KIT
FOR NEW AND EXISTING GREENHOUSE CUSTOMERS
© 2016 Grandio Greenhouses, Backyard Living Source Inc. All rights reserved
April 15, 2016 Manual Edition Extra Roof Vents for Element Greenhouses
615
616
618
W04
Z02
PLUG
22 3/4 in / 578 mm
22 3/4 in / 578 mm
19 11/16 in / 500 mm
CONNECTOR FOR 603
SCREWS FOR ROOF VENT
ENDCAP PLUG
GRAPHIC PART NAME SIZE/LOCATION QUANTITY
1
1
2
2
5
2
1
1.1 Detach the JG01 end cap from the 607 Ridge, and the J602A-E and J602B-E end caps from the 610 Gutters, you will only
need to remove the gutter end caps on the side that you are replacing a panel with a roof vent.
1.2 Slide 610 out of 609’s groove only as many panel sections as you need to access your preferred placement, as shown in
diagram . Remove the Y8 panel that you need to get to the area you are going to replace with a roof vent. Repeat on other side
if you have multiple vents you are going to install. Be sure to mark all panels you remove with an “X” to identify which side should
face the sun to be sure the correct side faces the sun.
REMOVING GUTTER INSTRUCTIONS
Warning: This section is only for already built greenhouses. If you are just building your green-
house for the first time skip ahead to page 2 for roof vent assembly.
J602A-E
Z03
J601
Z03
J602B-E
Z03
J602B-E Z03
J602A-E
Z03
J601
607
610
610
601B
601A
610
609
1.3 Locate your Y8 Panel from your original greenhouse or in the panel box if just beginning building now. You will need a utility
knife, straight edge ruler or square, a tape measure and a permanent marker for the next steps. You will need to mark a small “X” on
the side of the panel that should face outwards to the sun.
1.4 You will need to cut (1) of the Y8 Panels which measures 22 3/4” W x 53 5/8“ Hto the dimensions of a Y10 Roof Vent
Panel which is 22 3/4” W x 19 1/8” H. See .
1.5 You will need to cut what is left over of the Y8 Panel which should measure 22 3/4” W x 24 1/2“ H to the dimensions of a Y9
Under Roof Vent Panel which is 22 3/4” W x 22 7/16” H. See .
19 1/8”
53 5/8“
Y8
Y10
1109mm
486mm
Y9
22 7/16“
570mm
22 3/4”
578mm
22 3/4”
578mm
Cut
Cut
2
Transparent Clear Film
Opal White Film
Polycarbonate
Panels
Sun
The UV-Protected side is covered with clear lm and
must face toward the sun. The side covered in white lm
will always face the interior of the greenhouse. We
suggest you peel all lm o completely prior to assem-
bly and use a permanent marker to place a small “X” on
the lower right corner of each panel on the clear side
that faces the sun, each panel has a sticker labeling the
panel number and this side always faces the sun or
outward as well. DO NOT REMOVE LABELS UNTIL
YOU INSTALL PANELS. The “X” is suggested in case
you dis-assemble your greenhouse in the future so you
may identify which side has the UV coating. Always use
gloves when handling the polycarbonate panels as the
edges can be very sharp.
IMPORTANT: POLYCARBONATE PANELS
ROOF VENT ASSEMBLY
24 1/2“
623mm
Y8 Leftover
3
ROOF VENT ASSEMBLY CONTINUED
SUN
616 615
PC sheet
1.6 Assemble the roof window vents as shown below in and ,
using the Z02 screws attach the 615, 616, and 618’s with the Y10
panel as shown. Be careful not to strip screw heads. Pay attention to
the Y10 panel, stickers face the sun, and that the frames are
assembled according to images below.
1.7 Insert assembled window into the end of ridge of 607 and slide
into position. See . Window positions are your discretion, a 6x4
will have (1) roof vent and a 6x8 will have (2) roof vents.
1.8 For a 6x8 attach the additional 602B’s as shown after all roof
vents are positioned.
Y10
618
Z02
Z02
Z02
Z02
Z02
618
Screwdriver Outside View
615
616
618
616
Z02
Note Correct Orientation
616
618
615
607
SUN
Inside View of
Roof Vent
607
602B
602B
602B
602B
602B
4
1.9 To ensure there is no gap in roof vent
position 603C as shown in . Connect
603C to middle of 602B’s or between a
601B and 602B using W04 brackets and
S04/ML01 combos as shown. See .
1.10 Attach HQC01 to 616 with the Z04
screws see , close roof vent and attach
the handle onto HQC02 middle pin (the
rst two holes of the handle to the second
and third pins of HQC02). Then attach
HQC02 into 603C’s track with S04/ML01
(nuts and bolts), see .
603B
618
616
616
603B
616
Z04
HQC02
Y10
Y10
HQC01
Handle
Note: If you are installing automatic roof vent openers
follow those directions for correct installation.
SAVE MANUAL OPENERS FOR WINTER SWITCH OUT.
HQC01
Handle
ROOF VENT ASSEMBLY CONTINUED
HQC01
Handle
Inside View
Inside view of 603B
603C
602B
W04
603C
HQC02
HQC01
Handle
ML01/S04
Inside View
123
1.11 Insert polycarbonate sheets Y8’s and Y9’s into the
lower roof of your greenhouse. Panels may slide out
before gutters are in place. You may want to place a piece
of tape on the panel to prevent sliding as shown in the
diagram once the panels are in place.
1.12 Slide 610 Gutters into 609’s groove as shown
in diagram . Repeat on both sides. Note the
orientation of the gutters, the extension gutters
will be at the back and the holes should align
with gutter down spout hole. Reattach any
other elements you may have taken apart.
601B
601A
610
609
609
610
Gutter
Outside View
The two profiles should be flush
at ends when installed correctly.
ROOF VENT INSTALLATION
Y8
Y9
Y8
Y8 Y8
Y8
Y8
610
5
6
END CAP INSTALLATION
Z03
ENDCAP PLUG
J602A-E
Z03
J601
Z03
J602B-E
Z03
J602B-E Z03
J602A-E
Z03
607
610
601B
601A
610
609
1.13 For any greenhouse size if you have chosen to place a roof vent nearest the front or back you will need to locate the
ENDCAP PLUG, you will slide into the 607 track just before placing the J601 caps into place in next steps. See .
1.14 Attach caps to the ridge and gutters on both front and back as shown below. Squeeze a small amount of rubberized silicone
or construction adhesive into the ends of ridge to secure pressure t end caps. You will need to quickly secure the Z03’s into the
J602A-E and J602B-E, see . It is recommended to caulk any areas that may allow water penetration such as around gutter end
caps to seal against water. It is helpful to apply a piece of tape on the outside of the endcaps so they seal tight to their intended
extrusion, remove tape within 24 hours once silicone has set.
J601
610

Other Grandio Greenhouse Kit manuals

Grandio GRA-ASC-VENT User manual

Grandio

Grandio GRA-ASC-VENT User manual

Grandio ASCENT GRA-812-GR User manual

Grandio

Grandio ASCENT GRA-812-GR User manual

Grandio GRA-812BR-GR User manual

Grandio

Grandio GRA-812BR-GR User manual

Grandio Ascent 8x8 KIT User manual

Grandio

Grandio Ascent 8x8 KIT User manual

Grandio GRA-ASC-88 User manual

Grandio

Grandio GRA-ASC-88 User manual

Grandio ELITE 8x12 User manual

Grandio

Grandio ELITE 8x12 User manual

Grandio GP-EZ1 User manual

Grandio

Grandio GP-EZ1 User manual

Grandio ELITE User manual

Grandio

Grandio ELITE User manual

Grandio Summit Series User manual

Grandio

Grandio Summit Series User manual

Grandio Grandio Element 6x8 with Base Kit User manual

Grandio

Grandio Grandio Element 6x8 with Base Kit User manual

Grandio GRA-ELI88 User manual

Grandio

Grandio GRA-ELI88 User manual

Grandio GRA-LVR User manual

Grandio

Grandio GRA-LVR User manual

Grandio GRA-88BR-GR User manual

Grandio

Grandio GRA-88BR-GR User manual

Grandio 2015 EARTH & GRASS L-BOLT ANCHORING KIT User manual

Grandio

Grandio 2015 EARTH & GRASS L-BOLT ANCHORING KIT User manual

Grandio BA-A1 User manual

Grandio

Grandio BA-A1 User manual

Grandio GRA-ASC-812 User manual

Grandio

Grandio GRA-ASC-812 User manual

Grandio GRANDIO ELITE 8x12 2015 User manual
Grandio

Grandio GRANDIO ELITE 8x12 2015 User manual

Grandio 2015 User manual

Grandio

Grandio 2015 User manual
Popular Greenhouse Kit manuals by other brands

HOKLARTHERM Riga III Series Assembly instructions

HOKLARTHERM

HOKLARTHERM Riga III Series Assembly instructions

Palram CANOPIA HARMONY How to assemble

Palram

Palram CANOPIA HARMONY How to assemble

Hanover HANGHMN-1NAT Assembly instruction

Hanover

Hanover HANGHMN-1NAT Assembly instruction

Gainsborough K164 Assembly instructions/Instructions for use

Gainsborough

Gainsborough K164 Assembly instructions/Instructions for use

Juliana Veranda Assembly instructions

Juliana

Juliana Veranda Assembly instructions

GrowSpan 108197H manual

GrowSpan

GrowSpan 108197H manual

Palram 7290103123635 manual

Palram

Palram 7290103123635 manual

Little Cottage Octagon Greenhouse Assembly & instruction manual

Little Cottage

Little Cottage Octagon Greenhouse Assembly & instruction manual

OLT Garden in a Box with Greenhouse Cover Assembly manual

OLT

OLT Garden in a Box with Greenhouse Cover Assembly manual

ClearSpan CL108550 manual

ClearSpan

ClearSpan CL108550 manual

Mercia Garden Products 04PREMG0604-V1 General instructions

Mercia Garden Products

Mercia Garden Products 04PREMG0604-V1 General instructions

Palram CANOPIA HARMONY 6x6 manual

Palram

Palram CANOPIA HARMONY 6x6 manual

Alton EVOLUTION TWELVE CEDAR PARTITION instruction manual

Alton

Alton EVOLUTION TWELVE CEDAR PARTITION instruction manual

HobbyGrower Special Edition Enthusiast Assembly instructions

HobbyGrower

HobbyGrower Special Edition Enthusiast Assembly instructions

ACD PRESTIGE MR2 H manual

ACD PRESTIGE

ACD PRESTIGE MR2 H manual

Outsunny 845-435 manual

Outsunny

Outsunny 845-435 manual

Vente Unique OTERIA Assembly instruction

Vente Unique

Vente Unique OTERIA Assembly instruction

Royal Well Slim kweken Viola manual

Royal Well

Royal Well Slim kweken Viola manual

manuals.online logo
manuals.online logoBrands
  • About & Mission
  • Contact us
  • Privacy Policy
  • Terms and Conditions

Copyright 2025 Manuals.Online. All Rights Reserved.