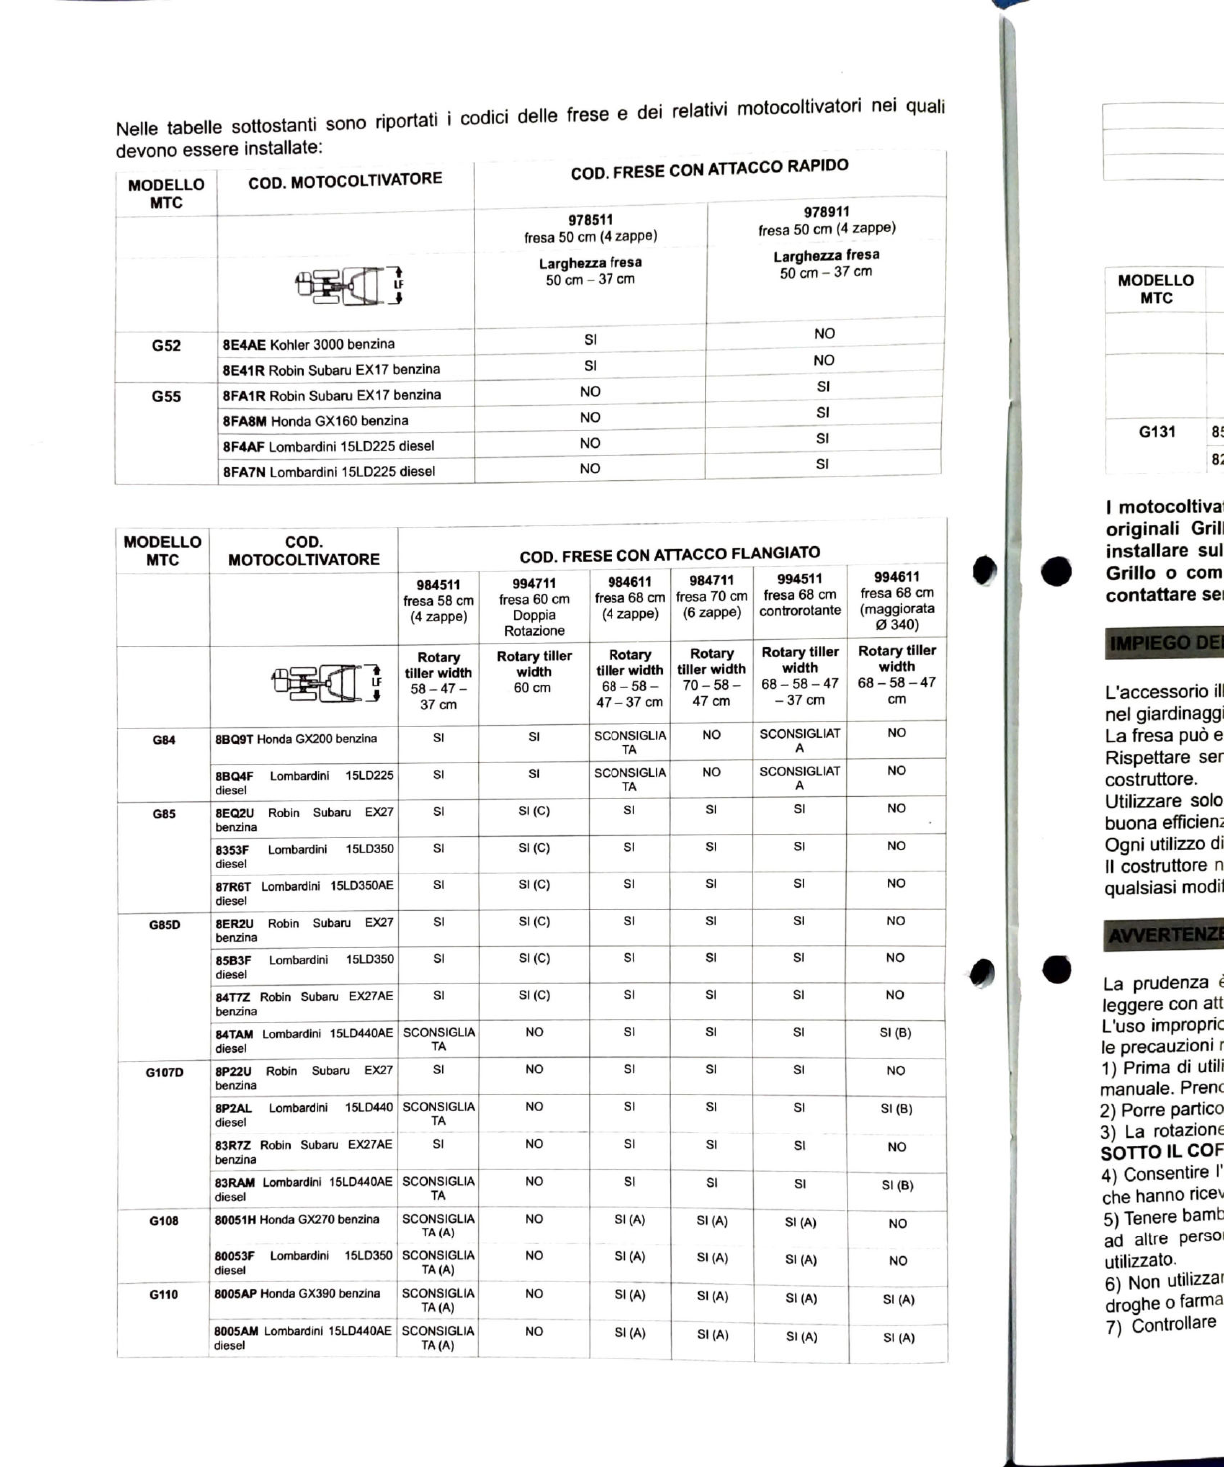
Grillo 978511 User manual

GrilloD
GRIGARDEN
MACHINES
. ROTARY TILLER
FRESA
FRAISE
FRÄSE
FRESA
OPERATOR'S MANUAL
MANUALE
DELL'OPERATORE
MANUEL
D'UTILISATION
BEDIENUNGSANLEITUNG
MANUAL
DE
INSTRUCciONES

The
following
schemes
show
the
rotary tillers
tem
no.
and
the
walking
tractor
model
they
can
be
attached to:
WALKING
TRACTOR
WALKING TRACTOR
NO.
ROTARY
TILLER
NO.
WITH
QUICK CoUPLING
MODEL
978511
978911
50
cm
rotary
tiller
(4-tines)
50
cm
rotary
tiller
(4-tines)
Rotary
tiller
width
50
cm-37
cm
Rotary
tiller
width
50
cm
37
cm
G52
8E4AE
Kohler
3000
petrol YES
NO
8E41R
Robin
Subaru
EX17 petrol YES
NO
G55
8FA1R
Robin
Subaru
EX17 petrol
NO
YES
8FA8M
Honda
GX160 petrol
NO
YES
8F4AF
Lombardini 15LD225 diesel
NO
YES
8FA7N Lombardini 15LD225 diesel
NO
YES
WALKING WALKING TRACTOR
NO.
TRACTOR
ROTARY
TILLER
NO.
WITH
COUPLING
THROUGH
FLANGE
MODEL
994511
994611
984711
70
cm
984511
994711
984611
68
cm
68
cm
58
cm
rotary
tiller (4-tines)
60
cm
double-
rotation
68
cm
rotary
tiller
(4-tines)
rotary
tiller
rotary
tilleer
(bigger
tines
contra
(6-tines)
rotating
tiller
rotary
tiller
340)
Rotary
tiller
width
58
47
37
cm
Rotary
tiller
width
Rotary
tiller
width
Rotary
Rotary
tiller
tiller
width|
Rotary
tiller
width
width
68-
58-47
-
70-
58
37
cm
68
58-47
-
37
cm
60
cm
47
cm
68-
58
-
Cm
G84
8BQ9T
Honda
GX200
petrol
YES
YES
not
NO
not
NO
recommended
recommended
8BQ4F
Lombardini
15LD225
diesel
YES YES
not
NO
not
NO
recommended
recommended
YES
(C)
YES YES
NO
G85
8EQ2U
Robin
Subanu
EX27
petrol
YES
YES
8353F
Lombardini
15LD350
diesel
YES
(C)
YES
YES
YES
NO
YES
YES
ES
(C)
YES
YES
YES
NO
87R6T
Lombardini
15LD350AAE
diesel
YES
YES
(C)
YES
YES
YES
NO
G85D
8ER2U
Robin
Subaru
EX27
petrol
YES
YES
(C)
YES
YES
YES
NO
85B3F
Lombardini
15LD350
diesel
YES
YES
YES
NO
84T7Z
Robin
Subaru
EX27AE
petrol
YES
YES
(C)
YES YES
YES
YES(
84TAM
Lombardini
15LD440AE|
not
recommended
diesel
NO
YES
NO
YES
YES
YES
NO
G107D
8P22U
Robin
Subaru
EX27
petrol
8P2AL
LOmbardini
15LD440
diesel
not
recommended
NO
YES
YES
YES
YES
(B)
YES
NO
83R7Z Robin Subaru
EX27AAE
petrol
YES
NO
YES
YES
83RAM
Lombardini
15LD440AE
not
recommended
NO
YES
YES
YES
YES
(B)
diesel
NO
YES
(A)
YES
(
not
recommended
A)
G108
80051H
Honda
GX270
petrol
NO
YES
(A)
NO
80053F Lombardini 15LD350diesel
not
recommended NO
YES
(A)
YES
(A)
YES
(A)
A)
YES
(A)
YES
(A)
YES
(A)
YES
(A)
NO
not
recommended
(A)
G110
8005AP
Honda
GX390
petrol
YES
(A)
YES
(A)
YES
(A)
8005AM Lombardini 15LD440AE
not
recommended
diesel
NO
YES
(A)
(A)
(A): no.
946311
necessary
(B):
no.
wheels
5.00-10
necessary

(C):
if
used with wheels
5.00-10,
the
extension
no.
9C1512 is necessary
WALKING
TRACTOR
WALKING
TRACTOR
NO.
ROTARY
TILLER
NO.
WITH
COUPLING
THROUGH
FLANGE
MODEL
989011
989111
70
cm
rotary
tiller
(4-tines)
70 cm rotary tiller (6-tines)
Rotary
tiler
width
83
cm
70
cm
37
cm
Rotary
tiller
width
83
cm
70
cm
37
cm
G131
85RB2 Lombardini 3LD510 diesel YES YES
82HB2 Lombardini 3LD510 diesel
YES
YES
Grillo
walking
tractors
have
been
conceived
to
be
exclusively
used
with
original
attachment
or
with
attachments
made
by
manufactures
authorized
by
Grillo
S.p.A.
Never
use
Grillo
walking
tractors
with
non-original
attachments
nor
with
attachments
produced
or
modified
by
unauthorized
manufacturers.
Always
contact
an
authorized
dealer
in
case
of
need.
INSTRUCTIONS
FOR
USE
This
attachment
has
been
exclusively
conceived
for
being
used
both
in
agriculture
and
in
gardening
and
to
till
the
soil.
The
rotary
tiler
can
be
mounted
on
specific
Grillo
walking
tractors
only.
Always
pay
dlose attention
to
the
functioning,
maintenance and repair operations
of
this rotary
tiller
outlined by
the
manufacturer
in
the
manual.
Always
use
Grillo original
spare
parts,
as
they
are
the
only
ones
to offer
complete
safety
and
interchangeability.
Any
improper
use
will
void
the
warranty
and
the
manufacturer
will
not
be
held
responsible
for
any
damage
that
occurs
thereafter.
WARNINGs
Caution
is
the
main
safeguard
in
preventing
accidents.
We
urge
you
to
read
the
following
warning
before
stating
working. Improper
use
of
the
walking tractor
and
its
equipment
can
be
dangerous.
To
reduce
the
risks to
the
minimum,
observe
the
necessary
precautions
set
out
below:
1) Read
the
whole of this manual before usingyourwalking tractor.
Be
thoroughly
familiar
with
the
controls
and
the
proper
use
of
the
machine
before
starting.
2)
Pay
special
attention to
the
safety
warnings
and
labels.
3)
The rotating
tiller
is
extremely dangerous; never insert hands
or
feet under the tiller!
4)
Before
other
people
are
allowed
to
use
the
machine,
make
sure
they
are
informed
about
the
safety
regulations
and
how to properly
use
this equipment.
5)
Ensure
children
and
animals
are
kept
at
a
safe
distance
of
about
15
metres.
Do not allow
people
to
come
closer
to
the
walking tractor
when
it
is being
used.
6) Do not
use
the
machine
when
physically fatigued
or
under
the
influence of alcohol
or
drugs
that
could
impair
the
operator's
physical
and
mental capacities.
7)
Thoroughly
check
t
damage
the
tines
(e.g.
stones)
or
that
could
be
caught
up
and
fiung
down,
therefore
becoming
highly
dangerous. (e.g. branches, stones).
8)
Always
wear
suitable
clothing
and
footwear.
It
is
recommended
to
wear
safety
footwear,
safety
goggles,
ear
plugs
and
gloves,
long
trousers.
Do
not
wear
clothing
or
accessories
that
could
get
trapped
in
the
controls
or
in
the
tiller
(e.g.
loose
trousers,
scarves...).
9)
Pay
close
attention
when
working
on
slopes.
Always
work
across
the
slope
and
never
upwards/downwards.
Pay
greater
attention
when
changing
direction
on
slopes
and
never
work
on
excessively steep ground.
10)
Never allow the machine
to
be used
by
anyone under
16
years
of
age
11)
Pay
cose
attention
when
operating
the
machine
in
reverse,
make
sure
that
there
are
no
und
before
using
the
walking
actor
and
remove
any object that could

obstacles
behind
you.
In
case
of
danger
release
the
handlebar,
the
machine
will
stop
immediately
12
angerous
to
sharply
activate
the
levers
with
the
engine
at
maximum
r.p.m.
It
is
13)
Do
not
operate
the
engine in a
confined
space
where
dangerous
carbon
monoxide
fumes
can
collect.
14)
Make
sure
you
work
preferably in
natural
light
or
good artificial
light.
15)
Never
use
the
walking
tractor
to
crush
building,
metallic
and
plastic
material
nor
roots
and
trunks
or
any
sort
of
garbage
16)
Do
not
use
the
machine
to
transport people,
animals
or
objects.
17)
Never
disable
safety
devices.
18)
Always
stop
the
engine
before
making
any
adjustment
or
cleaning.
19)
Never
allow
anyone
to
check
the
machine
with
engine running.
20)
The
user
is always
responsible
for injuries
or
damages
caused
to
third parties
and
for
any
risk
they
could
run.
21)
Damaged
tines
must
always
be
replaced
and
never
repaired.
22) Always
use
genuine
Grillo
spare
parts.
23)
Before
starting
any
work
with
the
machine,
check
that
all
the
accident
prevention
systens
with
which
it
is
equipped with
are
in
perfect working
order.
They
must
never
be
disabled
or
tampered
with.
24)
Before
starting work,
check
that
the
nuts
and
bolts
securing
the
tiller
and
tines
are
perfectly
secured.
25)
Never
operate
the
machine
without
safety protective
devices
in place (such
as
mudguards
and
engine
bonnets).
26) Never clean the tiller
with
the engine running
27)
Never
use
the
machine
barefoot.
28)
Never
change
the
max
RPM
engine settings
nor
any
other
engine
settings.
29)
Allow
the
engine
to
cool
before
storing
in
any
enclosure.
30)
CAUTION:
To
reduce
the
risk
of
fire,
keep
the
engine,
the
exhaust
pipe
and
the
exhaust
manifolds
free
from
grass,
leaves,
dust,
etc..
31)
Do
not
run
with
the
walking
tractor
32)
Hold
your
feet
away
when
starting
the
machine.
33)
Do
not
lift
or
transport
the
machine
with
the
engine running.
34) Grillo
walking
tractors
has
been
designed
with
the
sole
purpose
of
being
used
with
original
Grillo
attachments
or
with
attachments
designed
by
other
manufacturers
expressively
authorized
by Grillo.
Non
original
attachments
as
well
as
attachments
produced
and/or
modified
by
non-
authorized
manufacturers
must
never
been
connected
to
the
walking
tractor.
If
you
have
any
question
or
doubt
please
contact
the
nearest
Grillo
authorized
dealer.
35)
Never
work
without
the
central
knife
correctly
positioned
(fig.
4,
A).
Any
improper
use
will
void
the
warranty
and
the
manufacturer
will
not
be
held
responsible
for
any
damage
that
occurs
thereafter.
CAUTION!
We
recommend
the
use
of
ear
plugs/protection
should
the
walking
tractor
be
used
fora
prolonged
time.
Use
acoustic
protections
compliant
with
the
curent
law
(see
picture
below
-
Fig.
A).
Fig.
A

HOW
TO
CONNECT
THE
ROTARY
TILLER
TO
THE
WALKING
TRACTOR
IMPORTANT!
Take
the
rotary
tiller
out
of
the
packaging
using
a
lifting
machine
or
fully
open
the
packaging
paying
attention
not
to
damage
the
attachment. NEVER
lift
the tiller
by
hand,
it
weighs
more
than
30
kg.
NEVER
LIFT
THE
TILLER
USING
THE
ADJUSTING
LEVER PLACED ON THE HOOD.
Before
connecting
the
rotary
tiller
to
the
walking
tractor
make
sure
that
1)
The
handlebar
is
positioned
in
walking
tractor "mode" with
the
engine
in front
of
the
handlebar
(fig.
1)
2)
The
walking
tractor
is
OFF
and
the
PTO is
not
engaged.
3)
The
linking
flange
or
the
quick
coupling
shaft
are
well greased.
4)
The
quick
coupling
lock
lever
is in
FREE
position
(for
the
walking
tractor G52
and
G55
only).
CONNECTING
THE
ROTARY
TILLER
THROUGH
THE
QUICK
COUPLINGG
To
mount
the
tiller
do
as
follows:
-
Firmly
hold
the
walking
tractor
by
the
handlebar
and
insert
the
quick
coupling
shaft
until it's
fully
adherent.
Then
lock
the
quick
coupling
(fig.
2A)
CONNECTING
THE
ROTARY
TILLER
THROUGH
THE
FLANGED
coUPLING
Fimily hold
the
walking tractor by the handlebar then insert the
two
pins
into
the rotary tiler eyelets.
Tighten
both
nuts
paying
attention
not to
damage
the
centring ring. (fig. 2B).
STANDARD
ADJUSTABLE
TILLER
no.
978511-978911-984511-984611
984711-994611-989011
989111
The
rotary
tiller is
used
to
break
the
surface
layer of
the
ground
to
increase
its permeability
and
a
to
get
rid
of
weeds.
If
the
soil
is
hard
and
tough
it
is
recommended
to
till
in
1
st
speed,
while
if
it
is
soft
and
sandy
it
would
be
better
to
choose
the
2d
speed.
The
working
depth
can
be
adjusted
by
raising
or
lowering
the
central
knife
located
over
the
rotary
unit
through
the
black
lever.
To
obtain
a
deeper
tilling
of
the
soil
raise
the
lever
upwards
(fig. 3A).
It
is
recommended
to
start
tilling with
the
lever
place
in
the
lowest
position
and
to
raise
it
subsequently
if
a major
depth
is
needed.
Note
that
on
hard
soils
if
the
machine
jumps
forward
it
is
recommended
to
lower
the
central
knife
into position no. 1 (tilling
depth
adj.
Scheme
fig. 7) by using
the
black lever.
CAUTION:
Keep
your
hands
and
feet
away
from
the
rotary
tiller
hood
when
the
engine
is
running,
rotation
of
the
tiller
is
highly
dangerous.
Before
performing
any
kind
of
operation
on
the
tiller
(e.g.
replacing
hoes),
ALWAYS
SWITCH
OFF
THE
ENGINE.
o
operatn
CONTRAROTATING
TILLER
no.
994511
The
rotary tiller is
used
to
break
the
surface
layer
of
the
ground
to
increase
its permeability
and
to
get
rid
of
weeds.
The
contrarotating
tiller is highly
recommended
on
rough
and
hard
grounds.
The
tilling
depth
can
be
adjusted
raising
or
lowering
the
central
knife
positioned
under
the
rotary
tiller
unit.
To
increase
the
tilling
depth
raise
the
knife
upwards
(fig.
38)
using
the
appropriate
lever
position
on
the
rotary
tiller
hood.
It
is
recommended
to
start
tilling with
the
lever
placed
in
the lowest position and
to
raise
it
subsequently
if
a major depth
is
needed.
Important
to
prevent
the
machine
from sinking
excessively
into
the
ground
when
tilling
on
soft soils
lower
the
central
knife.
and
feet
away
from
the
rotary
tiller
hood
when
the
engine
is
CAUTION:
Keep
your
hand
running, rotation
of
the tiller
is
highlydangerous. Before performing any
kind
of
operation
on
the
tiller
(e.g.
replacing
hoes),
ALWAYS
SWITCH
OFF
THE
ENGINE.

DOUBLE ROTATION TILLER
no.
994711
he
tiller is
used
to
crush
the
ground
superficial
layer
to
make
it
suitable
for
seeding,
to
increase
the
ground
permeability
and to
get
rid
of
weeds.
The double rotation tiller works
the
soils
in
two
different
wayS
-
CONTRA-ROTATING
tiller:
the
hoes
rotate
in
the
opposite
direction
as
against
the
wheels
(fig.
2)
so
this tiller
is
ideal
for
hard soils.
-
STANDARD
tiller:
hoes
and
wheels
rotate
in
the
same
direction
(fig.
3)
so
this tiller is ideal
for
soft
and
sandy
soils.
o
shift
from
the
contra-rotating
system
to
the
standard
system
just
turn
the
lever
placed
on
the
tiller
cowling
(fig.
2-3)
and then
turn
the
central knife place
under
the
tiller
cowling
(fig.
2-
3).
For
a
greater
working
depth
raise
the
central
knife.
It
is
recommended
to
start
working
with
the
knife
set
at
the
lowest
position
and
to
raise
it
consequently
to
achieve a
greater
working
depth.
CAUTION:
Never
put
hands
or
feet
under
the
tiller
cowling
when
the
engine
is
running,
the
rotation
of
the
hoes
is
highly
dangerous.
Before
performing
any
repair
or
maintenance
operation
(e.g.
replacing
hoes
etc.)
ALWAYS
SWITCH OFF THE ENGINE.
STARTING
wORK
Once
the
rotary
tiller
has
been
attached
to
the
walking
tractor,
switch
the
engine
on
and
engage
the
PTO.
CAUTION:
THE
TILLER
WILL
IMMEDIATELY
START
ROTATING!
Engage
the
gear, push
the
red
lever
on
the
handlebar
and
start
working.
Pay
close
attention
to
the
SAFETY
WARNINGS
when
working.
END
OF
wORK
Once
work is finished,
disengage
the
PTO,
release
the
red
lever
on
the
handlebar
to
stop
the
walking
tractor, switch
the
engine
off
and
remove
the
starting
key
(where
necessary).
Clean
the
machine
from
ground
and
other
residues
and
guard
it
away from
rain
and
bad
weather
conditions.
MAINTENANCE
Below
the
operator
will
find
a list
of
maintenance
operations
to
be scheduled
at
regular
intervals.
Both
an
efficient maintenance programme
and
an
adequate
lubrication
will
push
down
operating
costs,
while
keeping
the
machine
fully
efficient
and
increasing
its
lifespan.
The
regular
maintenance described below
is
recommended
under
normal
working
conditions,
it
can
therefore
been
modified according to
use
and
environmental conditions.
IMPORTANT!
Before
carrying
out
any
maintenance
and/or
adjustment,
disengage
the
PTO
and
switch
the
engine
off.
EVERY 8
wORKING
HOURS:
Check
that
the
screws
of
the
hoes
are
well
tightened
(fig.
4,
n°1).
Check
thatthe hoes are
not
prematurely
worn.
CAUTION!
The
hoes
of Grillo
walking
tractors
are
made
of
a
special
steel
subjected
to
heat
treatments. Never
weld
the
hoes
if
broken
or
cracked,
because
they
could break
and
be
flung
away
becoming
therefore highly
dangerous
for
people
and
objects around.
Daily
check
both
the
hoes
and
their fixing bolts.
Sharpen
the
hoes
if
necessary.

EVERY
50
wORKING
HOURS:
For
rotary
tiller
with
flanged
coupling:
Check
the
oil
level
into
the
gearbox
by
removing
the
cap
located
on
the
side
of
the
gearbox
carter
(fig.
4,
n°2).
If
the
level is low
add
gearbox
oil
80W/90
(API GL5
US
MIL-L-2105D).
Replace
the
oil
once
a year.
OIL QUANTITY
Rotary
tiller
no.
978511
-
978911
250ml
Rotary
tiller
no.
994711
230m
Rotary tiller no. 984511 984611 984711
350ml
994511
994611
Rotary tiller no. 989011
989111
500m
ATTACHMENTS
FOR
ROTARY
TILLERS
BACK-CUTTER
FURROWER
(for
tillers
no.
978511,
994711
only)
This
tool is
mounted
at
the
rear
of
the
tiller
and
works
in
tandem
with
it.
The
furrower is
conceived
to
produce
irrigation
and
seed
drills.
CAUTION:
Before
connecting
or
removing
the
back-cutter
furrower,
ALWAYS
SWITCH
OFF
THE
ENGINE.
Keep
your
hands
and
feet
away
from
the
rotary
tiller
hood
when
the
engine
is
running,
rotation
of
the
tiller
is
highly
dangerous.
ADJUSTABLE
FURROWER
(for
tillers
no.
978911,
984511,
984611,
984711,
994511,
994611,
989011,
989111
only)
This
implement
is
specially
designed
for
preparing
furrows
for
sowing
and
irrigation
and
it
works
in
tandem
with
the
rotary
tiller.
The
furrow
width
can
be
adjusted
by
changing
the
position
of
the
two
wings
(fig.
5).
CAUTION:
Keep
your
hands
and
feet
away
from
the
rotary
tiller
hood
when
the
engine
is
running,
rotation
of
the
tiller
is
highly
dangerous.
Before
mounting
or
dismounting
the
adjustable
furrower,
ALWAYS
SWITCH
OFF
THE
ENGINE.
ROTARY TILLER
SUPPORT
WHEEL
(for
tillers
no.
978911,
984511, 984611,
984711,
994511,
994611, 989011,
989111
only)
It
is
very
useful
while
transferring
the
machine,
because
it
keeps
the
rotary
tiller
off
the
ground,
making
transfer
easier
and
less
tiring
(fig.
6).
CAUTION:
Keep
your
hands
and
feet
away
from
the
rotary
tiller
hood
when
the
engine
is
running,
rotation
of
the
tiller
is
highly
dangerous.
Before
connecting
or
removing
the
support
wheel,
ALWAYS
SWITCH
OFF
THE
ENGINE.

Nelle
tabelle
sottostanti
sono
riportati i
codici
delle
frese
e
dei
relativi
motocoltivatori
nei
quali
devono
essere
installate:
COD.
FRESE
CON
ATTACCO
RAPIDO
MODELLO
cOD.
MOTOCOLTIVATORE
MTC
978911
978511 fresa 50
cm
(4
zappe)
fresa
50
cm
(4
zappe)
Larghezza
fresa
50
cm-37
cm
Larghezza
fresa
50
cm
37
cm MODELLO
MTC
NO
G52
8E4AE
Kohler
3000 benzina S
NO
8E41R
Robin
Subaru
EX17
benzina
SI
NO
SI
G55
8FA1R
Robin
Subaru
EX17
benzina
SI
8FABM
Honda
GX160
benzina
8F4AF
Lombardini
15LD225
diesel
8FA7N
Lombardini
15LD225
diesel
NO
G131
NO
S
NO
S
I motocoltiva
originali
Gril
installare
sul
MODELLo
COD.
MOTOCOLTIVATOREMTC
cOD.
FRESE
CON
ATTACCO
FLANGIATO
Grillo
o
com
994611
fresa
68
cm
994711
984611
984711
994511
984511
fresa
58
cm
(4
zappe)
fresa
68
cm
fresa
70
cm|
fresa
68
cm
(4
zappe)
fresa
60
cm
contattare
se
Doppia
Rotazione
(6
zappe)
|controrotante
(maggiorata
340)
IMPIEGO
DE
Rotary
tiller
Rotary tiller
width
Rotary
Rotary
tiller
width
Rotary
Rotary
tiller
width
58-47
width
tiller
width
|
tiller
width
68-58-
70-58
47
cm
68-58-47
68-58-47
-37
cm
60
cm
L'accessorio
il
nel giardinagg
La
fresa
può
e
Rispettare
ser
cm
37
cm
47-37
cm
NO
scONSIGLIAT
NO
SCONSIGLJA
A
SCONSIGLIA|
G84
8BQ9T
Honda
GX200
benzina
SI
A
8BQ4F
Lombardini
15LD225
SI
SI
NO
scONSIGLIAT
NO
costruttore.
diesel
TA
Utilizzare
solo
G85 8EQ2U
Robin
Subaru
EX27
SI
SI
(C)
SI
SI S
NO
buona
efficien=
benzina
Ogni
utilizzo
di
Il
costruttore
n
8353F Lombardini 15LD350
Sl
SI
(C)
SI SI S
NO
diesel
NO
87R6T
Lombardini 15LD350AE
diesel
SI
SI
(C)
SI
SI
SI
qualsiasi
modi
8ER2U
Robin Subaru EX27 Si
(C)
SI
NO
G85D
SI
AVVERTENZE
benzina
SI
NO
85B3F
Lombardini
15LD350
diesel
SI
SI
(C)
SI
SI
prudenza
leggere
con
att
L'uso
impropric
le
precauzioni
n
1)
Prima
di
utile
manuale.
Prenc
2)
Porre
partico-
3)
La
rotazione
SOTTO
IL
COF
84T7Z
Robin
Subaru
EX27AE
SI
(C)
SI
SI
SI
NO
benzina
|84TAM Lombardini 15LD440AE SCONSIGLIA|
diesel
NO
SI
SI
SI
SI
(B)
A
8P22U
Robin
Subaru
EX27
benzina
NO
SI SG107D
NO
8P2AL Lombardini
15LD440
SCONSIGLIA
diesel
NO
S
SI
SI
SI (B)
TA
83R7Z Robin Subaru EX27AE
benzina
SI
NO
SI
SI
S
NO
4)
Consentire
che
hanno
rice
5)
Tenere
bama
ad
altre
perso
utilizzato.
83RAM
Lombardini
15LD440AE
SCONSIGLIA
TA
NO
SI
SI SI
(B)
diesel
G108 80051H Honda GX270 benzina
SCONSIGLIA
(A)
SI
(A)
VO
SI
(A)
NO
TA (A)
80053F
Lombardini
15LD350
SCONSIGLIA
diesel
NO
SI
(A)
SI
(A)
SI
(A)
NO
TA
(A)
6)
Non
utilizzar
droghe
o
farma
7)
Controllare
8005AP
Honda
GX390
benzina
ScONSIGLIA
TA (A)
NO
G110
SI
(A)
Si
(A)
SI(
A)
SI
(A)
8005AM
Lombardini
15LD440AE
SCONSIGLIA
TA
(A)
NO
SI (A) SI
(A)
SI
(A)
SI
(A)
diesel

(A):
necessita
di
946311
(B):
necessita
di
ruote
5.00-10
(C):
se
utilizzato con ruote 5.00-10 necessita
di
prolunga 9C1512
coD.
MOTOcOLTIVATORE
MODELLO
MTC
cOD. FRESE
CON
ATTACco
FLANGIATO
989011 989111
fresa 70 cm
(4
zappe) fresa 70
cm
(6 zappe)
Larghezza
fresa
83 cm 70
cm-
37 cm
Larghezza
fresa
83
cm-
70
cm
37
cm
G131
85RB2 Lombardini 3LD510 diesel SI
SI
82HB2 Lombardini 3LD510 diesel
SI
SI
I
motocoltivatori
Grillo
sono
stati
progettati
unicamente
per
essere
utilizzati
con
accessori
originali
Grillo
o
con
accessori
di
produttori
autorizzati
dalla
stessa
ditta
Grillo.
Non
installare
sulla
macchina
accessori
non
originali, o
prodotti
da
aziende
non
autorizzate
Grillo o
comunque
modificati
da
personale
non
autorizzato
Grillo.
Per
qualsiasi
dubbio
contattare
sempre
un
rivenditore
autorizzato.
IMPIEGO
DELLA
FRESA
L'accessorio
illustrato
in
questo
manuale
è
stato
costruito
esclusivamente
per
l'uso
in
agricoltura
e
nel
giardinaggio,
per
la
fresatura
del
terren0.
La
fresa
può
essere
installata solo
su
specifiche macchine Grillo.
Rispettare
sempre
le condizioni
di
funzionamento,
di
manutenzione e riparazione prescritte dal
costruttore.
Utilizzare
solo
ricambi originali Grillo
che
garantiscano
il
mantenimento della
sicurezza
e della
buona
efficienza dell'accessorio.
Ogni utilizzo diverso
da
quanto
descritto sopra, viene considerato
come
improprio.
Il
costruttore
non
accetta
responsabilità
per
danni
risultanti
dall'uso
non
corretto
o
improprio
e
da
qualsiasi
modifica
realizzata
arbitrariamente
sulla
fresa.
AVVERTENZE
La
prudenza
è l'arma principale nella prevenzione degli incidenti. La
preghiamo
vivamente
di
leggere
con
attenzione le seguenti avvertenze, prima
ancora
di
iniziare
il
lavoro.
L'uso
improprio
del
motocoltivatore
può
risultare
dannoso;
per
ridurre
queste
possibilità
osservare
le precauzioni
necessarie
di
seguito riportate:
1)
Prima
di
utlizzare
il
motocoltivatore, leggereattentamente tutte
le
istruzioni
riportate su questo
manuale.
Prendere
familiarità con i comandi
ed
il
corretto
uso
della macchina.
2) Porre particolare attenzione alle etichette
di
sicurezza
poste
sulla macchina.
3) La rotazione della fresa è altamente pericolosa,
NON
METTERE
MAI
LE
MANI
O I PIEDI
sOTTO
IL
COFANO FRESA QUANDO
IL
MOTORE E' ACCESO.
4) Consentire l'uso del motocoltivatore soltanto a
persone
che
hanno
letto
il
presente
manuale
o
che
hanno
ricevuto
adeguate
istruzioni
per
un
uso
sicuro e appropriato del motocoltivatore.
5) Tenere bambini e animali
ad
una
distanza
di
almeno 15 metri dall'area
di
lavoro. Non
consentire
ad
altre
persone
o animali
di
avyicinarsi
al
motocoltivatore
quando
questo
viene
acceso
o
utilizzato.
6)
Non
utilizzare
il
motocoltivatore
in
condizioni
di
affaticamento
fisico,
o
sotto
l'effetto
di
alcool
droghe
o farmaci
che
riducano le capacità fisiche e cognitive dell'operatore.
7) Controllare l'area nella
quale
deve
essere
utilizzata la macchina. Prima
di
procedere
alla

fresatura
rimuovere
tutti
gli
oggetti
che
potrebbero
danneggiare
le
zappe
(es.
pietre)
o
che
potrebbero
essere
lanciati
dall'apparato
fresante
(es.
sassi,
rami
ecc.).
8) Quando
si
lavora
con
il
motocoltivatore
utilizzare
sempre
un
abbigliamento adeguato.
Si
consiglia
d'indossare
calzature
di
sicurezza,
occhiali
o
visiera
protettiva,
cuffie
o
tappi
antirumore,
guanti
da
lavoro,
pantaloni lunghi.
Evitare
di
indossare
indumenti
o accessori
che
posano
impigliarsi
nei
comandi
o
nella
fresa
(es.
non
indossare
pantaloni
larghi,
sciarpe..).
9)
Sui
pendii
agire
sempre
con
cautela,
lavorare
trasversalmente
rispetto
alla
pendenza,
mai
in
salita
o in
discesa,
fare
particolare
attenzione
durante
il
cambio
di
direzione,
non
lavorare
su
pendii
eccessivamente
ripidi.
10)
E'
vietato l'uso del motocoltivatore
ai
minori
di
16
anni.
11) Prestare molta attenzione nella fase
di
retromarcia, assicurarsi che
il
terreno dietro
di
sé
sia
libero
da
ostacoli.
In
caso
di
pericolo
lasciare
il
manubrio.
La
macchina
si
arresterà
immediatamente.
12)
E
pericoloso
azionare
le
leve
bruscamente,
col
motore
a
massimo
regime.
13)
Per
evitare
il
pericolo
di
esalazioni
velenose,
non
adoperare
il
motore
acceso
in
un
locale
chiuso.
14)
Lavorare
solo
con
la
luce
del
sole
o
con
buona
luce artificiale.
15)
In
nessun
caso
utilizzare
il
motocoltivatore Grillo
per
frantumare
o
schiacciare
materiali
edilizi,
plastici, metallici,
radici,
tronchi e
rifiuti
in
genere.
16)
Non
utilizzare
mai
la
macchina
per
trasportare
persone
o animali.
17) Non
manomettere
o disattivare i dispositivi
di
sicurezza.
18) Non fare
nessun
tipo di regolazione o pulizia col motore
in
moto.
19)
Non
fare
controllare
la
macchina
da
nessuno
mentre
siete
alla
guida
col
motore
in
moto.
20)
L'utilizzatore è sempre responsabile dei danni arrecati a terzi, deglí incidenti o dei pericoli
nei
quali possono incorrere.
21)
Le
zappe
deformate o danneggiate devono essere sempre sostituite,
mai
riparate.
22)
Usare
sempre
ricambi originali Grillo.
23)
Prima
di
cominciare
qualsiasi
lavoro
con
la
macchina,
verificare
che
tutti
i
sistemi
antinfortunistici
di
cui
essa
è
dotata
siano
perfettamente
funzionanti. E
severamente
vietato
escluderli
o
manometterli.
24)
Prima
di
iniziare
il
lavoro, controllare
che
le
viti
e i dadi
di
bloccaggio
della
fresa
e
delle
zappette
siano
perfettamente
serrati.
25)
L'attrezzatura
protettiva (cofani, parafanghi, ecc.), va
assolutamente
mantenuta
durante
i lavori
di
zappatura.
26)
Non
pulire la
fresa
con
il
motore
acceso.
27)
Utilizzare la
macchina
indossando
calzature
di
sicurezza.
28)
Non
cambiare
29)
Far
raffreddare
il
motore
prima
di
mettere
la
macchina
in
locali
chiusi.
30)
ATTENZIONE:
per ridurre
il
pericolo
di
incendio mantenere
il
motore,
la
marmitta
ei
collettori
di
scarico
liberi
da
erba,
foglie,
polvere
ecc..
31)
Non
correre,
ma
accompagnare
la
macchina
sempre
e
solo
camminando.
32)
Avviare la
macchina
tenendo
i piedi
ben
distanti dalla
fresa.
33)
Non
sollevare
o
trasportare
la
macchina
quando
il
motore
è
acceso.
34)
I motocoltivatori Grillo
sono
stati progettati
unicamente
per
essere
utilizzati
con
accessori
originali
Grilo
o
con
accessori
di
produttori
autorizzati
dalla
stessa
ditta
Grillo.
Non
installare
sulla
macchina
accessori
non
originali,
o
prodotti
da
aziende
non
autorizzate
da
Grillo o
comunque
modificati
da
personale
non
autorizzato
da
Grillo.
Per
qualsiasi
dubbio
contattare
sempre
un
rivenditore
autorizzato
Grillo o
direttamente
il
centro
assistenza
Grillo.
35)
Non
fresare
senza
il
coltello
centrale
correttamente
posizionato
tra
le
zappe
(fig.
4,
A).
regolazioni del motore,
in
modo
particolare
il
numero
di
giri
massimo.
Ogni
utilizzo improprio comporta
il
decadimento
della
garanzia
ed
il
declino
di
ogni
responsabilità
del
costruttore.

ATTENZIONE!
Nell'uso
continuativo
dell'accessorio
si
raccomanda l'utilizzo
di
sistemi per
proteggere
rudito.
Utilizzare
tappi
e
cufie
conformi alle
vigenti
normative
in
materia
(fig.
A).
FIG.
A
INSTALLAZIONE
ATTENZIONE!
Togliere
la
fresa
dall'imballo utilizzando
appropriati
mezzi
di
sollevamento,
oppure
aprire
completamente
l'imballo
facendo
attenzione
a
non
danneggiare
l'attrezzo,
NON
sollevare
a
mano
la fresa,
il
suo
peso
è
superiore
ai
30Kg.
NON
SOLLEVARE
MAI
LA
FRESA
AGGANCIANDOSI
ALLA
LEVA
DI
REGOLAZIONE
CHE
E'
POSTA
SOPRA
IL
COFANO.
Prima
di
installare la
fresa
sul motocoltivatore accertarsi che:
1)
ll
manubrio
sia
posizionato
in
modalità motocoltivatore, col motore antistante
(fig.
1)
2)
II
motocoltivatore
sia
spento
e
che
la
presa
di
forza sia disinserita.
3)
La
flangia
di
collegamento
o
il
canotto
dell'attacco rapido siano correttamente ingrassati.
4)
La
leva
di
bloccaggio
dell'attacco rapido sia
in
posizione libera (solo
per
i motocoltivatori Grillo
G52 e G55).
MONTAGGIO
FRESA
CON ATTACCo RAPIDO
Per
installare la
fresa
sulla
macchina
procedere
come
segue:
tenendo
fermo
il
motoooltivatore dal manubrio, inserire
il
centraggio dell'attacco rapido fino a
battuta.
Completare l'installazione bloccando l'attacco
rapido.
(ig.
2A)
MONTAGGIO
FRESA cON
ATTACcO
FLANGIATO
Avvicinarel
fresa
al
motocoltivatore,
mantenendo
fermo
il
manubrio,
e
inserire
i
due
filetti
nelle
asole
della
fresa.
Serrare
i
due
dadi
facendo
attenzione
a
non
rovinare
l'anello
di
centraggio
(fig.
28).
UTILIZZO
DELLA
FRESA
REGISTRABILE
STANDARD
cod:
978511,
978911, 984511,
984611,
984711,
994611,
989011,
989111
La
fresa
va
utilizzata
per
frantumare
lo
strato
superficiale
del
terreno
per
renderlo
adatto
alla
,Per
aumentare
la
permeabilità
del
terren0
stesso
e
per
libera
La
fresatura
si
può
eseguire
in
prima
velocità,
se
il
terreno
è
duro
e
tenace,
o in
seconda,
se
il
terreno è frabile o
sabbios0.
La profondità
di
fresatura puó
essere
variata
alzando
o
abbassando
a leva
nera
centrale
posta sopra
il
corpo
fresa.
otenere
una
fresatura
profonda
portare
la
leva
verso
l'alto
(fig.
3A)
iniziare
il
lavoro
con
la
leva
nella
posizione
più
bassa,
successivamente
si potrà
alzare
la leva
per
ottenere maggiore profondità.
N.nei
terreni
duri,
se
la
macchina
tende
a
saltare
in
avanti,
abbassare
il
coltello
centrale
in
pOSIZione 1
(schema
fig.
7),
utilizzando
la
leva
nera.
NIONE:
Non
mettere
mai
le
mani
o i
piedi
sotto
eso,
la
rotazione
delle
zappe
è
altamente
pericolosa.
Prima
di
eseguire
qualsiasi
dalle
erbe
infestanti.
È buona norma
cofano
della
fresa
con
il
motore

Operazione sulla fresa (es. sostituzione
di
una zappa ecc.)
SPEGNERE
SEMPRE
IL
MOTORE.
UTILIZZO
DELLA
FRESA
CONTROROTANTE
cod.
994511
La
fresa
va
utilizzata
per
frantumare
lo
strato
superficiale
del
terreno
per
renderlo
adatto
alla
na.
per
aumentare
la
permeabilità
del
terreno
stesso e
per
liberarlo
dalle erbe
infestanti.
La
resa
controrotante è particolarmente indicata per terreni
ostili
e
difficili
da penetrare.
La
profondità
di
fresatura
può
essere
variata
alzando
o abbassando
lo
zappetto centrale
posto
sotto
il
corpo
fresa.
Per
aumentare
la
profondità
occorre
spostare
lo
zappetto
verso
l'alto
(fig.
33)
agendo
Sull'apposita leva
posta
sopra
al
cofano. È buona norma iniziare
il
lavoro con
lo
zappeto
nella
poSizione
più
bassa,
per
favorire
il
galleggiamento
sul terreno,
ed
alzarlo
poi
se
si
vuole
ottenere
maggiore
profondità.
N.B
nei
terreni
morbidi,
per
evitare
un
eccessivo
affondamento della macchina,
aumentare
il
galleggiamento
della
fresa
abbassando lo
zappetto.
ATTENZIONE:
Non
mettere
mai
le
mani
o i
piedi
sotto
il
cofano
della
fresa
con
il
motore
acceso,
la
rotazione
delle
zappe
è
altamente
pericolosa.
Prima
di eseguire qualsiasi
operazione
sulla
fresa
(es.
sostituzione
di
una
zappa
ecc.)
SPEGNERE
SEMPRE
IL
MOTORE.
UTILIZZO
DELLA FRESA
DOPPIA
ROTAZIONE
cod.
994711
La
fresa
va
utilizzata
per
frantumare lo
strato
superficiale
del
terreno
per
renderlo
adatto
alla
semina,
per
aumentare
la
permeabilità
del
terreno
stesso
e
per
liberarlo dalle
erbe
infestanti.
La
fresa
a
Doppia
Rotazione
ha
la
possibilità
di lavorare
il
terreno
in 2 differenti sistemi:
-
CONTROROTANTE:
le
zappe
ruotano
nella direzione
opposta
al
senso
di rotazione
delle
ruote
(fig. 9), è
il
tipo
di
lavorazione
che
consente
di
lavorare terreni duri e tenaci.
-
ROTAZIONE
STANDARD:
le
zappe
ruotano nello
stesso
senso
di rotazione
delle
ruote
(fig.
10),
è
il
tipo
di
lavorazione
che
consente
di lavorare terreni
friabili,
molli o
sabbiosi.
Per
passare
dalla
lavorazione controrotante a
quella
standard
è sufficiente
ruotare
la
leva
postaa
sopra
il
cofano
della
fresa
(fig.9e
10)
e
girare
lo
zappetto
posto
sotto
il
cofano
fresa
(fig.9
e
10
Per
ottenere
una
fresatura
profonda
portare
lo
zappetto
in
alto.
Ë
buona
norma
iniziare
il
lavoro
con
lo
zappetto
basso
e,
successivamente
si
potrå
alzare
per
ottenere
maggiore
profondità.
ATTENZIONE:
Non
mettere
mai
le
mani
o i
piedi
sotto
il
cofano
della
fresa
con
il
motore
acceso,
la
rotazione
delle
zappe
è
altamente
pericolosa.
Prima
di eseguire qualsiasi
operazione
sulla
fresa
(es. sostituzione di
una
zappa
ecc.) SPEGNERE
SEMPRE
IL
MOTORE
INIZIO
DEL
LAVORO
Una
volta
collegato
la
fresa
al
motocoltivatore,
avviare
il
motore
e innestare
la
presa
di
forza:
Inserire
la
marcia, premere
la
leva
rossa
sul
manubrio e iniziare
il
lavoro
ATTENZIONE
LA
FRESA
INIZIERA'
IMMEDIATAMENTE
ARUOTARE!
Durante
il
lavoro
attenersi
scrupolosamente
alle
AVVERTENZE.

FINE
LAVORO
Una volta terminatoIl lavoro, disinserire
la
presa
di
forza, rilasclare
la
leva
rossa
sul manubrio
per
arrestare
la
macchina,
spegnere
il
motore, togliere la
chiave
di
accensione
(se
presente).
Pulire
la
macchina
da
terra e altri residui, e riporta
in
un apposito locale al riparo
da
pioggia e intempenie.
MANUTENZIONE
Sono
di
seguito
elencate
le
operazioni
di
manutenzione
da
eseguire
con periodicta.
Un
rn
costo
di
esercizio
ed
una
lunga
durata
dell'accessorio
dipendono
dalla
metodica
e
costante
osservanza
di
tali indicazioni.
Gli
intervalli
di
tempo
degli
interventi
di
manutenzione
elencati
in
questo
manuale
hanno
solo
carattere
indicativo
e
sono
relativi a
condizioni
normali
d'impiego,
possono
pertanto
subire
variazioni
in
relazione al
genere
di
servizio, alle condizioni ambientali
ed
a fattori stagionali.
ATTENZIONE!
Prima
di
effettuare
qualsiasi operazione di
manutenzione
e/o di regolazione,
disinserire
la
presa
di
forza,
spegnere
il
motore.
OGNI
8
ORE
DI
LAVORO:
Verificare
che
le
viti
delle
zappe
siano
serrate
(fig.
4, n°1).
Verificare
lo
stato
di
usura delle
zappe.
ATTENZIONE!
Le
zappe
sono
realizzate
in
acciaio
speciale sottoposto a
trattamenti
termici.
Non
saldare
mai
le
zappe
se
rotte
o usurate, potrebbero spezzarsi
ed
essere
lanciate
anche
a
notevole
distanza
causando
danni
a
cose
elo
persone.
Controllare
giornalmente lo
stato
d'usura
delle
zappe
ed
in
modo
particolare i
bulloni
di fissaggio.
Se
necessario
è possibile
affilare
nuovamente
le
zappe.
OGNI
50
ORE
DI
LAVORO:
Per
frese
con
attacco
flangiato:
controllare
il
livello
dell'olio
nella
scatola
degli ingranaggi togliendo
il
tappo
posto
sulla
parte
laterale
del
carter
(fig.
4,
n°2);
se
il
livello
fosse
più
basso
aggiungere
olio
per
cambi
80W/90
(API
GL5
US
MIL-L-2105D).
Cambiare
l'olio
una
volta
all'anno.
DOSAGGIo
OLIO
Frese 978511, 978911 250ml
Fresa
994711
230m
Frese 984511,
984611,
984711,
994511,
994611
350ml
500m
Fresa
989011,
989111
ACCESSORI
PER
FRESE
ASSOLCATORE
RETROFRESA
FISSO
(solo
per
frese
978511, 994711)
L'assolcatore
retrofresa
realizza
una
duplice lavorazione
del
terreno:
operando
insieme
alla
fresa,
permette
l'ottenimento
di
solchi
da
irrigazione o
semina
nel
terreno
fresato,
due
lavorazioni
in
un
solo
passaggio.
ATTENZIONE:
Non
mettere
mai
le
mani
o i
pledi
sotto
il
cofano
della
fresa
con
il
motore
acceso,
la
rotazione
delle
zappe
è
altamente
pericolosa.
SPEGNERE
SEMPRE
IL
MOTORE
prima
di
montare
o
smontare
l'assolcatore
retrofresa.

ASSOLCATORE
REGISTRABILE
(solo per frese 978911, 984511, 984611, 984711,
994511,
994611,
989011,
989111)
L'assolcatore
registrabile
realizza
una
duplice
lavorazione
del
terreno
operando
insiemealla
fresa,
permette
'ottenimento
di
solchi
da
irigazione
o
semina
nel
terreno
fresato.
due
lavorazioni
in
un
solo
passaggio.
Con
questa
tipologia dí
assolcatore
è inoltre possibile modificare
la
posizione delle
ali, variando di conseguenza
l'ampiezza
del solco.
(fig.
5)
ATTENZIONE:
Non
mettere
mai
le
mani
o i
piedi
sotto
il
cofano
dellafresa
con
il
motore
acceso.
la
rotazione
delle
zappe
è
altamente
pericolosa.
SPEGNERE
SEMPRE
IL
MOTORE
prima
di
montare
o
smontare
l'assolcatore
retrofresa.
RUOTINA
SOSTEGNO
FRESA
(solo per frese 978911, 984511, 984611, 984711,
994511,
994611, 989011,
989111)
L'aggiunta
del
ruotino
di
sostegno
alla
fresa agevola
mantiene sollevato l'attrezzo dal terreno.
(fig.
6)
trasferimenti della
macchina
poiché
ATTENZIONE:
Non
mettere
mai
le
mani
o i
piedi
sotto
il
cofano
della
fresa
con
il
motore
acceso,
la
rotazione
delle
zappe
è
altamente
pericolosa.
SPEGNERE
SEMPRE
IL
MOTORE
prima
di
montare
o
smontare
la
ruotina.

Ci-dessous
les
ref.
des
différentes fraises
et
des
motoculteurs où elles
peuvent
être
montees
MODELE
REF.
MOTocULTEUR
REF.
FRAISE
AVEC
ATTACHE
RAPIDE
978511
fraise
50
cm
(4
couteaux) 978911
fraise
50
cm
(4
couteaux)
Largeur fraise
50
cm
37
cm
Largeur
fraise
50
cm
37
cm
G52
8E4AE
Kohler
3000
essence
OUI
NON
8E41R
Robin
Subaru
EX17
essence
OUI
NON
G55
8FA1R
Robin Subaru
EX17
essence
NON
OUI
8FA8M
Honda
GX160
essence
NON
OUI
8F4AF
Lombardini
15LD225
diesel
NON
OUI
8FATN
Lombardini 15LD225 diesel
NON
OUI
MODEL
REF.
MOToCULTEUR
REF.
FRAISE
AVEC ATTACHE
STANDARD
E
984511 984711 984611 984711
994511
994611
fraise 58 cm
(4
couteauK)
fraise
60
fraise
68
Cm
(4
couteaux)
(6
couteaux) contre-rotative contre-rotative (
340)
fraise
68
cm
fraise
70
cm
fraise
68
cm
cm
a
double
rotation
Largeur
fraise
58-47
37
Largeur
fraise
Largeur
fraise
Largeur
fraise
Largeur Largeur
fraise
fraise
68-58-47
cm
cm
60
cm
68-58-47
70-58-47
68-58-47
37
cm
cm
37
cmn
G84
8BQ9T
Honda
GX200
essence
OUI OUI
NON
NON
pas
recommandée
pas
recommandee
8BQ4F
Lombardini 15LD225
OUI
OUI
pas
NON
as
NON
diesel
recommandée
recommandée
G85
8EQ2U
Robin
Subaru
EX27
OUI
OUI
(C)
OUI
OUI
OUI
NON
essence
8353F
Lombardini 15LD350
OUI
OUI
(C)
OUI
OUI OUI
NON
diesel
87R6T
Lombardini 15LD350AE
OUI
OUI
(C)
OUI OUI OUI
NON
diesel
G85D
8ER2U
Robin
Subaru
EX27
OUI
OUi (C)
OUI OUI OUI
NON
essence
OUI
oUI
(C)
OUl
OUI OUI
NON
8583F
Lombardini
15LD350
diesel
84T7Z
Robin
Subaru
EX27AE
OUI
OUI
(C)
OUI
OUI
OUI
NON
essence
NON
OUI
OUI
OUI
OUI
(B)
Lombardini
pas
recommandée
84TAM
15LD440AE
diesel
G107D
8P22U
Robin
Subaru
EX27
OUI
NON
OU
OUI
OUI
NON
essence
NON
OUI OUI
UI
OUI
(B)
8P2AL
Lombardini
15LD440
diesel
pas
recommandée
83R7Z Robin
Subaru
EX27AE
OUT
NON
OUI OUI
OUI NON
essence
NON
OUI OUI
OUI OUI
(B)
83RAM
15LD440AE
diesel
Lombardini
pas
recommandée
G108
80051H
GX270
NON
OUI(A)
OUI(A) OUI(A)
NON
pas
recommandée
A)
Honda
essence
NON OUi A
OUI
(A)
OUI(A)
NON
80053F
Lombardini
15LD350
pas
diesel
recommandee
A)
G110
8005AP
NON
OUI
(A)
OUI(A)
OUI
(A)
OUI
(A)
Honda
GX390
pas
recommande
A)
essence
NON
OUI
(A)
OUI
A)
OUI
(A)
OUI
(A)
8005AM
15LD440AE
diesel
pas
recommandée
Lombardini
(A)

(A):
réf.
946311
nécessaire
(B):
roues
5.00-10
nécessaire
(C):
si
utilisée
avec
des
roues
5.00-10
la
rallonge
réf.
9C1512
est
nécessaire
MODELE REF. FRAISE
AVEC
ATTACHE STANDARD
REF. MOTOCULTEUR
989111
989011
fraise
70
cm
(4
couteaux)
fraise
70
cm
(6
couteaux)
Largeur
fralse
83
cm
70
cm
-
37
cm
Largeur fraise
83
cm-
70
cm
37
cm
OUI
G131
85RB2
Lombardini 3LD510 diesel
OUI
OUI
82HB2 Lombardini 3LD510 diesel
OUI
Les
motoculteurs
Grillo
ont
été
conçus
pour
être
utilisés uniquement
avec
des
accessoires
originaux Grillo ou
avec
des
accessoires
autorisés
par Grillo même.
Ne
pas
installer
sur
la
machine
d'accessoires
qui
ne
sont
pas
originaux,
qui
n'ont
pas
été
produits
par
des
société
autorisées
par
Grillo
ou
qui
ont
été
modifiés
sans
autorisation.
Pour
tout
éclaircissement
contacter
toujours
un
revendeur
autorisé Grillo.
EMPLOI
DE
LA
FRAISE
L'outil
décrit
dans
ce
manuel
a
été
conçu
uniquement
pour
être
utilisé
dans
l'agriculture
et
dans
le
jardinage
pour
fraiser
le
terrain.
La
fraise
peut
être
montée
seulement
sur
des
modèle
spécifiques
Grillo.
Il
est
impératif
de
respecter
les
indications
de
fonctionnement,
entretien
et
réparation
préconisées
par
le
fabricant.
Utiliser
toujours
des
pièces
détachées
d'origine
Grillo
pour
garantir
la
sécurité
et
l'efficacité
de
l'outil.
Tout
usage
impropre
de
l'accessoire
annule
la
garantie.
Le
fabricant n'accepte
aucune
responsabilité
pour
dommages
occasionnés
aux
tiers
en
cas d'usage
impropre
du
motoculteur
et
de
son
outil.
MISES
EN
GARDE
La
prudence
est
la
meilleure
arme
pour la
prévention
des
accidents.
Nous
vous
demandons
de
lire
attentivement
les
normes
suivantes
avant
mëme
de
commencer
le
travail. L'utilisation inadéquate
du
motoculteur
et
de
son
ééquipement
peut
être
dangereuse.
Pour
réduire
ces
éventualités
de
danger, veuillez respecter
les
précautions
nécessaires
décrites ci après:
1)
Lire
entièrement
ce
manuel
d'utilisation
avant
la
mise
en
service
du
motoculteur.
Se
familiariser
avec
les
commandes
et
l'utilisation correcte
de
la
machine.
Suivre
avec
une
attention
particulière
les
mises
en
garde
et
les
étiquettes
de
sécurité
placées
autour
de
la
machine.
La
rotation
de
la
fraise
est
extrêmement
dangereuse,
ne
jamais
mettre
les
mains
ou
les
pieds
sous
la
fraise.
Avant
de
confier votre motoculteur à
d'autres
personnes,
il
faut leur illustrer
aussi
bien les
normes
de
sécurité
que
le
mode
d'emploi.
Tenir
toute
autre
personne
éloignée
(15
mètres
min)
de
la
zone
de
travail. N'utiliser
ou
démarrer
en
aucun
cas
le motoculteur lorsque
des
animaux
ou
des
personnes,
en
particulier
des
enfants
se
tiennent
dans
la
zone
de
danger.
Ne
pas
utiliser le
motoculteur
en
cas
de
fatigue.
ll
est
interdit d'utiliser l'appareil
après
avoir
absorbé
des
drogues, alcool, médicaments etc., risquant de diminuer les capacités
physiques et cognitives de l'opérateur.
Contrôler
le terrain
avant
d'effectuer le
fraisage.
Enlever
tous
les
objets
qui pourraient
endommager
les
couteaux
(pierres...)
ou
être
lancés
au
loin
et
donc
être
très
dangereux.
2)
3)
4)
5)
6)
7)
Lors
de
l'utilisation
de
l'appareil,
porter
des
vétements
fonctionnels
et
ajustés.
Porter
8)
des
chaussures
solides,
lunettes
ou
visière
de
protection,
casque
ou
protections
auditives, gants robustes et pantalons longues.
Ne
pas porter
de
vêtement
ample
(par
exemple
d'écharpes)
qui
peuvent
étre
pris
dans
les
pièces
en
rotation.

Toujours
traiter les pentes dans
le
sens transversal, jamais dans
le
sens de
la
longueur
Faire
particulière
attention
en
cas
de
changement
de
direction
et
éviter d'utiliser l'apparen
9
sur
des
pentes
très
raides.
Ne
jamais
laisser
des
jeunes
de
moins
de
16
ans
utiliser
l'appareil.
10)
Faire
attention
quand
on
enclenche
la
marche
arrière.
Le
terrain
derrière
l'apparel
doit
etre
11)
libre.
En
cas de danger relâcher
le
guidon.
L'appareil
va
s'arrêter immédiatement.
ll
est
dangereux
d'actionner
brusquement
les leviers,
avec
le moteur à plein
regime
12)
13)
Pour
eviter
le
danger
d'exhalaisons
toxiques,
ne
pas
faire
tourner
le
moteur
dans
un
loca
fermé.
L'essence
est
une
substance
très
inflammable.
Ne
conserver
l'essence
que
dans
des
réservoirs
prévus à
cet
effet.
Ne
faire
le
plein
de
l'appareil
qu'à l'air libre
et
à
l'abri
d'étincelles,
de
flammes,
de
source
de
chaleur
et
autres
sources
d'étincelles.
Ne
pas
fumner
au
cours
de
cette
opération.
Faire
le
plein
d'essence
avant
de
démarrer
le
moteur.
Ne
pasS
ouvrir
le
bouchon
du
réservoir
ou
ne
pas
faire
le
plein
d'essence
lorsque le
moteur
tourne
ou qu'il
est
encore
chaud.
Si
le
réservoir a débordé, ne démarrer
le
moteur
qu'aprés
avoir
nettoyé
soigneusement
les
zones
souillées
d'essence
et
éviter
de
démarrer
le
motoculteur
tant
que
les
vapeurs
d'essence
ne
se
sont
pas
dissipées.
14)
15)
Eviter
les
fuites
d'essence
et
essuyer
systématiquement
tout
trace
de
carburant
renversée
avant
de
démarrer
le
moteur.
Conserver
l'essence
dans
des
réservoirs
prévus à
cet
effet.
Ne
travailler
qu'à la
lumière
du
jour
ou
si
l'éclairage
est
suffisant.
L'appareil
ne
doit
en
aucun
cas
servir
à
briser
ou
écraser
de
matériaux
de
constructioon,
plastiques, métalliques
ou
des
racines,
des
troncs
ou
tout
type
de
déchet
en
général.
Ne
pas
utiliser
la
machine
pour
transporter
personnes
ou
animaux.
Ne
pas
atérer
ou
désactiver
les
dispositifs
de
sécurité.
N'effectuer
aucun
réglage
ou
nettoyage
avec
le
moteur
en
marche.
Ne
pas
faire
contrôler
la
machine
lors
de
l'utilisation
et
avec
le
moteur
en
marche.
L'utilisateur
est
toujours
responsable
des
dommages
occasionnés
aux
tiers.
Les
couteaux
déformés
ou
endommagés
doivent
être
remplacés, jamais réparés.
Utiliser
toujours
des
pièces
de
rechange
Grillo d'origine.
Avant
de
commencer
tout
travail
avec
la
machine,
vérifier
que
tous
les
systèmes
contre
les
accidents
dont
la
machine
est
équipée
fonctionnent
parfaitement.
Il
est
formellement
interdit
de
les
exclure
ou
de
les
modifier.
16)
17)
18)
19)
20)
21)
22)
23)
24)
25)
26)
Avant
de
commencer
le
travail,
contröler
que
les
vis
et
écrous
de
blocage
de
la
fraise
et
des
houes
sont
bien
serrés.
Les
équipements
de
protection (capots, garde-boue, etc)
doivent
être
maintenus
durant
le
travail.
27)
28)
29)
Ne
pas
nettoyer
la
fraise
lorsque
le
moteur
est
allumé.
Ne
pas
utiliser la machine nu-pieds.
Ne
pas
modifier
les
réglages
du
moteur,
en
particulier le
nombre
de
tours
maximal.
30)
31)
32)
Laisser
refroidir
le
moteur
avant
d'entreposer
la
machine
dans
des
locaux
fermés
33)
ATTENTION:
pour
réduire
tout
danger
d'incendie,
veulllez
maintenir
le
moteur,
le
pot
et
les
collecteurs
d'échappement
libres
de
herbes,
de
feuilles
et
de
la
poussière.
Effectuer
Il'éventuelle
vidange
du
réservoir
du
carburant
en
plein
air.
34)
Marcher,
ne
jamais
courir
pendant
l'utilisation.
35)
Veller
à
ne
pas
mettre
les
pieds
trop
près
de
la
fraise.
36)
Ne
pas
soulever
ou
transporter la
machine
avec
le
moteur
en
marche.
37)
Ne
jamais
ranger
la
machine
avec
du
combustible
dans
le
réservoir
dans
un
båtiment
38)
fermé.
Les
vapeurs
du
combustible
pourralent
entrer
en
contact
avec
des
flammes
ou
des
étincelles.
Les
motoculteurs
Grillo
ont
été
conçus
uniquement
pour
etre
utilisés
avec
des
accessoires
originaux
Grillo
ou
avec
des
accessoires de Constructeurs
agrèés
Grillo.
Ne
jamais
Drancher
des
outils
qui
ne
sont
pas
dorigine
Grillo,
qui
ne
sont
pas
produits
par
de
constructeurs
agréés
Grillo
ou
qui
ont
ete
modifies
sans
autorisation
Grillo.
En
cas
de
doute,
veuillez
vous
adresser
au
concessionnaire
agrêé
Grillo
le
plus
proche
ou
bien
directement
au
Service
Assistance
Grillo.
39)

Tout
usage
impropre
du
motoculteur
ne
sera
pas
couvert
par
la
garantie.
Le
fabricant
décline
toute
responsabilité
en
cas
de
mauvaise
utilisation.
ATTENTIONI
Lors
d'une
utilisation
prolongée
de
la
machine,
il
est
recommandé
l'emploi
de
systèmes
de
protection
auditive.Veuillez
utiliser
bouchons
d'oreilles
ou
casques
conformes
aux
normes
en
vigueur
(fig.
A).
FIG.A
INSTALLATION
ATTENTION!
Déballer
la
fraise
en
utilisant
une
machine
de
relevage
ou
ouvrir
complètement
le
carton
en
faisant
attention
à
ne
pas
endommager
la fraise. Ne
pas
soulever
la fraise
par
la main,
son
poids
est
supérieur
à 30 kg.
NE
PAS
SOULEVER
LA FRAISE PAR LE LEVIER DE REGLAGE
PLACE
SUR
LE
BONNET
Avant d'installer la fraise
sur
le motoculteur
s'assurer
que:
1)
Le
guidon
soit
en
positionné
en
version
"motoculteur
avec
le
moteur
en
avant
(fig. 1).
2)
Le
motoculteur
soit
éteint
et
la prise
de
force
déclenchée.
3)
Le
manchon
de
liaison
et
l'arbre
de de
l'attache rapide
soient
bien
graissés.
4) Le levier
de
blocage
de
l'attache rapide soit en position "LIBRE (uniquement pour
le
motoculteurs
Grillo
G52
e G55).
MONTAGE
DE
LA
FRAISE
AVEC
ATTACHE
RAPIDE
Pour
monter
la fraise
sur
la
machine
suivre les indications
ci-dessous:
Maintenir
le
motoculteur bien fixe à travers le guidon
et
insérer
complètement
le
centrage
de
l'attache rapide.
-
Compléter
le
montage
en
bloquant l'attache rapide.
(fig.
2A)
MONTAGE DE LA FRAISE AVEC ATTACHE STANDARD
Maintenir
le
motoculteur
fixe
à
travers
le
guidon
et
insérer
les
deux
pivots
dans
les
oeillets
de
la
fraise.
Serrer
les
deux
écrous
en
faisant
attention
à
ne
pas
endommager
le
centrage
(fig.
2B).
EMPLOI
DE
LA
FRASE
REGLABLE
STANDARD
réf.
978511-978911-984511-
984611-
984711-994611-989011-989111
La fraise
sert
à briser la
couche
superficielle du terrain pour
en
augmenter
la
perméabilit
et
en
même
temps
pour
le
débarrasser
des
mauvaises
herbes.
Le
fraisage
peut
être
effectué
en
première
vitesse
si
le
terrain
est
dur
et
tenace,
ou
en
deuxime
vitesse
si
le
terrain
est
moelleux
ou
sablonneux.
II
est
pos
noir
centrale
placé
sur
le
corps
de
la
fraise.
Pour
augmenter
la
profondeur,
il
est
nécessaire
de
déplacer
le
levier
en
haut
(fig. 3A).
Il
est
de
règle
de
commencer
le
travail
avec
la lame
baissée
au
maximum,
et
de
la tirer
vers
le
haut
si
l'on
veut
obtenir
une
profondeur plus importante.
Important:
Si,
sur
les
terrains
trés
durs
la
machine
tend à
sauter
en
avant,
baisser
le
couteau
centrale en position 1 à travers
le
levier
noir
(voir
schéma).
ATTENTION:
ne
pas
mettre
les
mains
ou
les
pieds
au-dessous
du
capot
de
la
fraise
lorsque
le
moteur
est
en
marche.
La
rotation
des
couteaux
est
extrêmement
dangereuse.
Avant
d'effectuer
toute
opération
sur
la
fralse
(p.e.
Remplacement
des
couteaux
etc..)
ÉTEINDRE
TOUJOURS
LE
MOTEUR.
de
régler
la
profondeur
de
fraisage
en
levant ou
en
baissant
le levier

EMPL
DE
LA
FRAISE
CONTRA-ROTATIVE
réf.
994511
fraise
ise
sert à briser
la
couche
superficielle du terrain pour
en
augmenter
la perméabilité
et
au
La
meme
temps
pour
le
débarrasser
des
mauvaises
herbes.
La
fraise
contre-rotative
est
enécialement
recommandée
pour
des
terrains durs
et
difficiles I
est
possible
de
régler a
profo
rofondeur
de
fraisage
en
levant
ou
en
baissant
le
couteau
centrale
placé
au-dessous
du
corps
de
la
fraise.
Pour
augmenter
la
profondeur,
il
est
nécessaire
de
déplacer
le
couteau
vers
le
haut
en
utilisant le
levier
placé
sur
le
capot
de
la
fraise
(fig. 3B).
ll
est
de
règle
de
commencer
le
trava
vec
le couteau
dans
la
position
la
plus
basse,
et
de
le
tirer
vers
le
haut
si
l'on
veut
obtenir
une
profondeur
plus
importante.
Important:
S1,
Sur
les
terrains
très
durs
la
machine
tend
à
sauter
en
avant,
baisser
le
couteau
centrale.
ATTENTION:
ne
pas
mettre
les
mains
ou
les
pieds
au-dessous
du
capot
de
la
fraise
lorsque
le
moteur
est
en
marche.
La
rotation
des
couteaux
est
extrêmement
dangereuse.
Avant
d'effectuer
toute
opération
sur
la
fraise
(p.e. Remplacement
des
couteaux
etc..)
ETEINDRE
TOUJOURS
LE
MOTEUR.
FRAISE
A DOUBLE ROTATION réf. 994711
La
fraise
est
utilisée
pour
briser
la
couche
superficielle
du
sol
pour
ensemencer
le
terrain,
pour
augmenter
sa
perméabilit
et
pour
arracher
la
mauvaise
herbe.
Grâce
à la
fraise
à
double
rotation
on
peut
travailler
le
sol
en
deux
systèmes
différents:
-
CONTRA-ROTATION:
les
couteaux
tournent
dans
le
sens
contraire
par
rapport
au
sens
de
rotation
des
roues
(ig.
2)
pour
travailler
dans
les
terrains
durs
et
tenaces.
-
ROTATION
STANDARD: les
couteaux
tournent
dans
le
même
sens
de
rotation
des
roues
(fig.
3)
pour
travailler
dans
les
terrains
friables
et
sableux.
Pour
passer
d'un
système à
l'autre
tourner
le
levier
placé
sur
le
capot
de
la
fraise
(fig.
2-
fig.
3)
et
tourner
le
couteau noir centrale placé
sous
le capote
de
la
fraise
(fig.
fig.
3).
Pour
augmenter
la profondeur
du
travail
placer
le
couteau
noir
centrale
en
haut.
On
conseille
de
commencer
le
travail
avec
le
couteau
noir
en
position
basse
et
puis
de
le
soulever
pour
obtenir
une profondeur majeure.
ATTENTION:
Ne
jamais
mettre
mains
ou
pieds
au-dessous
du
capot
de
la
fraise
quand
le
moteur
est
en
marche
car
la
rotation
des
couteaux
est
extrmement
dangereuse.
ETEINDRE
TOUJOURS
LE
MOTEUR
avant
d'effectuer
toutes
opérations
de
maintenance
et/ou
réparations
(par
ex.
remplacer
les
couteaux).
DEBUT
DU
TRAVAIL
Une
fois
avoir
monté
la
fraise
sur
le
motoculteur,
démarrer
le
moteur
et
engager
la
prise
de
force.
ATENTION-
LA
FRAISE
COMMENCERAA
TOURNER
IMMEDIATEMENT!
ngager
la marche,
pousser
le
levier
rouge
sur
le
guidon
et
commencer
le
travail.
dni
travail
suivre
scrupuleusement
les
CONSEILS
de
SECURITE
FIN
DU
TRAVAIL
Une
Tois
terminé
le
travail,
déclencher
la
prise
de
force,
relächer
le
levier
rouge
sur
le
guidon
pour
arreter
le
motoculteur,
éteindre
le
moteur,
enlever
la
clé
de
contact
(pour
versions
à démarrage
electrique).
Nettoyer
la
machine
et
enlever
tout résidus
de
terre
et
poussière
et
la
ranger
à
l'abri
de
la
pluie
et
d'intempéries.

ENTRETIEN
Ci-dessous
la
liste
des opérations d'entretien à effectuer
sur
les
fraiseset
leur
intervalles
d'exécution.
L'observance
des
intervalles
d'entretien
préconisés
par
le
fabricant
garantit
la
productivité e
la
durée de service de
la
machine et permet au même temps de réduire
les
coúts
de
maintenance.
Les
intervalles
de
maintenance
préconisés
dans
ce
manuel
sont
indicatifs
et
se
référent
à
l'utilisation
normale
de
l'outil
et
pour
cette
raison
peuvent
être
modifiés
selon
des
condition
d'usage
et
environnementales.
ATTENTION!
Avant d'effectuer toute opération d'entretien et/ou réglage, déclencher toujours
la
prise de
force
et
éteindre
le
moteur.
TOUTES
LES
8
HEURES
DE
TRAVAIL:
Vérifier
que les
vis
des couteaux soient
bien
serrés
(fig.
4,
n°1).
Vérifier l'état
d'usure
des
couteaux.
ATTENTION!
Les
lames
sont
en
acier
spécial traité thermiquement. Ne
jamais
souder
les
lames
cassées
ou
usées,
elles pourraient
se
briser et être projetées
loin,
en
causant
des
dommages.
Controler tous les jours l'état d'usure des couteaux et spécialement les boulons de
fixation.
Si
nécessaire
affûter
de
nouveau
les couteaux.
TOUTES LES 50 HEURES
DE
TRAVAIL:
Pour
le
fraise
avec
attache
standard:
contróler
le
niveau del'huile
dans
la boite à engrenages en enlevant
le
bouchon placé dans
la
partie
latérale
du
carter
(fig.
4,
n°2).
Si
le
niveau
est
bas
ajouter
de
l'huile
pour
boites
à
vitesses
80W/90
(API
GL5
US
MIL-L-2105D).
Remplacer
l'huile
une
fois
par
an.
QUANTITE D'HUILE
Fraise
978511
-
978911
250m
Fraise
994711
230ml
Fraise
984511
984611
984711
994511
-350ml
994611
Fraise
989011
989111
500ml
ACCESSOIRES
POUR
FRAISE
BUTTOIR
DERRIERE
LA
FRAISE
(uniquement
pour
fraises
978511
-
994711)
Le
buttoir derrière
la
fraise
travaille
conjointement à
elle.
Il
trace des
sillons
de semis
ou
d'irrigation
ATTENTION:
ne jamais mettre mains et/ou pieds au-dessous du capot de
la
traise
lorsque
le
moteur
est
en
marche.
La
rotation
des
couteaux
est
extrêmement
dangereuse.
Eteindre
toujours
le
moteur
avant
de
monter
/
démonter
le
buttoir
derrière
la
fraise.
BUTTOIR
REGLABLE
(uniquement pourfraises
978911
984511-984611 984711 -994511
- 994611 -
989011
989111)
Le
buttoir derrière
la
fraise travaille conjointement å elle.
II
trace
des
sillons de
semis
ou d'irrigation
avec
une
seule
passée.
En
outre
il
est
possible
de
choisir
la
largeur du sillon
en
modifiant la
position
de
deux
ailes
du
buttoir
(fig.
5)
ATTENTION:
ne jamais mettre mains et/ou pieds au-dessous du capot de
la
fraise lorsque
le
moteur
est
en
marche.
La
rotation
des
couteaux
est
extrêmement
dangereuse.
Eteindre
toujours
le
moteur
avant
de
monter
/
démonter
le
buttoir
réglable.
This manual suits for next models
9
Table of contents
Languages:
Other Grillo Lawn And Garden Equipment manuals

Grillo
Grillo GH 9 User manual

Grillo
Grillo DUMPER 406 User manual

Grillo
Grillo gf2 User manual

Grillo
Grillo G52 User guide

Grillo
Grillo FM13.09 User manual

Grillo
Grillo G52 User guide

Grillo
Grillo CLIMBER 9.27 User manual

Grillo
Grillo 2500 User manual

Grillo
Grillo G52 User guide

Grillo
Grillo DUMPER 507 User manual
Popular Lawn And Garden Equipment manuals by other brands

DynaTrap
DynaTrap DT600TUN owner's manual

RedMax
RedMax EXTREME EXZ2450S-PH Owner's/operator's manual

SIP
SIP SILVERCUT DISC 380 S Instruction for work

Westfalia
Westfalia 828672 Assembly instruction

Johnny's Selected Seeds
Johnny's Selected Seeds BiO Plus 1000' user guide

Texas Equipment
Texas Equipment WRS 550 user manual