Grillo FM13.09 User manual

FM13.09
OPERATOR'S MANUAL
MANUALE DELL'OPERATORE
EMPLOI ET ENTRETIEN
GEBRAUCHS-UND WARTUNGSANLEITUNG
USO Y MANTENIMIENTO
02443 - 15

INDEX
Safety rules Pag. 1
Instructions : Pag. 5
Warnings Pag. 5
Identification and servicing Pag. 6
Technical specifications Pag. 7
Putting the machine into service Pag. 7
Instructions for use Pag.
Maintenance and lubrication Pag. 9
Implements Pag. 14
Commands (Fig. 1) Pag. 5
Information and warnings (Fig. 2) Pag. 60
Dashboard (Fig. 3) Pag. 62
Pictures Pag. 63
Lubrication chart Pag. 6
EC Declaration of conformity – Noise and vibration levels Pag. 69
INDICE
Norme antinfortunistiche Pag. 1
Istruzioni : Pag. 15
Avvertenze Pag. 15
Identificazione e assistenza Pag. 16
Caratteristiche tecniche Pag. 17
Messa in opera della macchina Pag. 17
Istruzioni d’uso Pag. 1
Manutenzione e lubrificazione Pag. 19
Accessori Pag. 24
Comandi (Fig. 1) Pag. 5
Etichette e avvertenze (Fig. 2) Pag. 60
Cruscotto (Fig. 3) Pag. 62
Foto Pag. 63
Scheda lubrificanti Pag. 6
Certificato di conformità CE – rumorosità e livelli di vibrazione Pag. 69
INDEX
Règles de sécurité Pag. 1
Instructions : Pag. 25
Mises en garde Pag. 25
Identification et assistance Pag. 26
Caractéristiques techniques Pag. 27
Mise en service de la machine Pag. 27
Mode d’emploi Pag. 2
Maintenance et lubrification Pag. 30
Accessoires Pag. 35
Commandes (Fig. 1) Pag. 5
Etiquettes et mises en garde (Fig. 2) Pag. 60
Tableau de bord (Fig. 3) Pag. 62
Figures Pag. 63
Fiche lubrifiants Pag. 6
Certificat de conformité CE – Niveaux sonores et de vibrations Pag. 69
INDEX
Sicherheitsvorschriften Pag. 1
Anleitung: Pag. 36
Sicherheitsrelevante Hinweise Pag. 36
Identifikation der Maschine und Kundendienst Pag. 37
Technische Daten Pag. 3
Inbetriebnahme der Maschine Pag. 3
Betriebsanleitung Pag. 39
Wartung und Schmierung Pag. 41
Zubehör Pag. 46
Steuerung (Abb. 1) Pag. 5
Etiketten und Warnungen (Abb. 2) Pag. 60
Armaturenbrett (Abb. 3) Pag. 62
Abbildungen Pag. 63
Schmierblatt Pag. 6
EG-Konformitätserklärung – Geräuschemission und Vibrationsspiegel Pag. 69
ÍNDICE
Normas de seguridad Pag. 1
Instrucciones: Pag. 47
Advertencias Pag. 47
Identificación y asistencia Pag. 4
Características técnicas Pag. 49
Puesta en servicio de la máquina Pag. 49
Instrucciones de uso Pag. 50
Mantenimiento y lubricación Pag. 52
Accesorios Pag. 57
Comandos (Fig. 1) Pag. 5
Etiquetas y advertencias (Fig. 2) Pag. 60
Tablero de control (Fig. 3) Pag. 62
Figuras Pag. 63
Lubrificantes Pag. 6
Certificado de conformidad CE – Niveles de ruido y vibracion Pag. 69

SAFETY SYMBOLS - SIMBOLOGIA PER LA SICUREZZA - SYMBOLOGIE POUR LA SECURITE –
SICHERHEITSSYMBOLE- SIMBOLOGÍA DE SEGURIDAD
OPEN MANUAL- means that ou must read the operator's manual ver carefull .
MANUALE APERTO - significa che dovete leggere attentamente il manuale di uso e manutenzione.
MANUEL OUVERT – signifie qu'il faut lire avec attention le présent manuel.
OFFENES HANDBUCH – bedeutet, dass Sie die Gebrauchs- und Wartungsanleitung aufmerksam durchlesen müssen.
MANUAL ABIERTO – es decir que ha que leer mu atentamente el manual del operador.
ОТКРЫТОЕ РУКОВОДСТВО - обозначает, что необходимо внимательно прочитать руководство по эксплуатации и
техобслуживанию.
CAUTION! - means that ou have to pa particular attention to the operation ou have to carr out, in particular if there is the
indication “DANGER”.
ATTENZIONE! - significa che dovete porre particolare attenzione all’operazione che dovete effettuare, in particolare se vi è anche
l’indicazione di “Pericolo”.
ATTENTION! - signifie qu'il faut faire particulière attention dans l'opération que vous allez faire, en particulier s'il a aussi
l'indication “DANGER”.
VORSICHT! - bedeutet, dass Sie besondere Aufmerksamkeit beim Durchführen des Vorgangs haben müssen, insbesondere wenn
auch der Hinweis “GEFAHR” aufgeführt ist.
ATENCIÓN! - es decir que ha que poner ma or atención en la operación a ejecutar si, en particular cuando ha también la
indicación “Peligro”.
ВНИМАНИЕ! - обозначает, что необходимо выполнять данную операцию с предельной осторожностью, особенно, если
стоит знак "Опасность".
INTERDICTION, YOU MUST NOT DO THAT! - means that it is absolutel forbidden to carr out the operations reported under this
s mbol because the could lead to mortal danger.
DIVIETO, NON FARE! - significa che non dovete assolutamente fare le operazioni riportate sotto questo simbolo, potrebbe
comportare un pericolo mortale.
INTERDICTION, NE PAS FAIRE! - signifie qu'il est absolument interdit d' effectuer les opérations reportées sous cette indication,
car elles pourraient conduire au danger de mort.
VERBOT, strengstens untersagt! - bedeutet, dass der Vorgang unter diesem S mbol absolut nicht durchgeführt werden darf, da er
zur einer lebensgefährlichen Situation führen könnte.
PROHIBICIÓN, NO LO HAGAN! - es decir que no ha que hacer absolutamente las operaciones bajo este símbolo, podría
comportar un peligro mortal.
ЗАПРЕЩЕНО, НЕ ДЕЛАТЬ! - обозначает, что категорически запрещено выполнять операции с этим знаком, могут нести
смертельную опасность.
NOTE, ou have to pa particular attention to the note put next to this s mbol
NOTA, dovete porre particolare attenzione alla nota posta accanto a questo simbolo.
NOTE, il faut faire attention particulière à la note mise à côté de ce s mbole.
ANMERKUNG, besondere Aufmerksamkeit muss auf die Anmerkungen neben diesem S mbol gelenkt werden.
NOTA, ha que poner atención particular en la nota puesta a lado de este símbolo.
ПРИМЕЧАНИЕ: обращать особое внимание на примечание рядом с этим знаком.
You must not repair nor lubricate the machine with moving parts or with the engine put on.
Non riparare o lubrificare la macchina con organi in movimento o motore acceso
Ne pas réparer ou lubrifier la machine avec des parties en mouvement ou à moteur en marche.
Niemals bei bewegenden Objekten oder bei laufendem Motor Reparationen oder Einschmierungen durchführen.
No reparar ni lubrificar la máquina con órganos en movimiento o motor en marcha.
Не ремонтировать и не смазывать машину, когда органы движутся или включен двигатель.
You must not smoke, light matches or lift flames, trigger frames nor cause sparks.
Vietato fumare, accendere fiammiferi o fiamme, lasciare fiamme libere o creare scintille.
Il est interdit de fumer, allumer des allumettes ou du feu, laisser des flammes libres ou de causer des étincelles.
Es ist untersagt zu Rauchen, Streichhölzer oder Feuer anzuzünden, Flammen auslösen oder Funken verursachen.
Prohibido fumar, encender cerillas o fuego, dejar llamas o crear chispas.
Запрещено курить, зажигать спички или огонь, оставлять открытый огонь или создавать искры.
1

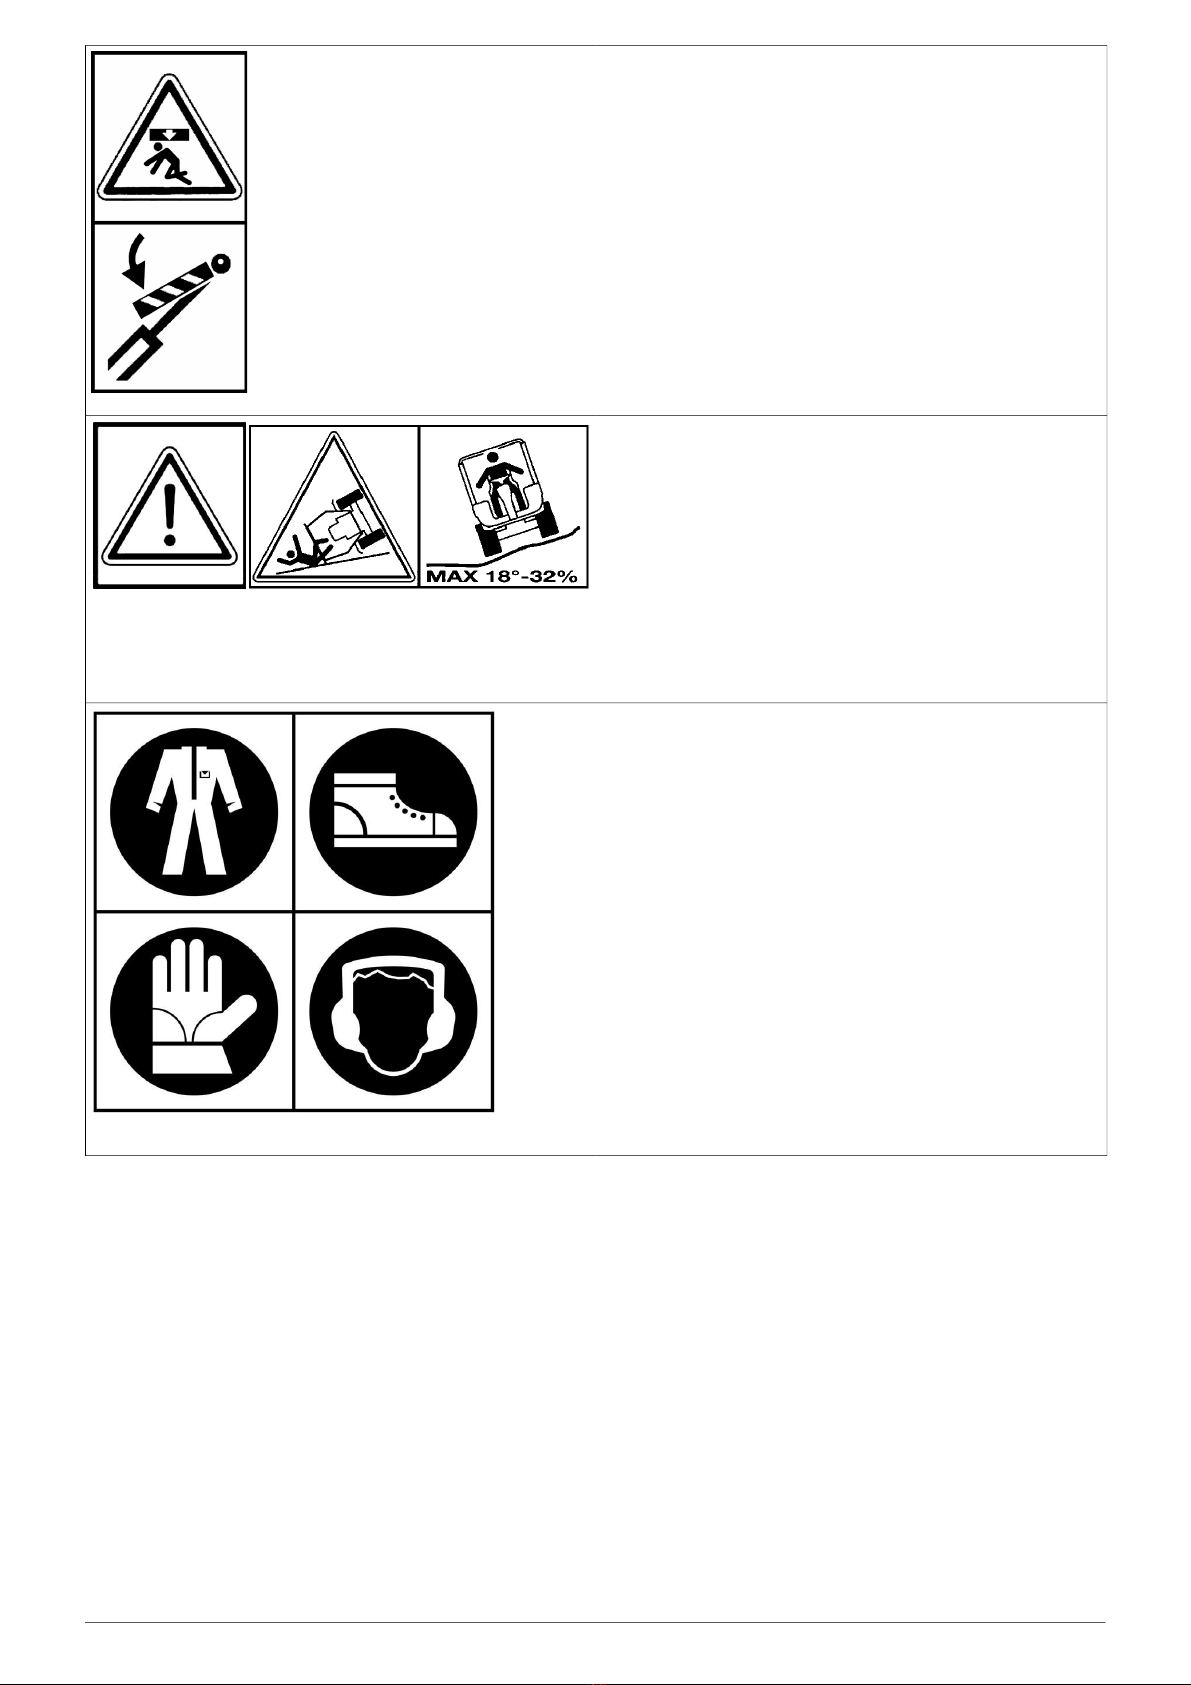
Take special care not to touch hot parts of the engine.
Prestate particolare attenzione a non entrare in contatto con parti
surriscaldate del motore.
Veiller tout particulièrement à ne pas toucher des éléments
surchauffés du moteur.
Achtung – keine heißen Motorteile erühren!
No tocar partes recalentadas del motor.
Tome muito cuidado para não entrar em contacto com as partes
aquecidas do motor.
Не дотрагиваться до нагретых частей двигателя.
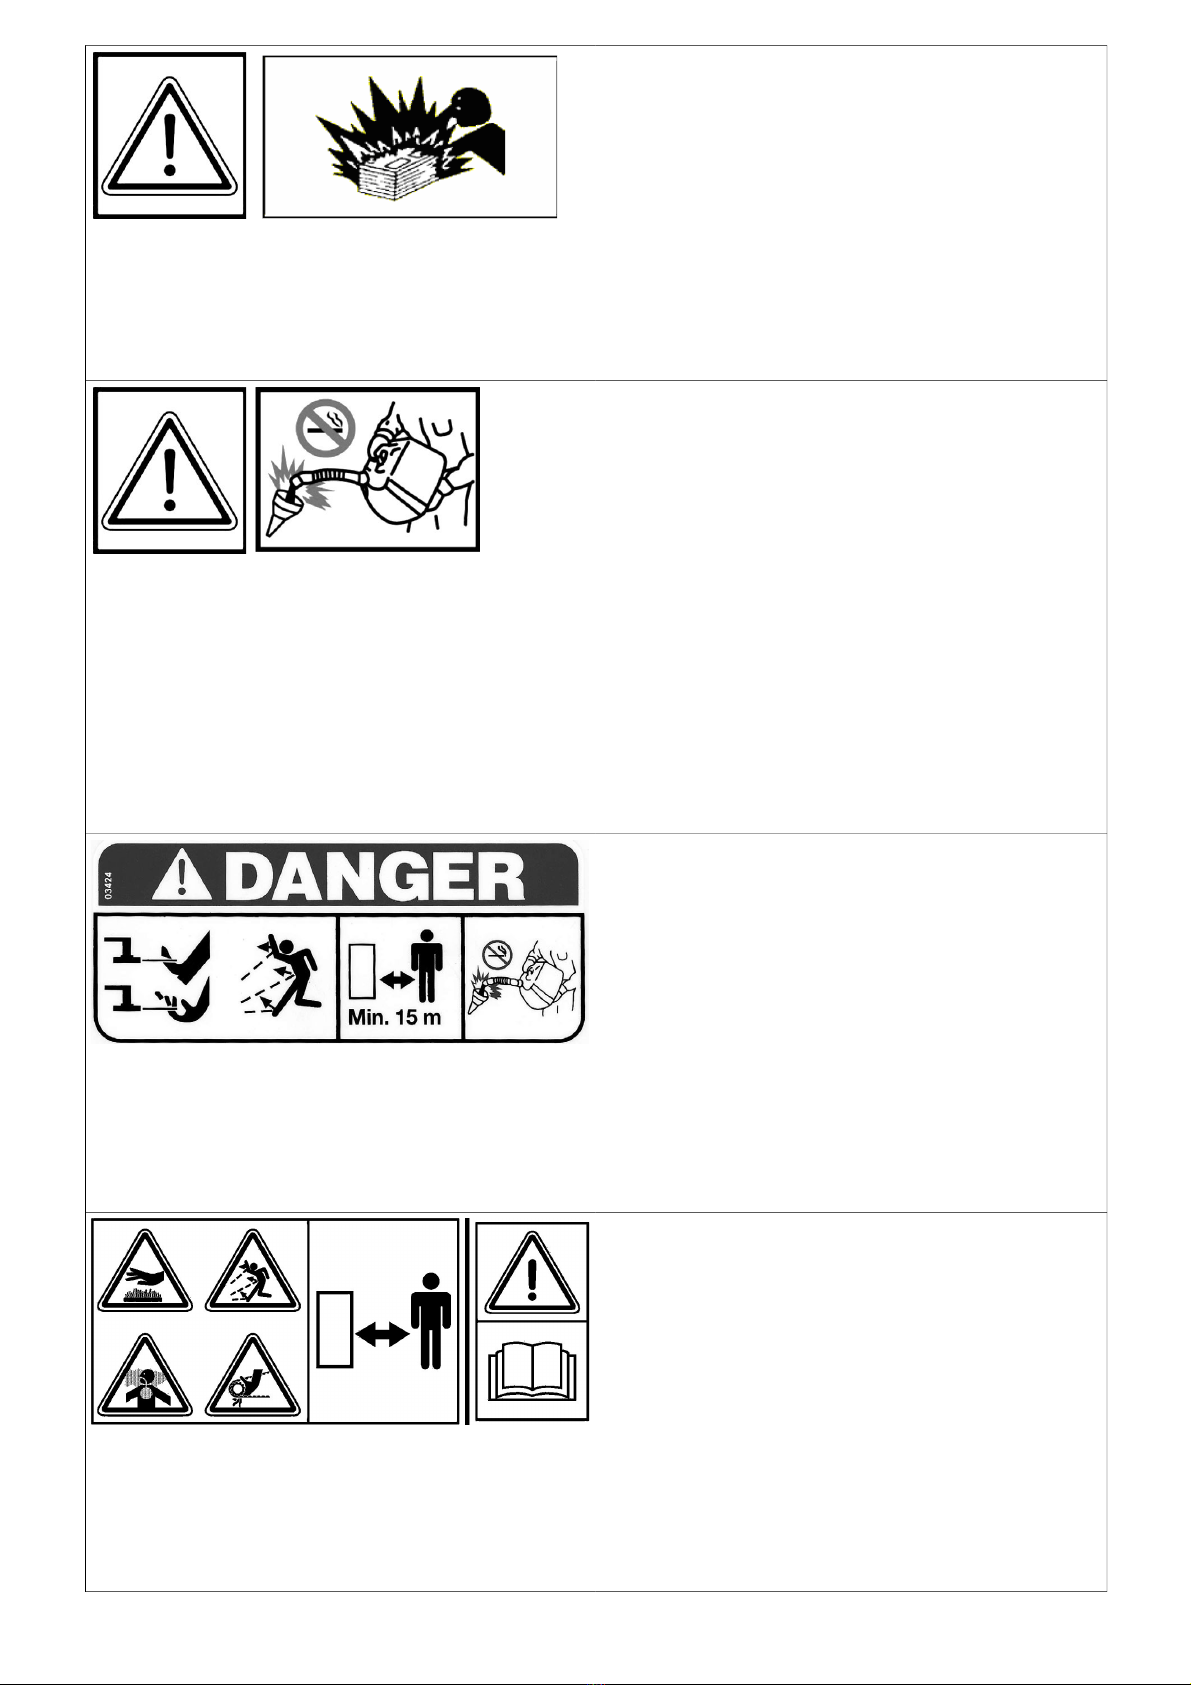
Engine exhaust fumes can cause sickness or death. If it is necessary
to run an engine in an enclosed area, use an exhaust pipe extension
to remove the fumes. Always try to work in a well ventilated area.
I gas di scarico possono causare malanni o morte. Se è necessario
mettere in moto un motore in uno spazio chiuso, usare una prolunga
tubo di scarico per far uscire il fumo. Lavorare in una zona ben
ventilata.
L’exhalation des gaz d’échappement peut être cause d’intoxication ou
de mort. S’il est vraiment nécessaire d’allumer le moteur à l’intérieur,
appliquer au tuyau d’échappement un autre tuyau extensi le pour
permettre la sortie des gaz. Il est toujours mieux de travailler en plein
air.
Auspuffgase können Übelkeit oder od verursachen. Wenn es
notwendig ist, einen Motor in einem geschlossenen Raum laufen zu
lassen, benützen Sie eine Verlängerung, um das Auspuffgas
abzuleiten. Versuchen Sie immer in einem gut belüfteten Raum zu
arbeiten.
Los gases de escape pueden provocar enfermedades o muerte. De
tener que poner en marcha un motor en un espacio cerrado, usar una
prolongación del tu o de escape para que salga el humo. Tra ajar en
una zona ien ventilada.
Os gases de escape podem causar danos ou morte. Caso seja
necessário fazer com que o motor funcione num espaço fechado,
utilize uma extensão para o tubo de escape que os fumos sejam
expulso para o exterior. rabalhe numa área bem ventilada.
Выхлопные газы могут вызвать болезни или смерть. Если
необходимо включить двигатель в закрытом помещении,
использовать удлинитель выхлопной трубы для вывода дыма.
Работать в хорошо проветриваемом помещении.
Caution! Never touch moving pulleys or elts. They can e very
dangerous. Never do maintenance with engine running.
Attenzione! Non toccare mai pulegge o cinghie in movimento, creano
gravi danni alla persona. Non fare manutenzione col motore in moto.
Attention! Ne jamais toucher ni poulies ni courroies en mouvement,
elles peuvent provoquer des accidents aux personnes. Ne pas faire
l’entretien quand le moteur est en marche.
Vorsicht! Nie laufende Riemenschei en oder Trei riemen anfassen,
da es gefährlich ist. Nie ei laufendem Motor Instandhaltung machen.
¡Atención! No tocar jamás poleas o correas en movimiento, porque
pueden crear graves daños a la persona. No efectuar el
mantenimiento con el motor en marcha.
Atenção! Nunca toque nas polias ou correias em movimento devido
ao alto risco de ferimentos. Nunca faça a manutenção da máquina
com o motor ligado.
Внимание! Никогда не прикасайтесь к движущимся ремней и
шкивов, создают серьезную травму. Не делай обслуживания при
работающем двигателе.
A urst which separates the tyre from the rim parts can cause serious
injury or death.
La separazione fra pneumatico e cerchione, causata dall’esplosione
del pneumatico, può provocare serie ferite o addirittura la morte.
La séparation entre le pneu et la jante, provoquée par l’explosion
d’une roue peut causer des dommages, lessures ou la mort.
Die Trennung der Räder von den Felgen durch Explosion kann
schwere Verletzungen oder den Tod verursachen.
La separación entre el neumático y la llanta producida por la
explosión del neumático puede provocar graves herida e incluso la
muerte.
A separação entre o pneumático e o aro, provocada pela explosão do
pneumático, pode causar graves ferimentos ou até mesmo a morte.
Отрыв покрышки от обода, вызванный её взрывом, может
привести к серьёзным травмам или даже смерти.
2

Prevent attery explosions: keep sparks, lighted matches and open
flames away from the top of the attery. Battery gas can explode.
Per prevenire l’esplosione della atteria, tenete scintille, fiammiferi
accesi e fiamme lontani dalla stessa. Il gas della atteria può
esplodere.
Prévenir l’explosion de la atterie: tenir les étincelles, les allumettes et
le feu loin de la atterie. Le gaz de la atterie peut exploser.
Vor eugung der Batterie-Explosion. Entfernen Sie Funken,
Zündhölzer und Flammen von der Batterie. Das Batteriegas kann
explodieren.
Para prevenir la explosión de la atería, mantener chispas, cerillas
encendidas y llamas lejos de la misma. El gas de la atería puede
explotar.
Para prevenir explosão da ateria ter centelhas, fósforos acendido e
chamas longe da mesma. O gás da ateria poderia explodir.
Для предотвращения взрыва аккумулятора, не должно быть искр
и пламени; матчах от него.Аккумулятор газ может взорваться.
Handle fuel with care, it is highly flamma le: Do not refuel machine
while smoking, when machine is near an open flame or sparks, or
when the engine is running. Stop the engine.
Maneggiare il car urante con cura, è altamente infiamma ile; non fate
rifornimento mentre fumate, o vicino a fiamme o scintille, o quando il
motore è acceso.
Manier avec soin le car urant car c’est très inflamma le. Ne pas
remplir le réservoir si vous êtes en train de fumer ou pendant que la
machine est près du feu ou d’étincelles ou encore pendant que la
machine travaille. Arrêter le moteur.
Trei stoff vorsichtig handha en, da er sehr entzünd ar ist: eim
Tanken nicht rauchen. Nicht tanken, wenn die Maschine in der Nähe
von Flammen oder Funken ist oder wenn der Motor läuft. Immer den
Motor a schalten.
Manejar el com usti le con cuidado porque es sumamente
inflama le; no repostar mientras se fuma o cerca de llamas o chispas,
o cuando el motor está encendido.
Manuseie o car urante com cuidado, pois este è altamente
inflamável; não fume durante o a astecimento da máquina ou
enquanto o motor estiver ligado, não o aproximado de chama ou de
faíscas.
Осторожно обращаться с топливом, оно легковоспламеняющееся.
Запрещается заправляться, когда вы курите, рядом с огнём или
искрами или при включенном двигателе.
Sharp component. Keep hands and feet awa . Do not clean the
attachment when the engine is turning.
Organo tagliente. Tenere lontano piedi e mani. Non pulire
l’attrezzo con il motore in moto.
Organe tranchant. Ne pas approcher mains et pieds. Ne pas
netto er l’outil quand le moteur est en marche.
Scharfe Klinge. Hände und Füße fernhalten. Niemals bei
laufendem Motor reinigen.
¡Peligro! Órgano cortante. Mantener lejos los pies las manos.
No limpiar la herramienta con el motor en marcha.
Perigo! Órgão afiado. Mantenha as mãos e os pés afastados. Não
limpe o equipamento com o motor em movimento.
Режущий орган. Не приближать ноги и руки. Не чистить
устройство, когда двигатель работает.
DANGER! READ THE INSTRUCTION MANUAL. KEEP SAFETY
DISTANCES.
PERICOLO! LEGGERE IL MANUALE D’ISTRUZIONE. TENERE
LONTANO LE PERSONE.
DANGER! LIRE LE MANUEL D’INSTRUCTIONS. RESPECTER LES
DISTANCES DE SÉCURITÉ
GEFAHR! DIE GEBRAUCHS ANLEITUNG DURCHLESEN. NICHT
IN DER NÄHE VON ANDEREN PERSONEN MÄHEN.
PELIGRO! LEER LAS INSTRUCCIONES. MANTENER ALEJADAS
LAS PERSONAS.
PERIGO! LER O MANUAL DE INSTRUÇÕES. MANTER AS
PESSOAS AFASTADAS.
ОПАСНОСТЬ! ПРОЧИТАТЬ РАБОЧЕЕ РУКОВОДСТВО.
СОБЛЮДАТЬ БЕЗОПАСНОЕ РАССТОЯНИЕ.
3

CAUTION! You must not stay for any reason under the lifted tipping
ody without any support.
ATTENZIONE! Non sostare per nessun motivo sotto il cassone
ri alta ile sollevato e non puntellato.
ATTENTION! Ne pas rester pour aucune raison sous la enne relevée
sans aucun support.
ACHTUNG! Auf keinen Fall unter der angeho enen und ohne jegliche
Stütze versehenen Pritsche stehen
¡PELIGRO! En ningún caso estar por de ajo de la plataforma elevada
y provista de ningún apoyo.
ATENÇÃO! Em nenhum caso, ser inferior a plataforma elevada e é
fornecida sem suporte
DANGER! Do no use this machine on slopes higher than 18° (32%).
PERICOLO! Non usare la macchina su pendenze superiori a 18°
(32%).
DANGER! Ne pas utiliser la machine sur des pentes supérieures à
18° (32%).
GEFAHR! Die Maschine nicht an Hängen mit einer Neigung ü er 18°
(32%) einsetzen.
¡PELIGRO! No utilizar esta maquina en pendientes superiores a 18°
(32%).
PERIGO! Nao use essa maquina em inclinacaoes além de 18° (32%).
Before using the machine, it is mandatory to put on the appropriate
individual safety devices: ody protection, protection gloves, security
shoes, ear protection.
Prima di utilizzare la macchina, è obbligatorio indossare gli appositi
dispositivi di sicurezza individuali: protezione del corpo, guanti di
protezione, calzature di sicurezza, protezione dell’udito.
Avant d’utiliser la machine, il est o ligatoire de mettre les dispositifs
individuels de sécurité appropriés: protection du corps, gants de
protection, chaussures de sécurité, protection de l’ouïe.
Vor dem Gebrauch der Maschine ist es vorgeschrieben, die geeignete
persönlichen Schutzkleidung anzuziehen: Körperschutz,
Schutzhandschuhe, Sicherheitsschuhe, Gehörschutz.
Antes de utilizar la máquina es o ligatorio ponerse los dispositivos
individuales de seguridad apropiados: protección del cuerpo, guantes
de protección, calzado de seguridad, protección del oído.
Перед использованием машины необходимо использовать
подходящие средства индивидуальной защиты: защита для тела,
защитные перчатки, защитная обувь, защита для слуха.
4

Translation of the original instructions
HYDROSTATIC LAWNMOWER FM 13.09
Dear Customer,
Thank you for having purchased our Grillo FM 13. 9. We are confident that this machine will fully satisfy all your
requirements. To use and maintain the mower at its best, we urge you to read and observe carefully the directions
given in this handbook; this will ensure the best possible results and will also safeguard your investment. Please
keep this handbook in a safe place. It should accompany the machine throughout its working life.
GENERAL DESCRIPTION AND INTENDED USE
The Grillo machine FM13. 9 is a lawnmower with operator on board, designed for the cut of grass . It can also be
equipped with an all-purpose flail and a snow blade.
ATTENTION! Read care ully be ore turning the engine on. The ollowing warnings
are important or operator sa ety!
WARNINGS
Caution is the main safeguard in preventing accidents!
We urge you to read the warnings that follow when using the mower, before starting any work at all.
Improper use of the mower and its equipment can be dangerous; to reduce the risks to the minimum, observe the
necessary precautions set out below:
1) Read the whole of this manual before turning on and using the mower for the first time.
2) Pay particular attention to the warnings and safety labels set out around the mower.
3) Before allowing others to use the machine, make sure they are aware of the safety precautions and how it is
used.
4) Before starting work, always wear suitable working clothes, gloves, boots and goggles.
5) Wear special acoustic protection (ear-caps) during work.
6) Before turning on the machine, make sure there are no persons around it; especially children.
7) Before driving the machine in reverse, make sure there are no persons or obstacles in the way.
8) Check the condition of the ground before mowing. Make sure there are no stones, sticks or other objects,
which could be run over and become a danger when projected.
9) If any impact with a foreign object occurs, disengage the blade, turn off the engine, remove the ignition key
and examine the lawnmower, if the machine vibrates have it repaired.
1 ) Before getting off the mower, turn off the engine, disengage the PTO, remove the ignition key and lower the
cutting deck to its lowest position.
11) Always drive slowly along uneven paths.
12) Keep the speed down when driving down slopes.
13) Always turn slowly when driving downhill.
14) The user is always liable for any damage caused to third parties.
15) Deformed or damaged blades must always be replaced, never just repaired.
16) Always use original Grillo spare parts and accessories.
17) Only work in sunlight or under effective artificial lighting.
18) Only store fuel in suitable containers designed for the purpose.
19) Be very careful when working close to a road.
2 ) Allow the engine to cool before putting the machine away in a closed environment.
IMPROPER USE TO BE AVOIDED
21) Do not allow passengers to ride on the machine.
22) Do not allow under-age children to operate it; use is prohibited to children under 16 years old.
23) Do not operate the machine when tired or after drinking alcohol.
24) Do not operate the mower near to ditches or verges which could collapse under the weight of the machine,
especially when the surface is loose or wet.
25) Do not stop when working up or down slopes.
26) Do not allow any fuel spillage and after filling the tank wipe away any spilled fuel before starting the engine.
27) Do not tamper with the safety devices or disable them.
28) Do not change the engine settings, especially the maximum number of revs.
29) Do not rest heavy loads on the seat, the starter safety device could become disengaged.
3 ) Never attempt any adjustments or cleaning with the engine running.
31) Never allow anyone to check the machine while you are seated at the controls with the engine running.
32) Do not move the machine without the deck, because it may turn over and be very dangerous.
33) Replace worn or damaged exhausts.
5

Translation of the original instructions
FURTHER SAFETY ADVICES
The above mentioned warnings could not be enough to avoid any risk, if the operator does not use the present
lawnmower correctly. Therefore for your safety we give following advices:
34) The mower blade is very dangerous when rotating, never put hands or feet underneath the mower deck.
35) Do not drive in reverse at high speed.
36) It is dangerous to operate the steering wheel abruptly with the motor at full power.
37) Fill the tank with fuel before starting the engine. Only refuel outdoors, always turn off the engine, keep
away from sparks or naked flames, do not smoke! Always replace the cap on the fuel tank and those on fuel
containers properly.
38) If the fuel tank has to be emptied, only do so outdoors.
39) Do not operate the mower over gravel which could become sucked up and drawn into the blade, becoming
very dangerous.
4 ) If you have children, hide the ignition key after using the machine.
41) CAUTION: to avoid the risk of fire, keep the engine compartment, exhaust, discharge outlets, battery, tank
area and fuel pipes free of grass, leaves, dirt, etc.
42) Do not store the machine inside any building where the engine fumes can reach naked flames, sparks or
bare electrical wires.
IDENTIFICATION AND SERVICING
IDENTIFICATION
The Grillo FM 13.09 is provided with an ID plate showing the serial
number, located on the side of the chassis.
SERVICING
This handbook provides the instructions for using the lawnmower. For a correct basic maintenance contact your
Local Dealer.
SPARE PARTS
Original spares should always be used as these are the only ones which offer safety and interchangeability. Each
order should include the machine serial number and the code of the spare part needed.
For engine spares, refer to the information in the specific manual.
WARRANTY
The warranty is subject to the terms and conditions stated on the warranty card which the dealer gives to the buyer
at the moment of sale.
As regards the engine and the battery, the individual manufacturers’ conditions apply.
RECOMMENDED SPARE PARTS TO BE KEPT ON HAND
1 set of lawnmower blades
1 set of belts
1 engine air filter
1 engine oil filter
1 throttle cable
A series of electrical equipment fuses
HOW TO ORDER SPARE PARTS
Always state the machine serial number and the code of the spare part needed. Contact our service centres. Our
address is:
GRILLO S.p.A.
Via Cervese 17 1 – 47521 CESENA (FC) ITALY
Tel. 39 – 547 – 633.111 / Fax 39 – 547 – 632. 11
Web site: www.grillospa.it / e-mail: [email protected]
6

Translation of the original instructions
TECHNICAL SPECIFICATIONS
MODEL: hydrostatic lawnmower with front deck.
ENGINE: YANMAR 3TNV82, diesel 1331 cm³ (31 HP at 3 revolutions), 3 cylinders, liquid cooling system with
electric fan, equipped with manual and automatic radiator clearing device.
FUEL TANK: 25 litres.
HYDRAULIC OIL TANK: 2 litres.
STARTER: electric 12V.
TRACTION: hydraulic, 4 drive wheels (integral and permanent also in case of sharp bend).
DIFFERENTIAL LOCK: AUTOMATIC AND MANUAL WITH PUSH BUTTON.
GEARBOX: hydrostatic transmission with 4 hydraulic engines on 4 wheels.
STEERING SYSTEM: hydraulic drive with steering wheel.
CLUTCH: electromagnetic for PTO, with magnetic blade brake.
SPEED: -15 km/h: continuous variation.
WHEELS: front 23 x 1 .5 -12; rear 18 x 8.5 -8.
BRAKE: drum service and parking brake.
HYDRAULIC DECK LIFTING .
2 X HYDRAULIC ATTACHEMENTS FOR INTERMITTENT USE: max. pressure:12 bar, max. oil flow 18
litres/minute with engine at 3 rpm.
SEAT: super comfort adjustable and sprung seat with arm-rests.
STEERING WHEEL: fixed on steering column with tilt adjustment.
STEERING RADIUS: 31 mm.
ATTACHMENTS: 13 cm MP cutting deck, 16 cm LMP cutting deck,135 cm all purpose flail, 15 cm front blade,
comfort cabin with heating, snow chains, pneumatic dampened seat.
HOURLY MOWING CAPACITY: 12. m2/h
SIZE (with 160 cm LMP cutting deck):
Length: 325 mm, Width: 192 mm, Height: 175 mm.
CLEAR SPAN FROM THE GROUND: 15 mm.
DISTANCE BETWEEN AXLES: 122 mm.
WEIGHT (without cutting deck): 932 kg.
PUTTING THE MACHINE INTO SERVICE
Make sure the machine is complete and that it has not suffered any damage during transit.
-Check the levels of the engine oil (fig. 4) and hydrostatic transmission (fig. 35).
-Check the tyre pressures:
Front wheels 23 x 1 .5 - 12 (1.4 bar)
Rear wheels 18 x 8.5 - 8 (1.4 bar)
Deck wheels (1.5 bar)
Check the battery voltage, it must not be less than 12.5 Volts; recharge if necessary.
If a dry battery has been supplied with separate acid, to put the machine into service proceed as follows:
1) pour in the acid and wait 2 hours;
2) charge the battery with a charger set to 12 Volts on a slow charge for 2 hours.
Caution, if this procedure is not observed this could lead to the battery deteriorating and the acid leaking out
during work.
BATTERY
Caution! The gases released by the battery are explosive, so keep it away from naked flames or sparks. Check the
level of the liquid at regular intervals and keep the terminals greased with Vaseline.
Important:
Do not invert the battery poles.
Do not run the lawnmower without the battery, as it is equipped with a charge regulator.
Be careful not to cause any short circuits.
RUNNING IN - CAUTION!!
Change the engine oil and filter after the first 5 hours of work.
Check for oil leaks or loose screws, especially those that retain the blades and the wheels. Adjust the tension on the
PTO belts with the nut on the corresponding spring: the spring has to be adjusted at 65 mm of length from bushing
to bushing (see red arrow - fig. 5, ref. A).
7

Translation of the original instructions
INSTRUCTIONS FOR USE
Before turning on the engine always check that:
-the radiator liquid is up to the level (fig. 7);
-the engine cooling intake grilles are clear (fig. 8);
-the engine oil is up to the level (fig. 14, ref. C);
-the hydraulic oil is up to the level (fig. 4);
-the feed and reverse motion pedals (fig. 1 n° 1 e n°2) are in the stop position;
-the PTO insertion button is in the neutral position (fig. 1 n°27);
-the air filter is clean (fig. 9);
-the cutting deck is clean.
Fill the fuel tank with fuel (diesel oil) using a funnel fitted with a very fine mesh filter (fig. 7).
STARTING THE ENGINE
Insert the ignition key (fig. 1 n° 4); turn it to warm-up; when the plug light goes out (after approximately 15 seconds),
turn the key again and release it as soon as the engine starts.
To switch off the engine turn the key to the “ ” position.
HYDRAULIC ATTACHMENTS
Two double acting hydraulic attachments for hydraulic services are positioned on the front of this machine (fig. 17).
These hydraulic services are to be switched on through a button and action on their turn attachments such as front
dozer blades and sweepers, thanks to the 1/4 quick couplings on the front of the machine. The couplings provide 18
l/m at 12 bar with engine at 3 r.p.m., that is 3,8 HP.
STARTING WORK
1) Lift the deck from the ground.
2) Adjust the cutting height using the hand wheel on the deck (fig.1 n° 12).
3) Adjust the seat (fig. 1 n° 15, 16, 17, 18, 19) and the steering wheel positions (fig. 1 n° 1 ).
4) Put the cutting deck down (fig. 1 n° 7).
5) Accelerate the engine half way (fig. 1 n° 6). Do not engage the blades with the engine at maximum speed, but
bring it to half speed and then engage the PTO (fig. 1 n° 27). Always engage the blades some metres before
getting into the grass to cut.
6) Gently press the speed presetting pedal (fig. 1 n° 1) and start work. Use the pedal next to it (fig. 1 n° 2) for the
reverse gear.
FINISHING WORK
Once mowing has been completed, disengage the blades. To stop:
1) Take off the foot from the feed pedal (fig. 1 n° 1 or n° 2).
2) Set the throttle lever to minimum speed.
3) Lower the cutting deck on the ground
4) Turn off the engine by turning the key in the “ ” position and the connect the parking brake (fig. 1 n° 3 and 5).
GUIDELINES FOR EFFECTIVE USE
The machine can also be used under harsh conditions . Certain measures must be taken and all devices must be
adjusted properly.
1) Before starting work check that the deck and the entry ducts are perfectly clean without any dried grass or soil.
2) Check the terrain before mowing, that there are no stones, sticks or foreign objects.
3) While mowing keep the engine at maximum revs., adjust the speed to suit the height of the grass. Be careful
when coming across tall thick clumps of grass, slow down.
4) Sharpen the lawnmower blades regularly; the cut will be better and the engine will not have to work so hard
(fig. 11).
5) Always engage the blades some metres before getting into the grass to cut in order to safeguard the clutch.
6) Keep the grid in front of the radiator clean (fig. 8).
7) If the grass is wet or very tall, do not cut in the lowest position, but at a mid-way height.
8) Check the tension on the belts that work the deck; using the adjuster if necessary (fig. 5, ref. A).
9) Check that the blades are not worn.
1 ) Check the engine revs. (max. 3 rpm).
11) Always mow with the engine at maximum revs; if the engine revs drop, slow down for a while, to allow the
engine to reach the right level again.
12) Check that the blades are fitted properly.
13) The lawnmower FM13. 9 is a hydrostatic machine, so it absorbs more power when cold, after e few minutes
the efficiency will be optimal. We inform you that the changeable delivery pump and the hydrostatic engines are
of optimal quality and high efficiency: the minimal loss is 5%.
14) The emergency brake pedal (fig. 1 n° 3) must be used only if there is a real emergency. Normally just release
the feed and the reverse pedals to stop the machine (fig. 1 n° 1 e n° 2).
8

Translation of the original instructions
15) CAUTION! Do not transfer the machine with lifted cutting deck. Use the cutting deck hydraulic lifter only to get
over obstacles, mount on pavements or on kerbs. It is compulsory, instead, to travel on public streets with a
type-approved machine, endowed with a lights system, a plate and with the cutting deck up.
MOWING POSITIONS
Use the pins (fig. 1 n° 12 and fig. 12) to adjust the cutting height. When working on rough terrain, with bumps or
humps, it is best to use the deck in the highest cutting position to avoid impact with the blade. Attention! During the
cut the deck lifting button has to be in the «floating» position.
CUTTING DECK
Mulching system (lever straight up fig. 25). This system is designed to cut and chop grass 1 /15 cm high. This
operation is best carried out with dry grass as the turbulence inside the deck mulches it better. It is advisable not to
stop the machine after cutting but to continue over the mown lawn for a few minutes to discharge the grass from the
inside of the deck. Inspect the blades regularly and sharpen or replace them if necessary. In some areas of Europe,
2 passes are made when using the mulching method; 1/3 of the grass height is cut in the first pass and the other 2/3
in the second. Please assess which method best suits your needs and your type of grass. Should the grass be taller
than 15 cm, please use the cutting deck in the rear discharge function (fig. 23).
SLOPING GROUND
Steep ground should be tackled in an up-and-down movement, being very careful at direction changes that the
wheels uphill do not meet any obstacles (stones, branches, roots, etc.) which could cause loss of control over the
machine. If the drive wheels tend to slip, use the hydraulic control to slightly raise the deck so that more weight is
exerted on the drive wheels, therefore giving more traction.
Evaluate the various conditions and be careful in the presence of damp ground and wet grass because this could
cause the mower to slide. When going downhill, start off at a slow speed and avoid driving over dry or cut grass
because the wheels could lose their grip.
The differential locking (fig. 1 n° 26) must be used only in special cases, for example: if during a strong descent you
want to reverse the direction of travel, to avoid the rear wheels skidding, or in case of load on motor vehicle in
reverse motion with the presence of ramps. Normally do not engage the differential locking.
Do not run any risks, check the ground carefully and if you do not feel safe, avoid strong slopes and do not exceed
the speed-limits, which are imposed by your country laws and written also in this manual (max. 18° or 32%).
SAFETY DEVICE TRIGGERING
Always remember that the engine stops each time when:
-the operator gets up from the seat, if the parking brake has not been engaged and the blades have not been
disengaged before.
In addition, the engine will not start if:
-the PTO switch is engaged;
-if there is no one seated on the driving seat, unless the parking brake has been engaged and the blades have
been disengaged before;
-the feed pedals and the reverse pedal are not in the stop position;
Attention! When the parking brake is engaged, it is possible to leave the driving seat with the engine on, if the
blades are disengaged.
MAINTENANCE AND LUBRICATION
CAUTION!
Stop the engine and remove the ignition key be ore carrying out any cleaning, maintenance or repairs.
Always wear suitable working clothes and sa ety gloves.
LUBRICATION
Never dispose of used oil, petrol or any other type of pollutant in the environment!
Proper maintenance and correct lubrication help to keep the mower perfectly working.
ENGINE
For the lubrication intervals follow the directions given in the engine manual; it is in any case indispensable to
change the oil and the ilter a ter the irst 50 working hours and then every 250 hours. For the diesel engine
use SAE 15 W 4 oil, 5 litres. When you change the engine oil, it is necessary to change also the oil filter (fig. 14,
ref. B). To remove the engine oil, unscrew the lid on the right side of the oil cup. Pour in the oil trough the lid (fig.
33). The first precaution to be taken is that the engine is maintained correctly with a clean air filter and the engine
oil up to the level. Keep the engine compartment, the muffler area and the collectors clean. Use a vacuum cleaner if
possible. Check the air filter (fig. 9) and the prefilter (fig. 13) every 8 hours or even more frequently in dusty
conditions. In order not to reduce the air needed to cool the radiator, the grid must always be kept clear. Make sure
the radiator is always clean. The radiator fan is driven by an electric engine.
9

Translation of the original instructions
If the radiator protection grids are obstructed and the cooling fluid and the hydraulic oil temperature gets over 88° C,
a sensor automatically inverts the direction of rotation of the fan for a few minutes in order to clean the grids. This
operation can also be made by hand, working for a few second the fan inverter button (fig. 1 n° 25). To check and
clean the radiator fan, remove the pin (fig. 15, ref. A).
RADIATOR REFILLING AND RESPECTIVE BLEED
Caution! Danger: hot liquid under pressure.
In order to let the engine cool down correctly, there should be no air in the cooling circuit. Make sure that the
clamps on the water muffs are well tight and that no air can get into the circuit from the outside.
Make the air bleed in the following way:
1) Caution! For this operation always wear suitable working gloves.
2) Start the engine and bring it to working temperature (to make sure the engine thermostatic valve is open).
3) With the engine at minimum, open the engine cooling liquid refilling bowl on the right side of the driving seat
(fig. 7).
4) Unscrew the screw for the bleed on the upper part of the radiator (fig. 15, ref. C).
5) With the screw open, accelerate to medium speed and reduce the speed several times until only liquid comes
out.
6) Tighten the screw.
7) Accelerate again for some minutes.
8) Unscrew the bleed screw again and repeat the steps 5-6-7 four or five times until only liquid comes out.
9) At the end, re-establish the liquid level in the bowl and close the lid.
ELECTRO-HYDRAULIC DISTRIBUTOR
The electro-hydraulic distributor (fig. 16) consists in three blocks held together with three tie rods with nuts (fig. 16,
ref. A) whose grip is 3.6 N/m. If this grip is not kept, the distributor will block.
HYDRAULIC ENGINES
Check the level in the reservoir with cold engines (fig. 4). If more oil is needed, add hydraulic oil OSO 46 (total
quantity: 2 litres). Make this control periodically.
Caution! Change the hydraulic oil in the hydraulic engines the first time after 5 hours and then every 1 hours.
The oil must be changed before the 5 hours if:
-the oil is black;
-the oil has a whitish colour (it is contaminated with water);
-there is black coloured residue (partial oil deterioration).
To remove the oil undo the lower oil reservoir drain plug (fig. 18). To fill it in, unscrew the upper lid (fig. 16, ref. B).
Pay attention to possible impurities, which may obstruct the circuit, causing serious problems to your machine.
When you change the hydraulic oil, you must also change the oil filter (fig. 19); pay attention to the filtration level. A
service indicator on the filter support signals when the filter must replaced (fig.19, ref. A).
Do not increase the wheels towing hydraulic system pressure over 250 bar; the hydraulic pump and the hydrostatic
engine on the wheels may be damaged.
160 cm LMP CUTTING DECK GEAR BOXES
Use synthetic oil LSX 75 W 9 (API GL4 + GL5; API MT1 and PG2), 1.55 litres, to be changed every 3 hours.
The oil level lid is positioned over the gear boxes (fig. 32).
If you notice any loss, check and change the oil guards to avoid the deterioration of the entire transmission.
EMERGENCY AND PARKING BRAKE
The FM13. 9 machine traction is based on hydraulic engines, therefore for braking you only have to release the
feed and reverse gear pedals (fig. 1 n° 1 and 2). The brake pedal (fig. n° 3) has to be used only in case of
emergency. To engage the parking brake, press the emergency brake (fig. 1 n° 3) and then put in the blocking with
the pedal (fig. 1 n° 5). To release the parking brake just press again the emergency brake (fig. 1 n° 3).
SHARPENING THE BLADES
For the cutting deck check and maintenance proceed as follows:
1) lift the cutting deck hydraulically;
2) release the two side shock absorber (fig. 21);
3) lift the cutting deck by hand and hitch it with the special lever (fig. 1 ).
You do not need to release the universal joint. Before starting the machine, make you sure that the universal joint is
well connected and that the stop push button is protruding.
A blunt blade pulls at the grass giving it an unsightly appearance, the cutting edges of the blades must therefore be
kept sharp at all times. As the blades wear they lose their cutting efficiency and tend to become unbalanced,
causing the lawnmower to vibrate; sharpen both blades uniformly.
When you replace the blades, it is compulsory to replace also the screw and the nut (fig. 11).
To remove a blade, hold it firmly using safety gloves and unscrew the fixing plate and the central screw.
Caution! Always replace damaged or bent blades; never try to repair them! ALWAYS USE ORIGINAL BLADES!
10

Translation of the original instructions
ADJUSTING THE CUTTING DECK
An even deck is essential for achieving a uniform cut over the whole lawn.
With the lawnmower on a flat surface, check the tyre pressures, check the distance of the cutting deck edge from
the ground and act on the tie rod (fig. 24, ref. B) and on the adjusting screw to put it parallel to the ground. If a
satisfactory parallel set up cannot be achieved, contact an Authorised Service Centre. To adjust the 132 cm cutting
deck, turn the hand wheel (fig. 22).
To remove the deck from the mower, unhook the two side shock absorber (fig. 21 and fig. 2 ) and the two pins (fig.
24, ref. B).
Attention! When re itting the deck always remember to reconnect the universal joint.
PTO BELTS
Attention! These belts are special, USE ORIGINAL BELTS.
To replace them, loosen the tie rod and remove the clutch locking screw.
To set the tension use a no. 13 spanner to turn the nut that adjusts the tension spring (fig. 5, ref. A).
The spring must be compressed at 75 mm length.
PTO CLUTCH-BRAKE
The FM13. 9 is provided with a multi-disc electro-hydraulic clutch for PTO activated by an electric push-button on
the dashboard. During work, with the PTO engaged, the friction material discs are pressed against each other by
the oil pressure. To make this happen, the working pressure is calibrated at 11 bar. All clutches are tested in
pressure to prevent oil leakage in the components. This construction design guarantees a long working life and a
gentle activation. In order to meet security requirements, the clutch or PTO has a brake that stops the cutting
blades within 7 seconds from the moment the clutch is disengaged. Due to the wear of the brake friction material
blades may need more than 5 seconds to stop, in that case it is necessary to re-establish the distance between the
disc and the plate to 38.8 mm (fig. no. 37) as per initial factory calibration. Carry out this intervention with the
machine turned off.
How to carry out the calibration:
1) Turn off the machine.
2) Loosen the counter-ring.
3) Bring the distance between the disc and the plate to 38.8 mm by acting on the ring.
4) Lock the counter-ring against the ring.
After adjusting it, make sure that the blades stop in less than 5 seconds. If the blades take 7 or more seconds to
stop contact an Authorized Grillo Dealer because the machine does not meet the sa ety standards and cannot be
used in a safe way.
CLUTCH ELECTROVALVE
The electrovalve of the clutch is located under the air filter (fig. 38). To inspect it or carry out controls remove the
side protection frame. Calibration is 11 bar. Never change it to avoid damages to the clutch seals.
11

Translation of the original instructions
MAINTENANCE SUMMARY TABLE
PROCEDURE EVERY 8
HOURS
AFTER 20
HOURS
EVERY
50
HOURS
EVERY
100
HOURS
ONCE A YEAR OR
EVERY 250
HOURS
Engine oil check the level ●
change
●
(first
change)
●
Air filter check ●
replace ٭
Hydraulic oil check the level ●
replace
٭
(first change after
5 hours)
Check that the cooler intake grid is clean ●
Check that blades are well-sharpened
and well-fixed ● ●
Lubricate with grease ● ●
● recommended procedure
٭ procedure to be carried out i necessary
LUBRICATION POINTS WITH GREASE
Find the lubrication points following the scheme. Lubricate with grease every 4 hours the rear axle pivots, the
pedals, the PTO transmission belt guide pulley and the pivot connected to 2 points of the cutting deck.
12

Translation of the original instructions
TROUBLESHOOTING GUIDE
PROBLEM CAUSE REMEDY
With the key in the AVV. [ON]
position the instrument panel
remains off
The battery is not providing any
current
- Check the connecting cables
- Check the electrolyte level
- Recharge the battery
- Replace the fuse
The instrument panel comes
on, but with the key in the ON
pos., the starter motor does
not turn
The battery is not providing
enough current
- Recharge the battery
No consent given to start
- Feed pedals in the STOP position
- Disengage the blades
- Sit on the driving seat
- Disengage the PTO
Difficult starting or the engine
runs irregularly Carburettor problems
- Clean or replace the air filter
- Check there is no air in the fuel line
- Bleed the fuel supply system
Sediment or dirt in the fuel - Check the diesel filter and replace if necessary
The starter motor turns but the
engine will not start No diesel flow
- Check fuel level in the tank
- Check the diesel filter (and replace if
necessary)
- Check that the breather hole in the fuel cap is
not blocked
Plugs not warmed up enough
on cold engine
- Wait for the plug light to go out
The timer does not give the
consent
- Check the connections
- Replace the timer
The electrostop does not run its
full course
- Check the course of the electrostop
- Replace the electrostop
Drop in engine performance
while cutting
Advance speed too high for the
grass height
- Reduce speed
- Lift the cutting deck by a few notches
Engine stops when blades are
engaged
No consent given for blade
engagement
- Check the blades engagement button
- Operator sitting on driving seat-
Uneven cutting Cutting deck not parallel with
the ground
- Check tyre pressures
- Restore deck parallelism
Blades not cutting correctly
- Check blades are fitted properly
- Sharpen or replace blades
- Adjust PTO belts tension
Advance speed too high for the
grass height and the lawn
conditions
- Reduce advance speed
Vibrations while working Blades not balanced - Balance blades or replace them if damaged
Loose screws - Check and tighten the screws that retain the
blades, the engine and the chassis-
Engine oil light comes on Insufficient pressure - Check engine oil level and top up if necessary
- Change engine oil filter
CAUTION: I the problems continue a ter having carried out the operations described in this manual,
contact an Authorized Service Centre. Never attempt to make di icult reparations without the necessary
means and technical knowledge.
IMPACT WITH A STONE OR SOME OTHER FOREIGN OBJECT
1) Stop the machine.
2) Turn off the engine and pull the parking brake.
3) Lift up the lawnmower.
4) Check the blade fixing screws and the cutting deck.
13

Translation of the original instructions
MECHANICAL PARKING BRAKE
You need to keep the parking brake device wire (fig. 27, ref.A) adjusted. The brake is engaged by pushing the pedal
(fig. 1 n°3) and by putting the block (fig. 1 n°5) in. To release the brake push the same pedal (fig. 1 n°3) again.
Always use the parking brake even if when the engine is switched off the machine is automatically braking.
The engine keeps on even when the operator leaves the driving seat, if the parking brake is engaged and the
blades are disengaged.
PARKING AND EMERGENCY BRAKE ADJUSTMENT
The brakes adjusting devices are under the platform (fig. 27, ref. A).
The drum brakes are on the front wheels, pay attention that the cable does not hit the wheel (fig. 28).
ELECTRICAL SYSTEM
The electrical system is protected by fuses which, if blown, cause the whole electrical system to cut out. These are
located under the bodywork, opening the box at the base of the seat (fig. 29). There are two main fuses (fig. 3 ): the
general one with 5 A/h, and the one that feeds the ignition key with 4 A/h. Once the ault has been located and
repaired, replace the blown fuse with one of the same rating. Never replace a use with another o a di erent
rating.
If the electrical problems still persist even after having changed the fuses, contact the Authorised Service Centre.
Never attempt to carry out complex repairs without having the necessary means and technical knowledge available.
Some relays are inside the box (fig. 31).
HOW THE MAIN ELECTRICAL SYSTEM DEVICES WORK
-A sensor is fitted on the radiator (fig. 15, ref. B). It senses the cooling liquid temperature. When the cooling
liquid temperature goes beyond 88°C, the sensor sends a signal to the control unit (fig. 31) which starts the
automatic cleaning cycle, inverting for some seconds the radiator fan rotating sense. It is possible to carry out
the cleaning cycle also by hand acting on the respective button on the control panel (fig. 1 n° 25). There are
four radiator fan inversion relays (fig. 29).
-On the thermostatic valve casing two sensors are fitted: the left one is connected to the instrument that
indicates the liquid temperature, the right one sends the alarm and engine turn-off signal if the temperature
goes beyond 11 °C (fig. 33).
-On the feed pedal a micro-switch is fitted which senses the stop position for the start (fig. 34, ref. A).
-On the parking brake blocking pedal there is a sensor (fig. 34, ref. B) that senses when the brake is engaged
and that allows that the engine keeps running even if the operator has left the driving seat.
-On the reverse gear pedal tie rod there is a microswitch that activates the reverse gear warning buzzer (fig. 34,
ref. C).
-The differential locking electric valve (fig. 6, ref. A) is under the accelerator: when it starts, a red led lights up.
-On the electromagnetic clutch cable (fig. 5, ref. B) a diode is fitted which prevents returns of current.
AIR FILTER
Check and clean the air filter (fig. 9) and the prefilter (fig. 13) every 8 hours or more frequently if the place where
you use the machine is very dusty. The air filter is endowed with a depression sensor that signals on the dashboard
that the filter is obstructed. For the replacement and the exact maintenance intervals please follow the instructions
and warnings in the engine manual.
DIESEL FILTER
Change the diesel filter cartridge (fig. 14, ref. A) every 5 hours, or more frequently if you notice impurities in the
container. Check the container at every use and empty it every 5 hours. For the replacement and the exact
maintenance intervals please follow the instructions and advices in the engine manual.
DIESEL DECANTING DEVICE
The decanting device (fig. 5, ref. C) makes possible liquid impurities in the diesel or water deposit on the ground so
that they do not get in contact with engine parts. Clean the decanting device every 5 hours, and also wash the
inside of the lid with clean diesel. Check the decanting device at every use and empty it every 5 hours.
For the cleaning and the exact maintenance intervals please follow the instructions and advices in the engine
manual.
Attention! When you fill up the diesel tank, always use a very fine filter.
CLEANING
Clean the deck, the entry ducts. Do not wash the engine compartment with water under pressure, use compressed
air or a vacuum cleaner.
TOW BAR
The towing bar is located in the rear part of the machine. You can tow compacting rollers and trailer up to max.
weight 25 kg in the plain.
14

Translation of the original instructions
TOWING OF THE MACHINE WITH SWITCHED OFF ENGINE
Attention! To move the machine with switched off engine unscrew of two turns the screw on the hydrostatic pump
(fig. 35); pay attention because doing so the efficiency of the self-braking device is cancelled.
Tow the machine at very low speed and only on small distances, maximum 100 metres, to avoid hydraulic
pump or engine seizing.
STORAGE AND LACK OF USE FOR LONG PERIODS
Store the machine in a dry environment, sheltered from the elements and, if possible, covered up.
If the mower will not be used for a long period (more than one month), disconnect the red battery lead and follow the
directions given in the engine manual; in addition grease all the joints.
Check regularly that the battery voltage has not dropped below 12.5 Volts and if it does so, recharge it.
IMPLEMENTS
LIFTING HOOKS AND TRANSPORT
The lifting hooks (fig. 36) location permits that the machine with the mounted cutting deck is perfectly balanced if it
must be lifted up with a crane. Check the machine’s weight on the plate and use suitable equipment (ramps, crane,
etc.). If the machine is carried with a camion or with a towed trailer, put the cutting deck in a low position, engage
the parking brake and tie it to the mean of transport through ropes, cables, or chains.
BODY DISCHARGE LEVER
To check the engine or to offload material from the body, use the lever (fig. 26). It is a rear tipper body.
15

Original instructions – Istruzioni originali – Instructions originales – Original-Anleitungen - Instrucciones originales
RASAERBA IDROSTATICO FM 13.09
Gentile Cliente,
nel ringraziarla per la fiducia e la preferenza accordata al nostro Grillo FM 13.09 confidiamo che l’uso di questa sua
nuo a macchina risponda pienamente alle sue esigenze. Per l’impiego ottimale e per la sua manutenzione nel
tempo, la preghiamo di leggere attentamente e seguire scrupolosamente le indicazioni di questo libretto; ciò le
consentirà di ottenere i massimi risultati e sal aguardare la sua spesa. La preghiamo di conser are questo libretto,
che do rà sempre accompagnare la macchina.
DESCRIZIONE GENERALE ED USO PREVISTO
La macchina Grillo FM 13.09 è un tosaerba con operatore a bordo, progettato per il taglio dell’erba. Può essere
equipaggiata anche con trinciatutto, e lama ne e.
ATTENZIONE!
Leggere atte tame te prima di avviare il motore. Le segue ti avverte ze so o
importa ti per l’i columità dell’operatore!
AVVERTENZE
La prudenza è l’arma principale nella pre enzione degli incidenti.
La preghiamo i amente di leggere con attenzione le seguenti a ertenze nell’uso del rasaerba, prima ancora di
iniziare il la oro. L’uso improprio del rasaerba e del suo equipaggiamento può risultare pericoloso; per ridurre
queste possibilità di pericolo, osser are le precauzioni necessarie di seguito riportate.
1) Leggere interamente questo manuale prima di accendere e mettere in mo imento il rasaerba.
2) Dare particolare attenzione alle ammonizioni e alle etichette di sicurezza attorno al rasaerba.
3) Prima di fare la orare con la macchina altre persone bisogna metterle al corrente delle norme di sicurezza e di
come si usa.
4) Prima di iniziare il la oro, indossare indumenti appropriati da la oro, guanti, scarponi, occhiali.
5) Durante il la oro indossare adeguati mezzi di protezione acustica (cuffie).
6) Prima di accendere la macchina erificare che non ci siano persone intorno, specialmente bambini.
7) Prima di partire con la macchina in marcia indietro controllare che non ci siano persone od ostacoli.
8) Controllare il terreno prima di procedere alla rasatura, che non i siano sassi, bastoni o corpi estranei, che
potrebbero essere scagliati lontano, e quindi molto pericolosi.
9) Se si urta un corpo estraneo disinnestare la lama, fermare il motore, togliere la chia e d’a iamento e
ispezionare il tosaerba; se la macchina ibra farla riparare.
10) Prima di scendere dal rasaerba, spegnere il motore, disinserire la PTO, rimuo ere la chia e d’a iamento e
abbassare il piatto tosaerba nella posizione più bassa.
11) Sui iali sconnessi iaggiare a bassa elocità.
12) Sulle pendenze, in discesa moderare la elocità.
13) In discesa cur are sempre lentamente.
14) L’utilizzatore è sempre responsabile dei danni arrecati a terzi.
15) I coltelli deformati o danneggiati de ono essere sempre sostituiti, mai riparati.
16) Usare sempre ricambi ed accessori originali Grillo.
17) La orare solo con la luce del sole o con buona luce artificiale.
18) Immagazzinare il carburante in contenitori specificatamente costruiti per questo scopo.
19) Fare attenzione quando si la ora icino ad una strada.
20) Far raffreddare il motore prima di mettere la macchina in locali chiusi.
USI IMPROPRI DA EVITARE
21) Non permettere passeggeri sulla macchina.
22) Non fare la orare ragazzi troppo gio ani; ietato l’uso ai minori di 16 anni.
23) Non usare la macchina quando si è affaticati e non bere alcolici.
24) Non operare col rasaerba icino a fossati o banchine che si possono rompere sotto il peso della macchina,
specialmente quando la superficie è staccata o bagnata.
25) Non fermarsi quando si la ora in salita o in discesa.
26) E itare fuoriuscite di combustibile e dopo a er riempito il serbatoio pulire ogni fuoriuscita sulla macchina prima
di a iare il motore.
27) Non manomettere o disatti are i dispositi i di sicurezza.
28) Non cambiare le regolazioni del motore in modo particolare il numero di giri max.
29) Non appoggiare pesi sul sedile, si potrebbe disatti are il dispositi o di sicurezza dell’a iamento.
30) Non fare nessun tipo di regolazione o pulizia col motore in moto.
31) Non fare controllare la macchina da nessuno mentre siete seduti alla guida col motore in moto.
32) Non spostare la macchina senza piatto tosaerba, si potrebbe impennare risultando molto pericolosa.
33) Sostituire le marmitte usurate o danneggiate.
16

Original instructions – Istruzioni originali – Instructions originales – Original-Anleitungen - Instrucciones originales
ULTERIORI ACCORGIMENTI PER LA SICUREZZA
Le a ertenze sopra riportate potrebbero non essere sufficienti ad e itare ogni rischio, nel caso in cui l’operatore
non si attenesse all’uso appropriato della presente macchina raserba. Pertanto, per maggiore prudenza
specifichiamo quanto segue.
34) La rotazione della lama del rasaerba è molto pericolosa, non mettere mai le mani o i piedi sotto al piatto
rasaerba.
35) Non fare retromarcia col motore accelerato.
36) È pericoloso azionare il olante di guida bruscamente, col motore a massimo regime.
37) Prima di a iare il motore riempire il serbatoio di carburante. Fare rifornimento di combustibile solo all’aperto,
spegnere sempre il motore, stare lontano da scintille o fiamme, non fumare! Riposizionare in modo sicuro il
tappo del serbatoio e dei contenitori di carburante.
38) Se do ete s uotare il serbatoio carburante eseguite l’operazione all’aperto.
39) Non la orare col rasaerba sopra alla ghiaia che iene aspirata e centrifugata dalla lama, risultando molto
pericolosa.
40) Se a ete dei bambini, quando non usate la macchina, nascondete le chia i di a iamento.
41) ATTENZIONE: per ridurre il pericolo di incendio mantenere il ano motore, la marmitta, i collettori di scarico, la
batteria, la zona serbatoio e conduttura carburante liberi da erba, foglie, pol ere, ecc..
42) Non immagazzinare la macchina dentro un edificio do e i apori del carburante possono arri are a fiamme,
scintille o fili elettrici scoperti.
IDENTIFICAZIONE E ASSISTENZA
IDENTIFCAZIONE
Il Grillo FM 13.09 è fornito di una targhetta con il numero della macchina,
posizionata lateralmente sul telaio.
SERVIZIO ASSISTENZA
Questo manuale fornisce le indicazioni per l’uso del rasaerba. Per una corretta manutenzione interpellare il
Ri enditore di Zona.
RICAMBI
Si raccomanda di impiegare esclusi amente ricambi originali, gli unici che offrono caratteristiche di sicurezza e
intercambiabilità. Ogni richiesta de e essere corredata del numero di matricola della macchina e il numero di codice
del pezzo da sostituire.
Per i ricambi del motore, attenersi a quanto indicato nel libretto specifico.
GARANZIA
La garanzia è fornita nei modi e nei limiti indicati nell'apposito certificato di garanzia che il ri enditore consegna
all’acquirente al momento della endita.
Per quanto riguarda il motore e la batteria, algono le condizioni pre iste dai rispetti i Produttori.
RICAMBI DI SCORTA CONSIGLIATI
N. 1 serie lame rasaerba
N. 1 serie cinghie
N. 1 filtro aria motore
N. 1 filtro olio motore
N. 1 filo acceleratore
N. una serie di fusibili impianto elettrico
COME ORDINARE I RICAMBI
Indicare sempre il numero di matricola della macchina e il codice del pezzo da sostituire. Ri olgersi ai nostri centri
presenti in ogni pro incia. Il nostro indirizzo è:
GRILLO S.p.A.
Via Cer ese 1701 – 47521 CESENA (FC)
Tel. 0547 – 633111 / Fax 0547 – 632011
Web site: www.grillospa.it / e-mail: [email protected]
17

Original instructions – Istruzioni originali – Instructions originales – Original-Anleitungen - Instrucciones originales
CARATTERISTICHE TECNICHE
MODELLO: rasaerba idrostatico con piatto frontale.
MOTORE: YANMAR 3TNV82, diesel 1331 c.c. (31 HP a 3000 giri), 3 cilindri, raffreddato a liquido con
elettro entola, dotato di dispositi o manuale e automatico di pulizia radiatore.
CAPACITÀ SERBATOIO CARBURANTE: 25 litri.
SERBATOIO OLIO IDRAULICO: 20 litri.
AVVIAMENTO: elettrico 12V.
TRAZIONE: idraulica a 4 ruote motrici (integrale permanente anche su raggio di sterzata stretto).
BLOCCAGGIO DIFFERENZIALE AUTOMATICO E MANUALE A PULSANTE.
CAMBIO: trasmissione idrostatica con 4 motori idraulici sulle 4 ruote.
SISTEMA DI GUIDA: a olante con idroguida.
FRIZIONE: per PTO idraulica co fre o lama i tegrato.
VELOCITÀ: 0-15 km/h: ariazione continua.
PNEUMATICI: ant. 23×10.50-12; post. 18×8.50-8; GARDEN.
FRENO: a tamburo di ser izio e di stazionamento.
SOLLEVAMENTO PIATTO IDRAULICO.
2 x ATTACCHI IDRAULICI PER SERVIZI INTERMITTENTI: pressione massima 120 bar. Portata massima 18 litri al
minuto a 3000 rpm.
SEDILE: super comfort con braccioli, molleggiato e registrabile.
VOLANTE: montato su colonna di guida, inclinabile.
RAGGIO DI STERZATA: 310 mm.
ACCESSORI: Piatto di taglio MP 130 cm, piatto di taglio LMP 160 cm, trinciatutto cm 135 con kit lame scarificatore,
catene per ruote, lama ne e 150 cm, kit cabina comfort con riscaldamento, sedile con molleggio pneumatico e
compressore.
CAPACITÀ ORARIA: 12.000 m2/h
DIMENSIONI (co piatto 160 LMP): Lu ghezza: 3250 mm, Larghezza: 1920 mm, Altezza: 1750 mm.
LUCE LIBERA DA TERRA: 150 mm.
INTERASSE: 1220 mm.
PESO (se za piatto): 932 kg.
MESSA IN OPERA DELLA MACCHINA
-Controllare l'integrità della macchina e accertare che non abbia subito danni durante il trasporto.
-Verificare i li elli olio motore (fig. 4) e trasmissione idrostatica (fig. 35).
-Verificare la pressione dei pneumatici:
Ruote anteriori 23 x 10.50 - 12 (1,4 bar)
Ruote posteriori 18 x 8.50 - 8 (1,4 bar)
Ruote piatto (1,5 bar)
-Controllare il oltaggio della batteria, non de e risultare inferiore al alore di 12,5 Volt, e entualmente
pro edere alla ricarica.
-Se la batteria è stata fornita a secco con acido a parte, per la messa in opera procedere come segue:
1) inserire l'acido e attendere 2 ore;
2) caricare la batteria con un carica batteria regolato a 12 Volt su carica lenta per 2 ore. Atte zio e: non
rispettando questa regola si può a ere il deterioramento della batteria e la fuoriuscita dell'acido durante il
la oro.
BATTERIA
Atte zio e! I gas sprigionati dalla batteria sono esplosi i, tenetela lontano da fiamme o scintille. Controllate
periodicamente il li ello del liquido e mantenete i morsetti lubrificati con grasso di aselina. Importa te: E itare di
in ertire la polarità della batteria.
-Non far funzionare il rasaerba senza la batteria, poiché esso è dotato di un regolatore di carica.
-Fare attenzione a non causare corto circuiti.
RODAGGIO - ATTENZIONE!
Sostituire l'olio motore dopo le prime 50 ore di funzionamento unitamente al filtro. Controllare che non i siano
perdite d'olio o iti lente, in particolare quelle di fissaggio delle lame e delle ruote. Registrare la tensione delle
cinghie della presa di forza mediante il dado posto sulla relati a molla: la molla a registrata ad una lunghezza di 65
mm da boccola a boccola ( edi freccia rossa - fig. 5, rif. A). Registrare la tensione della cinghia dell’acceleratore di
carico mediante il dado posto sulla relati a molla: la molla a registrata ad una lunghezza di 70 mm (fig.6, rif. B).
18
Table of contents
Languages:
Other Grillo Lawn And Garden Equipment manuals

Grillo
Grillo CLIMBER 780 User manual

Grillo
Grillo CL62 User manual

Grillo
Grillo gf2 User manual

Grillo
Grillo 978511 User manual

Grillo
Grillo 2500 User manual

Grillo
Grillo GH 9 User manual

Grillo
Grillo G52 User guide

Grillo
Grillo DUMPER 406 User manual

Grillo
Grillo DUMPER 507 User manual

Grillo
Grillo G52 User guide
Popular Lawn And Garden Equipment manuals by other brands

Krone
Krone Comprima F 125 Original operating instructions

Flowtron
Flowtron Leaf Eater LE-900F owner's manual

ILESTO
ILESTO GUARDI GARTENBOX L BENJAMIN Construction manual

Outdoor GreatRoom Company
Outdoor GreatRoom Company Intrigue INT-1 owner's manual

Craftsman
Craftsman 41AJSS-C799 Operator's manual

Raider
Raider RD-ESH02 user manual