GSi Airstream 2000 Series User manual

1
Owner's
Manual
MANUAL # PNEG-582
CGA Approved
Series 2000 Heater
Installation And
Operating Instructions
MODEL # VHC - __ __ - __ __ - 2 __ (HIGH)
MODEL # VLC - __ __ - __ __ - 2 __ (LOW)

2
THIS EQUIPMENT SHALL BE INSTALLED IN ACCORDANCE WITH THE CURRENT
INSTALLATION CODES FOR GAS BURNING APPLIANCES AND EQUIPMENT,
CAN1-B149.1 AND B149.2, OR APPLICABLE PROVINCIAL REGULATIONS WHICH
SHOULD BE CAREFULLY FOLLOWED IN ALL CASES. AUTHORITIES HAVING
JURISDICTION SHOULD BE CONSULTED BEFORE INSTALLATIONS ARE MADE.

3
CGA SERIES 2000 HEATER OPERATING INSTRUCTIONS
TABLE OF CONTENTS
Series 2000 Heater Check List.....................................................................................4
Warranty.......................................................................................................................5
Roof Warning, Operation & Safety.....................................................................................6
Safety Alert Decals.......................................................................................................7
Series 2000 Heater Installation....................................................................................8
High Temperature Heater Specifications................................................................8
Low Temperature Heater Specifications................................................................8
Plenum Temperature Sensor Mounting.................................................................9
Transition Hi-Limit Installation................................................................................9
Heater Unit Wiring.................................................................................................10
Secondary Heater Unit Wiring...............................................................................10
Machine To Earth Ground.....................................................................................11
Proper Installation Of The Ground Rod.................................................................11
Previously Installed Units......................................................................................11
Fuel Connection For Liquid Propane Models.........................................................12
Fuel Connection For Propane Vapor Models........................................................12
Fuel Connection For Natural Gas Models............................................................12
Series 2000 Operating Procedure....................................................................................13
Power Up..............................................................................................................13
Normal Operating Displays With Heater Not Running..........................................14
Starting The Dryer.................................................................................................15
Setting Gas Pressure ............................................................................................15
BTU's Per Gauge Pressure (PSI) Propane Models (Approximate)......................16
BTU's Per Gauge Pressure (PSI) Natural Gas Models (Approximate).................17
Adjusting The Vaporizor........................................................................................18
Running The Dryer...............................................................................................18
Programming Set Points.......................................................................................19
Programming Hours To Shut Down.......................................................................20
Drying Grain In The Hours To Shut Down Mode...................................................20
Run Hours Display...............................................................................................20
Multiple Heater Notes............................................................................................20
Factory Configuration..................................................................................................21
Configuration Dip Switches (Normally Done At GSI)............................................21
Error Conditions..........................................................................................................22
Limit Switches......................................................................................................22
Multiple Heater Error Conditions...........................................................................22
Misc Error Numbers..............................................................................................22
Series 2000 Heater Service..........................................................................................22
Series 2000 Heater Wiring..........................................................................................24
Notes...........................................................................................................................25

4
CGA SERIES 2000 HEATER CHECK LIST
_____ 1. All wire connections
_____ 2. Spark plug gap - .125
_____ 3. Pipe train tightness and gas leaks
_____ 4. Flame sensor tight
_____ 5. Fuse in place, extra fuse provided
_____ 6. Flame out light
_____ 7. Indicator light
_____ 8. Pressure gauge
_____ 9. Regulator adjusted
_____ 10. Shut off valve operates correctly
_____ 11. Vapor high limit
_____ 12. Unit cycles ON to OFF
_____ 13. Heat rise even across transition
_____ 14. Unit cycles HI to LO (HI-LO only)
_____ 15. Mod valve holds temp within 1 degree (mod units only)
_____ 16. All decals and serial number tag
_____ 17. Aesthetic appearance
_____ 18. Manual
Tester Signature___________________________________________
Date____________________________________

5
WARRANTY
EXCEPT FOR THE ABOVE STATED EXPRESS LIMITED WARRANTIES, GSI MAKES NO WARRANTY OF
ANY KIND, EXPRESSED OR IMPLIED, INCLUDING, WITHOUT LIMITATION, WARRANTIES OF MER-
CHANTABILITY OR FITNESS FOR A PARTICULAR PURPOSE OR USE IN CONNECTION WITH (i) PROD-
UCT MANUFACTURED OR SOLD BY GSI OR (ii) ANY ADVICE, INSTRUCTION, RECOMMENDATION OR
SUGGESTION PROVIDED BY AN AGENT, REPRESENTATIVE OR EMPLOYEE OF GSI REGARDING OR
RELATED TO THE CONFIGURATION, INSTALLATION, LAYOUT, SUITABILITY FOR A PARTICULAR PUR-
POSE, OR DESIGN OF SUCH PRODUCT OR PRODUCTS.
IN NO EVENT SHALL GSI BE LIABLE FOR ANY DIRECT, INDIRECT, INCIDENTAL OR CONSEQUEN-
TIAL DAMAGES, INCLUDING, WITHOUT LIMITATION, LOSS OF ANTICIPATED PROFITS OR BENEFITS.
PURCHASER'S SOLE AND EXCLUSIVE REMEDY SHALL BE LIMITED TO THAT STATED ABOVE, WHICH
SHALL NOT EXCEED THE AMOUNT PAID FOR THE PRODUCT PURCHASED. THIS WARRANTY IS NOT
TRANSFERABLE AND APPLIES ONLY TO THE ORIGINAL PURCHASER. GSI SHALL HAVE NO OBLIGA-
TION OR RESPONSIBILITY FOR ANY REPRESENTATIVE OR WARRANTIES MADE BY OR ON BEHALF
OF ANY DEALER, AGENT OR DISTRIBUTOR OF GSI.
GSI ASSUMES NO RESPONSIBILITY FOR FIELD MODIFICATIONS OR ERECTION DEFECTS WHICH
CREATE STRUCTURAL OR STORAGE QUALITY PROBLEMS. MODIFICATIONS TO THE PRODUCT NOT
SPECIFICALLY COVERED BY THE CONTENTS OF THIS MANUAL WILL NULLIFY ANY PRODUCT WAR-
RANTY THAT MIGHT HAVE BEEN OTHERWISE AVAILABLE.
THE FOREGOING WARRANTY SHALL NOT COVER PRODUCTS OR PARTS WHICH HAVE BEEN
DAMAGED BY NEGLIGENT USE, MISUSE, ALTERATION OR ACCIDENT. THIS WARRANTY COVERS
ONLY PRODUCTS MANUFACTURED BY GSI. THIS WARRANTY IS EXCLUSIVE AND IN LIEU OF ALL
OTHER WARRANTIES EXPRESS OR IMPLIED. GSI RESERVES THE RIGHT TO MAKE DESIGN OR SPECI-
FICATION CHANGES AT ANY TIME.
PRIOR TO INSTALLATION, PURCHASER HAS THE RESPONSIBILITY TO RESEARCH AND COM-
PLY WITH ALL FEDERAL, STATE AND LOCAL CODES WHICH MAY APPLY TO THE LOCATION AND
INSTALLATION.
THE GSI GROUP, INC. ("GSI") WARRANTS ALL PRODUCTS MANUFACTURED BY GSI TO BE FREE OF
DEFECTS IN MATERIAL AND WORKMANSHIP UNDER NORMAL USAGE AND CONDITIONS FOR A PE-
RIOD OF TWELVE MONTHS AFTER RETAIL SALE TO THE ORIGINAL END USER OF SUCH PROD-
UCTS. GSI'S ONLY OBLIGATION IS, AND PURCHASER'S SOLE REMEDY SHALL BE FOR GSI, TO RE-
PAIR OR REPLACE, AT GSI'S OPTION AND EXPENSE, PRODUCTS THAT, IN GSI'S SOLE JUDGMENT,
CONTAIN A MATERIAL DEFECT DUE TO MATERIALS OR WORKMANSHIP. ALL DELIVERY AND SHIP-
MENT CHARGES TO AND FROM GSI'S FACTORY WILL BE PURCHASER'S RESPONSIBILITY. EXPENSES
INCURRED BY OR ON BEHALF OF THE PURCHASER WITHOUT PRIOR WRITTEN AUTHORIZATION
FROM AN AUTHORIZED EMPLOYEE OF GSI SHALL BE THE SOLE RESPONSIBILITY OF THE PURCHASER.

6
ROOF WARNING, OPERATION & SAFETY
ROOF DAMAGE WARNING AND DISCLAIMER
WARNING! BE ALERT!
Personnel operating or working around
electric fans should read this manual.
This manual must be delivered with the
equipment to its owner. Failure to read
this manual and its safety instructions is
a misuse of the equipment.
The symbol shown is used to call
your attention to instructions con-
cerning your personal safety. Watch
for this symbol; it points out impor-
tant safety precautions. It means
"ATTENTION", "WARNING", "CAU-
TION", and "DANGER". Read the
message and be cautious to the
possibility of personal injury or
death.
SAFETY ALERT SYMBOL
Thank you for choosing a GSI/Air-
stream product. It is designed to
give excellent performance and
service for many years.
This manual describes the op-
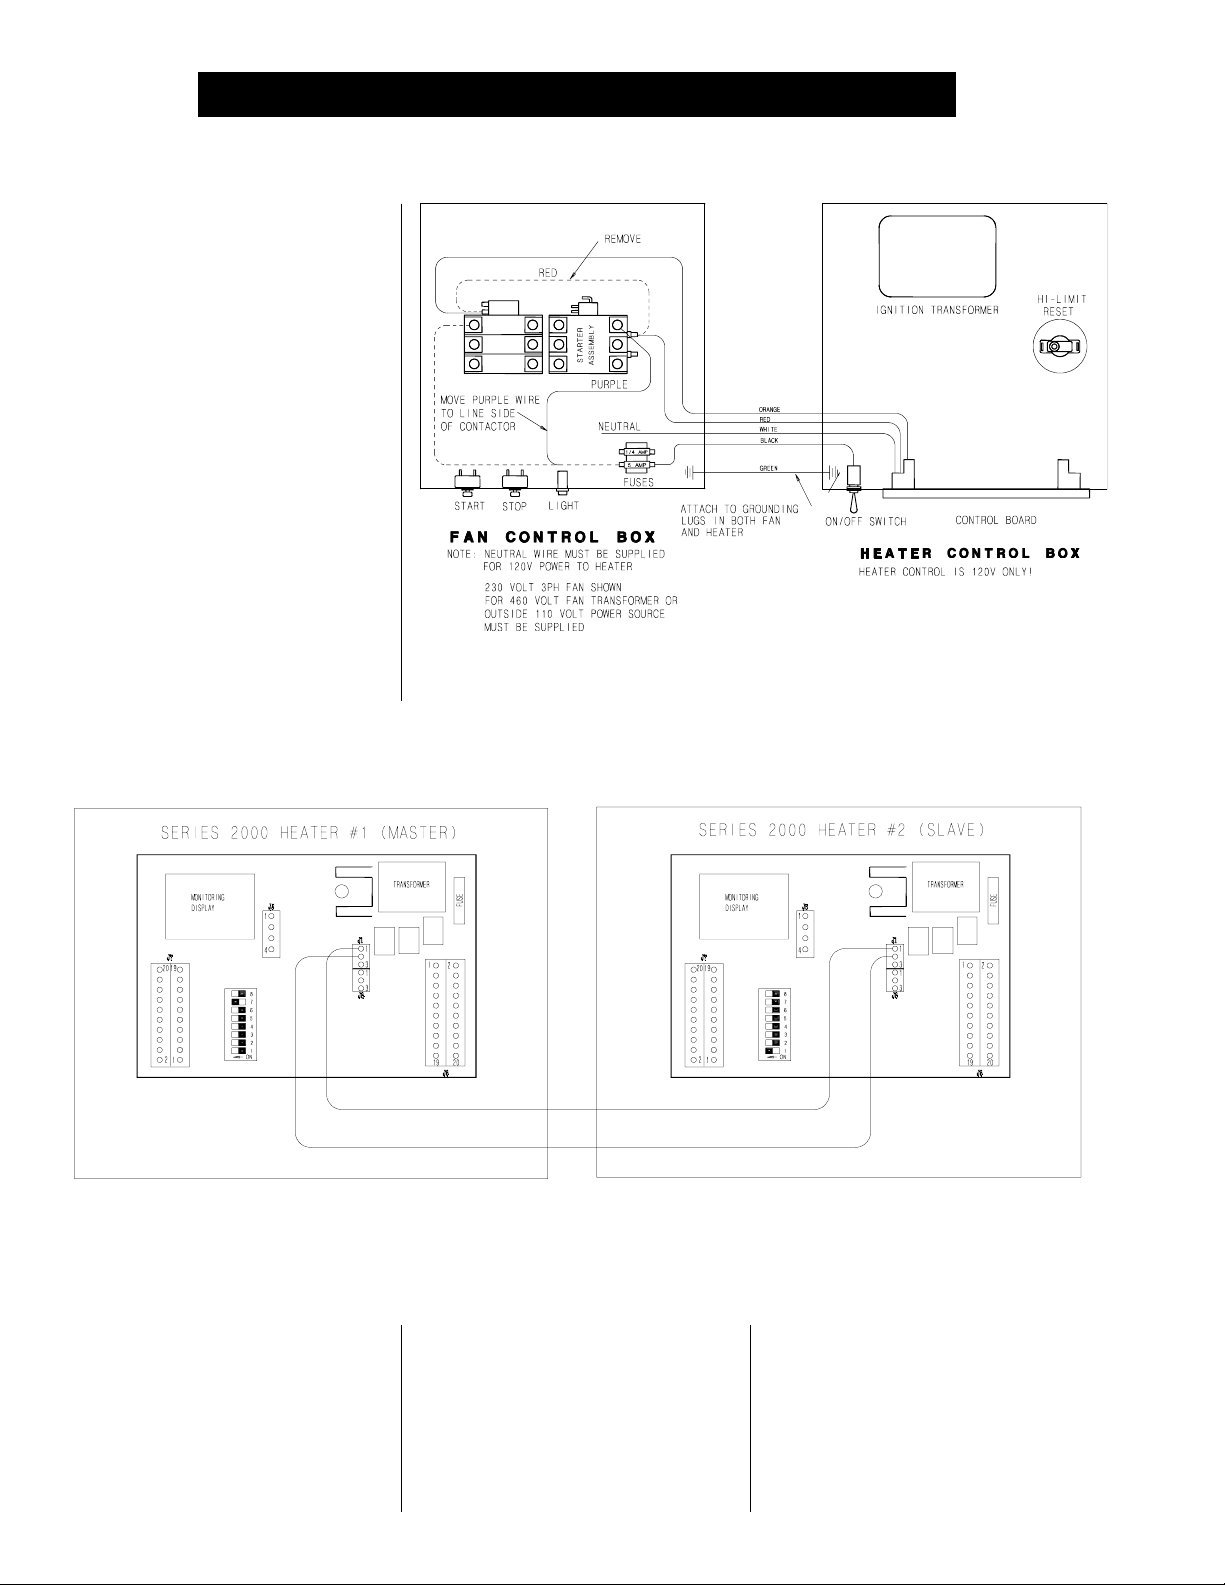
eration of the Airstream Chi-town
Heater. It is designed for low to me-
dium temperature grain condi-
tioning, and is ideal for the aera-
tion of rice, popcorn or other se-
lect grains. It is available in both
propane vapor and natural gas
models.
The principal concern of the GSI
Group, Inc. ("GSI") is your safety and
the safety of others associated with
grain handling equipment. This
manual is written to help you under-
stand safe operating procedures,
and some of the problems that may
be encountered by the operator or
other personnel.
As owner and/or operator, it is
your responsibility to know what
requirements, hazards and pre-
cautions exist, and to inform all
personnel associated with the
equipment, or who are in the dryer
area. Avoid any alterations to the
equipment. Such alterations may
produce a very dangerous situa-
tion, where serious injury or death
may occur.
GSI DOES NOT WARRANT ANY ROOF DAMAGE CAUSED
BY EXCESSIVE VACUUM OR INTERNAL PRESSURE FROM
FANS OR OTHER AIR MOVING SYSTEMS. ADEQUATE
VENTILATION AND/OR "MAKEUP AIR" DEVICES SHOULD
BE PROVIDED FOR ALL POWERED AIR HANDLING SYS-
TEMS. GSI DOES NOT RECOMMEND THE USE OF DOWN-
WARD FLOW SYSTEMS (SUCTION). SEVERE ROOF DAM-
AGE CAN RESULT FROM ANY BLOCKAGE OF AIR PAS-
SAGES. RUNNING FANS DURING HIGH HUMIDITY/COLD
WEATHER CONDITIONS CAN CAUSE AIR EXHAUST OR
INTAKE PORTS TO FREEZE.
HEATER OPERATION

7
SAFETY ALERT DECALS
Grain Systems, Inc. recommends
contacting your local power company,
and having a representative survey
your installation so the wiring is com-
patible with their system, and ad-
equate power is supplied to your unit.
Safety decals should be read
and understood by all people in the
grain handling area. The bottom
right decal should be present on the
inside bin door cover of the two ring
door, 24" porthole door cover and
the roof manway cover.
If a decal is damaged or is miss-
ing contact:
Grain Systems, Inc.
1004 E. Illinois St.
Assumption, IL 62510
217-226-4421
A free replacement will be sent to you.

8
Inside diameter
Bolt circle diameter
Length
BTU rating
Weight
Maximum fuel flow (GPH)
Orifice
Modulating valve bypass orifice
Minimum operating pressure
Maximum operating pressure
Minimum line size
Maximum fuel flow (CFH)
Orifice
Modulating valve bypass orifice
Minimum operating pressure
Maximum operating pressure
Minimum line size
Maximum fuel flow (CFH)
Orifice
Modulating valve bypass orifice
Minimum operating pressure
Maximum operating pressure
Minimum line size
All models
Liquid models
Vapor models
Natural gas
models
18"
18.5/16"
19.7/16"
22"
1400000
81
N/A
N/A
N/A
N/A
N/A
N/A
585
5/32"
Green
2
20
1/2"
1473
1/4"
Blue
1
7
3/4"
24"
24.1/4"
25.3/4"
22.1/2"
2100000
110
23
3/16"
Blue
2
20
3/8"
877
3/16"
Blue
2
20
3/4"
2210
5/16"
Aluminum
1
7
1"
26"
26.5/16"
27.15/16"
22.1/4"
2700000
115
30
7/32"
Blue
2
20
3/8"
1128
7/32"
Blue
2
20
3/4"
2842
23/64"
Aluminum
1
7
1.1/4"
28"
28.1/8"
29.5/8"
25.1/4"
3000000
140
34
15/64"
Aluminum
2
20
3/8"
1253
15/64"
Aluminum
2
20
3/4"
3157
3/8"
Aluminum
1
7
1.1/4"
HIGH TEMPERATURE HEATER SPECIFICATIONS
All models
Vapor models
Natural gas
models
Inside diameter
Bolt circle diameter
Length
BTU rating
Weight
Maximum fuel flow (GPH)
Orifice
Modulating valve bypass orifice
Minimum operating pressure
Maximum operating pressure
Minimum line size
Maximum fuel flow (CFH)
Orifice
Modulating valve bypass orifice
Minimum operating pressure
Maximum operating pressure
Minimum line size
18"
18.5/16"
19.7/16"
22"
400000
81
167
5/64"
Red
2
20
3/8"
421
9/64"
Yellow
1
7
1/2"
24"
24.1/4"
25.3/4"
22.1/2"
500000
110
292
3/32"
Yellow
2
20
3/8"
736
5/32"
Green
1
7
1/2"
26"
26.5/16"
27.15/16"
22.1/4"
500000
115
292
3/32"
Yellow
2
20
3/8"
736
5/32"
Green
1
7
1/2"
28"
28.1/8"
29.5/8"
25.1/4"
500000
140
292
3/32"
Yellow
2
20
3/8"
736
5/32"
Green
1
7
1/2"
CGA SERIES 2000 HEATER INSTALLATION
LOW TEMPERATURE HEATER SPECIFICATIONS

9
CGA SERIES 2000 HEATER INSTALLATION
PLENUM TEMPERATURE
SENSOR MOUNTING
The plenum temperature sensor is
the small gray PVC junction box at-
tached by a cord to the fan/heater
control box.
1. 24" to the right side of the transi-
tion, drill one 3/8" hole in the cen-
ter of the plenum in a valley on
the bin sidewall.
2. Insert the probe through the hole.
3. Position the housing so that the
tabs are vertical, and the cord
exits the housing horizontally.
4. Use two self drilling screws to mount
the housing to the bin sidewall.
5. Caulk between the housing and
the sidewall to seal. Plenum temperature sensor installation.
1. Mark location on transition one
(1) foot up from the bottom
(entrance collar) and centered
in the transition.
2. Drill or knock out 7/8" diameter
hole on marked location.
3. Install transition hi-limit using
supplied self drilling screws.
TRANSITION HI-LIMIT INSTALLATION
Figure 1: The transition connecting the Series 2000 Heater to the bin with
the plenum sensor in place.

10
1. Be sure fan unit is installed and
wired to meet local codes. Be
sure equipment is well grounded
(see page 9).
2. A separate neutral is required
for 120 volt heater circuit in 220
volt 1PH and 3PH fan units. For
460 volt fan units a separate 120
volt power supply or transformer
is required.
3. Run cord from heater unit to fan
unit and connect as shown in
Figure 2.
WIRING
HEATER UNIT
SERIES 2000 HEATER INSTALLATION
4. Third heater unit may also be
added to system. If adding third
unit, run connections to master
unit #1 and connect them in
parallel with secondary heater
unit.
2. Run (2) 20 gauge (minimum)
wires from secondary heater
unit (slave) to heater unit #1
(master).
3.
Connect wires as shown in Figure 3.
1. Secondary heater unit runs as
a slave of heater unit #1 and re-
quires no plenum or grain tem-
perature sensor.
Figure 3: Secondary heater wiring diagram.
Figure 2: Wiring diagram for the fan and heater unit.
SECONDARY
HEATER UNIT

11
SERIES 2000 HEATER INSTALLATION
It is very important that a machine
to earth ground rod be installed at
the fan. This is true even if there is
a ground at the pole 15 feet away.
This ground needs to be as close to
the fan as possible, but no more than
8 feet away. The ground rod should
be connected to the fan control panel
with at least a #6 solid bare copper
ground wire, or in accordance with
local requirements. The machine to
earth ground provides additional
safety if there is a short. It also pro-
vides the grounding necessary for
long life and operation of the solid
state circuit boards used on control
circuits and the electronic ignition
systems.
MACHINE TO EARTH
GROUND
Dig a hole large enough to hold 1
or 2 gallons of water. Work the
ground rod into the earth until it is
completely in the ground.
It is recommended that previously
installed units be checked to see that
a machine to earth ground has been
installed by an electrician.
(Ground rods and wires are not sup-
plied by Airstream). It is recom-
mended that the rod not be driven into
dry ground. The following steps en-
sure proper ground rod installation:
1. Dig a hole large enough to hold
1 to 2 gallons of water.
2. Fill hole with water.
3. Insert rod through water and jab
it into the ground.
4. Continue jabbing the rod up and
down, the water will work its way
down the hole, making it pos-
sible to work the rod completely
into the ground. This method of
installing the rod gives a good
PREVIOUSLY INSTALLED
UNITS
PROPER INSTALLATION
OF THE GROUND ROD
conductive bond with the sur-
rounding soil.
5. Connect the bare copper ground
wire to the rod with the proper
ground rod clamp.
6. Connect the bare ground wire to
the fan control boxes with a
grounding lug. See figure 4.
7. Ground wire must not have any
breaks or splices. Insulated
wire is not recommended for
grounding.
Figure 4: Use a #6 or approved size bare copper ground wire. Install a 5/8"
diameter 8' long copper-clad ground rod, 2' away from the foundation and 1'
below the surface of the ground or in accordance with local requirements.

12
SERIES 2000 HEATER INSTALLATION
Standard electrical safety prac-
tices and codes should be
used when working with a
heater. Refer to the National
Electric Code Standard Hand-
book by the National Fire Pro-
tection Association. A quali-
fied electrician should make all
wiring installations.
IMPORTANT! Do not use pro-
pane tanks that have previ-
ously been used for ammonia
unless they have been purged
according to procedures of the
National L.P. Association.
Fuel supply system must
comply with local codes for L.P.
gas installation.
1. Propane vapor models are de-
signed to run directly off of a
supply tank or from a separate
external vaporizer.
2. Run proper size line (see speci-
fications on page 6) to pipe train
on heater. Have a qualified gas
service person inspect installa-
tion to be sure that everything
is installed according to local
codes and ordinances.
3. After installation is complete
check all connections for leaks.
DO NOT USE FLAME FOR
LEAK TESTING.
LIQUID PROPANE
MODELS
NATURAL GAS MODELS
PROPANE VAPOR
MODELS
ALWAYS DISCONNECT
AND LOCK OUT
POWER
BEFORE WORKING ON
OR AROUND HEATER
1. Natural gas models are de-
signed to run directly off of a
supply tank or from a separate
external vaporizer.
2. Run proper size line (see speci-
fication on page 6) to pipe train
on heater. Have a qualified gas
service person inspect installa-
tion to be sure everything is in-
stalled according to local codes
and ordinances.
3. After installation is complete
check all connections for leaks.
DO NOT USE FLAME FOR
LEAK TESTING.
3. After installation is complete
check all connections for leaks
with liquid detergent or compa-
rable. Wear rubber gloves and
eye protection. Avoid contact
with liquid propane. DO NOT
USE FLAME FOR LEAK TEST-
ING.
1. L.P. models are designed to run
on liquid propane with liquid
draw from the propane tank.
Avoid using propane supply
tanks that have been used for
vapor draw for long periods of
time. When using liquid draw
systems any moisture that may
be present in tank or lines may
freeze when system is used in
cold weather. To avoid this situ-
ation, purge the system with
methanol.
2. Run proper size line (see speci-
fication on page 6) to liquid pipe
train on heater. Have a qualified
gas service person inspect in-
stallation to be sure that every-
thing is installed according to
local codes and ordinances.
FUEL CONNECTION

13
ALWAYS DISCONNECT
AND LOCK OUT POWER
BEFORE WORKING ON OR
AROUND HEATER
SERIES 2000 HEATER OPERATING PROCEDURE
The control panel display showing initial start up.
fore the controller has been powered
up, the controller locks up with the
main display alternating between a
"FAN" and "ON" message. This may
be bypassed by depressing and
holding the "FAN BYPASS" switch
(lower right switch). Normal oper-
ating procedure should be to power
up the controller with the fan off.
If multiple heaters are tied to-
gether, and the master detects that
the slave fan is on (the air switch
stuck?), the master will lock up dis-
playing "SLA ERROR". This con-
dition may be bypassed with the
"FAN BYPASS" switch.
All safety and high limit switches are
checked upon power up. If a safety
or limit is open, the control displays it.
The control cannot operate with a
safety switch error, and the fan can-
not turn on with an error condition.
There is no way to bypass an error
condition. It must be fixed. (see errors
on page 20)
The air switch is also checked
on power up. The air switch must
indicate no airflow. This is neces-
sary to check the function of the
air switch. However, if the opera-
tor forgets and turns the fan on be-
Standard electrical safety practices
and codes should be used when
working with a heater. Refer to the
National Electric Code Standard
Handbook by the National Fire Pro-
tection Association. A qualified
electrician should make all wiring
installations.
POWER UP

14
SERIES 2000 HEATER OPERATING PROCEDURE
NORMAL OPERATING
DISPLAYS WITH HEATER
NOT RUNNING
dition is corrected, the display re-
turns to its normal output. This is
not the case with an error or limit
condition during the drying opera-
tion. This causes the display to
lock up in the error display mode.
This is to keep the display locked
up with the condition illuminated.
(see section on "Running the
Dryer" for mode explanation on
page 16)
The heater display with fan on (airflow).
is displayed if air is flowing or not
flowing. "RX TX" (receive, transmit)
is displayed if multiple heaters are
connected.
All safeties or high limits are
continuously checked during the
off mode. A limit switch open, or
any other error condition will cause
the display to show the limit or er-
ror condition. When drying is not
occurring, and the limit or error con-
The main display shows the plenum
temperature. If the dryer has not
been running, the display should
show outside temperature. The con-
trol is preset at the factory to dis-
play temperature in centigrade or
fahrenheit.
"AIRFLOW" or "NO AIRFLOW"

15
SERIES 2000 HEATER OPERATING PROCEDURE
1. At heater turn toggle switch
to "ON" position.
2. Press the "PROGRAM TEM-
PERATURE" button.
3. Use the increase or decrease
button to set the "PLENUM
HIGH LIMIT SET POINT" to de-
sired setting (100°-160°*).
4. Press the "PROGRAM TEM-
PERATURE" button to continue
to set the "CYCLE SET POINT".
(hi-lo units only)
5. Use the increase or decrease
buttons to set the "CYCLE SET
POINT" to desired setting
(90°-150°*) (hi-lo units only).
6. Press the "PROGRAM TEM-
PERATURE" button to continue
to set the "TEMPERATURE
DIFFERENTIAL".
7. Use the increase or decrease
buttons to set the "TEMPERA-
TURE DIFFERENTIAL" to 10°*.
8. Open all manual gas shut off
valves, on and to the heater unit.
9. Start the fan unit.
10. Make sure that the blade is spin-
ning in the right direction. If not
place the toggle switch in the
"OFF" position and correct the
problem.
11. After the fan reaches full speed
the display should read "AIR-
FLOW" in the upper right hand
corner.
12. Press the start button on the
heater control.
13. After 10 seconds the burner
should ignite. If not, turn "OFF" the
toggle switch and then back "ON".
Repeat 12-15.
14. When the burner ignites the dis-
play should read "HI-FLAME" at
the left of the display. Loosen the
nut on the main regulator and turn
screw in, to increase pressure and
out to decrease pressure. The
pressure gauge should be set at
10-15 lbs. for LP units, or 4-6 lbs.
for natural gas units. (use the
charts on the following pages to
set pressure)
15. Press the "PROGRAM TEM-
PERATURE" button to change
the high limit set point. Press
it again to change the "CYCLE
SET POINT". (hi-lo units only)
16. Decrease the "CYCLE SET
POINT TEMPERATURE" until
the heater cycles to low flame. (hi-
lo units only)
17. Open or close the low cycle ball
valve until the gas pressure is
3-5 lbs. for LP, or 1-2 lbs. for
natural gas. (hi-lo units only)
18. Increase the cycle set point to
return to high flame. (hi-lo units only)
19. Watch heater run several min-
utes to make sure it cycles be-
tween hi and lo flame or on and
off properly.
20. Hi-flame pressure should be
adjusted so plenum reaches cy-
cling temperature easily.
21. Adjust pressure on on/off units
so that unit is on approximately
75% of the time.
After heater power is turned on, the
fan must be turned on. Attempting
to start the dryer without the air
switch indicating there is airflow will
cause an airflow alarm to go off when
the start switch is depressed. The air-
flow alarm is simply the entire display
going blank, and the "NO AIRFLOW"
message flashing for a few seconds.
The display must show "AIRFLOW"
before the dryer can be started.
To start the dryer, just push the
"START" switch. The first message
to come up will be the "PURGE"
message--the drying process begins
with a 10 second purge.
When multiple heaters are con-
nected together, drying may be
started from any heater control.
Programming the temperature
differential.
SETTING GAS PRESSURE
STARTING THE DRYER
*Temperatures are fahrenheit.

16
SERIES 2000 HEATER OPERATING PROCEDURE
BTU'S PER GAUGE PRESSURE (PSI) PROPANE MODELS (APPROXIMATE)
60
2
1
low-temp
2
1
low-temp
low-temp
4
3
2
1
2
2
1
1
low-temp
3
2
2
1
low-temp
Fan Model
3HP-18"
7HP-24"
10HP-24"
15HP-26"
15HP-28"
Heat Rise Degrees F
Static
Pressure
1"
2"
3"
1"
2"
3"
4"
1"
2"
3"
4"
1"
2"
3"
4"
5"
1"
2"
3"
4"
5"
80
3
1
low-temp
4
3
low-temp
low-temp
6
5
3
2
4
4
3
3
1
4
4
3
2
1
100
4
2
1
6
4
1
low-temp
9
8
4
3
6
5
4
4
2
7
6
4
3
2
120
5
3
2
8
5
2
low-temp
13
10
6
4
8
7
5
5
3
9
8
5
4
3
140
6
4
2
10
7
3
1
18
14
8
5
11
9
7
7
3
12
11
8
6
3
160
8
5
3
14
9
3
2
22
18
9
6
14
13
10
9
4
16
14
10
8
4
180
9
6
3
17
11
4
3
26
22
11
8
18
16
13
11
5
20
18
13
10
5
GAUGE PRESSURE (PSI) REQUIRED TO MAINTAIN TEMPERATURE (APPROXIMATE)
(HIGH TEMP UNITS ONLY)
2
102900
148370
Diameter
18"
24-28"
4
145970
210580
6
181870
258440
8
208190
299130
10
234510
335020
12
253660
366130
14
275200
394850
16
294340
421170
18
311090
447490
20
335020
473810
LOW TEMPERATURE
Operating Pressure (PSI)
2
416380
598250
816010
935660
Diameter
18"
24"
26"
28"
4
588680
844730
1148640
1318540
6
720290
1036170
1409480
1617670
8
832760
1198890
1632030
1868930
10
930880
1340080
1825860
2091480
12
1019420
1464520
1995762
2309250
14
1107800
1581770
2153700
2467180
16
1174960
1689460
2302070
2649050
18
1244360
1787570
2436070
2792630
20
1340080
1892860
2577260
2955360
HIGH TEMPERATURE
Operating Pressure (PSI)

17
SERIES 2000 HEATER OPERATING PROCEDURE
BTU'S PER GAUGE PRESSURE (PSI) NATURAL GAS MODELS (APPROXIMATE)
HIGH TEMPERATURE
7
1204750
1881456
2487940
2708640
6
1115380
1741920
2302800
2507090
5
1016880
1587790
2099420
2285470
4
909260
1419980
1876896
2043790
3
787970
1231200
1627920
1772020
2
644780
1006850
1331520
1450080
1
454180
710450
938450
1022350
Operating Pressure (PSI)
Diameter
18"
24"
26"
28"
LOW TEMPERATURE
7
383040
470590
6
353860
435936
5
322850
397632
4
289100
355680
3
250800
308260
2
205200
251710
1
144100
177840
Operating Pressure (PSI)
Diameter
18"
24-28"
60
1
1
low-temp
1
1
low-temp
low-temp
2
1
1
low-temp
1
1
1
1
low-temp
1
1
1
1
low-temp
Fan Model
3HP-18"
7HP-24"
10HP-24"
15HP-26"
15HP-28"
Heat Rise Degrees F
Static
Pressure
1"
2"
3"
1"
2"
3"
4"
1"
2"
3"
4"
1"
2"
3"
4"
5"
1"
2"
3"
4"
5"
80
1
1
low-temp
2
1
low-temp
low-temp
2
2
1
1
2
1
1
1
low-temp
2
2
1
1
low-temp
100
2
1
1
2
1
1
low-temp
4
3
1
1
2
2
2
1
1
3
2
2
1
1
120
2
1
1
3
2
1
1
5
3
2
1
3
3
2
1
1
4
3
2
1
1
140
3
2
1
4
2
1
1
6
4
2
1
4
3
3
2
1
5
4
3
2
1
160
3
2
1
5
3
1
1
7
6
3
2
5
4
3
2
1
7
5
4
2
2
180
4
3
31
6
4
2
1
8
7
4
2
7
5
4
3
2
8
6
5
3
2
GAUGE PRESSURE (PSI) REQUIRED TO MAINTAIN TEMPERATURE (APPROXIMATE)
(HIGH TEMP UNITS ONLY)

18
SERIES 2000 HEATER OPERATING PROCEDURE
Adjusting the vaporizer coil on a liquid propane model. The top photo
shows the setting in, and the bottom photo shows the coil out.
ADJUSTING THE
VAPORIZOR
The display will indicate "FLAME"
when flame is sensed. If no flame
is sensed, the "FLAME" message
will be off. The display indicates
what part of the cycle it is in. If the
unit is a hi-lo dryer, the display will
indicate whether it is in the "HI-
FLAME" or "LO-FLAME" part of the
cycle. (see "programming set points"
page 17 for setting the hi-lo flame
temperature). If the temperature is
above the high temperature setting,
the flame will be off, the "FLAME"
message will be out and the display
will be flashing "OFF-CYCLE".
If the flame is shut off because
of the humidity sensor (humidistat),
the display flashes "OFF-CYCLE
HUMIDISTAT".
RUNNING THE DRYER
1. Vaporizer should be adjusted so
the vapor pipe train runs warm
to the touch (100°-120°F).
2. Loosen 5/16" bolt on adjustment
bracket.
3. Swivel vaporizer away from
flame if running too hot, closer
to flame if too cold.
4. Move vaporizer only 1" at a time
and allow a few minutes for tem-
perature to equalize.
5. Tighten 5/16" bolt and watch
heater run for several minutes
to verify adjustment.

19
SERIES 2000 HEATER OPERATING PROCEDURE
PROGRAMMING SET
POINTS
multiple heaters may be done at any
heater control console. The infor-
mation programmed is automatically
transmitted to all other heaters when
the programming is complete.
Hi Limit Set Point--The upper
left cursor is flashing indicating the
mode. If the plenum temperature
increases above this point, the flame
is shut off--"OFF-CYCLE" is dis-
played on screen.
Cycle Set Point--The upper 2nd
from left cursor is flashing indicat-
ing the mode. If the dryer is not a
hi-lo dryer, this function is
skipped. If the plenum tempera-
ture increases above this point, the
flame reduces to "LO-FLAME".
Humidity Set Point--The upper
2nd from right cursor is flashing in-
dicating the mode. If the humidity is
Depressing the "PROGRAM" switch
(lower left) causes the display to en-
ter the program mode. Each item
below is programmed by using the
up and down arrow switches. Hold-
ing down these up and down arrow
switches for about 2 seconds will
cause the numbers to increase/de-
crease rapidly until the switch is re-
leased. When finished program-
ming an item, depressing the "PRO-
GRAM" switch again will cause the
new setting to be entered into
memory, and the display will ad-
vance to the next function to be pro-
grammed.
Programming may be done at
anytime (unless an error condi-
tion exists) even while the dryer
is in operation.
Programming a system with
The limits are continuously
checked during the drying operation.
A limit switch open or any other er-
ror condition will cause the dryer to
shut down, and the fan will be shut-
down. If a limit opens, or an er-
ror condition occurs during dry-
ing, the control will lockup in the
error display mode. Power must
be shut off and back on to the
control to clear the error condi-
tion--even if the error or limit that
caused the shutdown has been cor-
rected. This is to keep the display
locked up with the condition that
caused the error, allowing the opera-
tor time to determine what caused the
shutdown.
above this point the dryer operates
normally--flame on and off at the
high limit and cycle set points. If the
humidity is below this point the dryer
goes into the "OFF-CYCLE" mode.
Note: At this time a true humidity
sensor has not been introduced.
To use this option, set the humid-
ity setting to 50% and use a hu-
midistat switch. When the humid-
ity is high the switch is closed, indi-
cating high humidity. At this setting,
the dryer runs normally.
Temperature Differential--The
upper right cursor is flashing indicat-
ing the mode. If the flame shuts off
because the temperature is greater
than the high limit set point, the tem-
perature must fall below the (Set Point
minus Temperature Differential) for
the flame to come back on.
Programming the high-limit set point.

20
On hi-lo units when the unit
reaches cycle set point, the flame
will switch to lo-flame and unit will
not cycle back to hi-flame until (Set
Point minus Temperature Differen-
tial) is reached.
Temperature differential would
normally be set for 10-15 degrees F
for high temp units, and 2-5 degrees
F for lo-temp units.
Humidity Differential--The upper
right cursor is flashing indicating the
MULTIPLE HEATER NOTES
When multiple heaters are con-
nected together, the temperature
and humidity sensors must be con-
nected to the master.
the switch, depress the up and down
arrow switches to alter the hours.
Setting range is 0 to 200 hours.
DRYING GRAIN IN THE
HOURS TO SHUT DOWN
MODE
While drying grain, depress and hold
the "SHUTDOWN HOURS" switch.
While holding in on that switch, de-
press the "START" switch. After
depressing the start switch one time,
the heater is in the shutdown mode.
Then, the fan and heater shut down
when the time expires. This is indi-
cated by the lower left cursor flash-
ing.
Depressing the start switch
again (while holding in on the
"SHUTDOWN HOURS" switch) will
cause only the heater to shut off.
This leaves the fan on when the time
expires. This is indicated by the 2nd
from lower left cursor flashing. De-
pressing the start switch one more
time returns the heater into the con-
tinuous--non-shutdown mode.
RUN HOURS DISPLAY
Run hours are recorded when the
controller detects that the fan is on
(airflow). The hours may be viewed
by depressing the "HOURS" to get
hours and "HOURS X 1000" to get
the number of 1000 hours accumu-
lated.
mode. If the flame shuts off because
the humidity is less than the humid-
ity set point, the humidity must rise
above the (Set Point plus Humidity
Differential) for the flame to come
back on.
PROGRAMMING HOURS
TO SHUT DOWN
To change the hours to shut down,
depress and hold the "SHUTDOWN
HOURS" switch. While holding in on
Setting the cycle set point.
SERIES 2000 HEATER OPERATING PROCEDURE
Table of contents
Other GSi Heater manuals
Popular Heater manuals by other brands

Hatco
Hatco GR Series Installation and operating manual

Harvia
Harvia SENTIO Qube 240 Instructions for installation

Toyostove
Toyostove DC-80 Operating and maintenance instruction

Lasko
Lasko 5775 Important instructions & operating manual

Toyotomi
Toyotomi Radiant 101 Type F user guide

Ayce
Ayce PTC924-L Original instructions