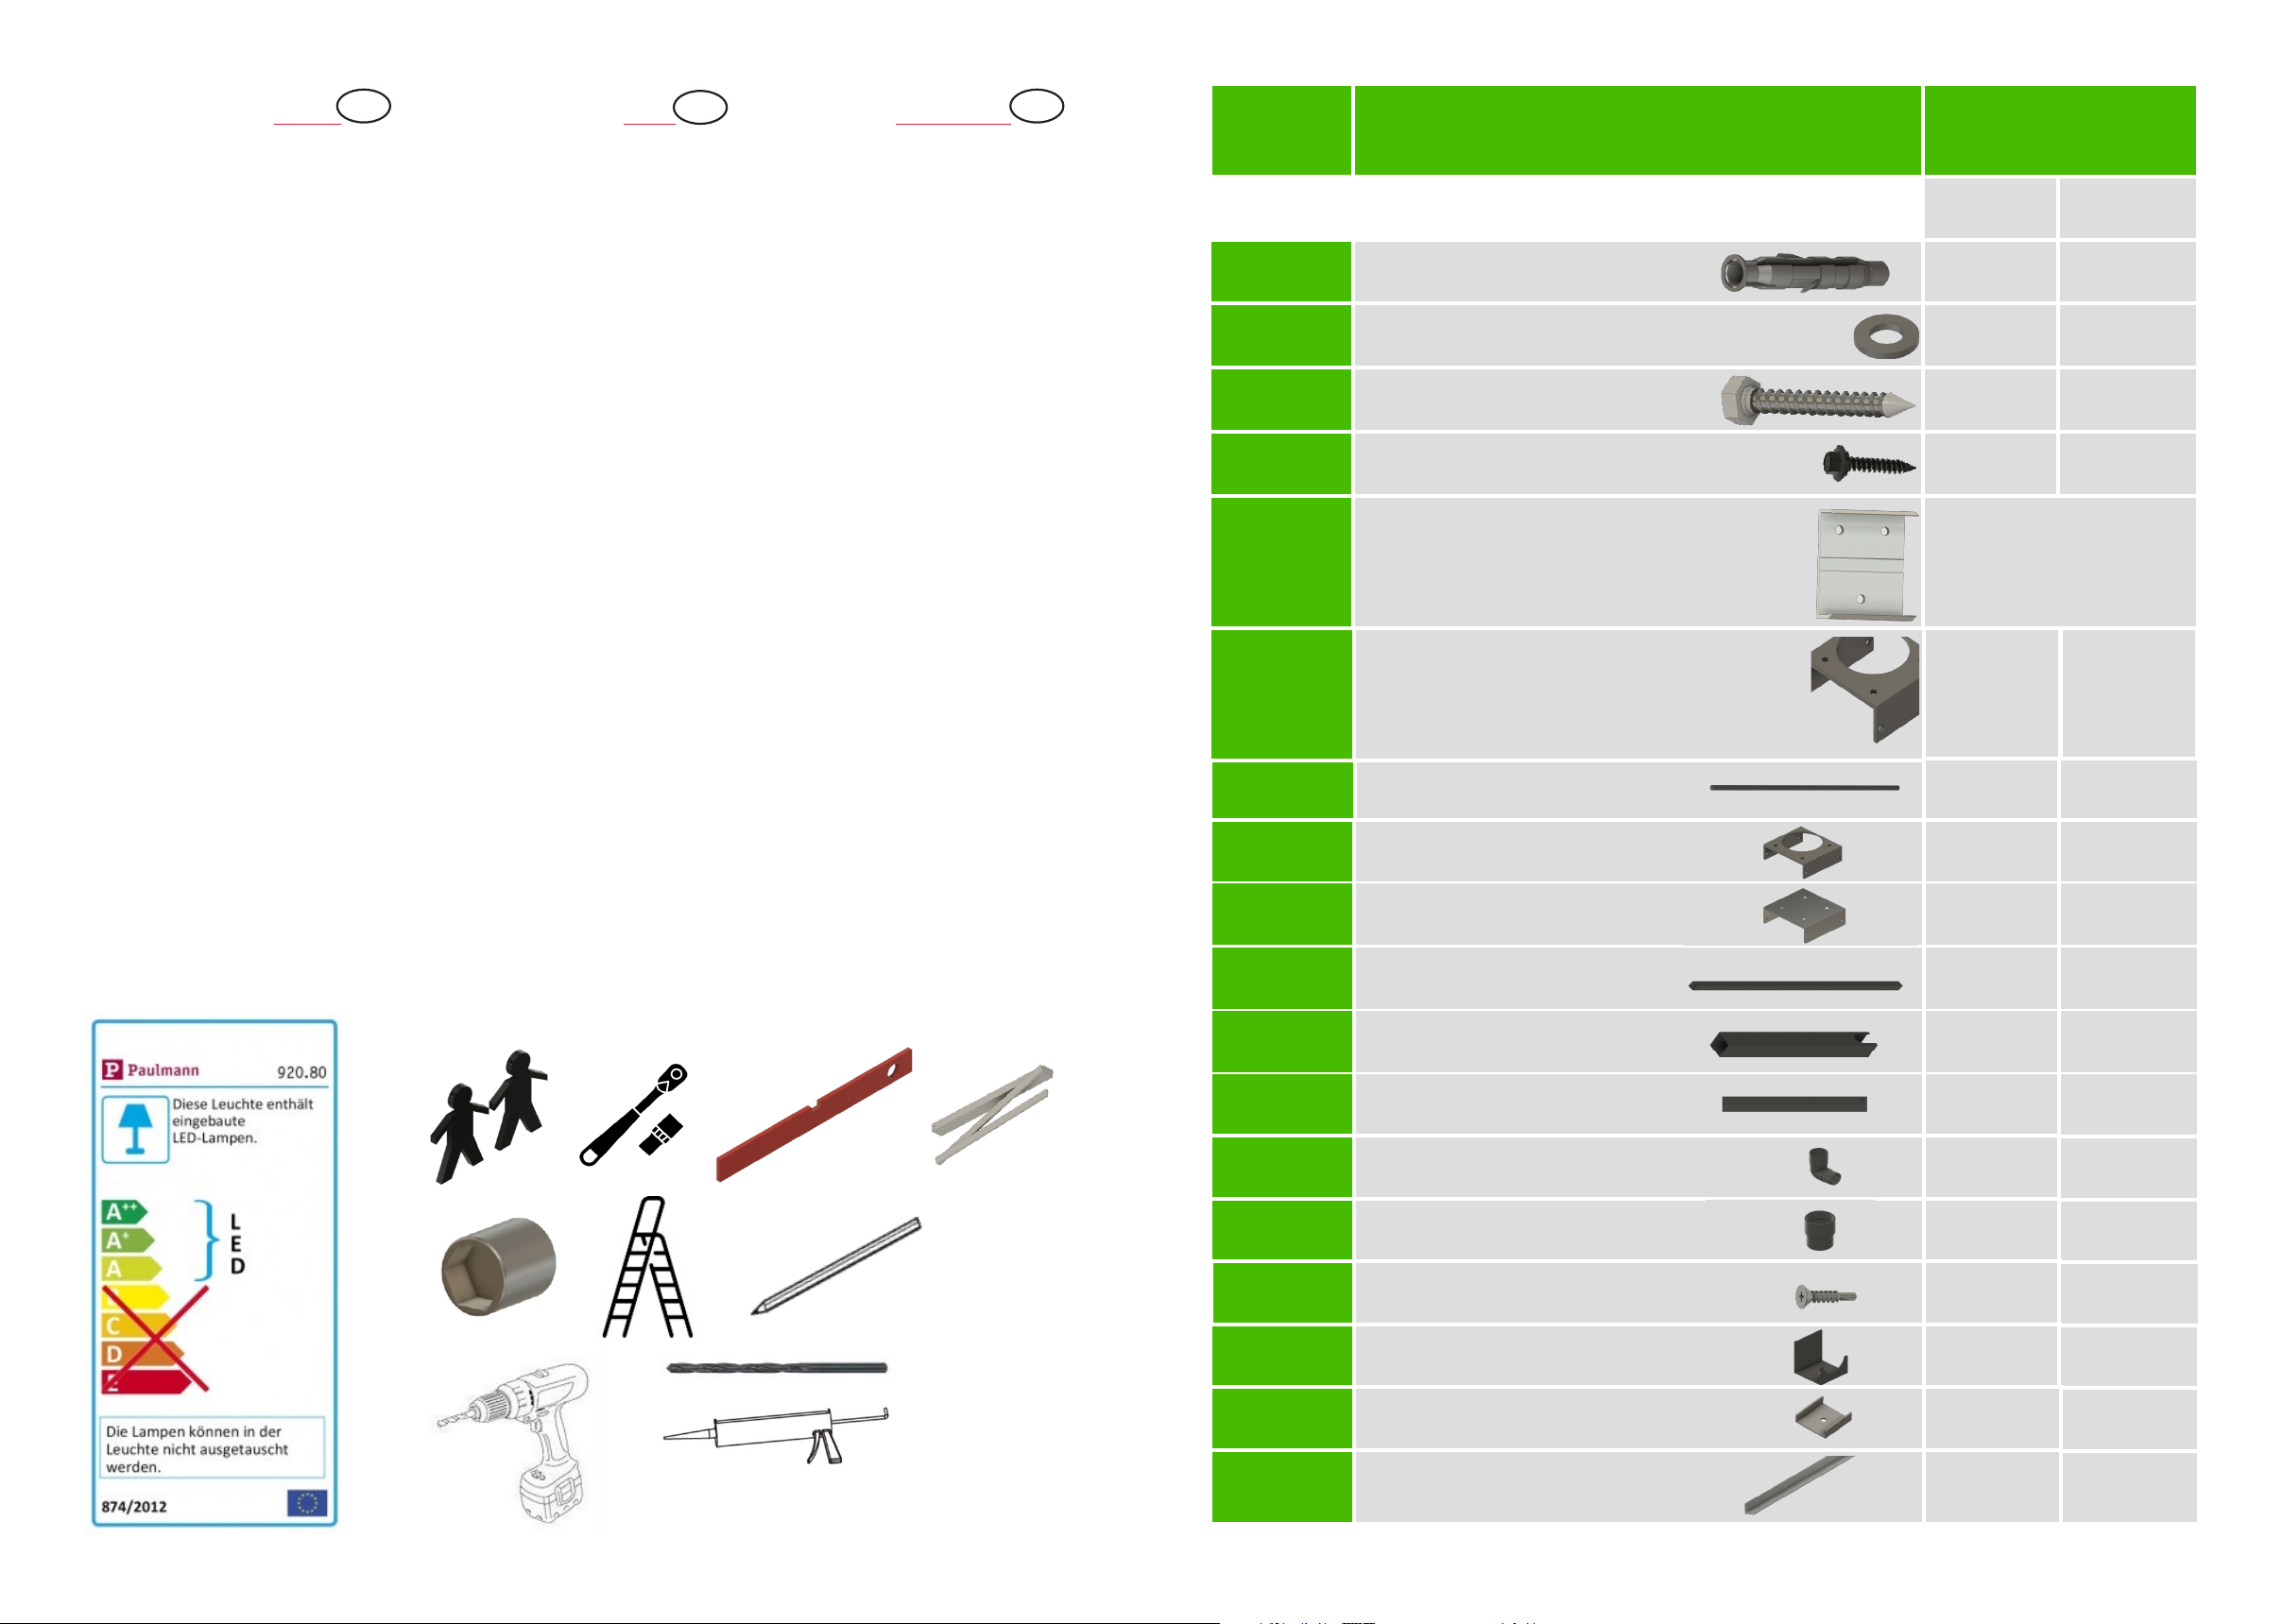
manuals.online logo
Brands
  1. Home
  2. •
  3. Brands
  4. •
  5. Gutta
  6. •
  7. Outdoor Furnishing
  8. •
  9. Gutta 7500803 User manual

Gutta 7500803 User manual

1
Montageanleitung
Assembly instructions
Instructions de montage
Nr.: 9219121
Rechteckvordach BS Plus 250 mit Seitenblende + PfostenRechteckvordach BS Plus 250 mit Seitenblende + Pfosten
oder 2 Pfostenoder 2 Pfosten
Artikel 7500803 - 7500832Artikel 7500803 - 7500832
D
GB
F
23
Nr.
No.
No.
Bezeichnung
Designation
Désignation
Stück
Pieces
Piéces
1. Dübel Ø 12 mm
Plugs Ø 12 mm
BS plus 250
mit 2 Pfosten
BS plus 250
mit Seitenteil und
Pfosten
9 15
2. U-Scheibe
Washers 9 15
3. Schraube 10 x 80 mm
Screw 10 x 80 mm 9 15
4. Metallschraube 4,8 x 35 mm
Metal srew 4,8 x 35 mm 24 36
5.
Wandhalter 110 x 137 mm
Wall bracket 110 x 137 mm
Support mural 110 x 137 mm 4
Recommandations
importantes !
• Avant le montage, veuillez lire exactement
les instructions de montage et vérifier s‘il n‘y
a pas de défaut ou si le produit n’a pas été
endommagé pendant le transport, car aucu-
ne responsabilité ne sera assumée pour les
pièces déjà montées.
• Vérifiez avant le montage, si le type, la di-
mension et la couleur correspondent.
• Les fabrications sur mesure ne seront pas
échangées.
• L‘auvent doit être seulement utilisé pour la
fonction prescrite, dans le cas contraire, tou-
tes
prestations de garanties seront annulées !
•
Nettoyez l‘auvent environ tous les trois mois.
Utilisez seulement des produits d‘entretien
recommandés dans le commerce (pas de ré-
curant ou de solvant). Si nécessaire, les pièces
laquées peuvent être également entretenues
avec un polish pour automobile.
• Nettoyez les gouttières régulièrement (l‘ac-
cumulation d‘eau pourrait endommager l‘au-
vent).
• Les moyens de fixation sont à adapter selon
la nature du mur. Une fixation sûre et suffisan-
te est à garantir.
• Nettoyez l‘auvent si une épaisse couche de
neige et de glace le recouvre.
• ATTENTION DANGER ! Ne montez pas sur
l‘auvent.
• Recommandation : Le montage devrait être
effectué par 2 personnes. En supplément,
vous devez étancher avec de la pâte de sili-
cone usuelle.
• L‘installation électrique doit être effectuée
ou enlevée par un électricien qualifié.
• Une fois la période de garantie légale arrivée
à son terme, cette garantie ne s’applique plus
sur les pièces d’usure.
•
Pour cet auvent, nous livrons également des
accessoires des accessoires séparés. Veuillez
vous informer auprès de votre dépositaire.
• Sous réserve de modifications de la cons-
truction.
Wichtige Hinweise!
• Vor der Montage bitte Montageanleitung
genauestens durchlesen und Produkt auf evtl.
Transportschäden bzw. Fehler überprüfen, da
für Schäden an bereits montierten Produkten
keine Haftung übernommen werden kann.
• Prüfen Sie vor dem Einbau, ob Typ, Maß und
Farbe übereinstimmen.
• Maßanfertigungen sind vom Umtausch aus-
geschlossen.
• Das Vordach darf nur für den vorgeschrie-
benen Zweck verwendet werden, anderenfalls
erlischt der Produkthaftungsanspruch!
• Reinigen Sie das Vordach bitte in Abstän-
den von ca. 3 Monaten. Verwenden Sie nur
vom Handel empfohlene Pflegemittel (keine
Scheuer- oder Lösungsmittel). Die lackierten
Teile können auch bei Bedarf mit Autopolitur
behandelt werden.
• Die Wasserabläufe sind regelmäßig zu reini-
gen (ansonsten Beschädigungsgefahr durch
Stauwasser).
• Die Befestigungsmittel sind der jeweiligen
Beschaffenheit der Wand anzupassen. Eine
ausreichende Befestigung ist zu gewährleis-
ten.
• Bei erhöhter Schnee- und Eislast ist das Vor-
dach abzuräumen.
• Achtung Unfallgefahr! Vordach ist nicht be-
gehbar.
•
Empfehlung: Die Montage sollte von zwei Per-
sonen durchgeführt werden. Zusätzlich müssen
Sie mit einem handelsüblichen Silikon abdich-
ten.
• Die Elektroinstallation muss vom Elekt-
ro-Fachmann ausgeführt oder abgenommen
werden.
• Auf Verschleißteile besteht nach Ablauf der
gesetzlichen Garantiezeit kein Garantiean-
spruch.
• Zu diesem Vordach liefern wir auch sepa-
rates Zubehör. Bitte informieren Sie sich bei
Ihrem Fachhändler.
• Änderung der Konstruktion vorbehalten.
Important
Reccommendations!
• Prior to assembly please study the assem-
bly instructions in detail and check the con-
signment for possible faulty parts or damage
during transportation. No liability will be assu-
med for damage to products already assem-
bled.
• Please check that type, dimensions and co-
lour correspond before assembly
• Custom-made parts cannot be exchanged.
• The canopy may only be used for the inten-
ded purpose, otherwise no claims for product
liability can be accepted!
•
Clean the canopy every 3 months and only
use a recommended cleaning product (no
scrubbing 0agents or solvents). If necessary,
the lacquered parts can also be treated with
with car polish.
• The water drains should be cleaned regu-
larly (in order to avoid damages caused by
accumulated water).
• In each case, the canopy fastenings must
be suitable for the construction of the wall in
question. Secure attachment must be warran-
ted.
•
Accumulated snow and ice should be remo-
ved from the canopy.
• Caution - Danger of Accident! The canopy
is not load bearing; do not climb or place your
weight on the canopy.
• Recommendation: Assembly should be car-
ried out by two persons. You must also seal
the canopy using standard commercial silico-
ne.
• The electrical installation must be carried
out or removed by a qualified electrician.
• No guarantee claims can be accepted for
parts subject to wear and tear after the statu-
tory guarantee period has expired.
• We can also supply separate accessories
for this canopy. Please ask your local trader
for further.
• The design is subject to alterations.
3/8“
Ø 3,5 mm
Ø 12,0 mm
GB
DF
7. Fallrohr 2089mm
Downpipe 2089mm 1 1
8. Befestigungswinkel
Mounting bracket 1
9. Befestigungswinkel
Mounting bracket 1 1
10. Pfosten 2000 mm
Posts 2000 mm 2 1
11. Pfosten Unterteil mit Auslauf
Post lower part with outlet 1
12. Pfosten Unterteil ohne Auslauf
Post lower part without outlet 1 1
13. Rohrbogen
Pipe bend 1
14. Rohrmuffe
Pipe socked 1
15. Senkkopfschraube 3,9x16
Countersunk screw 3,9x16 13 10
16. Befestigungswinkel
Mounting bracket 1
17. Befestigungswinkel
Mounting bracket 11
18. Alu Winkel
Aluminum uncle |Oncle en aluminium 11
6.
Wandhalter 110 x 137 mm
Wall bracket 110 x 137 mm
Support mural 110 x 137 mm
4
bereits vormontiert
bereits vormontiert
already pre-assembled
déjà préassemblé
déjà préassemblé
45
Anbaumaße BS 250 | Screw size BS 250 | Taille de vis BS 250
2211 mm
697 mm 60 mm
Mind. Höhe / min. High / hauteur minimale = 2250mm
697 mm 697 mm
19. Fugendichtband
Joint sealing tape |Bande de scellement pour joints 11
20. Dübel Ø 10 mm
Plugs Ø 10 mm |Cheville Ø 10 mm 2 1
21. U-Scheibe
Washers |Laveuse 2 1
22. Schraube 8 x 80 mm
Screw 8 x 80 mm |Vis 8 x 80 mm 2 1
67
Montage BS 250 mit Pfosten | Montage BS 250 with posts |
Instructions BS 250 avec poteaux
Montage der oberen Befestigungswinkel am Vordach
Mounting the upper mounting brackets on the canopy
Montage des supports de fixation supérieurs sur la verrière
1.
58 mm
63 mm
40 mm
40 mm
50 mm
55 mm
55 mm
50 mm
BS 250 1x 1x 7x
Montage BS 250 mit Seitenteil | Montage BS 250 with side panel |
Instructions BS 250 avec panneau latéral
Montage der oberen Befestigungswinkel am Vordach
Mounting the upper mounting brackets on the canopy
Montage des supports de fixation supérieurs sur la verrière
1.
58 mm
63 mm
40 mm
40 mm
BS 250 1x 4x
89
Befestigung von oben / at the top / Pièce jointe supérieure
Bringen Sie das Fugendichtband an den Winkel an. Bohren Sie die Löcher mit einem
Bohrer 3,5mm vor. Setzten Sie die Schrauben wie angezeigt.
Attach the combination strap to the angle. Drill the holes with a 3.5mm drill bit.
Insert the screws as shown.
Fixez la sangle combinée à la cornière. Percez les trous avec une mèche de 3,5 mm.
Insérez les vis comme indiqué.
Montage BS 250 mit Pfosten |
Montage BS 250 with posts |
Instructions BS 250 avec poteaux
Montage BS 250 mit Seitenteil |
Montage BS 250 with side panel |
Instructions BS 250 avec panneau latéral
Abziehen des LED Panels und das Stromkabel durch das Vordach ziehen.
Disconnect the LED panel and pull the power cable through the canopy.
Débranchez le panneau DEL et tirez le câble d‘alimentation à travers la verrière.
2. 4. Befestigung von unten / Fastening from below / Fixation par le bas
1. Bohren Sie die Löcher mit einen Bohrer 3,5mm vor / Pre-drill the holes with a
3.5mm drill bit / Pré-percer les trous avec une mèche de 3,5 mm
2. Setzen Sie die Schrauben wie angezeigt / Insert the screws as indicated / Insert rer les vis comme indi
qué
BS 250 6x
5. Klemmen Sie das LED Panel an das Stromkabel an und befestigen Sie dieses wieder am
Vordach /
Connect the LED panel to the power cable and reattach it to the canopy /
Connectez le panneau DEL au câble d‘alimentation et rebranchez-le à la verrière
Montage BS 250 mit Pfosten |
Montage BS 250 with posts |
Instructions BS 250 avec poteaux
Montage BS 250 mit Seitenteil |
Montage BS 250 with side panel |
Instructions BS 250 avec panneau latéral
3.
BS 160 12x
BS 200 16x
BS 160 | BS 200 1x
Neigung | Pitch | pente de toit | Helling
max. 0,5%
bereits vormontiert
bereits vormontiert
already pre-assembled
déjà préassemblé
déjà préassemblé
reeds voorgemonteerd
Neigung | Pitch | pente de toit | Helling
max. 0,5%
Auf der Seite, wo das Seitenteil montiert wird, bitte die Senkkopfschauben (2x) verwenden.
On the side where the side panel will be mounted, please use the countersunk screws (2x).
Du côté où le panneau latéral est monté, veuillez utiliser les vis à tête fraisée (2x).
Aan de kant waar het zijpaneel wordt gemonteerd, gebruikt u de verzonken schroeven (2x).
10 11
6. Montage Pfosten mit Entwässerung / Mounting post with drainage /
Poteau de montage avec drainage
B
A
AUntere Befestigungspunkt für Befestigungswinel mittels eines Pendels ausjustieren.
Anschließend Befestigungswinkel auf dem Boden verschrauben.
Adjust the lower fixing point for the mounting bracket using a pendulum. Then
screw the fixing bracket to the floor.
Régler le point de fixation inférieur de l‘étrier de fixation à l‘aide d‘un pendule. Ensui-
te, vissez l‘étrier de fixation au sol.
BS 250 1x
Pendel
Pendulum
Pendule
/ C
115 mm985 mm985 mm
87 mm
1. Setzten Sie die Seitenblende auf die Winkel und 2. Schieben Sie die Seitenblende an das Vordach
1. Place the side panel on the brackets and 2. slide the side panel onto the canopy
1. placer le panneau latéral sur les supports et 2. glisser le panneau latéral sur la verrière
6.
1.
2.
1.
2.
Montage BS 250 mit Pfosten | Montage BS 250 with posts |
Instructions BS 250 avec poteaux
Montage BS 250 mit Seitenteil | Montage BS 250 with side panel |
Instructions BS 250 avec panneau latéral
Setzten Sie den Pfosten mit dem Fallrohr, dem Pfosten Unterteil und dem Rohrbo-
gen zusammen.
Assemble the post with the downpipe, the lower part of the post and the pipe bend.
Assemblez le poteau avec le tuyau de descente, la partie inférieure du poteau et le
coude du tuyau.
Stecken Sie das Fallrohr und den Rohrbogen zusammen. Setzten Sie dies auf den
unteren Befestigungspunkt. Die Differenz, welche über das Vordach steht muss ab-
gesägt werden. Tipp: Rohr und Rohrbogen müssen stramm zwischen Vordach und
Halter sitzen.
Push the downpipe and the pipe bend together. Place this on the lower fixing point.
Cut off the difference above the canopy. Tip: Pipe and pipe bend must sit tightly
between canopy and bracket.
Poussez le tuyau de descente et le tuyau plier ensemble. Placez-le sur le point de
fixation inférieur. Coupez la différence au-dessus de la verrière. Conseil : Le tuyau et
le coude du tuyau doivent être bien serrés entre la verrière et le support.
BS 250 je 1x
8x80 M10
!OBEN | Top | Top
12 13
CSetzten Sie den Rohrbogen auf den Winkel auf und schieben Sie das
Pfosten Unterteil nach unten. Verschrauben Sie den Pfosten mit dem
Winkel und das Pfosten Oberteil mit dem Pfosten Unterteil (kleines
Bild).
Place the pipe bend on the angle and slide the lower part of the post
down. Screw the post to the bracket and the post top to the post
bottom (small picture).
Placez le coude du tuyau sur l‘angle et faites glisser la partie inférieure
du poteau vers le bas. Vissez le poteau au support et le haut du pote-
au au bas du poteau (petite photo).
BS 160 8x
BS 200 8x
Befestigung / Fasting / Attachement
1. Bohren Sie die Löcher mit einen Bohrer 3,5mm vor / Pre-drill the holes with a
3.5mm drill bit / Pré-percer les trous avec une mèche de 3,5 mm
2. Setzen Sie die Schrauben wie angezeigt / Insert the screws as indicated /
Insert rer les vis comme indiqué
6.
BS 250 12x
Montage BS 250 mit Pfosten | Montage BS 250 with posts |
Instructions BS 250 avec poteaux
Montage BS 250 mit Seitenteil | Montage BS 250 with side panel |
Instructions BS 250 avec panneau latéral
BSetzten Sie den eben zusammen gesteckten Pfosten auf den oberen Befestigungs-
winkel und verschrauben Sie diesen.
Place the post, which has just been assembled, on the upper mounting bracket and
screw it together.
Placez le poteau qui vient d‘être assemblé sur le support de montage supérieur et
vissez-le ensemble.
BS 250 8x
14 15
7. Montage Pfosten ohne Entwässerung / Mounting post without drainage /
Poteau de montage sans drainage
B
A
Pendel
Pendulum
Pendule
/ C
AUntere Befestigungspunkt für Befestigungswinel mittels eines Pendels ausjustieren.
Anschließend Befestigungswinkel auf dem Boden verschrauben.
Adjust the lower fixing point for the mounting bracket using a pendulum. Then
screw the fixing bracket to the floor.
Régler le point de fixation inférieur de l‘étrier de fixation à l‘aide d‘un pendule. Ensui-
te, vissez l‘étrier de fixation au sol.
BS 250 1x
Setzten Sie das Pfosten Oberteil mit dem Pfosten Unterteil zusammen. Je nach
Montagehöhe des Vordaches muss der Pfosten und das Fallrohr gekürzt werden.
Assemble the post top part with the post bottom part. Depending on the installation
height of the canopy, the post and the downpipe must be shortened.
Assemblez la partie supérieure du poteau avec la partie inférieure du poteau. En
fonction de la hauteur d‘installation de la verrière, le poteau et le tuyau de descente
doivent être raccourcis.
B
A
Pendel
Pendulum
Pendule
/ C
BSetzten Sie den eben zusammen gesteckten Pfosten auf den oberen Befestigungs-
winkel und verschrauben Sie diesen.
Place the post, which has just been assembled, on the upper mounting bracket and
screw it together.
Placez le poteau qui vient d‘être assemblé sur le support de montage supérieur et
vissez-le ensemble.
BS 250 8x
CSetzten Sie das Pfostenunterteil auf den Winkel auf. Verschrauben Sie
den Pfosten mit dem Winkel und das Pfosten Oberteil mit dem Pfos-
ten Unterteil (kleines Bild).
Place the lower part of the post on the angle. Screw the post to the
bracket and the post top to the post bottom (small picture).
Placez la partie inférieure du poteau sur l‘angle. Vissez le poteau au
support et le haut du poteau au bas du poteau (petite photo).
BS 250 8x
8. Setzen Sie eine Silikonfuge zwischen Wand und Vordach /
Place a silicone joint between wall and canopy /
Placer un joint en silicone entre le mur et la verrière
Montage BS 250 mit Pfosten |
Montage BS 250 with posts |
Instructions BS 250 avec poteaux
Montage BS 250 mit Seitenteil |
Montage BS 250 with side panel |
Instructions BS 250 avec panneau latéral
Montage BS 250 mit Pfosten |
Montage BS 250 with posts |
Instructions BS 250 avec poteaux
Montage BS 250 mit Seitenteil |
Montage BS 250 with side panel |
Instructions BS 250 avec panneau latéral
BS 250 je 1x
8x80 M10
16
www.gutta.com
Gutta Werke GmbH
Bau- und Heimwerkerprodukte
Bahnhofstraße 51
-
57
D-77746 Schutterwald
Telefon 0781 6090
Telefax 0781 6093200
[email protected]
www.scobalit.de
Scobalitwerk Wagner GmbH
Zürnkamp 27
D-21217 Seevetal-Meckelfeld
Telefon 040 2190210
Telefax 040 70011446
[email protected]
Scobalitwerk Wagner GmbH
Industriepark 3
D-97273 Kürnach
Telefon 09367 98440
Telefax 09367 984429
[email protected]
Scobalitwerk Wagner GmbH
Hermann-Ilgen-Straße 7
D-04808 Wurzen
Telefon 03425 814708
Telefax 03425 814709
[email protected]
Scobalitwerk Wagner GmbH
Buchenstraße 1
D-56584 Anhausen
Telefon 02639 962570
Telefax 02639 962571
[email protected]
Hohlkammerplatten Profilplatten
Paneele Ebene Platten
Hobbyplatten Effektplatten
Vordächer Terrassendächer
Bitumenwellplatten Noppenbahn
GartenprodukteRasengitter
Produktübersicht / Product range / Gamme de produits
Scobalitwerk Wagner GmbH
Bahnhofstraße 51-57
D-77746 Schutterwald
Telefon 0781-9907900
Telefax 0781-6093207
offenbur[email protected]
D - 04/21 - 200- Montageanleitung-Nr.: 9219121

This manual suits for next models

1

Other Gutta Outdoor Furnishing manuals

Gutta 4295301 User manual

Gutta

Gutta 4295301 User manual

Gutta 4295021 User manual

Gutta

Gutta 4295021 User manual

Gutta 7500703 User manual

Gutta

Gutta 7500703 User manual

Gutta BS Plus 160 User manual

Gutta

Gutta BS Plus 160 User manual

Gutta BS Plus 160 User manual

Gutta

Gutta BS Plus 160 User manual

Gutta 7500015 User manual

Gutta

Gutta 7500015 User manual

Gutta BS Plus 160 User manual

Gutta

Gutta BS Plus 160 User manual

Gutta Premium Carport 4296203 User manual

Gutta

Gutta Premium Carport 4296203 User manual

Gutta 4295003 User manual

Gutta

Gutta 4295003 User manual

Gutta BS Timber-Line 160 User manual

Gutta

Gutta BS Timber-Line 160 User manual

Gutta BS 160 User manual

Gutta

Gutta BS 160 User manual

Gutta Timber 160 User manual

Gutta

Gutta Timber 160 User manual

Gutta 7500015 User manual

Gutta

Gutta 7500015 User manual

Gutta 4295003 User manual

Gutta

Gutta 4295003 User manual

Gutta BS 160 User manual

Gutta

Gutta BS 160 User manual

Gutta BS 160 User manual

Gutta

Gutta BS 160 User manual

Popular Outdoor Furnishing manuals by other brands

Outsunny 84B-247 manual

Outsunny

Outsunny 84B-247 manual

True Value A102020300 Assembly instructions

True Value

True Value A102020300 Assembly instructions

ISLAND RETREAT EZ-CARE TEK-WOOD NU3222 Assembly instructions

ISLAND RETREAT

ISLAND RETREAT EZ-CARE TEK-WOOD NU3222 Assembly instructions

MANGA STREET SCOOPI SEAT manual

MANGA STREET

MANGA STREET SCOOPI SEAT manual

Sunjoy A102012900 Assembly instruction

Sunjoy

Sunjoy A102012900 Assembly instruction

Costway HW64563YE user manual

Costway

Costway HW64563YE user manual

Sojag 500-4155945 owner's manual

Sojag

Sojag 500-4155945 owner's manual

Broyhill A104002101 Assembly instructions

Broyhill

Broyhill A104002101 Assembly instructions

OVE FRANKLIN 3 Assembly instructions

OVE

OVE FRANKLIN 3 Assembly instructions

Keter LOUNGE SET Assembly instructions

Keter

Keter LOUNGE SET Assembly instructions

Premium Poly Patios Skyline SK-0402-36 Assembly instructions

Premium Poly Patios

Premium Poly Patios Skyline SK-0402-36 Assembly instructions

Sunjoy D-PB002PCO ASSEMBLY INTRUCTION

Sunjoy

Sunjoy D-PB002PCO ASSEMBLY INTRUCTION

Prodesign Furniture Emeria 4pce Outdoor set Assembly instruction

Prodesign Furniture

Prodesign Furniture Emeria 4pce Outdoor set Assembly instruction

real living GB23-001-2 Assembly instructions

real living

real living GB23-001-2 Assembly instructions

HUTTON Avon Corner Arbour Assembly instructions

HUTTON

HUTTON Avon Corner Arbour Assembly instructions

Blooma Gabbs 3663602723349 quick start guide

Blooma

Blooma Gabbs 3663602723349 quick start guide

FREETIME FUN FEELIN GROOVY PT2550T quick start guide

FREETIME FUN

FREETIME FUN FEELIN GROOVY PT2550T quick start guide

Extremis Hopper Picnic manual

Extremis

Extremis Hopper Picnic manual

manuals.online logo
manuals.online logoBrands
  • About & Mission
  • Contact us
  • Privacy Policy
  • Terms and Conditions

Copyright 2025 Manuals.Online. All Rights Reserved.