manuals.online logo
Brands
  1. Home
  2. •
  3. Brands
  4. •
  5. GYS
  6. •
  7. Inverter
  8. •
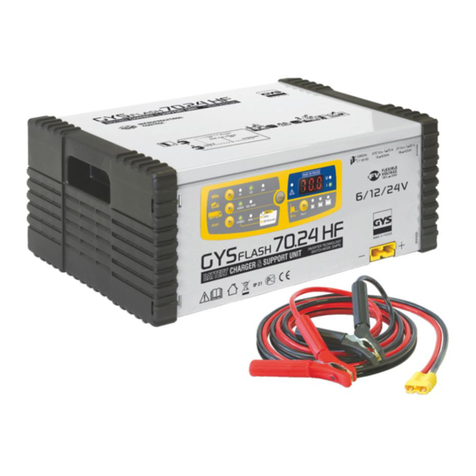
  9. GYS Gysflash 70-24 HF User manual

GYS Gysflash 70-24 HF User manual

Other manuals for Gysflash 70-24 HF

2

Other GYS Inverter manuals

GYS CUTTER 21 User manual

GYS

GYS CUTTER 21 User manual

GYS PSW 6042U User manual

GYS

GYS PSW 6042U User manual

GYS Gyspot BP.LC-S7-230V User manual

GYS

GYS Gyspot BP.LC-S7-230V User manual

GYS INVERTER 3200 User manual

GYS

GYS INVERTER 3200 User manual

GYS PSW8300 User manual

GYS

GYS PSW8300 User manual

GYS GYSmi 125 User manual

GYS

GYS GYSmi 125 User manual

GYS Cutter Inverter 25K User manual

GYS

GYS Cutter Inverter 25K User manual

GYS Greenline Inverter 5000 User manual

GYS

GYS Greenline Inverter 5000 User manual

GYS GYSMI 80P User manual

GYS

GYS GYSMI 80P User manual

GYS MSW 82000 User manual

GYS

GYS MSW 82000 User manual

GYS PSW 601 W User manual

GYS

GYS PSW 601 W User manual

GYS GYSpot EVOLUTION PTI-s7 -400V User manual

GYS

GYS GYSpot EVOLUTION PTI-s7 -400V User manual

GYS GYSFLASH 30.12 HF User manual

GYS

GYS GYSFLASH 30.12 HF User manual

GYS PTI.G User manual

GYS

GYS PTI.G User manual

GYS CONVERGYS 300 User manual

GYS

GYS CONVERGYS 300 User manual

GYS PSW 600 W User manual

GYS

GYS PSW 600 W User manual

GYS CUTTER 21 User manual

GYS

GYS CUTTER 21 User manual

GYS MAGYS 400-4 User manual

GYS

GYS MAGYS 400-4 User manual

GYS PSW 6042U User manual

GYS

GYS PSW 6042U User manual

GYS PSW 6043U User manual

GYS

GYS PSW 6043U User manual

GYS Gysflash 70-24 HF User manual

GYS

GYS Gysflash 70-24 HF User manual

GYS CONVERGYS 150 User manual

GYS

GYS CONVERGYS 150 User manual

GYS GySpot GY 019652 User manual

GYS

GYS GySpot GY 019652 User manual

Popular Inverter manuals by other brands

Omnik New Energy Omniksol-1.5k-TL user manual

Omnik New Energy

Omnik New Energy Omniksol-1.5k-TL user manual

Agilent Technologies 33250A user guide

Agilent Technologies

Agilent Technologies 33250A user guide

4-noks ZR-SWITCH-RC instruction manual

4-noks

4-noks ZR-SWITCH-RC instruction manual

V&T V5 Series user manual

V&T

V&T V5 Series user manual

Hon Turing HT-T-S1000-12 introduction

Hon Turing

Hon Turing HT-T-S1000-12 introduction

Metabo E 140 SP Plus Original operating instructions

Metabo

Metabo E 140 SP Plus Original operating instructions

BARRON EXITRONIX Tucson Micro Series installation instructions

BARRON

BARRON EXITRONIX Tucson Micro Series installation instructions

Baumer HUBNER TDP 0,2 Series Mounting and operating instructions

Baumer

Baumer HUBNER TDP 0,2 Series Mounting and operating instructions

electroil ITTPD11W-RS-BC Operation and Maintenance Handbook

electroil

electroil ITTPD11W-RS-BC Operation and Maintenance Handbook

Silicon Solar TPS555-1230 instruction manual

Silicon Solar

Silicon Solar TPS555-1230 instruction manual

Mission Critical Xantrex Freedom SW-RVC owner's guide

Mission Critical

Mission Critical Xantrex Freedom SW-RVC owner's guide

HP 3312A Operating and service manual

HP

HP 3312A Operating and service manual

Hoymiles HM-500T user manual

Hoymiles

Hoymiles HM-500T user manual

Nitecore SPM10 user manual

Nitecore

Nitecore SPM10 user manual

AEG Protect PV installation manual

AEG

AEG Protect PV installation manual

On Board TruePower Plus 1200MS owner's manual

On Board

On Board TruePower Plus 1200MS owner's manual

Plugreen PGM-200P-230 Installation and operation manual

Plugreen

Plugreen PGM-200P-230 Installation and operation manual

Fourgroup Easy use and Programming Handbook

Fourgroup

Fourgroup Easy use and Programming Handbook

manuals.online logo
manuals.online logoBrands
  • About & Mission
  • Contact us
  • Privacy Policy
  • Terms and Conditions

Copyright 2025 Manuals.Online. All Rights Reserved.

Instore "130"you
canfind and buy almostall necessarygoodsforyourauto
in
Kyiv and othercities,deliveryby ground andpostal services. Ourexperienced
consultantswill provide youwithexhaustive informationand helpyoutochose
the very particular thing.We arewaiting foryou at the address
http://130.com.ua
PHONES
(044) 338-0-130
(050) 332-0-130
(063) 577-0-130
(067) 353-0-130
Internet storeof
autogoods
CARRECEIVERS —Receivers •Mediareceiversandstations•Nativereceivers •CD/DVD changers •FM-modulators/USBadapters•Flashmemory•Faciaplates and adapters •Antennas •Accessories |
CARAUDIO —Car audiospeakers •Amplifiers•Subwoofers •Processors•Crossovers •Headphones•Accessories|TRIPCOMPUTERS —Universalcomputers •Modelcomputers •Accessories|
GPSNAVIGATORS —PortableGPS•Built-in GPS•GPSmodules •GPStrackers •Antennas forGPSnavigators•Accessories|VIDEO —DVR •TVsetsand monitors•Car TVtuners•Cameras •Videomodules
•Transcoders •Car TVantennas•Accessories|SECURITYSYSTEMS —Car alarms •Bikealarms •Mechanicalblockers •Immobilizers •Sensors •Accessories |OPTICANDLIGHT —Xenon•Bixenon •Lamps
•LED •Stroboscopes •OpticandHeadlights •Washers •Light,rainsensors •Accessories |PARKTRONICS ANDMIRRORS —Rear parktronics•Frontparktronics •Combined parktronics •Rear-viewmirrors
•Accessories |HEATINGANDCOOLING —Seat heaters •Mirrorsheaters •Screen-wipers heaters •Engineheaters •Auto-refrigerators •Airconditioningunits •Accessories |TUNING —Vibro-isolation
•Noise-isolation •Tintfilms •Accessories |ACCESSORIES —Radar-detectors•Handsfree,Bluetooth•Windowlifters•Compressors •Beeps,loudspeakers •Measuring instruments •Cleaners •Carsits
•Miscellaneous|MOUNTING —Installationkits •Upholstery•Grilles•Tubes•Cableand wire •Tools•Miscellaneous|POWER —Batteries •Converters •Start-chargingequipment•Capacitors
•Accessories |MARINE AUDIOANDELECTRONICS —Marinereceivers•Marineaudiospeakers •Marinesubwoofers •Marineamplifiers•Accessories |CARCARE PRODUCTS —Additives •Washer fluid •
Care accessories •Car polish •Flavors •Adhesives andsealants |LIQUIDANDOIL —Motoroil•Transmissionoil •Brakefluid •Antifreeze•Technicallubricant
SKYPE
km-130
TABLE OF CONTENTS
GENERAL DESCRIPTION ....................................... 11
START UP .............................................................. 11
CHARGE MODE ...................................................... 12
POWER SUPPLY MODE/DIAGNOSIS ..................... 14
SETTINGS MENU ................................................... 16
PROTECTION......................................................... 17
TROUBLESHOOTING ............................................. 17
WARNINGS........................................................... 19
DECLARATION OF COMPLIANCE .......................... 19
BATTERY COMBINATIONS ................................... 46
SYMBOLS............................................................... 46
TECHNICAL FEATURES .......................................... 47
CONTROL PANEL ................................................... 47
Autogoods “130”
130.com.ua
11
Inverter 70



24 HF
This manual contains safety and operating instructions. Read it carefully before using the charger
for the first time and keep it in a safe place for any future reference.
GENERAL DESCRIPTION
The Inverter 70-24 F is a high powered stabilised power supply incorporating SMPS (Switch Mode
Power Supply) technology.
Designed to sustain 6V, 12V & 24 V batteries (liquid or gel) for vehicles during diagnostic work, and
will ensure an ideal charging cycle for battery maintenance for the most modern vehicles.
Inverter 70.24 F has 2 modes :
- Charge Mode: to charge liquid or gel electrolyte (lead, lead Calcium, lead Calcium-Silver, AGM)
•Starter batteries :
- from 10Ah to 850Ah in 6/12V (3/ 6 elements of 2V).
- from 10Ah to 425Ah in 24V (12 elements of 2V).
•Lead traction batteries :
- From 45Ah to 450Ah suitable for 6 or 12V batteries (6 elements of 2V)
- From 45 to 225Ah suitable for 24V batteries (12 elements of 2V)
- « Diagnostic » Mode: on a stationary vehicle, the INVERTER 70 F supplies up to 70A in 12V
and up to 35A in 24V to ensure compensation for the current used by high-energy consumers
(engine fan, window regulator, electronic suspension, etc) during testing.
This mode is recommended for use during battery replacement. The machine ensures a
stabilised power supply to the vehicle during battery replacement to preserve memory settings.
START UP
1. Connect the charger to the mains.
Mains voltage automatically adaptable for all countries from 100V
to 240V (50/60 z)
2. Switch « ON ».
The machine will display GYS Px.x ».
3. Select the required mode.
If no modes are selected, the charger will default to the last
settings used. (Except for SOS Recovery and traction battery
modes)
Automatic diagnostics of cables (if worn out or modified)
After 360 charge cycles, the Inverter 70-24 F offers to check and calibrate the cables if needed:
« CAL ». This message is displayed for 10 seconds and every 30 starts until the user launches the
checking operation (start button). For more information on this mode, please refer to the sub menu
« check cables » page 16.
Autogoods “130”
130.com.ua
12
Inverter 70



24 HF
CHARGE MODE
Starter batteries
Ensure that the correct sequence is followed:
Precaution: Check the electrolyte level for open batteries. Fill if necessary.
1. Select « C ARGE » mode
2. Select the voltage of the battery (6 / 12 / 24V)
3. Select the type of battery (liquid or gel):
Liquid: Lead, lead calcium, lead calcium silver,
Gel: Gel batteries, AGM, maintenance free batteries
4.
Connect the clamps: Red clamp on the "+" battery terminal, and black clamp on the
"-" terminal
5. Press « Start/Stop »
6. Before beginning the charge, the Inverter 70 F analyses the battery
voltage/condition and will indicate its status (See the TROUBLES OOTING section).
The charger detects a battery with a voltage above 1,3 V.
7. If the machine detects that the voltage is different from the one selected, it offers to
modify it. Press OK to confirm the new settings (flashing LED) or push the “Start”
button for 3 seconds if you prefer to keep the current settings.
The 70-24 will automatically detect if the battery is sulphated, and the SOS
Recovery LED will flash, and a warning buzzer will sound. More information is
available in the de-sulfation chapter. For other anomalies, please consult the
TROUBLES OOTING section.
8. During the charge, the Inverter 70 F display alternates between the current ("I"
LED illuminated: Ampere) and the charge voltage ("U" LED illuminated: Volts)
9. At the end of the charge :
a. If the « Floating » option "FLt" is not activated (see page 16), the Inverter 70 F
displays « END » and will discontinue charging.
b. If the « Floating » option is activated (see page 16), the Inverter 70 F will display
« END » whilst maintaining the charge.
NB : When the charge ends, if the battery remains connected, the Inverter 70 F
starts again, providing, if necessary, a charge cycle to compensate for the automatic
discharge of the battery.
10. Press « Start/Stop »
11.Switch « OFF ».
12. Unplug the power supply cable first, then disconnect the clamps
Autogoods “130”
130.com.ua
13
Inverter 70



24 HF
Traction batteries
1. Choose the charging speed according to the capacity (Ah) indicated on your battery.
(Press and hold for 5 seconds)
2. Select the voltage of the battery (6 / 12 / 24V)
3. Select the type of battery (liquid or gel):
Liquid: Lead, lead calcium, lead calcium silver,
Gel: Gel batteries, AGM, maintenance free batteries
4. Connect the clamps: Red clamp on the "+" battery terminal, black clamp on the "-"
battery terminal
5. Press « Start/Stop »
6. Before beginning the charge, the Inverter 70.24 F analyses the battery
voltage/condition and will indicate its status (see the TROUBLES OOTING section):
If the machine detects that the voltage is different from the one selected, it offers to
modify it. Press OK to confirm the new settings (flashing LED) or push the “Start”
button for 3 seconds if you prefer to keep the current settings (non-flashing LED).
7. During the charge, the Inverter 70 F display alternates between the current ("I" LED
illuminated: Ampere) and the charge voltage ("U" LED illuminated: Volts).
8. Once the battery has been charged, if the battery remains connected for more than 48
hours, the Inverter 70 F will automatically restart a charge cycle to compensate for
the automatic discharge of the battery.
9. Press « Start/Stop » button
10. Switch « OFF ».
11.Unplug the power supply cable first and then disconnect the clamps.
Autogoods “130”
130.com.ua
14
Inverter 70



24 HF
SOS Recovery
This feature is designed for starter batteries.
Once a battery is connected, the Inverter 70 F will analyse the battery status. If after a few seconds
the machine detects a sulphated battery, the "SOS Recovery" LED will flash, and a warning buzzer will
sound - this means that your battery has been deeply discharged for a long time and has started a
sulfation process. The Inverter 70 F will offer to start the SOS Recovery function to desulphate the
battery.
To activate this function, follow the correct sequence below:
1. The vehicle battery MUST be disconnected
(DANGER - IG VOLTAGE RISK)
2. Push the SOS Recovery button for 5 seconds to initiate the desulphation process.
The machine will then display “SOS”.
3. During the SOS Recovery procedure (desulphation + full charging), the Inverter
70 F display alternates between the current ("I" LED illuminated: Ampere) and
the charge voltage ("U" LED illuminated: Volts).
4. At the end of SOS Recovery (16 max) :
a. If the « Floating » option is not activated (refer to page 14) the Inverter 70 F
displays « END ».
b. If the « Floating » option is activated (refer to page 14) the Inverter 70 F
displays « END » whilst maintaining the charge.
POWER SUPPLY MODE/DIAGNOSIS
On a stationary vehicle, the INVERTER 70 F supplies up to 70A in 12V and up to 35A in 24V to
ensure compensation for the current used by high-energy consumers (engine fan, window regulator,
electronic suspension, etc).
Changing batteries:
DIAGNOSIS mode also enables the Inverter 70 F to ensure a stabilised power supply while changing
the battery, in order to prevent the loss of electronic data and memory settings.
“Diag +” feature (12V Batteries only)
The « Diag + » feature allows the user to specify the voltage delivered to the battery where a value
other than 13.5V is required (according to the manufacturers specifications).
NB1: before using the diag + mode: If the screen displays a current higher than 10A it
indicates the battery is discharged. In this case your 70HF will start charging it
automatically. Check all electrical consumers are switched off on your vehicle. Wait until
the current falls below 10A and then re-launch Diag+
NB2: When the user exits Diag+ mode the selected voltage setting will not be saved and
will revert back to 13.5V (default).
Autogoods “130”
130.com.ua
15
Inverter 70



24 HF
Using Diagnostic Mode:
Ensure the correct sequence is followed:
1. Select « DIAG » mode
DIAG + only : Press and hold again the MODE button for 5 seconds. Inverter will
display the voltage previously defined in the settings menu.
2. Connect the red clamp to the lugs connected to the “+” terminal of the battery and
the black clamp to the lugs connected to the “–” terminal of the battery.
3. Press « START »
4. During the process, the instantaneous current consumption is displayed.
5. Press “START/STOP”
6. When the process has finished, turn the machine OFF,
7. Unplug the power supply cable, and disconnect the battery clamps.
Use during battery replacement
Ensure the correct sequence is followed
1. Select « DIAG » mode
2. Connect as follows:
a. The black "-" clamp to the vehicle chassis.
b. The Red "+" clamp to the end of the lug connected to the "+" battery terminal, in
such a way that the battery can be changed without disconnecting the clamp.
3. Press « START » to activate the mode
4. During the process, the instantaneous current consumption is displayed.
5. Change the battery, ensuring that the polarity is correct
CAUTION: while exchanging the batteries, be careful not to disconnect the
charging clamps as this can cause loss of electronic data.
6. After changing, press « Start/Stop »
7. Unplug the power cable.
8. Unplug the clamps or the connector from the battery.
Autogoods “130”
130.com.ua
16
Inverter 70



24 HF
SETTINGS MENU
1. To access the Settings Menu
Press and hold « START » for 5 seconds.
2. Navigation :
To scroll through the sub menus, and confirm the sub menu settings.
The sub menus appear in the following order:
Timer "00 "  Cables Testing "CAL"  Charge End "FLt" 
Restart "LP"  DIAG + "13.5"
To select or modify the values in each sub menu.
NB. For the Timer sub menu: To modify the settings quickly, press and hold.
Press Start to confirm and exit the « settings » menu, in « Cable Test
"CAL" » Start will launch the function.
Sub menus :
Timer "00H":
Maximum value : 24 hours (displays eg : 24 )
Minimum value : 00 = no delay set
To set the timer, scroll through using the Voltage Selection button. After setting the timer, press
Start to start to confirm.
Follow the instructions for the « charge » mode.
The LED’s will deactivate until the beginning of the charging cycle. The display will show a count-
down to the start of the charge
If a battery is not connected, the count-down will continue without being displayed. If the
charger does not detect a battery when the count-down has finished, then no charging current
will be supplied to the clamps until a battery has been connected.
In case of polarity reversal, the Inverter 70-24 F will continue the count-down, but will not
supply a charging current when the count-down has finished.
DIAG + "13.5"
The « Diag + » feature allows the user to specify the voltage delivered to the battery.
Voltage selection will need to be made each time prior to running the DIAG+ procedure
-In the settings menu, this option is displayed as the default voltage value "13.5"
-To scroll up through the voltages available, between 12 and 15V, use the Voltage Select
button. old the button to scroll faster.
-Once you reach 15V, it reverts back to 12V
-Press "Start/Stop" to confirm selection.
To start using DIAG+ mode follow the steps of the Diagnostic mode listed on page 14.
Check cables "CAL":
This mode must be used each time the output cables are changed. The Inverter 70-24 F is
compatible with cables up to 2x5m in 16mm² or 2x12m in 50mm².
1. To launch the cables check, select in Settings Menu, and press Start.
2. The message « SCc » will be displayed.
3. Put the clamps in short circuit for more than 10 seconds.
Autogoods “130”
130.com.ua
17
Inverter 70



24 HF
When the clamps are in short circuit, the message, « Scc » disappears.
4. The result « End »: Indicates the cables are in good working condition, and will be displayed
for 10 seconds - after which the Inverter will revert back to the main menu.
5. If no message is displayed during this time, this indicates there may be an error with the
cables. After switching off the charger, clean the contacts then check the charge cables
and change them if necessary. After this is done, restart the « check cables » cycle.
Charge End / Floating mode "FLt"
After the battery has been charged, 'Floating' mode continues to deliver a current to the battery to
maintain a maximum charge.
This function is initially active => display « FLt ».
To disable this function, select « OFF ».
Restart "LP":
The automatic restart function only works in charge mode - it enables an automatic restart for the
charger in the event of unexpected power loss.
By default, the function is inactive : displays « off ».
To activate this function, select « LP » for LOOP.
PROTECTION
The Inverter is protected against short-circuits, polarity inversions and engine starts. It has an anti-
spark feature which prevents sparks whilst connecting the inverter to the battery. The inverter will not
deliver current if there is no battery detected (no voltage in the clamps). The charger is protected by
1 x 80A (Ref: 054651) internal fuse.
TROUBLESHOOTING
PROBLEMS CAUSES SOLUTIONS

A warning beep sounds
+ the warning LED illuminates
+ the display shows :
Inverter 70 F detects a polarity
reversal in the clamps.
Connect the red clamp to the
"+" terminal, and the black
clamp to the "-" terminal

The display shows :
« Bat »
+ the warning LED flashes
The charger cannot detect a
battery
Ensure the battery terminals are
clean, and the clamps are
securely connected

The display shows :
« I »
+ the warning LED flashes
A consumer has been left on
(eg : eadlights)
Turn off any active consumers,
disconnect the clamps and re-
connect to re-start the charge
Alternatively: disconnect the
battery from the vehicle before
charging.
CHARGER MODE
CHARGER MODE

The display shows:
« OUt »
+ The warning LED illuminates
The battery is in short circuit or
damaged. Replace the battery
Autogoods “130”
130.com.ua
18
Inverter 70



24 HF

Voltage LED is flashing
Inverter 70-24 has detected a
different voltage than the one
selected
Press STOP to change the
voltage.
Press START for 3 seconds to
confirm the voltage initially
selected.

The display shows:
« FUS »
+ a warning beep sounds
+ the warning LED illuminates
The fuses have blown
Change the internal fuse
(qualified staff only)
(ref.054651)

The charger displays nothing
+ the warning LED illuminates Electrical network fault
Check the voltage of the
electrical network is between
100 and 240V
Ventilation holes blocked. Check and clear ventilation holes

The display shows:
« t I » Faulty fan. Contact your retailer

A warning beep sounds
+ The warning LED illuminates
+ the display shows :
Inverter 70 F detects a polarity
reversal in the clamps.
Connect the red clamp to the
"+" terminal, and the black
clamp to the "-" terminal

The display shows:
« dIA »
and flashes
The charger cannot detect a
battery
Ensure the battery terminals are
clean, and the clamps are
securely connected

The display shows :
« I »
+ beep
Excessive consumption
compared to the charger
capacity
Switch off some electrical
consumers to lower the
consumption.

The display shows :
« FUS »
+ a warning beep sounds
+ the warning LED illuminates
The fuses have blown
Change the internal fuse
(qualified staff only)
(ref.054554: 40A)
(ref :054651:80A)

The charger does not display
anything
+ the warning LED is illuminated
+ warning beep sounds twice
Electrical network fault
Check the voltage of the
electrical network is between
100 and 240V
Ventilation holes blocked Check and clear ventilation holes
DIAGNOSIS MODE

The display shows:
« t I » Faulty fan Contact your retailer
A lot of electrical consumers in
your vehicle are active.
Normal use of the 70 F. Switch
off all electical consumers in
your vehicle to check if your
battery is not deeply discharged.

The 70 F delivers a high current
(between 10A<70A) when not in
diagnostic mode.
Battery discharged
Your battery is deeply
discharged; the 70 F will start
charging automatically. Wait
until the current is below 10A
before launching Diag+ and
starting diagnostics on your
vehicle.
Autogoods “130”
130.com.ua