J&J ELECTRONICS, INC. 3-YEAR LIMITED WARRANTY
Operation
For more information about this or other J&J Electronics lighting products, please visit www.purewhitepoollight.com.
Rev. 072717
©2017 J&J Electronics, LLC. All rights reserved. PureWhite is a trademark of J&J Electronics, LLC. All registered and trademarked brands and names are the property of their respective companies.
PAGE 2
STEP 8
Check for air bubbles when light is turned ON
STEP 3
Inspect your light housing for signs of wear
STEP 4
Dry the light housing and lens
STEP 5
Install PureWhite lamp
STEP 6
Reassemble the light housing
STEP 7
Submerge assembled light into the water
WARNING! Always use a new lens gasket
whenever reassembling your pool light housing.
J&J Electronics, LLC. (“J&J”) warrants the above-referenced model numbers of PureWhite LED In-ground Pool Lamp (the “Product”) to be free from defects in
material and workmanship, under normal use, conditions and service, for a period of three (3) years from the original date of purchase, subject to the terms
specified herein. If during the first twenty-four (24) months of the warranty period, the Product fails to operate due to a defect in material or workmanship, J&J
will, at its option, repair or replace the Product at no charge. If during months twenty-five (25) through thirty-six (36), the Product fails to operate due to a defect
in material or workmanship, J&J will grant the purchaser a pro-rated credit
1
for purchase of a J&J replacement part, as the purchaser’s sole remedy. Pro-rated
credit is calculated as follows:
TERMS AND CONDITIONS
This warranty is available to the original purchaser of the product(s) only. This warranty applies only when products are properly installed in an in-ground pool; any other use voids the warranty. Products must be
used in lighting equipment designed and approved for the application and in environmental conditions within the normal specified operating range. This warranty does not apply to any abnormal use of
product(s), use in violation of any applicable standard, code or instructions for use in installations including those contained in the latest National Electrical Code (NEC), the Standards for Safety of Underwriters
Laboratory, Inc.(UL),Standards for the American National Standards Institute (ANSI).This warranty will not apply in the event of conditions demonstrating abnormal use or stress, freezing,operating when not fully
submerged,under/over voltage/current conditions, excessive switching cycles or operating hours or outside the recommended operating conditions.This warranty does not apply to color shifts or dimming caused
by emissions and/or LED color shifts and dimming that naturally occurs over time.Warranty conditions: If the product operates for 15 or more hours per day or continuously for 24
hours per day, the product warranty period stated shall be reduced to half the stated period. This warranty does not cover damage occurring during shipment, damage or failure
resulting from alteration,accident, acts of God, theft, abuse,negligent installation, improper service,unauthorized repairs, freezing or where adequate care has not been taken to prevent damage to the product(s).
Tampering with any internal component of this product(s) will void the warranty.
This warranty gives you specific rights.You may have other rights that vary according to the laws of your state.
LIMITATION OF LIABILITY
THE FOREGOING SHALL CONSTITUTE THE EXCLUSIVE REMEDY OF THE PURCHASER AND IS IN LIEU OF ALL OTHER WARRANTIES, WHETHER EXPRESS OR IMPLIED, INCLUDING ALL WARRANTIES OF
MERCHANTABILITY OR FITNESS FOR A PARTICULAR PURPOSE,AND ALL WARRANTIES ARISING FROM COURSE OF DEALING OR USAGE OR TRADE.THE LIABILITY OF J&J UNDER THIS WARRANTY SHALL BE LIMITED
TO THE REPLACEMENT, REPAIR OR PRO-RATED CREDITOF THE PRODUCTAS STATED HEREIN. J&J IS NOT RESPONSIBLE FOR SHIPPING OR TRANSPORTATION COSTS RELATEDTO OBTAINING WARRANTY SERVICE.IN
NO EVENT SHALLJ&J BE LIABLE FOR ANY OTHER COSTS OR DAMAGES, INCLUDING LOST PROFITS OR REVENUES, LABOR CHARGES OR FOR ANY INCIDENTAL,SPECIAL OR CONSEQUENTIAL DAMAGES.
J&J reserves the right to change the warranty, warranty period without prior notice and without incurring obligation.
T
o
obtain
warranty
service,
retain
the
failed
P
roduct,
retain
the
installation
invoice
showing
product
purchase
price
and
contact
J&J
Electronics,
LLC.
at
800.735.4553
ext.
242
or
warr
[email protected].
As of 7.27.17
1Credit is only redeemable by the purchaser through J&J and will be applied against the current MSRP of the product purchased.
2Product Price is the price at which the product was purchased as stated on the purchaser’s invoice and may not exceed the MSRP for the product at the time of the purchase.
Product Price ($)
2
x Unexpired warranty period (months)
Total Warranty Period (months)
Inspect the rubber grommet where the power cord enters the light for
excessive deterioration. Inspect the light housing, the tensioning clamp,
and face ring for warping, dents and excessive rust. Do not install
PureWhite into a pool light housing that appears to be worn out from
Set the lens and faceplate in the light housing and re-assemble according
to the light housing manufacturer’s specification. Tighten the screws or
clamp slightly, allowing the gasket to seal evenly.
Once the screws or clamp are tight, submerge the assembled light
housing in the water and visually check that air bubbles are not escap-
ing from the gasket area. Should bubbles appear, immediately remove
the light housing from the water and reset the gasket and lens.
Once you are satisfied that there are no air leaks, complete the installa-
tion by wrapping the cord around the light housing and re-attaching
the light housing to the niche assembly.
Reconnect power to the pool light by resetting the circuit breaker to the
“ON” position. Go back to the light location and check for air bubbles
rising to the surface from the pool light housing for at least 10 minutes.
It is important that the lamp is turned on during this time.
If you do not see air bubbles rising to the surface at anytime during the
10-minute inspection process, the housing is holding its water tight seal
and the installation is complete. You are now ready to enjoy your new
PureWhite Replacement LED In-Ground Pool lamp. If you do see air
bubbles rising to the surface at anytime during the inspection process,
immediately remove the PureWhite lamp from the housing, dry it
completely and reset the gasket and lens. Make sure that the PureWhite
lamp and light housing are completely dry before reassembling.
If the pool light housing continually leaks water after 2 or more attempts
at installation, replacement of the pool light housing may be necessary.
Please read the J&J Electronics”PureWhite Quick Start Guide” for
further installation advice.
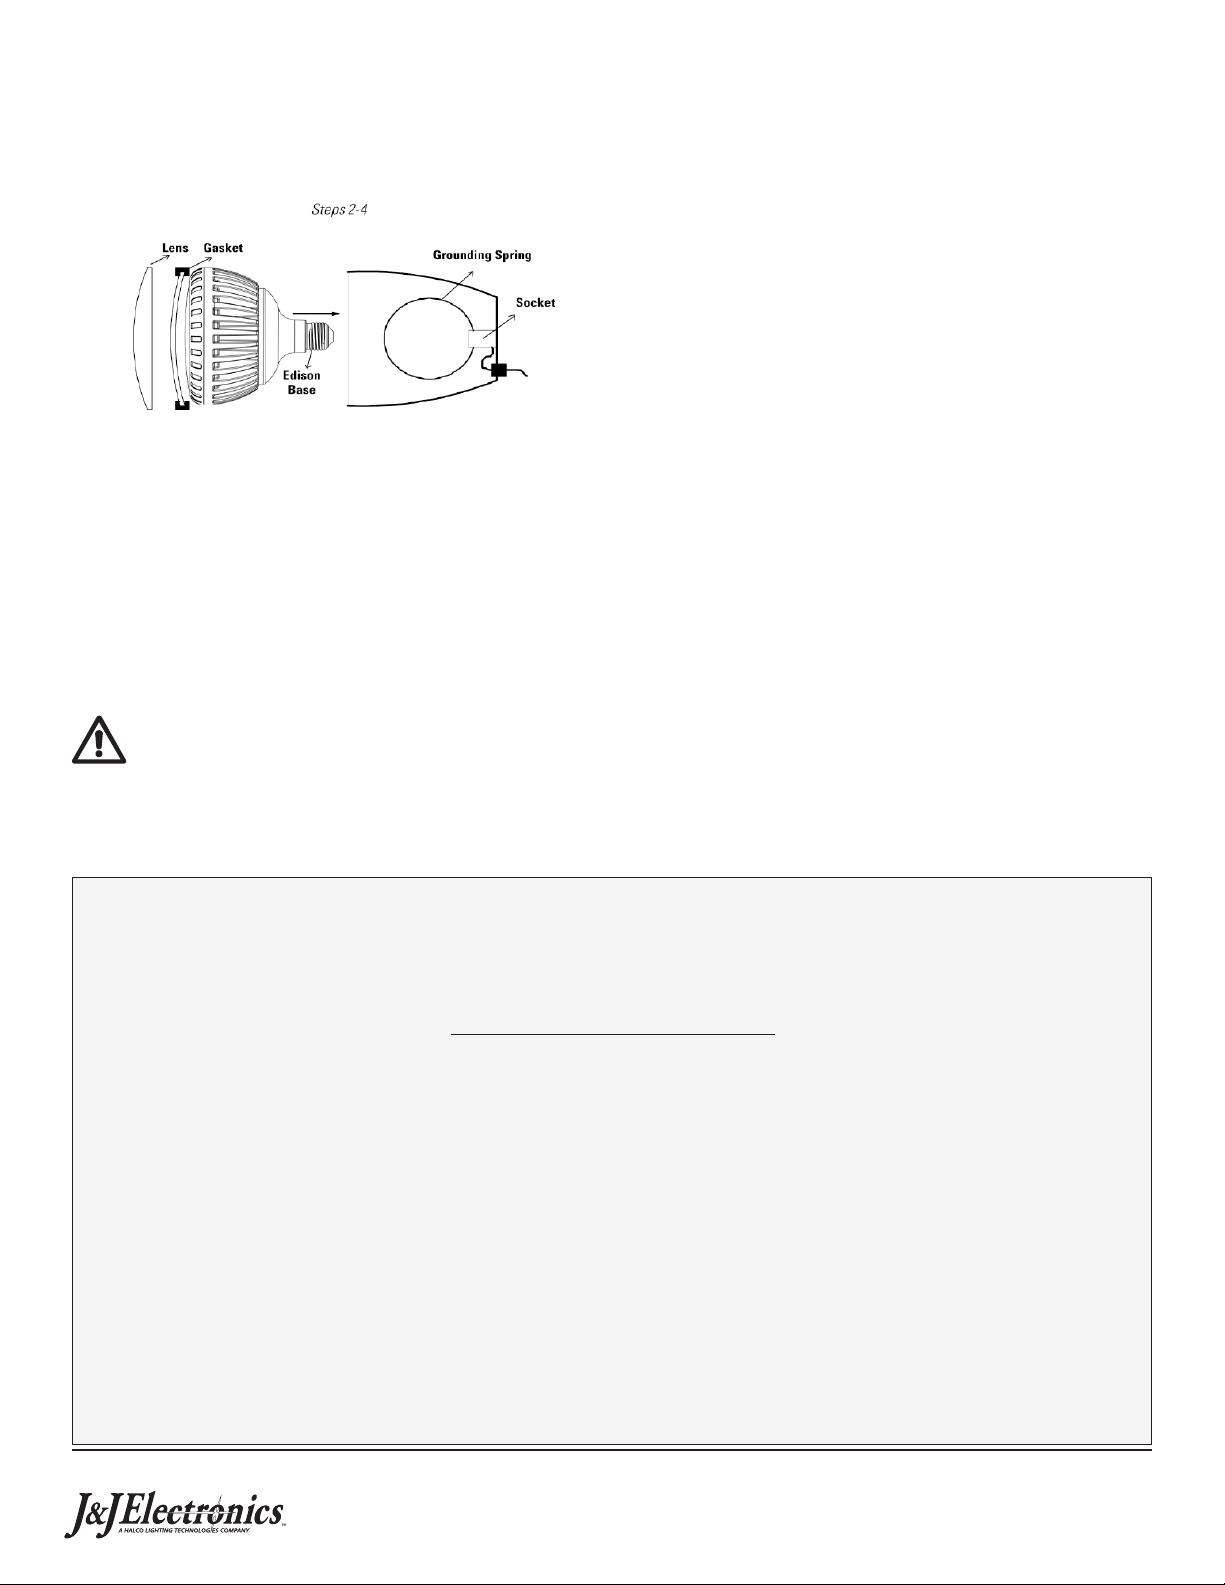
Note on Figures 1-3: All figures are provided for illustration purposes only. Refer to the
original pool light manufacturer’s installation manual for further reference.
Use the pool’s current light switch to turn “ON” and “OFF” your new
PureWhite lamp.
Make sure the inside of the light housing and glass lens are completely
dry by wiping them down with a clean rag.
Remove the old lamp and discard. Carefully screw the PureWhite lamp
into the socket.
Proceed by cleaning any gasket residue from the light housing body. A
clean surface is necessary for the new gasket to seat properly and
prevent leakage. Install the new gasket onto the glass lens.
Failure to install a new lens gasket could result in water leakage which
can permanently damage the PureWhite lamp and cause serious injury
or death due to electrical shock.
The product warranty is voided if the proper gasket is not
installed. See the “Gasket Compatibility” section for details.
6 Bendix, Irvine, CA 92618 USA • 800.735.4553 • 949.455.4460 • www.jandjpoolspa.com


