Hama 23054296 User manual

Operating Instructions/Bedienungsanleitung / Mode d‘emploi/ Instrucciones de uso /
Руководство по эксплуатации/ Istruzioni per l‘uso /Gebruiksaanwijzing / Οδηγίεςχρήσης / Instrukcja obsługi/
Használati útmutató/ Návod k použití /Návod na použitie / Manual de instruções/ Kullanma kılavuzu/
Manual de utilizare/Bruksanvisning / Käyttöohje/ Работна инструкция/Betjeningsvejledning / Manuelt stasjonssøk
1 2 3 4
(DR1001BT)

2
2.1 Explanation of warning symbols and notes..........................................3
2.2 Package contents.............................................................3
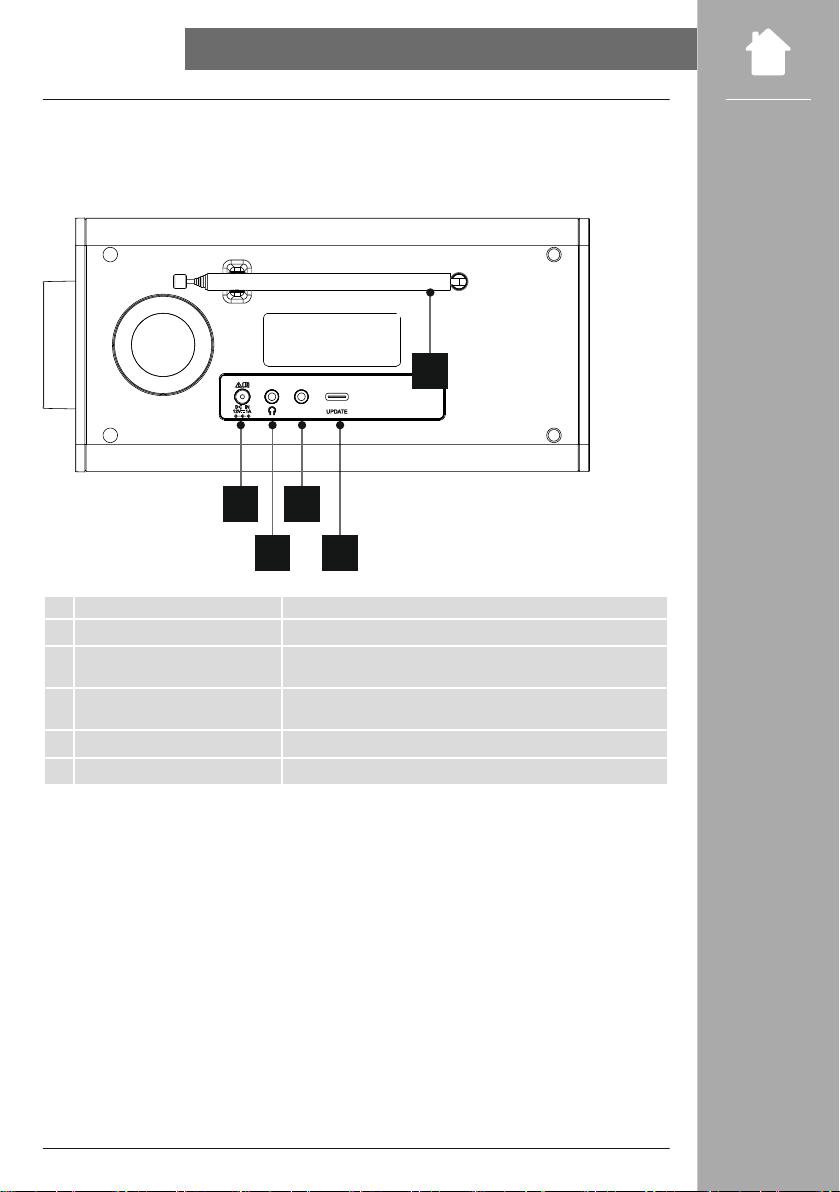
5.1 Rear view ..................................................................5
5.2 Front view ..................................................................6
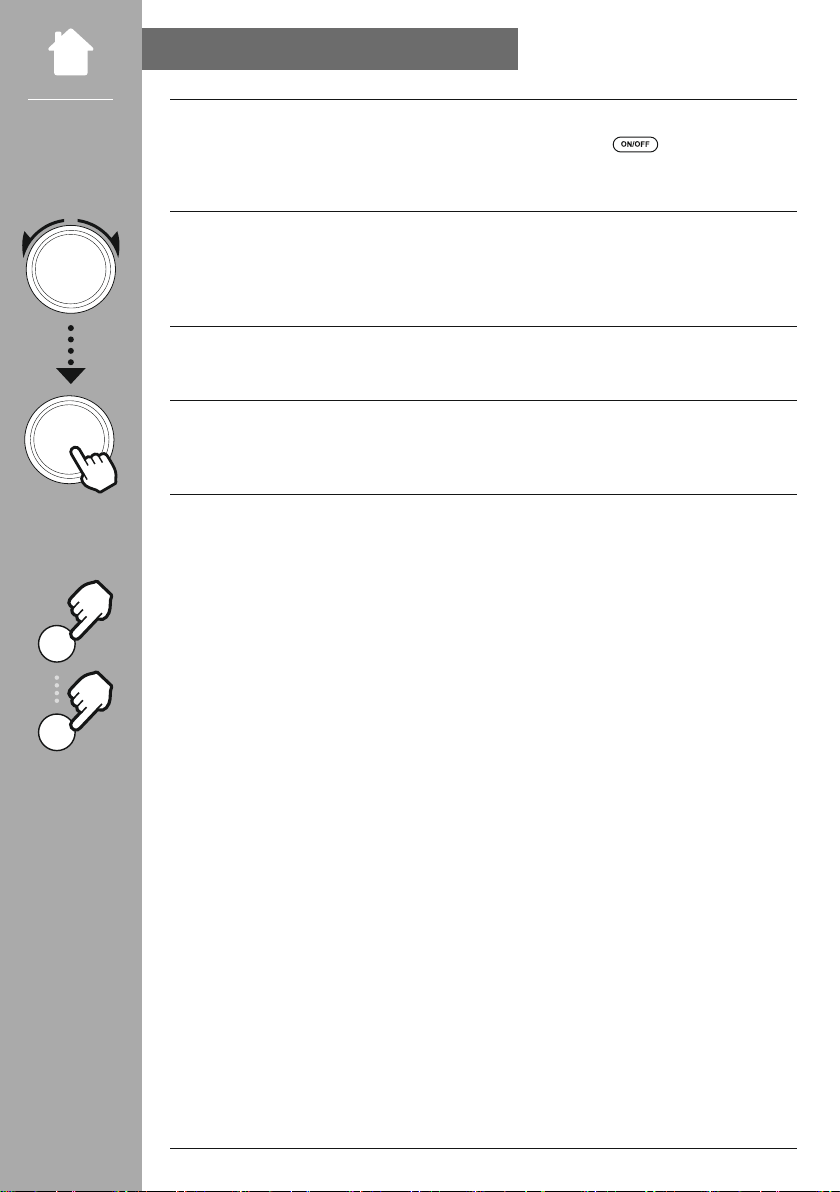
6.1 General operation ............................................................7
6.2 Managing favourites ..........................................................8
7.1 Connecting and operating the radio...............................................9
8.1 Control options .............................................................10
8.2 Time settings ...............................................................10
8.3 Screen display ..............................................................10
8.4 Managing favourites .........................................................10
9.1 Station list .................................................................11
9.2 Full scan ..................................................................11
11.1 Music playback via Bluetooth®................................................12
11.2 Further settings - Bluetooth®receiver ............................................12
11.3 Pair a new device...........................................................12
13.1 Standby screen ............................................................14
13.2 Time settings ..............................................................14
13.3 Screen display .............................................................14
13.4 Language selection .........................................................14
13.5 SW version ...............................................................14
13.6 Factory settings ............................................................14

3
1 2 3 4
Thank you for choosing a Hama product. Take your time and read the following instructions and
information completely. Please keep these instructions in a safe place for future reference. If you sellthe
device,please pass these operating instructions on to the new owner.
This symbol indicates a risk of electric shock fromtouching uninsulated product parts that may carry
hazardous voltage.
This symbol is used to indicate safety instructions or to draw your attention to specic hazards and
risks.
This symbol is used to indicate additional information or important notes.
• DR1001BT digital radio
•Power supply unit (12V/1A)
•Operating instructions
OperatingInstructions /Bedienungsanleitung / Mode d‘emploi/ Instrucciones de uso/
Руководствопо эксплуатации /Istruzioni per l‘uso /Gebruiksaanwijzing /Οδηγίες χρήσης /Instrukcja obsługi /
Használatiútmutató /Návod k použití / Návod na použitie/ Manual de instruções/ Kullanma kılavuzu/
Manualde utilizare /Bruksanvisning / Käyttöohje/ Работна инструкция/ Betjeningsvejledning/ Manuelt stasjonssøk
(DR1001BT)
1 2 3 4

4
•The product is intended for private, non-commercial useonly.
•Do not use the product in areas in which electronic products are not permitted.
•Protect the product from dirt, moisture and overheating and use it in dry rooms only.
•As with all electrical products, this device should be kept out of the reach of children.
•Do not drop the product and do not exposeit to anymajorshocks.
•Do not operate the product outside the power limits given in the specications.
•Keep the packaging material out of the reach of children due to the risk of suffocation.
•Dispose of packaging material immediately in accordance with the locally applicable regulations.
•Do not modify the devicein any way. Doing so voids thewarranty.
•Use the product only for the intended purpose.
•Do not use the product in the immediate vicinity of heaters, other heat sources or in direct sunlight.
•Do not use the product in a damp environment and avoid splashing water.
•Only use the article under moderate climatic conditions.
•The battery is integrated and cannot be removed.
•Do not open the device or continue to operate it if it becomes damaged.
•Do not incinerate the battery or the product.
•Do not tamper with or damage/heat/disassemble the batteries/rechargeable batteries.
• Do not open the device or continue to operate it if it becomes damaged.
• Do not use the product if the AC adapter, adapter cable or power cable is damaged.
•Do not attempt to service or repair the product yourself. Leave any and all service work to qualied
experts.
• High sound pressure!
• There is a risk of hearing damage.
•To prevent any loss of hearing, avoid listening at loud volumes for prolonged periods.
•Always keep the volume at a reasonable level. Loud volumes can damage hearing – even over short
periods.
• Using this product limits your perception of ambient noise.Forthis reason, do not operate any
vehicles or machines while using this product.
• Please note:
Always pull the antenna out completely.
We recommend you adjust the antenna vertically to ensure optimal reception.
•Try various different positions if necessary to getthe bestreception.

5
LINE OUTLINE OUT
Mains connection Connection of the enclosed mains adapter to the power supply
Headphone jack (3.5 mm) Analogue connection with wired headphones with a 3.5 mm jack
connection
Line Out (3.5mm) Analogue connection with external loudspeakers and other audio
devices via a 3.5 mm audio cable
USB-C socket Only for software updates, no playback option via USB
Antenna Antenna for receiving DAB/FM signals

6
1234
1Favourites button 1
2Favourites button 2
3Favourites button 3
4Favourites button 4
On/Off switch
RADIO
Radio playback
Automatic station search
Call up station list
Call up alarm settings
BluetoothTM
Navigation/OK/Volume
Display

7
Hand symbol Press once
Hand symbol Press multiple times
Hand symbol Press repeatedly
Hand symbol Hold for 3 seconds
Rotary controller
Navigation
• Navigation forwards in the current menu
• Navigation backwards in the current menu
• Reduces the volume of the current playback
• Increases the volume of the current playback
Rotary controller
button
• Conrmation button for opening the menu or function currently
highlighted
On/Off button •Switching the radio on and off
•Long button press (approx. 5 seconds): Opens the Settings menu
RADIO
Radio button
•Changes the contents shown in the station information
•Long button press (approx. 3 seconds): Changes to FM mode
• Open menus are closed and the radio returns to the playback
screen
Automatic station
search
•Long button press (approx. 3 seconds): Automatic station search
*Change station
Call up station
list • Opens the station list (DAB/DAB+)
Alarm button •Opens the alarm settings
•Long button press: Activates/deactivates alarm 1
Bluetooth®•Pair a new device

8
1 button
• Access favourite storage space 1 for
current playback mode
• Save the current station to favourite
storage space 1
2 button
• Access favourite storage space 2 for
current playback mode
• Save the current station to favourite
storage space 2
4 button
• Access favourite storage space 4 for
current playback mode
• Save the current station to favourite
storage space 4

9
• Only operate the product from an approved socket that is connected to the public powersupply. The
socket must be installed close to the product and must be easily accessible.
• Disconnect the product from the power supply using the On/Off switch –if this is notavailable,
unplug thepower cord from the socket.
•If using a multi-socket power strip, make sure that the total power consumption of all connected
devices does not exceed the socket strip's maximum throughput rating.
• If you will not be using the product for a prolonged period, disconnect it from mains power.
•Connect the mains cable to a properly installed and easily accessible mains socket.
•The power supply unit is suitable for mains voltages between 100 and 240 V and can therefore be used
on virtually any AC power grid. Please note that a country-specic adapter may be necessary.
•You can nd an appropriate selection of Hama products at www.hama.com.
Once the product has been connectedto mains power, initialisation takes place.
The radio starts up.

10
Once the radio has been initialised for the rst time, switch it on using the button (Power button)
if required to start the product setup process. The relevant steps are explained in brief below. Further
information canbe found in the relevant detailed sections "(13. System settings)".
Please see the operating concept for information on theradio's general operation.
Theradio can be used with the following control options:
1. Control elements on the device
The radio allows the time to be displayed in 12-hour (am/pm) or 24-hour format.
Three different presentations of the display content are supported. Here, you can switch between
complete text display, image and text display and full image with subtitles.
To save the station currently playing as a favourite, press any favourites button for 3 seconds. With a brief
press on a favourites button, you can reselect anypreviously saved favourite.
1
4

11
This radio receives all common digital radio frequencies in the rangeof174 MHz to 240 MHz (band III,
channels 5A to 13F). The automatic DAB station search starts automatically when DAB mode is started
for the rst time. As soon as this has been completed, the current station list is displayed.
Pressing one of the buttons allows you to access the following.
The station list offers a complete display of all radio stations that were found during the last complete
search.
Navigate to the desired station you want to call up and conrm this selection. The radio will now start
playing the corresponding station.
For stations that are currently no longer available, a ?appears at the front.
If the location of the radio changes or if new stations can be received, it is advisable toperform the
station search again. The entire frequency range is searched again and the station list is updated.
• If any of the stations you are looking for is not available on DAB, you can still listen to the station on FM.To
set FM reception, press and hold (6) for around 5 seconds.
•The FM station setting option appears, which you can operate using the controller. Turning the
controller slowly adjusts the frequency in steps of 0.05 MHz.
Turn the controller faster to adjust the frequencyin steps of 0.5 MHz.
• Once you have found the station you want, conrm by the setting by pressing the rotary controller.
•The display shows "FM" in the rst line to indicate the reception of FM radio.
The set frequency can also be assigned to a shortcut button (see 11).
• If you wish to adjust the frequency, press the rotary controller (11) againto activate the frequency
setting.

12
This radio has a Bluetooth®receiver which allows you to transfer audio content to the radio. The
transmitting device, for example a smartphone, is connected to the radio forthis purpose and the audio
content is transmitted directly to theradio. To do this, activate Bluetooth®playback mode.
As soon as your source device, for example a smartphone, is connected to the radio, start playback on the
source device.
The radio now plays back the content. The volume canbe changed directly via the radio, but note that
the volume must also be adjusted on the source device.
You can pair your terminal devices with the radio using Bluetooth®and use this as a playback device. You
can control playback directly on the terminal device. You can adjust the volume on the radio, as well.
The radio's mode is changed to Bluetooth playback and the radio is immediately in mode. This
means that the radio is visible to other devices and you can connect via your smartphone/tablet or other
source device. After a successful connection, you can start playback via the source device.

13
The radio has two individually adjustable alarm times.
Alarm 1 and Alarm 2 are congured identically and allow two separate alarm times to be saved.
Press [] (9) to open the Settings menu. Select Alarm 1or 2using the rotary controller (11).
Conrm your selection by pressingrotary controller (11).
Turning the rotary controller (11) allows you to switch between "ON" (alarm active) and "OFF") (alarm
inactive). If you select "OFF", the setup process is terminated and you are taken back to the alarm menu's
start screen
Turn the rotary controller to select the time in hours. Conrm the selection by pressing the rotary
controller (11). Next, repeat the setting process to congure the alarm time in minutes.
Now select which days the alarm is to be active on. The following options are available forthis:
a) Daily àThe alarm is active from Monday to Sunday
b) Once àThe alarm is only active once, i.e. as soon as the set alarm time next arrives.
c) Mon– Fri àThe alarm is active from Monday to Friday
d) Sat– Sun à
The alarm is active from Saturday to Sunday
e) Select days àThis selection takes you to a drop-down menu in which you can choose the
required day (Monday to Sunday). Once a day is selected, this is indicated by a
symbol (√)
Now choose whether you wish to be wokenby an alarm (Sound) or the radio (Radio). If you choose
Radio, you can select from Favourites 1 and 2 that are saved on the shortcut buttons.
You can set the volume at which the alarm sound should be played. This setting makes it irrelevant how
loud you last listened to theradio.
Now select the alarm duration.
The button (9) takes you back to the previous step.
The alarm setting process is now complete. As soon as the alarm goes off, you can activate the snooze
function by pressing the rotary controller button. Repeatedly pressing the rotary controller (11) allows you
to changethe snooze time. [] (9) disables the alarm.
You can activate and deactivate alarm 1 again by pressing and holding (9). This shortcut
function also works if theradio is in standby mode.
If the alarm is active, the alarm symbol appears on the left next to the time. If the radio is switched off,
the alarm symbol is displayed on the left next to the date.
The symbol for alarm 2 appears on the right-hand side accordingly. Alarm 2 cannot be activated via a
shortcut button.

14
To access the system settings, ensure that the radio is switched on.
Then hold the ON/OFF button down for 5 seconds.
Select a brightness setting for the display that is to be used in standby mode.
The radio allows the time to be displayed in 12-hour (am/pm) or 24-hourformat.
Three different presentations of the display content are supported. Here, you can switch between
complete text display, image and text display and full image with subtitles.
One of the available system languages can be selected here.
Theradio's current software version is displayed.
This function allows you to reset your radio to the factory settings on the software side. Conrm the
prompt with to start the process.
Resetting to the factory default settings canremedy some problems and malfunctions.
However, all settings made previously, such as equaliser presets, station presets and network proles,
will be permanently deleted.

15
• Only clean this product using a lint-free, slightly damp cloth and do not use any harsh cleaners.
• If you do not plan to use the product for a prolonged period, turnoff the device and disconnect it from
the power supply. Store it in a clean, dry place away from direct sunlight.
Hama GmbH & Co KG assumes no liability and provides no warranty for damage resulting from improper
installation/mounting, improper use of the product or from failure to observe the operating instructions
and/or safety notes.
Hama GmbH & Co KG hereby declares that the radio equipment type [23054296, 23054297]is
in compliance with Directive 2014/53/EU. The full text of the EU declaration of conformity is
available at the following Internet address:
www.hama.com ->23054296 ->Downloads
Frequency band(s) Maximum radio-frequency power transmitted
Bluetooth: 2,402 –
2,480GHz 10 dBm (EIRP)

16
4.3" (10.92 cm) TFT
Full-range loudspeaker (5W RMS)
12.0 V 1.0A 12.0W
German, Dutch, French, English
Digital radio, power supply unit, operating instructions
®receiver (RX): V5.0, class 2, A2DP, AVRCP
AUX in 3.5mm
Headphone 3.5 mm
(174,928 - 239.2 MHz) ü
4
(87.5 - 108 MHz) ü

17
Hama, HRA12159, DresdnerStr. 9,
86653 Monheim, Germany
K12S120100G
100– 240 V
50/ 60 Hz
12.0 VDC / 1.0 A / 12.0 W
83.3%
79.7%
0.05W

2
2.1 Verklaring van waarschuwingssymbolen en instructies .................................3
2.2 Inhoud van de verpakking ......................................................3
5.1 Achteraanzicht...............................................................5
5.2 Vooraanzicht ................................................................6
6.1 Algemene bediening ..........................................................7
6.2 Favorietenbeheer.............................................................8
7.1 De radio aansluiten en in gebruik nemen ...........................................9
8.1 Bedieningsopties ............................................................10
8.2 Tijdinstellingen .............................................................10
8.3 Schermweergave ............................................................10
8.4 Favorietenbeheer............................................................10
9.1 Zenderlijst .................................................................11
9.2 Volledig zoeken .............................................................11
11.1 Afspelen via Bluetooth®.....................................................12
11.2 Andere instellingen - Bluetooth®-ontvanger .......................................12
11.3 Nieuw apparaat koppelen ....................................................12
13.1 Beeldscherm stand-by .......................................................14
13.2 Tijdinstellingen ............................................................14
13.3 Schermweergave ...........................................................14
13.4 Taalkeuze ................................................................14
13.5 SW-versie ................................................................14
13.6 Fabrieksinstellingen .........................................................14

3
1 2 3 4
Hartelijk dank dat u voor een product van Hama hebt gekozen! Neem de tijd om de volgende
aanwijzingen en instructies volledig door te lezen. Berg deze gebruiksaanwijzing vervolgens op een
goede plek op zodat u hem als naslagwerk kunt gebruiken. Mochtuhet apparaat verkopen, geeft u dan
ook deze gebruiksaanwijzing aan de nieuwe eigenaar.
Dit symbool duidt op gevaar bij aanraking van niet-geïsoleerde onderdelen van het product, welke
mogelijk onder een zodanig gevaarlijke spanning staan, dat het gevaar voor een elektrische schok
aanwezig is.
Wordt gebruikt om veiligheidsinstructies te markeren of om op bijzondere gevaren en risico’s te
attenderen.
Wordt gebruikt om extra informatie of belangrijke aanwijzingen te markeren.
• Digitale radio DR1001BT
• Netadapter (12V/1A)
• Gebruiksaanwijzing
OperatingInstructions /Bedienungsanleitung / Mode d‘emploi/ Instrucciones de uso/
Руководствопо эксплуатации /Istruzioni per l‘uso /Gebruiksaanwijzing /Οδηγίες χρήσης /Instrukcja obsługi /
Használatiútmutató /Návod k použití / Návod na použitie/ Manual de instruções/ Kullanma kılavuzu/
Manualde utilizare /Bruksanvisning / Käyttöohje/ Работна инструкция/ Betjeningsvejledning/ Manuelt stasjonssøk
(DR1001BT)
1 2 3 4

4
•Het product is bedoeld voor huishoudelijk, niet-commercieel gebruik.
•Gebruik het product niet op plaatsen waar elektronische producten niet zijn toegestaan.
•Bescherm het product tegen vuil, vocht en oververhitting en gebruik het alleen in droge
ruimtes.
•Dit product dient, zoals alle elektrische producten, buiten het bereik van kinderen te worden gehouden!
•Laat het product niet vallen en stel het niet bloot aan zware schokken of stoten.
•Gebruik het product niet buiten de in de technische gegevens vermelde vermogensgrenzen.
•Het verpakkingsmateriaal mag absoluut niet in handen van kinderen komen in verband met
verstikkingsgevaar.
•Voer het verpakkingsmateriaal direct en overeenkomstig de lokaal geldende afvoervoorschriften af.
•Verander niets aan het apparaat. Daardoor vervalt elke aanspraak op garantie.
•Gebruik het product alleen voor het beoogde doel.
•Gebruik het product niet in de onmiddellijke nabijheid van de verwarming, andere warmtebronnenof in
direct zonlicht.
•Gebruik het product niet in een vochtige omgeving en vermijd spatwater.
•Gebruik het artikel alleen in gematigde klimatologische omstandigheden.
•De accu is vast ingebouwd en kan niet worden verwijderd.
•Open het product niet en gebruik het niet meer bij beschadigingen.
•Gooi de accu resp. het product niet in vuur.
•U mag de accu‘s/batterijen niet wijzigen en/of vervormen/verhitten/demonteren.
• Open het product niet en gebruik het niet meer bij beschadigingen.
• Gebruik het product niet indien de adapter, de adapterkabel of de voedingskabel is beschadigd.
•Probeer het product niet zelf te onderhouden of te repareren. Laat onderhouds- en
reparatiewerkzaamheden door vakpersoneel uitvoeren.
• Hoge geluidsdruk!
• Er is een risico op gehoorbeschadiging.
•Vermijd langdurig luisteren op een hoog volumeniveau om gehoorverlies te voorkomen.
•Houd het geluidsvolume te allen tijde op een verstandig niveau. Hoge geluidsvolumen kunnen –
zelfs kortstondig – tot gehoorbeschadiging leiden.
• De gebruikmaking van het product beperkt u in de waarneming van omgevingsgeluiden. Bedient u
om deze reden tijdens het gebruik ervan geen voertuigen of machines.
• Let op het volgende:
Trek de antenne altijd volledig uit.
Voor een optimale ontvangst adviseren wij de antenne verticaal te richten.
•Zo nodig moet u verschillende locaties testen om de best mogelijke ontvangst te bereiken.
This manual suits for next models
1
Table of contents
Languages:
Other Hama Radio manuals