Hama IR80MBT User manual

Streaming Radio
Streaming Radio
Operating Instructions / Bedienungsanleitung / Mode d‘emploi / Instrucciones de uso /
Руководство по эксплуатации / Istruzioni per l‘uso / Gebruiksaanwijzing / Οδηγίες χρήσης / Instrukcja obsługi /
Használati útmutató / Návod k použití / Návod na použitie / Manual de instruções / Kullanma kılavuzu /
Manual de utilizare / Bruksanvisning / Käyttöohje / Работна инструкция / Betjeningsvejledning / Manuelt stasjonssøk
00054846
(IR80MBT)

GOperating instructions
Technical data
Radio Receiver DAB
-
DAB+
-
FM
-
Internet
ü
Spotify
ü
Connectivity WiFi 2.4GHz (b/g/n) / 5GHz (a/n), Bluetooth®4.1
Encryption WPA, WPA2
Speaker
Tweeter 1“
10 W RMS
Satellite
3“ 20 W RMS
Acoustic Material
Plastic
Power input 15 V 2 A switch mode power supply
Power Consumption Operation max. 30 WStandby < 2 W (network standby)
Input & Output AUX IN
Package Content IR80MBT, Power Supply, Remote Control, Batteries,
Quick Start Guide

6
10
16
14
17
20
22
27
3
7
15
11
19
21
25
26
1
2
18
4 5
23
9
13
24
8
12
1
2
4
6
3
5
7
9
8
10
11
12
13
14
15

1
Controls and Displays
A: Front
1[POWER] button
2[PRESET 1] button
3[VOLUME +] button
4[PRESET 2] button
5[VOLUME -] button
6[PRESET 3] button
7[MODE] button
8LED
9Infrared sensor
B: Rear
10 Slide switch for L / mono / R
11 [WPS] BUTTON
12 [RESET] button
13 AUX-In socket
14 Mains power supply
15 Thread for wall bracket
C: Remote Control
1[POWER] button
2[MUTE] button
3Internet Radio - Mode
4DAB Radio - Mode*
5FM Radio - Mode*
6AUX - Mode
7Backlight Level*
8Media-Player - Mode
9[MODE] button
10 [EQUALIZER] button*
11 [ALARM] button*
12 [SLEEP] button*
13 [SNOOZE] button*
14 [MENU] button*
15 [PREVIOUS] button
16 [NEXT] button
17 ▲▼◄►*
18 [SELECT] (Enter/OK) button*
19 [REWIND] button
20 [Fast-Forward] button
21 [VOLUME] +/- buttons
22 Presets Up / Down buttons
23 [PLAY / PAUSE] button
24 [BACK] button
25 Presets buttons (1-10)
26 [PRESETS / FAVORITES] Menu*
27 [INFO] button*
Note
Buttons marked with an * asterisk have no function on
this radio model.

2
LED indicator
Mode LED colour LED state
IR mode
Steadily lit
(if streaming radio is not connected
to network, these LEDs ash)
The streaming radio is in IR mode.
Spotify mode The streaming radio is in Spotify mode.
Local music mode The streaming radio is in local music mode.
Music player mode The streaming radio is in music player mode.
AUX mode Steadily lit The streaming radio is in AUX mode.
Bluetooth mode Flashing The streaming radio is in Bluetooth pairing mode. The
speaker can now be connected to the terminal device.
Bluetooth Steadily lit
The Bluetooth connection has been established.
Multi-room mode
Flashing àestablishing connection
with group
Steadily lit àspeaker is part of a
group, music is playing
The streaming radio is in multi-room mode.
Status LED colour LED state
WLAN The LED(s) of the selected mode are
ashing.
WLAN pairing mode is activated. The streaming
radio is searching for a connection.
WLAN is connected Steadily lit The WLAN connection has been established.
WLAN connection
failed Flashing quickly The WLAN connection has failed.
Initial setup (UNDOK) Flashing Initial setup via UNDOK may now commence.
Ready for initial setup
(UNDOK) Flashing quickly in pulses of three
The connection to the AP has been established. The
terminal devices can be connected to the streaming radio
directly via WLAN in order to perform the initial setup.
WPS mode Flashing quickly PBC is active.
Standby mode Glowing dimly
The streaming radio is in standby mode.
Software update Illuminated The streaming radio is in update mode.
An update can now be performed.
Software update
running Flashing A software update is currently in progress.
Reset/startup Illuminated
The streaming radio is resetting to factory settings. /
The streaming radio is restarting after a power
interruptions.
Volume +/- The LED(s) of the selected mode are
ashing.
When the lowest or highest volume has been
reached, the LED(s) stop ashing.
Presets Flashing once
A preset is being saved. The LED indicator ashes once.

3
1. Explanation of Warning Symbols and Notes ...........4
2. Package Contents ................................4
3. Safety Notes ....................................4
4. Information and notes before initial startup ...........5
5. Before getting started.............................5
6. Getting started ..................................5
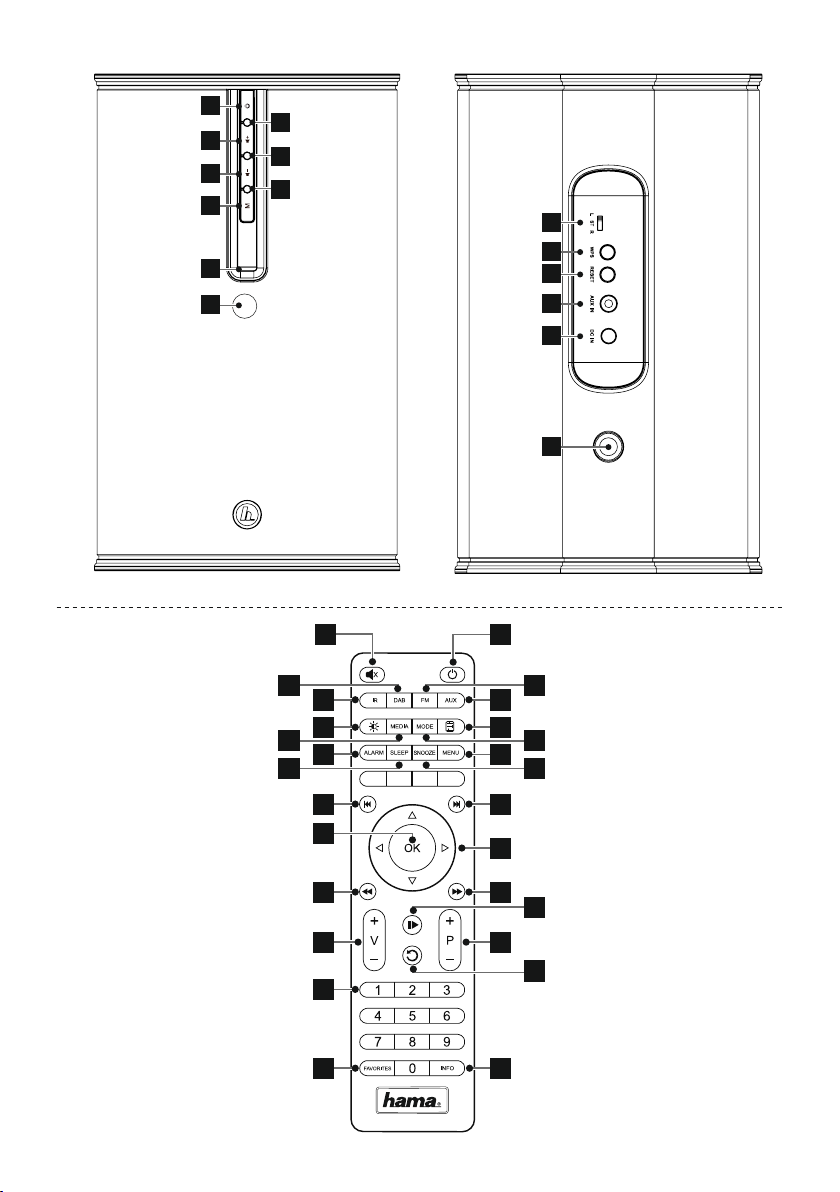
6.1 Switching on the radio...............................5
6.2 General notes on use ................................6
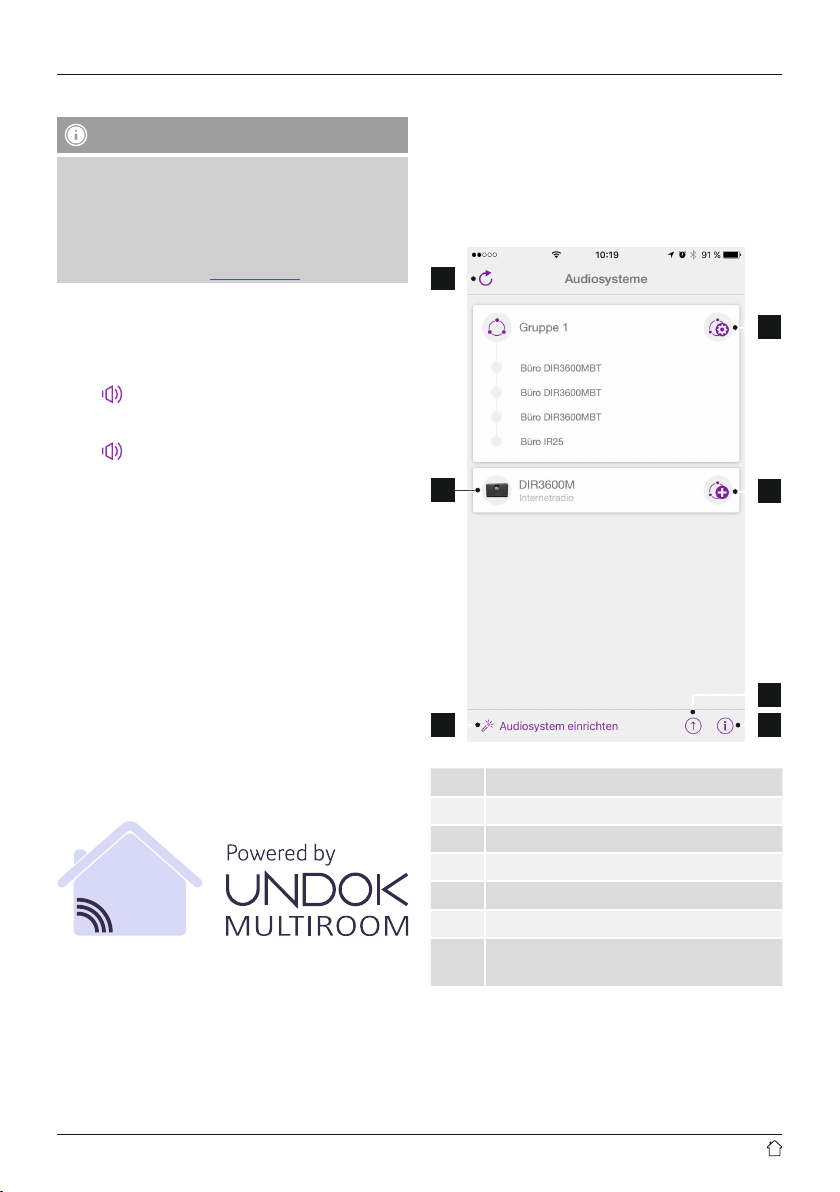
7. UNDOK – everything in the palm of your hand .........6
7.1 Interface / layout of the UNDOK home screen..............6
7.2 First-time setup of the device with UNDOK................7
7.2.1 Procedure for iOS users ...........................7
7.2.2 Procedure for Android users .......................7
7.3 General control of a device or group ....................8
7.4 Creating / managing multi-room groups..................9
7.5 Multi-room setup via UNDOK..........................9
7.5.1 General information .............................9
7.5.2 Creating a group...............................10
7.5.3 Add clients to a group...........................10
7.5.4 Leave group ..................................10
7.5.5 Delete group..................................10
7.6 Settings and standby ..............................10
8. Modes ........................................10
9. Internet radio ..................................11
9.1 Station search ....................................11
9.1.1 Search by country or region.......................11
9.1.2 Search by genre ...............................11
9.1.3Searchbyname................................11
9.1.4 Popular stations ...............................12
9.1.5 New stations..................................12
9.1.6 Local stations .................................12
9.2 Podcast .........................................12
9.2.1 Search by country ..............................12
9.2.2 Search by format (subjects or categories) .............12
9.2.3Searchbyname................................13
9.3 Favourites (local) ..................................13
9.3.1 Save favourites ................................13
9.3.2 Opening favourites .............................13
9.3.3 Management of favourites with the remote control .....13
10. Spotify .......................................13
11. Music player mode (UPNP, USB) ...................14
11.1 Playback from a computer (streaming) .................14
11.2 Playback from the network – Accessing les using the radio.15
11.3 General playback options...........................15
12. Auxiliary Input.................................15
13. Snooze ......................................16
14. Equaliser .....................................16
15. Wireless connection ............................16
16. Mono/Stereo mode .............................17
17. Display settings................................17
17.1 Time settings ....................................17
17.2 Language ......................................17
17.3 Factory settings ..................................17
17.4 Software updates.................................18
17.5 Info ...........................................18
18. Care and Maintenance ..........................18
19. Warranty Disclaimer ............................18
20. Service and Support ............................18
21. Recycling Information ..........................18
22. Declaration of Conformity........................19
Content

4
Thank you for choosing a Hama product.
Take your time and read the following instructions and
information completely. Please keep these instructions in a
safe place for future reference. If you sell the device, please
pass these operating instructions on to the new owner.
1. Explanation of Warning Symbols and Notes
Risk of electric shock
This symbol indicates product parts energized with a
dangerous voltage of sucient magnitude to constitute
a risk of electric shock.
Warning
This symbol is used to indicate safety instructions or to
draw your attention to specic hazards and risks.
Note
This symbol is used to indicate additional information or
important notes.
2. Package Contents
•Internet Radio IR80MBT
•Remote control
•2x AAA batteries
•AC/DC adapter
•Quick guide
3. Safety Notes
•The product is intended for private, non-commercial use
only.
•Protect the product from dirt, moisture and overheating
and use it in dry rooms only.
•As with all electrical devices, this device should be kept
out of the reach of children.
•Do not drop the product and do not expose it to any
major shocks.
•Do not operate the product outside the power limits
given in the specications.
•Keep the packaging material out of the reach of children
due to the risk of suffocation.
•Dispose of packaging material immediately according to
locally applicable regulations.
•Do not modify the device in any way. Doing so voids the
warranty.
Risk of electric shock
•Do not open the device or continue to operate it if it
becomes damaged.
•Do not use the product if the AC adapter, adapter
cable or power cable is damaged.
•Do not attempt to service or repair the device
yourself. Leave any service work to qualied experts.
Warning – Batteries:
•When inserting batteries, note the correct polarity (+
and - markings) and insert the batteries accordingly.
Failure to do so could result in the batteries leaking
or exploding.
•Do not allow children to change batteries without
supervision.
•Do not mix old and new batteries or batteries of a
different type or make.
•Remove the batteries from products that are not
being used for an extended period
•Do not short-circuit batteries.
•Do not charge batteries.
•Do not throw batteries in a re.
•Keep batteries out of the reach of children.

5
4. Information and notes before initial startup
Network connection /
Preparing the internet connection
You can integrate this radio into a local network and
even access home servers or other authorised resources.
To receive internet radio or access non-local media
(streaming, such as Spotify Connect), the network must be
connected to the internet.
WLAN/WiFi connection (wireless network)
•Make sure that the router is on and that you have an
Internet connection.
•If it is not already activated, activate the WLAN network
of your router.
•If you have questions about router conguration,
please consult the operating manual of the router for
troubleshooting.
•A detailed description of how to congure the WLAN
connection is given in the Wireless network connection
section.
5. Before getting started
Note
A detailed description of the
UNDOK app and the full
scope of functions can be found in our
UNDOK guide at:
www.hama.com ->00054846 ->Downloads
Notes on use
•Before you can use the streaming radio, you need
to set it up (see Chapter 6) by smartphone using the
UNDOK app.
Getting started with the remote control
Open the battery compartment cover. It is located on the
rear of the remote control and can be opened by sliding it
in the direction indicated.
Two AAA batteries are included in the delivery, they should
be inserted in the battery compartment of the remote
control. Observe the correct polarity when inserting
batteries. The polarity (+ / -) is indicated in the battery
compartment.
6. Getting started
6.1 Switching on the radio
•Connect the power cable to a properly installed socket.
Warning
•Only connect the product to a socket that has been
approved for the device. The electrical socket must
always be easily accessible.
•Disconnect the product from the power supply using
the on/off switch – if this is not available, unplug the
power cord from the socket.
•Wait until the speaker initialisation procedure has nished.
•Press the [POWER] button (1) on the device.
Alternatively, press the [POWER] button (1) on the
remote control.
Note – Turning on for the rst time
•When you turn on the device for the rst time, the
speaker starts in SETUP mode.
•The LED (8) begins to ash white. The speaker can be
connected to your smartphone only using the UNDOK
app.
•If the loudspeaker is not in SETUP mode, follow the
instructions under 17.3 Factory settings.

6
6.2 General notes on use
Notes on use
•These operating instructions always relate to
operation using the controls on the device. Functions
that are only usable by app or remote control are
explained separately.
•The buttons on the remote control and their functions
(≙) correspond to the control buttons on the device.
Adjusting volume / mute
•Press [VOLUME +/–] on the device or the remote control
to adjust the volume.
Alternatively, the volume may be adjusted using the
UNDOK app (see Undok yer).
•Press on the remote control to mute the radio.
Alternatively, the radio may be muted using the UNDOK
app (see Undok yer).
•Press
on the remote control again to restore the volume
to the value it was at prior to the radio being muted.
Alternatively, the volume may be restored using the
UNDOK app (see Undok yer).
Entering passwords, search terms, and so on
•Entry may proceed only using the UNDOK app
(see Undok yer).
Switching on / off / standby
•Press [POWER] to turn the radio on.
Alternatively, the radio may be switched on using the
UNDOK app.
•Press and hold [POWER] for approximately 1 seconds to
switch off the radio (standby).
•To completely switch off the device, disconnect it from
the power supply.
7. UNDOK – everything in the palm of your hand
The UNDOK app, developed by Frontier Silicon, gives you
full control of radios and speakers from your smartphone.
Whether you are setting up the device for the rst time,
specifying settings for the equaliser and multi-room, or
managing your favourite stations – the UNDOK app lets
you access all the features from your smartphone or tablet,
thereby offering you greater convenience.
7.1 Interface / layout of the UNDOK home screen
1
2
3
4
5
7
6
1Update the audio system list
2Preview for ungrouped radios
3Set up new audio system
4Icon for managing an existing multi-room group
5Create a new multi-room group with this device
6Check for system update for all devices
7Further information, such as app info, change
app theme, and data logging

7
7.2 First-time setup of the device with UNDOK
The rst time you switch on an UNDOK-enabled product
from Hama, or when you have set it to the factory settings,
it creates a micro access point – a separate WiFi network
that you can connect to with your tablet or smartphone.
Note
•The UNDOK app uses the language selected in your
smartphone’s system.
Open / unsecured network
Note
•We recommend against establishing unsecured
connections and advise you to always protect your
network against unauthorised access.
•If your desired network has no safeguards, it is
enough to select the network from the list and
conrm your selection. The radio then promptly
connects to the access point.
7.2.1 Procedure for iOS users
•Open the UNDOK app on your iPhone or iPad.
•Tap the Set up audio system menu item.
•Make sure that the radio or speaker is in SETUP mode.
Set the product to the factory settings, if necessary.
Conrm the query with Next.
•The UNDOK app now prompts you to connect to the
product’s WiFi network using the iPhone/iPad settings –
to do so, switch to the system settings on your iPhone
and select the WiFi network (for example, Setup Hama
DIR3120LED). Then return to the UNDOK app and tap
Next.
•Now choose a name for the radio (for example, Oce
DIR3120) and conrm your entry with Next.
•The various network conguration options are then
offered to you (where applicable, WiFi, WPS and
Ethernet). Tap the desired method; the UNDOK app
switches to the next window.
•Depending on the selected method, you can now select
and congure the desired WiFi network, or set up a WPS
connection.
•Finally, the radio connects to the network; by tapping
Start using my audio system, you will be able to use
the device in the UNDOK app.
•The network connection LED indicator (7) is now
constantly lit.
7.2.2 Procedure for Android users
•Open the UNDOK app on your tablet or smartphone.
•Tap the Set up audio system menu item.
•Make sure that the radio or speaker is in SETUP mode.
Set the product to the factory settings, if necessary.
Conrm the query with Next.
•On the following page, you will nd a list of all
available WiFi networks as well as the suggested
audio systems; the Hama product (for example, Setup
Hama DIR3120LED) should be listed here. Tap the
corresponding WiFi network.
•Now choose a name for the radio (for example, Oce
DIR3120) and conrm your entry with Next.
•The various network conguration options are then
offered to you (where applicable, WiFi, WPS and
Ethernet). Tap the desired method; the UNDOK app
switches to the next window.
•Depending on the selected method, you can now select
and congure the desired WiFi network, or set up a WPS
connection.
•Finally, the radio connects to the network; by tapping
Start using my audio system, you will be able to use
the device in the UNDOK app.
•The network connection LED indicator (7) is now
constantly lit.

8
7.3 General control of a device or group
To control a congured device, tap the relevant device/
group in the selection list on the UNDOK home page.
This takes you to the product’s playback screen; the
following functions are available:
1
2
3
4
5
7
8
10
11
9
1Open the home page (all audio systems)
2Selection of the various sources (dependent on
the active device/the devices in the group)
3Open the favourites list (storing and selecting
favourites)
4Share current station
5Volume control for the group or active device
6Advanced settings (equaliser/ date/ factory
settings, depending on the device)
7Switch device/ group to standby
8Browse current source
9Playback screen of the device/ group
10 Depending on the source, function buttons are
shown here (play, next, previous)
11 Here the volume settings of all devices in a
multi-room group can be adjusted individually.

9
7.4 Creating / managing multi-room groups
If there areseveral multi-room-enabled devices in your
network, they will appear in the selection list with a+symbol
after their name.
The device that you have selected in the list by tapping the
icon will be the master when the group has been created. This
means that audio being played on the master is continued in
the group.
Once you have tapped the icon, a screen appears in which all
compatible devices are listed. Tap each of the devices you would
like to have in the group, and conrm your selection with Done.
In this window, you can also delete an existing group and
thereby dissolve it, or give the group a new name.
(See gure 3 – Group name)
Please note that it is sucient if one device in the group supports
a source such as Spotify, Bluetooth* or CD, and can share it with
the other devices in the group.
* When playing audio via Bluetooth, the source
(smartphone, tablet, PC) must be located near the device
in which the corresponding receiver is integrated.
7.5 Multi-room setup via UNDOK
7.5.1 General information
•All radios must be connected to the same network via
LAN cable or Wi-Fi.
•This section explains how multi-room can be set up and
managed using UNDOK.
•A so-called multi-room group can consist of up to ve
devices (one master and four clients).
Note
Master and client – explanation
•The so-called master is the source device and transfers
the audio it is currently playing to all other devices
(clients) in the group.
•If you wish to play audio via Bluetooth or from a CD,
only the device that has the corresponding receiver or
playback technology can be the master.
The following modes are available for a multi-room group
(depending on the availability of the radio)
•Spotify Connect
•Internet radio
•DABradio
•FM radio
•Aux in
•Wi-Fi streaming (DLNA-compatible) and UPnP
network playback
•USB playback
•CD playback
•Bluetooth

10
7.5.2 Creating a group
•If you wish to create a new group, navigate to the
overview of all devices present in the network.
•Select Create new group.
•Choose the clients to belong to the new group.
•Enter a name for the new group and conrm with [OK].
7.5.3 Add clients to a group
•If the selected device is already the master, you can add
(further) clients using the icon in the radio overview.
•Selecting this option will display a list of the devices
present in the network. Devices with a tick mark already
belong to the group.
•Only devices without a tick mark can be added as clients
to the group.
7.5.4 Leave group
•Remove the tick mark of a client to remove it from the
current group.
7.5.5 Delete group
•If you want to delete a complete group, select
Congure group.
•Then press Delete group.
7.6 Settings and standby
To open the settings of the radio, press the Settings icon
and then Settings.
To put the radio into standby mode using the app, press
the Standby symbol .
In the settings, you can rename the radio, reset it to factory
settings, congure the equaliser, activate logging, and set
the sleep timer and language.
8. Modes
Select amongst the available operating modes by
repeatedly pressing [M].

11
9. Internet radio
Note
* If necessary, it is possible to switch providers in order
to make all features and functions of the product
available.
Press [M]repeatedly to activate Internet radio mode.
Alternatively, you can use the UNDOK app:
UNDOK App
Source
Internet radio
Alternatively, press [IR] on the remote control to switch
directly to this operating mode.
9.1 Station search
Desired stations can only be searched for using the UNDOK
app.
9.1.1 Search by country or region
To search for a station by continent, country and region,
proceed as follows:
UNDOK App
Source Internet radio
browse
Stations
Location
Once you have restricted the results to a certain country or
region, select a station from the complete list or from a list
sorted by genre.
9.1.2 Search by genre
To search for a station of a certain genre or subject focus,
proceed as follows:
UNDOK App
Source Internet radio
browse
Stations
Genre
Once you have restricted the results to a certain genre,
select a station from a list of all stations available, or from
a pre-selected list, or from a list sorted by country.
9.1.3 Search by name
If you know the name of the desired station, you can
search for it directly:
UNDOK App
Source Internet radio
browse
Stations
Search
Enter the complete name, or a part thereof, in the input
screen and select OK to start the search. Youreceive a list of
all available stations whose names contain the search key.

12
9.1.4 Popular stations
To get a selection of the most popular stations, proceed as
follows:
UNDOK App
Source Internet radio
browse
Stations
Popular stations
9.1.5 New stations
Find stations that were just added to the database,
proceed as follows:
UNDOK App
Source Internet radio
browse
Stations
New stations
9.1.6 Local stations
To search for stations from your own country (or the
country in which the radio is currently located), proceed
as follows:
UNDOK App
Source Internet radio
browse
Local <Country>
Note
Replace the <Country> placeholder with the country you
are currently located in.
You can lter this local list by genre, or select a station
from the complete list, or select from a pre-selected list.
9.2 Podcast
Podcasts are programs on various topics, and include, for
example, talk shows, news and much more. Podcasts can
be downloaded from the Internet.
There are normally approximately 10,000 programs
available. Similarly to radio stations, the radio makes it
possible to lter a large number of Podcasts, or to search
the entire database for a matching result.
9.2.1 Search by country
To search for podcasts by continent, country and region,
proceed as follows:
UNDOK App
Source Internet radio
browse
Podcasts
Location
Once you have restricted the results to a certain country or
region, select a podcast from the complete list or from a
list sorted by genre.
9.2.2 Search by format (subjects or categories)
To search for podcasts of a certain genre or subject focus,
proceed as follows:
UNDOK App
Source Internet radio
browse
Podcasts
Formats

13
9.2.3 Search by name
If you know the name of the desired podcast, you can
search for it directly:
UNDOK App
Source Internet radio
browse
Stations
search
Enter the complete name, or a part thereof, in the input
screen and select OK to start the search. Youreceive a list of
all available podcasts whose names contain the search key.
9.3 Favourites (local)
You can save up to 30 of your favourite stations for quick
and direct access.
9.3.1 Save favourites
•Set the station that you would like to save as a favourite
station preset.
•With the station playing, proceed as follows:
UNDOK App
Presets
+
•Alternatively, press and hold one of the three [PRESET]
buttons (2/4/6) for approx. 3 seconds to assign the
station to that [PRESET] button.
9.3.2 Opening favourites
•Press one of the three [PRESET] buttons (2/4/6) to start
playing the favourite assigned to that [PRESET] button.
•Alternatively, favourites may be selected using the
UNDOK app (see Undok yer).
Note
Favourites cannot be deleted.
If all 30 station memory slots are lled and you wish to
save a new station, choose one of the occupied slots.
The station in this slot will be overwritten with the new
station.
9.3.3 Management of favourites with the remote
control
Favourites 1-10
The remote control enclosed has number keys 1-0 (0 ≙10).
A favourite (per type of reception) can be assigned to each
of these number key.
•To save a station, press and hold the corresponding
number key on the remote control (approx. three
seconds).
•To call up a favourite, briey press the corresponding
number key on the remote control.
Favourites 1-30 (alternative to number buttons)
•To assign a station to one of the favourite slots 1-30,
use the UNDOK app (see Undok yer).
10. Spotify
Spotify Connect gives you access to millions of songs. You
can listen to them on your radio, on the go using your
smartphone, or at your PC.
Requirements:
•You must have the Spotify app installed on your Android
or iOS device.
•It can be downloaded from the Play Store or the Apple
App Store. Once the app is installed, start it and log into
your account (or, if you do not have an account, register
a new one).
•You will require a Spotify Premium account
(see www.spotify.de for more information).
•The radio must be on the same network as the Android
or iOS device with the Spotify app installed.

14
Use:
•In the Spotify app, start playback of a playlist or title as
usual.
•The usual playback information is displayed, such as the
album cover, title, etc.
•At the bottom edge of the screen, the Spotify Connect
logo is shown next to Available devices.
•Choose Available devices to access an overview of
all devices available on the network.
•Select the radio. The audio is now played back on the
radio.
Once the connection has been established, the Spotify
Connect logo and the device designation are displayed
in green.
After successful initial connection:
Press [M] on the device or [MODE] on the remote control
repeatedly to activate Spotify mode (Spotify Connect) on
the radio.
Alternatively, you may do this using the UNDOK app:
UNDOK App
source
spotify
•Press (or [►I I / ] on the remote control) to begin
playback.
•Alternatively, you can control the radio (skip to a different
title, adjust the volume, etc.) using the remote control or
the Spotify app.
11. Music player mode (UPNP, USB)
This operating mode enables the playback of MP3, WMA or
FLAC les stored on a PC, data medium or local network.
Press [M] on the device or [MODE] on the remote control
repeatedly to activate Music player mode on the radio.
Alternatively, you may do this using the UNDOK app:
UNDOK App
source
music player
Alternatively, press [MEDIA] on the remote control to
switch directly to this operating mode.
11.1 Playback from a computer (streaming)
You can manage the radio and stream music to it from your
computer.
The following explanation assumes your computer’s
operating system is Windows 8. If you use a different
operating system and require assistance, or if you have
any other questions, please contact our customer support
team.
Requirements:
•The radio and the computer must be on the same
network.
•The radio must be authorised as a playback device on the
computer.
Proceed as follows:
àControl Panel àNetwork and Internet àView
network computers and devices
The radio should be shown here.
•Right-click on the icon or designation of the radio and
choose Allow streaming to this device.
•Right-click again on the icon or designation of the radio
and choose Show device website to change the
designation (friendly name) of the device.
•A new browser window opens. You can make the desired
changes here.
Use:
•The radio can now access shared directories on the
computer, and you can stream audio les to the device
for playback.
•The music directory of your music library is enabled as
standard.
•Create and manage shared folders using Explorer or
Windows Media Player.
•Right-click on the desired music le, choose Play To,
and then select the designation of the radio.
•The radio begins playback of the music le.

15
11.2 Playback from the network – Accessing files
using the radio
To access existing network shares from the radio, proceed
as follows:
•Enable Music player operating mode on the radio by
repeatedly pressing [M]:
UNDOK App
music player
browse
shared media
You can now search for les, open a playlist, or search
through the entire shared music folders.
If you want to search through the entire selection of
shared music, there are other searching and sorting
functions available (album, artist, genre, folder, etc.) that
can help you nd the desired le more quickly.
Note
Many search and lter actions are only usable if the ID3
tags and other le information in the audio les on the
source device are set.
11.3 General playback options
These playback options, which are valid for all playback
under Music player, can be found in the UNDOK app.
Repeat: On / Repeat: Off
To change this function (on/off), press repeatedly.
When Repeat: On is set, the current track is repeated.
Shue: On / Shue: Off
To change this function (on/off), press repeatedly.
When Shue: On is set, all tracks are played in random
order.
12. Auxiliary Input
You can use the analogue audio input (AUX IN socket) to
connect mobile devices (for example, smartphone, tablet
PC, MP3 player, etc.) to the radio and play your audio les
using the radio.
•Repeatedly press [M] / [MODE] to activate Auxiliary
Input (Aux in) mode on the speaker:
Alternatively, press [AUX] on the remote control to switch
directly to this operating mode.
•The AUX-In connection LED indicator (8) begins to ash.
•Connect your mobile device to the audio input (the AUX
IN socket) of the radio using a 3.5-mm audio cable (jack
cable).
•The AUX-In connection LED indicator (8) is now
constantly lit.
•Start and control audio playback using the controls of the
connected terminal device.
Alternatively, you may perform setup with the UNDOK app.
UNDOK App
source
Auxiliary Input

16
13. Snooze
The radio has a timer function, which switches the radio to
standby mode after a pre-dened length of time.
UNDOK App
Settings
Sleep Timer
desired time (15/30/45...)
OK
•Once the pre-set interval has elapsed, the radio switches
to standby mode.
•Press [PLAY/PAUSE] on the device or the remote control
to switch radio back on.
•Alternatively, you can switch the radio back on using the
UNDOK app (see Undok yer).
•You may change or deactivate a previously set interval at
any time using the UNDOK app:
UNDOK App
Settings
Sleep Timer
desired time "Off"
OK
14. Equaliser
The equaliser allows you to adjust the sound of the radio
to suit your preferences by amplifying or reducing the
amount of bass or treble in the audio .
You can choose from precongured proles, adjusted to
suit a variety of music genres, or create your own custom
prole.
To change the equaliser settings, proceed as follows:
UNDOK App
Settings
Equalizer
•To create your own equaliser prole, choose the option
My EQ settings.
•This takes you to the settings for Bass,Treble and
Loudness (volume amplication).
Note
•Often the Pre-Shared Key is printed on the back or
bottom of the router or access point.
•When entering the key, take notice of capitalisation.
15. Wireless connection
Depending on the network, there are various ways to
connect to it. Networks that support WPS (WiFi Protected
Setup) are marked in the list by the prex [WPS]. Other
connections are either open networks or connections
protected with a PSK, or Pre-Shared-Key.
WPS/PSK/open connection
WPS allows simple and nevertheless protected connection
of the radio to the network. Two options are available for
this purpose:
The connection can be set up by means of PBC, or Push-
Button Conguration, or by the PIN procedure, in which
the web interface of your router prompts you to enter a
randomly generated sequence of numbers.
Other manuals for IR80MBT
1
Table of contents
Other Hama Radio manuals